


OTX System Documentation
OTX is a business management tool that has been used over by 12 million users worldwide, bringing in advanced business management with dedicated control of the operations of the business. The OTX ERP has released the new version of the one-of-a-kind solution, the OTX 15, the most advanced and high-performing business management solution ever. Moreover, with dedicated tools and advanced operations capabilities, the new OTX will be the most reliable and efficient tool which has ever come from the platform.
The OTX 15 Enterprise book acts as a manual for all OTX users providing a complete insight into the platform’s operation. Additionally, with clear illustrative images of the platform, the OTX 15 Enterprise book will act as the complete guide on the procedures and the functional aspects of the newest OTX . Brought in by Cybrosys Technologies, the defined gold level partner with years of experience functioning with the OTX platform, the OTX 15 Enterprise book is complete reference material on operating with OTX .
Articles
Accounting
Accounting is an inevitable part of any kind of business. No matter the size or type of business you run, if the financial processes are not governed and monitored in an adequate manner, you will face a drastic financial failure in the future. Managing all accounting operations manually is not a good idea since it requires lots of time and effort. The chances of error in accounting are high in the case of manual accounting management. Every financial transaction and statement done on the company’s behalf should be recorded and maintained properly. The new OTX 16 Accounting module will improve your accounting management proficiency by offering automated tools and reporting systems.
Automated recording of payments, receipts, vendor bills, customer invoices, and other financial transactions is ensured by OTX . It allows for bill reconciliations with banks and synchronizes your bank statements with your bank accounts automatically. You can effortlessly generate accounting reports of a particular time period and compare the performance to analyze workflow. OTX streamlines all actions related to accounts payable and accounts receivable thereby evading the cash flow issues to enrich cash management. OTX accounting module provides multi-currency support to businesses so that you can make transactions hassle-free with other countries.
In this chapter, we will describe all available features in the OTX 16 Accounting module. When you click on the OTX Accounting module from your main dashboard, OTX will lead you to the accounting dashboard of the module as shown in the image below.

This is the image of the Accounting Dashboard of the module. Here, you will get a configuration panel where you can set Accounting Periods, Bank Accounts, Taxes, and Chart of Accounts step by step before starting any accounting operations.
Initially, let’s define the fiscal year and tax return periodicity in the Accounting Period section. Defining the accounting period is essential for any kind of accounting management operation. Click on the Configure button and OTX will open a new pop-up window where you can mention the Fiscal Year and Tax Return period.

The date from which accounting is managed in OTX can be seen in the Opening Date field. It is the date of the opening entry. Mention the Fiscal Year End in the respective field. The last day of the month will be used if the selected date doesn’t exist. In the Tax Return field, you can specify the Periodicity, Reminder, and Journal in the corresponding field and click on the Apply button. We have configured the Accounting Period and you can see that on the screen as the Step Completed.

Now, let’s move to the next step which is the configuration of the Bank Account. You can connect your bank account with the OTX Accounting module within seconds by using the Add a Bank Account button. A pop-up window will appear on the screen with the list of banks from where you can select your bank and account type.

The screenshot given above shows the list of banks available in the United States region. You can use the filter Worldwide to get the list of banks available worldwide. After selecting the account, you can click the Connect button to connect with your account. If your bank is not available in the list, you can click the Create it button.

Here, you can specify your Bank Account Number, Bank, Bank Identifier Code, and Journal. Click the Create button and configure your account with the OTX Accounting module. You can also add bank accounts to the Accounting module by using the Add a Bank Account option from the Configuration menu. To synchronize your bank account with the OTX Accounting module, you can use the Online Synchronization button available in the same menu.
Now, you can set default taxes for the sales and purchase transactions.

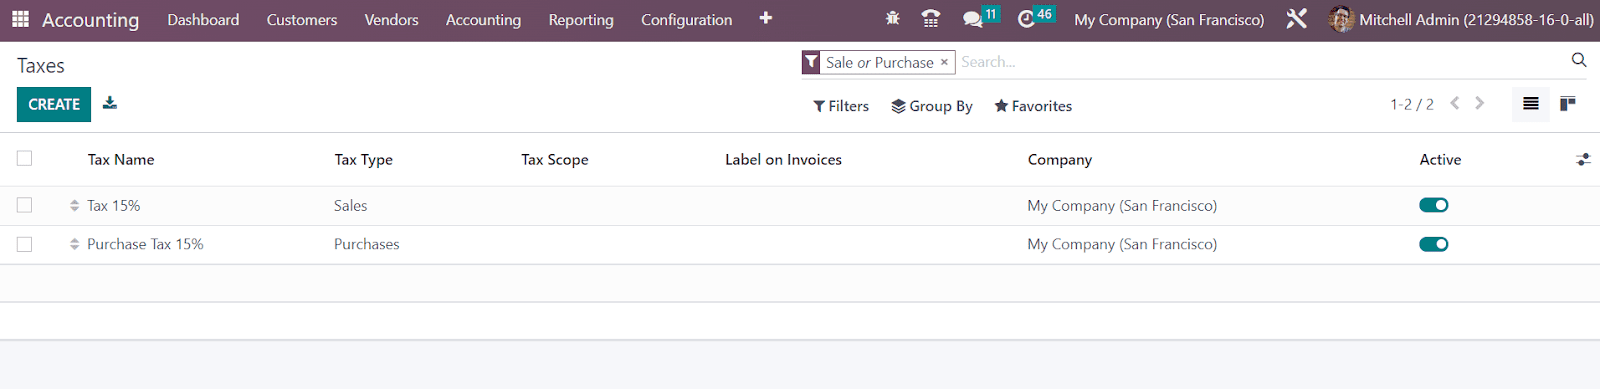
Click on the Review button. You will get the list of already available taxes in the Accounting module as shown below with the details of the Tax Name, Tax Type, Tax Scope, Label on Invoices, and Company.

If you want to create a new tax for transactions, you can use the Create button. Using the Active button, you can activate the taxes and set them as default options for your sales and purchase operations.
The last option available in the Configuration Panel is the Chart of Accounts.

Click the Review button to set up your chart of accounts and record the initial balances.

The Accounting dashboard gives a preview of all major operations available in the module. You can manage Customer Invoices, Vendor Bills, Miscellaneous Operations, Bank, Cash, Point of Sale, Expenses, Exchange Difference, Cash Basis Taxes, Inventory Valuation, Salaries, and many more from the dashboard itself. Corresponding operation tools will be available for each accounting operation tab. You can use Favorites, Sales, Purchases, Liquidity, Miscellaneous, and Archived as default Filters. It is possible to use the customizable group by and filter options to organize data available in the accounting dashboard.
It is possible to view and create new data in a journal from the dashboard itself. For this, you can use the three vertical dots available on each journal entry. Here, let’s look at the options available in the Customer Invoices journal.

As you can see, you will get the options to view the Invoices, Credit Notes, Payment Matching, and Journal Items recorded under the Customer Invoices journal. Under the New session, you will get access to create new Invoices, Credit Notes, and to Upload Invoices to the respective journal directly from the dashboard. You will also get the buttons to generate reports of Invoice Analysis, Aged Receivables, and Follow Up Reports in this menu. Like this, each journal possesses an advanced menu inside the three dots that enable you to monitor and manage the operations of the respective journal.
Customer Invoices
There are several methods available in OTX that automate customer invoice creation depending on the operation you perform and the module you use. While discussing the Sales module, we mentioned the management of invoices. Once you confirm a sales order, you will get a draft customer invoice in OTX . You just need to validate the draft invoices and send them to the respective customers. All such automated invoices will be recorded and managed in the Invoices platform available under the Customer menu of the Accounting module. This platform will allow you to create invoices manually also.

The list of invoices recorded in the Accounting module is shown below. The list view gives the details of the Number, Customer, Invoice Date, Due Date, Activities, Tax Excluded, Total, Total in Currency, Payment Status, and Status. It is possible to expand the list view by adding additional details related to the customer invoice. This can be done by using the small icon given next to the Status field as highlighted in the image below.

From this menu, you can enable or disable required fields for the list view of the customer invoice. It includes the Invoice Date, Due Date, Source Document, Reference, Salesperson, Sales Team, Activities, Company, Tax Excluded, Tax, Total, Total in Currency, Amount Due, Invoice Currency, To Check, Payment Status, Electronic Invoicing, and Status.

Using the default Filters, you can filter the invoices based on My Invoices, Draft, Posted, Canceled, To Check, Unpaid, Paid, Overdue, Invoice Date, and Due Date. You are allowed to create custom filters for invoices using the Add Custom Filter button.

In the Group By option, you can group the available invoices according to the Salesperson, Status, Sales Team, Electronic Invoicing State, Preferred Payment Method, Invoice Date, Due Date, and Referrer. The Add Custom Group button helps you to create custom group options.

The screenshot above shows the Kanban view of the Invoice platform. You can use the Upload button to upload an invoice to the database. In order to create an invoice manually, you can click on the Create button which directs you to the invoice creation window as shown below.

Here, we are going to create a draft invoice. You can mention the customer id in the Customer field and their current delivery address in the Delivery Address field. Set an Invoice Date and mention the Payment Reference to set on journal items in the respective fields. Once you mention the customer id in the corresponding field, the respective Payment Term will automatically appear on the invoice based on the configuration. Otherwise, you can set a Due Date for the invoice within which the invoice should be paid by the customer. Specify a suitable Journal for the invoice.
The invoice screen shows three additional tabs such as Invoice Line, Journal Item, and Other Info to complete. Under the Invoice Lines tab, you can mention the list of products one by one using the Add a Line button. It includes the details of Product, Label, Account, Analytic, Quantity, UoM, Price, Taxes, and Subtotal. If the invoice is generated from a sales order, the Invoice Line will show the products that are described in the Order Line of the sales order.

Use the Add a Section and Add a Note buttons to add a section and note to the invoice respectively. After adding products, you can observe the Untaxed Amount, Taxes, and Total of the invoice under the Invoice Line.
Based on the products you added in the invoice line, corresponding journal items can be seen in the Journal Items tab with the details of Account, Label, Origin, Reference, Analytic, Debit, Credit, and Tax Grids.

If you want to delete any of these journal items, you can use the delete icon and add a new one using the Add a Line button.
The Other Info tab is used to mention the Invoice, Accounting, and Marketing details of an invoice. Under the Invoice field, you can add the Customer Reference. This invoice can be assigned to a particular Salesperson and Sales Team by mentioning their ids in the given spaces. The bank account number to which the invoice will be paid can be defined in the Recipient Bank field. If you have any referrer for this sale, you can mention their id in the Referrer field.

Use the Marketing field to specify the Campaign, Medium, and Source of this invoice. Your company id can be mentioned in the Company field available in the Accounting section. Specify the Incoterms used for international transactions, Fiscal Position to adapt taxes and accounts for particular customers or sales orders/invoices, Intrastat Country (Arrival Country), and Inalterability Hash in the respective fields. You can post this entry automatically by selecting the period from the Auto Post field. This recurring move will be posted up to a particular date and you can set that date in the Auto Post Until field. If you want to do it manually, you can select the No option from the Auto Post field.
If you are not sure about the details mentioned in the invoice at the time of creation, you can activate the To Check field. Enabling this field indicates that the move needs to be checked again.

Now, the draft invoice is ready. In order to confirm this invoice, click on the Confirm button which will change the status of the invoice from Draft to Posted.

The screenshot shows an example of a confirmed invoice. You can reset a confirmed invoice to draft using the Reset To Draft button. If you want to get a customer preview of the invoice, use the Preview button.

This is the customer preview of the invoice from the customer portal where the customer can check the invoice and pay the amount using a suitable payment method. The customer will get options to Download, and Print the invoice and send a message to the respective salesperson.

Using the Send & Print button, you can send the invoice to the customer via mail. An automated mail will be generated as shown below where you can add the recipient’s list and change the subject according to your requirements.

The invoice will be added to the mail as an attachment and you can click the Send button. Once the customer gets this mail, they can check the details and pay the invoice. After completing the payment procedures, you can record their payment using the Register Payment button. OTX generates a pop-up window to confirm the details of the payment registration.

The window will show the Journal, Payment Method, Recipient Bank Account, Amount, Payment Date, and Memo as shown in the image above. You can make changes to the available details if needed. Now, click the Create Payment button. The payment registration can be completed by this step. Once the customer pays the invoice, the status of the invoice can be observed as Paid.
In the case of any mistakes in the invoice, wrong delivery of products, damaged goods, or rejection of service, you can trigger a credit note to your customer. This can be done by using the Add Credit Note button.

As soon as you click on this button, a new wizard will appear to define the credit note.

You can mention the reason to generate this credit note in the Reason field. The Reversal Date can be set as a Specific Date or the Journal Entry Date. The journal entry used to record the credit note can be specified in the Use Specific Journal field. The Refund Date will be available on the screen and you can click the Reverse button to reverse the payment.
OTX leads you to a new window where you can observe the draft customer credit note.

You can click on the Confirm button to confirm the customer credit note. Later the payment can be recorded using the Register Payment button.
In OTX , Debit Notes are used to generate bills or invoices. By generating the Debit Notes, OTX will automatically reverse the respective bill and invoice.

To generate a debit note, you can click on the Add Debit Note button.

In the new wizard, define the Reason, Debit Note Date, Copy Lines, and Use Specific Journal to add the debit note. Click the Create Debit Note button. You can observe the debit notes generated on an invoice using the smart button available on the window.

This is how OTX manages Customer Invoices in the Accounting module. Next, let’s move to the Credit Note platform available in the module.
Credit Note
Credit Note
If any mistakes occur in an invoice, delivered goods, services, or payments, you can generate credit notes for your customers. You can generate credit notes for reversing both invoice and bill. We already discussed how to create credit notes from customer invoices. In the OTX Accounting module, you will get a separate platform under the Customer menu to manage such credit notes in one place.

The view of this platform is the same as that of the Invoice platform. You can observe already generated credit notes here. The Upload button will be available to upload documents related to a credit note. For the manual creation of the Credit Note, you can click on the Create button

You can create a new credit note here by following the steps we discussed in the creation of a new invoice. Using the Confirm button you can confirm the credit note and later register the payment after paying the amount to the respective customer.
Payments
Payments
OTX offers a dedicated platform in the Accounting module to record all payments from customers. You can check payment records from the Payments option available under the Customers menu. The preview of the list view shows the Date, Number, Journal, Payment Method, Partner, Batch Payment, Amount, and Status.
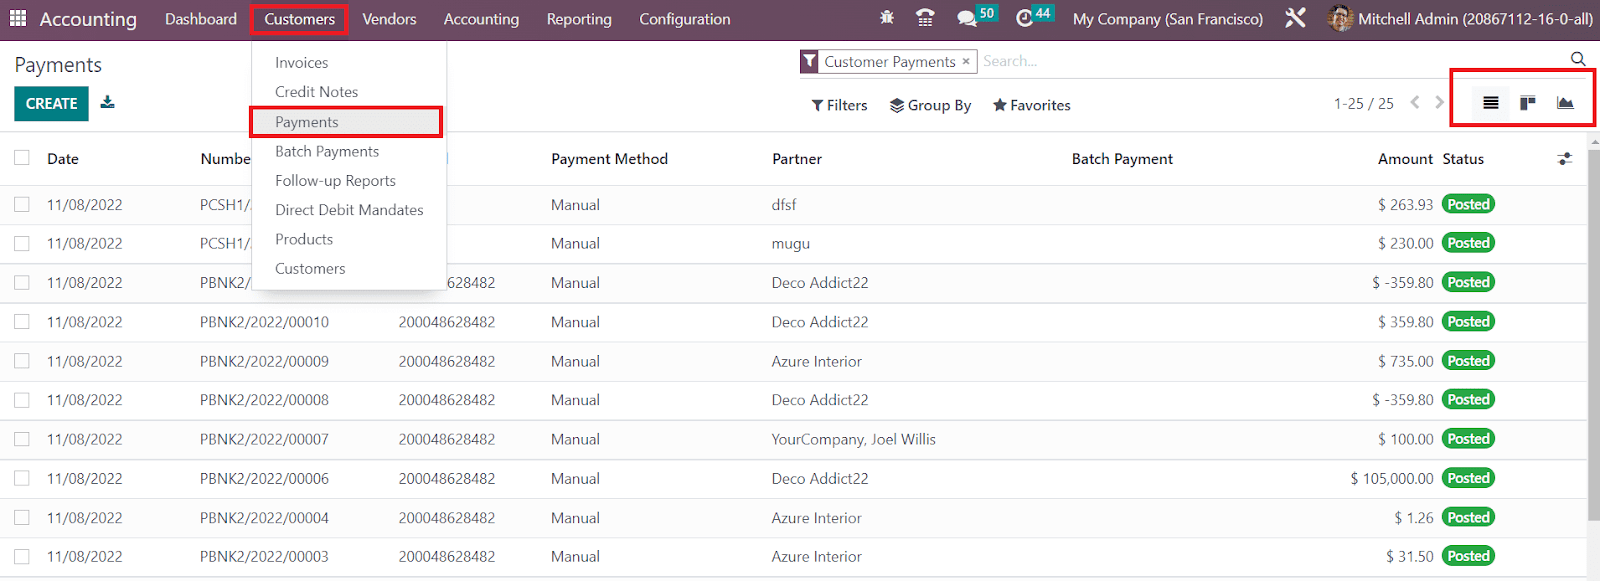
The view of the platform can be altered between List, Kanban, and Graph as per your demand. As sorting options, you will get filters and group by options.
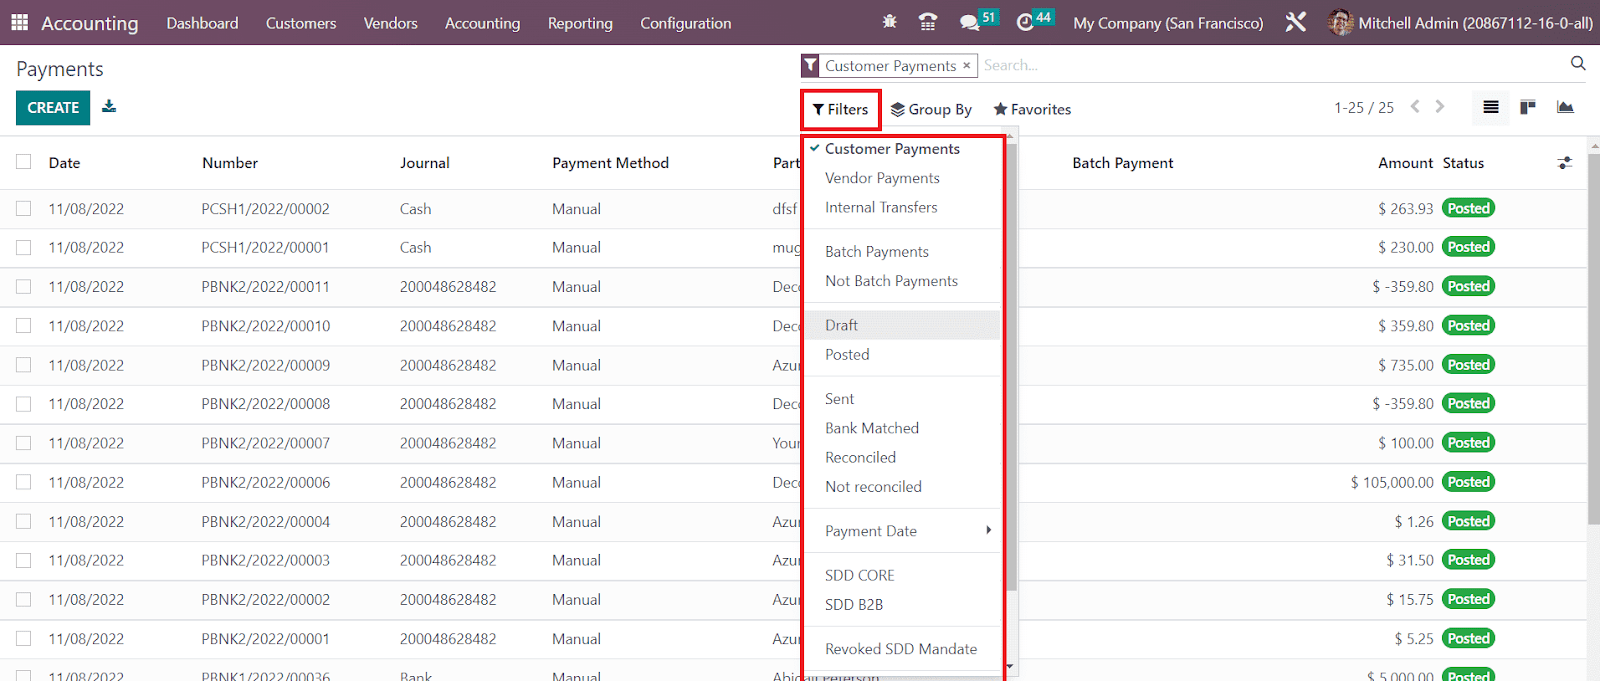
OTX offers Customer Payments, Vendor Payments, Internal Transfers, Batch Payments, Not Batch Payments, Draft, Posted, Sent, Bank Matched, Reconciled, Not Reconciled, Payment Date, SDD CORE, SDD B2B, Revoked SDD Mandate, and Checks to Print as default filters. Adding custom filters is an easy task using the Add Custom Filters option.
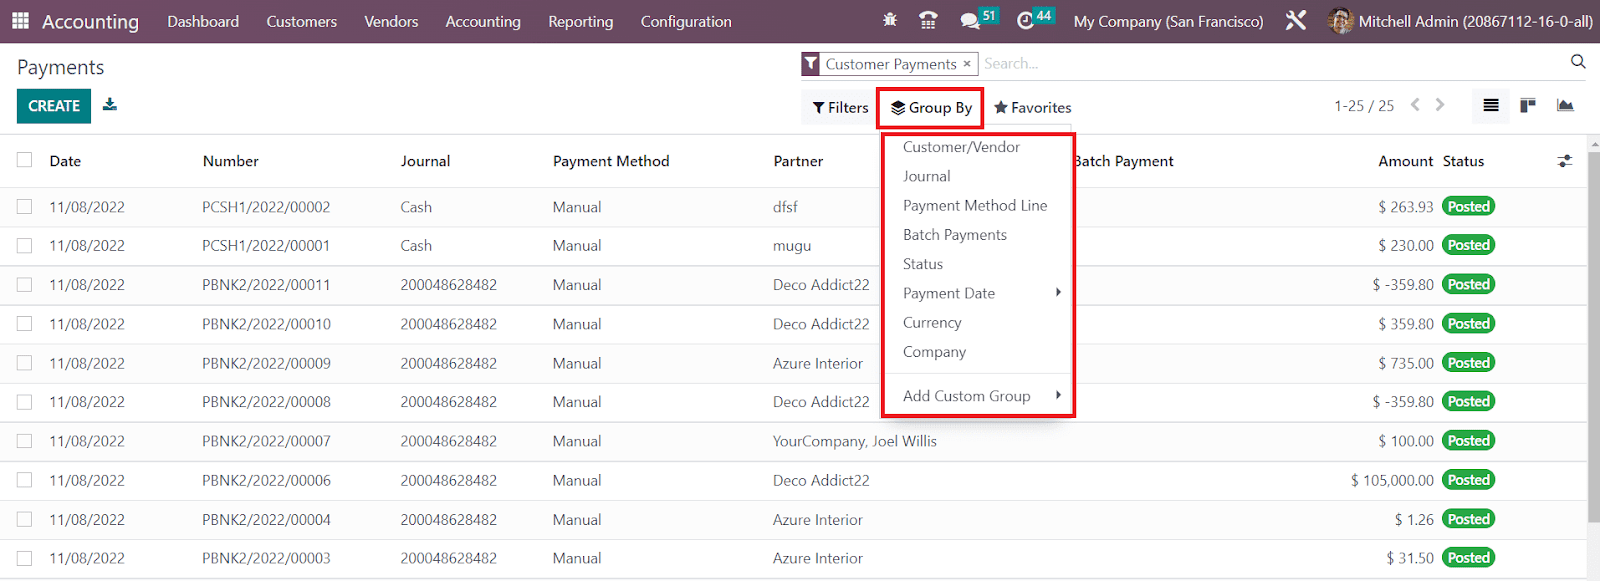
You are allowed to group the payments according to the Customer/Vendor, Journal, Payment Method Line, Batch Payments, Status, Payment Date, Currency, and Company. If required, you can use the Add Custom Group option to create customized grouping options.
Click on the Create button to create a payment record manually.
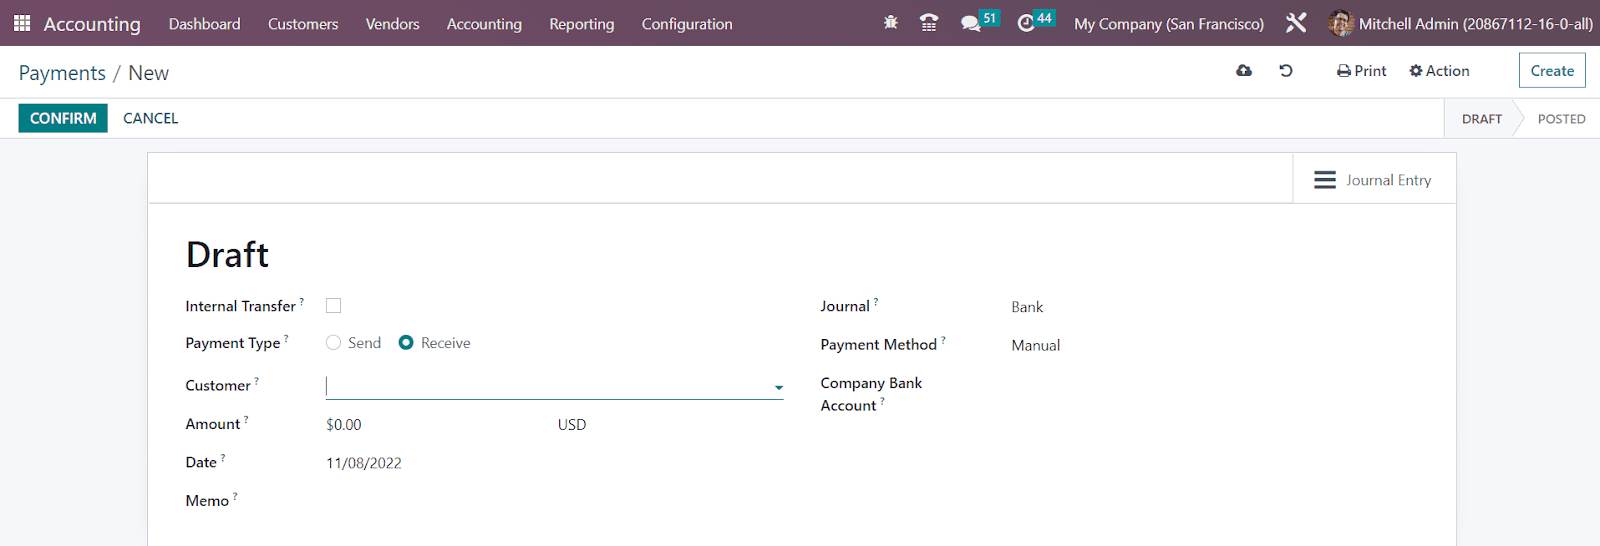
If you are creating this payment record for an internal transfer, you can activate the Internal Transfer field. Internal transfer refers to the transactions that move funds from one account to another within the company. Since it is a customer payment, the Payment Type can be set as Receive. The payment type Send is used in the case of vendor payment. You can specify the customer id in the Customer field. In the corresponding fields, you can mention the Amount, Date, Memo of the payment, Journal to record the payment, Payment Method, and Company Bank Account. The customer can choose manual, payment providers, check, batch deposit, SEPA credit transfer, or SEPA Direct Debit as the payment method to pay the amount.

Using the Confirm button, you can confirm the draft payment.
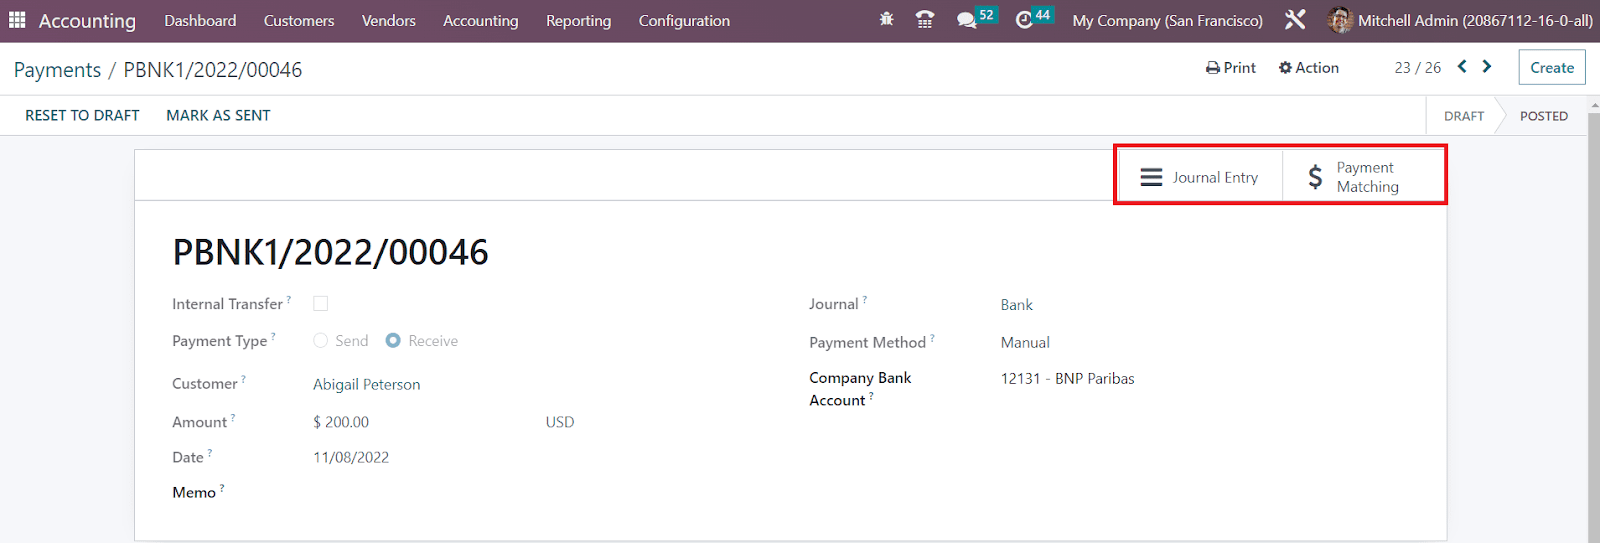
You can observe the Journal Entries related to this payment using the corresponding smart button available in the window. Once the customer completes the payment, you can add this payment to the pending invoices of that particular customer by using the Payment Matching smart button. This button will display all open invoices of that customer. You can choose an invoice from the list with the same amount and reconcile it. You can use the Mark as Sent option to label the payment as Sent and the Reset to Draft button to reset the payment to draft.
In order to manage vendor payments, OTX gives you the option Payments under the Vendor menu also. This platform is almost similar to that of the customer payment window.

The list view of the vendor payments will show the name of the Vendor instead of the customer name. You will get the list of Vendor Payments from the customer payment window itself by using the filter Vendor Payment as shown in the image above.
While recording a vendor payment, you need to mention the Vendor id and Vendor Bank Account in the corresponding fields.
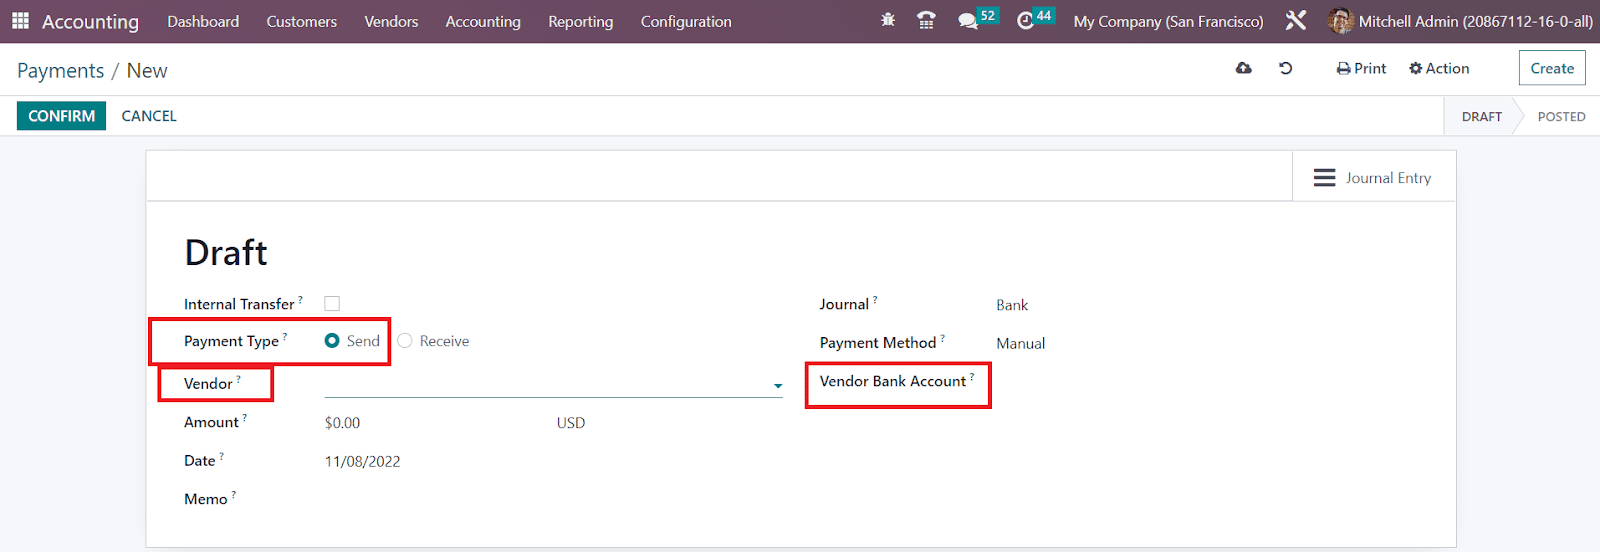
Since it is a vendor payment, the Payment Type will be available as Send.
Now, let’s discuss the Receipt management window in the Accounting module
Receipts
Receipts
The users will get separate platforms to manage the sales and purchase receipts in the OTX Accounting module. A sales receipt is an official record or a simple receipt of the amount that you have already been paid for the items or services you have provided to those who purchased them. Usually, receipts are given after payment as payment proof and it is not a valid document for taxation. Only the invoice will be considered as a valid document for taxation. If you want to create sales receipts manually, you can go to the Customers menu of the Accounting module where you can find the Receipts option.

The list view of this platform is shown above with the details of the Number, Customer, Invoice Date, Due Date, Activities, Tax Excluded, Total, Total in Currency, Payment Status, and Status. You can upload a sales receipt to the system using the Upload button. For creating a new sales receipt, click on the Create button.
The creation of a new sales receipt is similar to that of the creation of an invoice in OTX . In the corresponding fields, you can specify the Customer, Delivery Address, Reference, Invoice Date, Payment Reference, Payment Terms, and Journal.
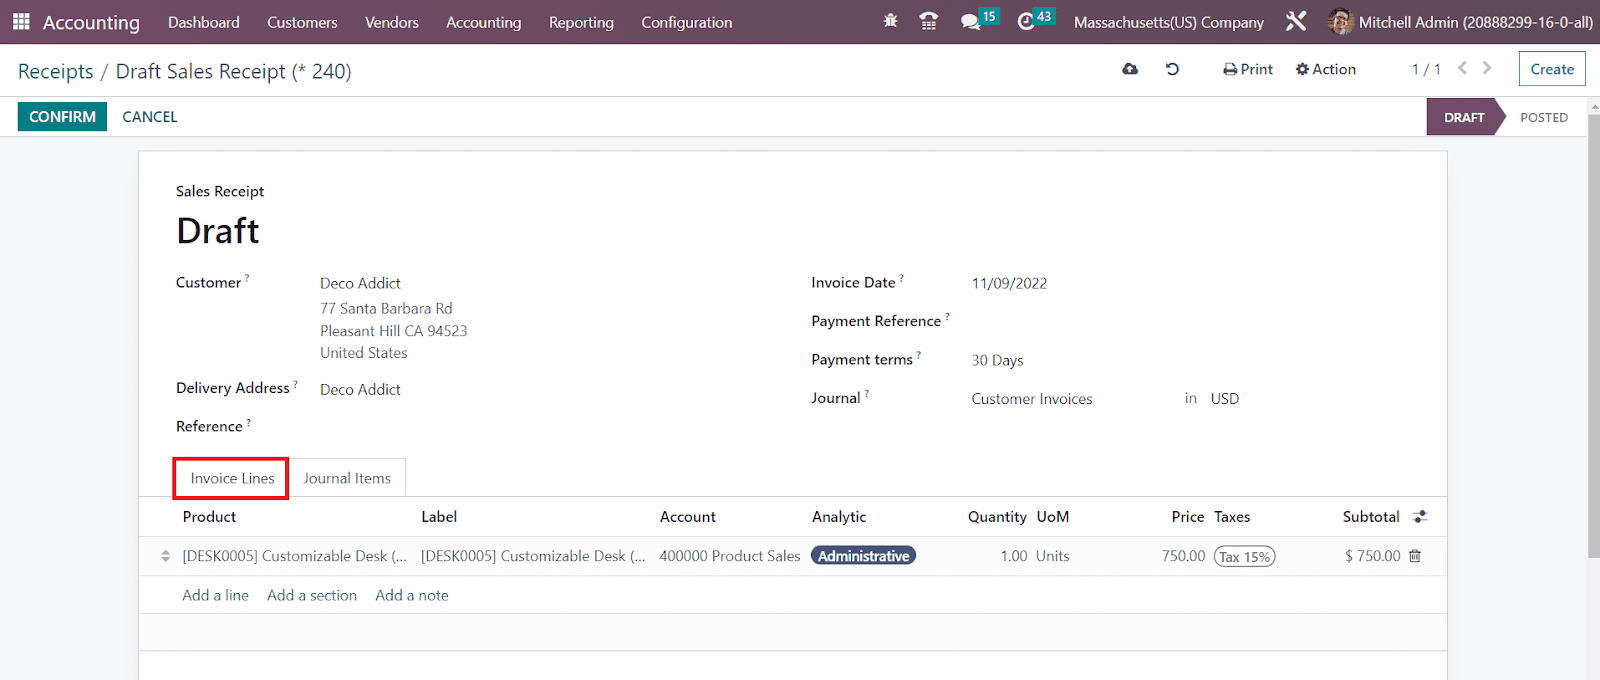
Under the Invoice Lines tab, add the products on which you want to generate receipts one by one using the Add a Line button. The product will be displayed in the list with the Product name, Label, Account, Analytic, Quantity, UoM, Price, Taxes, and Subtotal details. Corresponding journal items to record the payment details can be observed in the Journal Items tab as shown below with the Account, Label, Analytic, Debit, and Credit details.

By clicking on the Confirm button, you can confirm the receipt.
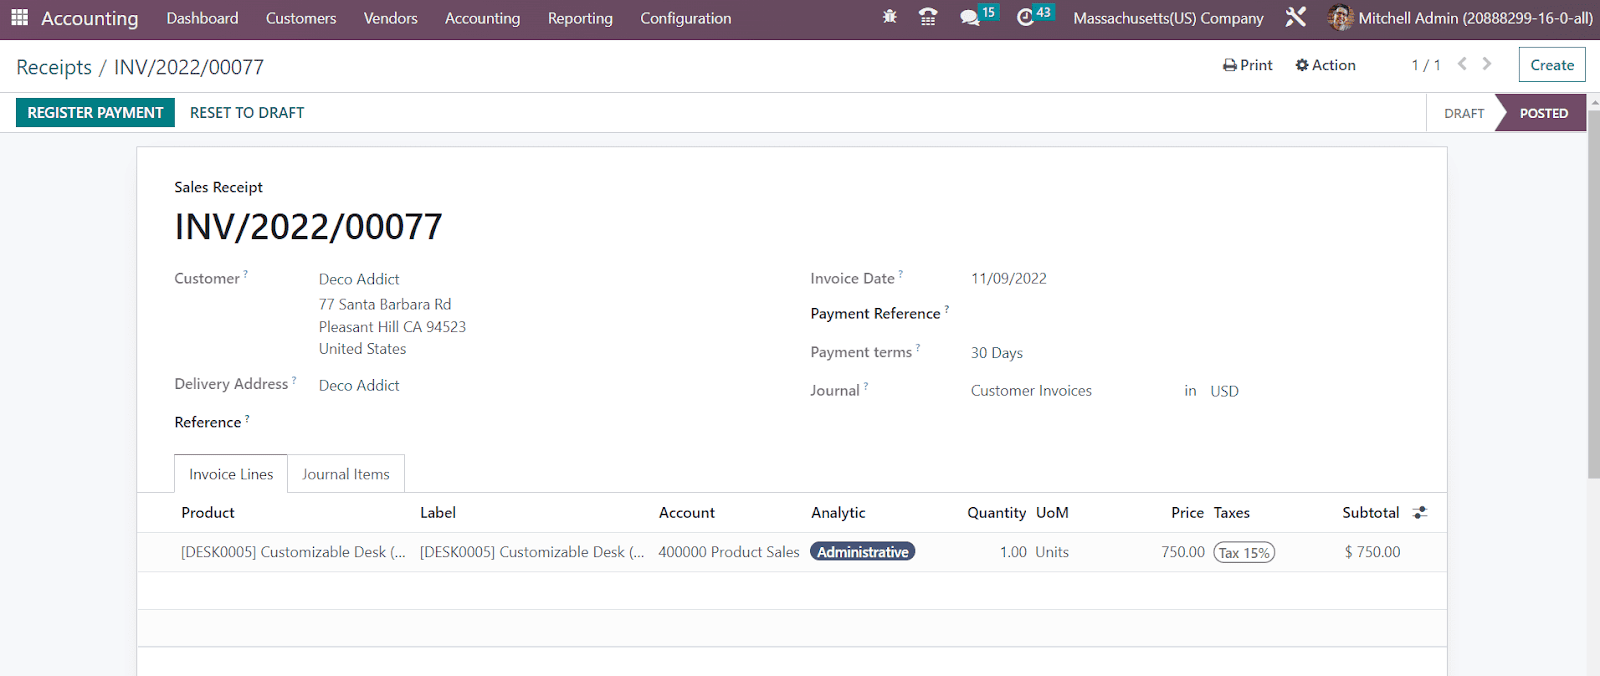
Once the sales receipt is confirmed, you can register the customer payment using the Register Payment button.
In the Vendor menu of the Accounting module, you will see another Receipt button that records the purchase receipts of your company. Once you confirm a purchase order, receive products, and payment is made, the purchase receipt can be generated. You can record a purchase receipt manually from the Account module. Go to the Vendor menu and click on the Receipt option. The configuration of the sales receipt and purchase receipt are almost similar. The changes in the purchase receipt are highlighted in the screenshot below.
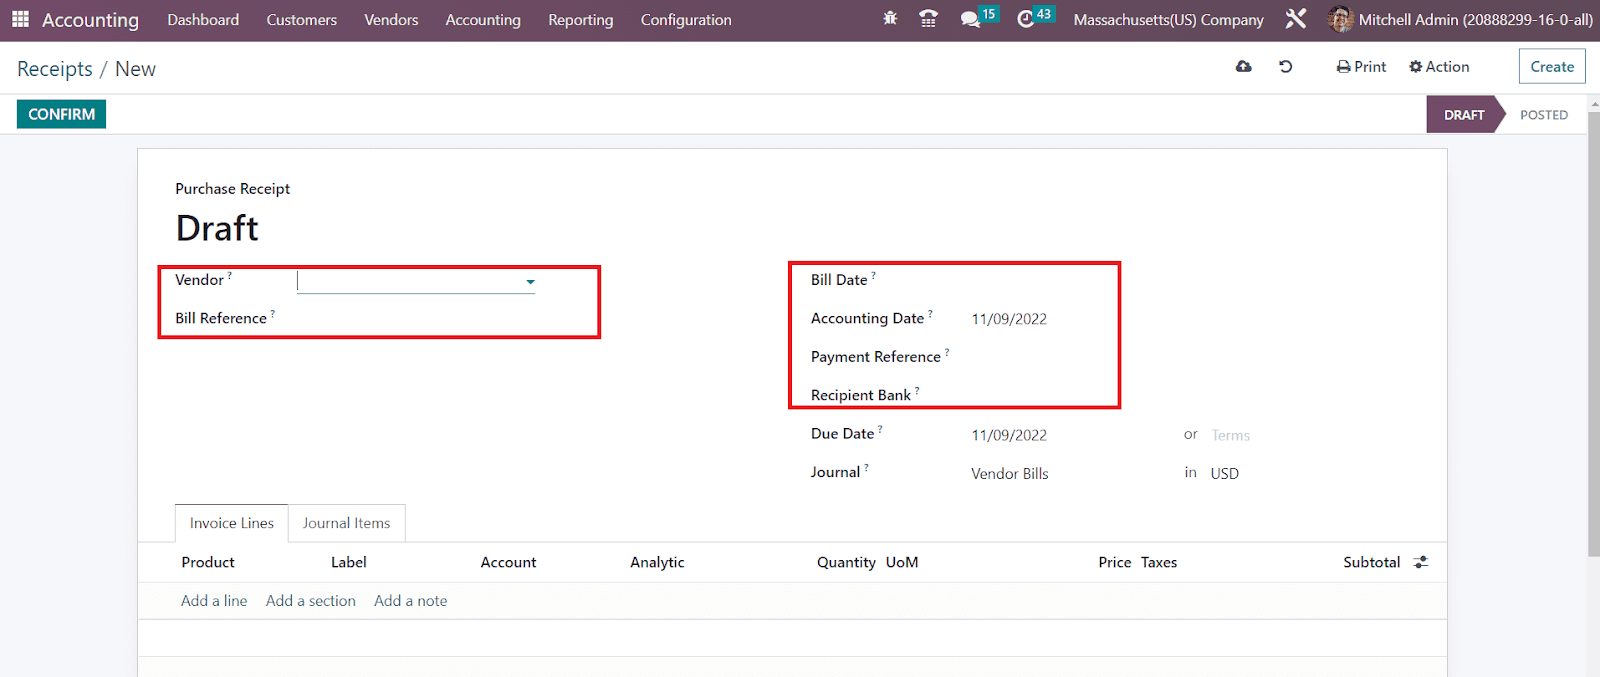
In a purchase receipt, you need to mention the Vendor, Bill Reference, Bill Date, Accounting Date, and Recipient Bank. Click on the Confirm button to confirm the receipt. This feature is generally used in OTX when you pay the invoice directly with your company’s money for an expense.
Batch Payments
Batch Payments
The batch payment feature in OTX allows you to group different payments in order to simplify the reconciliation. Matching bank statements with batch payments is a crucial task in accounting management. OTX provides support to reconcile multiple payments with bank statements in simple methods. With the assistance of the batch payment feature, you can process a group of payments in a single step. This will record the batch payment as a single entry in the bank statement. In order to get this feature in the OTX Accounting module, you have to activate the Batch Payments option from the Settings menu as shown below.

Once you activate this option, you will get the option Batch Payments under the Customers as well as Vendors menus. You can batch different customer payments using the Batch Payments option available in the Customers menu. The Batch Payments option under the Vendors menu will assist you to batch the vendor payments. The method of creating a new batch payment is similar in both cases.

The list view of the Batch Payment window is shown above. Here, you can observe the Reference, Bank, Date, Amount, and State of the batch payments. Clicking on the Create button will lead you to a new window where you can configure a new batch payment.

There are two types of batch payments available in OTX , Inbound, and Outbound. The Inbound batch payment is used when batching customer payments. If you want to batch multiple numbers of vendor payments you can use the Outbound batch payment. After defining the Batch Type, you can select the Bank from the dropdown. In the corresponding fields, you can add the Payment Method used for payment registration, Date, and Reference. Now, add the payments that you want to batch under the Batch Content tab.
When you click on the Add a Line button, a pop-up will appear from where you can select payments.

In the case of Inbound batch payment, this list will show customer payments. You will get the list of vendor payments in the pop-up window in the case of Outbound batch payment.

After adding a list of payments to the batch, you can click on the Validate button.

The stage of the validated batch payment can be seen as Sent as shown in the image above which indicates that the payment needs to be reconciled with the bank statement.
Follow-up Reports
Follow-up Reports
The Follow Up Reports in OTX will help you to identify and manage delayed payments. OTX allows you to send reminders to the respective customers on due. The Follow-up Reports option available under the Customers menu will show the list of customers with overdue payments. Before sending reminders to the customers, OTX permits you to reconcile all bank statements so that you can avoid sending reminders to customers who are already paid.

The list view of the reports gives details regarding the Name, Responsible, Reminders, Follow-up Status, Next Reminder, Follow-up Level, Total Due, Total Overdue, Company, and Activities.

You can use default as well as customizable Filters and Group By options as sorting options highlighted in the screenshot above.
To get a detailed view of the overdue report, you can select the required report from the list.

In this window, you will get the list of overdue invoices with the details of Date, Invoices No, Due Date, Origin, Expected Date, and Residual Amount. If you want to exclude any of the invoices from the follow-up activities, you can enable the Exclude from Follow-ups button given on each invoice line. The Next Reminder field will show the date before which the next follow-up action should be taken. The assigned user responsible for the follow-up activities is mentioned in the Responsible field. The smart button Customer gives the customer details and the Invoices gives the list of invoices generated for this particular customer. Using the Reconcile button, you can reconcile the payments of the customer with the bank.
You can take follow-up action by clicking on the Follow-Up button. You will get an automated mail to send a reminder to the customer with the attachments of the corresponding overdue invoices.
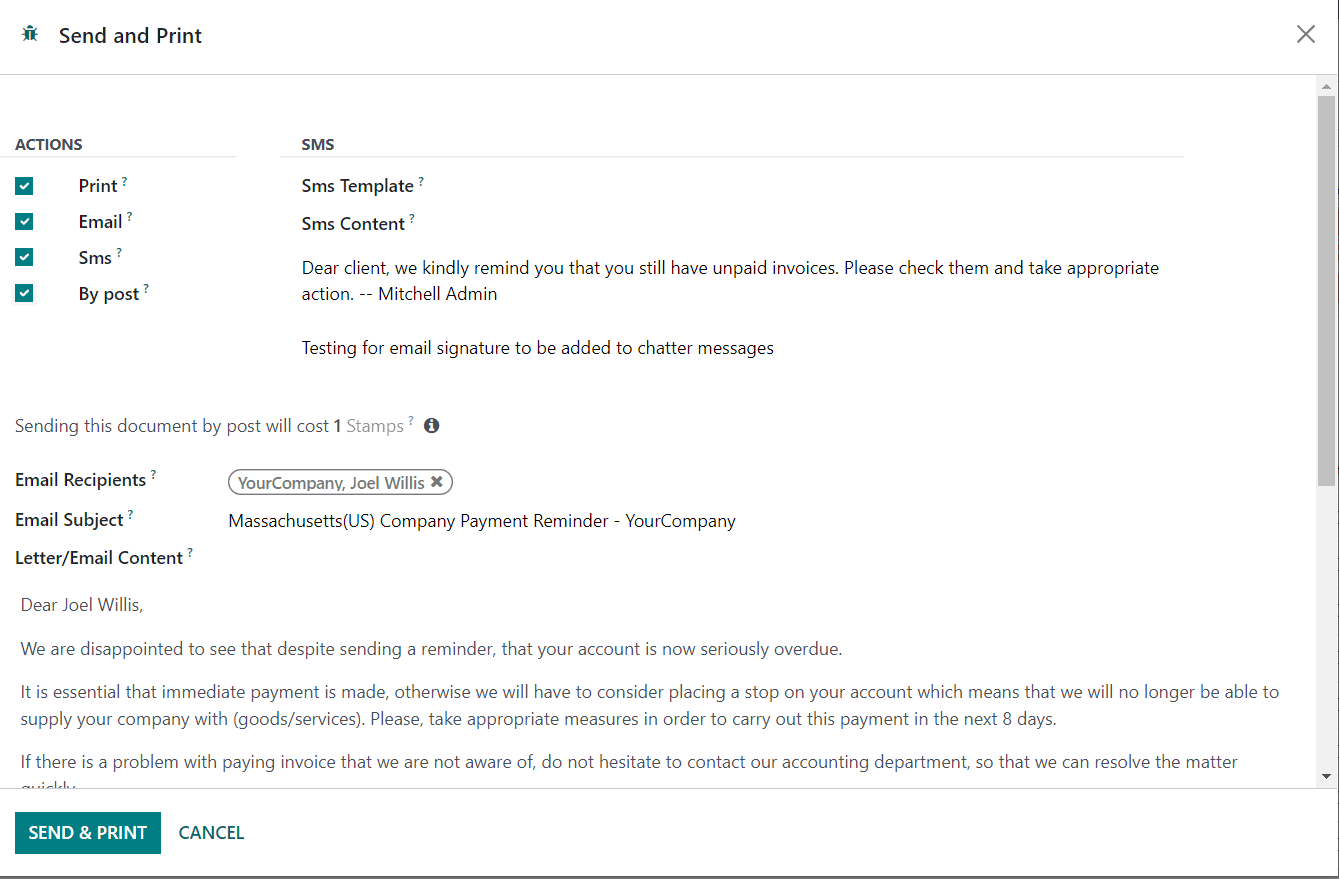
Clicking on the Send button, you can send follow-up reports to the mentioned follow-up address. The action will be triggered automatically based on the number of overdue days.
In the Configuration menu of the Accounting module, you will get the Follow-up Levels button to configure different levels for the follow-up actions.

The preview of the list shows the Description, Activity, and Company of each follow-up level. The number of days after the due date of the invoice to wait before sending a reminder can be seen in the Due Days field. The Send Email, Send SMS Message, Send a Letter, and Automatic fields can be observed as enabled or disabled according to the actions configured on the corresponding level.
Click the Create button to create a new follow-up level. You can specify the description of the follow-up level in the Description field and set Due Days in the given space.

Under the Notifications tab, you can enable the Actions to be taken as follow-up activities. By activating the Send Email and Send a Letter buttons, you will get an additional field called Content Template where you can mention the content template for the mail and letter. Similarly, activating the Send SMS Message gives an additional option to specify the SMS Template. If you want to automate the follow-up activities, you can activate the Automatic option. The Attach Invoices feature can be enabled to attach overdue invoices by email.
The Activity tab shows the Schedule Activity option to activate if you want to plan scheduled activities on the follow-up reports.

In the Responsible field, you can determine to whom this activity can be assigned. You can set Follow-up Responsible, Salesperson mentioned on the invoice or the Account Manager as the Responsible. Select a suitable Activity Type from the drop-down and specify its Summary in the given space. Additional notes related to the scheduled activity can be added in the Activity Notes field.
This is how the OTX Accounting module manages Follow-up Reports. Now, let’s check the Direct Debit Mandates option in the module.
Direct Debit Mandates
Direct Debit Mandates
The Mandates represent a document signed by your customer that authorizes you to automatically collect money directly from their accounts. You can collect customer payments with a single click using the EURO SEPA Service in OTX . With the integration of the SEPA Direct Debit, you can receive authorization from customers with a signed mandate that allows you to collect payments from the respective customer bank accounts. This feature is useful for recurrent payment operations.
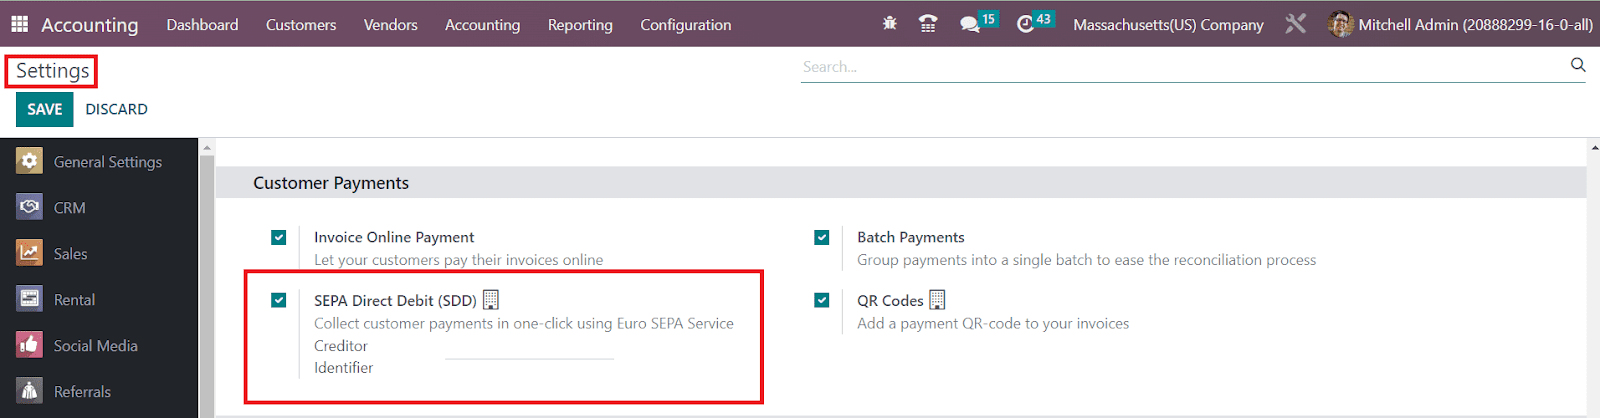
The SEPA Direct Debit feature can be activated from the Settings menu of the Accounting module as shown below. After activating this feature, enter your company’s Creditor Identifier in the given space.
Now, you can configure a new Direct Debit Mandate from the Customers menu. Once an invoice is made in OTX for a customer having a mandate active on the invoice date, its validation will trigger its automatic payment, and you will then only have to generate a SEPA Direct Debit (SDD) XML file containing this operation and send it to your bank to effectively get paid.
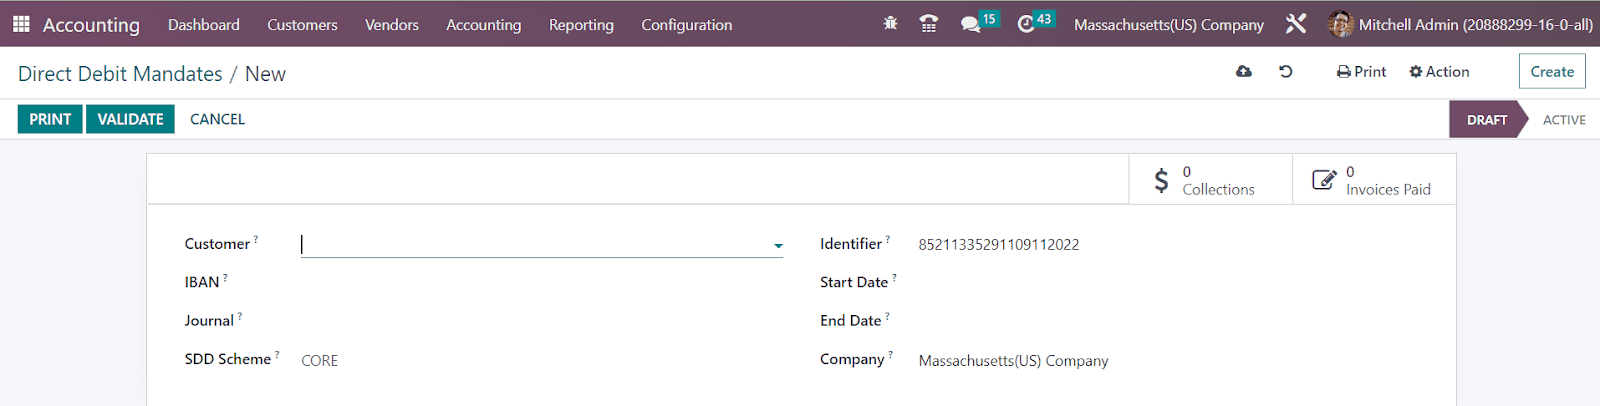
The id of the customer whose payments are to be managed by this mandate can be specified in the Customer field. In the IBAN field, you can add the account of the customer to collect the payments. The Journal mentioned in the respective field will be used to receive SEPA Direct Debit payments from this mandate. In the corresponding fields, you can define the SDD Scheme, the unique Identifier of this mandate, Start Date, End Date, and Company. After adding all necessary details in the given fields, you can click the Validate button to validate this mandate. The payment to collect from this customer and Invoiced Paid using this mandate can be seen in the respective smart buttons available in the window.
Vendor Bills
Vendor Bills
While doing purchases from a vendor, you can generate vendor bills in the OTX Accounting module which shows the payment that you need to make to the respective vendor. A vendor bill will document all payment details of the purchases done by your company from a vendor. Once you confirm a purchase order, you will get the option Create Bill as shown in the image below in order to automatically generate the corresponding vendor bill.

We already discussed the management vendor bills in the Purchase module. Such generated vendor bills will be recorded in the Accounting module also. You can find the Bills option under the Vendor menu in the Accounting module. As shown in the image below, already generated bills can be observed here.

The user can select either Kanban or List view on this platform. The preview of the list view includes Number, Vendor, Bill Date, Due Date, Reference, Activities, Tax Included, Total, Total in Currency, Payment Status, and Status of each vendor bill.

You can use My Invoices, Draft, Posted, Canceled, To Check, SDD Mandates, Unpaid, Paid, Overdue, Bills to Pay, Bills in Exception, Invoice Date, Accounting Date, and Due Date as filters for the available vendor bills. Additional filters can be added using the Add Custom Filter option.

The available default Group By options are Salesperson, Status, Sales Team, Electronic Invoicing State, Preferred Payment Method, Invoice Date, Due Date, and Referrer. Use the Add Custom Group button to create a new custom group by options.
You can upload a reference of the vendor bill using the Upload button. Manual creation of vendor bills can be performed using the Create button. A new window appears on the screen to mention the necessary details regarding the bill.

Mention the id of the vendor in the Vendor field and reference related to the bill in the Bill Reference field. You can autocomplete the remaining fields of the bill by specifying a past bill or purchase order related to this bill in the Auto-Complete field. The date on which the bill is generated can be mentioned in the Bill Date field. The Accounting Date shows the date on which the accounting entries of this bill are updated in the system. In the respective fields, you can specify Payment Reference, Recipient Bank, Due Date of the bill, and Journal .
The Invoice Line, Journal Items, and Other Info tabs are the same as that of the invoice. Once you complete all necessary fields, click the Confirm button to confirm the bill. The status of the bill will change from Draft to Posted once you confirm the bill. You can manage the vendor bills from the Accounting Dashboard also.

You can upload a vendor bill using the Upload button and create a new bill using the Create Manually button. There are options available to create and view Bills, Refunds, and Journal Items. Using the Payment Matching option, you can match invoices and payments with corresponding bank statements.
As we mentioned, you can create refunds from the Accounting Dashboard itself. You will get a separate platform under the Vendors menu to generate Refunds. We already discussed the generation of customer credit notes. In the same method, you can generate vendor credit notes also. As shown in the image below, you will get the Add Credit Note option on a bill.

You can trigger a vendor credit note using this button. These vendor credit notes will be recorded under the Refunds platform available in the Vendors menu.

You can create a new refund using the Create button.
Employee Expenses
Employee Expenses
There may be situations where the employee has to spend money from their personal fund to perform a project or task or complete purchases on behalf of the company. In such cases, the company is responsible for returning the money to the respective employee. An employee can record these expenses with the assistance of the OTX Accounting module. The Employee Expenses option can be seen under the Vendors menu. Here, you can record your expenses and submit them to the manager for approval. Once you get approval from the manager, the amount mentioned in the Expense will be returned to your account.

The Employee, Expense Report, Company, Activities, Total Amount, Status, and Payment Status can be seen in the list view of the Employee Expenses. The Scan option allows you to scan and upload expense reports. To create a new report, click the Create button.

You can add a title for the report as Expense Report Summary in the given field. In the Employee field, your employee id will be auto-populated. In the Paid By field, you can specify whether you used your own account or a company account. The name of the Company can be seen in the corresponding field and you can mention the Manager whose approval is required for getting your money back. Under the Expense tab, you can add the expenses one by one using the Add a Line button.
A pop-up will appear to select the expenses.
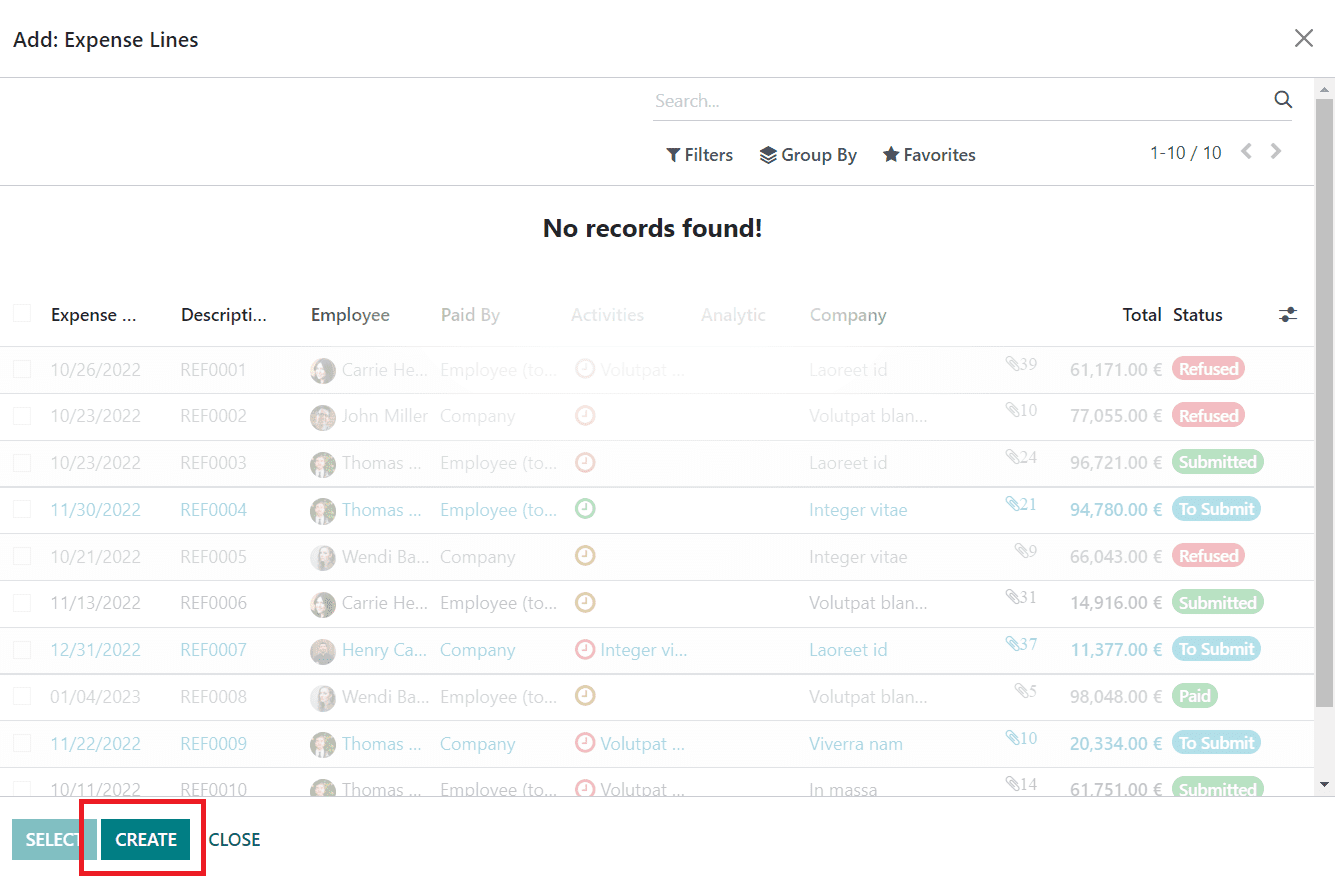
If you haven’t recorded your expenses yet, you can click on the Create button to create a new expense line.

Add a Description for the expense line and specify the Category of the expense. In the Total field, you can mention the total expense in the selected currency. In the respective fields, you can define data related to Employee, Paid By, Bill Reference, Expense Date, Account, Analytic, and Company.
After adding the expense lines, you can click on the Submit To Manager button. Clicking on this button will submit the expense report to the mentioned manager for approval.

You can report the payment in the next payslip by clicking on the Report in Next Payslip button. Once the submission is completed, the manager can approve or refuse the report by checking the submitted report.

The manager can reset the expense report to draft if it requires clarifications. If any obligations are found in the report, the manager can refuse the expense using the Refuse button. The approved expense will be added to your next payslip.
Journals
Journals
It is very important to record all your accounting entries in accounting journals. An accounting journal is a record of transactions arranged by date. In OTX , you can create a sales journal for customer invoices, a purchase journal for vendor bills, a bank journal for bank transactions, and a general journal for other miscellaneous operations. After creating suitable accounting journals, you can record your business transactions in these journals by adding journal entries. In order to view and create Journals in OTX , you can go to the Configuration menu of the Accounting module where you will get the option Journals as shown in the screenshot below.
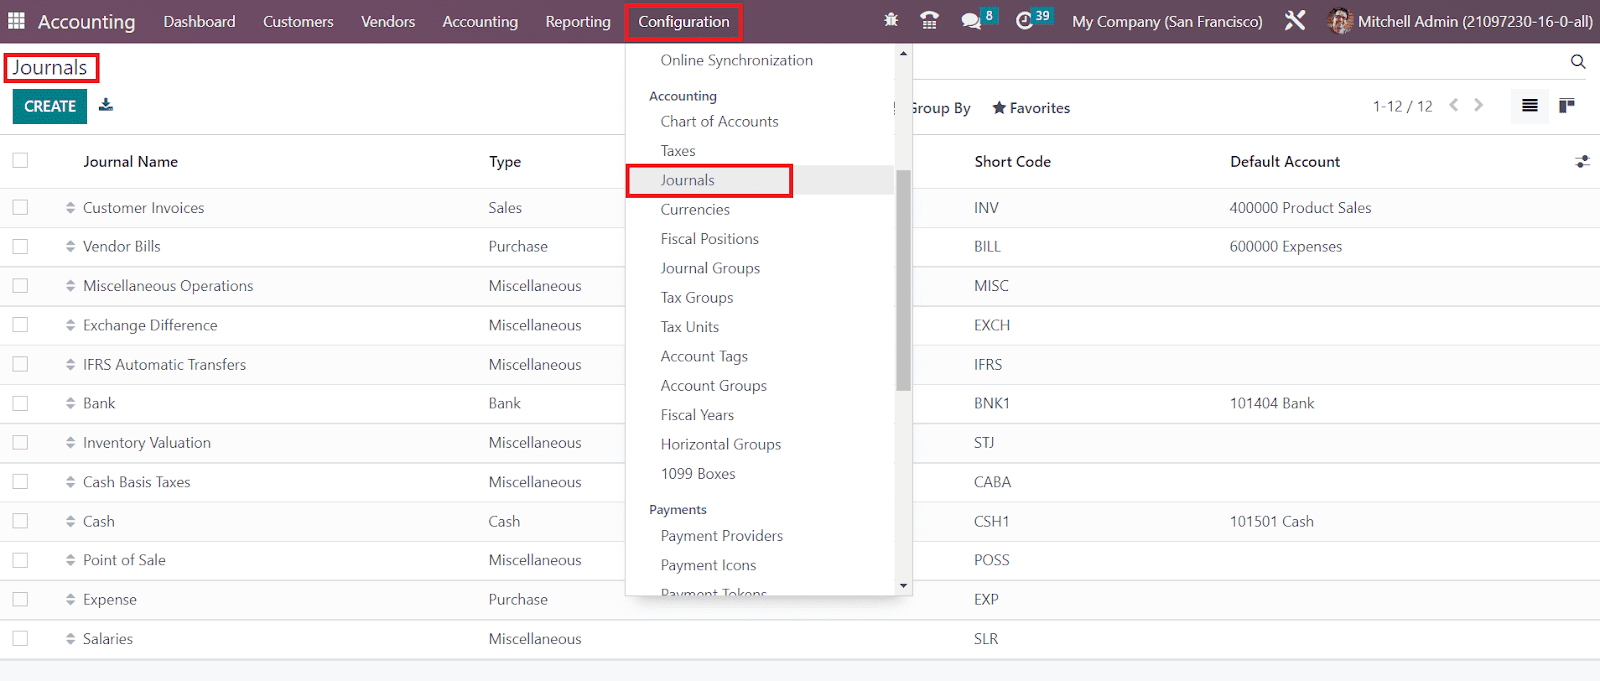
The list of already configured journals can be seen here with the details of the Journal Name, Type, Journal Groups, Short Code, and Default Account. You can create a new Journal for recording your accounting entries using the Create button.
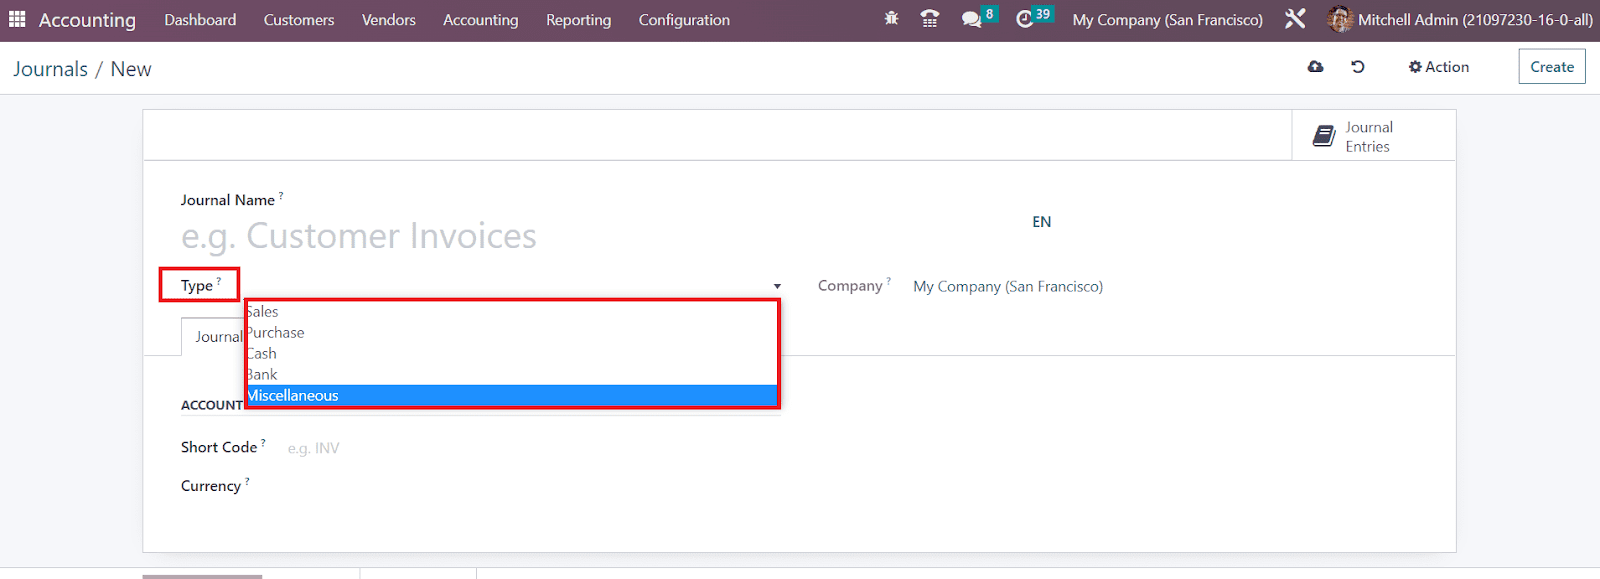
After mentioning the Journal Name, you are requested to define the Type of the journal. Your company id will auto-populate in the Company field. In OTX , you can create Sales, Purchase, Cash, Bank, and Miscellaneous journals. The remaining configuration options will change according to the journal type you select. The journal type will decide where to use this journal in recording an accounting entry.
Let’s take a look at the configuration of each journal type separately.
Sales
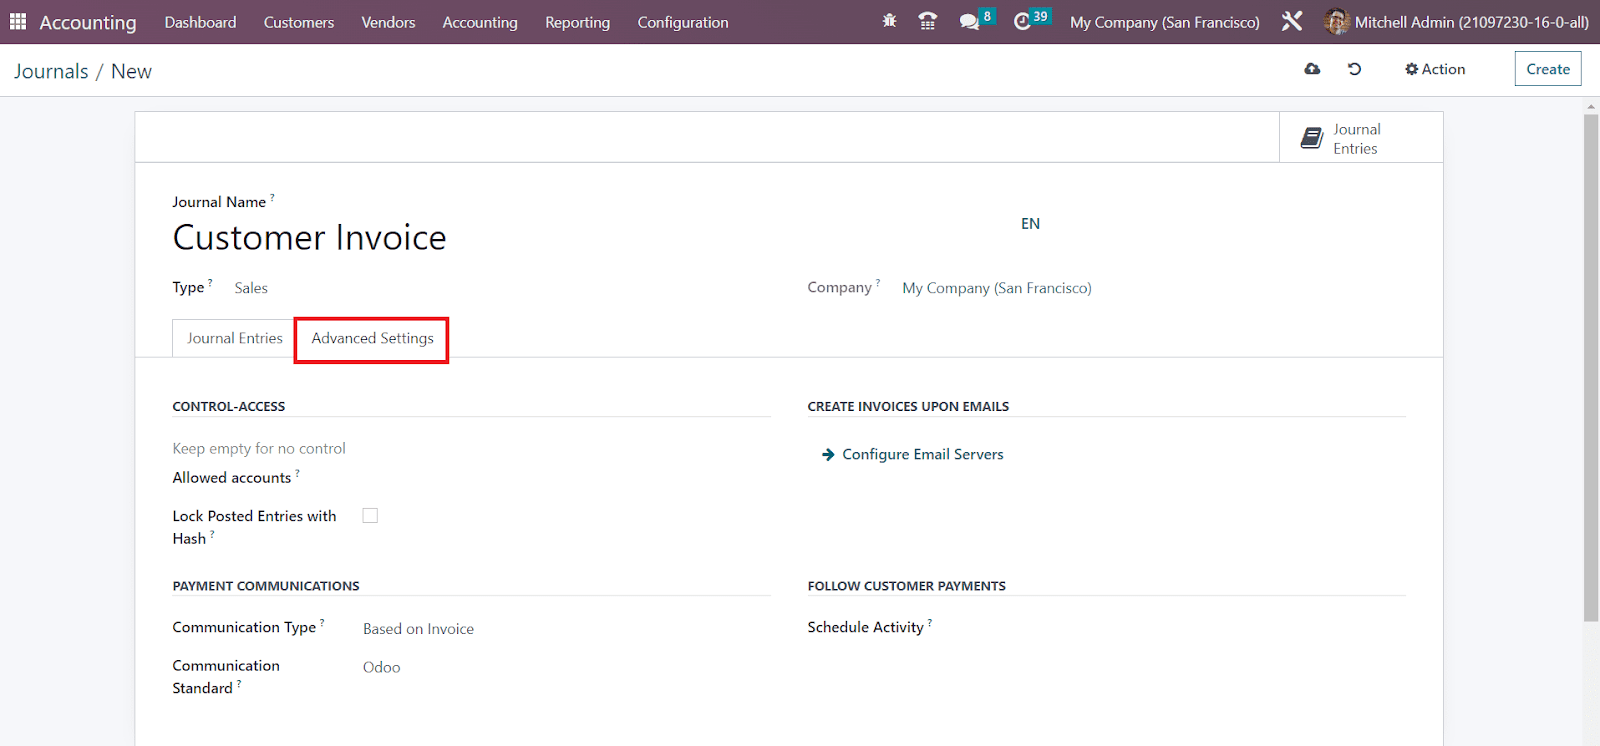
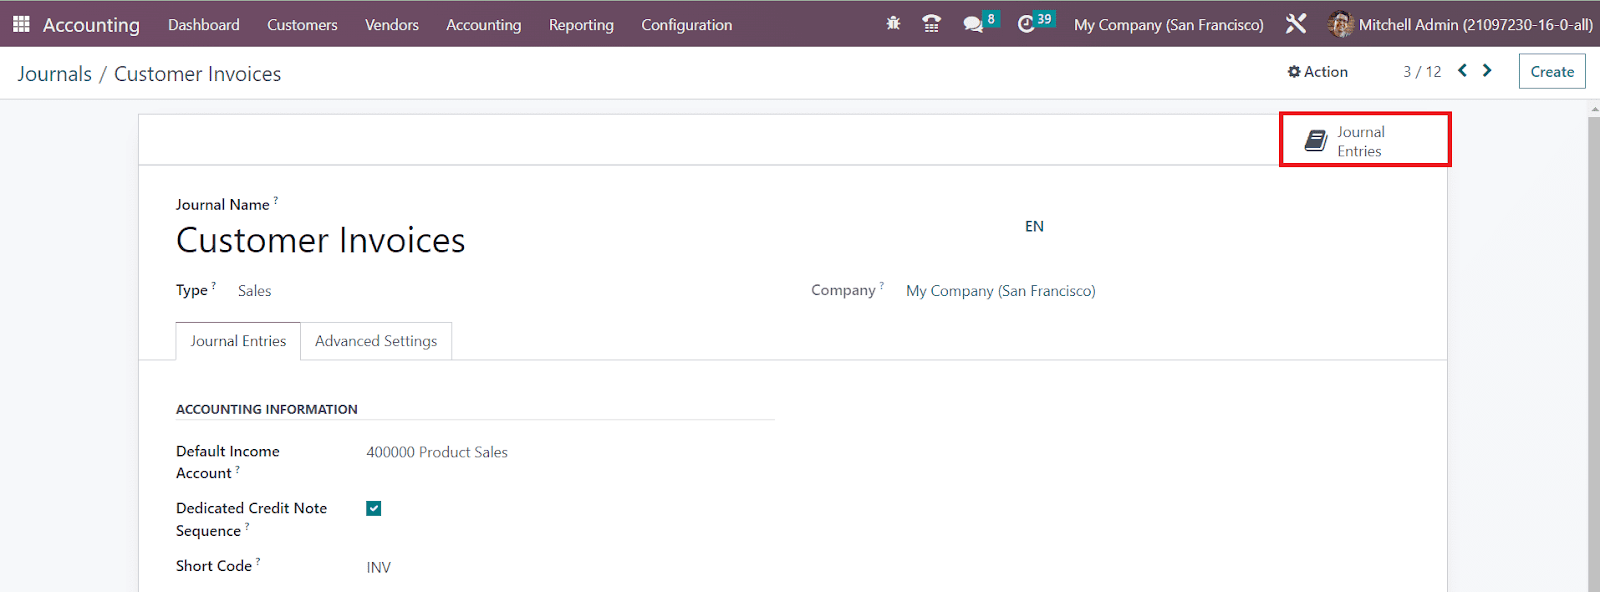
For customer invoice entries, you can configure sales journals. For this, you can select the Journal Type as Sales. You will get some additional fields in both the Journal entries and Advanced Settings tabs.

Under the Journal Entries tab, you can define the Accounting Information of the entries in this journal. You can set a Default Income Account for the sales journal in this tab. You can enable the Dedicated Credit Note Sequence field if you don’t want to share the same sequence for invoices and credit notes from this journal. By activating this option, a dedicated sequence will be assigned to credit notes added to this journal. You can mention a shorter name used for display in the Short Code field. The journal entries of this journal will be named using this prefix as default. The Currency used to record the accounting statements can be specified in the respective field.
In the Advanced Settings tab, you can control access by mentioning the Allowed Accounts. If you don’t want to set any control over the accounts, you can keep the field empty. The accounting entry or invoice will receive a hash as soon as it is posted by enabling the Lock Posted Entries with Hash feature. By doing so, the posted entry will be locked and can not be modified anymore.
In the Communication Type field, you can define the payment communication method. You can set the default communication here that will appear on the customer invoice, once validated, to help the customer to refer to that particular invoice when making the payment. It can be set as Open, Based on Invoice, or Based on Customer. In the Communication Standard field, you can choose different models for each type of reference. Here, the default one is the OTX reference. By configuring Email servers in the given field, it is possible to create invoices upon Emails. To follow customer payments, you can schedule different activities with the customer. The activity mentioned in the Schedule Activity field will be automatically scheduled on the payment due date in order to improve the collection process.
Purchase
For recording vendor bill entries, you can create purchase journals. The Journal Type can be set as Purchase. The Journal Entries and Advanced Settings tabs are almost similar to that of the sales journal.
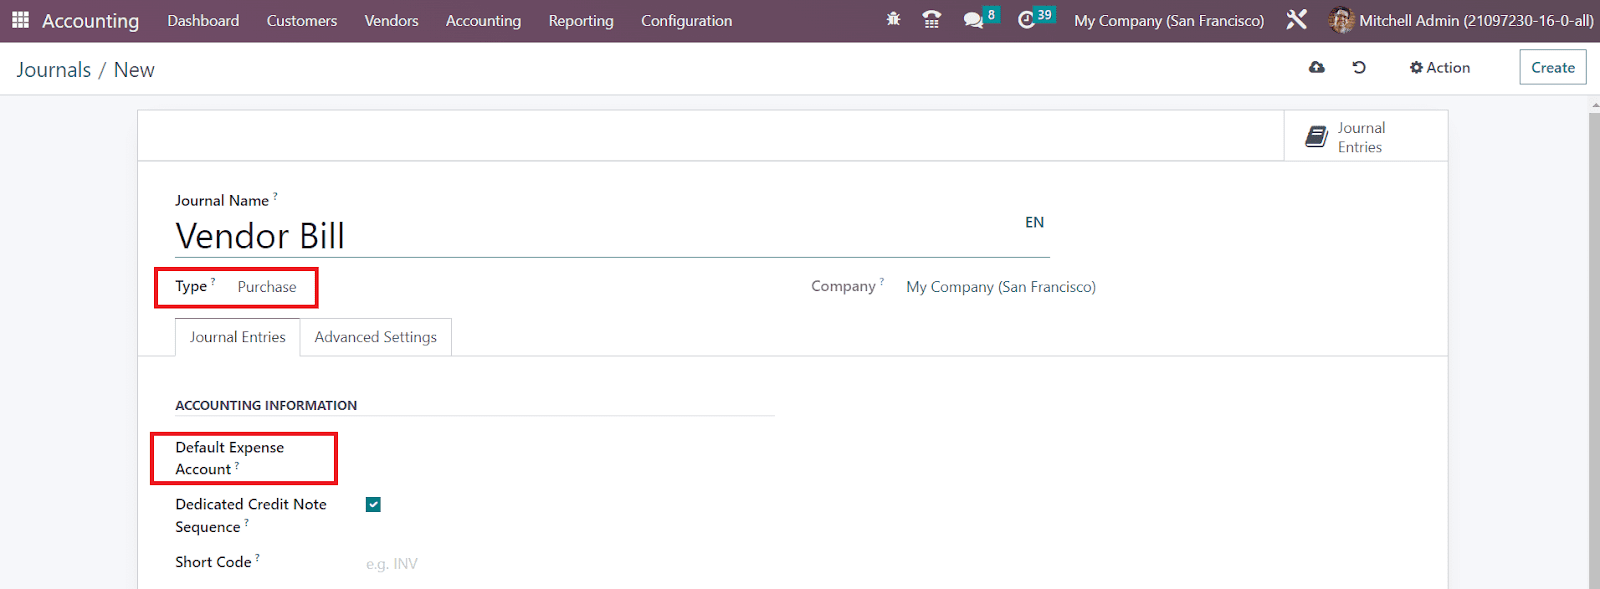
Here, you are requested to mention the Default Expense Account in the accounting information field.
Cash
The accounting entries through manual cash transactions can be recorded using the Cash journal. While configuring a cash journal, you will get some additional tabs as shown in the image below.
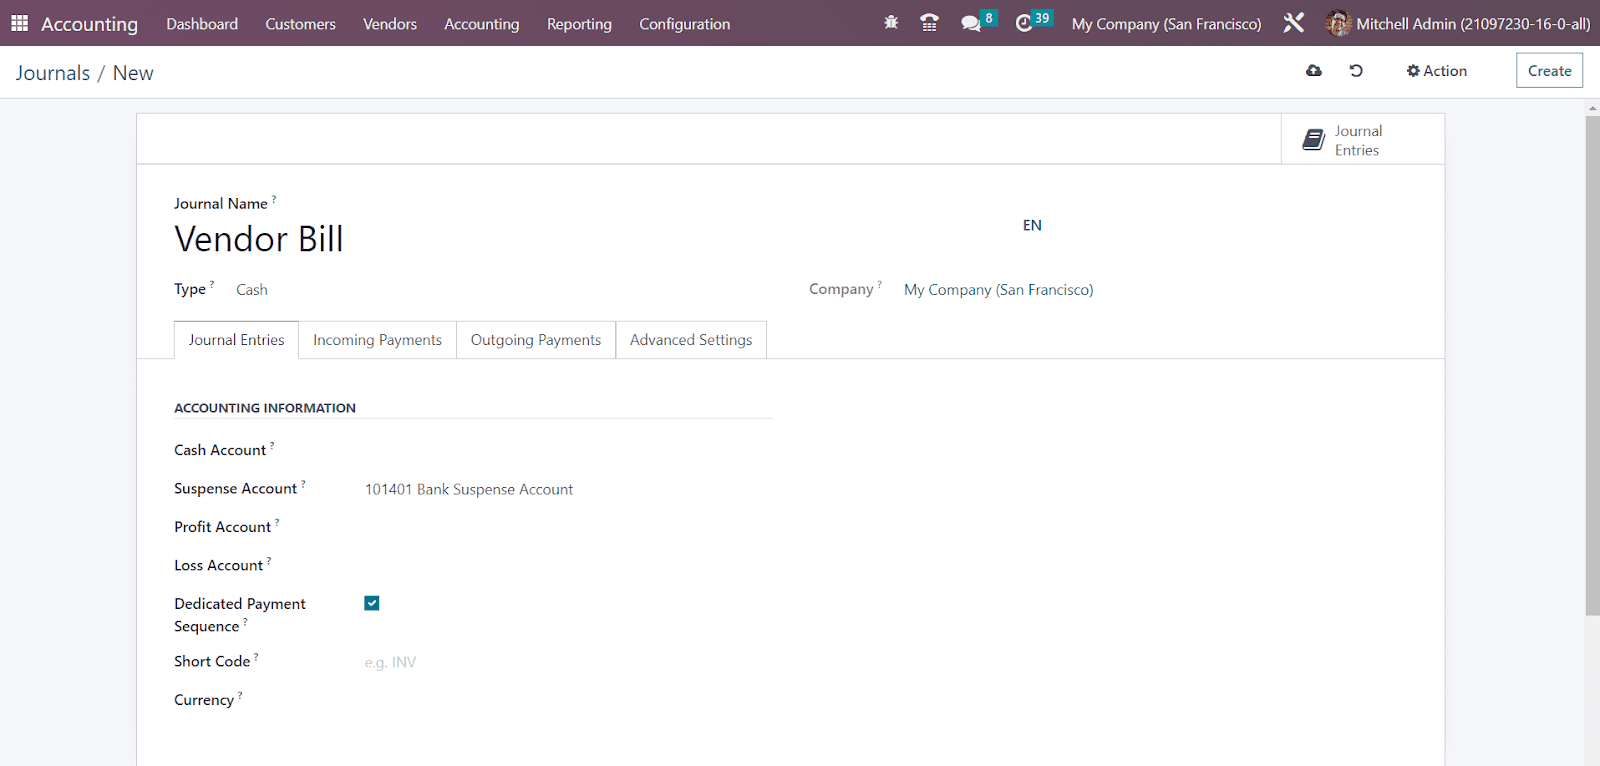
In the Journal Entries tab, you can specify the Cash Account . Additionally, you can specify a Suspense Account for the cash journal. The bank statements and transactions will be posted on the suspense account until the final reconciliation finds the right account. The Profit Account and Loss Account mentioned here are used to register a profit or loss respectively when the ending balance of a cash register differs from what the system computes. If you want to get a dedicated payment sequence for payments and bank transactions posted on this journal, you can enable the Dedicated Payment Sequence feature.
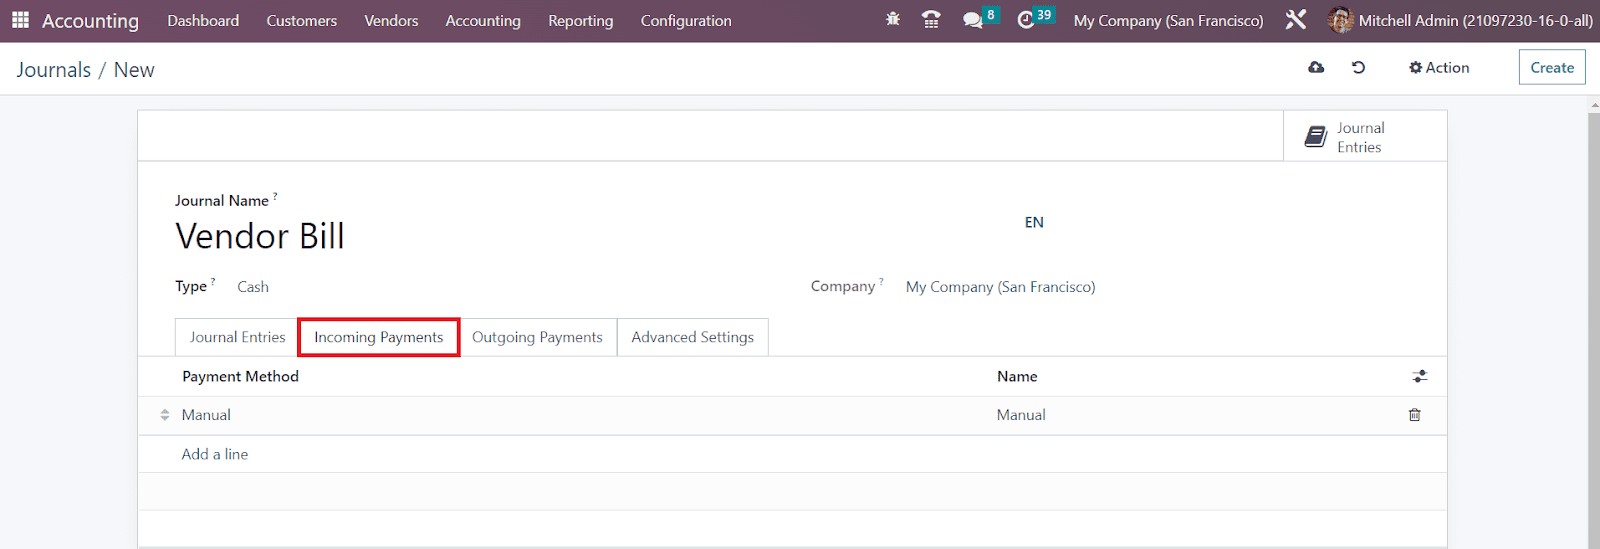
The incoming payment methods and their names can be specified under the Incoming Payments tab. Similarly, the outgoing payment method and their names can be added under the Outgoing Payments tab.

You can control access of the cash accounts by mentioning the allowed accounts in the Advanced Settings tab.

Bank
The bank transaction entries can be recorded in bank journals. For this, you can select Bank as the journal type.
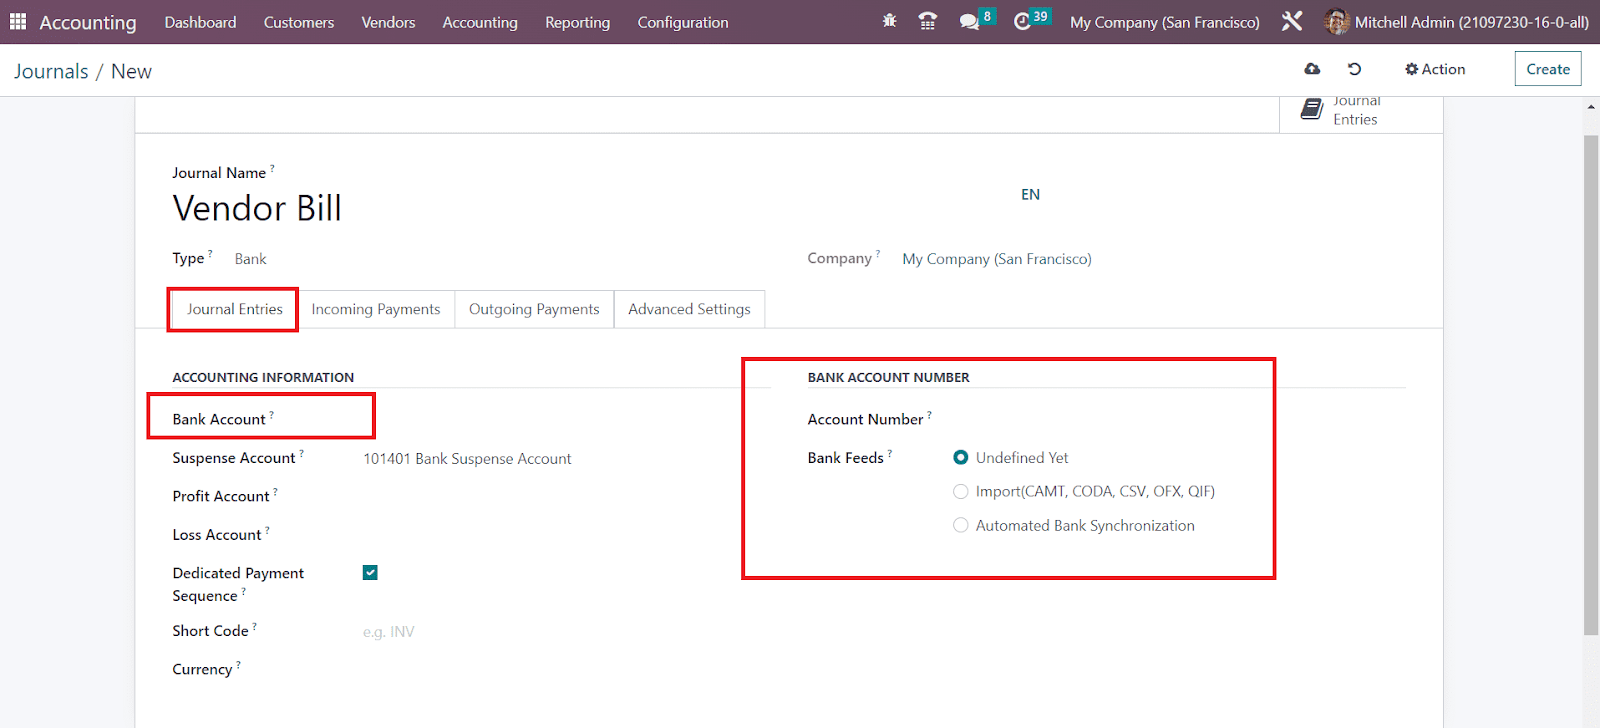
Here, you need to specify the Bank Account along with the Account Number. The option you select in the Bank Feeds field will define how the bank statements will be registered. You can either import the bank statements or automate bank synchronization. The option Undefined Yet can be chosen if you are not specific about the registration of bank statements.
The payment methods used for Incoming Payments and Outgoing Payments can be specified in the respective tabs.

While selecting different payment methods, you will get additional configuration options based on the payment method you select.
For recording the invoices and payments which do not fit into any specific category, you can use the miscellaneous journal. Once you complete the configuration of the Journal it will be automatically saved in your system.
All entries added to a journal can be observed using the smart button Journal Entries as shown in the image above.
Journal Entries
Journal Entries
You can record a transaction in a journal in the form of a journal entry. A proper journal entry records the details of the accounting date, amount to be debited and credited, reference details, and description of transactions. In OTX , at least one debit line and one credit line are demanded by the Double Entry Bookkeeping System. A journal entry must have equal debit and credit amounts. The lines that make up a journal entry are called Journal Items. You will get access to the Journal Entries platform from the Accounting menu of the module.

The list view provides the Date, Number, Partner, Reference, Journal, Company, Total, and Status details of each journal entry. In order to create a new journal entry and record it in a particular journal, you can click on the Create button.

Any reference related to this journal entry can be mentioned in the Reference section. The Accounting Date of the entry will be visible in the respective field. You can select a suitable Journal from the given list to record this journal entry. Under the Journal Items tab, you can add journal items one by one using the Add a Line button. These are the lines of a single journal entry. You can specify the Account, Partner, Label, Analytic, Debit, Credit, and TaxCloud details in this tab.

Under the Other Information tab, you will get the Auto-post option to activate which will automatically post the entry on the respective accounting date. If the entry needs to be checked again, you can enable the To Check field. After specifying the Fiscal Position and Company, you can click on the Post button to post the entry in the corresponding journal.

The entry can be canceled before posting it on the journal using the Cancel Entry button.
After posting the journal entry, you will get the option for Reverse Entry.

Using this button, you can easily reverse a posted journal entry. A pop-up will appear to specify the Reversal Date and Specific Journal.

The Reversal Date will automatically appear as soon as you select the Reversal Date as Specific. The Reversal Date can be set as the same as that of the Journal Entry Date by selecting the respective option. Click the Reverse button and the journal entry will be reversed.
The journal items added to different journal entries can be observed in a separate platform in the OTX Accounting module. Under the Accounting menu, you can find the Journal Items option which will record all journal items of your accounting entries.

The list view will show the details of the Date, Journal Entry, Account, Partner, Label, Amount in Currency, Debit, Credit, Matching Number, and Analytic. Using the Match button, you can match the journal item with the respective bank statement.
The Journal Groups option available in the Configuration menu can be used to create particular groups for the journals. Journal groups are used in reporting to display relevant data together.

Using the Create button, you can specify the name of the Journal Group. In the Excluded Journals field, you can add the journal ids which you want to exclude from this group. The name of the Company will be auto-populated in the respective field.
So far we are discussing the configuration of Journal Entries in the OTX Accounting and now let’s move to the Automatic Transfers feature in the module
Automatic Transfers
Automatic Transfers
The Automatic Transfers feature in the OTX Accounting module lets you plan scheduled transfers which will assist you to automate the bookkeeping operations. This feature can be used when you need to transfer an amount from one account to another over a fixed period of time. In order to get access to this feature, you can go to the Accounting menu.

By clicking on the Accounting Transfers option, OTX leads you to a new platform that shows the list view of the already scheduled automatic transfers. The preview gives the Name, Company, Start Date, Stop Date, and Frequency of each automatic transfer. Clicking on the Create button, you can schedule a new automatic transfer.

In the Description field, add a small title for the transfer. You can set the starting and ending date of the transfer in the Period field. The transfer can be scheduled on a monthly, quarterly, or yearly basis. This can be specified in the Frequency field. Along with these details, you can mention a Journal to record the accounting entries of this transfer. In order to add the source accounts of this transfer, you can use the Add a Line button available in the Origin Accounts tab. A wizard will appear to select the suitable source accounts for the transfer.
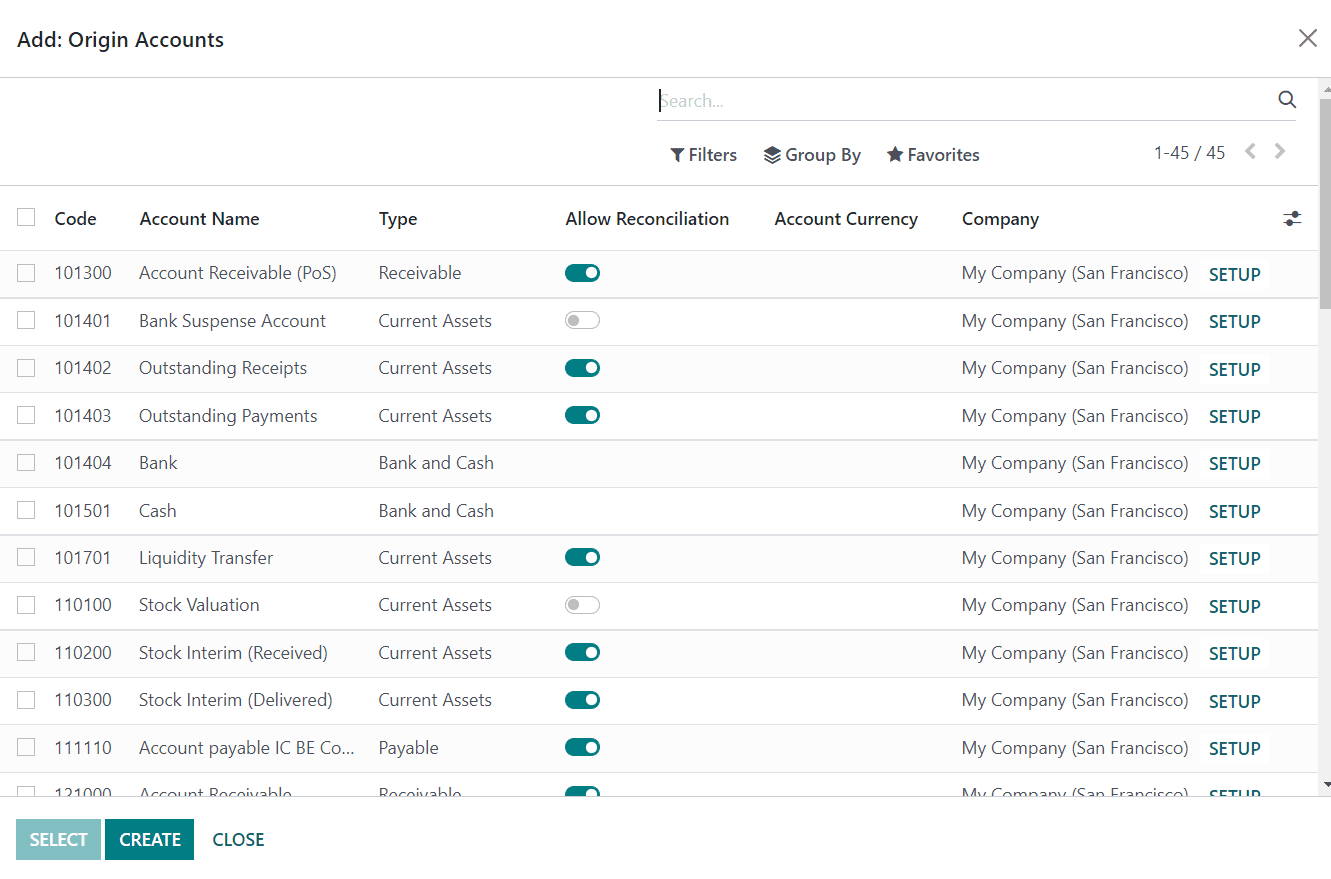
After selecting accounts, you can click the Select button and it will be added to the automatic transfers form view. You can observe the Code, Account Name, and Type of the source account under the Origin Accounts tab.
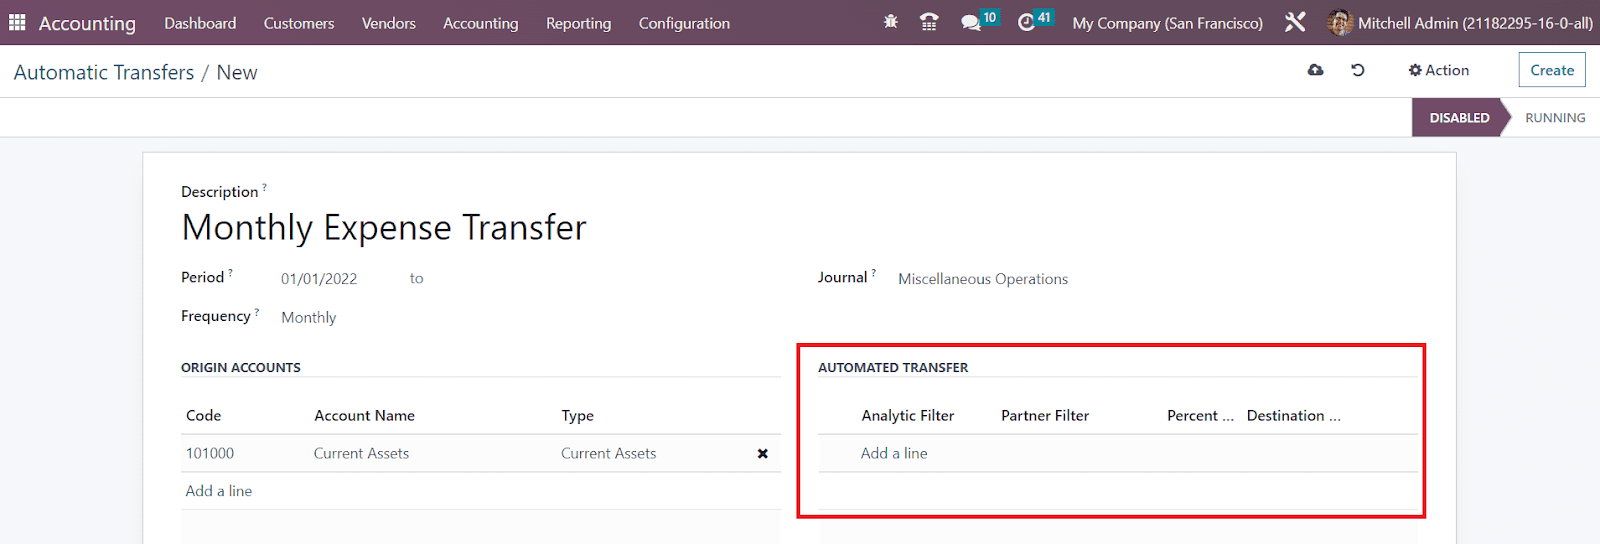
Now, the destination account accounts can be added under the Automatic Transfers tab with the help of the Add a Line button. Along with this, you can set Analytic and Partner Filters which add a condition to only transfer the sum of the lines from the origin accounts that match the mentioned analytic account and partners to the destination account. You can mention the percentage of transactions in the Percentage field. By doing so, the mentioned percentage of the sum lines from the origin accounts will be transferred to the destination account.
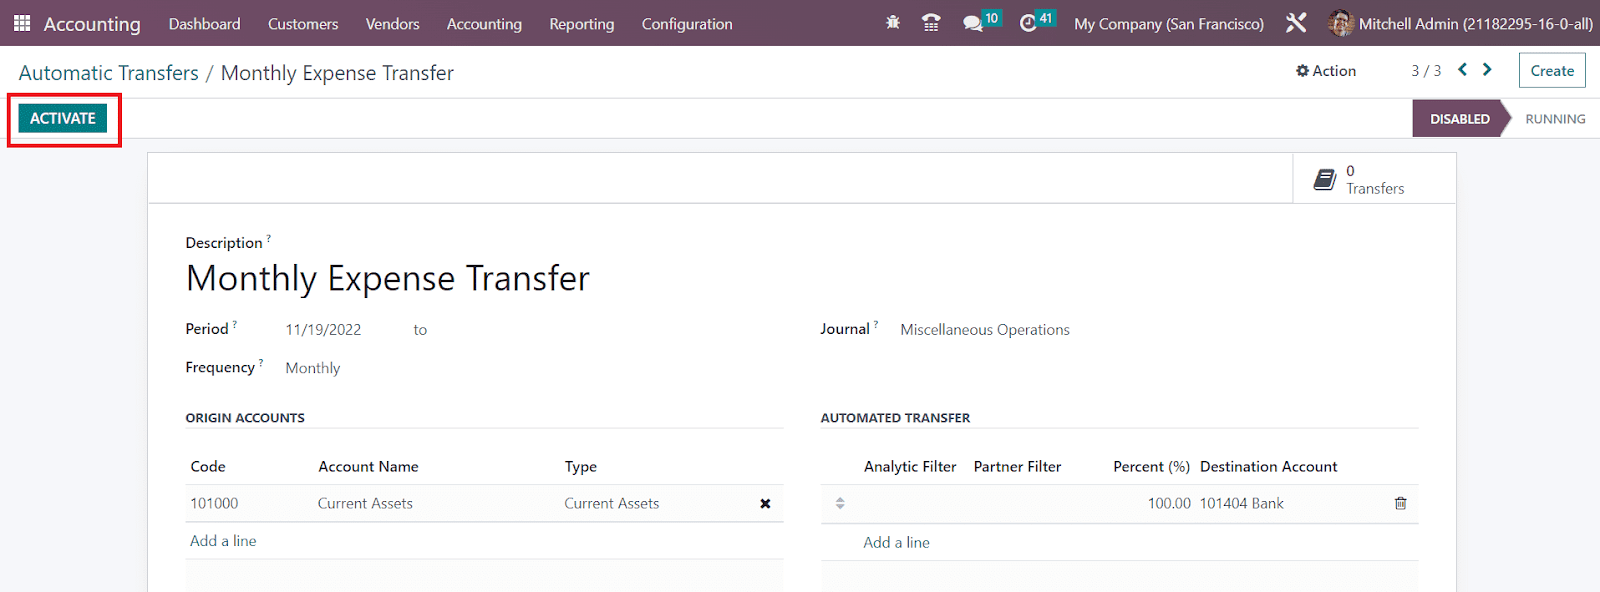
After completing the configuration process, you will get the Activate button to activate the automatic transfer.
Once the transfer is activated, you can compute the transfer to the destination account using the Compute Transfer button. You can observe the transfers done using this scheduled plan in the Transfers smart button as highlighted in the screenshot below.
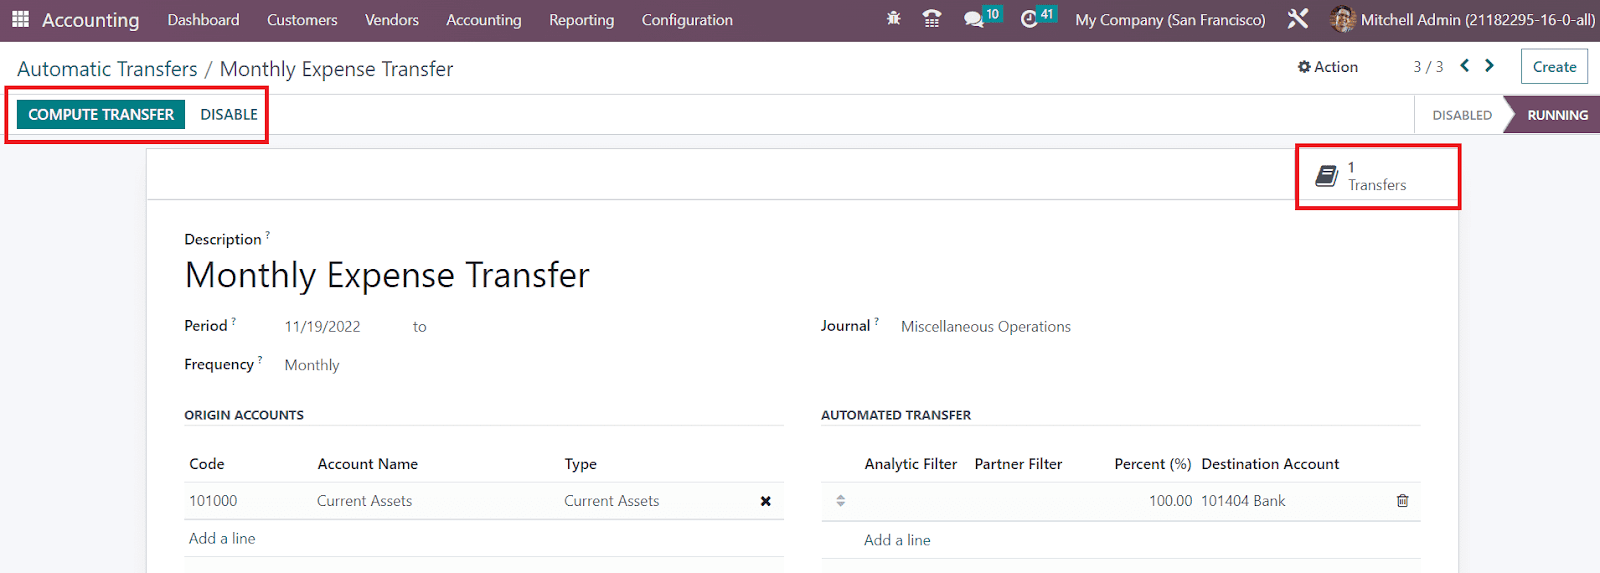
If you want to deactivate the automatic transfer before its ending date, you can use the Disable button.
Analytic Items
Analytic Items
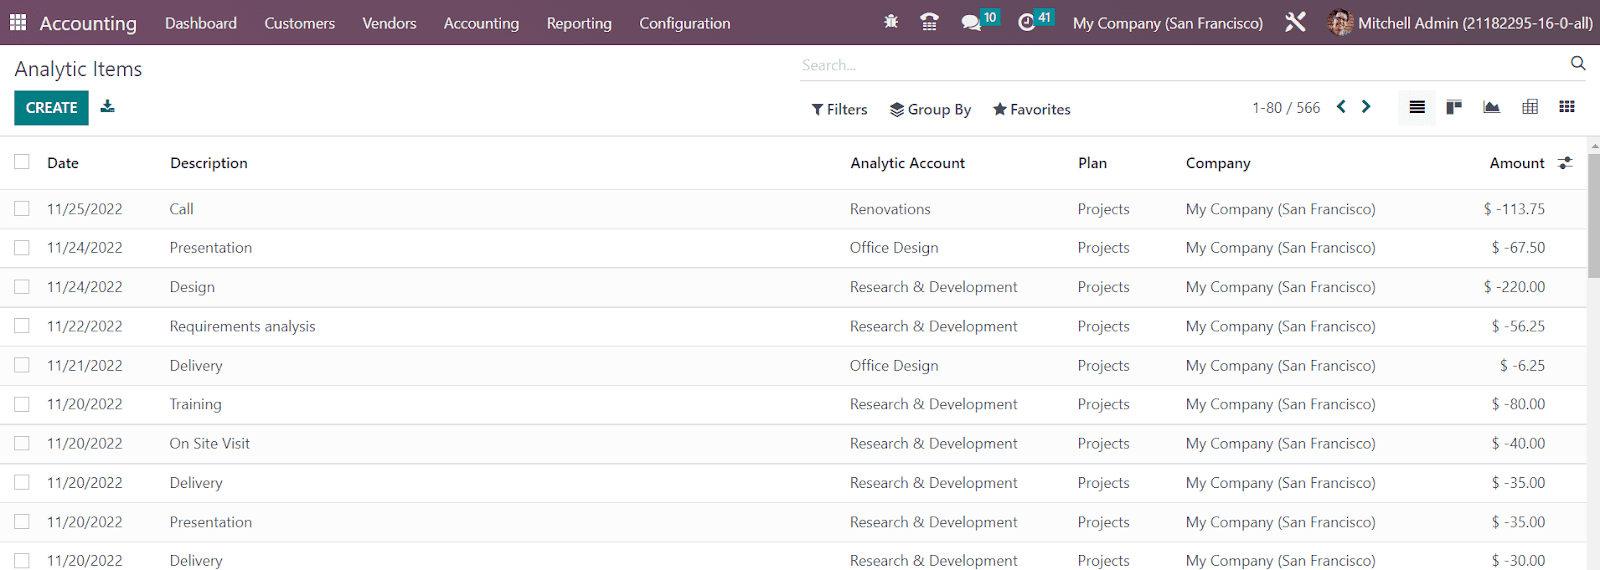
The accounting entries added to an analytic account will be counted as analytic items in OTX Accounting. You can manage and create analytic items from the Accounting menu of the module. By clicking on the Analytic Items option, you will get the list of already defined analytic items for different analytic accounts in your system.

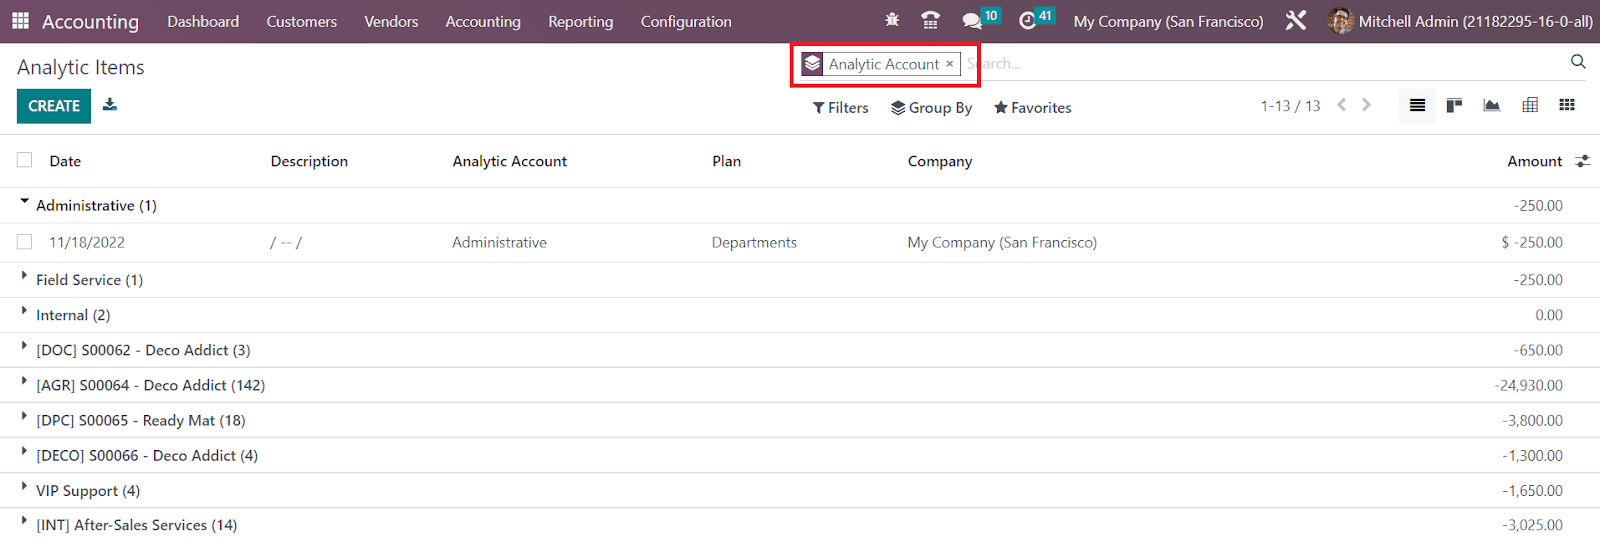
You can observe the Date, Description, Analytic Account, Plan, Company, and Amount of each analytic item here. To understand it easier, you can use the Group By option, Analytic Account which will provide a view with the details of analytic account with specific analytic items included in them.

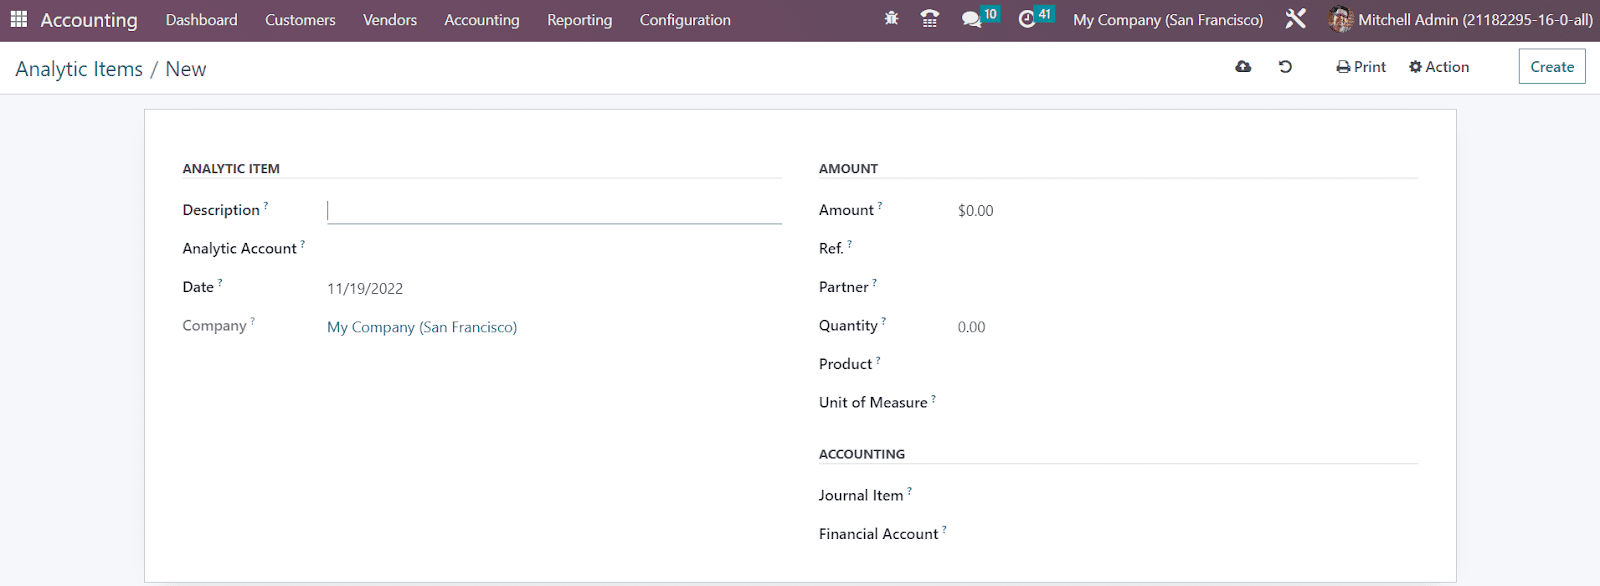
This will help you to understand the items defined in each analytic account. You can manually create a new analytic item for a specific account by clicking on the Create button.

In the Description field, you can mention a title for the new analytic item. In the corresponding fields, you can specify the Analytic Account to which you want to add this item, the Date of creation, and the Company. In the Amount section, specify the Amount, Reference, Partner, Quantity, Product, and Unit of Measure in the respective field. For Accounting details, you can add the Journal Item and Financial Account in the given spaces. Once you complete the configuration, the item will be added to the respective analytic account.
Budgets
Budgets
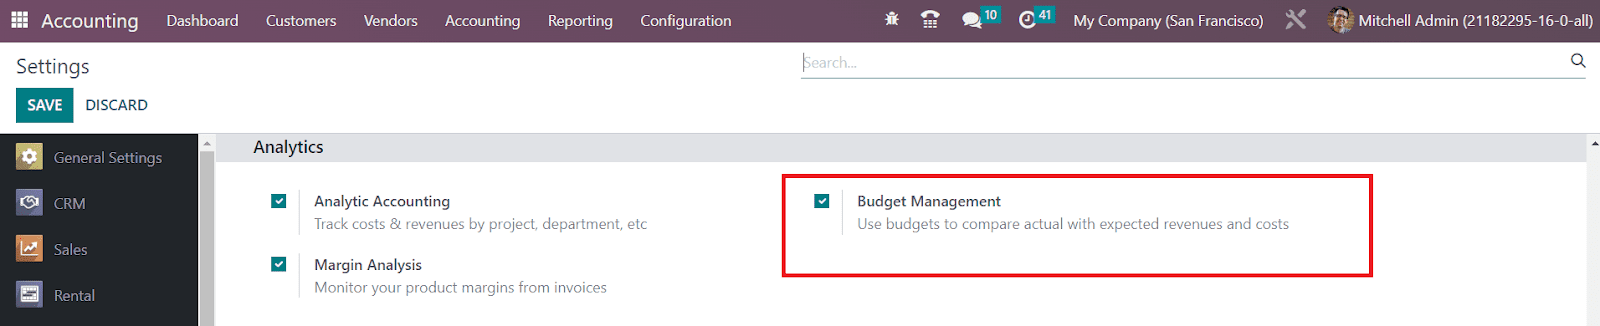
In managing expenses properly and prioritizing business operations according to the expense, budget plays an inevitable role in business management. It will help you to have a clear understanding of the plans and expenses required to perform various business activities over a particular period of time. For getting this feature in your OTX Accounting module, go to the Settings menu and activate the Budget Management option as shown in the image below.
After activating this feature, you can go to the Accounting menu available in the main menu bar from where you will get access to the Budget platform as shown below.

The user gets the Budget Name, Start Date, End Date, Company, Responsible, and Status of already created budgets from this window. In order to create a new budget, you can use the Create button.

Specify a suitable name for your budget in the Budget Name field. Along with this, you can assign an employee for the managing and monitoring this budget in the Responsible field. The starting and ending period of this particular budget can be defined in the Period field. Since this database is working based on a US Company, the name of the Company can be seen in the Company field.
Now, you can add your budget lines under the Budget Lines tab using the Add a Line option. In the Budgetary Position field, you can specify the position of your budget. It is also possible to create a new budget position from this window itself. Once you mention the name of the budget position, a pop-up will appear as shown below.
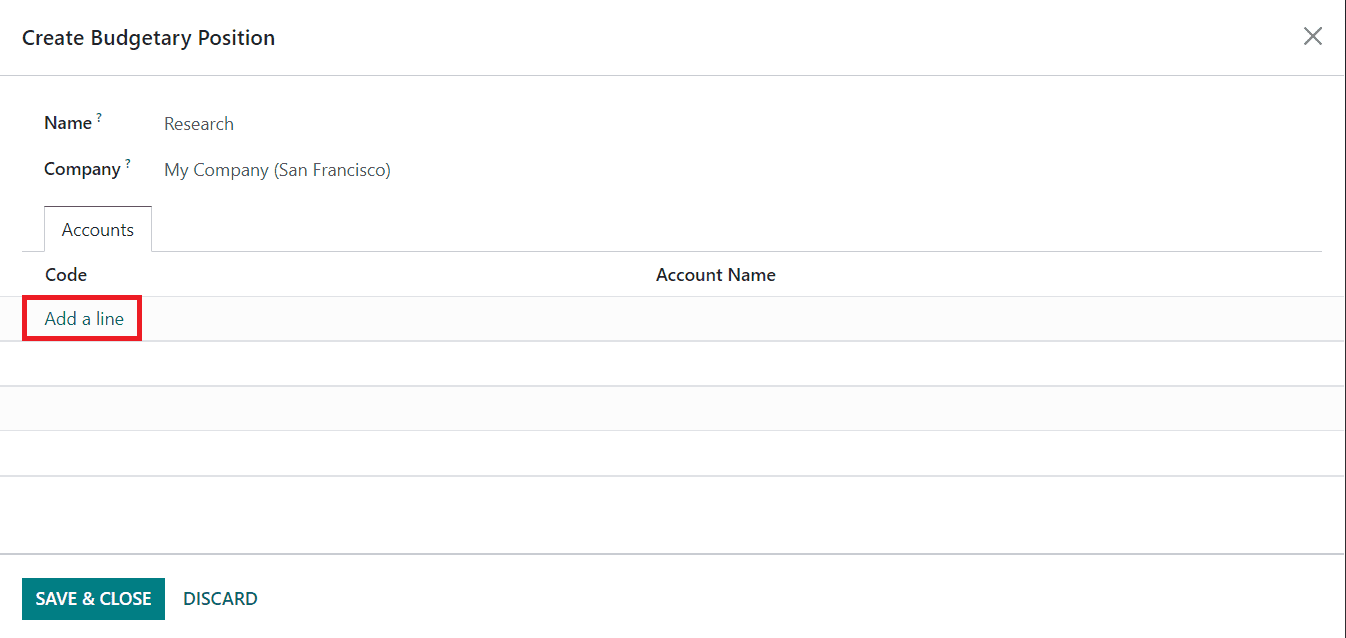
Here, you can see the Name and Company of the budgetary position. Under the Accounts tab, you can add suitable accounts for this particular budgetary position. By clicking on the Add a Line button, OTX opens another pop-up to choose accounts.
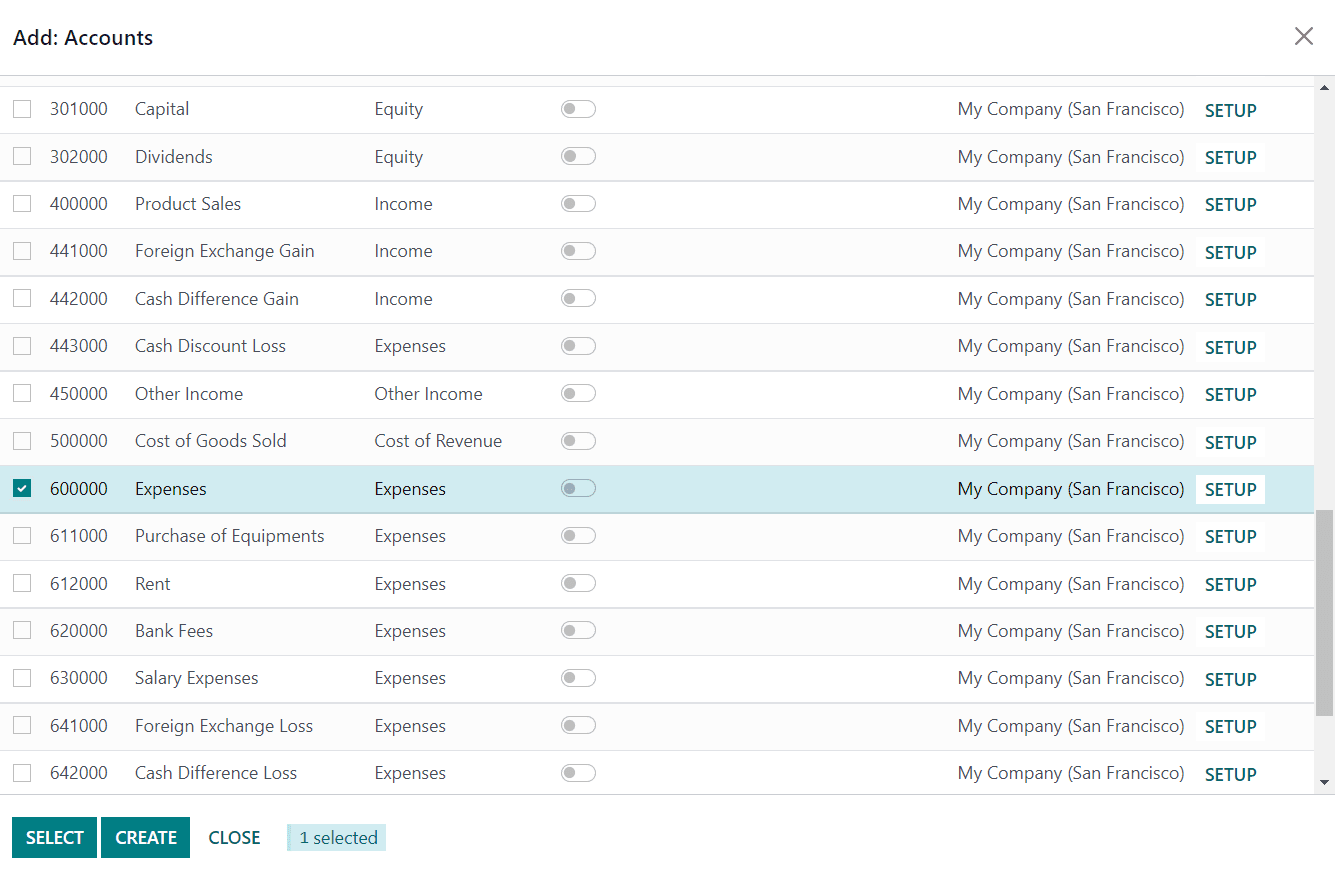
After choosing the required accounts, you can click the Select button.
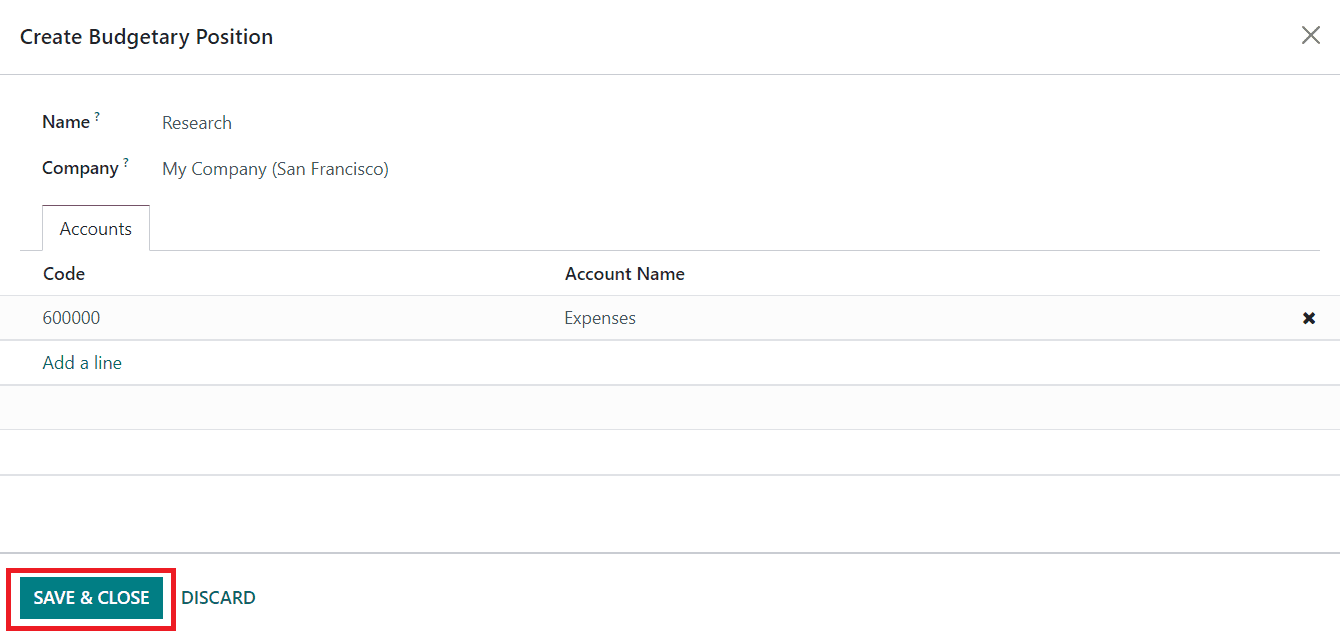
As you can see in the image above, the Code and Account Name will be displayed in the Budgetary Position window. Now, click the Save & Close button.
The accounting entries added to an analytic account will be counted as analytic items in OTX Accounting. You can manage and create analytic items from the Accounting menu of the module. By clicking on the Analytic Items option, you will get the list of already defined analytic items for different analytic accounts in your system.
You can observe the Date, Description, Analytic Account, Plan, Company, and Amount of each analytic item here. To understand it easier, you can use the Group By option, Analytic Account which will provide a view with the details of analytic account with specific analytic items included in them.
This will help you to understand the items defined in each analytic account. You can manually create a new analytic item for a specific account by clicking on the Create button.
In the Description field, you can mention a title for the new analytic item. In the corresponding fields, you can specify the Analytic Account to which you want to add this item, the Date of creation, and the Company. In the Amount section, specify the Amount, Reference, Partner, Quantity, Product, and Unit of Measure in the respective field. For Accounting details, you can add the Journal Item and Financial Account in the given spaces. Once you complete the configuration, the item will be added to the respective analytic account.
Assets
Asset management now becomes easier with the guidance of the OTX Accounting module. OTX offers dedicated platforms in the module for managing assets that are purchased for long-term use. As time passes, the fixed assets will undergo depreciation and their value will reduce eventually.
First, let’s create Asset Models from the Configuration menu of the module. The product you purchase as an asset will be added to the corresponding asset model in OTX . The list of asset models will show the Asset Name, Fixed Asset Account, Depreciation Account, Method, Number of Depreciation, and Period Length.

Click the Create button and OTX will lead you to a new configuration window as shown in the screenshot below.

In the Asset Model Name field, you can provide a name for the asset model. You can set the Depreciation Method as a Straight Line, Declining, or Declining then Straight Line. The Straight Line is a widely used depreciation method that is easier to calculate. It can be calculated by dividing the gross value by duration. In the Declining method, you can set a declining factor. The value is calculated by multiplying the residual value with the specified declining factor. The Declining then Straight Line method is a combination of both methods mentioned above. It operates like the Declining method but with a minimum depreciation value equal to the Straight Line value.
The number of depreciation required to depreciate your asset can be defined in the Duration field. You can set the Computation method as No Prorata, Constant Periods, Based on days per period. The name of your Company can be observed in the respective field. Mention the account used to record the purchase of the asset and its original price in the Fixed Asset Account. The account used in the depreciation entries, to decrease the asset value can be specified in the Depreciation Account field. The Expense Account field can be used to add the account used in the periodical entries to record a part of the asset as an expense. The configuration can be completed by specifying the Journal for recording the accounting entries of this asset model.

In order to automate the assets, you can go to the Configuration menu and select the Chart of Accounts.

From the given list, you can select the account you mentioned in the asset model and click the Setup button.

Here, you can select the Create and Validate option in the Automate Asset field. As soon as you select this option, you will be able to get an additional field to mention the Asset Model. You can mention the newly created Asset Model here.
Now let’s take a look at how to create a record of assets in OTX . First, generate a vendor bill for the purchased asset. While generating the vendor bill, make sure to select the account as the same as that of the asset model.

Once you validate this vendor bill, you will get the Asset smart button on the screen as shown below.

By clicking on this button, you can observe the respective asset recorded in OTX .

In the Depreciation Board tab, you will get the details of the upcoming depreciations. By clicking on the Modify Depreciation button, you can modify the current depreciation. You will get a pop-up as shown below where you decide the action to act on the current depreciation.

If you want to dispose of the asset, you set the Action as Dispose. The Date will be available in the respective field. The account used to write the journal item in case of loss can be specified in the Loss Account field. The Note field can be used to add internal notes for the modified depreciation.
In the case of Sell as action, you need a disposal invoice in order to generate the closing journal entry in the Customer Invoice field. Specify the Invoice Line related to this asset in the given space.

The depreciation can be re-evaluated by using the Re-evaluate option as Action. Here, the new residual amount for the asset can be added in the Depreciation Amount field.

In the Not Depreciation Amount field, you can add the new salvage amount for the asset. You can observe the Gross Increase Account, Asset Counterpart Account, Depreciation Account, and Expense Account in the corresponding fields.

Select the Pause option as Action if you want to pause the depreciation. Once you click the Modify button, the changes in the depreciation can be seen on the Depreciation Board tab.

The posted journal entries can be observed and managed using the available smart button Posted Entries. You can save this asset as an asset model by clicking on the Save as Model. If you want to cancel the running asset, use the Cancel Asset button.
In the OTX Accounting module, you will get a separate platform to manage and create Assets under the Accounting menu. The already created assets can be seen here as shown below with the details of Asset Name, Acquisition Date, Original Value, Method, Book Value, Depreciation Value, and Status.

You can manually configure a new asset in your system by using the Create button. The new configuration window appears on your screen as shown below.

Give a name for your asset in the Asset Name field. Then, you can configure details in the Asset tab. Under the Asset Values section, mention the Original Value, Acquisition Date, and Asset Model of the asset. Under the Current Values section, mention the Not Depreciable Value. It is the amount you plan to have that you can not depreciate. The sum of the depreciable value, the salvage value, and the book value of all value increase items can be seen in the Book Value field.

In the Depreciation Method and Accounting sections, the details will be auto-populated based on the asset model you select. Additionally, you will get the Analytic field to specify the analytic distribution. In case of an import from another software, you might need to use the Depreciated Amount field to have the right depreciation table report. This is the value that was already depreciated with entries not computed from this model.

The bills related to this asset can be added one by one using the Add a Line button under the Bills tab.

You can click on the Confirm button to confirm the asset. Using the Compute Depreciation button, you can calculate the depreciation and it will be available under the Depreciation Board tab as shown below.

Once you confirm the asset, it will change to the running status.
Deferred Revenues and Expenses
The money that you received in advance for the goods or services which is not delivered or completed can be calculated as deferred revenue. It is not possible to report this money in your income account since the status of the money is still received not earned. The status will not change to revenue or income unless and until the delivery or service is completed. This amount can be reported as a liability. In the Accounting module, the option to record the details of such deferred revenues can be seen under the Accounting menu.
Before creating a new deferred revenue record, you can create a new Deferred Revenue Model for it from the Configuration menu. By doing so, you can group similar deferred revenues under a model. Go to the Management tab of the Configuration menu where you can find the Deferred Revenue Models option. The window shows already configured models with the details regarding the Revenue Name, Revenue Account, Deferred Revenue Amount, Number of Recognitions, and Period Length.

These models can be used while creating new deferred revenues in OTX . Click the Create button to create a new module.
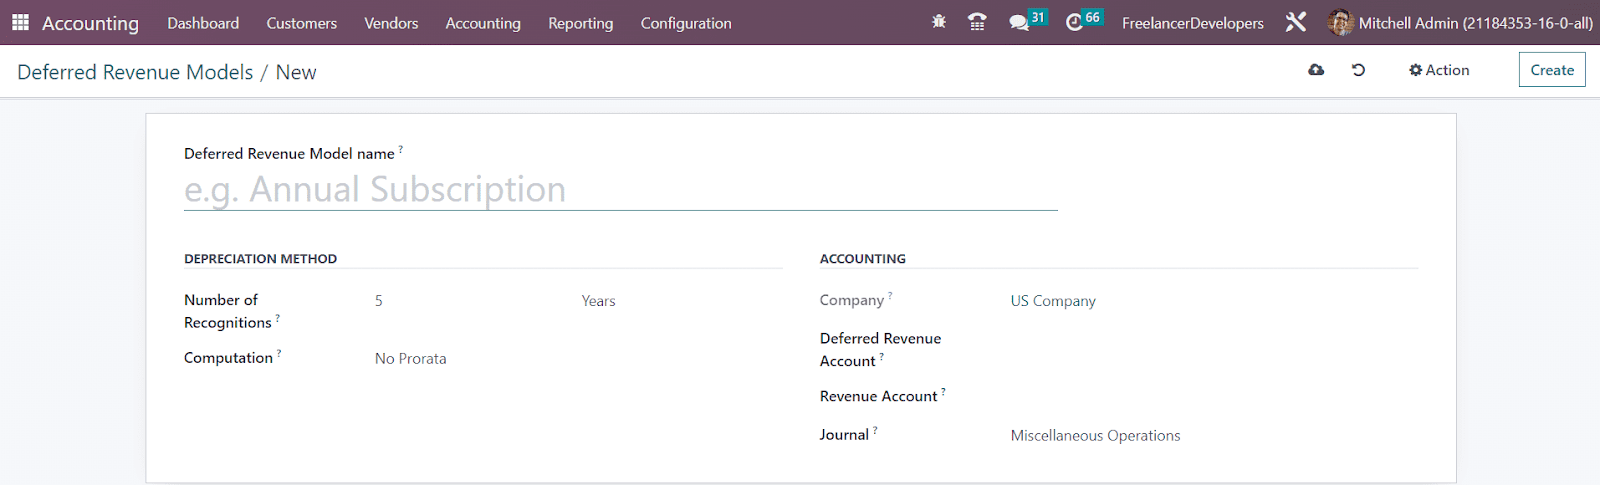
Give a name for the Deferred Revenue Model in the given space. Under the Depreciation Method, you can mention the number of depreciation needed to depreciate your asset in the Number of Recognition field. The Computation method of the depreciation can be set as No Prorata, Constant Periods, or Based on Days per Period. In the Accounting section, the Company name will automatically appear in the given field. The account used to record the deferred income can be added in the Deferred Revenue Account field. In the Revenue Account field, you can specify the account used to recognize the revenue. Mention the Journal to record the accounting entries of the deferred revenue in the respective field.
Once you complete the configuration of the Deferred Revenue Model, you can go to the Accounting menu and click on the Deferred Revenues option.

The list view provides the details of Revenue Name, Book Value, Depreciable Value, Currency, Company, and Status of available deferred revenues. Clicking on the Create button, you can create a new one.
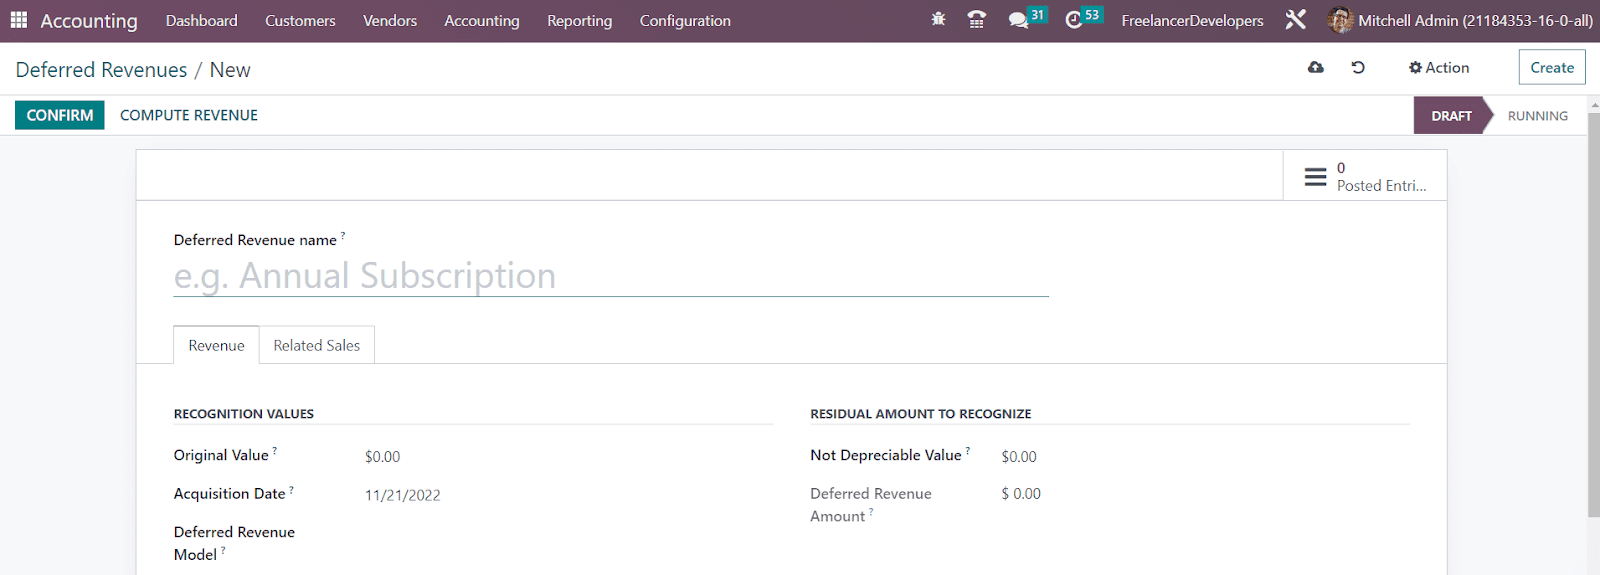
After mentioning the name of the Deferred Revenue in the given field, you can specify the Original Value of the revenue under the Recognition Values tab. The Acquisition Date will be available as the current date which can be edited according to your need. In the Deferred Revenue Model field, you can select a suitable model for this deferred revenue.
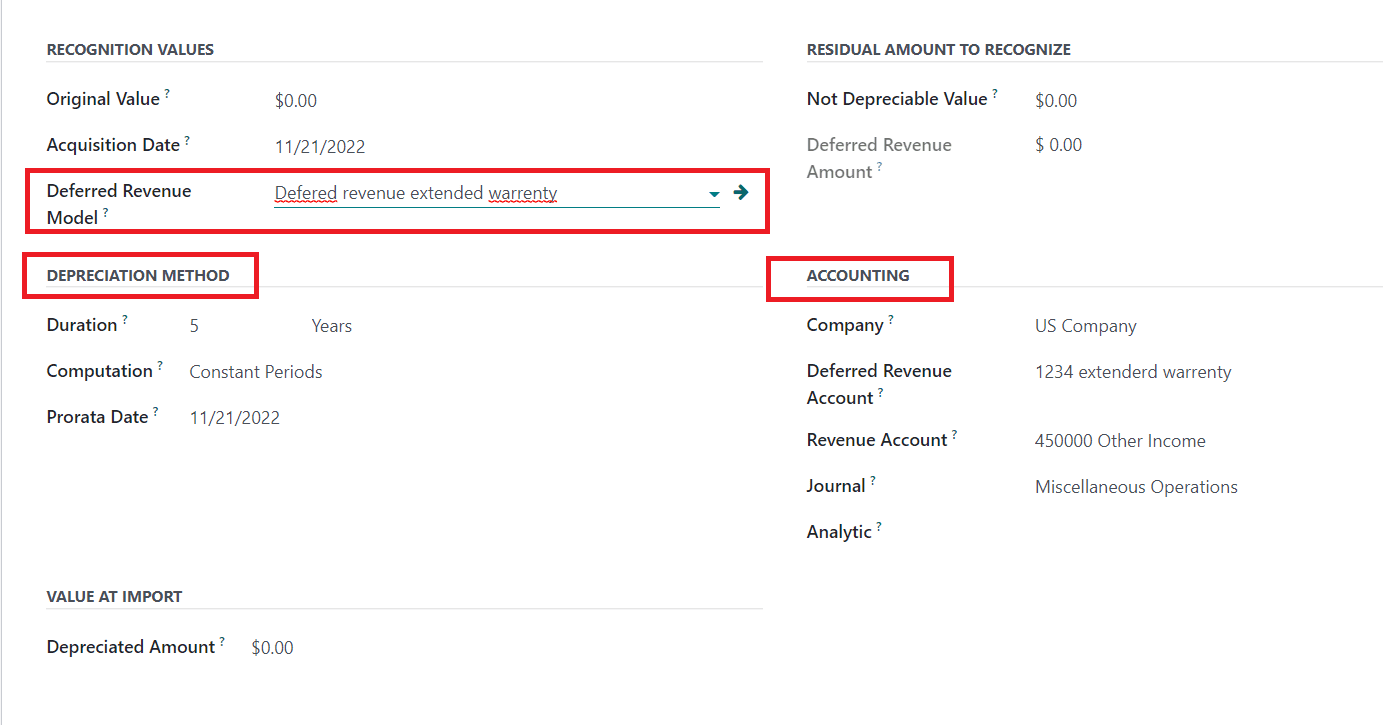
Once you select a suitable model of the deferred revenue, the Depreciation Method and Accounting sections will be automatically completed based on the details mentioned in the selected model. In the Residual Amount to Recognize section, you can mention the Not Depreciable Value which indicates the amount you plan to have that you can not depreciate. The Deferred Revenue Amount shows the sum of the depreciable value, the salvage value, and the book value of all value increase items. In case of an import from another software, you might need to use the Depreciated Amount field to have the right depreciation table report.
The sales details related to this deferred revenue can be mentioned in the Related Sales tab using the Add a Line button.
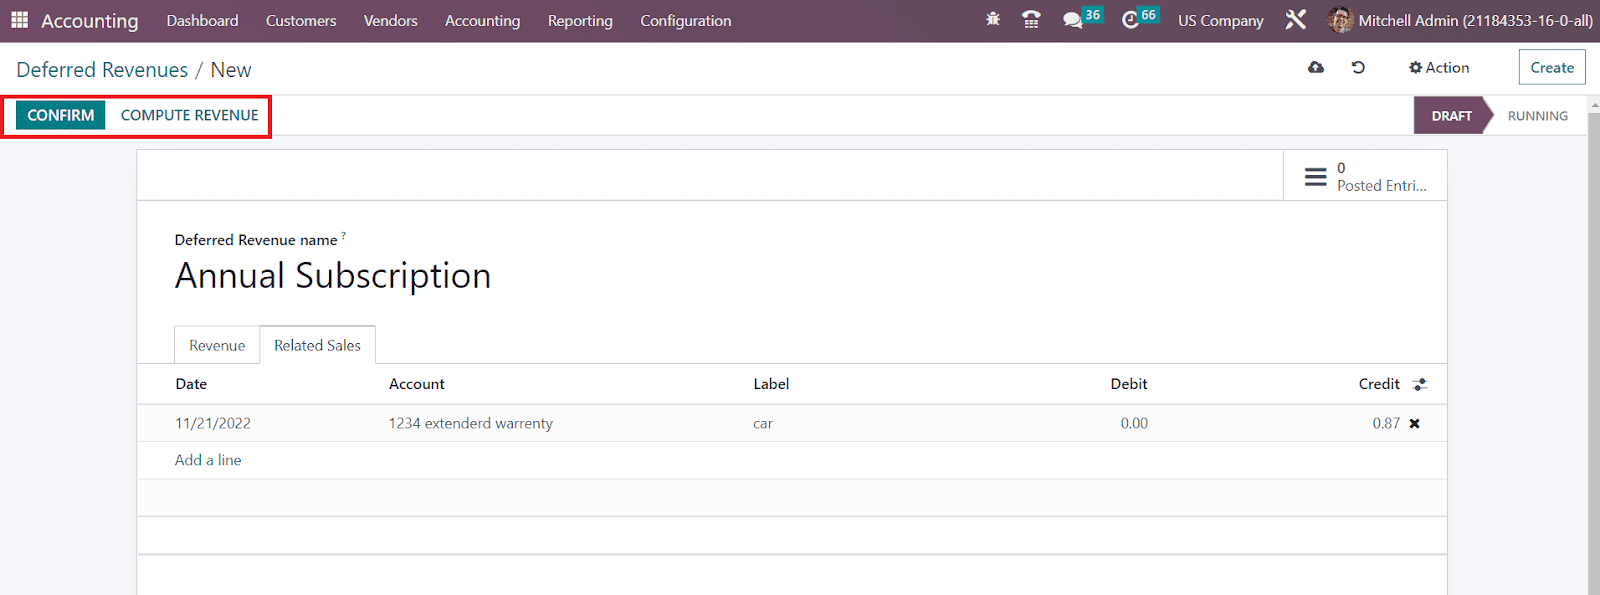
After adding journal items related to sales in the corresponding tab, you can click on the Compute Revenue button in order to get a Revenue Board as shown in the image below.
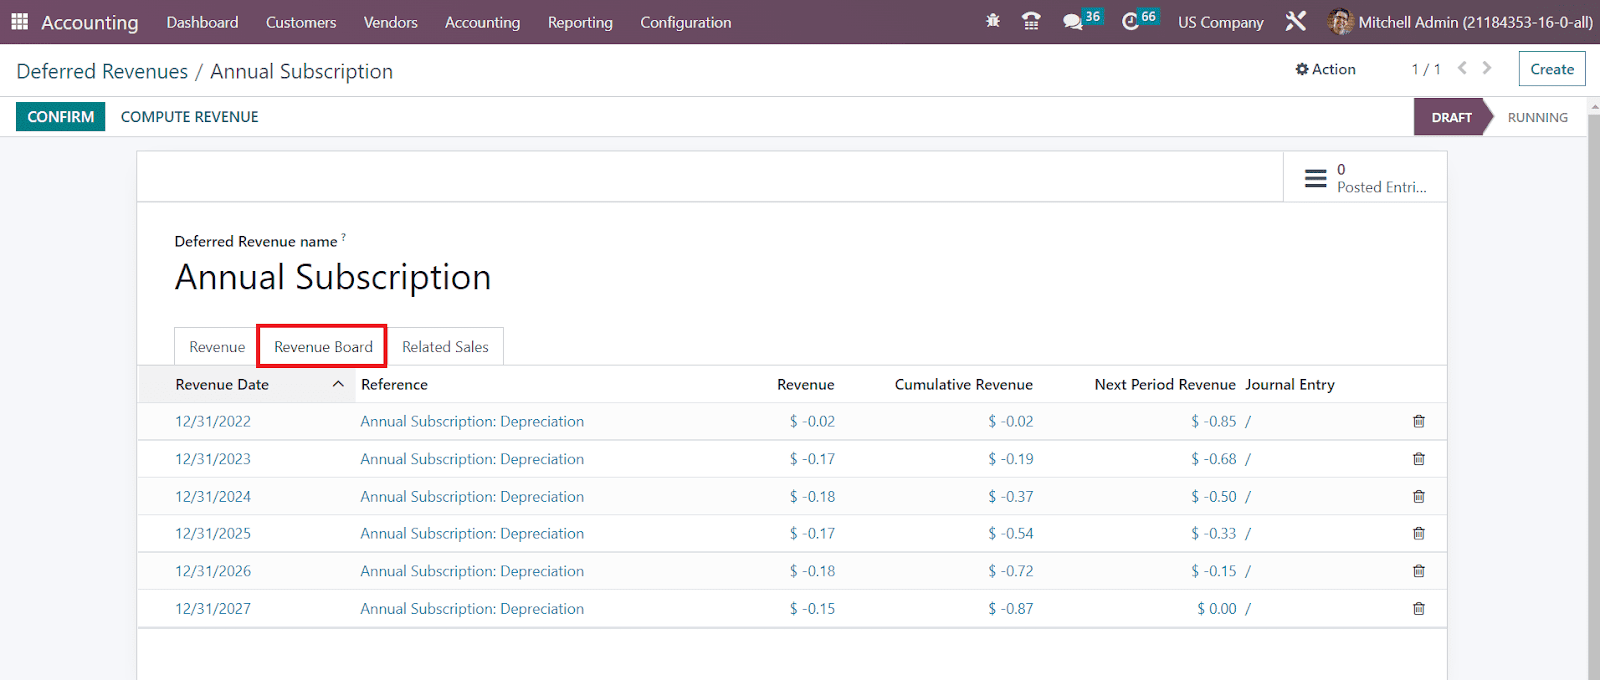
This tab will show the details of the Revenue Date, Reference, Revenue, Cumulative Revenue, Next Period Revenue, and Journal Entry. Now, click on the Confirm button to confirm the new deferred revenue and change the status from ‘Draft’ to ‘Running’.
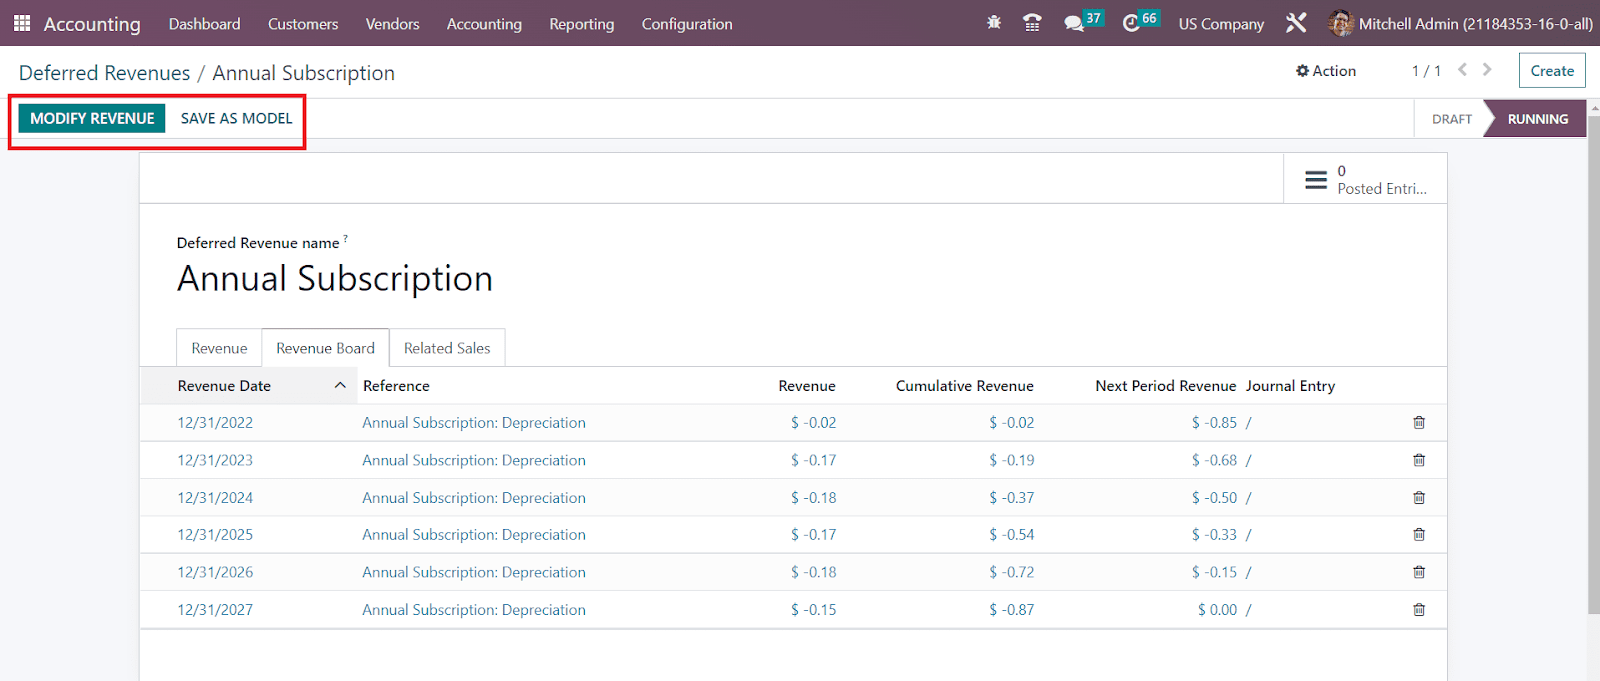
Just like we discussed in the section Assets in this chapter, the revenue can be modified using the Modify Revenue button and save as a new deferred revenue model using the Save as Model button.
Deferred Expenses
Deferred expenses are the prepayments that have already been paid before consuming or receiving the products or services. These costs are considered as long-term assets for the company. In the OTX Accounting module, you can create records of such deferred expenses. Just like we discussed in the previous section, the configuration of deferred expense and its model are similar to that of deferred revenue and its model.
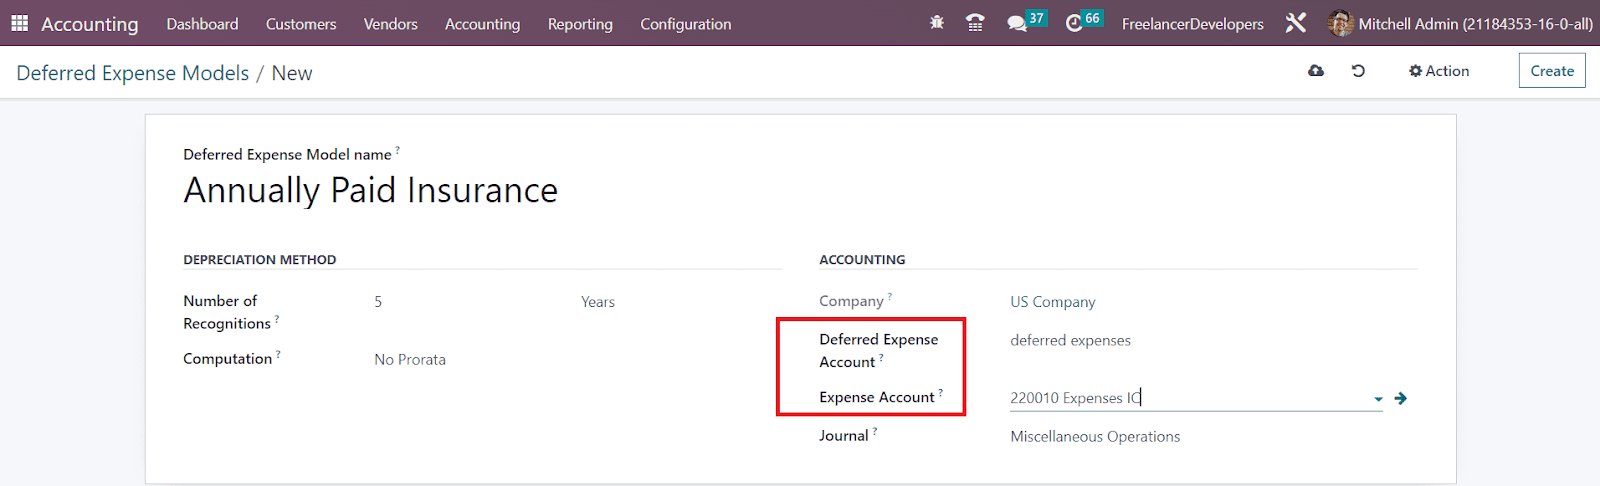
The option to configure the Deferred Expense Model can be obtained from the Configuration menu of the module.

While configuring the model, you are requested to mention the Deferred Expense Account and Expense Account in the respective fields. Now using this model, you can create a record of new Deferred Expenses from the Accounting menu.

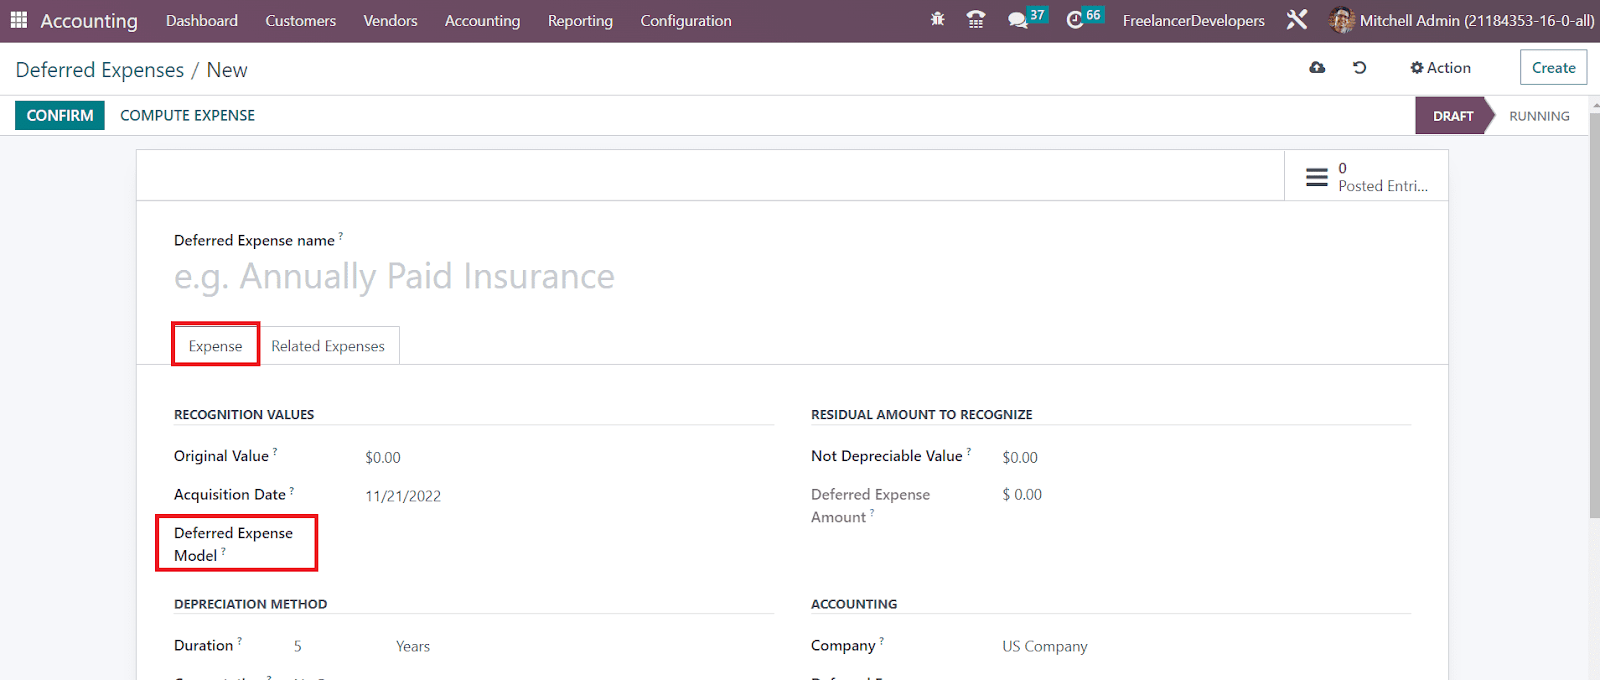
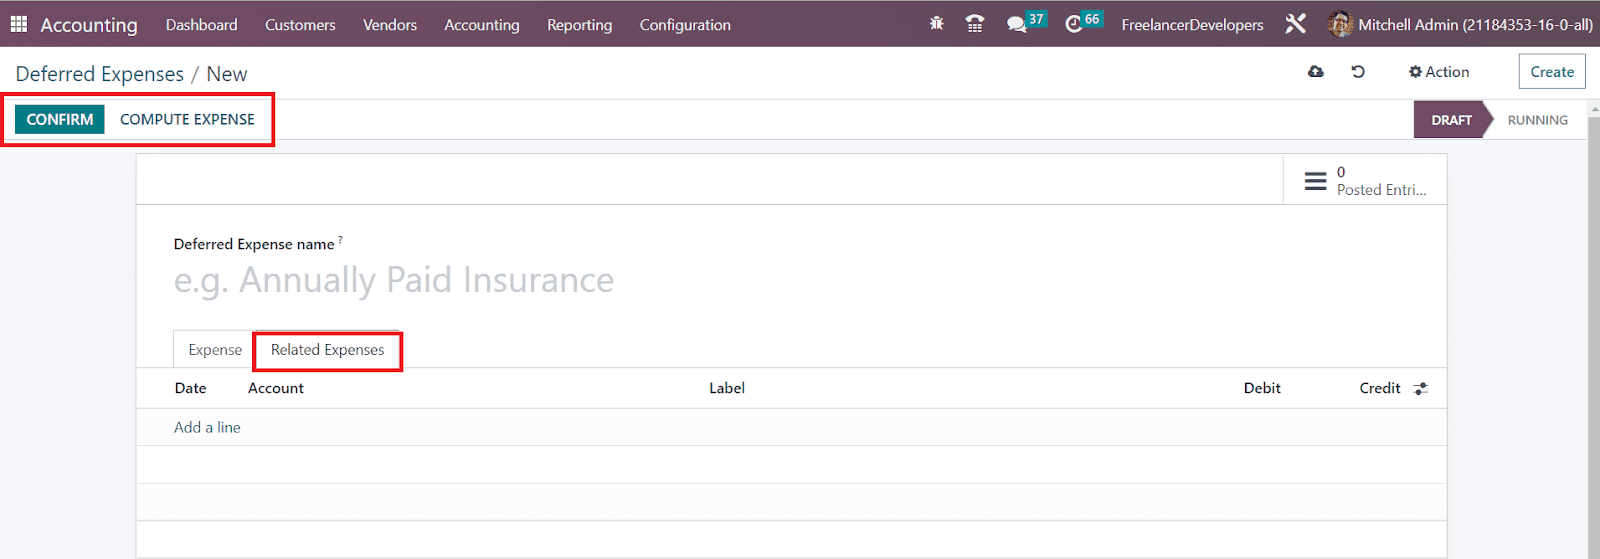
Here, you can mention the model that we created earlier in the Deferred Expense Model field. Under the Related Expenses tab, you can add journal items of the bill recorded in the selected deferred expenses account.

Just like we did earlier, the Confirm button can be used to confirm the deferred expense, and Compute Expense button to compute the deferred expense.
Deferred Expenses
Deferred expenses are the prepayments that have already been paid before consuming or receiving the products or services. These costs are considered as long-term assets for the company. In the OTX Accounting module, you can create records of such deferred expenses. Just like we discussed in the previous section, the configuration of deferred expense and its model are similar to that of deferred revenue and its model.
The option to configure the Deferred Expense Model can be obtained from the Configuration menu of the module.
While configuring the model, you are requested to mention the Deferred Expense Account and Expense Account in the respective fields. Now using this model, you can create a record of new Deferred Expenses from the Accounting menu.
Here, you can mention the model that we created earlier in the Deferred Expense Model field. Under the Related Expenses tab, you can add journal items of the bill recorded in the selected deferred expenses account.
Just like we did earlier, the Confirm button can be used to confirm the deferred expense, and Compute Expense button to compute the deferred expense.
Reconciliation
Bank reconciliation is essential to check if there is any difference in the accounts used for business transactions by comparing them. If any variances are detected, you can immediately correct them by taking remedial actions. It will be difficult to match bank records with account statements manually. In business, cash transactions are recorded in cash accounts and it is important to sync with the bank accounts. To ensure this, it is needed to confirm that the bank account matches the cash account. Performing all these operations manually will be difficult and consume lots of time and effort. You can rely on the OTX Accounting module in order to simplify the reconciliation process.
You can easily perform reconciliation operations from the Accounting Dashboard itself.

Here, you will get the list of statements that need to be reconciled in the Reconcile button as shown above.

You can observe the bank statement reconciliation in this window. On the left side of the screen, the statements can be seen as arranged based on the accounting date. You can see the ‘Matched’ label on the statements which indicate that the statements are already matched with bank accounts. The statements which need to be checked and reconciled will be labeled as ‘To Check’.
In order to make the reconciliation process easier, you can configure a suitable reconciliation model first. This can be done from the Reconciliation Models option available under the Configuration menu.

The already available reconciliation models can be seen in this window with the details of the Name, Type, and Auto-validate status. Use the Create button to get a new configuration window.

After mentioning the Name of the reconciliation model, you can select the type from the given options. The remaining configuration options will change according to the type you select.
Button to generate counterpart entry
In the case of the Button to generate counterpart entry option as the model type, you will get the Journal Availability field, where you can add a journal as Cash or Bank. The reconciliation model will only be available from the selected journals.

Under the Counterpart Entries tab, you are allowed to specify the Account, Amount Type, Amount, Analytic, and Journal Item Label. The Account Type can be Fixed, Percentage of Balance, Percentage of Statement Line, or From Labels. Once the configuration is completed the Button to generate counterpart entry model for reconciliation is ready to use.
Rule to suggest counterpart entry
In the case of the Rule to suggest counterpart entry, the available configuration options are shown in the screenshot below.

Here, you will get the Auto-Validate option to activate to validate the statement line automatically. After mentioning the Journal Availability, you can select a suitable Amount Type from the given options which are Received (only applied when receiving an amount), Paid (only applied when paying an amount), or Paid/Received (applied in both cases). By doing so, the reconciliation model will be only applied to the selected transaction type. In the Amount Condition, you can mention a specific amount and the reconciliation model will be applied when the amount is lower than, greater than, or between the specified amount. You can set rules for Label, Note, and Transaction Type as Contains, Not Contains, or Match Regex. By activating the Partner is Set field, the reconciliation model will be applied only when a customer/vendor is set. By activating this option, you will be able to get additional fields to mention the Matching Partners and Matching Categories. Add Counterpart Entries in the given space using the Add a Line button.

Under the Partner Mapping tab, you can add Find Text in Label, Find Text in Notes, and Partner using the Add a Line button.
Rule to match invoice/bills
The configuration window of the reconciliation model type Rule to match invoice/bills is shown below. In order to validate the statement line automatically, you can enable the Auto-Validate field. In the Search Months Limit, you can set a number of months in the past to consider entries from when applying this model.

The Matching Order can be set as Oldest First or Newest First. Under the Bank Transactions Conditions tab, you can find similar options as that we discussed earlier. Additionally, you will get the Payment Tolerance to activate to accept differences in case of underpayment. The Same Currency field can be activated to restrict propositions having the same currency as the statement line. In the Match Invoice/Bill with field, you can activate the Label, Note, or Reference to match the invoice/bill. The configuration can be completed by configuring the Partner Mapping in the respective tab.
In order to get the list of all statements to be reconciled, you can go to the Reconciliation option available in the Accounting menu.

Here, you can use the Reconcile button to perform the reconciliation of statements with bank accounts.
From the Accounting Dashboard of the module, you can easily import bank statements to your system, which can be used for the reconciliation process later. You can import your bank statements in CSV, OFX, QIF, and CAMT based on the option you activate from the Settings menu of the Accounting module.

The corresponding options can be found in the Bank & Cash tab as shown in the image above.

Once you activate this feature, you will be able to get a button to import bank statements from the Accounting Dashboard.
Lock Dates
Locking the accounting period is necessary to avoid the chances of posting accounting entries into the previous period. In the OTX Accounting module, you can easily set accounting closing dates from the Accounting menu. In this menu, you will get the Lock Dates option which directs you to a pop-up window as shown below.
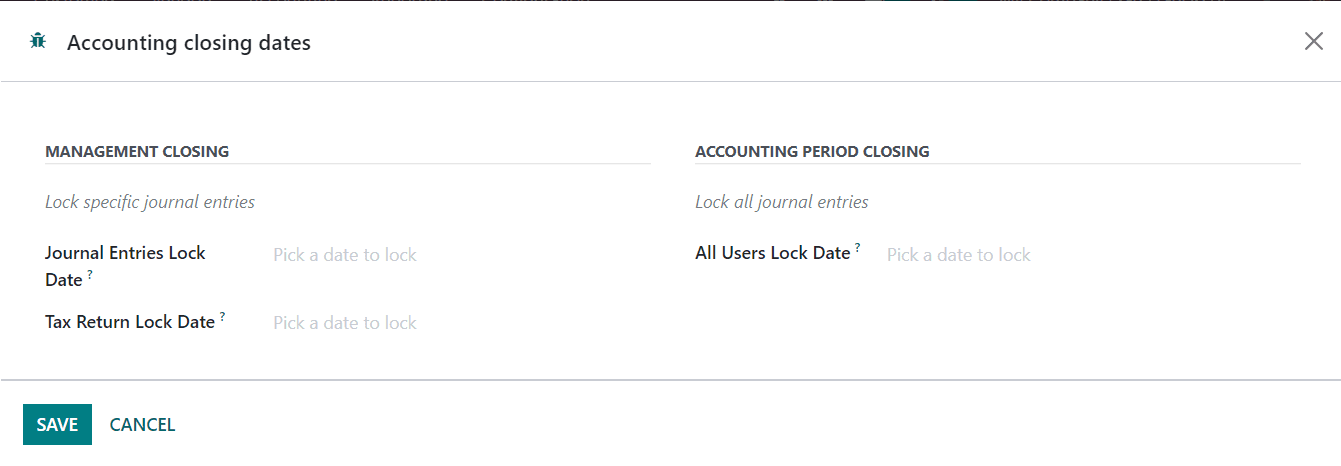
Under the Management Closing tab, you can lock specific journal entries by mentioning the Journal Entries Lock Date in the respective field. By doing so, OTX will prevent journal entries creation prior to the defined date except for account users. You can pick a date to lock in the Tax Return Lock Date to prevent Tax Returns modifications prior to the defined date (journal entries involving taxes). The Tax Return Lock Date is automatically set when the corresponding journal entry is posted. It is possible to lock all journal entries from the Accounting Period Closing tab. Pick a date in the All Users Lock Date field that will prevent journal entry creation or modification prior to the defined date for all users. As a closed period, all accounting operations are prohibited once you set a lock date.
Payment Terms
Payment Terms
Each business organization has its own payment-making and payment-collection meth OTX s and strategies. According to your company policies, you can make different payment terms and use them while creating customer bills and vendor bills. The payment terms will define the conditions under which a payment is completed. Using payment terms on sales orders, customer invoices, vendor bills, and contracts will help you to get the due dates automatically. This feature is especially useful for installment payments.
In the Configuration menu of the Accounting m OTX ule, you can find the Payment Terms option under the Invoicing tab. As shown in the screenshot below, you will get the list of already configured payment terms here with the details of their name and Company.

Configuration of new payment terms can be easily performed by using the Create button.

In the corresponding fields, you can specify the name of the Payment Terms and Company. You can provide a payment term explanation for customers by adding a small description in the Description on the Invoice field. The payment deadlines and respective due amounts will be detailed on the invoices by enabling the Display Terms on Invoice feature.
You can define the terms related to the payment under the Terms tab using the Add a Line button. Select the kind of valuation related to this payment terms line in the Due Type field. It can be a Balance, Percent, or Fixed Amount. The last line’s computation type should be “Balance” to ensure that the whole amount will be allocated. Add the corresponding value of the due type in the Value field. After mentioning Months and Days in order to set the due date of the payment, you can switch to the end of the month after having added months or days in the End of Month field if necessary. By activating this field, you will be able to mention the number of days to add after the end of the month in the Days after End of Month field. The early payment discount granted for this line can be added in the Discount field. In the Discount Days field, mention the number of days before the early payment proposition expires.
After completing the configuration of payment terms, you can use them in the Sales & Purchase tab in the contact form while creating records of vendors or customers so that whenever you select a vendor or customer, the corresponding payment term will automatically appear on the respective purchase order or sales order.
Incoterms
Incoterms are trade terms generally used in international and domestic trade contracts. These commercial terms are accepted worldwide for defining the costs and responsibilities between the vendor and the customer. In the OTX Accounting module, you will get a dedicated platform for the management of Incoterms under the Configuration menu. As soon as you enter the platform, OTX displays the available list of Incoterms in your system as depicted in the screenshot below.
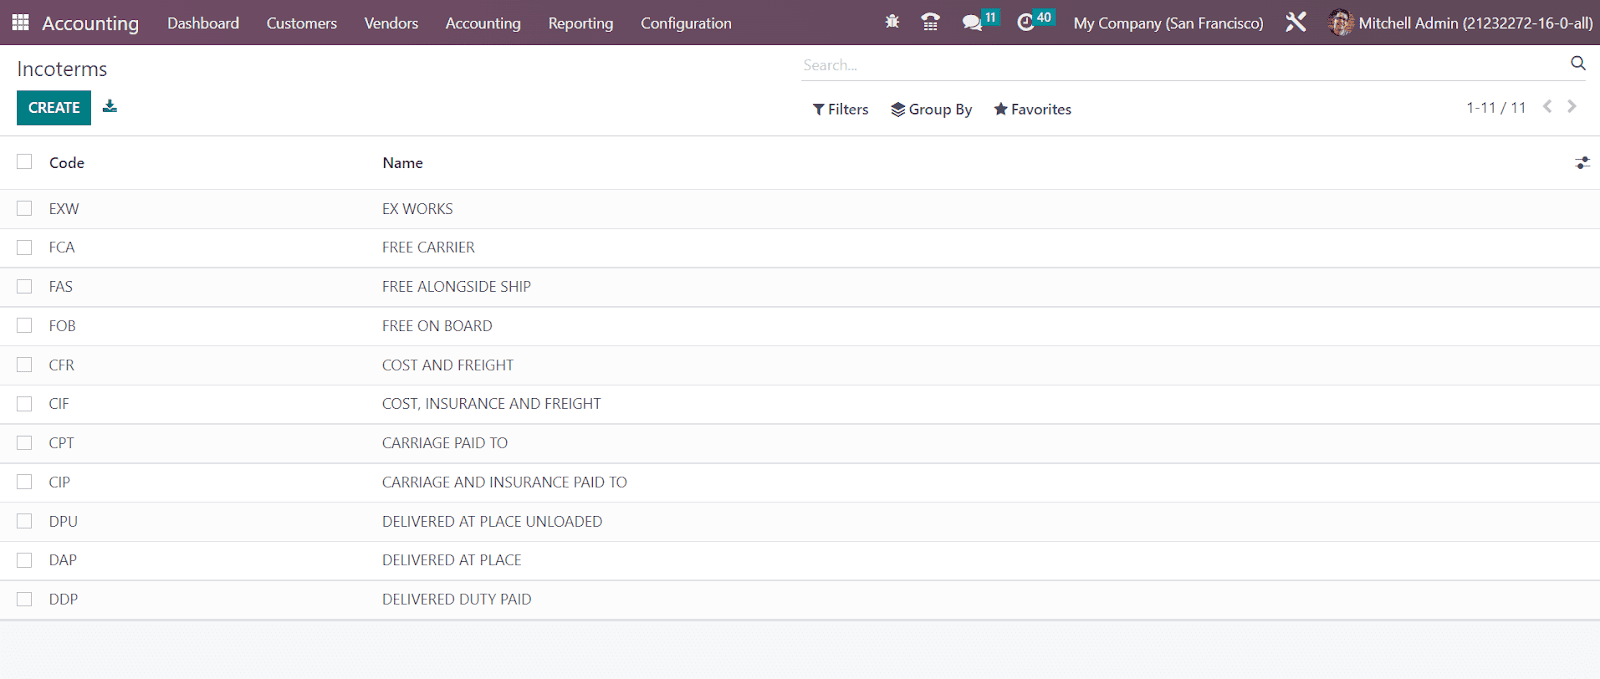
The preview of the list gives the details related to the Code and Name of each Incoterm. In order to add a new Incoterm to this list, you can click on the Create button.
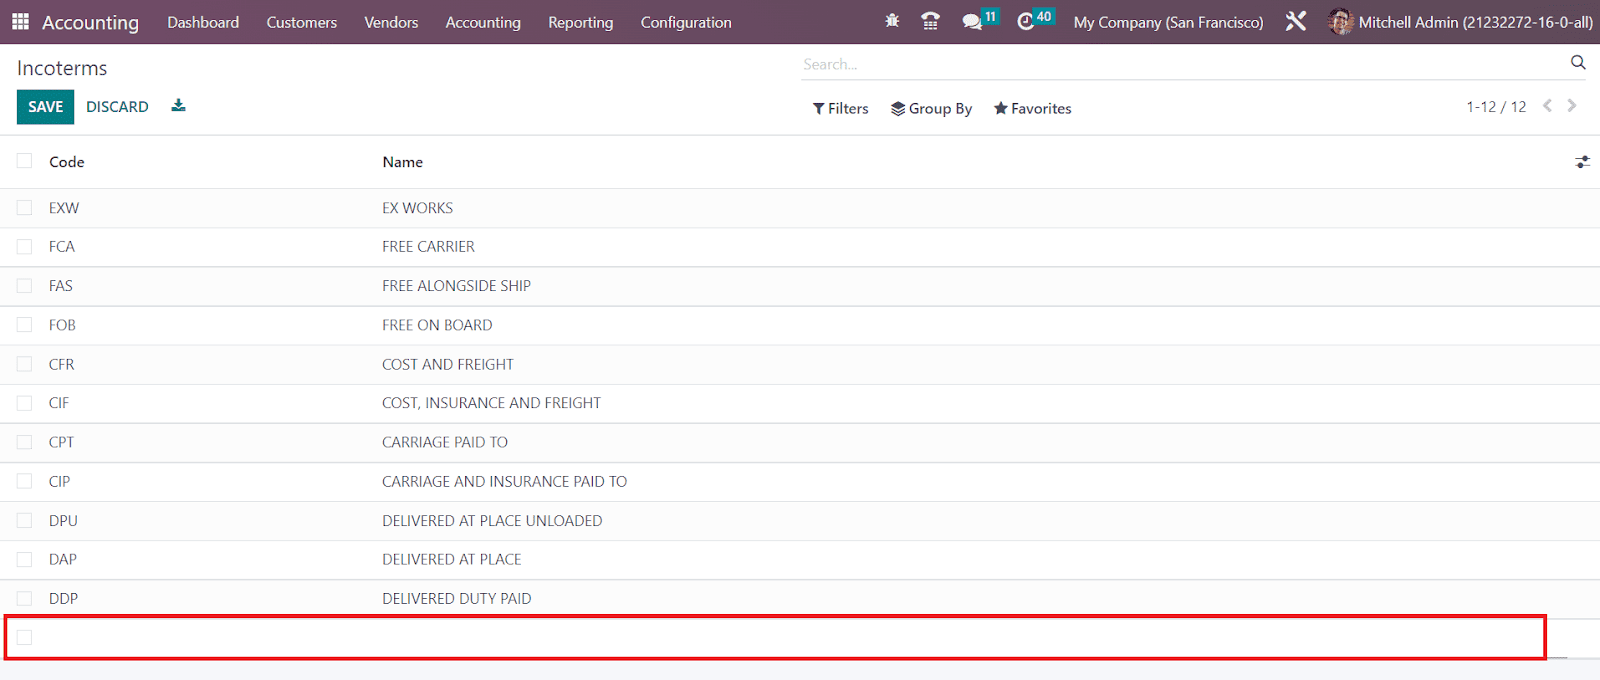
Once you click on the Create button, a new line will appear under the available list to add the Code and Name of the new Incoterm. You can use these incoterms while creating orders and invoices in OTX .
Chart of Accounts
The list of all accounts used for recording the financial transactions in the general ledger of a business organization can be found in the Chart of Accounts. This list of accounts will keep a track of all financial dealings done in a company. From the Configuration menu of the Accounting module, you will get access to the Chart of Accounts platform. Based on your requirements, you can manage the existing accounts as well as create a new one without any difficulties.

The preview of the list view of the Chart of Accounts is shown above. It includes the Code, Account Name, Type, Allow Reconciliation, Account Currency, and Company details. The account type mentioned in the Type field is used for information purposes, to generate country-specific legal reports, and set the rules to close a fiscal year and generate opening entries. By activating the Allow Reconciliation field, the account allows invoices and payments matching of journal items.
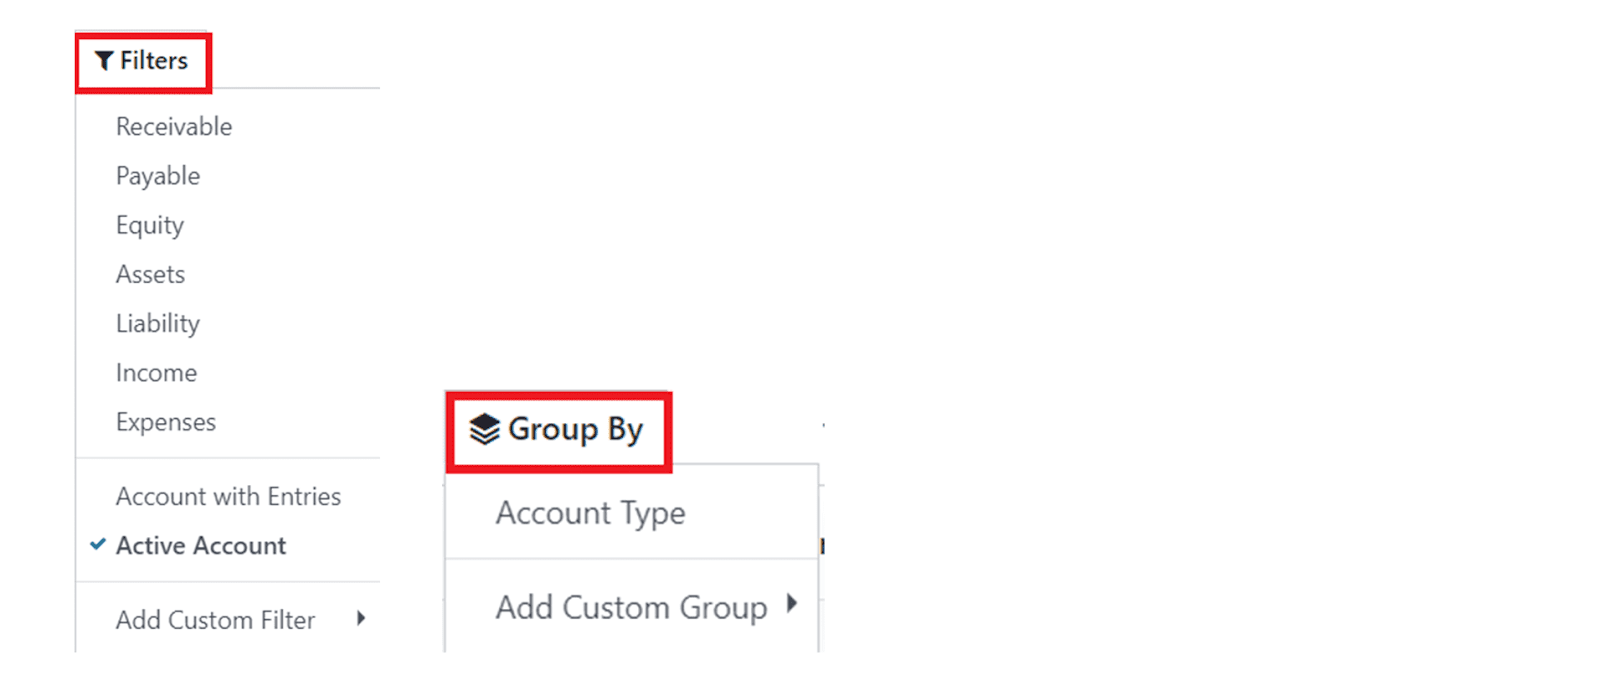
The available default filters are Receivable, Payable, Equity, Assets, Liability, Income, Expenses, Account with Entries, and Active Accounts. You can use them to filter the list of charts of accounts. Customized filters can be easily created using the Add Custom Filter option. Based on Account Type, you can group the accounts. For creating more customized grouping options, use the Add Custom Group option.
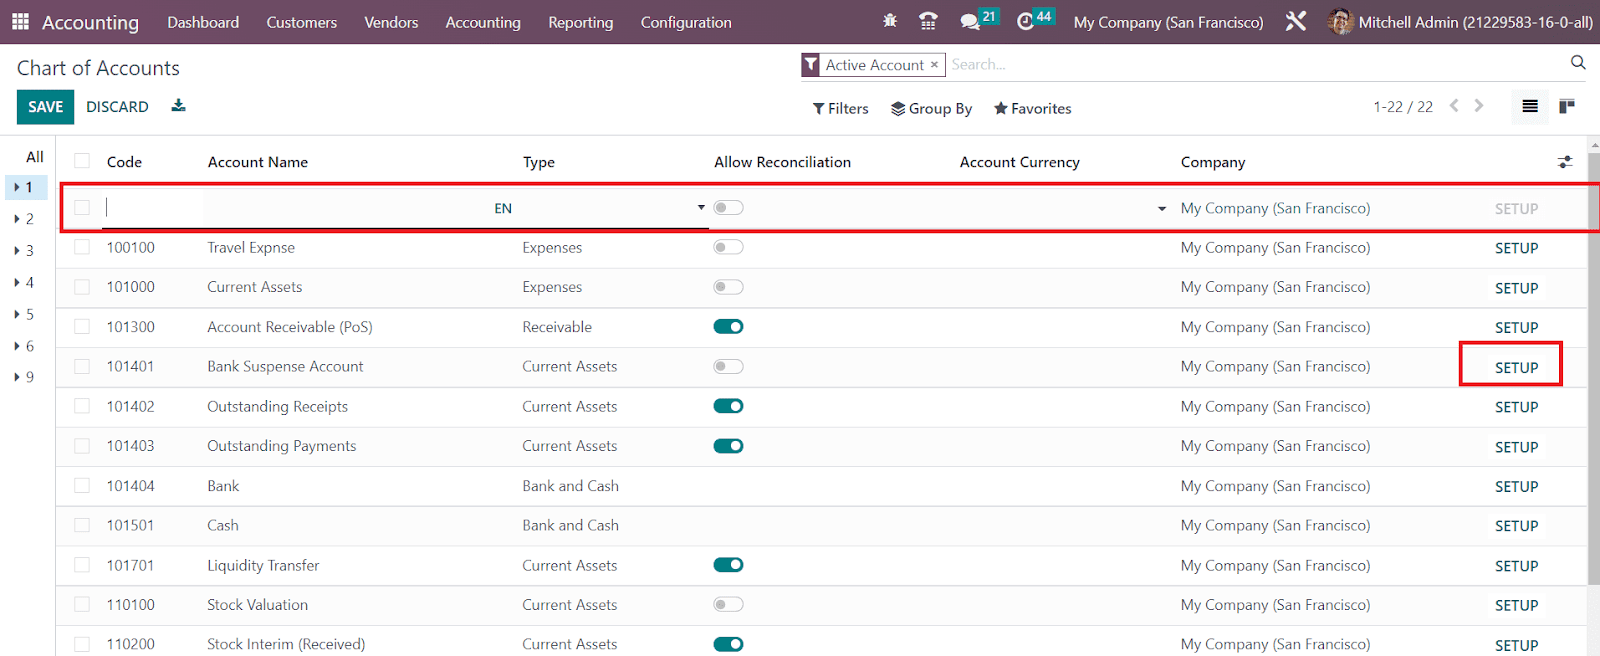
By clicking the Create button, it is possible to add a new account to this list. As shown in the image above, you will get a new line as soon as you click on the Create button to mention the details of the account. Additional changes and edits can be made on an account using the Setup button.

The Balance button will show the debit and credit balances of the account.
Default Accounts
In the Settings menu of the Accounting module, you will get a separate tab to define the default accounts used for various operations in your company.

Here, you can set default Journal, Gain Account, and Loss Account to post exchange difference entries in your accounting. Additionally, you can specify default accounts used for specified accounting operations. It includes Bank Suspense Account, Outstanding Receipts Account, Outstanding Payments Account, Internal Transfer Account, Cash Discount Gain Account, and Cash Discount Loss Account.
Taxes
Tax calculation is one of the challenging parts of accounting management which requires accuracy in operation. Even a small error in computation will put your company in danger. With the introduction of the OTX Accounting module, tax computation is just a piece of cake now. From the Configuration menu of the module, you can access the Taxes platform where you can manage sales and purchase taxes.
The available list of taxes can be filtered on the basis of Sales, Purchases, Services, Goods, Active, and Inactive. You can group them based on Company, Tax Type, and Tax Scope. The user will get customizable options in the Filters and Group By options. Now, click on the Create button to configure a new tax.

Give a name to the new tax in the Tax Name field. You can select the Tax Type as Sales or Purchases. It determines where the tax is selectable. ‘None’ means the tax can’t be used by itself, however, it can still be used in a group. You can restrict the use of taxes to a type of product by selecting the suitable option in the Tax Scope field. You can set the tax as Active to false to hide the tax without removing it. In the Tax Computation field, you will get the Group of Taxes, Fixed, Percentage of Price, Percentage of Price Tax Included, and Python Code options to select which will determine the tax computation method.
In the case of the Group of Taxes, the tax is a set of sub-taxes and the final tax is computed by calculating the sub-taxes.
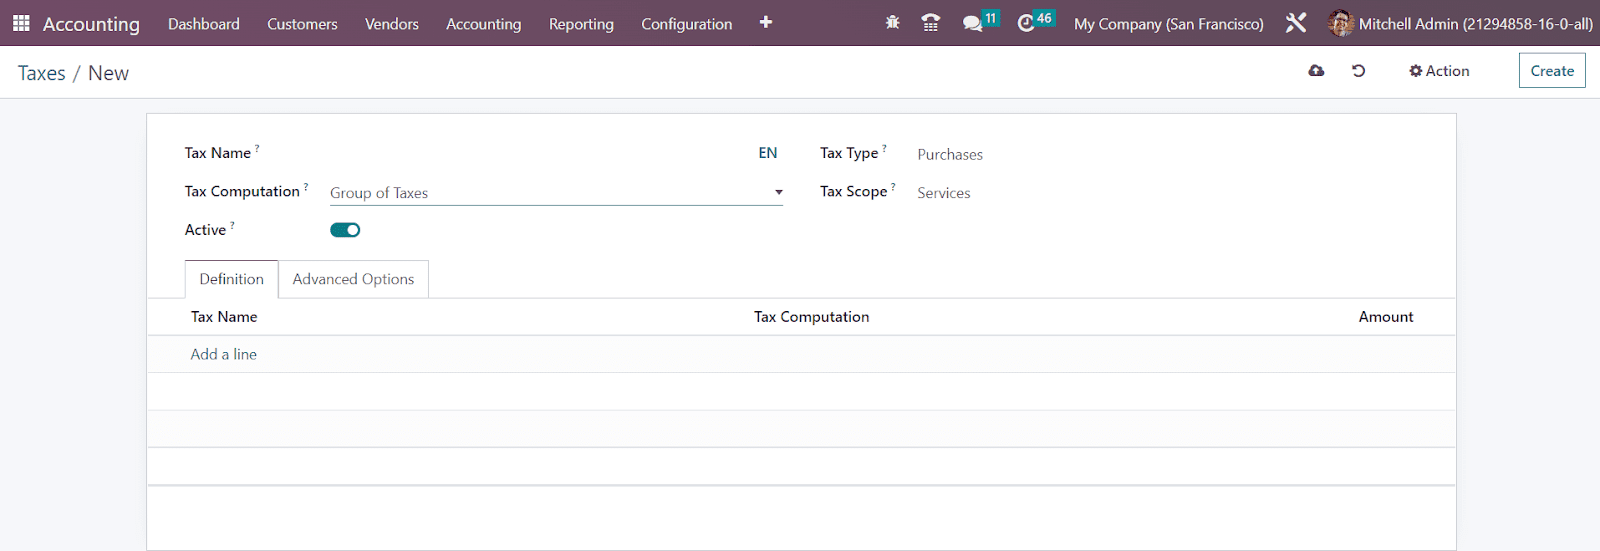
You can add the sub-taxes under the Definition tab one by one using the Add a Line button.

Under the Advanced Options tab, you will get the Company and Country details.
By selecting Tax Computation as Fixed, the tax amount stays the same, whatever the price. The tax amount can be set as a particular percentage of the actual price by selecting the Percentage of Price as the tax computation method. The tax amount will be a division of the actual price in the Percentage of Price Tax Included method. The tax can be also calculated using python code with the help of the Python Code option. The configuration options for all these methods are the same.
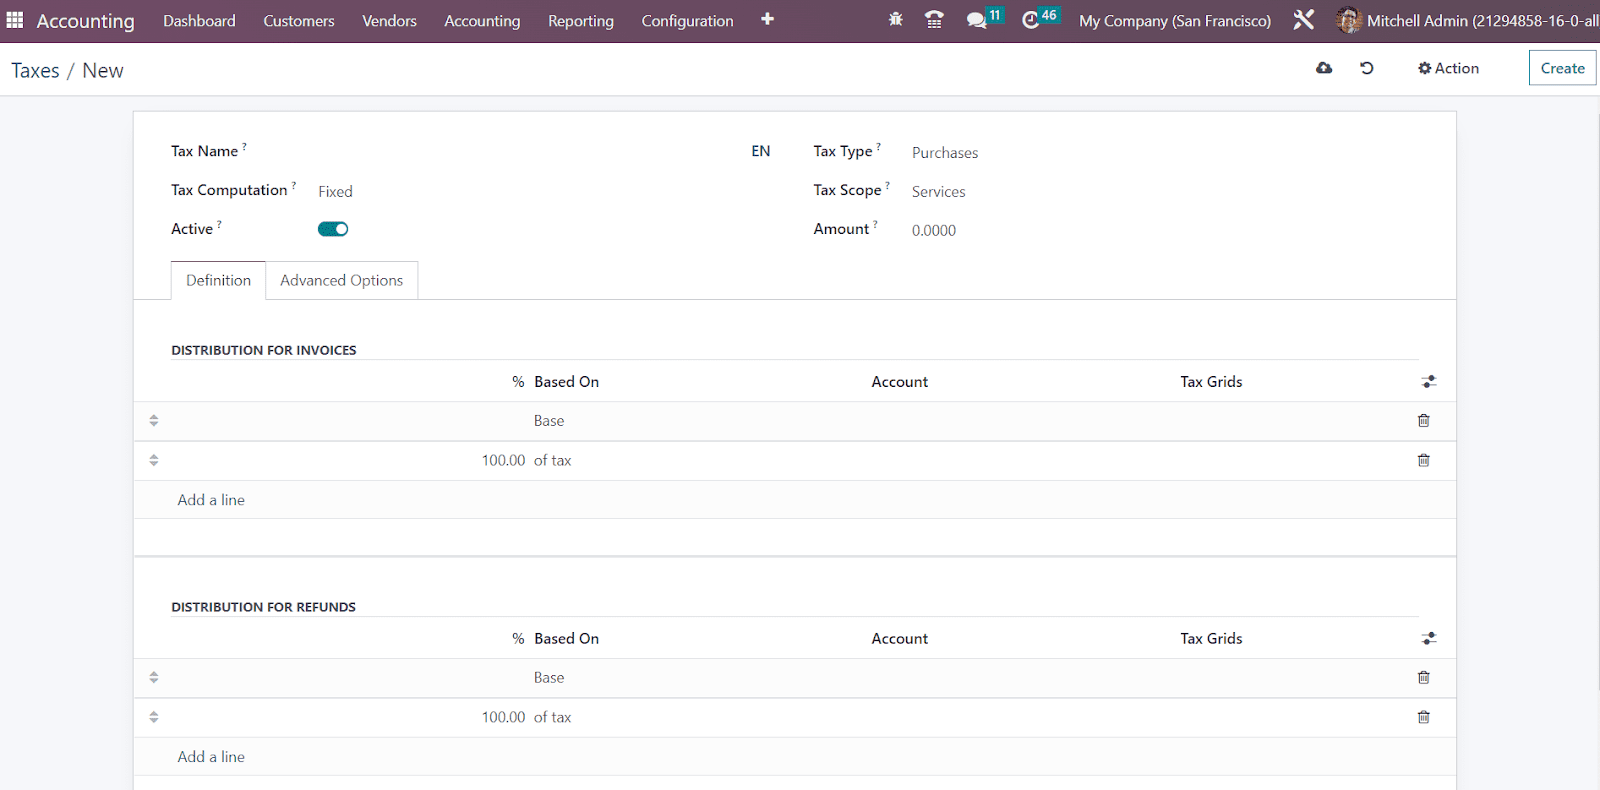
Under the Definition tab, you can define the distribution for invoices and refunds separately by mentioning the base on which the factor will be applied, account on which to post the tax amount, and tax grids using the Add a Line button.
In the Advanced Options tab, you can mention the Label on Invoice to add them on invoices. The suitable Tax Group can be selected from the given options.

By activating the Include in Analytic Cost option, the amount computed by this tax will be assigned to the same analytic account as the invoice line. The Company and Country (for which this tax is applicable) details can be seen in the respective fields. Enable the Included in Price field if the price you use on the product and invoices includes this tax. Taxes with a higher sequence than this one will be affected by it by activating the Affect Base of Subsequent Taxes feature. Taxes with a lower sequence might affect this one by enabling the Base Affected by Previous Taxes. In the Tax Exigibility field, you will get two options to select from such as Based on Invoice and Based on Payment. The tax is due as soon as the invoice is validated by selecting the Based on the Invoice option. In the case of Based on Payment, the tax is due as soon as the payment of the invoice is received. This feature will be only available after activating the Cash Basis from the Settings menu of the Accounting module.
The Cash Basis feature can be activated to allow the configuration of taxes using cash basis. You can activate this feature if the taxes should use cash basis, which will create an entry for such taxes on a given account during reconciliation.

You can mention the Tax Cash Basis Journal and Base Tax Received Account details in the corresponding fields.
Based on your company operations, you can use these taxes on products, services, vendors, companies, and accounts. You can observe the available list of Tax Groups in OTX from the Configuration menu of the Accounting module as shown below.

The list view gives the details of the Name, Country, Tax Payable Account, Tax Received Account, and Tax Advance Account.
Tax Unit is used to group tax report declaration which is available under the Configuration menu of the Accounting module. The new Tax Units configuration window will be displayed as shown below.

After adding a title to the tax unit, you can mention the Country in which this tax unit is used to group your company’s tax report declaration. In the given fields, you can specify the Companies and Main Company (the one actually reporting and paying the taxes). The identifier to be used when submitting a report for this unit can be added in the Tax ID field.
Default Taxes
Default Taxes can be configured in OTX which will be automatically selected when there are no other taxes specifically mentioned in financial operations. These taxes will be automatically applied on new products while configuring them. You can later change it from the product form. This will be also used in local translation if there are no other taxes available to use.
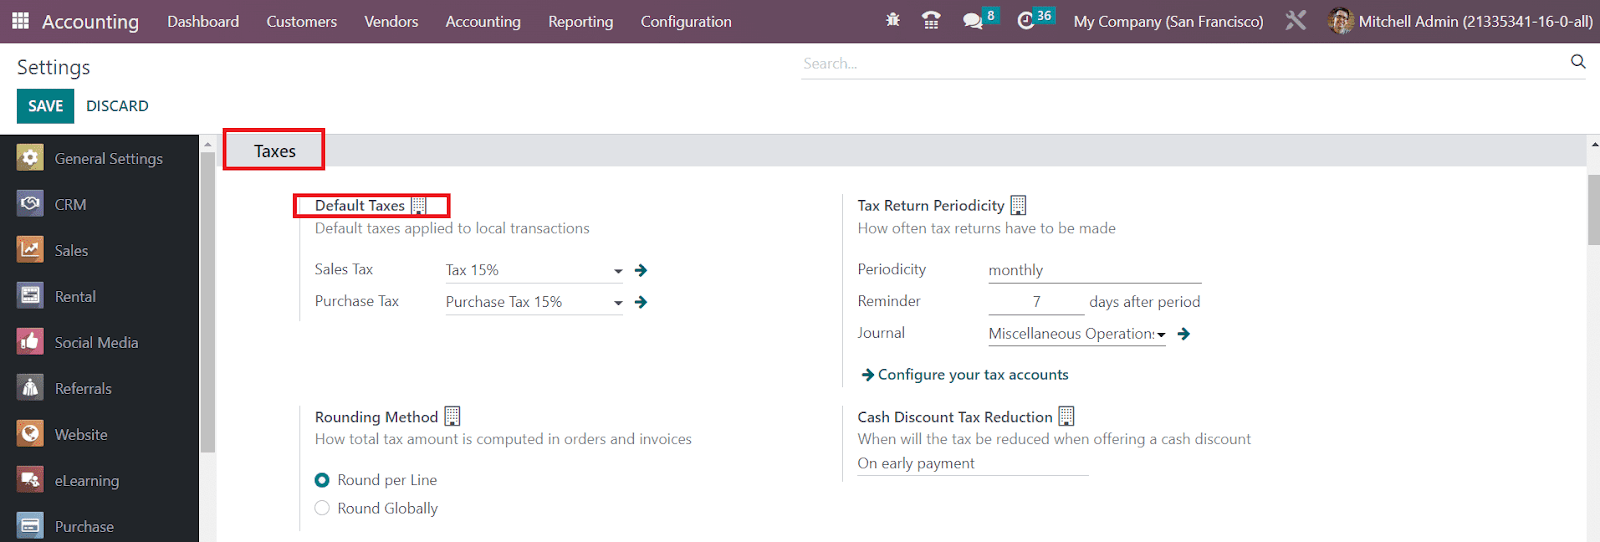
As shown in the image above, you can set Default Taxes for sales and purchases from the Settings menu of the Accounting module. Using the internal link available in the default taxes field, you can make adjustments to the sales and purchase taxes. The Tax Return Periodicity field defines how often tax returns have to be made. Here, you can mention the Periodicity, Reminder, and Journal to record the tax returns in the respective fields.
The Rounding Method section can be used to define how the total tax amount is calculated in orders and invoices. Here you will get two methods to select which can be either Round per Line or Round Globally. A rounding per line is advised to use if your prices are tax-included. That way, the sum of line subtotals equals the total with taxes. In the Cash Discount Tax Reduction field, you can define when the tax will be reduced when offering a cash discount. It can be set as On early payment, Never, or Always (upon invoice). This is a new feature in OTX 16 Accounting module.
TaxCloud & AvaTax
By activating the TaxCloud feature from the Settings menu of the Accounting module, OTX helps you to calculate the tax rates based on U.S. Zip codes. In the available fields, you can specify the API ID, API KEY, and Default Category.
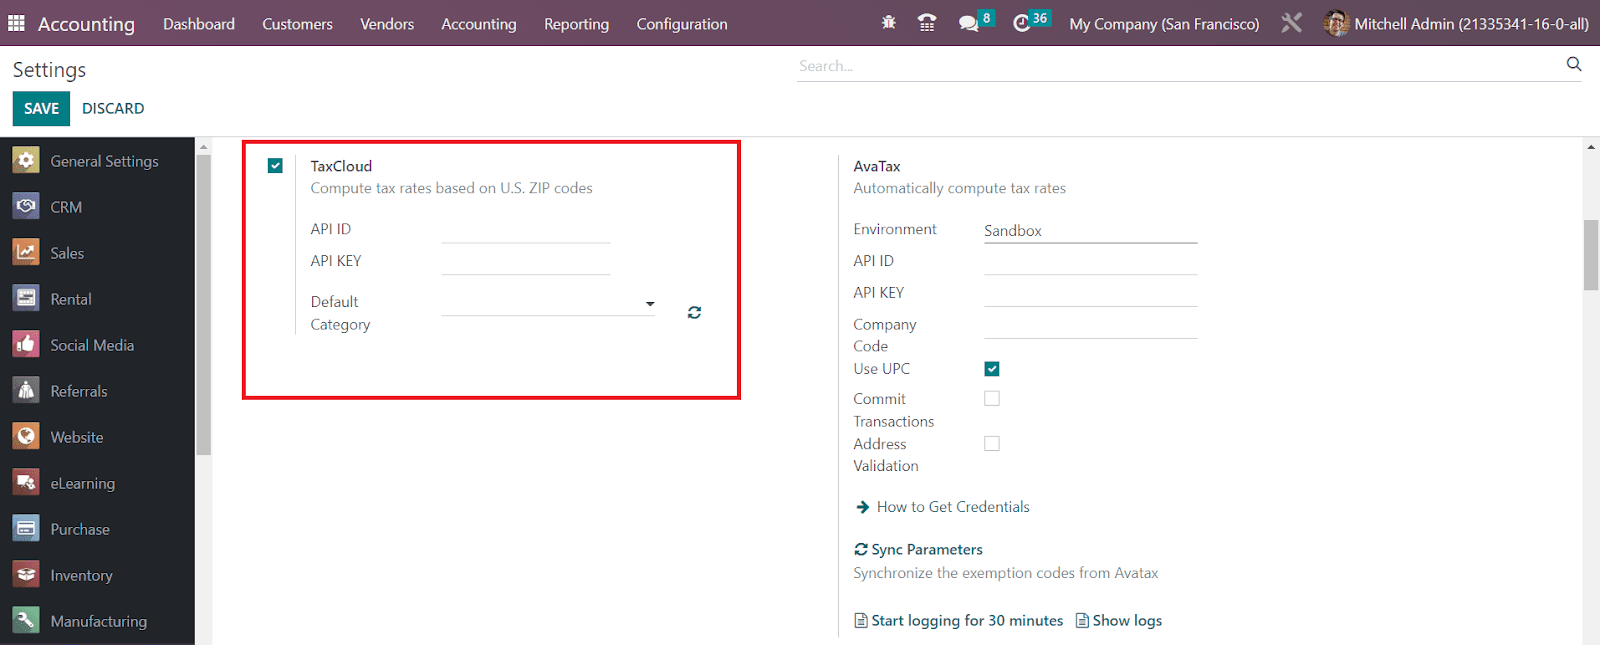
The default category will be used where there is no tax cloud set on products or product categories. It is possible to create different taxcloud categories from the Configuration menu of the module as shown below.

Under the Management tab in the Configuration menu, you can find the TaxCloud Categories. Here, you can create a new category by mentioning the TIC Description and TIC Code.
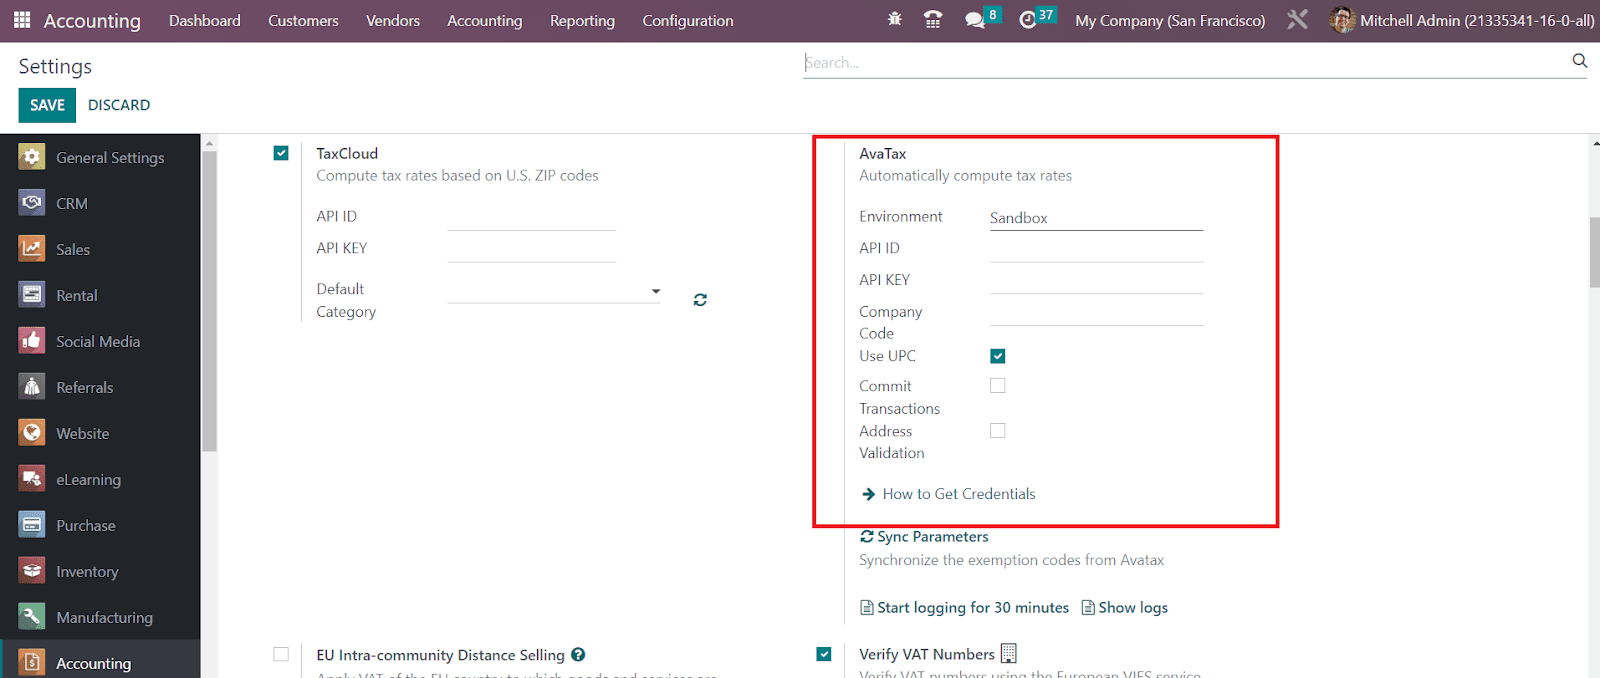
Avatax is a tax calculation provider that automatically computes the tax rates. In the respective fields, mention the Environment, API ID, API KEY, and Company Code. Activate the Use UPC, Commit Transactions, and Address Validation if necessary. After providing adequate information, you can specify avatax categories on products and products categories while configuring them. It helps to automatically compute the taxes on orders and invoices.
EU Intra-community Distance Selling
If you sell goods and services to customers in a foreign EU country, you must charge VAT based on the delivery address. For this, you can activate the EU Intra-community Distance Selling feature from the Settings menu of the Accounting module as shown below. This rule applies regardless of where you are located.
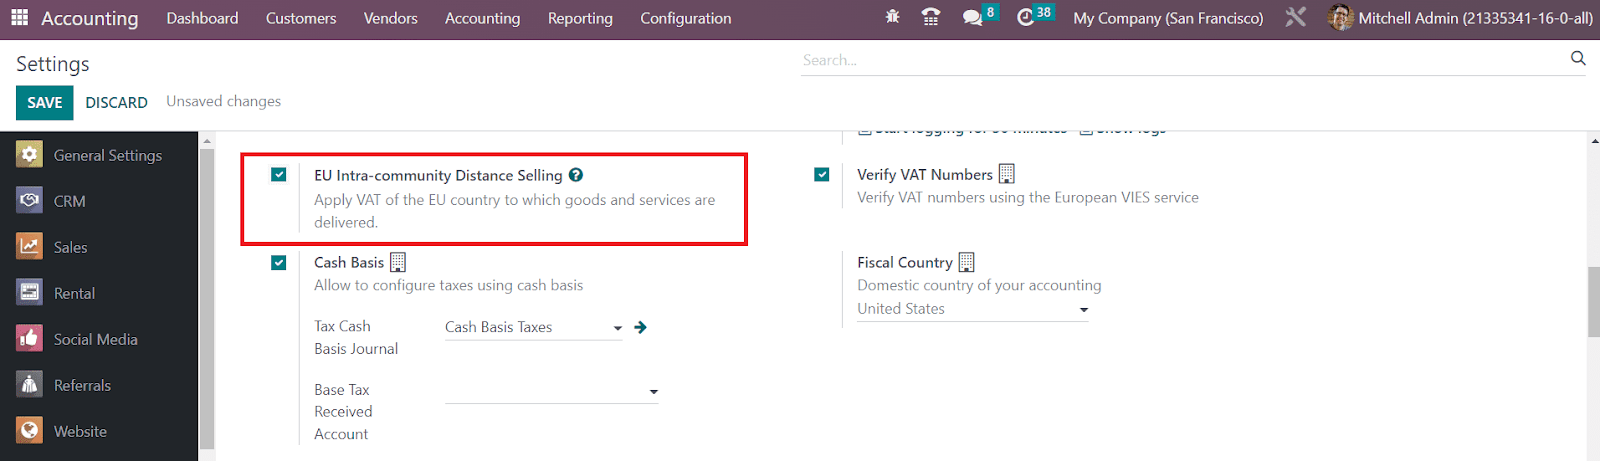
OTX will automatically create suitable taxes and fiscal positions required for each EU member state based on the country of your country.
Currencies
OTX provides multi-currency support for its users so that they can extend their businesses in international markets also. You can configure multiple currencies in your system using the Currencies option from the Configuration menu. The window displays all available currencies in your system with the details of the Symbol, Name, Last Update, Current Date, Use on eBay status, and Active status.
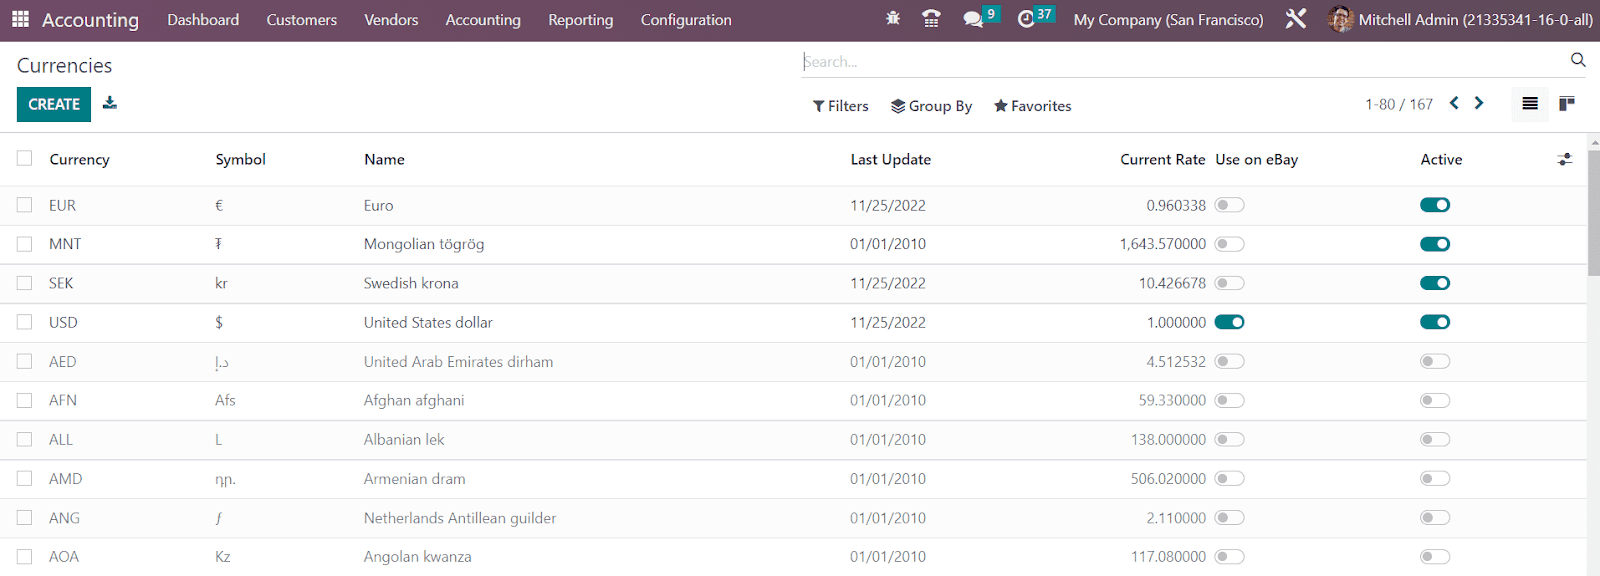
In order to configure a new currency, click on the Create button.
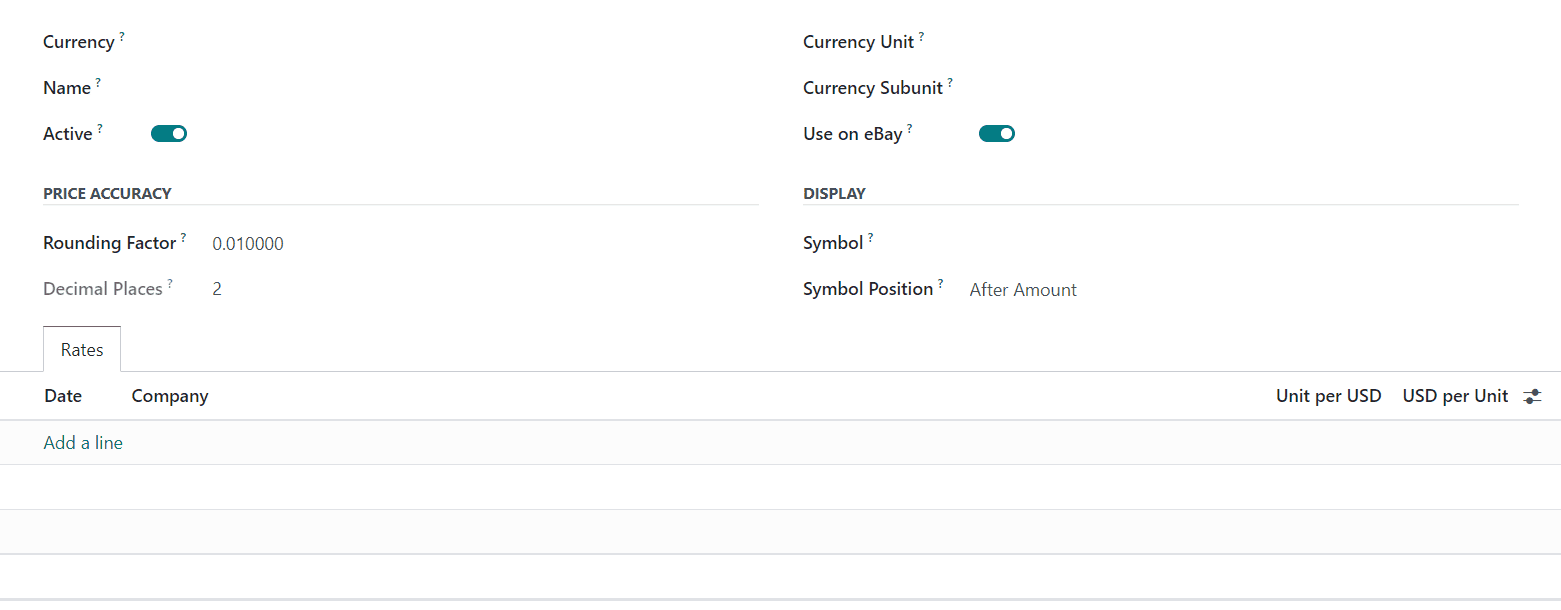
You can set a currency code in the Currency field. In the corresponding fields, you can define the Name, Currency Unit, and Currency Subunit. The currency will be ready to use by enabling the Active button. If you want to allow the usage of this currency on eBay, activate the Use on eBay feature. By mentioning the Rounding Factor in the Price Accuracy section, the amounts in this currency will be rounded off to the nearest multiple of the mentioned rounding factor. The Decimal Places will be determined by the rounding factor. It is taken into account for operations on amounts in this currency.
Under the Display section, you can specify a Symbol for the currency to use when printing amounts. The Symbol Position determines where the currency symbol should be placed. It can be either after or before the amount. The rates of the currency according to the main currency of your company can be added under the Rates tab using the Add a Line button.
In order to set the main currency for your company operations, you can go to the Settings menu. Under the Currencies tab, you will get the Main Currency field as shown below. Here, you can set the main currency for your company from the available list.

In order to update the exchange rates automatically, you can activate the Automatic Currency Rates field. Here, you are requested to mention the Service, Interval, and Next Run details in the respective fields.
Fiscal Position
The currency rates and tax computation methods will be different for different countries. Using the fiscal positions, OTX will help you to create appropriate rules to automatically adapt the taxes and accounts of a country used for business purposes. For configuring the Fiscal Position, you can go to the Configuration menu of the Accounting module and click on the Fiscal Position button. As shown in the image below, you will get the already configured fiscal positions here with the details of their name and companies.

In order to create a new one click on the Create button. You can add a name for the Fiscal Position in the given field.

The Use TaxCloud API can be activated to automatically find the tax rate of the customer by location. In the Company field, you can observe the name of your company. By activating the Detect Automatically field, OTX will automatically apply this fiscal position based on the location you select. Once you activate this option you will be able to get two additional options such as VAT Required and Country Group. By activating the VAT Required field, OTX applies for this fiscal position only if the partner has a VAT number. The fiscal position will be applied only if the delivery country matches with the group or countries mentioned in the Country Group and Country fields. The tax ID of your company in the region mapped by this fiscal position can be mentioned in the Foreign Tax ID field.
The tax that will be mapped to this fiscal position can be added in the Tax Mapping tab. Using the Add a Line button, you can mention the tax that you want to replace in the Tax on Product field. The tax that you want to apply for this fiscal position can be mentioned in the Tax to Apply field.

Under the Account Mapping tab, you can mention the account you want to replace and the account you want to use for this fiscal position in the Account on Product and Account to Use Instead fields respectively.
You can automatically compute the tax rates by activating the Use AvaTax AP option. By activating this option, you will get the AvaTax tab as shown in the screenshot below.

Here, you can specify the Avatax Invoice Account (the account that will be used by AvaTax taxes for invoices) and Avatax Refund Account (the account that will be used by AvaTax taxes for refunds). The legal mentions that have to be printed on the invoices can be specified in the Legal Notes space.
You can set your domestic country used for accounting operations in the Settings menu. As shown in the image below, you can set your Fiscal Country under the Taxes tab.

It is important to define the last day of your fiscal year so that OTX can automatically open new entries. You can set the last day of your fiscal year in the Fiscal Period tab available in the Settings tab.

If the fiscal year of your company is more than or less than 12 months, you can activate the Fiscal Years option to configure the fiscal year of your company. You can configure new fiscal years using the external link available in this section. In the Invoicing Switch Threshold field, you can set a date and the invoices up to this date will not be taken into account as accounting entries.
1099 Reports
For the purpose of reporting tax details for the services during a financial year, it is important to generate 1099 income statements for the contract employees with a payment of $600 or more who work in The United States. With the assistance of the OTX Accounting module, now a user can effortlessly submit 1099 reports electronically. Along with this, you can also export corresponding CSV files which include all information you need in the 1099 report.
In order to create 1099 reports using 1099 boxes, you can go to the Configuration menu of the Accounting module and click on the 1099 Boxes.

Using the Create button, you can create new 1099 boxes. Using the 1099 Reports button available in the Reporting menu of the Accounting menu, you can generate the CSV files of the 1099 reports.

The CSV file will encompass all the necessary information you need to e-file through a third-party service. The pop-up window by default displays all liquid journal items posted in an account under the balance sheet, Asset. You can check the details in the pop-up window and remove unwanted details. The missing details can be added to the window manually. In order to get an auto-populated list of journal items, you can specify the Start Date and End Date in the respective fields. The list includes the details of the Date, Partner, Journal, Account, Label, Debit, and Credit. By clicking on the Generate button, you will get the CSV file of the 1099 report.
Horizontal Groups
The Horizontal Group is a new feature in the OTX 16 Accounting module. Using this feature, you can add horizontal groups to your reports. It will be helpful to easily analyze company reports as per your preference. For example, you are requested to generate the company-wise Balance Sheet report for a particular year. In OTX , you can customize and create appropriate horizontal group options so that you can effortlessly examine the reports based on your requirements.
Here, you are asked to generate Balance Sheet reports based on the company. For creating a new horizontal group you can go to the Configuration menu of the Accounting module. Under the Accounting tab, you will get the Horizontal Groups option.

As shown in the image above, you will get the already configured list of Horizontal Groups here. It shows the Name and Reports of each Horizontal Group. In order to create a new one, you can click on the Create button and OTX leads you to a new configuration window as depicted below.

You can provide the name of the horizontal group in the given space. The reports to which you want to add this horizontal group can be specified in the Reports field. You can set the domain and field name of the new horizontal group using the Add a Line button.

You will get a pop-up window as soon as you click on the Add a Line button. This window can be used to create rules. Mention the Field Name and set Domain for the respective field. Clicking on the Save & Close button will add this field to the horizontal group.
Once you complete the configuration, you can go to the Reporting menu to generate the Balance Sheet report.

As highlighted in the screenshot above, you will get the Horizontal Group option in the Balance Sheet report. While clicking on this option, you can see the available horizontal groups for this report. The newly created Company Wise option can be also seen in this option.

By using the Company Wise horizontal group option, you can analyze the balance sheet report based on companies. This is how the horizontal group feature works in the OTX Accounting module.
Account Tags and Groups
For creating tags, especially for the accounting operations, you can click on the Account Tags option from the Configuration menu. As shown in the image below, the list will show the Tag Name and its Applicability.

The Create button will help you to create a new Account Tag.

In the new configuration window, mention the name of the new account tag in the Tag Name field. OTX allows you to apply this tag on Accounts, Taxes, and Products. You can specify this in the Applicability field.
In OTX , it is possible to create groups for categorizing your accounts. You will get the Account Groups option in the Configuration menu itself.

The pre-configured list of account groups shows the details of the Code Prefix Start, Code Prefix End, Name, and Company. Click the Create button to create a new account group.

In the respective fields, you can mention the Name, Code Prefix, and Company of the account group. Once the configuration is completed, the new account group is ready to use.
Payments
In the Configuration menu of the Accounting module, you will get various options to manage the payments of your company. OTX provides options for managing Payment Providers, Payment Icons, Payment Tokens, Payment Transactions, and Payment Way Codes. Let’s take a look at each of these options in detail.
Payment Providers
The Payment Providers allow your customers to pay their customer invoices using e-payment portals. Using the support of such payment providers, you can use the appropriate payment method for completing payment transactions at any time and anywhere. OTX supports multiple payment providers that benefit your company to increase the chances of getting paid on time. This will also help customers to choose a suitable payment method based on their convenience.
The list of all available payment providers can be observed in the Payment Providers platform in OTX available in the Configuration menu.
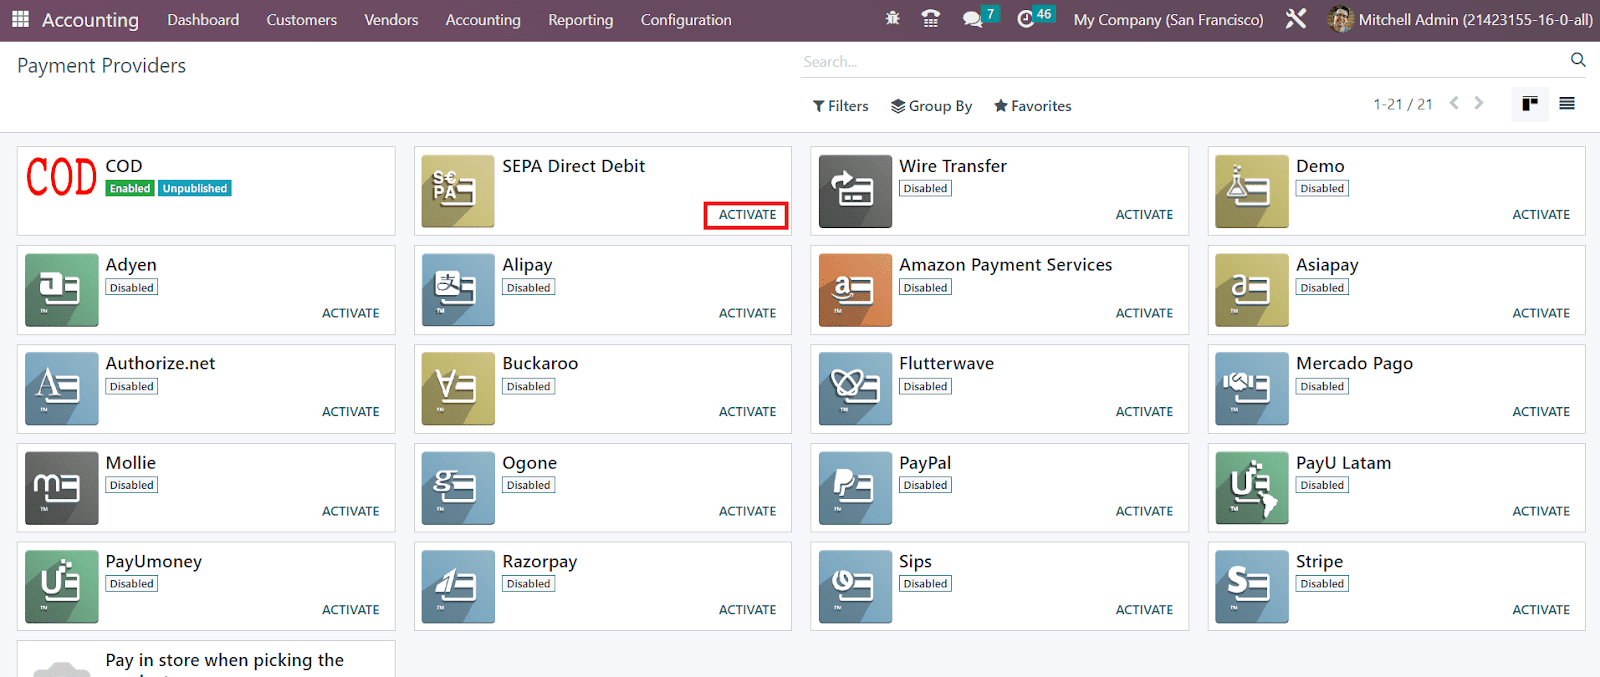
You can activate a payment provider by clicking on the Activate button. For making additional changes in the settings of a payment provider, you can click on them.
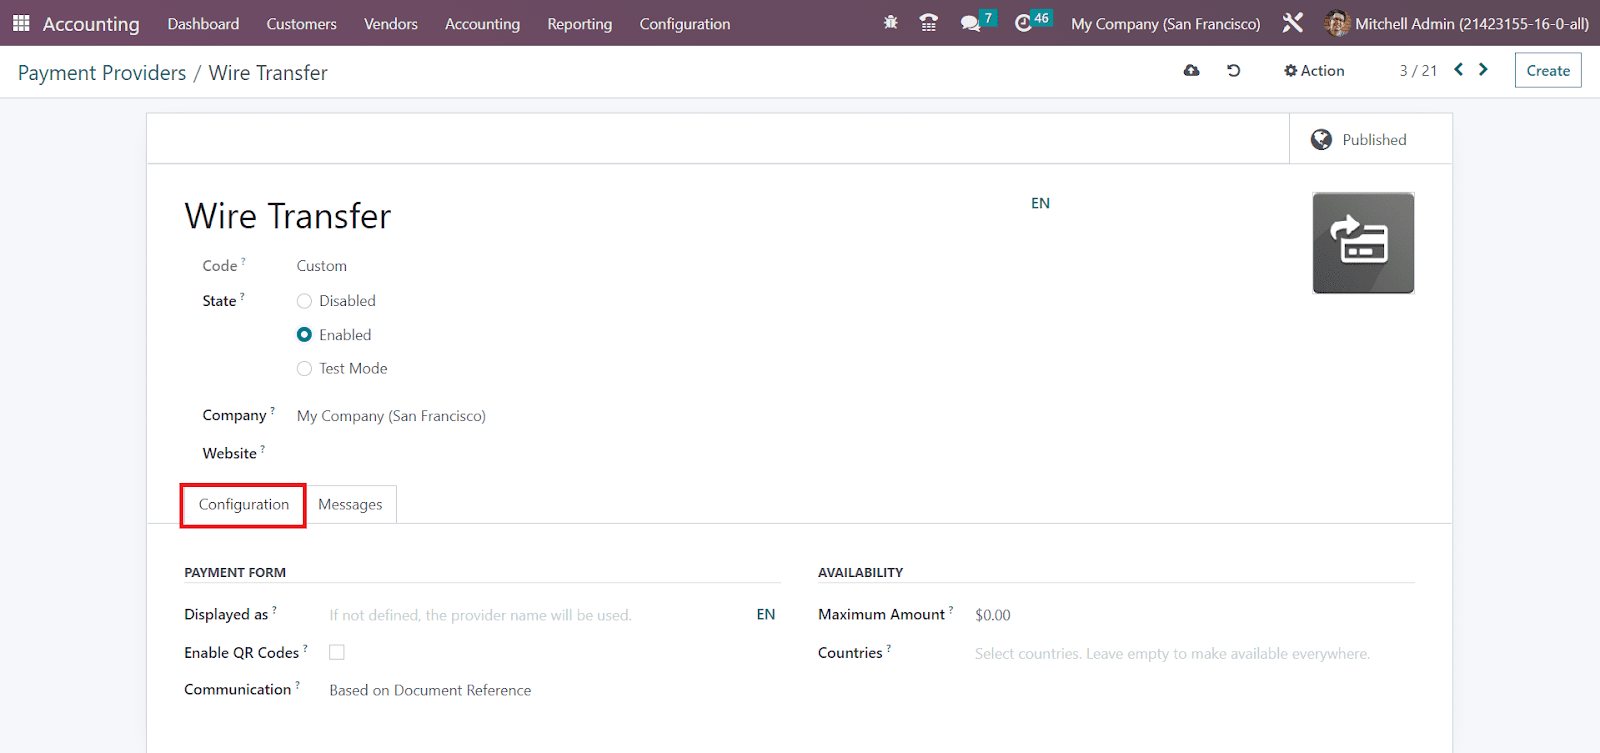
The form view shows the name of the payment provider in the given space. The technical code of the payment provider can be seen in the Code field. You can set it as Disabled, Enabled, or Test Mode by selecting the corresponding option in the State field. The name of the Company and Website will be displayed in the respective fields. If those fields are kept empty, then the payment provider will be available for all companies and websites defined in your database.
The description of the provider for customers can be seen in the Displayed as field. You can provide QR Code options for your customer for making payments using QR codes. For this, the QR Codes field can be activated. In the Communication field, you can set the communication type that will appear on sales orders. The communication will be given to the customer when they choose the payment method. In the Maximum Amount field, the maximum payment amount that this payment provider allows can be seen. The countries in which this payment provider is available can be added in the Countries field. You can leave the field blank to make this provider available in all countries.

The message specified in the Pending Message field will be shown if the order pending after the payment process. You can make changes in the settings of the available payment providers as per your requirements to make it more convenient for customers.
Payment Icons
Payment Icon is one of the advanced features offered by OTX in order to enlighten the operations of online payments. These icons will perform the functions of an identifier. With the assistance of the payment icons, the customer will be able to get an idea related to the online payment method or payment gateway accepted by your eCommerce portal. Under the Configuration menu of the Accounting module, you can find the option to create and manage Payment Icons.
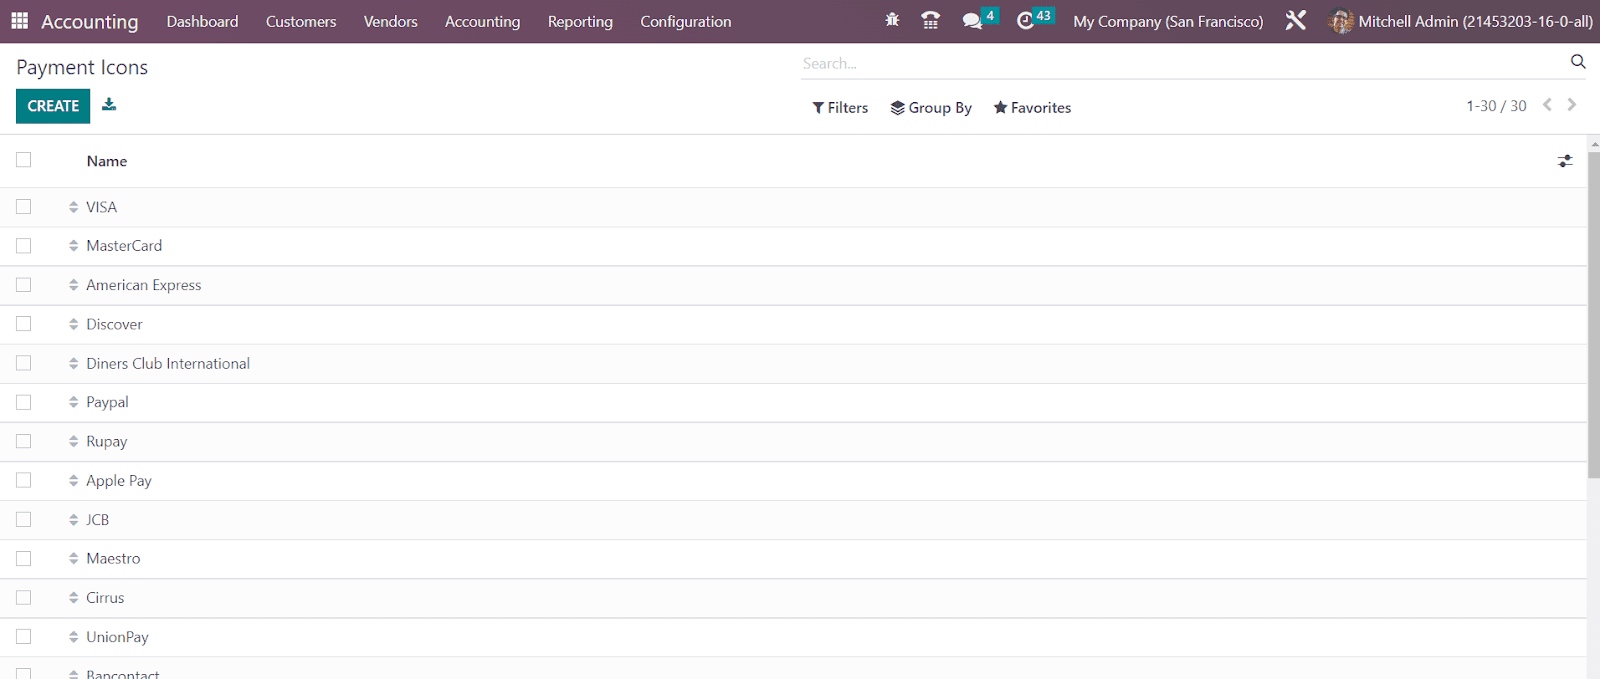
The screen displays the list of already configured payment icons. Creating a new payment icon can be done by clicking on the Create button.

OTX leads you to a new configuration window where you can provide a name for the new payment icon. Under the Providers List tab, you can mention the payment providers that you want to add to this payment icon.
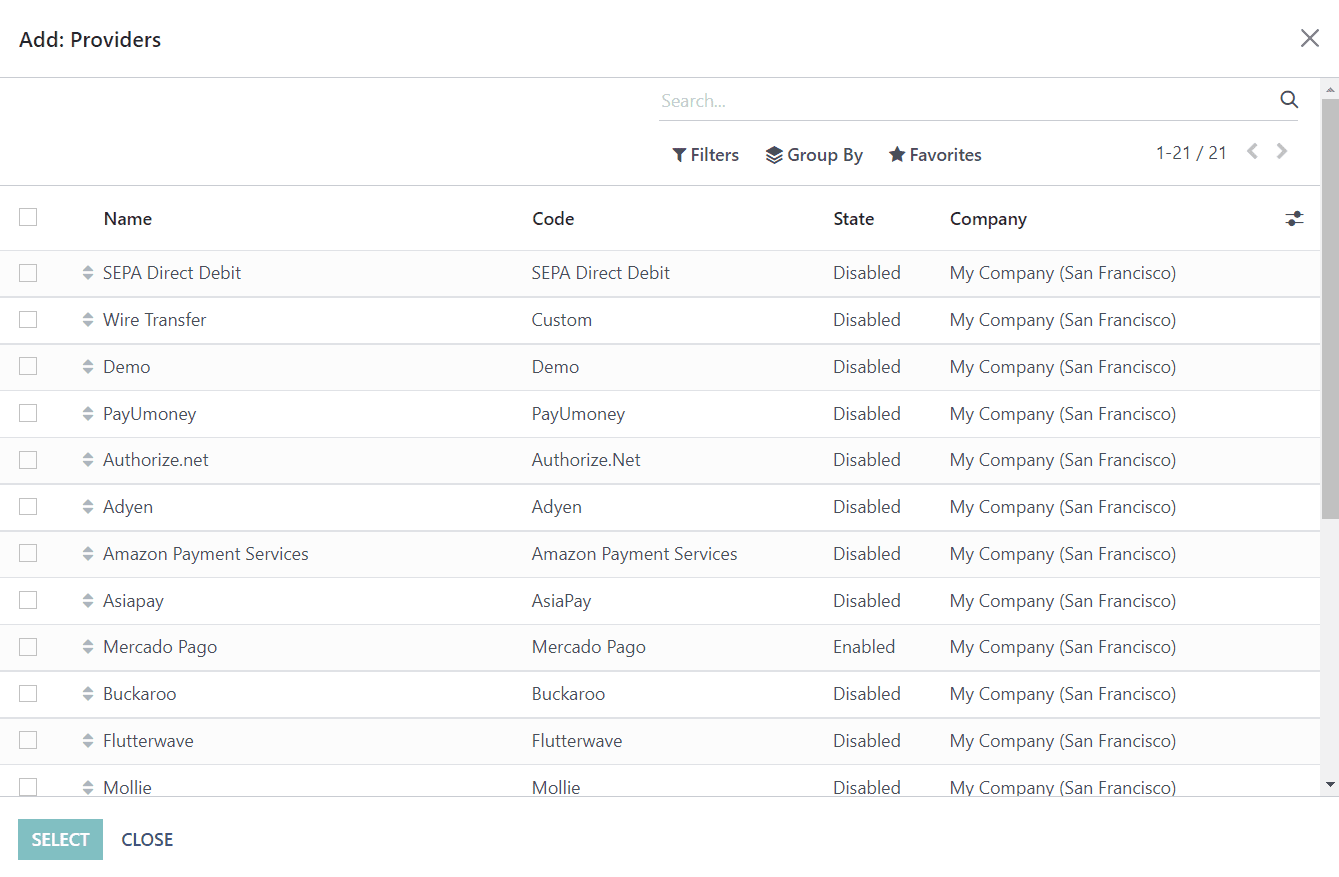
When you click on the Add a Line button, a pop-up window will appear from where you can select suitable payment providers for your payment icon using the Select button.
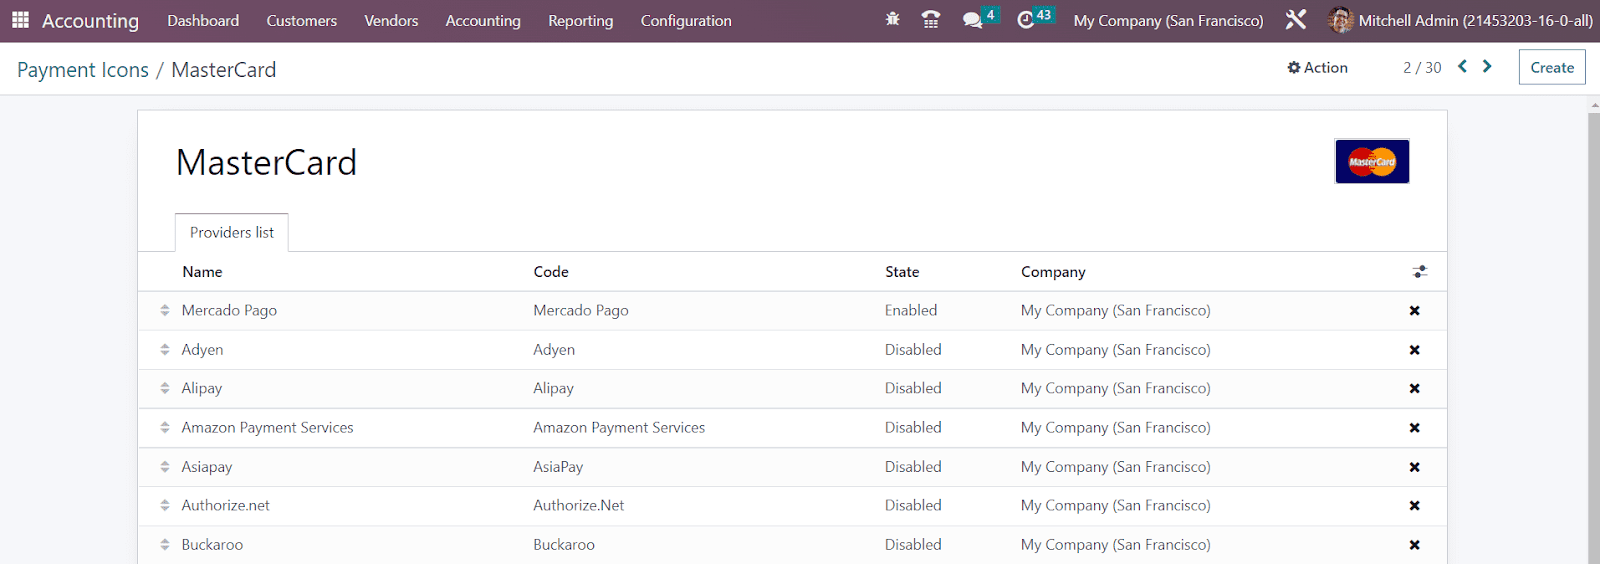
By following this method, you can create multiple payment icons for your eCommerce portal.
Payment Tokens
Based on the configuration of the payment providers, you can store the payment details with tokens when a customer pays for the very first time. The saved card details can be used next time to deduct the amount automatically. When a customer purchases a product from your eCommerce site and makes the payment using a convenient payment provider, OTX offers a save card details option at the time of payment. This option will save the details of the card used for the payment as payment tokens in your database. This feature will be beneficial for recurring payments like subscriptions where the amount will be deducted automatically.
First, let’s take a look at how OTX records the payment card details. During the checkout process, you will be asked to select a suitable payment method from the option offered by the company.
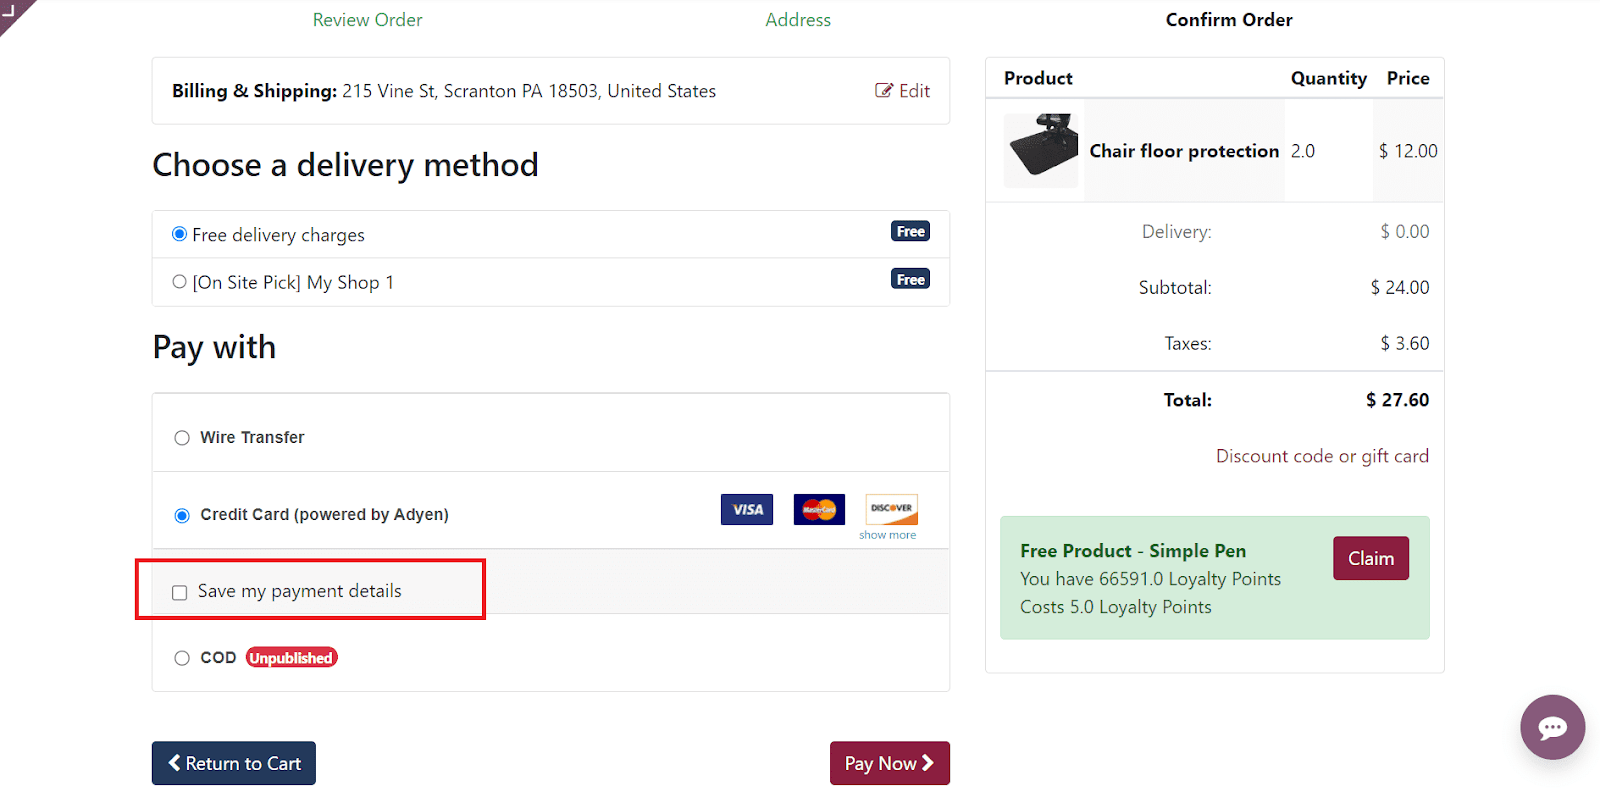
Once you select a payment method, you will get the option Save my Payment Details as shown in the screenshot above which records your payment card details as a token. You can observe such saved cards in the backend by selecting the Payment Tokens option from the Configuration menu of the Accounting module.

By clicking on a token, you will get a detailed view.
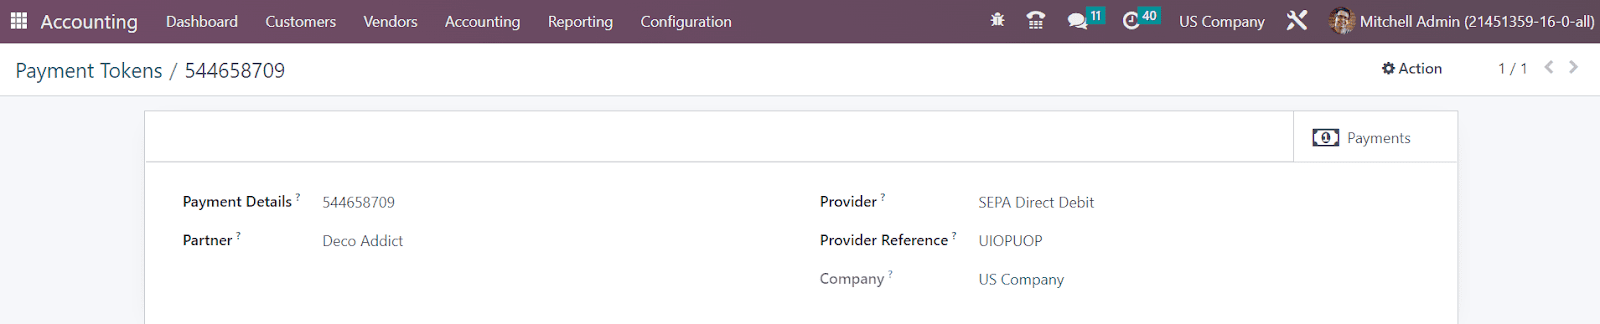
A payment token shows the payment Details, Partner, Provider, Provider Reference, and Company. Next time, when you are purchasing something on the same eCommerce page, you will get the option to select the saved card details for making payment.
In order to get the history of all online transactions, you can use the Payment Transactions option available under the Configuration menu. This platform will keep a record of all online transactions done using different payment gateway.

The transaction history window displays the details of the Reference(internal reference of the transaction), Created on, Provider, Customer, Partner Name, Amount, Fees, Status, and Company.
Cash Roundings
Cash rounding is used to define the smallest coinage of the currency used to pay by cash. You can use this feature in OTX to round off the cost of a bill to the nearest available denomination of the currency. In order to get access to this feature, you need to activate the Cash Rounding option from the Customer Invoices tab as shown below. This option is available in the Settings menu of the Accounting module.

After activating this feature, you can go to the Configuration menu of the module and click on the Cash Roundings option.

The list view shows the details regarding the Name, Rounding Precision, and Rounding Method. In order to create a new cash rounding method, you can click on the Create button.

In the form view, mention the name of the new cash rounding method in the Name field. The non-zero value smallest coinage can be specified in the Rounding Precision field. Specify which way will be used to round the invoice amount to the rounding precision in the Rounding Strategy field. It can be either Add a rounding line or Modify tax amount. In the case of Add a rounding line, you are requested to mention the Profit and Loss Accounts in the corresponding fields. You will get three options to select as the Rounding Method. By choosing the Up method, the value will be rounded off towards the positive infinity according to the rounding precision. In the Down method, the value will be rounded off towards the negative infinity according to the rounding precision. The third option is the Half-Up method. You can use this method for fractional values. When the fractional part is greater than or equal to 0.5, the value will be rounded off towards the positive side and the value will be rounded off towards the negative side if the fractional part is less than 0.5.
Disallowed Expenses
In accounting operations, the disallowed expenses are considered as the expenses that can not be deducted from the fiscal results but the user can perform deduction of such expenses from the bookkeeping results. Using the Disallowed Expenses Categories feature of the OTX Accounting module, you can generate adequate financial reports in real-time. Go to the Configuration menu and click on the Disallowed Expenses Categories button.

Pre-configured disallowed expense categories can be observed in this window. By clicking on the Create button, a new line will appear under the existing list to specify the Name, Related Account, and Current Rate.
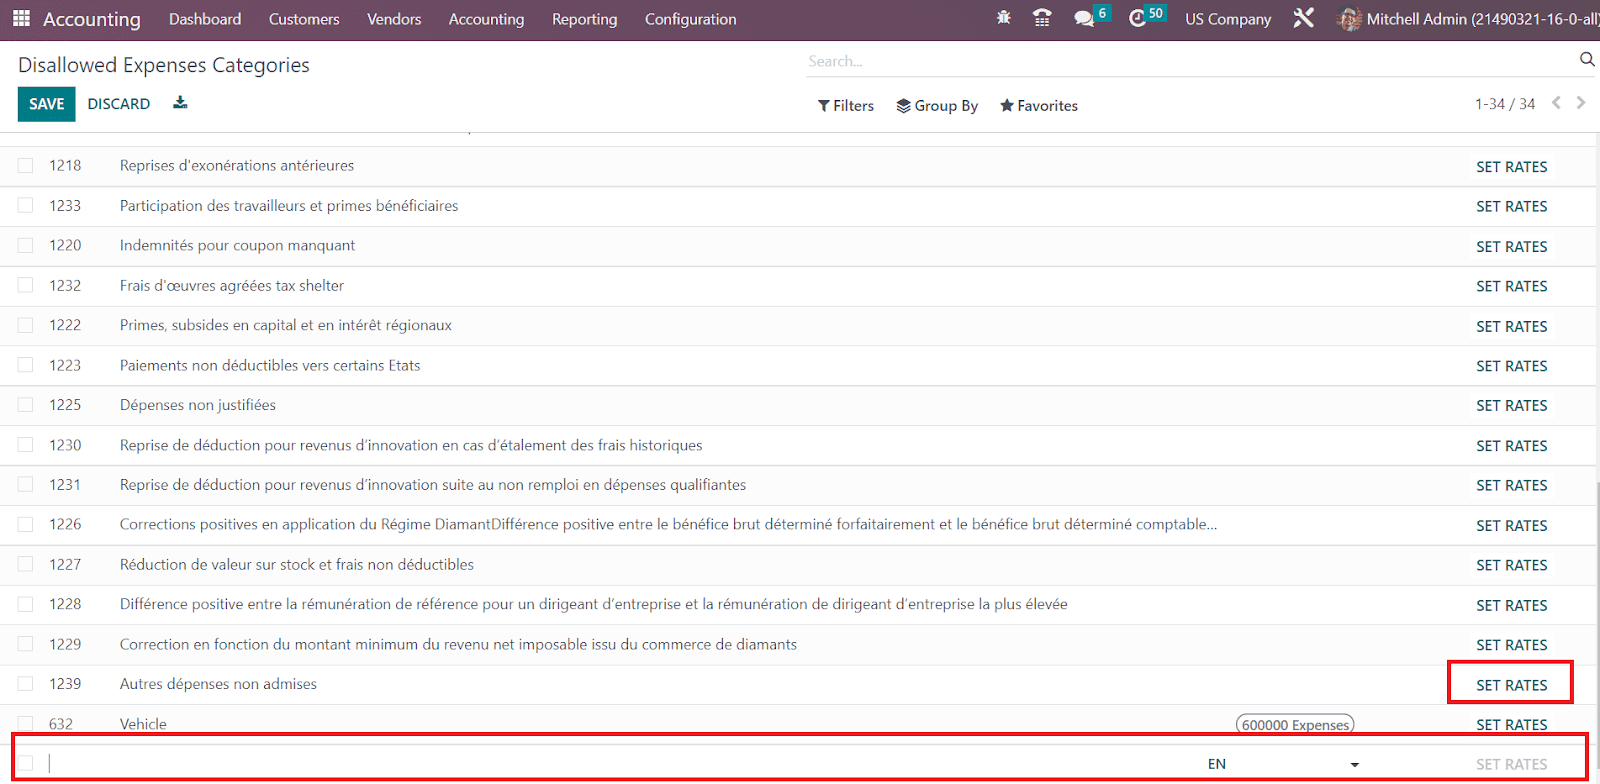
You are allowed to click on the Set Rates button to set rates for the disallowed expenses categories. Clicking on any of the available categories will direct you to the form view of the respective category where you can edit the available data and set rates.

The screen shows the Code, Category Name, Company, and Related Account details of the expenses. The Car Category field makes the vehicle mandatory while booking a vendor bill. Under the Rates tab, the rates can be added one by one using the Add a Line button with the details of the Start Date, Disallowed %, and Company.
It is possible to link the disallowed expenses category with an expense account described in the Chart of Accounts platform.

By doing so, the disallowed expense will be calculated according to the disallowed expense category mentioned in the expense account when a new expense is created with this account. In order to generate Disallowed Expenses reports, you can go to the Reporting menu of the module.
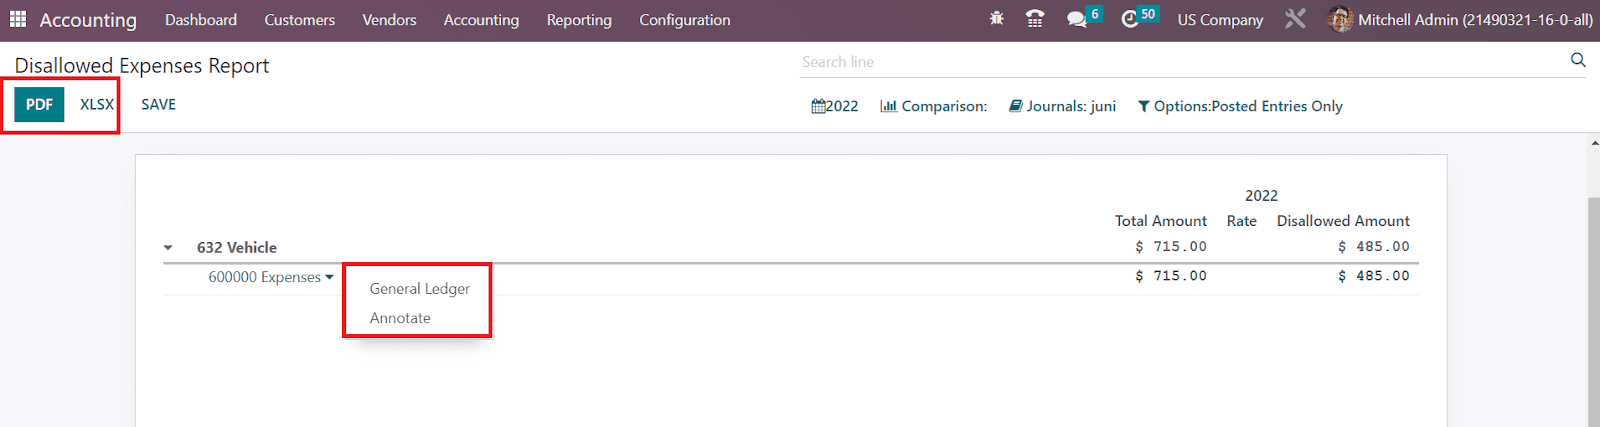
You can convert the report into PDF and XLSX formats using the respective buttons available on the screen. You can analyze the general ledgers related to the reported disallowed expenses by using the General Ledger button. The Annotate button can be used to add footnotes to the report.

The report shows the journal items, Date, Communication, Partner, Currency, and Debit details of the general ledgers of the disallowed expenses of the selected time period.
Analytic Accounts
In order to keep track of specific costs and revenues, you can use the Analytic Accounts feature available in the OTX Accounting module. You can create a chart of analytic accounts in your system for recording particular analytical entries as per your business requirements. These accounts are linked to the general accounts in OTX but treated independently. In order to get this feature in your Accounting module, you have to activate the Analytic Accounting option from the Settings menu of the module.

As soon as you activate this feature, the Analytic Accounting options will appear in the Configuration menu of the module. By clicking on the Analytic Accounts button, you will get the list of all available analytic accounts in your system. The list view shows the Name, Reference, Customer, Plans, Company, Debit, Credit, and Balance of each analytic account.

It is easy to configure a new analytic account in the Accounting module. Click on the Create button to get a new configuration window as depicted below.

Provide the name of the account in the Analytic Account field. If this account applies to any particular customer, you can mention their ids in the Customer field. Mention the Reference, Company, and Currency used to record the analytic entries in the corresponding field. The Plan field is a new feature in OTX 16 where you can select a suitable analytic plan for this account. It is also possible to create a new Analytic Plan from the Configuration menu of the module.
As you can see in the screenshot below, you will get the list of available Analytic Plans in this window.

Clicking on the Create button, you can create a new plan.

After mentioning a name for the plan, you can set the Parent plan and Default Applicability of the plan in the respective fields. You can select a suitable Color for your plan for identification. The name of your company will be auto-populated in the corresponding field. Under the Applicability tab, you can define the applicability of this plan using the Add a Line button. The Domain can be set as Invoice, Expense, Vendor Bill, Sales Order, Purchase, or Miscellaneous. The prefix mentioned in the Financial Accounts Prefix defines which accounts from the financial accounting this applicability should apply on. Similarly, mention the Product Categories also to apply this analytic plan. You can set the Applicability as Mandatory, Optional, or Unavailable. In order to add Sub Plans to a parent plan, you can use the smart button available in the window.
You will also get another smart button in the same window to observe the analytical accounts under this plan.
Now, let’s go back to the configuration of the analytic account. Under the Budget Items, you can add Budget plans so that this analytic account can record the cost and revenue of the items included in the budget.

Using the Add a Line button, you select a budget from the pre-configured list. The configuration of the budget is already detailed in this chapter and you can check that portion for additional information. Once you complete the configuration of the analytic account, the budget amount and gross margin can be observed in the respective smart buttons.
Now, let’s take a look at how to add analytical items to an analytic account. For example, you want to record the amount of a vendor bill in your analytic account. While creating the vendor bill, you will be asked to mention the analytic account to record the accounting details of the vendor bill.

Once you confirm the bill, the entry will be added to the selected analytic account.

You can observe the recorded vendor bill details in the analytic account using the respective smart button as shown in the image above.
Analytic Distribution Model
By activating the Analytic Accounting feature in OTX , it is possible to define an analytic distribution in every journal item. It allows you to distribute the total amount to different analytic accounts. The option to manage and create a new Analytic Distribution Model can be seen in the Configuration menu of the module.

The preview of the list shows the details of the Accounts Prefix, Partner, Product, Company, and Analytic of each Analytic Distribution Models. You can create a new distribution model by clicking on the Create button.

In this window, you can set conditions for the distribution model. You can select a Partner, Partner Category, Product, Product Category, and Company in the given fields for which the analytic distribution will be used. Set the Accounts Prefix that defines which accounts from the financial accounting this model should apply on. In the Analytic Distribution to Apply field, you can specify the Analytic Accounts to distribute the amount of the journal item to different analytic accounts.

After configuring the distribution model, when you create an invoice for the partner mentioned in the distribution model, the amount will be distributed to the respective accounts. An example is shown below.

Here, while creating a new invoice, respective analytic accounts will automatically appear under the Journal Items. After confirming the payment, let’s check the entries of these analytic accounts.


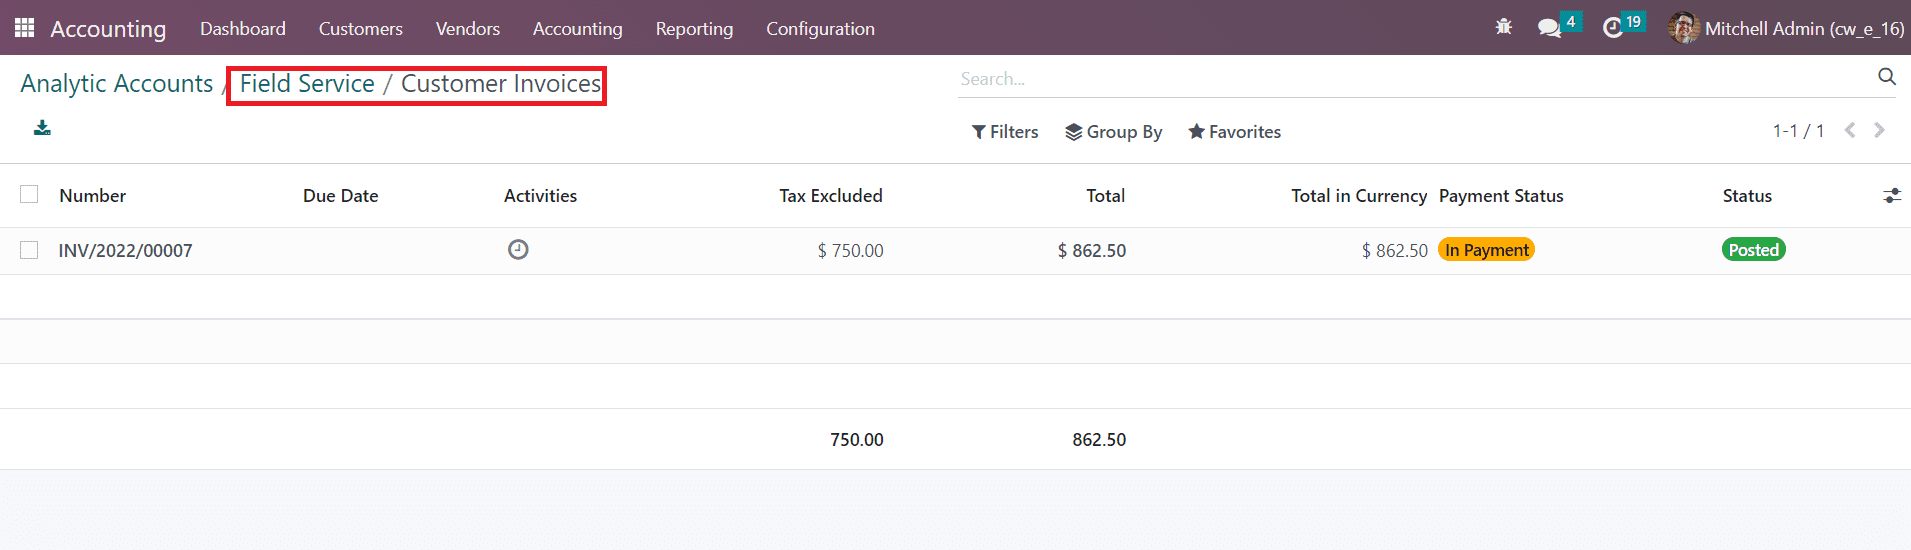
The screenshots show that the new analytic entry is distributed to the analytic accounts mentioned in the distribution models.
Anglo- Saxon Accounting
Anglo- Saxon Accounting
Anglo-saxon accounting and continental accounting are the two major types of accounting practices used widely across the world. The Anglo Saxon accounting method is preferred by small communities and it is available in the enterprise edition of OTX . You can activate this feature from the Settings menu of the Accounting module after enabling the developer mode as shown in the image below.
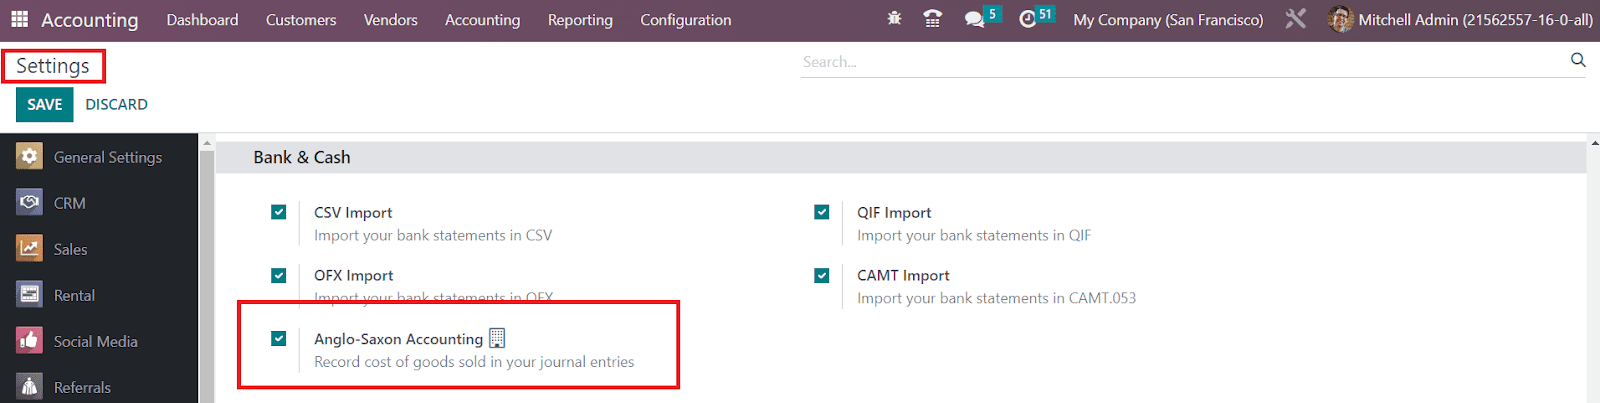
Many countries use this accounting type for managing their accounting operations. In anglo- saxon accounting, the costs of sold products are reported only after they are sold/delivered to the respective customer. But, the costs of the products will be taken into account as soon as they are received in stock of the company in Continental accounting.
The expense account will not be affected even if you receive a product or create a bill in Anglo- Saxon accounting. It will be affected only after the product is invoiced to the final customer. Create a purchase order for a product (set the inventory valuation of the product as Automated to automatically record the accounting entries).

After creating the purchase order, you can receive the product and validate the transfer. Now, go back to the Accounting module and check the Journal Entries where you can find the journal items of the corresponding entry.
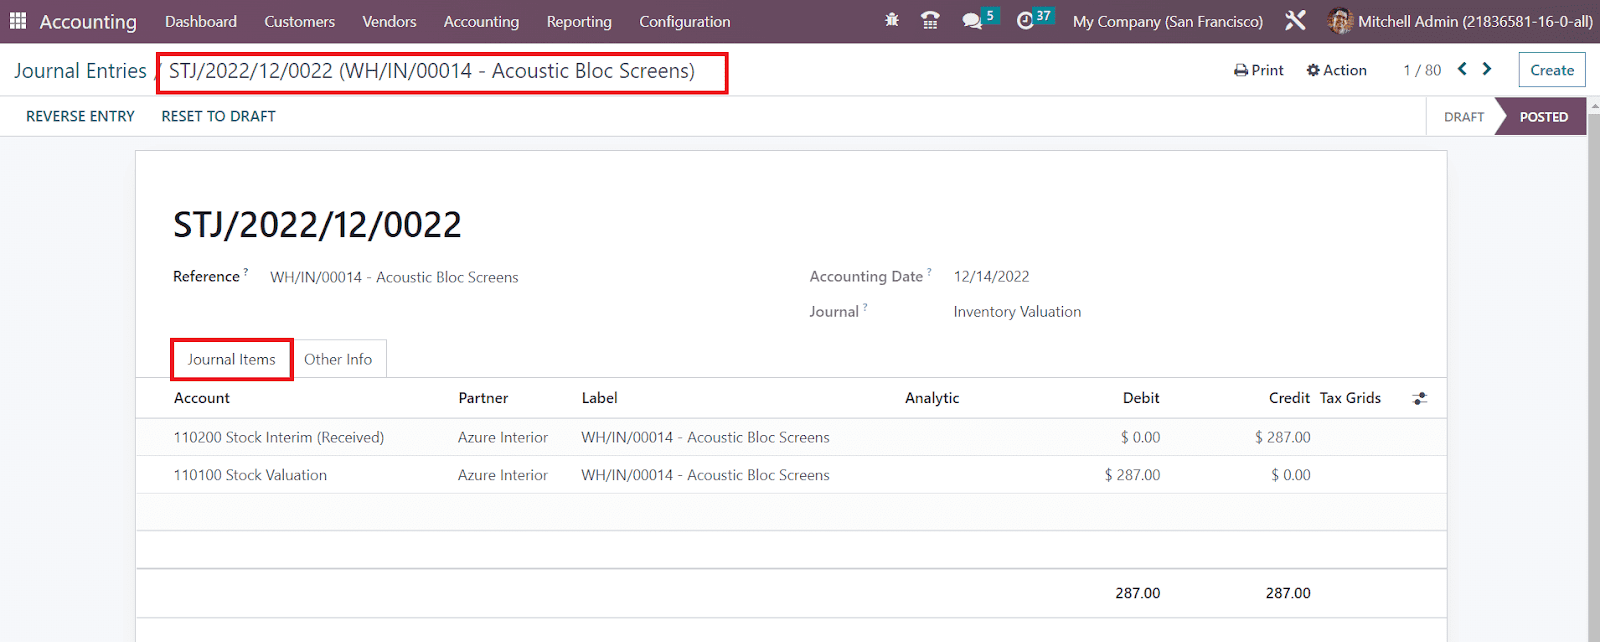
You can create a bill for the purchase and confirm it. As soon as you confirm the bill, the journal items of the vendor bill will appear as shown below.
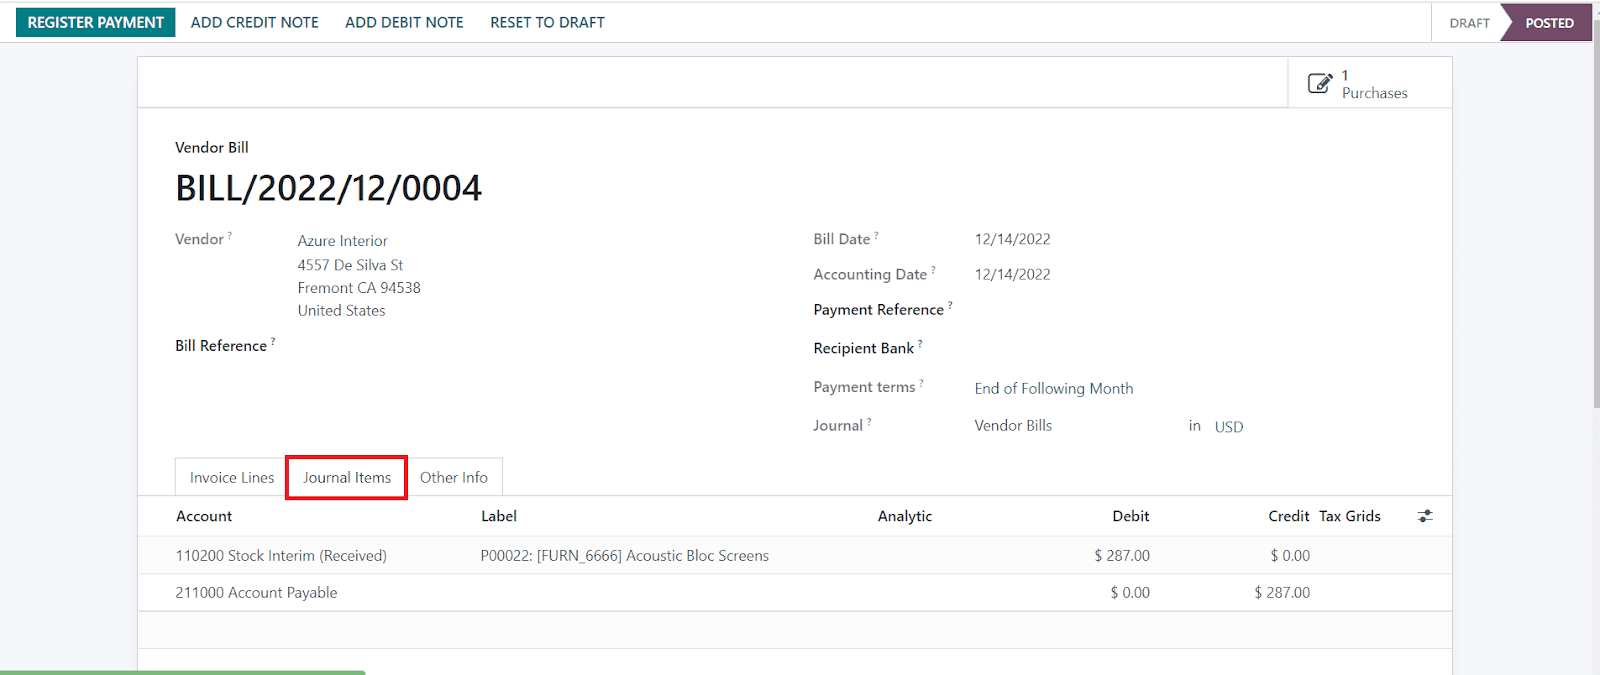
The expense account is not affected here. When you check the Purchase Journal Entry, you can see the data related to it as shown below.

Let’s check how the expense account is affected in Anglo- Saxon accounting. You can create a sales order for a product and confirm it.
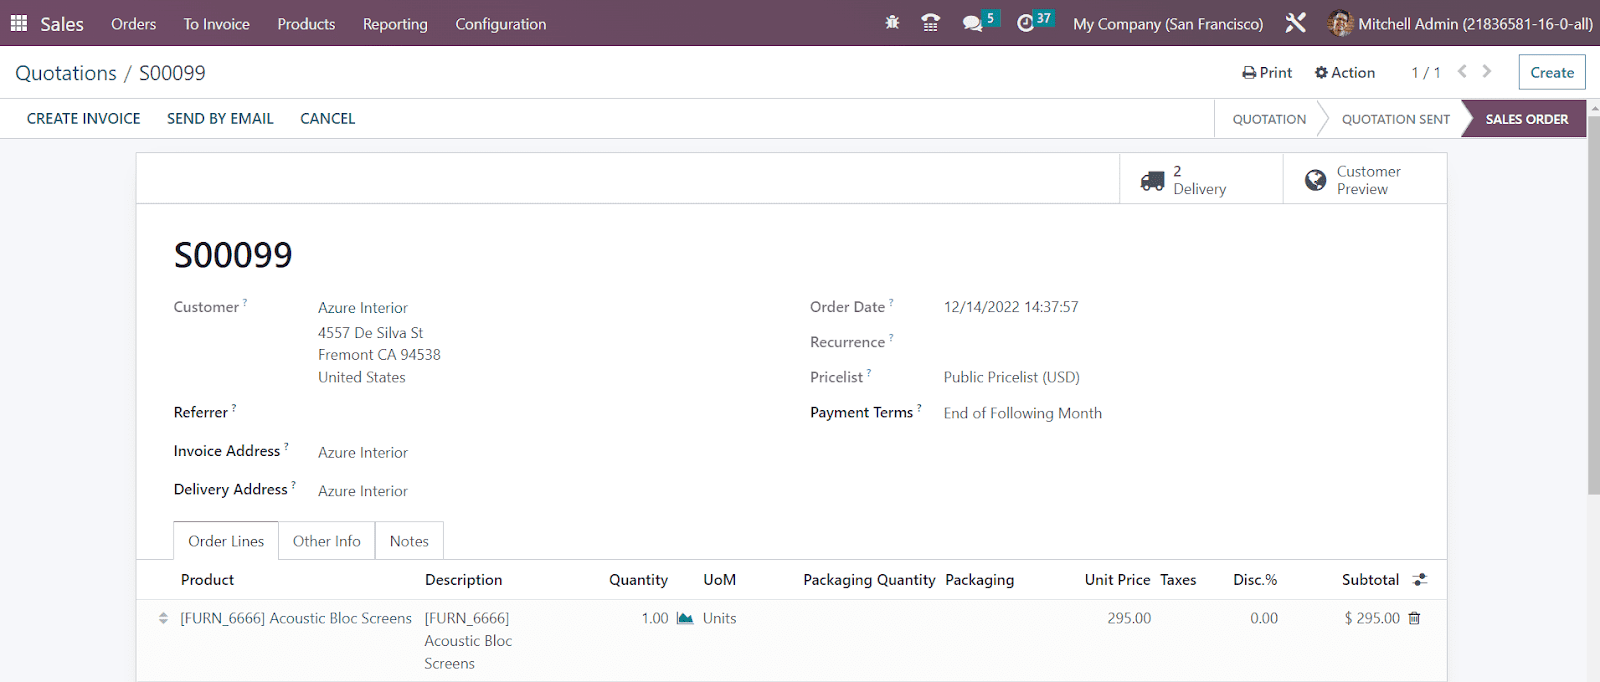
After confirming the sales order you can Validate the delivery. From the Accounting module, you can observe the corresponding sales journal entry.
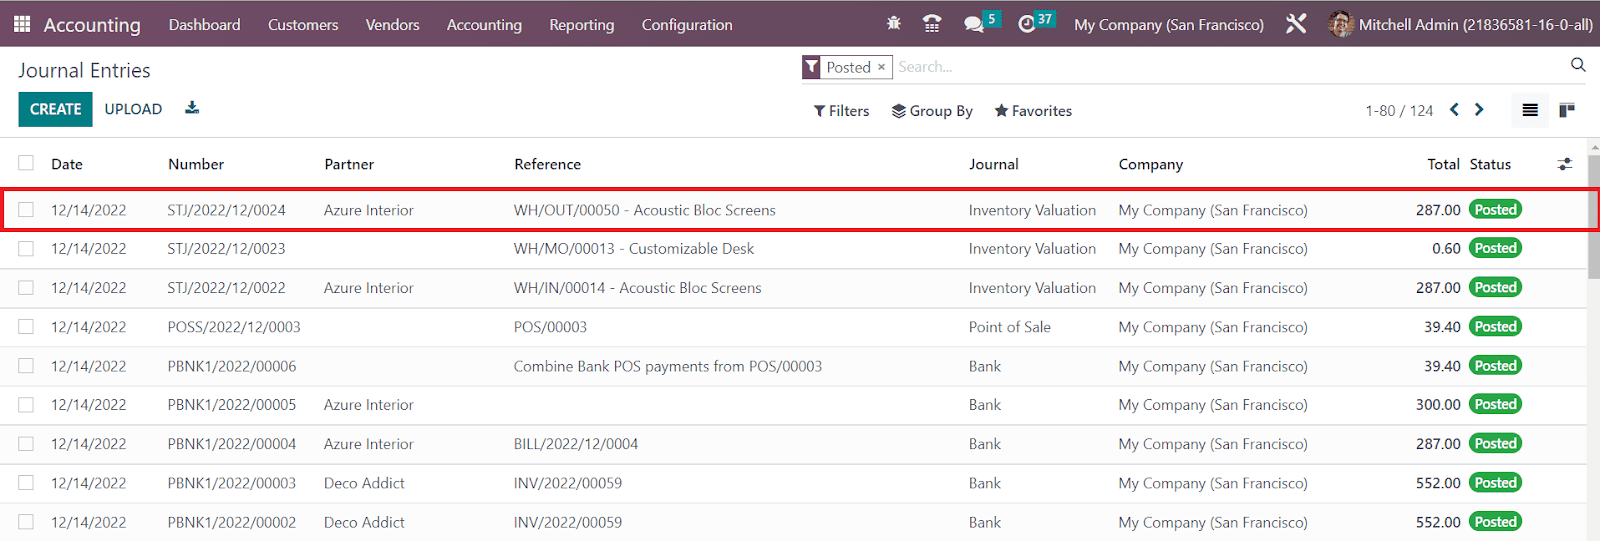
Now, you can create an invoice for the sales order and confirm it. The corresponding journal items will be shown as depicted in the image below.
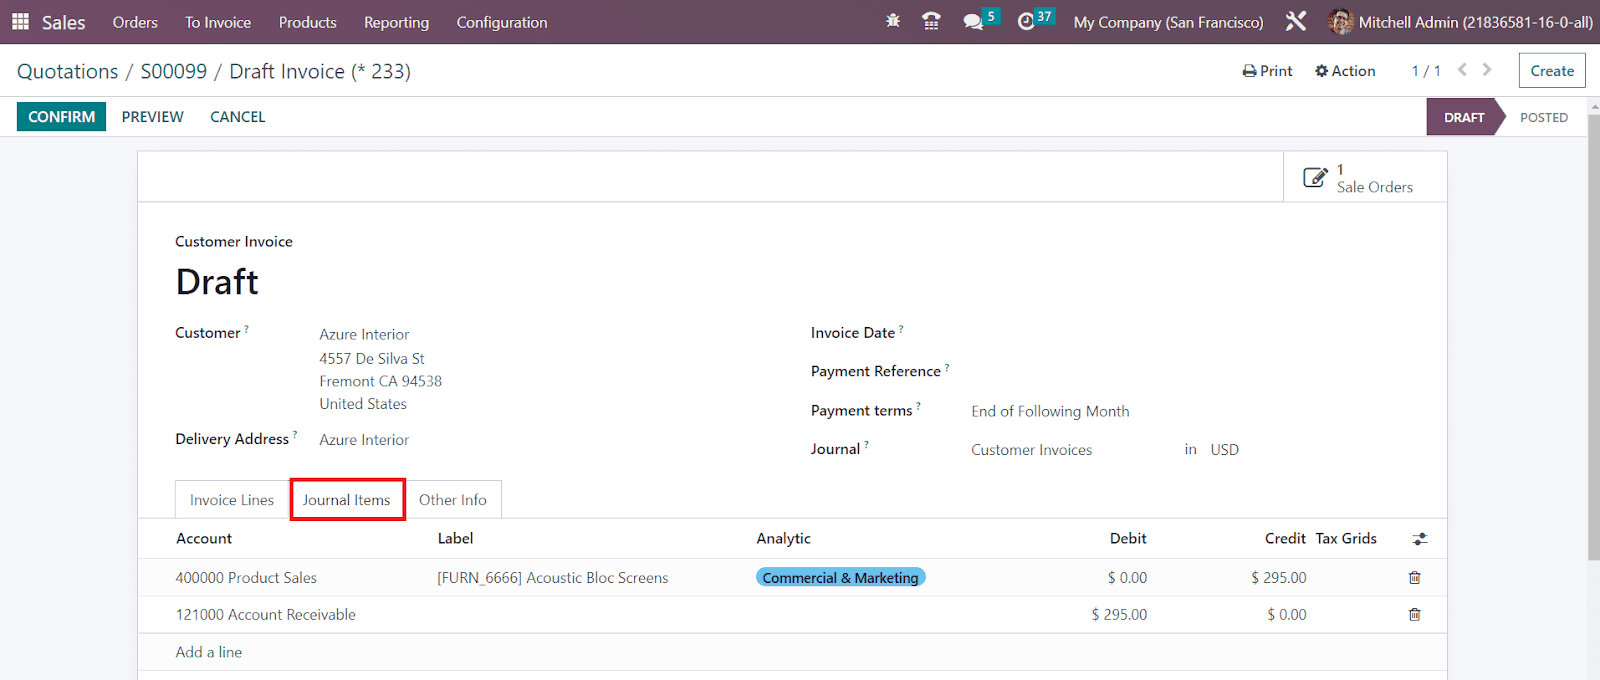
While checking the corresponding journal items, you can observe that along with the income account, the expense account is also affected.
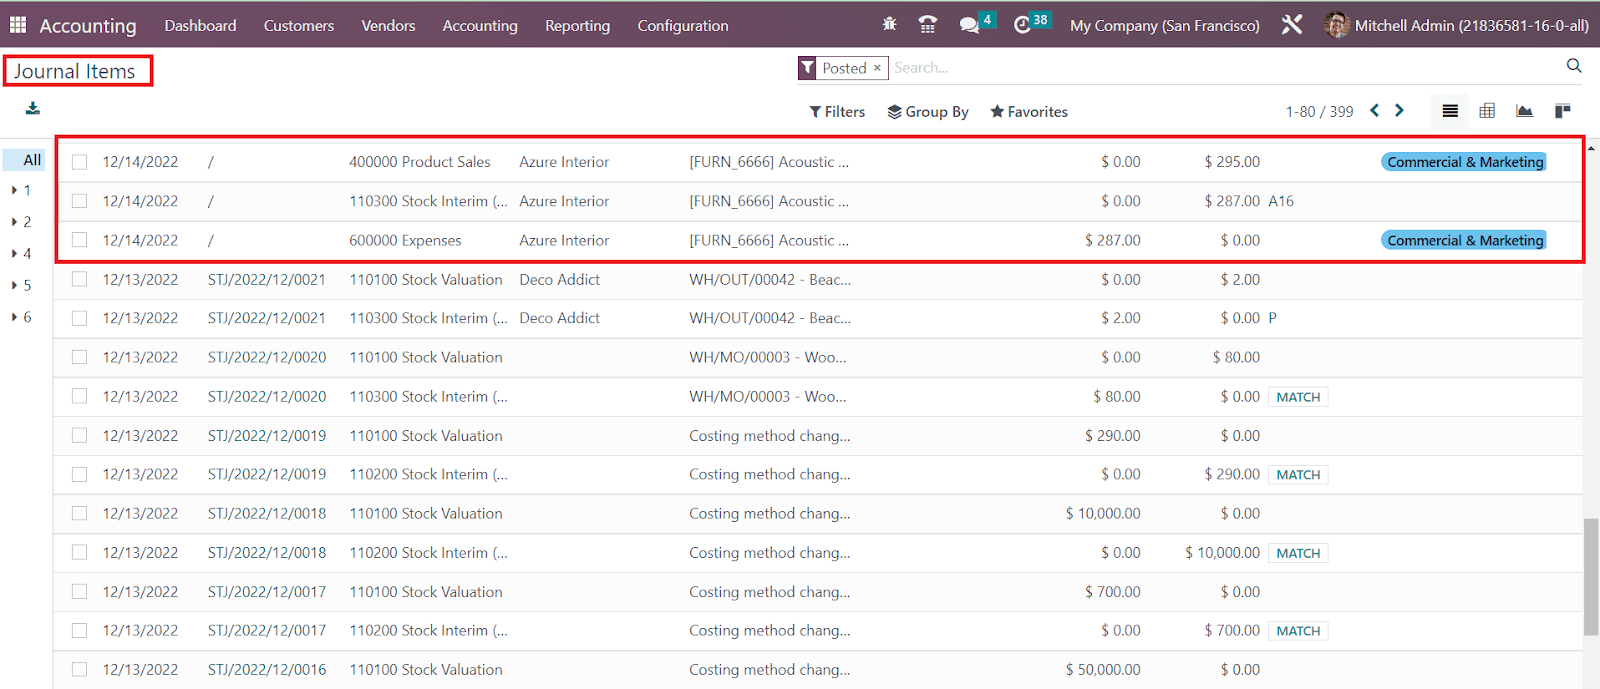
After selling the product and generating invoice, the cost of product is recorded as expense in the Anglo- Saxon accounting.
Reporting
Reporting
Reports are essential for any kind of business to understand the progress of operations and analyze the workflow. A well-defined reporting platform will simplify the process of analysis and help you to make decisions in crucial situations. In the case of the financial operations inside a company, reports play an important role in providing an insight into the management of finance in real time. In this section, we will detail the reporting features offered by the OTX Accounting module.
Balance Sheet
The user will be able to get details regarding the asset, liability, and equity of an organization from the Balance Sheet report at a single point of time. You can create customized reports by using the additional features offered by OTX . It is possible to get the balance sheet of a particular date by selecting that date in the small calendar icon given in the screen.
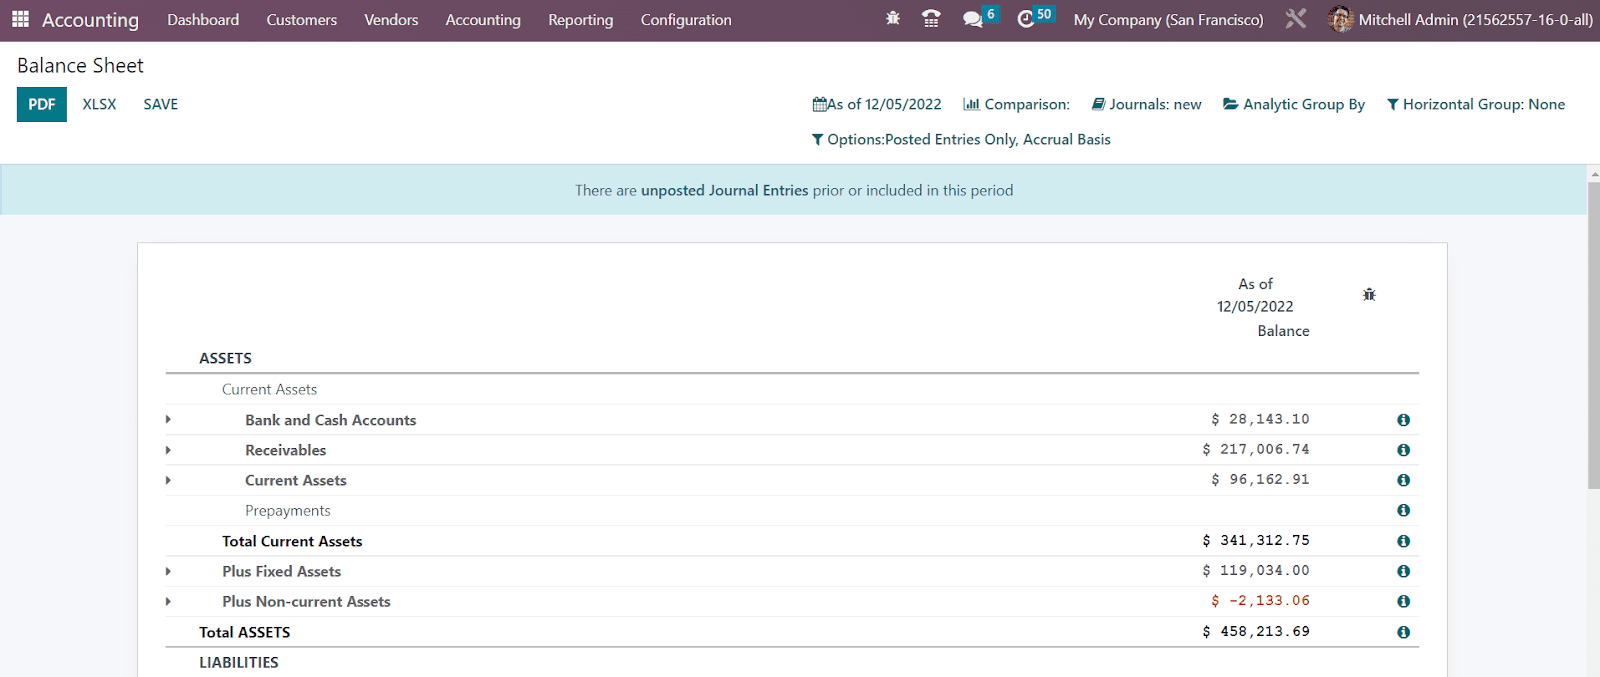
The reports can be compared with the previous period using the Comparison tool. If you want to get the balance sheet report of a particular journal, you can select that journal from the Journals option. Additionally, you will get some advanced filters also in order to sort the available data according to the requirements.
Once you activate the developer mode, you will be able to get a little ‘i’ at the end of each reporting line as highlighted in the image below.
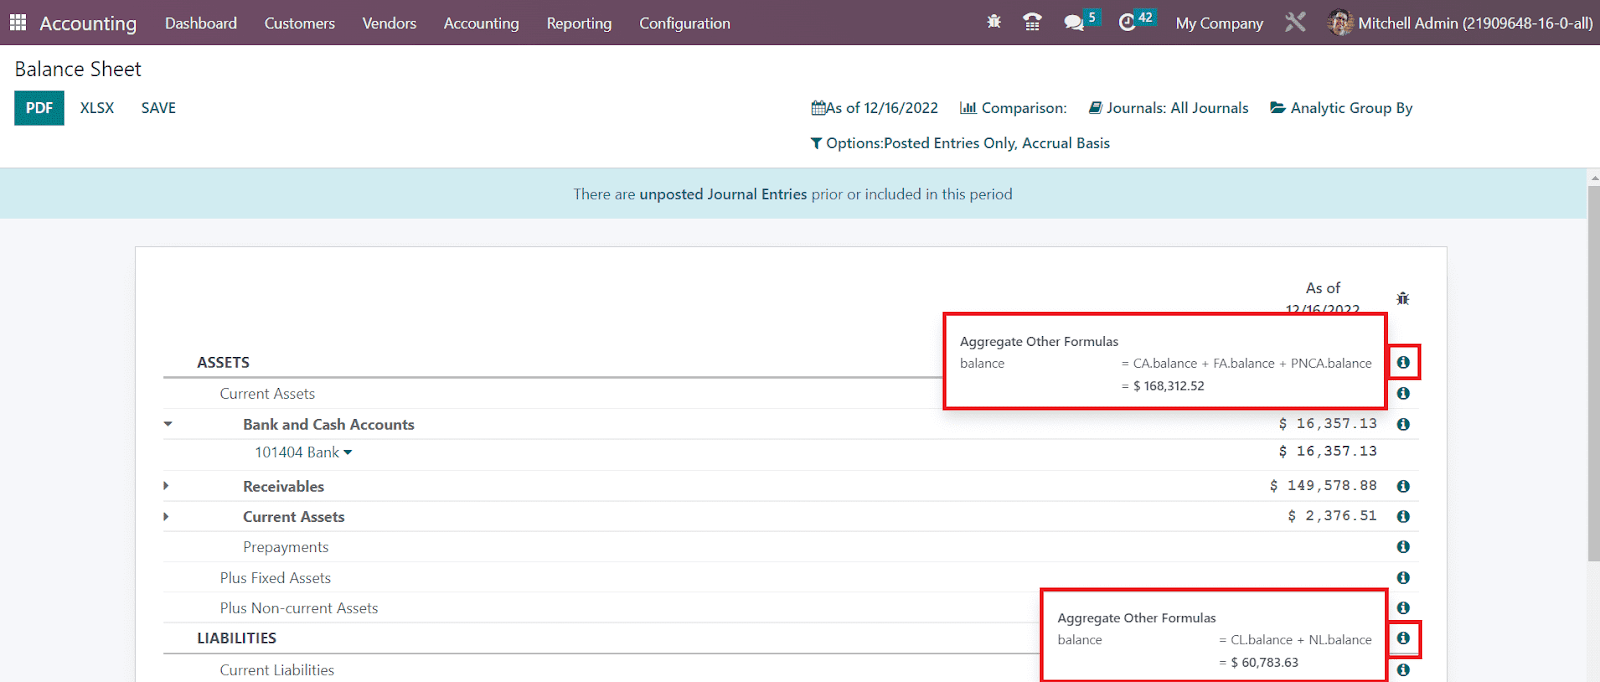
This option will show the calculation formula of the respective reporting line.
Using the PDF and XLSX options, you can convert the data into corresponding formats. In the OTX Reporting platform, you will get a Save button to export the PDF or XLSX of the document to the Document module in OTX . When you click on the Save button, a pop-up window will appear as shown below.

In the Export to field, you can mention the document format of the file. It can be either PDF or XLSX. The name of the generated document will be available in the window. Mention the Folder where to save this document file and click the Export button.
Profit & Loss
The reports of income statements are the most important part of the financial reporting. In the Profit & Loss reporting platform, you will get the revenue, expenses, profit, and loss of the organization during a particular period of time. The ending balance of the profit & loss report of the selected period of time will not be carried forward to the next accounting period unlike the balance sheet.
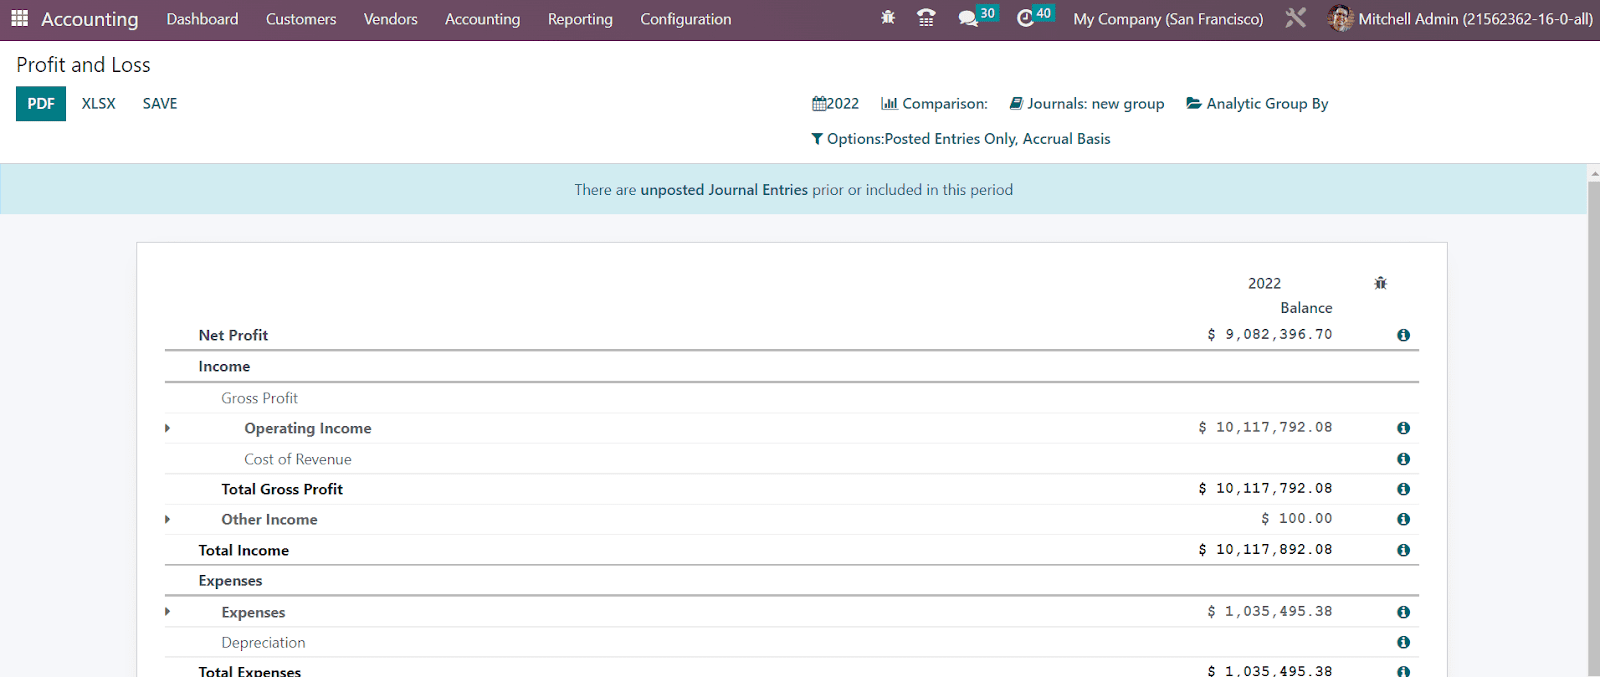
Cash Flow Statement
The cash flow statement reporting will provide the financial statement regarding all cash inflows and outflows. These reports will be based on the accounts you configured for the cash flow statement invoice. You will get the cash flow statement reports based on the operating activities, investment activities, and financial activities.

Executive Summary
The Executive Summary platform available in the Reporting menu summarizes the cash flow, profitability, and balance sheet reports of a particular period. Along with this, the Performance tab reports the Gross Profit Margin, Net Profit Margin, and Return on Investment. Under the Position tab, you can observe the Average Debtors Day, Average Creditors Days, Short Term Cash Forecast, and Current Assets to Liabilities.

Tax Reports
The detailed reports of sales and purchase taxes can be generated from the Tax Reports platform available in the Reporting menu. Using the Closing Entry option, you can report the return tax of the selected period.

EC Sales List
This report will give the details of the sales of the goods and services you provided for the customers from the European Union who are registered for VAT. Filing the European Commission sales to HMRC is necessary for any sales transaction to the EU- VAT registered customers.

The report gives the total, country code, VAT number, and amount related to the EC Sales.
General Ledger
The General Ledger reports will show all transaction reports from all accounts configured in your system for a selected period of time. Along with the account name, you can observe the Date, Communication, Partner, Currency, Debit, Credit, and Balance of each account. It records every financial transaction of your organization during a financial year.
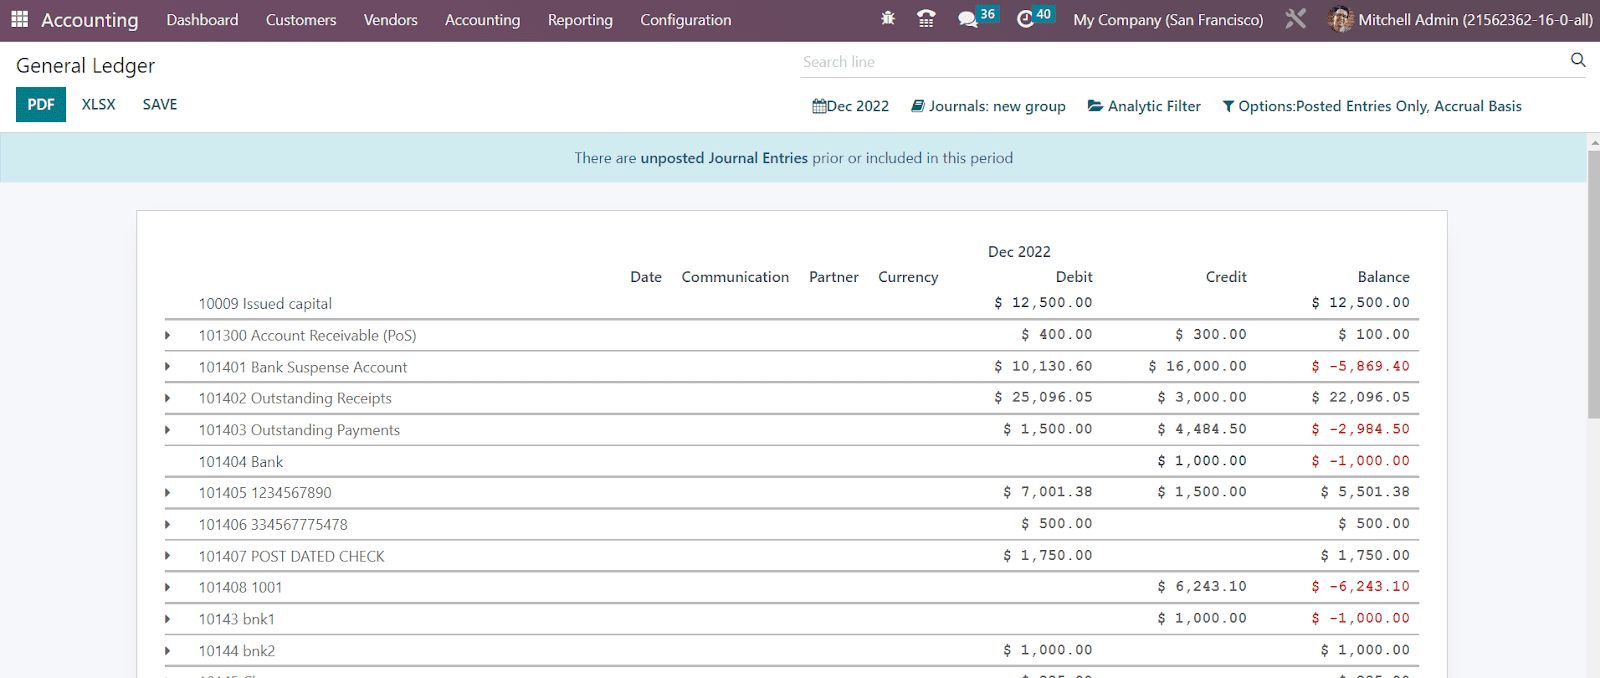
Trial Balance
Trial balance is an accounting report that shows the results of all accounting entries posted through different journals. The trial balance reports are mostly generated on the financial year end of the organization. These reports are used for the operations of auditing. As you can see in the image below, the report shows the credit and debit details from initial balance, selected month/year, and end balance of the journal entries.
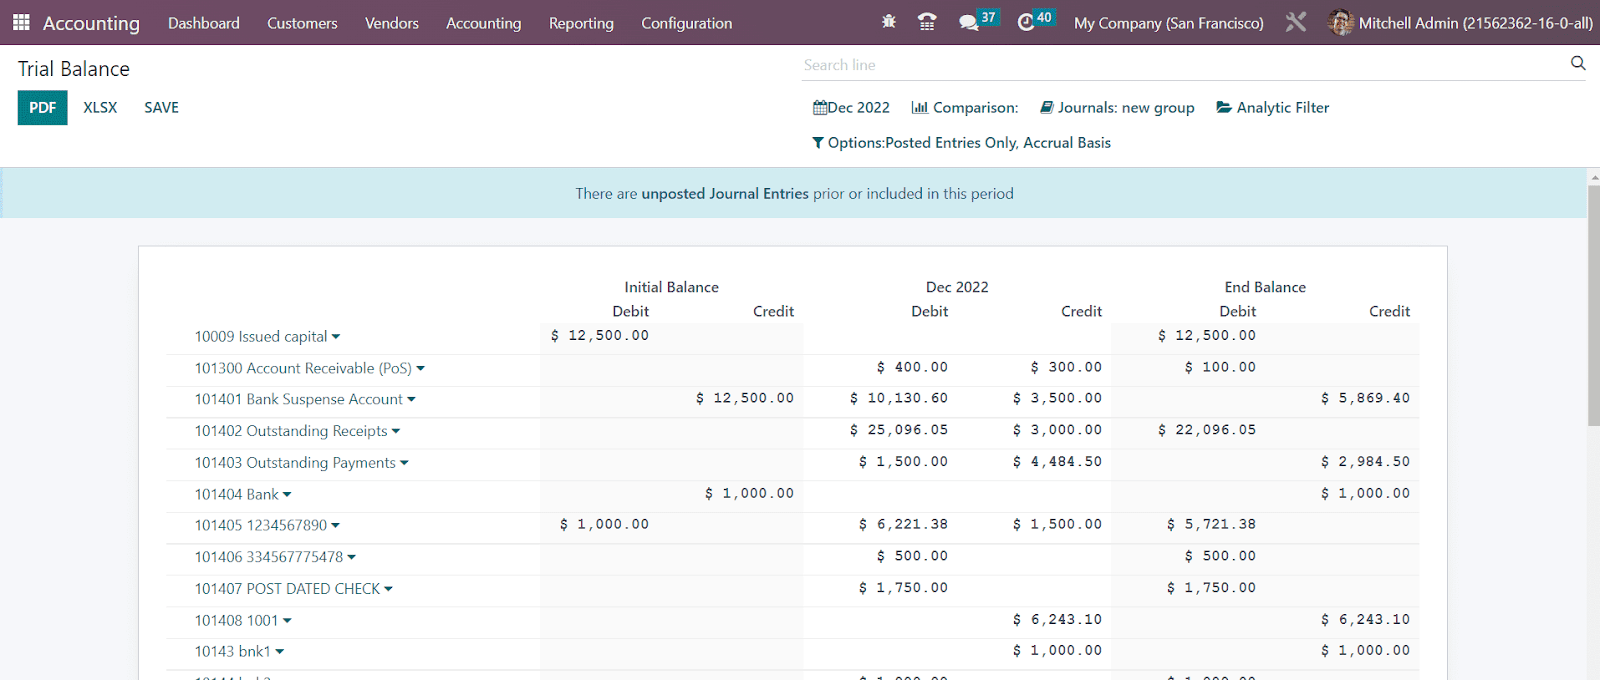
Journal Report
Accounting reports of various journals configured in your Accounting module can be generated from the Journal Reports platform. Under each Journal, you will get the report of corresponding journal items also with the details of the Name, Account, Label, Debit, and Credit.
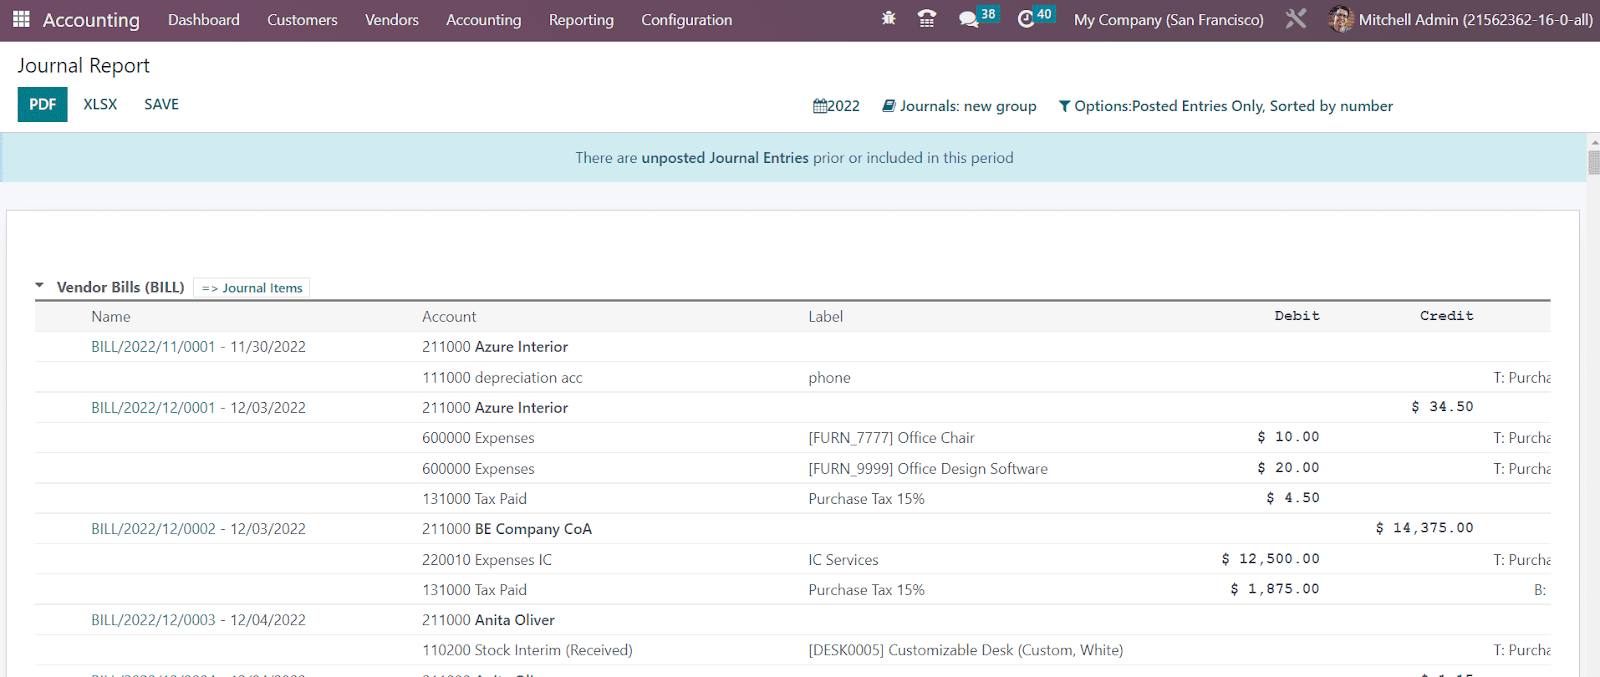
Intrastat Code
Intrastat is the system used to collect the statistics of transactions and trade of goods and services with EU member states. From the Settings menu of the Accounting module, you can activate this feature. The Intrastat Code option available in the Reporting menu will give reports of this, as shown below.
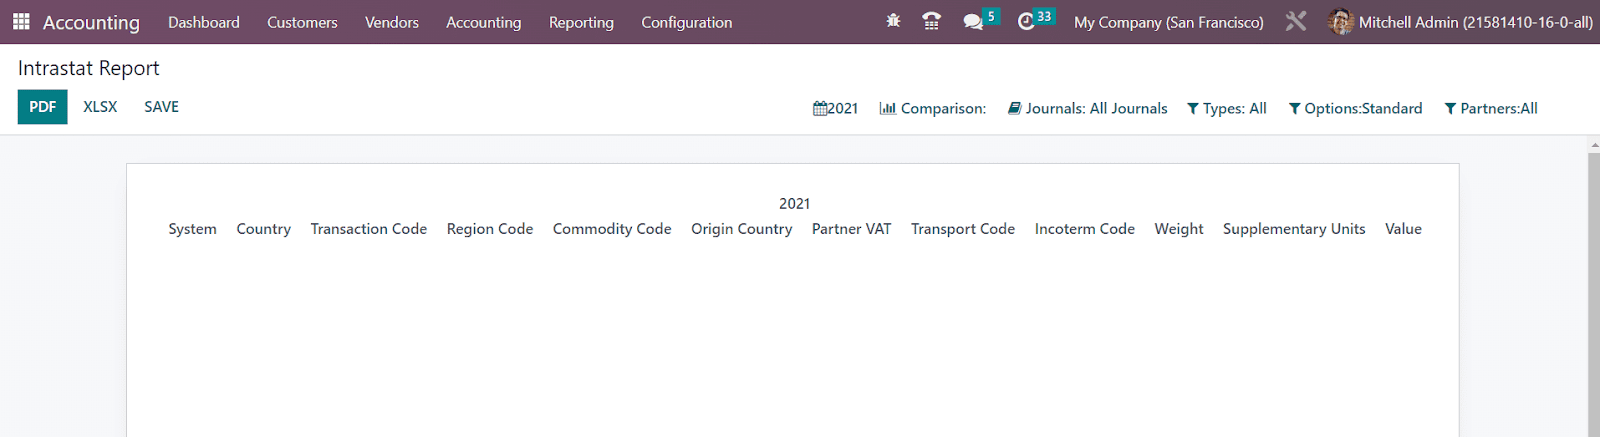
It includes the System, Country, Transaction Code, Region Code, Commodity Code, Origin Country, Partner VAT, Transport Code, Incoterm Code, Weight, Supplementary Units, and Value.
Check Register
All financial transactions using checks will be reported in the Check Register platform in the Reporting menu. You can generate check register reports on this platform by selecting a particular period of time. The bank accounts used for check transactions, along with respective journal items, can be seen in this report. It shows the Date, Communication, Partner, Currency, Debit, Credit, and Balance details.
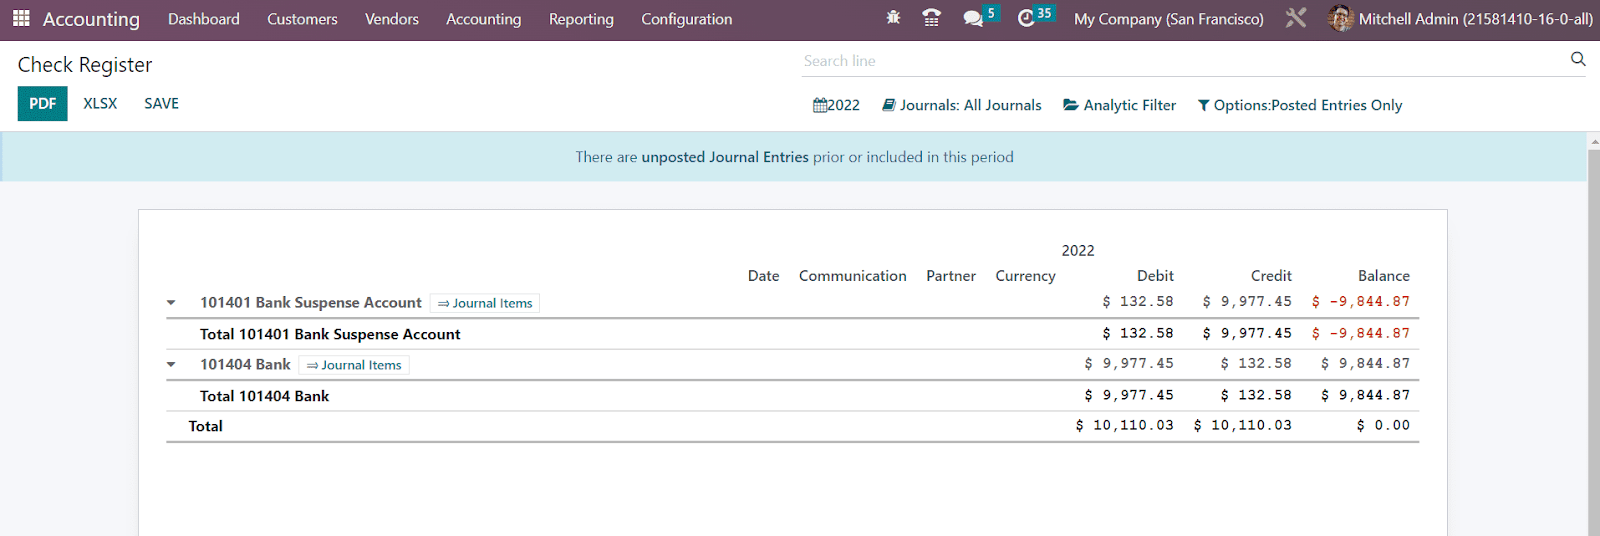
Partner Ledger
The report of receivable and payable journal entries of partners can be observed in the Partner Ledger reporting platform. It shows the Journal, Account, Reference, Due Date, Matching Number, Debit, Credit, Amount, Currency, Balance of the partners during the select period of time. In order to reconcile the accounts of the partners, you can use the Reconcile button given on the report.
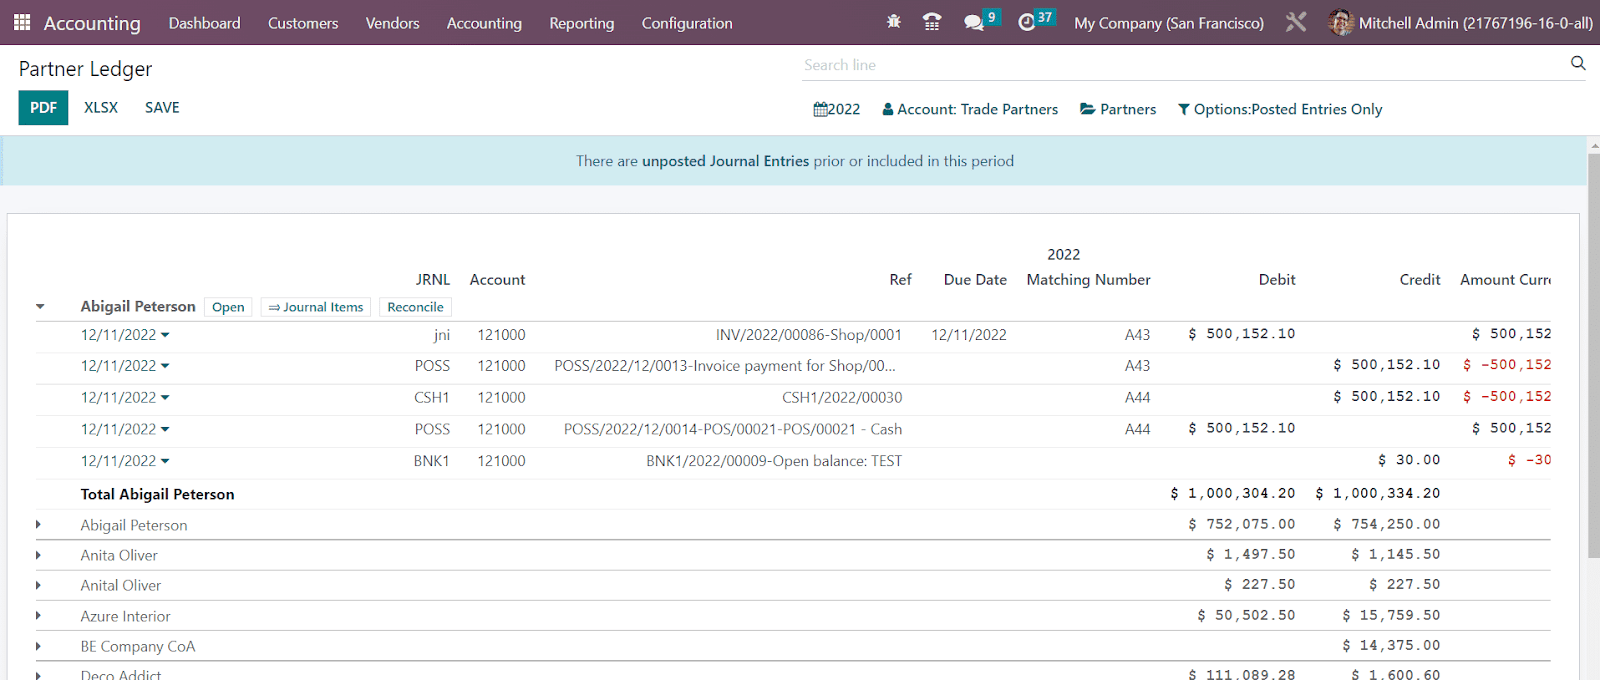
Aged Receivable
The Aged Receivable platform in the Reporting menu assists you to get reports of the aged partner receivable balances of the selected date. These are the reports of invoices that are awaiting payment. If the customer failed to pay the invoice even after the days mentioned in the payment terms, the payment will fall under the category of Aged Receivables. As shown in the screenshot below the report shows the Due Date, Amount, Currency, Account, Expected Date, receivable amount At Date, Older, and Total.
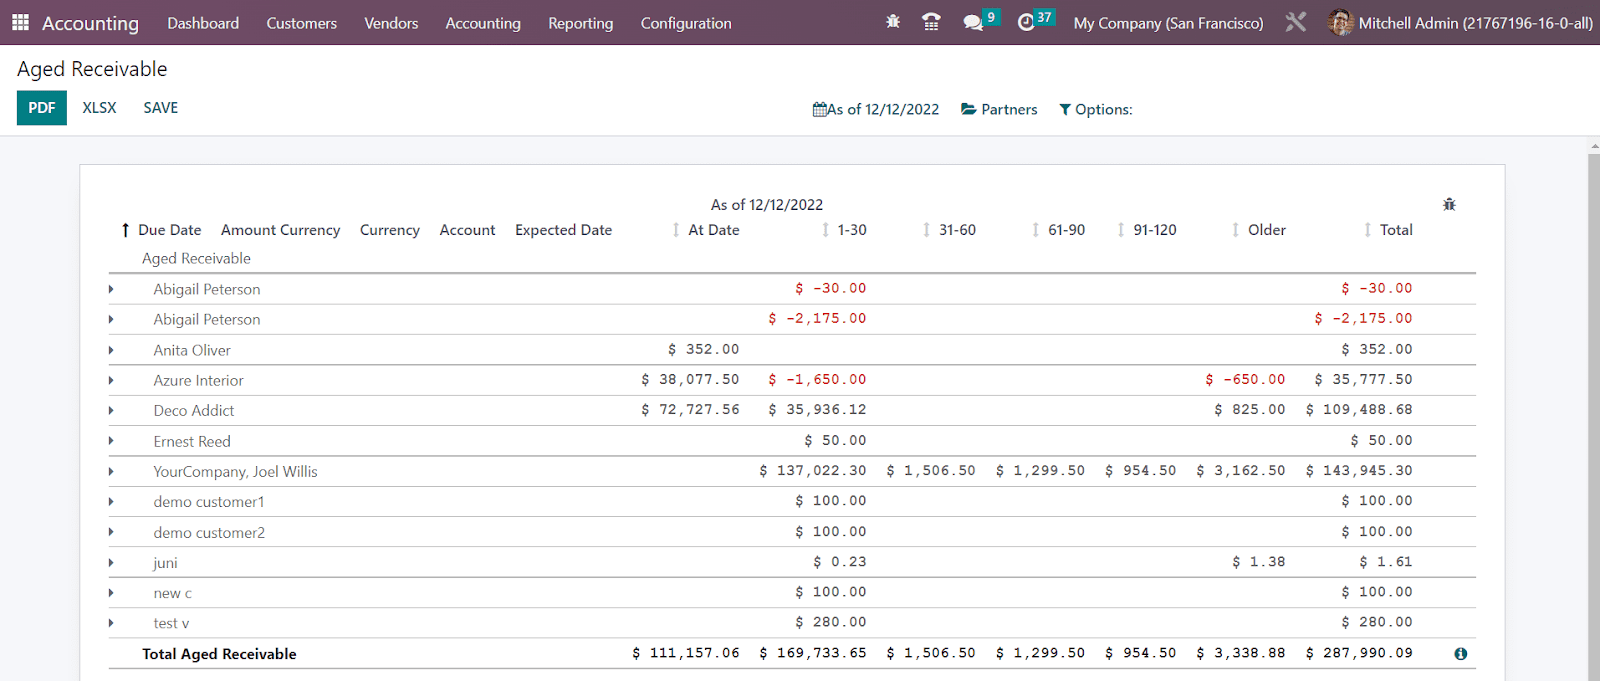
Aged Payable
Similar to the Aged Receivable platform the Aged Payable also shows delayed payment reports. These delayed payments are meant to be paid by your company to the respective partners before the due date. If your company failed to pay the invoices before the due date mentioned in the payment terms, it will be added to the Aged Payable report in the OTX Accounting.

Invoice Analysis
Using the Invoice Analysis option from the Reporting menu, you can observe the invoice reports of the company during the selected accounting period. The report can be generated in the graphical and pivot table format at your convenience. You will get the Average Price, Product Quantity, Total, Untaxed Total, and Count as Measures on this window. The available default filters are My Invoice, To Invoice, Invoiced, Customer, Vendor, Invoices, Credit Notes, Invoice Date, and Due Date. The customization option will help you to create custom filters for invoice analysis.
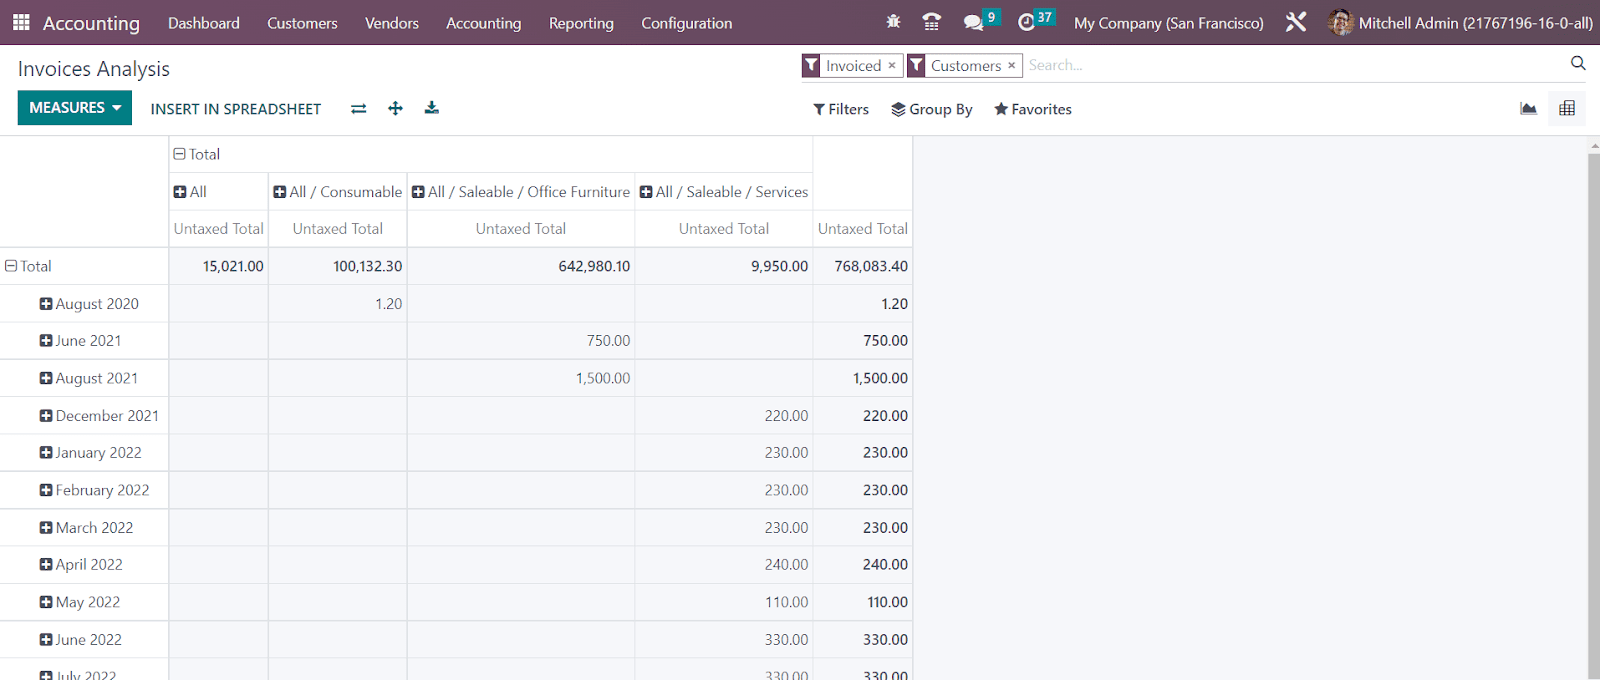
You can group the invoices based on the Salesperson, Sales Team, Partner, Product Category, Status, Company, Date, and Due Date.
Unrealized Currency Gains/Losses
You will get the report of all open accounts on your balance sheet that need to be re-evaluated again in the Unrealized Currency Gains/Losses platform in the Reporting menu. The reports will be grouped based on the currency used in the respective account. It shows the details of the Balance in Foreign Currency, Balance at Operation Rate, Balance at Current Rate, and Adjustment. Required adjustments can be made to the entries using the Adjustment Entry button.
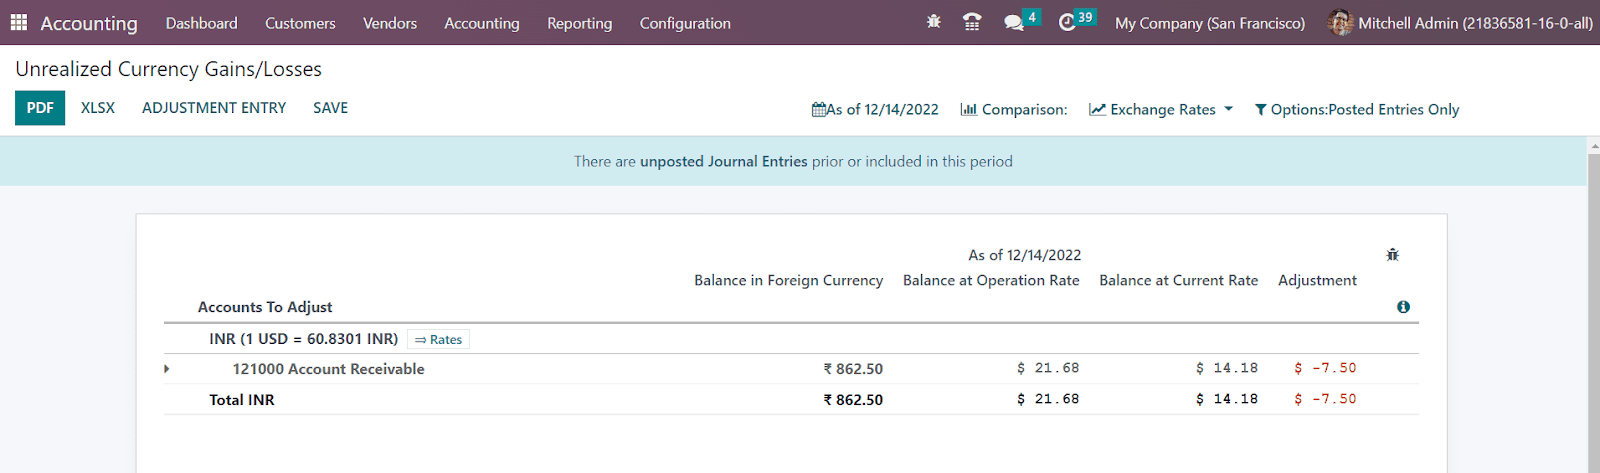
The amount that is taken from the bill or invoice can be seen in the Balance in Foreign Currency. In the Balance at Operation Rate, you will get the amount that is calculated at the time you received the bill. The current value of the amount at the time of the report generation can be seen in the Balance at Current Rate field. The value shown in the Adjustment column should be added to the accounting to update the financial reports according to the current information. Using the Exchange Rates feature, you can adjust the exchange rate accordingly.
For making adjustments, you can click on the Adjustment Entry button.
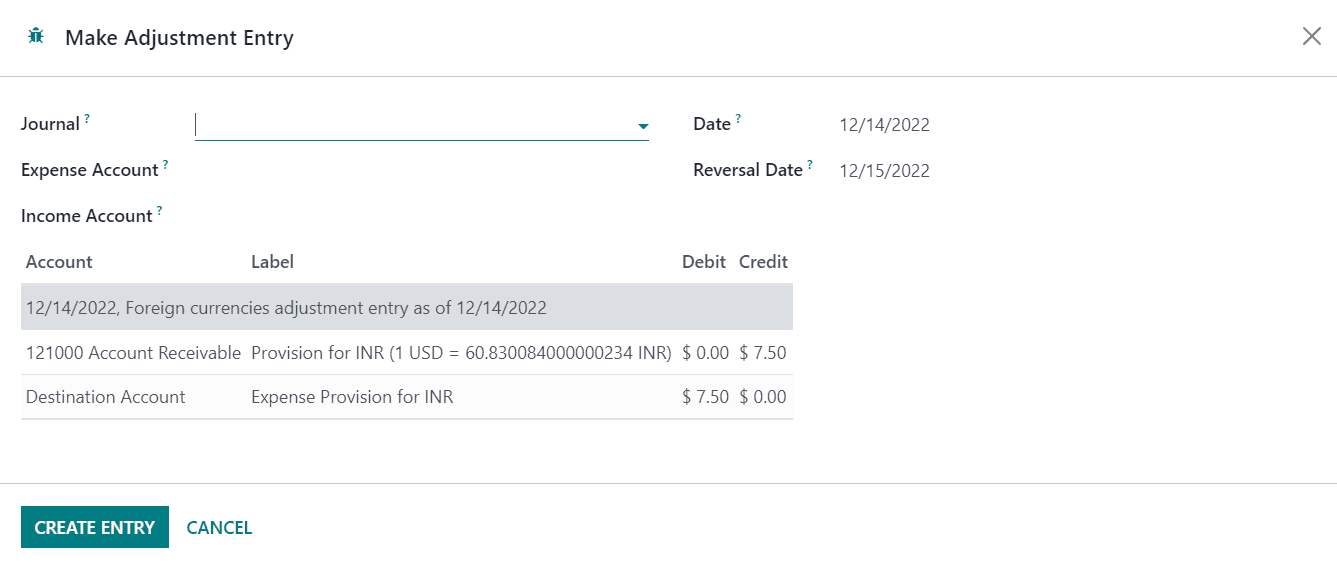
Here, you can select the suitable Journal to record this new accounting entry. Then, select Expense Account, Income Account, and set a Date on which you want this accounting entry to be reported in the respective fields. After adding the necessary details, you can confirm the adjustments by clicking on the Create Entry button. By doing so, the adjustment will be done automatically and corresponding accounting entries will be posted in the mentioned journal as shown below.
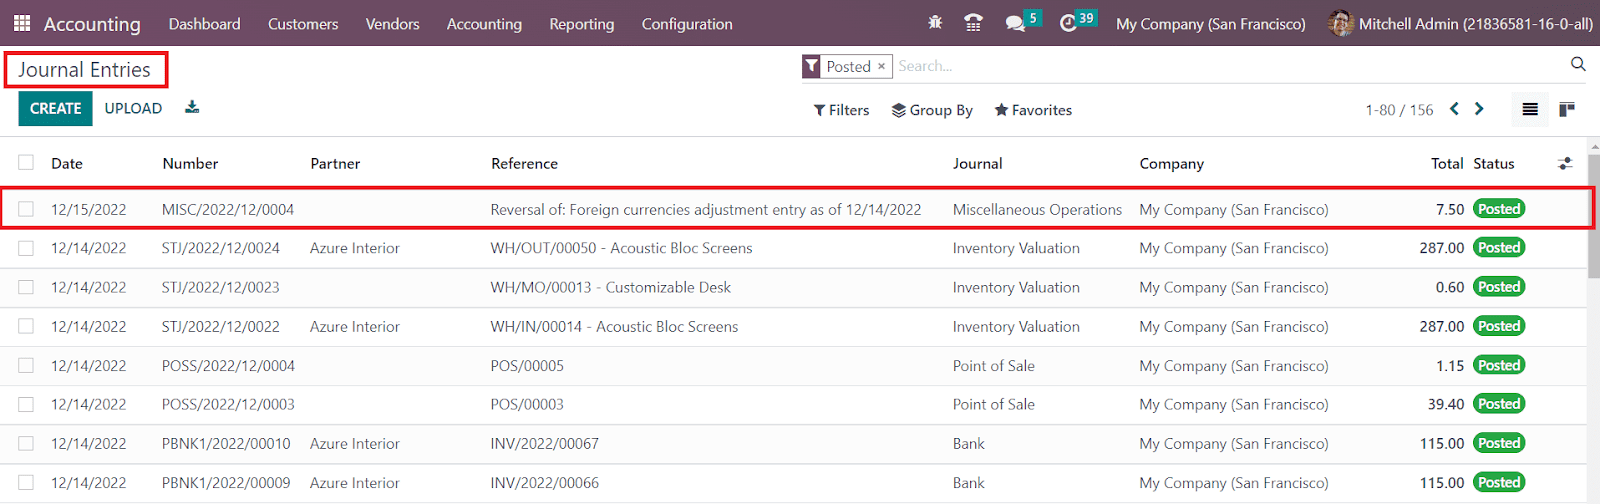
You can check the Unrealized Currency Gains/Losses report again to ensure if any adjustment is required or not.
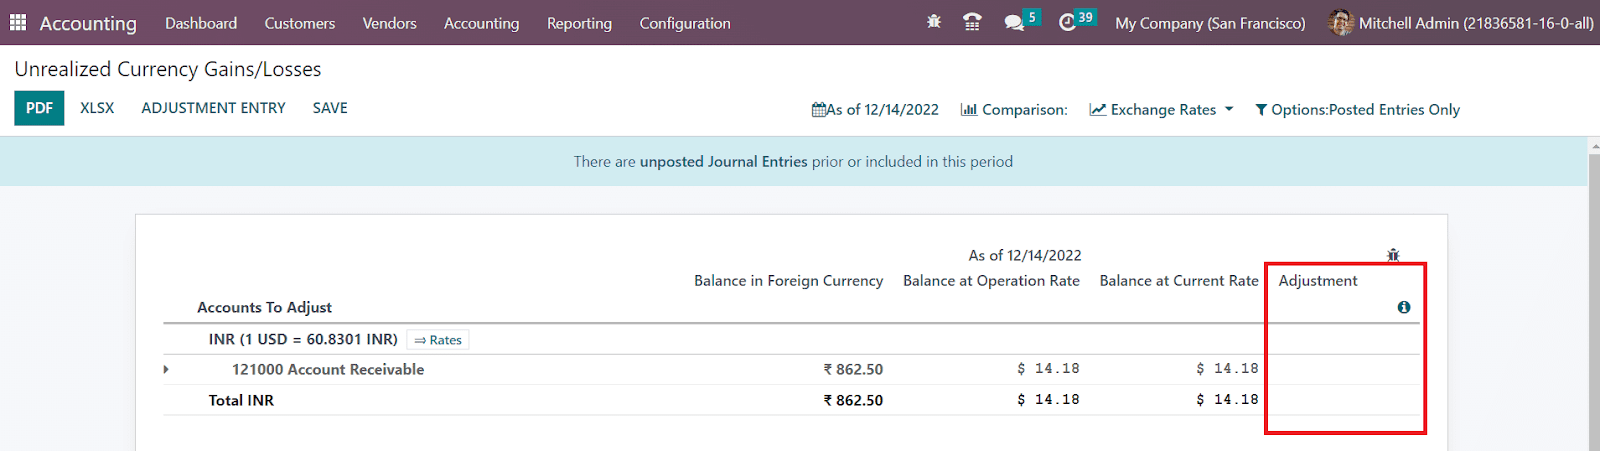
Depreciation Schedule
The schedule created for depreciating the cost of valuable assets over a particular number of accounting periods can be observed in the Depreciation Schedule platform. As shown in the image below, the report shows the Acquisition Date, First Depreciation, Method, Duration/Rate, depreciation dates, and Book Value.
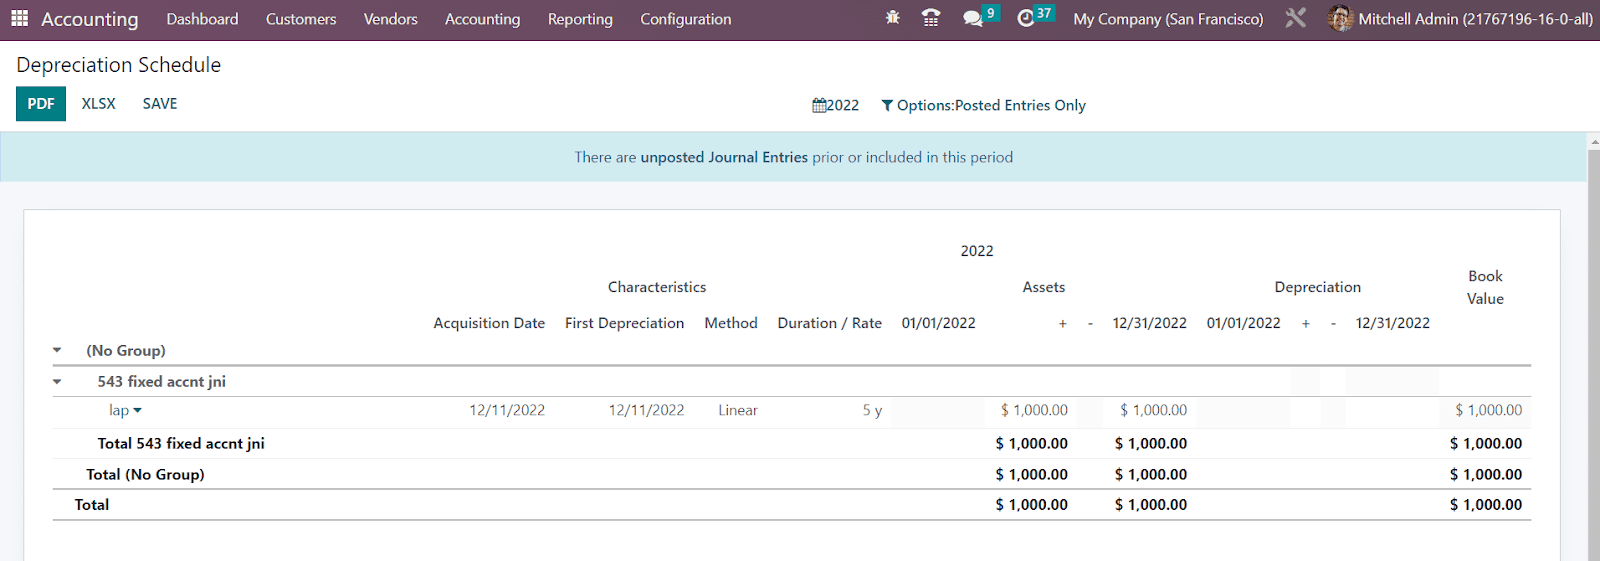
Product Margins
In order to calculate margins on products, you can click on the Product Margins option from the Reporting menu. A pop-up will appear as shown below to mention the From date and the Invoice State. The invoice state can be set as Paid, Open and Paid, or Draft, Open and Paid.

Now, click on the Open Margins button which will give the product margin report as shown below.
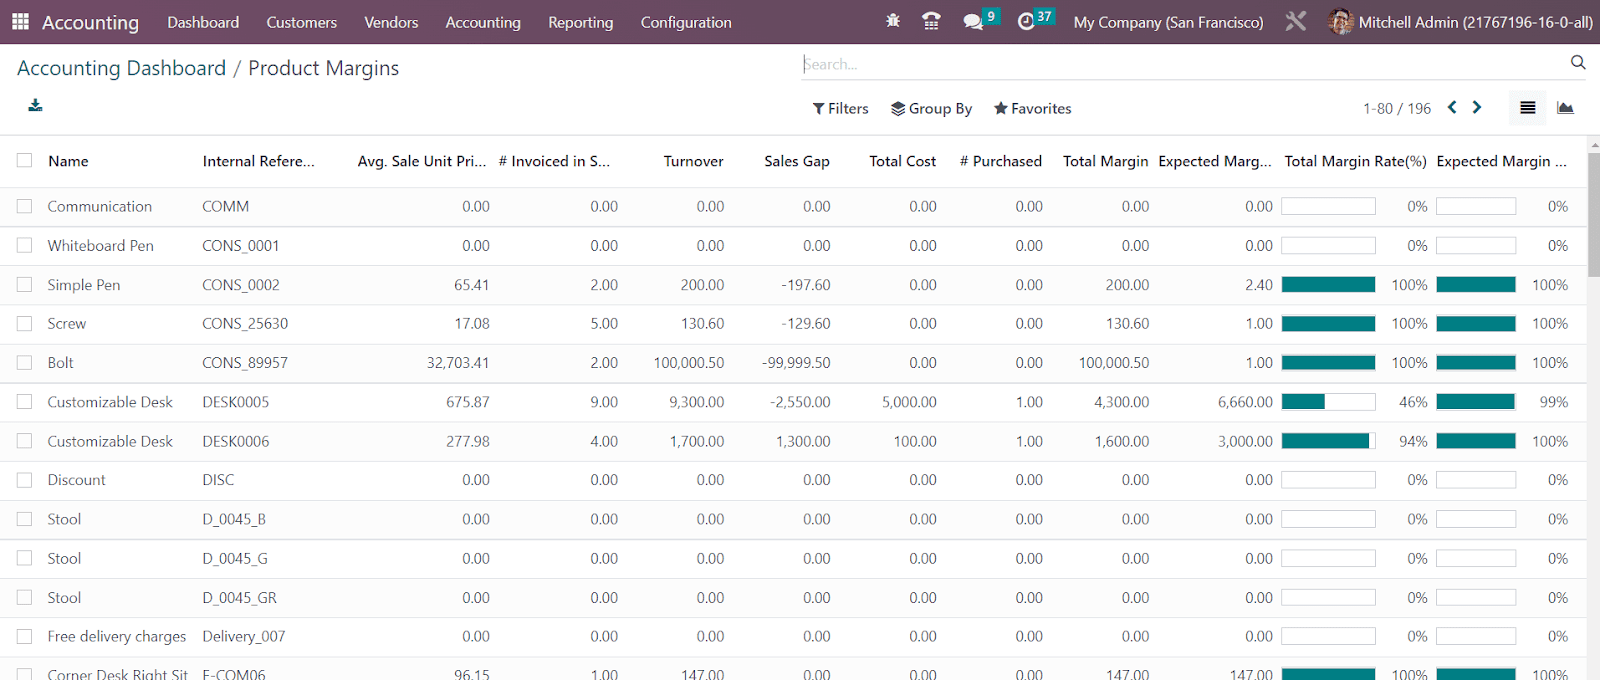
The report shows the Name of the product, Internal Reference, Average Sale Unit Price (Average price in customer invoices), Invoiced in Sale (Sum of quantity in customer invoices), Turnover (Sum of multiplication of invoice price and quantity of customer invoices), Sale Gap (Expected sale- turnover), Total Cost (Sum of multiplication of invoice price and quantity of vendor bills), Purchased (Sum of quantity in vendor bills), Total Margin (Turnover- standard price), Expected Margin, Total Margin Rate, and Expected Margin Rate.
The product margins report is beneficial to understand the product sales progress. It helps to improve the financial analysis of your company by tracking the performance reports over a period of time.
In the Settings menu of the Accounting module, you can find the Reporting tab from where you can activate the feature called Add Totals Below Sections.
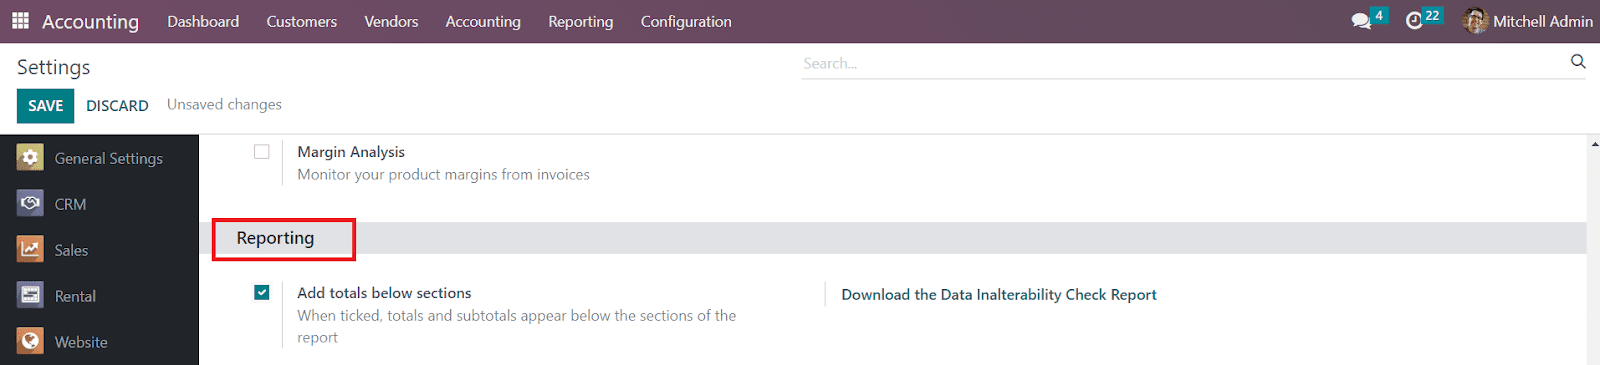
By activating this feature, you will get the details of the total and subtotals in your financial reports as shown in the example below.
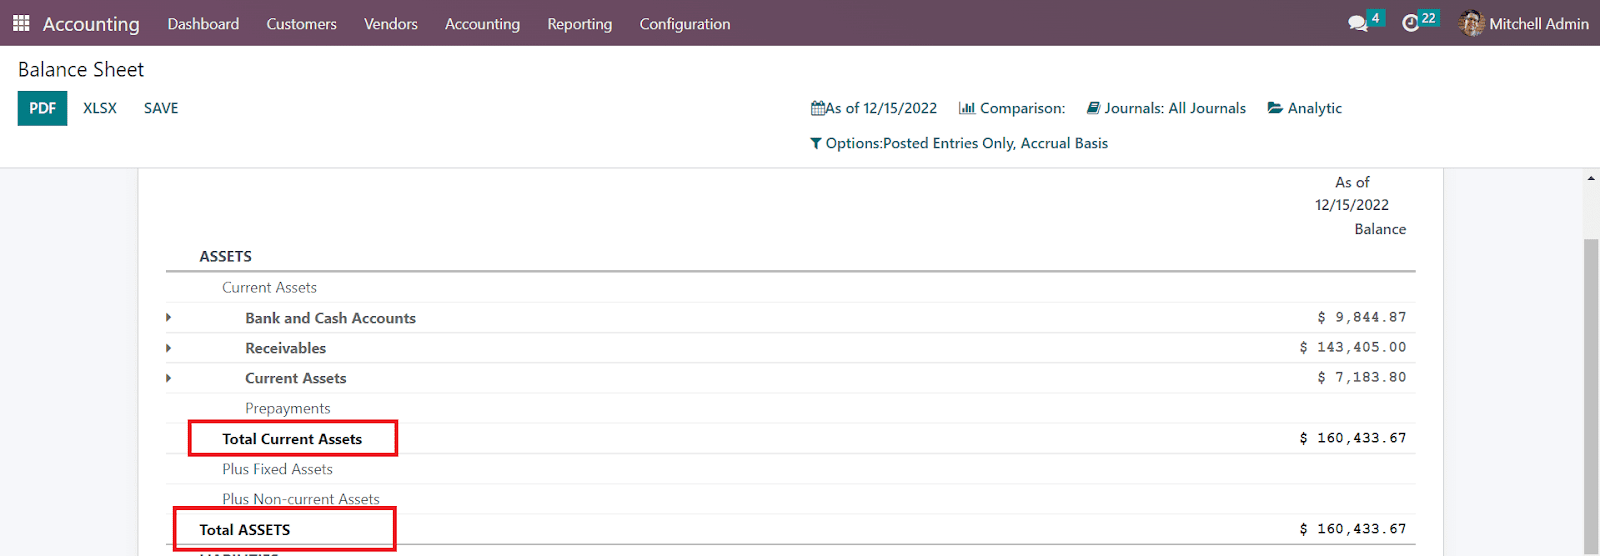
Accounting Reports
Accounting Reports
For making the reports more informative and understandable, OTX offers a new feature for customizing your accounting reports. If you want to customize the accounting reports of your company according to your requirements, you can go to the Accounting Reports option given under the Configuration menu of the Accounting module. This platform will assist you in creating reports that suit your needs. You can change the configuration of the already existing reports also by selecting the corresponding one from the given list, as shown below.

Let’s detail this feature through an example. Here, we are going to customize the report of Aged Receivable. For this, you can select the Aged Receivable from the list.

The name of the report will be available here. In the Root Report field, you can mention the root report, and the current report will be a variable of the mentioned root report. Under the Lines tab, you can specify new report lines using the Add a Line button. You will get a pop-up window to configure the details of the new report line.

Here, we are creating a new report line called Aged Receivable in our financial report. In the Partner Line, you can specify the partner id of this reporting line. A separate list of fields will appear in the report line by mentioning the keys in the Group By field. If you want to turn the report line into a link, you can use the Action field. The Level field will show the hierarchical level of this report line. You can specify a unique identifier for this line in the Code field. By activating the Foldable field, a folding button will be displayed on the report to fold this line. When the Print on New Page button is activated, everything after it will be printed on a new page. By enabling the Hide if Zero feature, OTX will automatically hide the line when all of its columns are 0. Using the Add a Line button, you can specify the Label, Computation Engine, Formula, and Subformula.
After creating a new line, you can observe the new reporting line in the Aged Receivable report as shown below.

Now, let’s create a new column for the report. Under the Column tab, you can create new columns for the Aged Receivable report by clicking on the Add a Line button.

Here, we are adding the column Currency to our report. You can mention the Name, Express Label, and Figure Type in the respective fields. The Sortable and Blank if Zero fields can be activated as per your demand.

As shown in the image above, the new column Currency will be available in the Aged Receivable report.
Under the Options tab, you will get advanced customization options to create the report at your convenience.

The limit value can be set in the Load More Limit field. You can set the Account Groups feature as Enabled by Default, Never, or Optional. The filter Multi Company can be adjusted based on the Use Company Selector or Use Tax Unit. Set the field as Disabled if you want to disable the Multi-Company filter option. The Default Opening field can be used to set a time period and to show the report of the selected time period as default while opening the Aged Receivable report in OTX . The required Horizontal Groups can be added in the given space. You can activate the Analytic Filter and Analytic Group By options if you want to provide more sorting options in your reports.
If you want to show the Date Range, Unfold All, Growth Comparison, and Period Comparison features on the Aged Receivable report, you can activate the corresponding fields from the Advanced session. Activating the Cash Basis field will display the option to switch to cash basis mode. In order to add additional filters to the report, you can enable the Account Types, Journals, Partners, Draft Entries, and Unreconciled Entries from the Filters session.
After making the necessary changes in the settings of the Aged Receivable report, you can observe corresponding changes in the reporting platform as shown in the image below.

Using the dedicated Accounting Reports feature, you can customize your financial reports to make them more advantageous enough to perform an excellent analysis of the financial operations done in your organization.
Accounting Import
The OTX Accounting module is now equipped with several advanced tools and features to improve accounting operations. One such feature is the Accounting Import facility in OTX . The user can decide how they want to set up their Chart of Accounts using this feature. You will be able to get access to this new feature from the Settings menu of the Accounting module.

Here, you will get the Review Manually option to get a view of the Chart of Accounts of your organization. You manage your chart of accounts from this platform.

Clicking on the Import button will direct you to a new window where you can find various Accounting Import Options.

Here, you can use a predefined format to import your data faster. You are allowed to use templates to import CSV or Excel for your accounting setup. Similarly, you can use the Import Contacts options to import customers or suppliers and their contacts, Import Chart of Accounts option to import Chart of Accounts and their initial balances, and Import Journal Items for unreconciled entries in your Payable and Receivable accounts using templates.
Let’s take a look at how to import contacts using this feature. For this, you can click on the Import Contacts button. OTX will direct you to a new window where you can upload an Excel or CSV field to import contacts.

Using the Import Template for Customers button, you will be able to get a predefined template to import contacts. You can use this template and upload it using the Upload File button.

Once you upload the template, the screen will display the data from the uploaded template. Click on the Import button and OTX will show the customers list as shown below.

By following the same method, OTX will enable you to import Chart of Accounts and Journal Items for your accounting setup.

The Import button available in the Accounting Import tab will directly lead you to the Accounting Import Guide. So, if you want to use the import options, you can click on this button.
Storno Accounting
Storno Accounting is a newly introduced accounting feature in OTX . In this method of accounting, it will use negative credit or debit amounts recorded in your account to reverse the original journal entries. With the assistance of this practice, it is possible to cancel a file having incorrect accounting information related to the recorded amount.
After canceling the wrong accounting document, you are responsible for entering the actual amount details to ensure accuracy.

If you are using Storno accounting, OTX will create a copy of the original entry, and you can see that the amount mentioned in the reverse entry will be shown in a negative sign.
Let’s discuss this accounting feature through an example. Imagine that you already posted an invoice from a vendor in the amount of $180. While completing the payment, you discovered that the amount was mistakenly entered as $180 instead of $160. In this situation, you need to create Storno for the original entry. After reversing the entry, you can create a correct invoice for the amount of $160.

The screenshot shows the invoice for the amount of $180. The journal items for this invoice can be seen under the respective tab, as shown below.

While checking the Journal Items in your Accounting module, you can find the posted journal items for the amount as shown below.
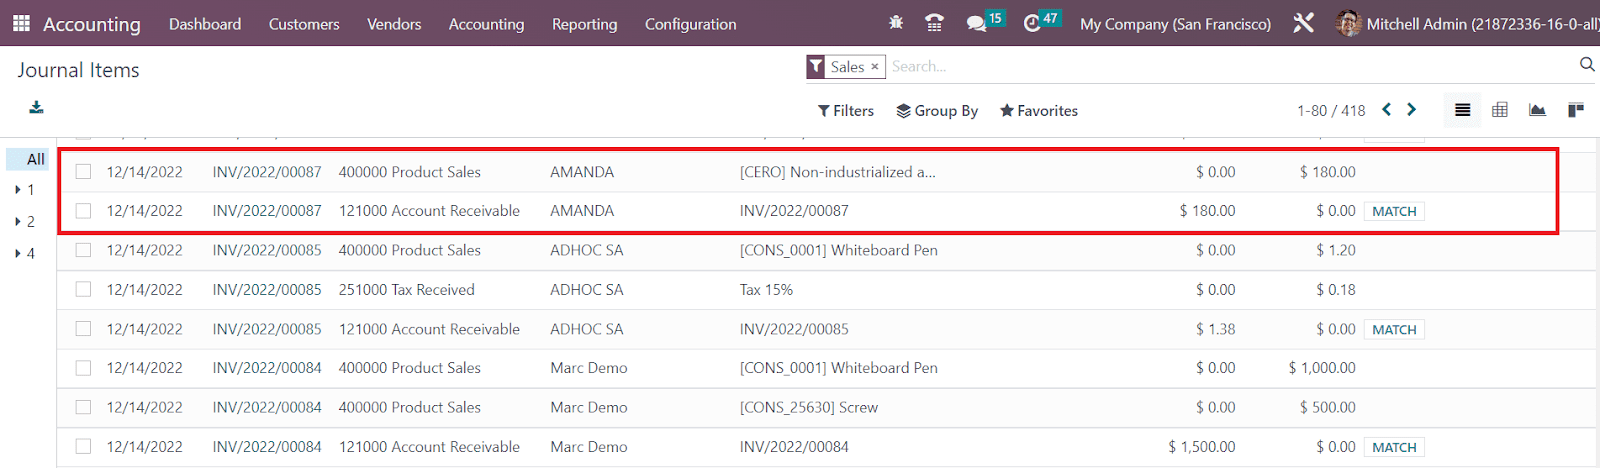
Now, we are going to reverse the entry because the invoiced amount is not the actual amount.

Click the Add Credit Note, and a pop-up will appear to mention the details of the credit note.

After mentioning the necessary details, you can click on the Reverse button. The posted journal entry will be reversed, and the amount will be recorded in the journal items with a negative sign, as shown below.

After reversing the journal entry, you can invoice the actual amount.

The journal items of the incorrect invoice, Storno, and correct invoice can be seen in the Journal Items menu of the Accounting module, as shown in the image above.
Sales Credit Limit
With the assistance of the new Sales Credit Limit feature in the OTX 16 Accounting module, it is possible to trigger an alert while creating invoices and sales orders for partners with a total receivable amount exceeding a limit. You can activate this feature from the Customer Invoice tab of the Settings menu.

Here, you will get an additional field to specify the Default Credit Limit for the partners. Here, we mentioned $500 as the Sales Credit Limit.

Now, let’s check what will happen once you create an invoice or sales order for a partner whose credit limit has already exceeded $500.

As you can see in the image above, OTX will display an alert to inform you that this customer has already reached the credit limit of $500. It will also show the total amount due of the customer.
It is possible to set the credit limit separately for individual customers also. For this, you can select the Customers menu from the Accounting module. From the given list of customers, you can select a customer to set Sales Credit Limit. Under the Accounting tab of the form view, you will get the option to activate the Partner Limit.

After activating the Partner Limit feature, you can set a credit limit for this customer. The Total Receivable field will show the total amount this customer owes you. By following these steps, you can set sales credit limits for each customer in your database.
Predict Vendor Bill Accounts
The Predict Vendor Bills Accounts is one of the advanced features offered by OTX to simplify the billing process in the Accounting module. By enabling this feature in your OTX , the system will attempt to predict the accounts on vendor bill lines based on the history of previous bills. From the Vendor Bills tab of the Settings menu, you can activate the Predict Vendor Bill Accounts feature in your Accounting module.
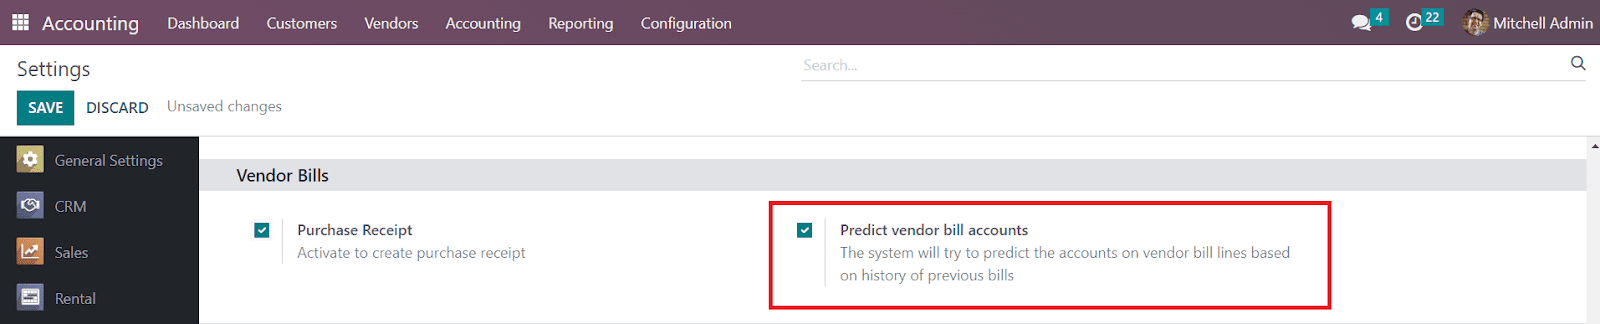
When you mention a label in the vendor bill line without specifying the product, the product field will be auto-completed with a product that is similar to the label you mentioned.

The vendor bill line will be auto-populated according to the history of previous bills in your database.
Document Digitization
The Document Digitization feature in the OTX Accounting module can be used to digitize your PDF or scanned documents with OCR and Artificial Intelligence. With this feature, you can manage your vendor bills and invoices easily on a daily basis. It allows you to gather all documents in the same place, and everything will be integrated into your database. With the OCR, all the documents will be automatically recognized and filled in your OTX database. You can activate this feature from the Settings menu of the Accounting module.
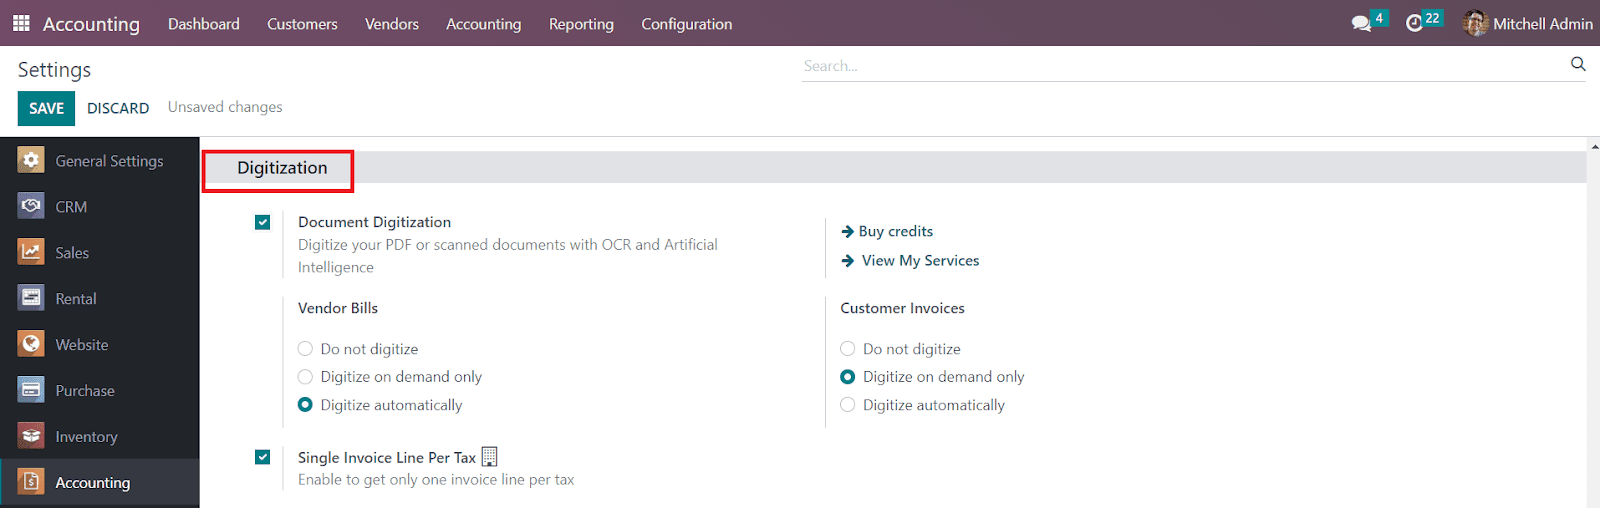
After activating this feature, you can decide how to digitize the Vendor Bills and Customer Invoices. You can set the options as Do not Digitize, Digitize on Demand Only, or Digitize Automatically as per your requirements. This feature will be helpful to automatically encode your paper bills into vendor bills and customer invoices in your Accounting module. The Single Invoice Line per Tax can be activated to get only one invoice line per tax.
You can upload the bills and invoice manually or send scanned documents using an Email alias. You can use the Upload button available on the Customer Invoice and Vendor Bills platforms in the OTX Accounting module to upload an invoice or bill to your system.

Here, we are going to upload a customer invoice using the Upload button available in the Invoices menu. Once you complete the process, the document will be processed automatically according to your settings and the details will be auto-populated in the fields of the invoice as shown below.
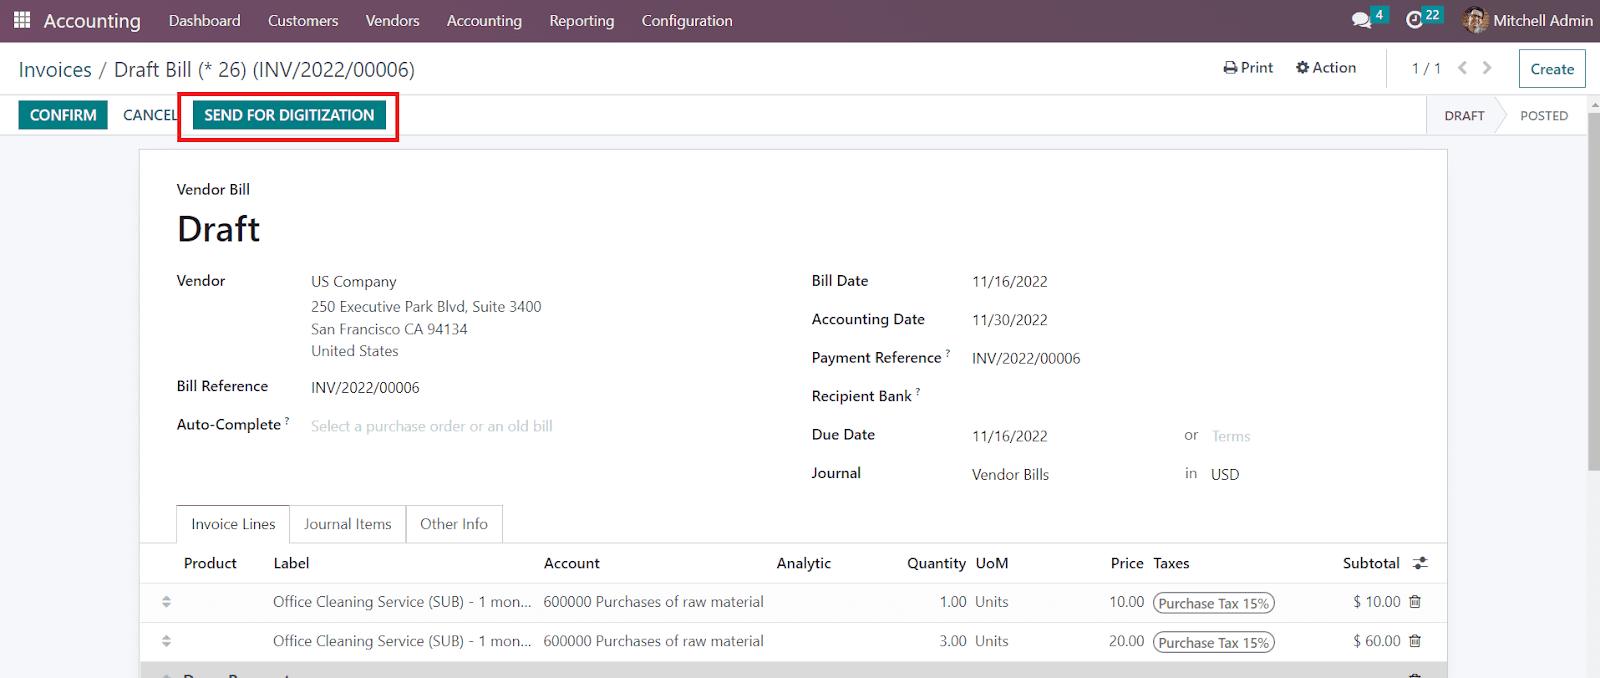
In order to do the process manually, you can click on the Send For Digitization button.

Once the details from the PDF or the scanned document are extracted to your system, you can check the data and make corrections if necessary. Remember that you need to buy credits in order to extract data from invoices.
Sales
Sales module in OTX is used to ensure advanced sales management operations of a company. In order to run your sales processes efficiently, you can completely rely on the OTX Sales management application. You can streamline your workflow by systematically coordinating the quotation creation, customer management, sales team organization, sales order confirmation, invoice generation, and many more sales operations within an organization. Managing and monitoring all these activities manually will be tiring. With the high integration features available in the OTX 16, you can make use of the advanced tools and attributes of an ERP system to perform all essential sales tasks seamlessly.
OTX is developing day by day to assure its best performance for users. OTX 16, the latest version of OTX , offers you the fastest processing time without compromising on high execution. You can find new changes in the Sales module also which are helpful to elevate the overall sales management. In the latest version, OTX allows the merging of subscriptions into sales orders. A dedicated smart button will be available on the corresponding sales orders to manage the subscription from the sales module itself. Apart from this, you will be able to find more changes introduced in the Sales module in
Products
Needless to say, the product is an irreplaceable factor in any kind of business. You should always prioritize product management to run a successful business no matter if it is a consumable product or a service product. By considering the significance of the proper management of products in a company, OTX Enterprise offers a dedicated platform for recording all necessary details regarding product management. This platform will make sure to keep track of vital information related to products that are configured into the system for sales operations. The exclusive product management tool provided by OTX will benefit you in many aspects of your business. The product configuration tool will assist you in creating a record of all your sales products in an organized manner. In each product configuration window, you will be able to get corresponding tabs to document the accounting, purchase, inventory, eCommerce, and many more data related to product management operations.
Here, we will be discussing the Products menu available in the OTX 16 Sales module. While creating new quotations or sales orders in the Sales module, you are requested to mention the product details. So, creating a record of all sales products is very essential to simplify the creation of quotations or sales orders in the Sales module. By doing so, you can easily select the required product from your system with a single click. The highly integrated nature of the OTX ERP system will allow the Sales module to work integrated with the Inventory module which will benefit you to get the stock details of the product from the Sales module itself. So, before creating a sales order, make sure to configure the required products to the Sales module.
As you can see in the screenshot below, the Products menu will be shown in the main menubar of the OTX Sales module under which you will get sub-menus such as Products, Products Variants, Pricelists, Discount & Loyalty, and Gift Cards & eWallet.

We will discuss each of these sub-menus in detail. First, let’s take a look at the Product management window in the Sales module. As soon as you select the Products sub menu, OTX will direct you to a new window that will give you a view of all the configured products in the Sales module. This window can be viewed in Kanban as well as List view. The screenshot given below is the Kanban view of the Product management window.

Just like we observed in the CRM module, the icon that represents the Kanban view has changed in OTX 16. Apart from the kanban and list views, you will get an additional view on this platform which is Activity which will show the list of activities scheduled for different sales-related operations for different products. Regardless to say, the Filters and Group By options are available in this window also to simplify the sorting process. Customizable options are available in both sorting options so that you can easily retrieve the required data within seconds. You will get a star icon on each product which can be used to add a product to your favorite list.
The List view of the product window displays the details of the Product Name, Internal Reference, Responsible, Product Tags, Sales Price, Cost, Quantity on Hand, Forecasted Quantity, and Unit of Measure. You can add additional default fields as well as custom fields to the list view using the icon given on the right corner of the window as marked in the screenshot below.

Now, let’s take a look at the configuration of new products in the OTX 16 sales module. If you want to make changes to the available products, you can select the required products from the given list and edit them. In order to create a new record, you are instructed to click on the Create button. The new product configuration window is shown below.

The name of the product can be mentioned in the Product Name field. As we mentioned earlier, you can use the star icon to add this product to your favorite list. This product can be sold, purchased, expensed, recurring, and rented based on the option you select. You can choose the Can be Sold option if you want to sell this product. Selecting the Can be Purchased option will configure this product as a purchasable product. The product can be selected at an expense by selecting the Can be Expensed option. Confirming a sales order with this product will create a subscription by selecting the Recurring option. OTX will allow you to rent the product by choosing the Can be Rented option.
The Sales module works integrated with many major modules in OTX . Based on the modules installed in your database, you will be able to get advanced tabs in the product configuration window. Let’s discuss each of them in detail.
The General Information tab is used to mention the general data regarding the product. You can select the suitable Product Type from the given options.

There are Consumable, Service, Storable Products, Event Tickets, Course, and Event Booth product types available in OTX . A Storable product is a product for which you manage stock. The Inventory module has to be installed to manage the storable products. Consumable products are physical products that don’t demand any stock management. These are always available. A Service is a non-material product you provide for your customers.
After mentioning the Product Type, you can set the Invoicing Policy. You can set invoicing policy on ordered quantity or delivered quantity based on the demand. You can invoice quantities ordered by the customer by choosing the invoicing policy as Ordered Quantities. By selecting the invoicing policy as Delivered Quantities, OTX will generate invoices for the quantities delivered to the customer. You can set a default unit of measures that can be used for all stock operations in the Unit of Measure field. The Purchase UoM field can be used to set the default UoM purchase orders. It must be in the same category as the default unit of measure. The price at which the product is sold to customers can be added in the Sales Price field. The Customer Taxes field indicates the default taxes used when selling the product. Mention the TaxCloud Category in the corresponding field. This refers to TIC (Taxability Information Codes) which is used by TaxCloud to compute specific tax rates for each product type. The value set here prevails over the one set in the product category.
In the corresponding fields, you can specify the Cost, Product Category, Internal Reference, Barcode, Product Tags, and Company. The Internal Notes available in the General Information tab can be used to add notes for internal purposes.
Sometimes a product may contain multiple variants with different attributes. All those attributes and variants of a product can be listed under the Attributes & Variants tab.

Using the Add a Line button, you can add the Attribute and corresponding Values in the given spaces.
The sales-related details of the new product will be recorded under the Sales tab of the product configuration window. You can use this tab to define your upselling and cross-selling strategies, eCommerce shop, and point of sale. The screenshot depicted below shows the Sales tab of a product. Under the Upsell & Cross-Sell field, you can define the Optional Products, Accessory Products, and Alternative Products in the respective spaces.

Optional Products: It is a coss-sell strategy that suggests related products whenever the customer hits the ‘Add to Cart’ button on the eCommerce page.
Accessory Products: This is also a cross-sell strategy that suggests related products when the customer reviews the cart before payment.
Alternative Products: It is an upsell strategy that suggests alternatives to a product on the product page.
Here, OTX offers you an option to generate warning messages on products. You can activate this feature from the Settings menu of the Sales module. Using this feature, you can set warnings and block messages on a product.

Under the Quotation & Orders tab, you can find the option to activate the Sale Warnings. As soon as you activate this option, you will get the field Warning in the sales tab of the product configuration window to set a warning when selling that product.

The action can be set as Warning, Blocking Message, or No Message. Selecting the Warning option will send a warning message to the user and you can specify the message in the given space. By selecting the Blocking Message, OTX will block the flow.
Under the Commerce Shop field, you can specify the details regarding your eCommerce website to publish the product for online sales. The Website Sequence will determine the display order on the eCommerce page. The Categories field can be used to mention the eCommerce category of the product. While publishing a product on an eCommerce page, you can add ribbons on them like New, Out of Stock, Limited Stock, etc to attract customers. Such ribbons can be mentioned in the Ribbons field. If you want this product to appear at the point of sale, you are allowed to enable the Available in POS POS option given under the Point of Sale field. Using the Add a Media button, you can upload Extra Product Media related to the product.
The Sales Description field will help you to specify sales-related notes which will be added to the sales orders and invoices of this particular product.
If you are configuring a purchasable product the purchase-related details can be defined under the Purchase tab. Here, you can specify the Vendors of the product using the Add a Line button. You can add multiple vendors to a product using this button. If you want to subcontract the product, you can enable the Subcontract field.

Mention the Currency suitable for your purchase operations with the selected vendor, the Quantity to purchase from this vendor to benefit from the price expressed in the vendor product unit of measure, the default Unit of Measure used for purchase orders, the Price to purchase this product, and the Delivery Lead Time in the respective fields. The Delivery Lead Time is the lead time in days between the confirmation of the purchase order and the receipt of the product in your warehouse.
The default taxes used when buying the product can be added in the Vendor Taxes field. The Control Policy can be set on Ordered Quantities (control bills based on ordered quantities) or Received Quantities (control bills based on received quantities). The notes described in the Purchase Description field will be added to purchase orders.

The essential information to manage the inventory of the product will be available under the Inventory tab of the product configuration window as depicted above. The Routes of Operations of the particular product can be selected from the given option. Based on the modules installed in your database, this will allow you to define the route of the product. Under the Logistics field, you can mention a user in the Responsible field. This user will be responsible for the next activities related to the logistic operations for this product. The Weight and Volume of the product can be defined in the respective fields.
You can define the Manufacturing Lead Time in the given field which is the average lead time in days to manufacture this product, in the case of multi-level BOM, the manufacturing lead time of the components will be added. In case the product is subcontracted, this can be used to determine the date on which components should be sent to the subcontractor. You will also get a field to specify the number of Days to Prepare Manufacturing Orders . In the Customer Lead Time, you can mention the delivery lead time in days. It’s the number of days promised to the customer, between the confirmation of the sales and the delivery. Mention the HS Code in the corresponding field which is a standardized code for international shipping and goods declaration. At the moment, it is only used by the FedEx shipping provider. The Origin of Goods field will determine where goods originate, i.e. not where they have been shipped from, but where they have been produced or manufactured.

Under the Counterpart Location field, you will get two locations to define.
Production Location: This stock location will be used, instead of the default one, as the source location for stock moves generated by manufacturing orders.
Inventory Location: This stock location will be used, instead of the default one, as the source location for stock moves generated when you do an inventory.
In the Inventory tab, you will get an additional field to specify the packaging methods by enabling the Packaging Methods option from the Settings menu of the Sales module.

As soon as you activate the option, you will get the field to define the packaging methods as shown in the image below.

Using the Add a Line button, you are allowed to add Packaging along with the Package Type, Contained Quantity (Quantity of products contained in the package), Unit of Measure, Sales Order, and Purchase Order. Additionally, you can add notes in the Description for Receipts, Description for Delivery Orders, and Description for Internal Transfers in the respective fields.
The Accounting tab will be helpful to record the accounting details of a product.

In the Receivables field, you can mention the Income Account and in the Payables field, you can mention the Expense Account . The Price Difference Account is used in automated inventory valuation to record the price difference between a purchase order and its related vendor bill when validating this vendor bill. Under the Intrastat field, you can define the Commodity Code and Country of Origin. By defining an Email Template in the Automatic Email at Invoice field, OTX will automatically send a product-specific email once the invoice is validated. The UNSPSC code related to the product can be defined in the UNSPSC Category field.
You can sell this product on eBay by activating the Sell on eBay option under the eBay tab.

You will be able to get the eBay Status of the product in this tab. In the respective fields, you can mention the Title, Subtitle, Item Condition, Category, Store Category, Listing Type, Starting Price for Auction, Buy it Now Price, Duration, Allow Best Offer, and Private Listing. The policies related to eBay selling of the product such as the Payment Policy, Return Policy, and Shipping Policy can be defined in the given fields. Under the eBay Description tab, you can add a Description Template related to the characteristics of the product.
We discussed all available tabs in the product configuration window. This is how we configure products in the OTX 16 Sales module.
Product Variants
You can offer more varieties of a product to your customers by configuring its variants in the OTX Sales module. From the Settings menu, you can activate the Variants feature. The screenshot given below shows the Settings menu of the Sales module. Here, you will get the Variants option to activate under the Product Catalog tab. Activating this feature will allow you to sell variants of a product using attributes.

Using the Product Variants option under the Products menu will assist you to configure new variants of a product to your database. The configuration of variants of a product is similar to the product configuration that we discussed earlier.

The list of already configured Product variants can be seen as shown in the image above. Using the Create button, you can easily add a new one by following the same method of product configuration. You can configure different attributes for the products to define their variants from the Configuration menu of the module. Click the Attributes option from the Configuration menu as shown below.

A list view of the Attributes will appear on your screen with the details of the Attribute, Category, Display Type, Variants Creation Mode, and eCommerce Filter Visibility. Use the Create button to add a new attribute to your system. as Instantly, Dynamically, or Never. By selecting the Instantly option, all possible variants will be created as soon as the attribute and its values are added to a product. The variants will be created only when their corresponding attributes and values are added to a sales order by selecting the Dynamically option. Variants are never created for the attributes by choosing the Never option in the Variants Creation Mode.

In the Attribute Name field, you can specify the name of the attribute. Set a category to regroup similar attributes under the same section in the Comparison page of eCommerce. The Display Type used in the Product Configurator can be set as Radio, Pills, Select, or Color as per your preference. You can set the Variants Creation Mode
The attribute will be available in the ecommerce filter by selecting the Visible option from the eCommerce Filter Visibility field. You can hide this attribute from the filter in the website by selecting the Hidden option. Under the Attribute Values tab, you can mention the Values of the attribute one by one using the Add a Line button. The smart button Related Products will show the list of products with this attribute.
Pricelists
OTX offers advanced pricing features to give support to the pricing strategy of your business. With the assistance of these features, you can effectively create new pricelists for specific customers. Depending on the pricing strategies of the company, you can create and manage new pricelists in OTX 16 Sales module.
In order to get access to the platform to configure new pricelists, you must activate the corresponding feature from the Settings menu of the Sales module. One can easily activate the Pricelists feature from the Pricing tab as shown in the image below.

The user will be able to create two types of pricelists in OTX .
- 1.Multiple Prices per Product
- 2.Advanced Price Rules
We will detail each of these options in this session. After activating the Pricelist feature, you will be able to find the corresponding option under the Products menu as marked in the screenshot below to get access to the pricelist platform.

The list view of this platform shows the details of the Pricelist Name, Discount Policy, Currency, Selectable, Website, and Company. If you want to change the view to Kanban, you can click on the Kanban icon given in the top right corner of the window. As we mentioned earlier, you can create two types of pricelists in OTX . First, we will discuss the configuration of Advanced Price Rules.
Advanced Price Rules
While activating the Pricelist feature from the Settings menu, you can select the Advanced Price Rules option to generate an advanced pricelist for products. Now, go to the Pricelist option given under the Product menu. You will get a view of the Pricelist platform as depicted below.

Clicking on the Create button will lead you to a new pricelist configuration window. The advanced price rule configuration window is depicted below.
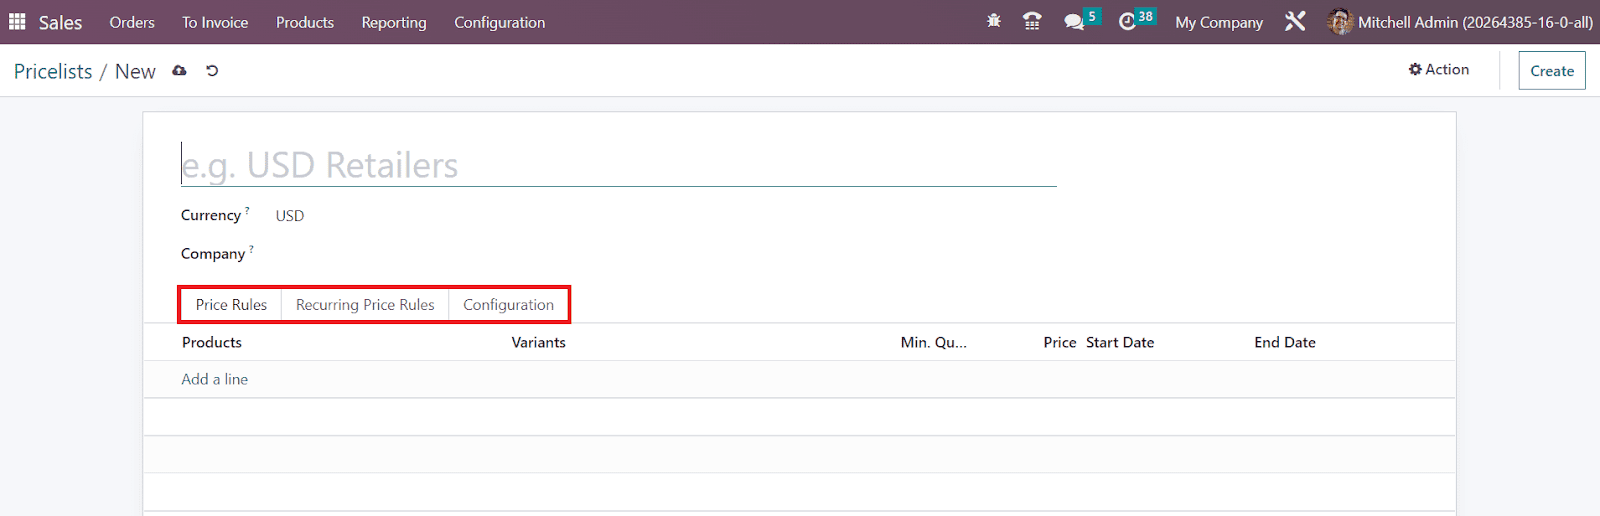
Here, you can mention the title of your new pricelist in the given space. Then, you can select suitable Currency from the dropdown and mention your Company in the corresponding fields. There are three tabs included in the pricelist configuration window to mention additional information regarding the new pricelist. Under the Price Rules tab, you can create new price rules for products using the Add a Line option. As soon as you click on this button, a new wizard will appear to create new pricelist rules as depicted in the screenshot below.
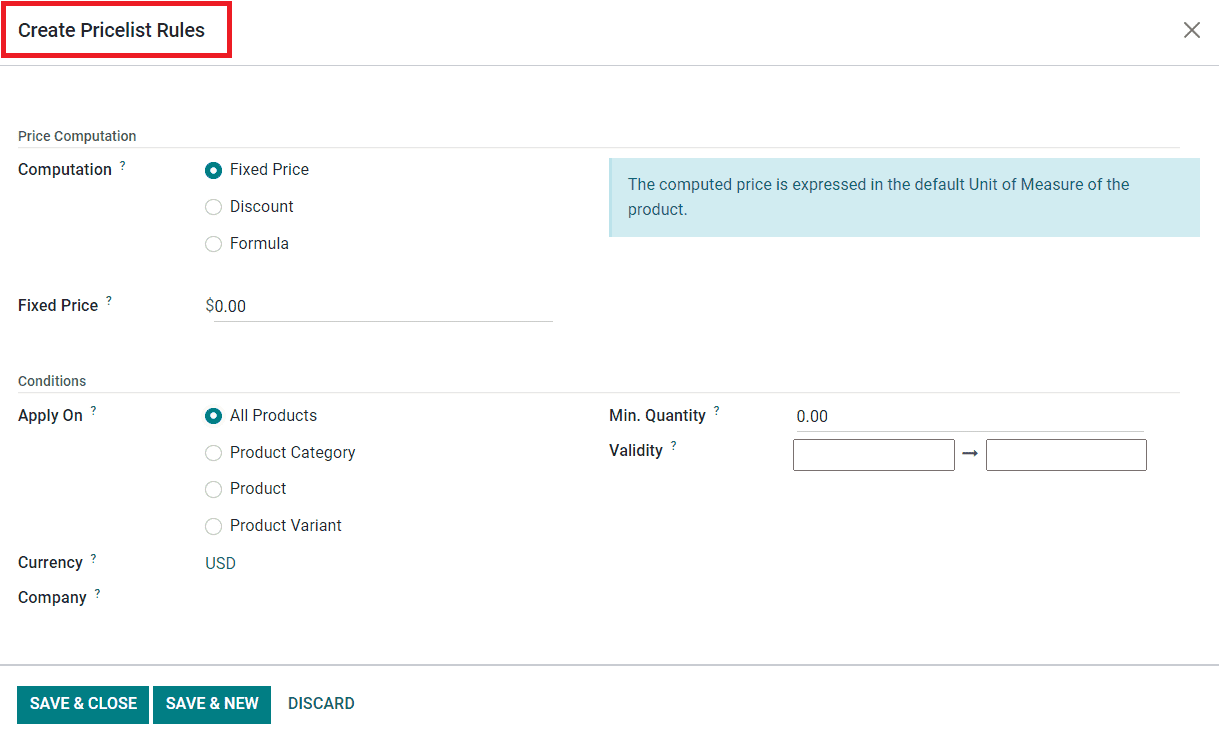
In the Price Computation field, you will get three computation methods to select such as Fixed Price, Discount, and Formula. Based on the option you select, additional fields will appear to specify details regarding the selected computation method. For example, if you select the Fixed Price option, you will get an extra field to specify the Fixed Price. Now, you can set the Conditions for the Pricelist Rules. You can apply this rule to All Products, or a particular Product Category, Product, and Product Variant based on the option you select in the Apply On field. Mention the Currency and Company in the corresponding fields. In order to apply this rule to a product, the bought/sold quantity must be greater than or equal to the quantity mentioned in the Minimum Quantity field. Finally, mention the starting and ending date of this pricelist rule in the Validity field. Click the Save button to add the new rule to your pricelist. In case the company wants to add more rules to the pricelist, you can use the Save & New button.
You can recur this price rule by mentioning the products in the Recurring Price Rules tab. Using the Add a Line button, you are allowed to select the product on which this pricing will be applied along with its variants. The minimum duration before this rule will be applied to the selected product can be specified in the Duration field. The duration can be specified in hours, days, weeks, months, or years based on the option you select in the Unit field.

The Price of the product will automatically appear on the corresponding field as soon as you select the product.
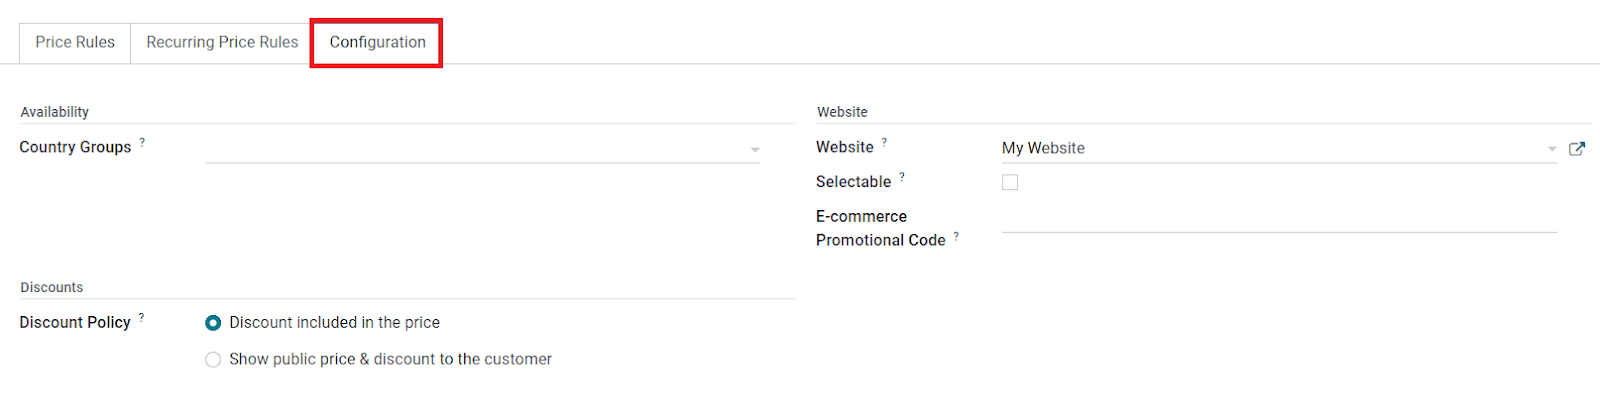
Now, you can move to the Configuration tab where you can find the Availability Discount and Website field to complete. In the Availability field, you can mention the Country Groups where this pricelist is available. You can set the Discount Policy as ‘Discount included in the price’ or ‘Show public price & discount to the customer’ in the Discounts field based on your company policies. In the Website field, specify the Website and eCommerce Promotional Code to use this pricelist on eCommerce. The user can choose this pricelist by activating the Selectable field. After completing all necessary fields, you can use the Save button.
Multiple Prices per Product
You can effortlessly create multiple prices for a product by configuring a new pricelist. In order to create this type of pricelist, don’t forget to select the Multiple Prices per Product option while activating the Pricelist feature from the Settings menu. The image depicted below is the screenshot of the multiple prices per product configuration window.
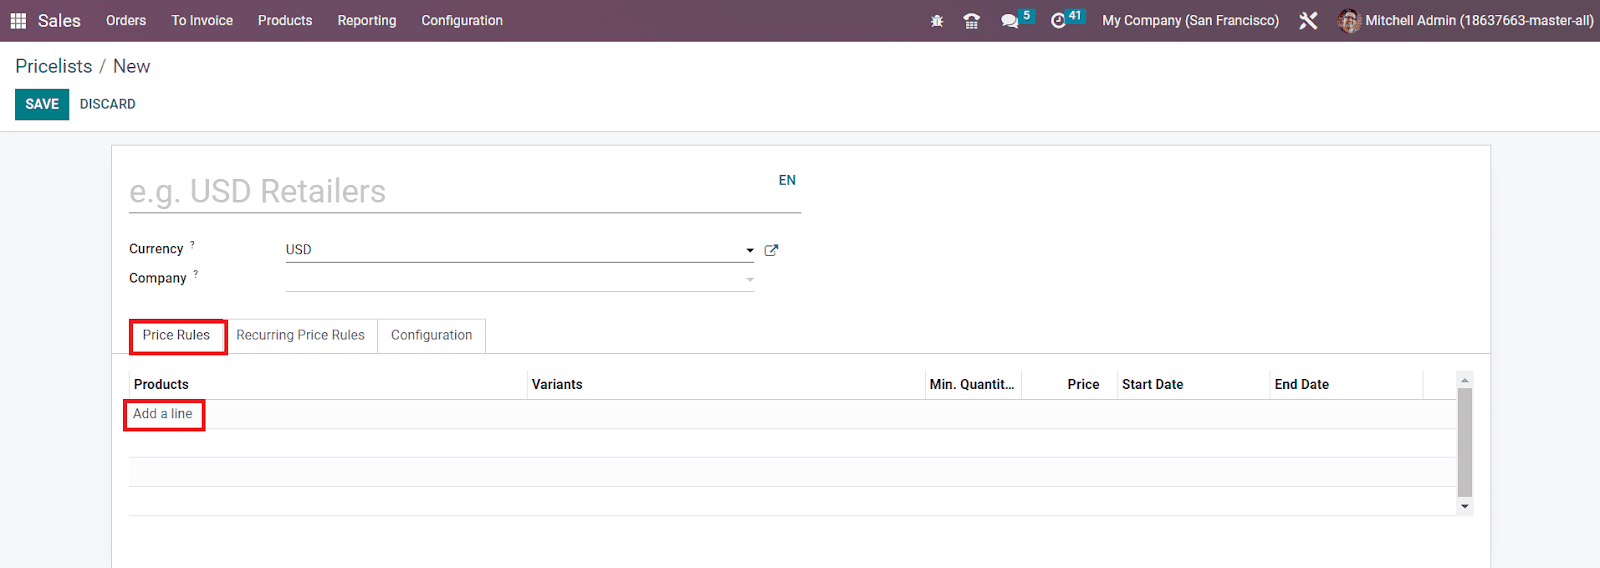
The configuration method is similar to that of the advanced price rule configuration. The only difference is that, under the Price Rule tab, you can add the list of products that you want to add to this pricelist using the Add a Line button.
Now, let’s take a look at the Promotions, Gift Card, and Loyalty features available in the Sales module.
Discount, Loyalty, and Gift Card
Discount, Loyalty, and Gift Card
Instead of the Promotion and Coupon Programs in OTX 15, you can find a single platform to configure discount, gift cards, eWallet and loyalty under the Product menu in OTX 16. You can activate this feature from the Settings menu of the Sales module.

Under the Pricing tab, you will be able to get the Discount, Loyalty, & Gift Card feature to activate as highlighted in the screenshot above. These features are used to attract customers and thereby boost sales. You can go to the Products menu where you can find the separate options to manage Discount & Loyalty and Gift Cards & eWallet.
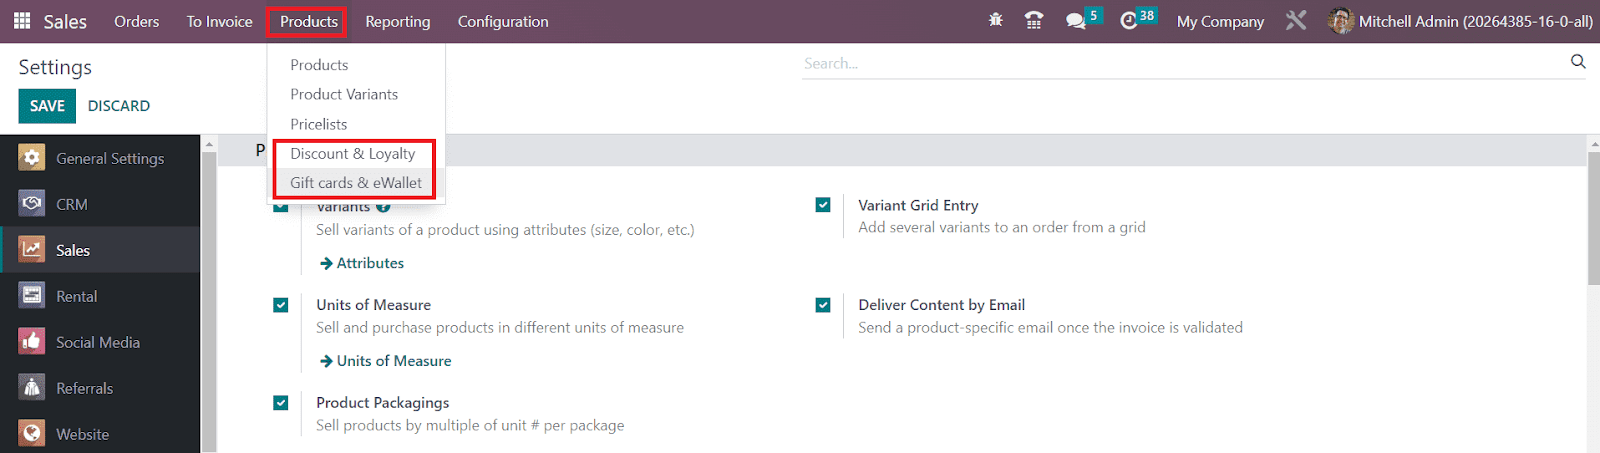
First, let’s take a look at the Discount & Loyalty option.
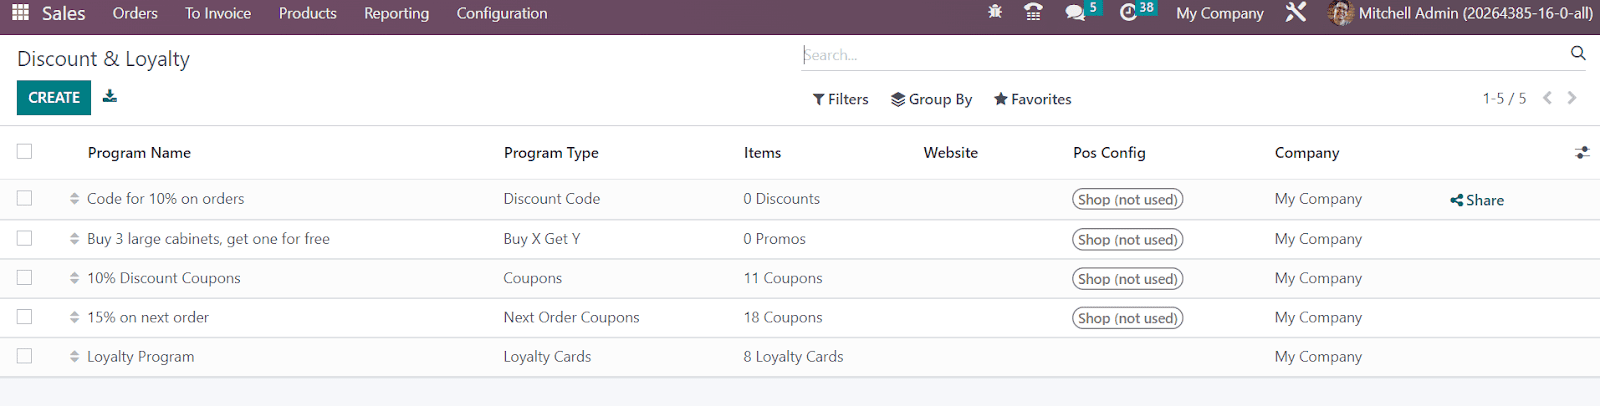
The preview of the list includes the Program Name,, Program Type, Items, Website, POS Configuration and Company details. Additionally, you will get a Share button that helps you to share the coupon on a particular website. A wizard will appear as soon as you click the Share button as depicted below.

You can mention the Website and Redirect in this pop-up window and click on the Done button.
Now, let’s create a new program using the Create button. The Create button will lead you to a new window where you can create new offers for your customers to improve your sales. As you can see in the screenshot below, you will get a specific space to mention the name of the Program. You can provide a suitable title to the program in the Program Name field. Then you can select the Program Type.

In OTX 16, you can create Coupons, Loyalty Cards, Promotions, Discount Code, Buy X Get Y, and Next Order Coupons from a single place. The method of creation of all these program types is almost similar. So, let’s select a program type and detail its creation. Here, we selected Promotions as the Program Type. In the corresponding fields, you can specify the Company, Points Unit, Currency, and Website. In the Validity field, you can set an ending date for the promotion program.
If you want to limit the usage of the promotion program, you can activate the Limit Usage field and mention the number of usages allowed. Activating the Show Points field will display the number of points available and used by reward in the web portal, POS ticket, and eCommerce checkout. The promotion program will be available on Point of Sale, Sales, and Website by activating the respective fields in the Available On section. The customer will be eligible for a reward automatically in their cart by assigning the Trigger as Automatic. By assigning the Trigger as Use a Code, the customer will be eligible for the reward if they enter a specific code.
Under the Rules & Rewards tab, you can set rules and suitable rewards using the Add button.

In order to add Conditional Rules, you can use the Add button given on the right corner of the Rules tab. A new pop-up will appear to create rules as shown below.

In the Conditions tab, you can mention the Minimum Quantity and Minimum Purchase amount to qualify for this promotion program. If you want to provide this promotion for particular Products, Categories, and Product Tag, you can specify them in the corresponding fields. Under the Points tab, you can mention the promo points in the Grant field. It can be granted based on the order, money spent, or unit paid. After configuring the new rule, you can use the Save button.
Using the Add button, you can add Rewards to the promotion program. A pop will appear on the screen as shown below.
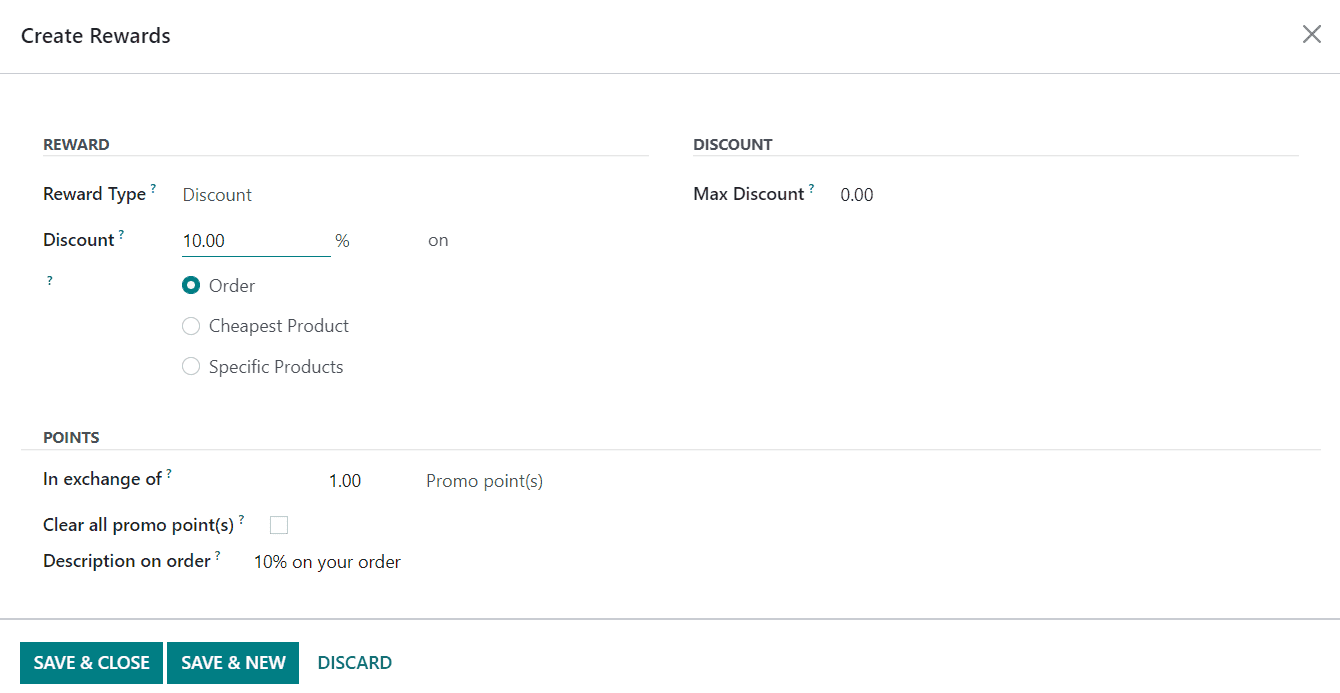
Select the Reward Type here, it can be Discount, Free Product, or Free Shipping. If you want to provide a discount to your customer, you can select the Discount option. Then, you can specify the percentage of the Discount that you want to offer to your customer. You can provide a discount on Order, Cheapest Product, or Specific Product by selecting the corresponding option. Under the Discount tab, you can specify the Maximum Discount offered as reward.
It is possible to give free products as a reward in OTX . For this, you can select the Reward Type as Free Product. As soon as you select this option, you will get some additional fields to specify the details of the free product.

The quantity of the free product can be mentioned in the Quantity Rewarded field. In the Product field, you can mention the reward product and the corresponding tags can be added in the Product Tag field.
In the case of Free Shipping as reward, you can specify the Max Discount for free shipping.
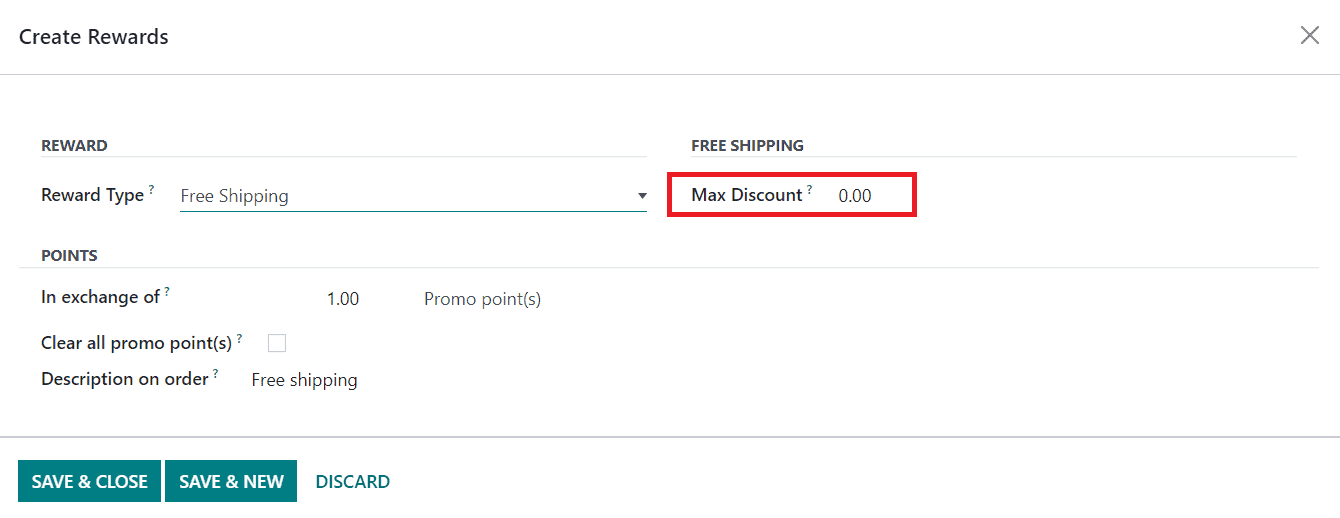
Under the Points tab, mention the Promo Points and activate the Clear all promo points if necessary. The Description on Order will be also available in the Points tab. Click the Save button to save the new reward. This is how we create promotion programs in OTX .
Gift Cards & eWallet
A separate menu for the management of Gift Cards and eWallets is a new feature in OTX 16. In the new OTX Sales module, you will get the features of the eWallet. As shown in the image below, the platform shows the list of Gift Cards and eWallets with the details of the Program Name, Program Type, Name, Website, PoS Configuration, and Company.

When you click on the Create button, OTX will lead you to a new configuration window as shown below.

Here, you can specify the Program Name in the given field. In the Program Type field, you can define which type of program you want to create. It can be either a Gift Card or an eWallet. First, let’s take a look at the generation of gift cards. Gift Cards are created manually or automatically and sent by email when the customer orders a gift card product. The Gift Cards can be used to pay for orders. After selecting the Program Type as Gift Card, you can trigger product ids in the Gift Card Products field. In the Email Template field, you can add an email template for this gift card which will be used to send to the customer when they qualify for this reward. The option mentioned in the Print Report will be used to print the generated gift cards from PoS. The Currency used for the transactions of this gift card can be specified in the corresponding field. After mentioning the Company, you can make this gift card available on Point of Sale, Sales, and Website by activating the respective fields. You will get additional fields to mention the respective Point of Sale and Website on this platform. You can specify the point portal name in the Displayed as field.
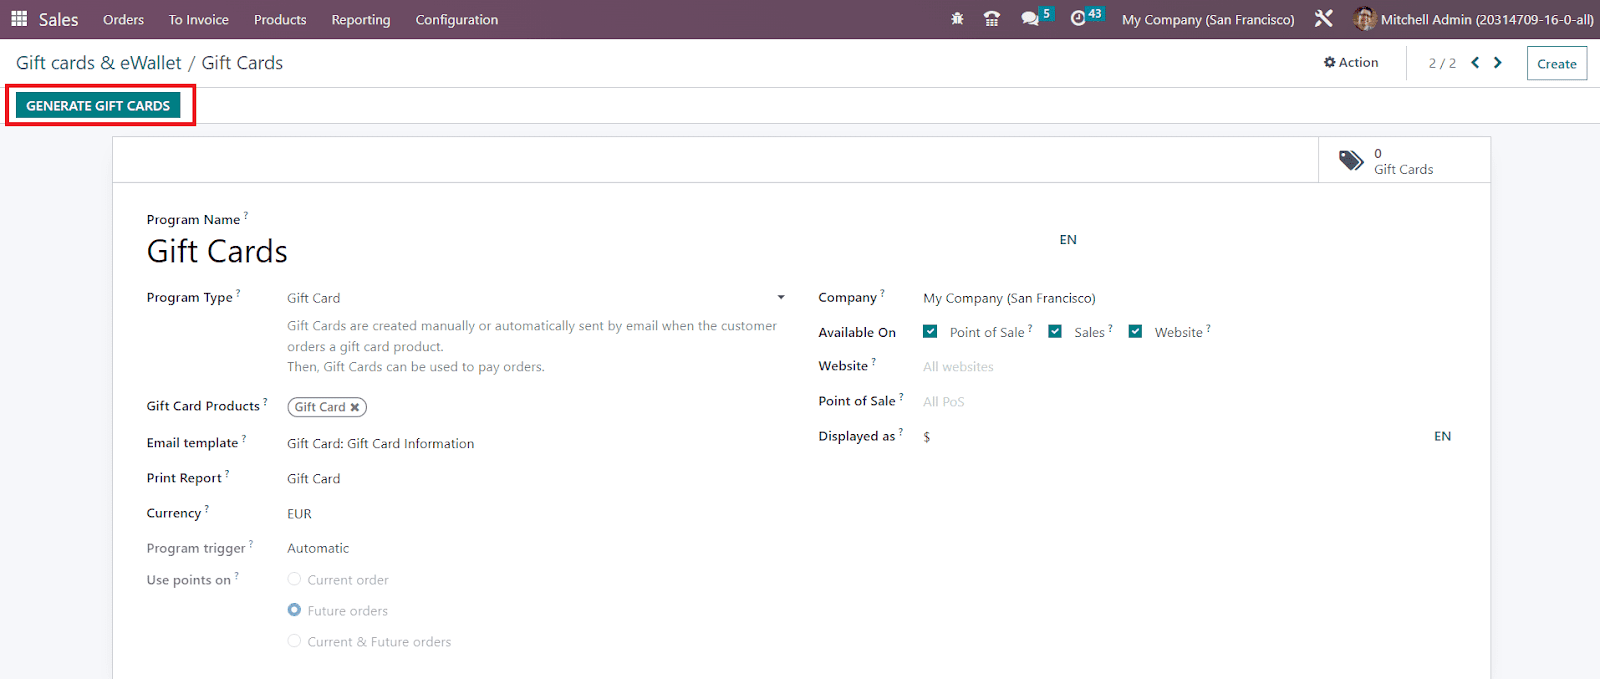
After creating the new gift cards, you can use the Generate Gift Cards button as highlighted in the screenshot above. A pop-up window will appear where you can give additional details required for the generation of the gift card.

It is possible to generate gift cards for Anonymous Customers as well as Selected Customers based on the option you select in the For field. In case you want to generate gift cards for Selected Customers, OTX will provide additional fields to mention the Customers and Customer Tags. The total number of gift cards that you want to generate can be specified in the Quantity to generate field. Along with this, please mention the points granted to the customers in the Gift Card Value field. The Valid Until field will define the validity of these newly generated gift cards. Finally, clicking on the Generate Gift Card button will generate the required amount of gift cards. You can observe them using the smart button available on the screen as highlighted in the image below.

As soon as you click this button, the list of all generated gift cards will appear on the screen. It shows the details of the gift card Code, Balance, Expiration Date, Program, and Partner.
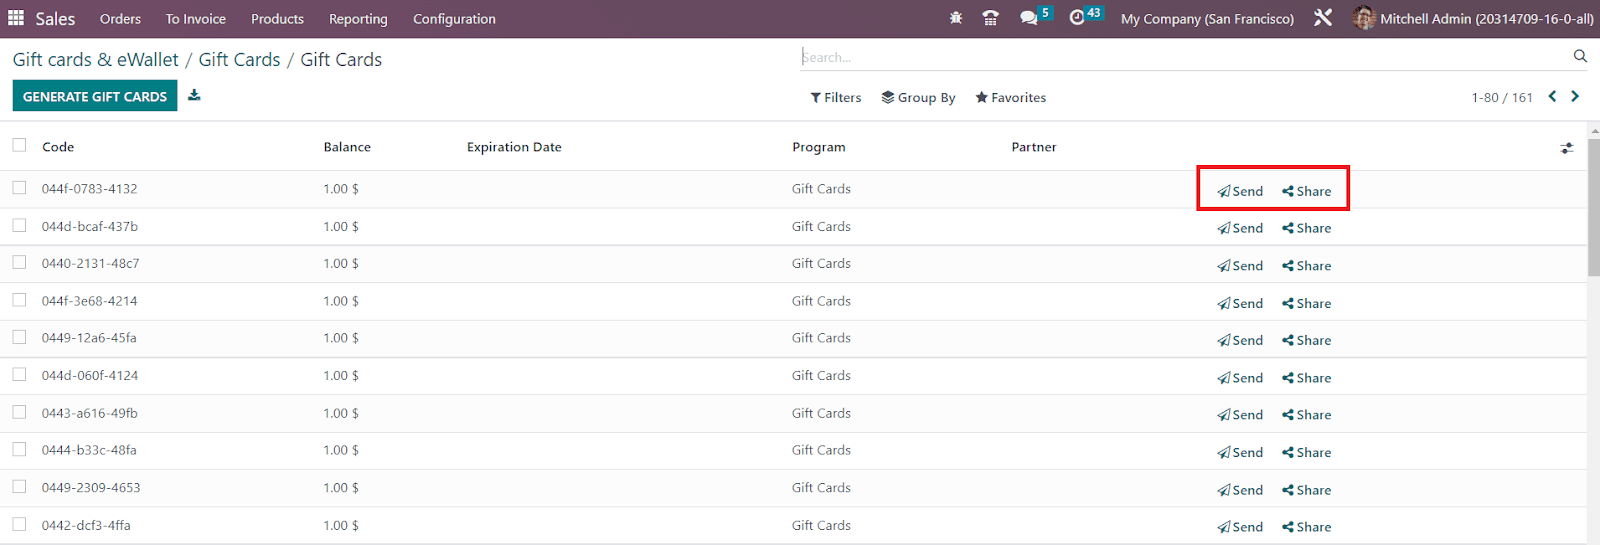
Clicking on the Send button will allow you to send the gift card to particular customers via mail.
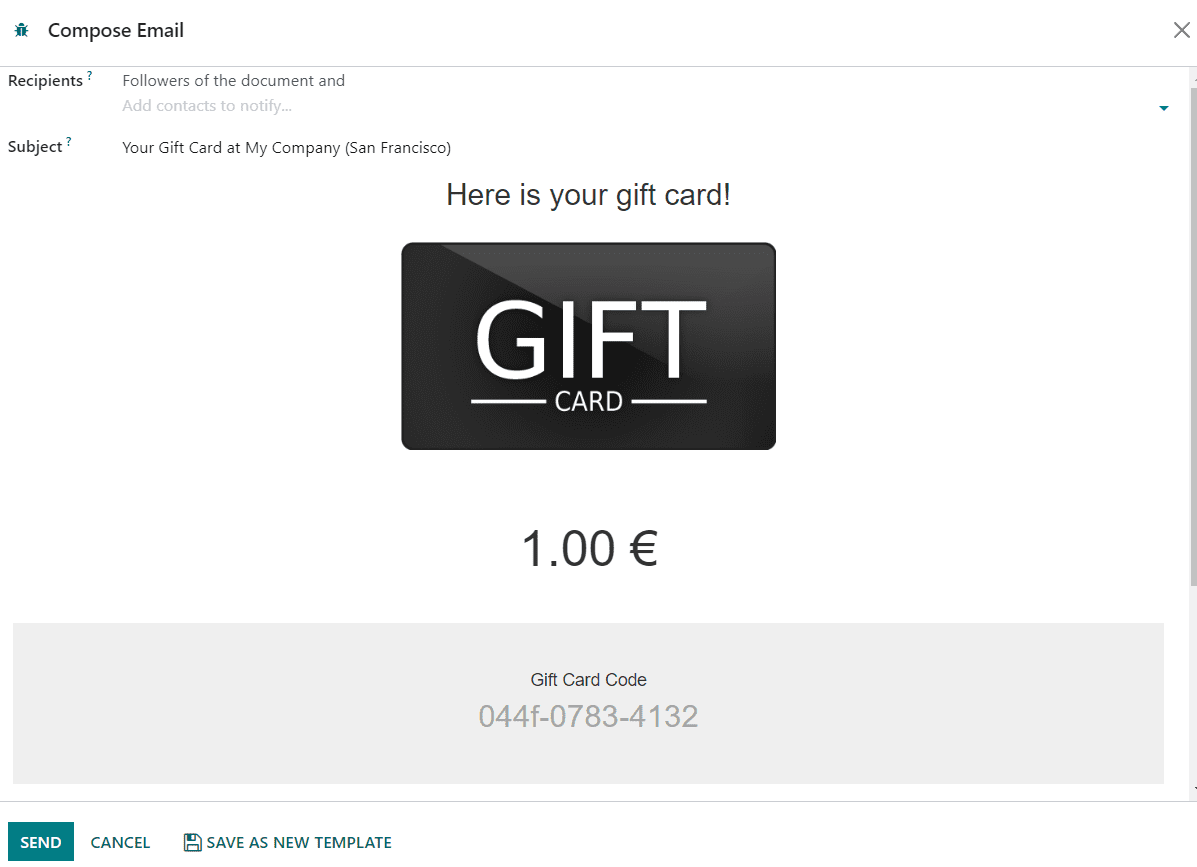
Here, you can mention the name of the qualified customers in the Recipients field and use the Send button to send the gift card.
Clicking on the Share button will give a pop window from where you can copy the link of the gift card and share it on different channels.

The gift card can be also shared on the Website by mentioning the Website id in the given space.
Generation of eWallets can be also easily done by following the similar method we used in the generation of gift cards. In the Program Type field, you can select the eWallet option. The eWallets are created manually or automatically when the customer orders an eWallet product. eWallets are proposed during the checkout, to pay orders.
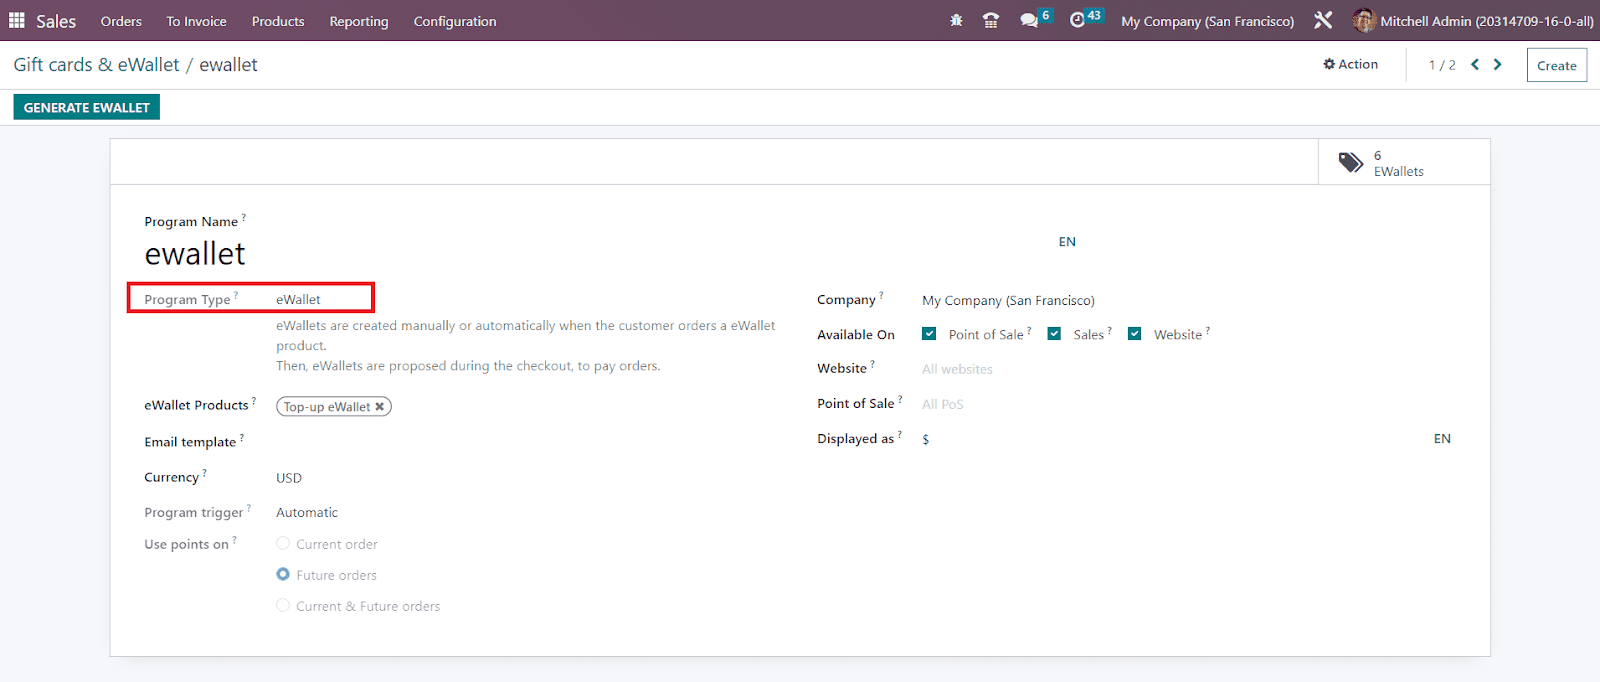
In the eWallet Products field, you can trigger product ids. You can generate the required amount of eWallets by clicking on the Generate eWallet button.

A new wizard will appear where you can mention the Customers, Customer Tags, Quantity to generate, eWallet Value, and Validity in the respective fields. Use the Generate Ewallet button to generate the required quantity of eWallets.

The smart button EWallets available on the screen will show the list of all newly generated Ewallets. You can send them to qualified customers and share them on different platforms using the share link according to your company policies.
Now we will discuss the configuration of new customers in the OTX Sales module.
Customers
You will get a separate platform in the OTX Sales module to create and manage the records of the customers of your company. Under the Orders menu, you can find the Customers platform as shown below. The window depicted below is shown in Kanban view which can be converted to a list view also based on your requirements. The customizable Filters and Group By options will assist you in easily locating required data from the record of the customers maintained in your database.
Using the small clock icon given on the right corner of each customer profile, you can effortlessly schedule various activities with them. Additionally, you can find some new updates in the kanban view of the customer window. On each customer profile, you can find the number of scheduled activities, added to favorites, purchases, and sales done by each customer. Click on these icons will directly lead you to the corresponding window where you can easily manage them.

Now, you can configure a new customer with the help of the Create button.

You can configure a new customer profile in the name of an individual or company. The name of the customer can be mentioned in the given space. Then, you can configure the necessary details regarding the customer such as Address, Tax ID, Phone, Mobile, Email, Website, Language, and Tags.
Under the Contacts and Addresses tab, you can add the contact details of the customer using the Add button.

You can mention the contact details as Invoice Address, Delivery Address, Private Address, or Other Address based on the option you select. After selecting the suitable option, you can specify the Contact Name, Address, Email, Phone, and Mobile in the respective fields.
The details required for the sales and purchase-related operations with the customer can be defined under the Sales and Purchase tab.

Under the Sales tab, you can assign a Salesperson and Sales Team in the respective fields to manage the sales operations related to this customer. By mentioning Payment Terms, this payment term will be used instead of the default one for sales orders and customer invoices. You can mention the assigned partner id in the Implemented By field. You can define a specific Pricelist for this customer in the specified field which will be used for sales instead of the default one. The customer will get an Avalara Code which can be used to cross-reference in the Avalara port. Mention the Avalara Partner Code and Avalara Exemption in the respective fields. The default delivery method to use in the sales orders of this customer can be specified in the Delivery Method field.
Under the Purchase tab, you can mention the suitable Payment Terms for the customer which will be used for purchase orders and vendor bills instead of the default one. Mention 1099 Box and the journal items of this vendor will be summed in the selected box of the 1099 report. In the Payment Method field, you can mention the preferred payment method when paying this customer. This is used to filter vendor bills by preferred payment method to register payments in mass. By activating the Receipt Reminder, OTX will automatically send a confirmation mail to the customer particular days before the expected receipts date, asking the customer to confirm the exact date. The currency mentioned in the Supplier Currency field will be used for purchases from the current partner.

You can set a Barcode for the customer to identify them in Point of Sale. The Fiscal Position of the customer can be defined under the Fiscal Information field. The fiscal position determines the taxes/accounts used for this contact. Under the Miscellaneous tab, you can specify the Company ID, Reference, Company, Website, Website Tags, Industry, and SLA Policies in the corresponding fields.
In the Inventory field, you can specify the Customer Location in the given space. This stock location is used as a destination when sending goods to this contact. The stock location which is used as a source when receiving goods from this contact can be specified in the Vendor Location. In the Subcontractor Location field, you can mention a stock location that is used as a source and destination when sending goods to this contact during a subcontracting process.
The accounting details regarding the customer can be defined under the Accounting tab.

Using the Add a Line button, you can mention the Bank Accounts of the customer one by one along with the Account Number. After adding bank accounts, you can use the View Accounts Details button to get a better view of accounts. The Account Receivable and Account Payable can be specified under the Accounting Entries field.
If the customer uses the OCR number on their vendor bills, you can activate the Vendor OCR. If the Default Vendor Payment Reference is set, the customer uses the same default vendor payment reference or OCR number on all their vendor bills.
The Internal Notes tab can be used to add additional notes regarding the customer.

If you want to generate warning messages for the operations done between this customer, you can activate the Sales Warning feature from the Settings menu of the Sales module.

This feature will help you to get warnings in orders for customers. After activating this feature, you can check the Internal Notes tab in the Customer configuration window.

As highlighted in the image above, you can generate warnings on the sales orders, purchase orders, invoices, and picking for this customer.
The Partner Assignment tab will assist you in congratulating the Partner Activation, Partner Review, and Geolocation details. Under the Partner Activation field, you can mention the Partner Level, Commission Plan, Activation, and Level Weight. The Partner Review field can be used to specify Latest Partner Review, Next Partner Review, and Partnership Date.

The Membership tab can be used to add the membership details of the customer.

If you want to give free membership to the customer, you can activate the Free Member option. A member to whom you want to associate the customer’s membership can be specified in the Associate Member field. The Current Membership Status of the customer can be seen on this tab. Using the Buy Membership button, you can easily buy a membership. The Join Date, Membership, Membership Price, Invoice, and Membership Status can be also observed in this tab.

Based on the operations done with the customer, you will get smart buttons on the screen to manage each of those operations. Here, you can find the smart buttons for Meetings, Opportunities, Sales, Subscriptions, Tasks, Purchases, On Time Rate, Due, Invoiced Amount, Vendor Bills, Partner Ledger, Saved Payment Tokens, Certifications, Signature, Documents, Direct Debit Mandates, and Courses details of the customer Joel Willis.
Now, let’s discuss the sales team management in the OTX 16 Sales module.
Sales Team
In order to manage all sales-related operations inside a company, the necessity of having an efficient group of employees is very high. With the help of the OTX Sales module, you can create multiple efficient teams of responsible employees to monitor your sales programs and thereby improve sales. The configuration option for the sales team can be seen in the CRM module also which we already discussed in the earlier chapter. The method of sales team configuration is similar in both the Sales and CRM modules. Under the Configuration menu of the Sales module, you can find the Sales Teams option which will give access to the platform as shown below to create and manage sales teams.

You will be able to see the already configured sales teams on this platform along with the details of the name of the Sales Team, Alias, Team Leader, and Company. Using the Create button, you can effortlessly create a new team to manage your sales operations.
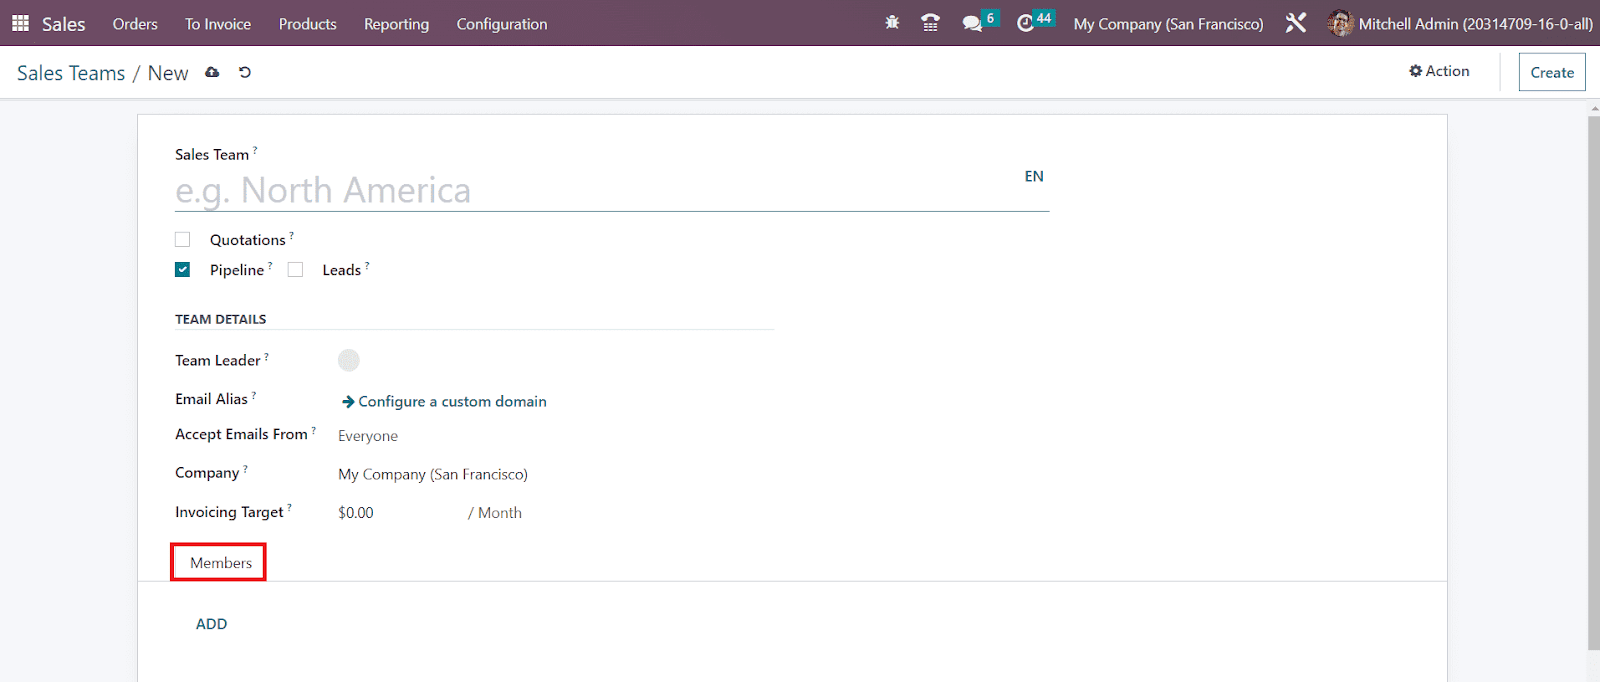
In the new sales team configuration window, you can mention a suitable name for your team in the Sales Team field. Then you can check the Quotations box if you want to send quotations to your customers rather than confirming sales orders straight away. You can check the Pipeline box to manage a pre sales process with opportunities. You can check the Leads box to filter and qualify incoming requests as leads before converting them into opportunities and assigning them to a salesperson.
Under the Team Details section, you can assign an employee as the Team Leader. Then specify Email Alias and for this, you can configure a custom domain in the given field. This sales team can accept emails from Everyone, Authenticated Partners, Followers only, or Authenticated Employees based on the option you select in the Accept Emails From field. The Company related to the sales team can be specified in the corresponding field. In the Invoicing Target field, you can define the revenue target for the current month.
Under the Members tab, you can add employees to the team using the Add button. You will get a new wizard as shown in the image below as soon as you select the Add button.

You can select members for your team from this window. After adding members, the new sales team will be saved to your system.
All Sales Teams configured in the OTX Sales module can be managed in a separate platform which is available under the Orders menu. This platform will display all sales teams in an organized manner. You will get the number of opportunities, quotations, sales orders, orders to invoice, leads, and many more sales-related operations managed by each sales team from the preview itself.

The Sales Analysis button will lead you to a new window where you will get the sales analysis report of the selected group. This report can be used to analyze the performance of the team based on various criteria.
Clicking on the three vertical dots given on the top right corner of each sales team will give you some advanced options to manage the sales operations.

Here, you will get the options to view Opportunities, Quotations, Sales Orders, and Invoices managed by this sales team. Similarly, you will get options to create new Opportunities and Quotations from this menu. The Reporting field includes the options to generate reports of the Opportunities, Quotations, Sales, Invoices, and Activities managed by this particular team. These options are available on each sales team in the Kanban view.
After configuring sales teams, let’s move to the creation of sales quotations in the Sales module.
Sales Quotations
Sales Quotations are the first step in the process of the generation of sales orders in a business. A sales quotation will document all necessary information related to the sales product in order to give an exact idea to the customer. You can consider a sales quotation and the commercial document between the seller and the customer. It will bring clarification for both parties related to the price of the products included in the sales operation. With the assistance of the OTX ERP system, you can easily create and send a quotation to a customer which will help the customer to know the exact price details of the products and services offered by your company before signing any sales deals. The sales quotation can be later converted into a successful sales order if the customer is satisfied with your company’s offers.
The option to manage and create Quotations in the Sales module can be seen under the Orders menu. By clicking on this option, you will get the list of already configured sales quotations as shown in the image below.

The preview includes Quotation Number, Creation Date, Customer, Salesperson, Activities, Company, Total, and Status of each quotation. Using the small clock icon given on the Activities field, you can schedule various activities with the respective customers. Apart from the list view, OTX provides Kanban, Calendar, Pivot, Graph, and Activity views for this platform. Using the customizable and default sorting options you can filter and group the quotations as per your requirements.
Let’s take a look at the creation of a new sales quotation. For this, you can click on the Create button which will direct you to a new quotation creation window as depicted below.
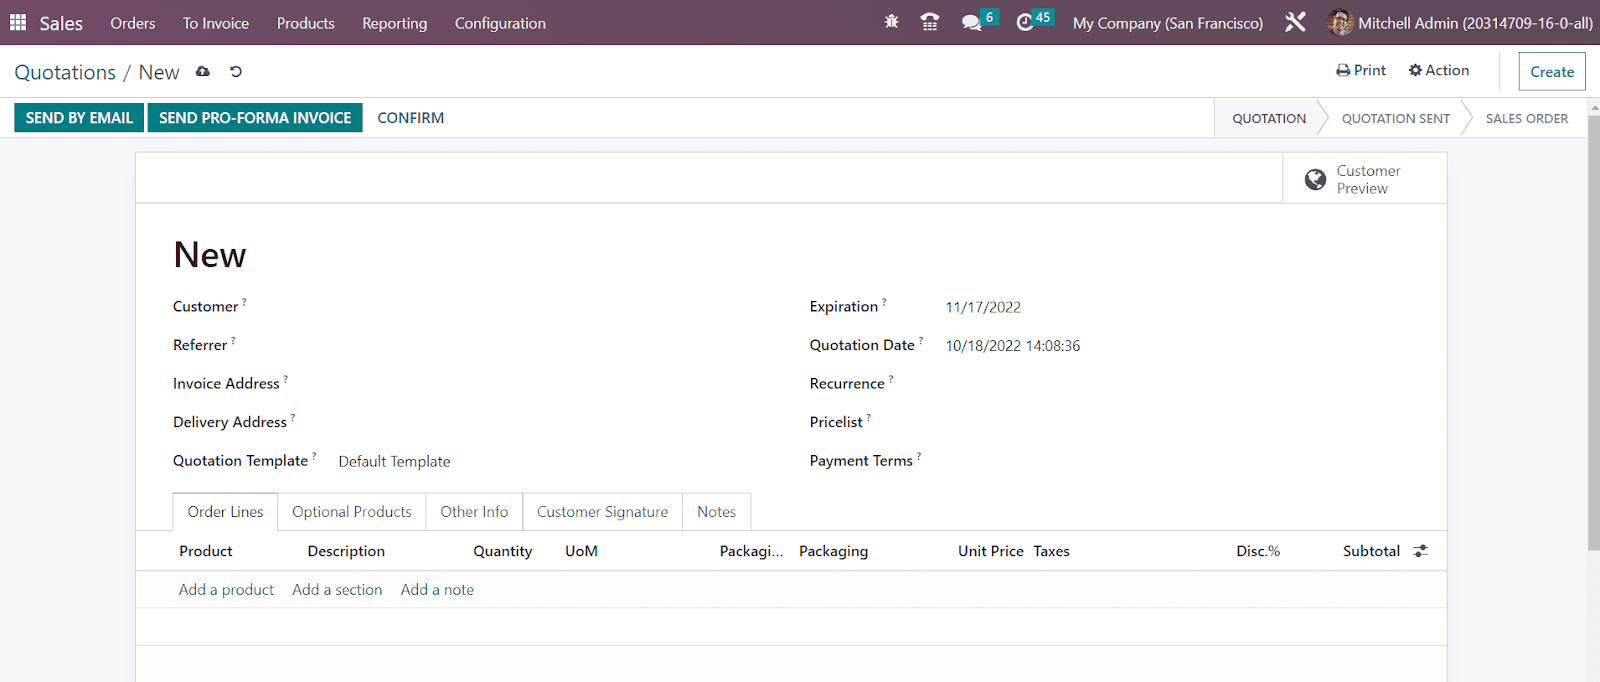
The name of the Customer can be selected from the given list to add to the quotation. Once you select an already configured customer here, the Invoice Address, Delivery Address, Pricelist, and Payment Terms will automatically appear in the corresponding fields based on the details you mentioned at the time of the customer creation. Additionally, mention the Referrer, Quotation Template, and Expiration date of the quotation in the respective fields. The creation date of the quotation can be observed in the Quotation Date field.
Now, under the Order Line, you can add the products that you want to offer to your customer. Using the Add a Line button, you can specify the Product, Description, Quantity, UoM, Unit Price, Taxes, Discount, and SubTotal. You can add as many as products in this section based on the customer’s requirement. After adding products, you will get the Total amount of the order in the Order Line as highlighted in the image below.
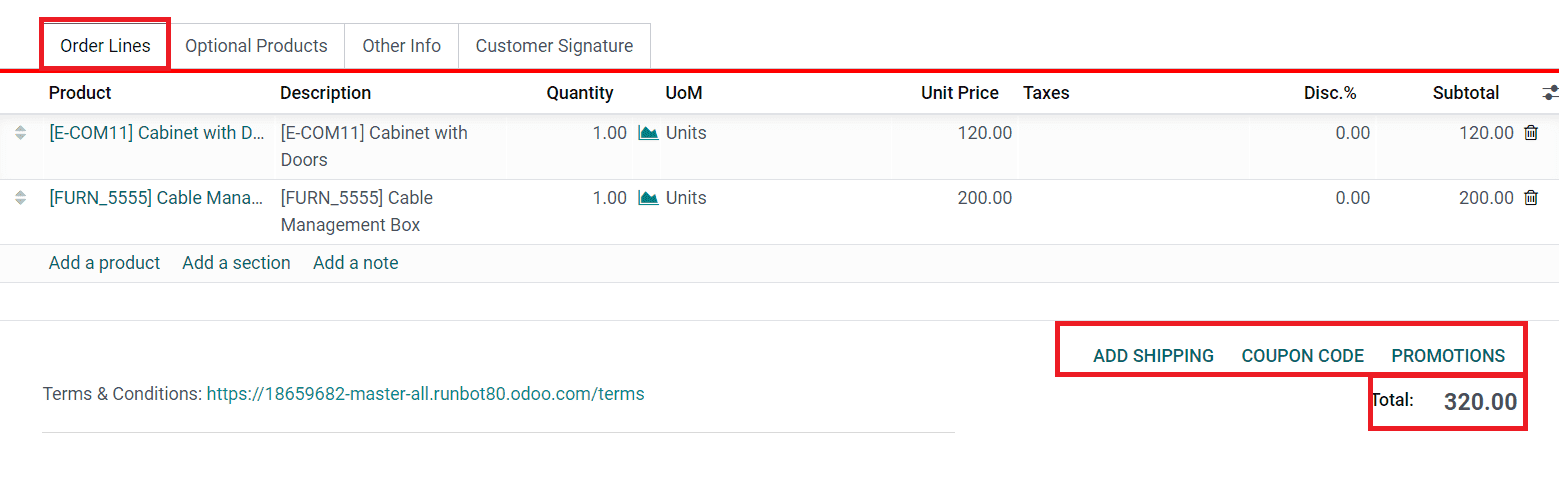
If the customer owns any Coupon Code or Promotions, use the corresponding options given in the Order Line tab. The Add Shipping button will assist you to configure a shipping method for this sale. In the same tab, You will get the Add a Section option to add sections and Add a Note option to add notes to your quotation.
Sometimes, companies offer additional products to customers as a part of their cross-selling strategies. In such cases, you can mention those additional products in the Optional Products section.

The Other Information tab in the quotation can be used to mention the Sales, Delivery, Tracking, Invoice, and Payment details.
Under the Sales section, you can assign an employee as the Salesperson who is responsible to manage the sales operations related to this quotation. The name of the Sales Team and Company will appear in the corresponding fields. If you want to allow your customer to sign the sales order online, you can activate the Online Signature field. Activating the Online Payment button allows the customer to pay the order using online payment methods. Mention the Customer Reference and suitable Tags in the given spaces and activate the Print Variant Grids if you want to print variant grids.

Under the Invoicing and Payments section, you can mention the Fiscal Position. Fiscal Positions are used to adapt taxes and accounts for a particular customer or sales orders/invoices. The Analytic Account, Account Tags, and Payment Token related to this quotation can be defined in the corresponding field and you are allowed to activate the Contract in Exception option if necessary.
Under the Delivery fields, you can set the Shipping Policy as As Soon as Possible or When all Products are Ready based on your company policies. If you deliver all products at once, the delivery order will be scheduled based on the greatest product lead time. The Delivery Date field can be used to mention the delivery date promised to the customer. If set, the delivery order will be scheduled automatically based on this date rather than the product lead time. Here, the expected delivery date of the quotation can be seen near the Delivery Date field.
For enabling effective Tracking processes, you can mention the Source Document, Opportunity, Campaign, Medium, and Source in the corresponding fields given in the Tracking section.
Once you activate the Online Signature feature from the Other Information tab for the customer to sign the quotation online, OTX will provide an additional tab in the quotation window as shown below to record the details of the Customer Signature.
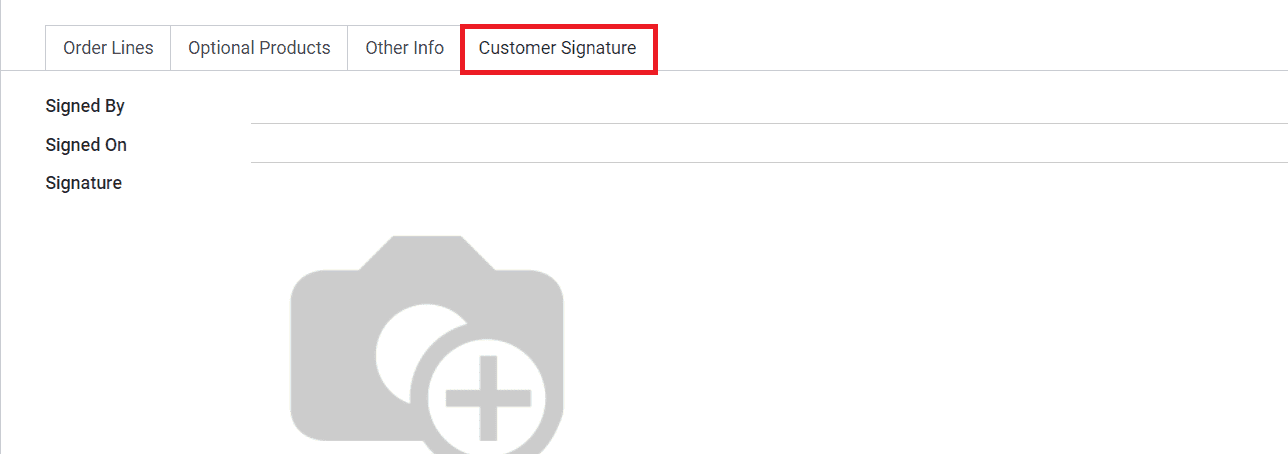
When the customer signs the quotation, this tab will show the details regarding the signature such as Signed By, Signed On, and Signature.
If you want to make the Online Signature feature available for all sales orders, you can go to the Settings menu of the Sales module and activate the Online Signature option.
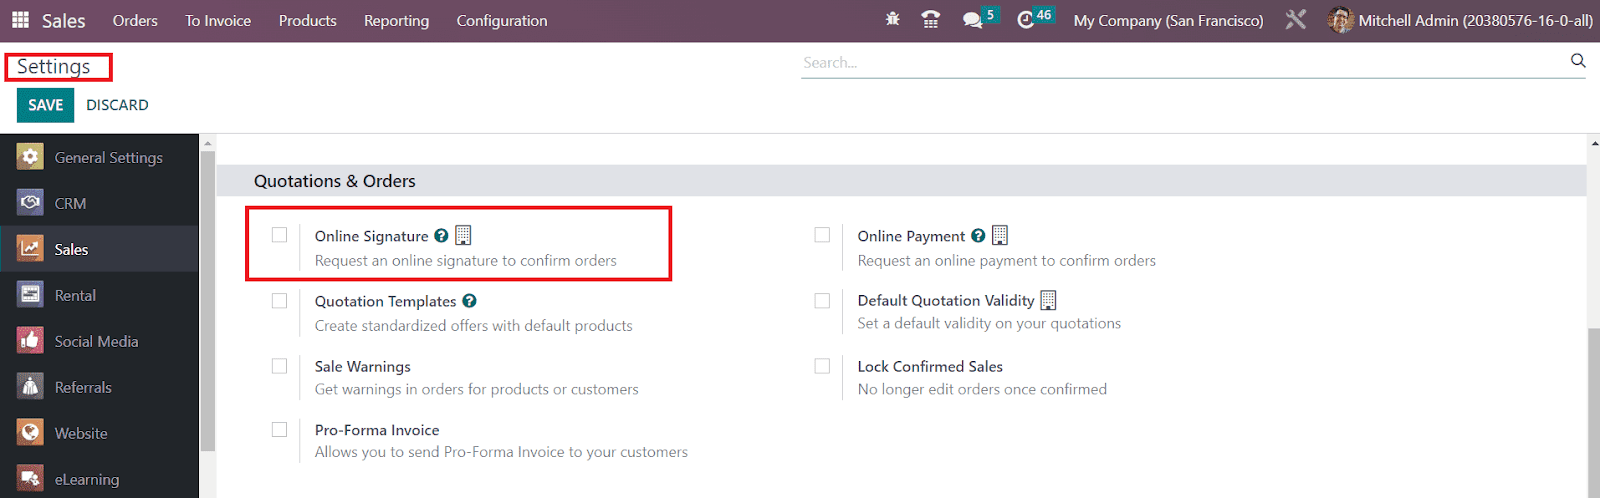
Now the sales quotation is ready and you can send this to the corresponding customer.

The Send By Email button is used to send the quotation to the customer via Email. If the customer is satisfied with the quotation, you can confirm the sale by clicking on the Confirm button which will convert this sales quotation into a sales order. The Cancel button will assist you to cancel the newly created quotation.
When you click on the Send By Email button, OTX will automatically generate an email with the quotation as an attachment as shown in the image below.

You can mention the name of the recipient in the given field. If you want to change the Subject of the mail, you can do so accordingly. Finally, click the Send button. The status of the quotation will be changed to Quotation Sent as highlighted in the image below.

The Customer Preview button will provide you with the website view of the quotation. This is the preview of the customer portal where the customer can conveniently view the quotation and confirm it.

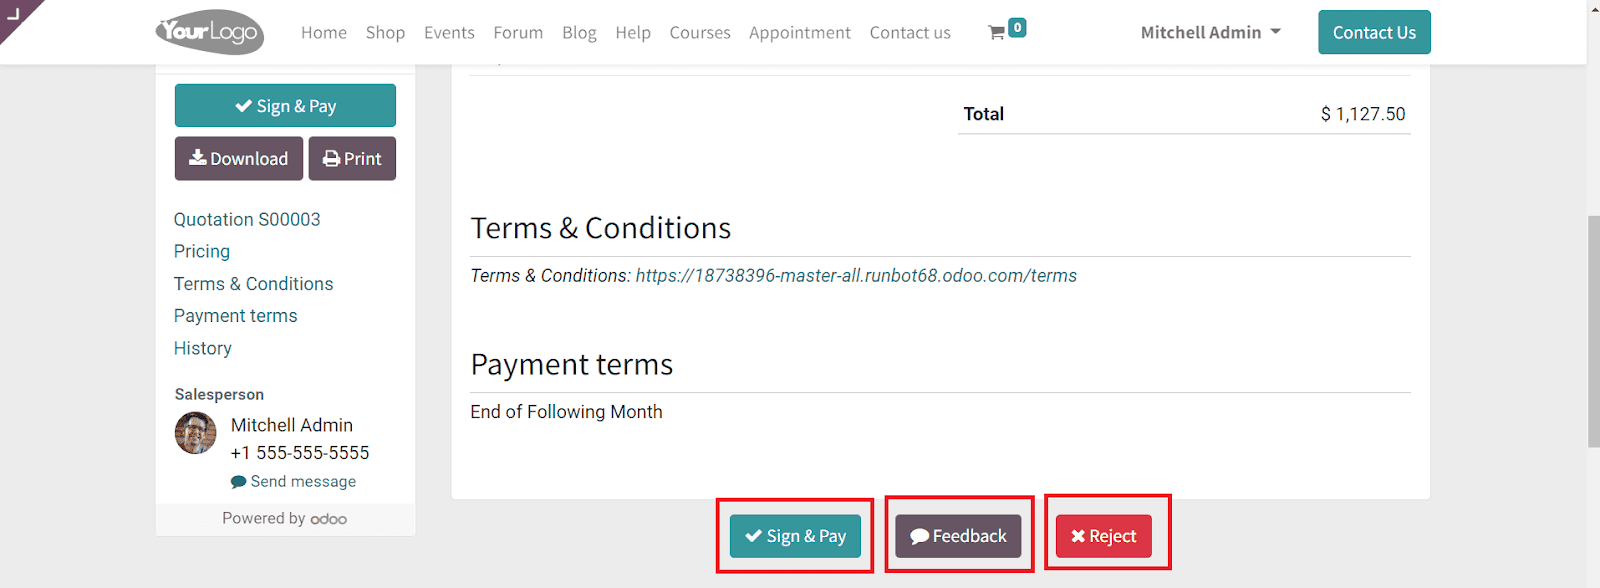
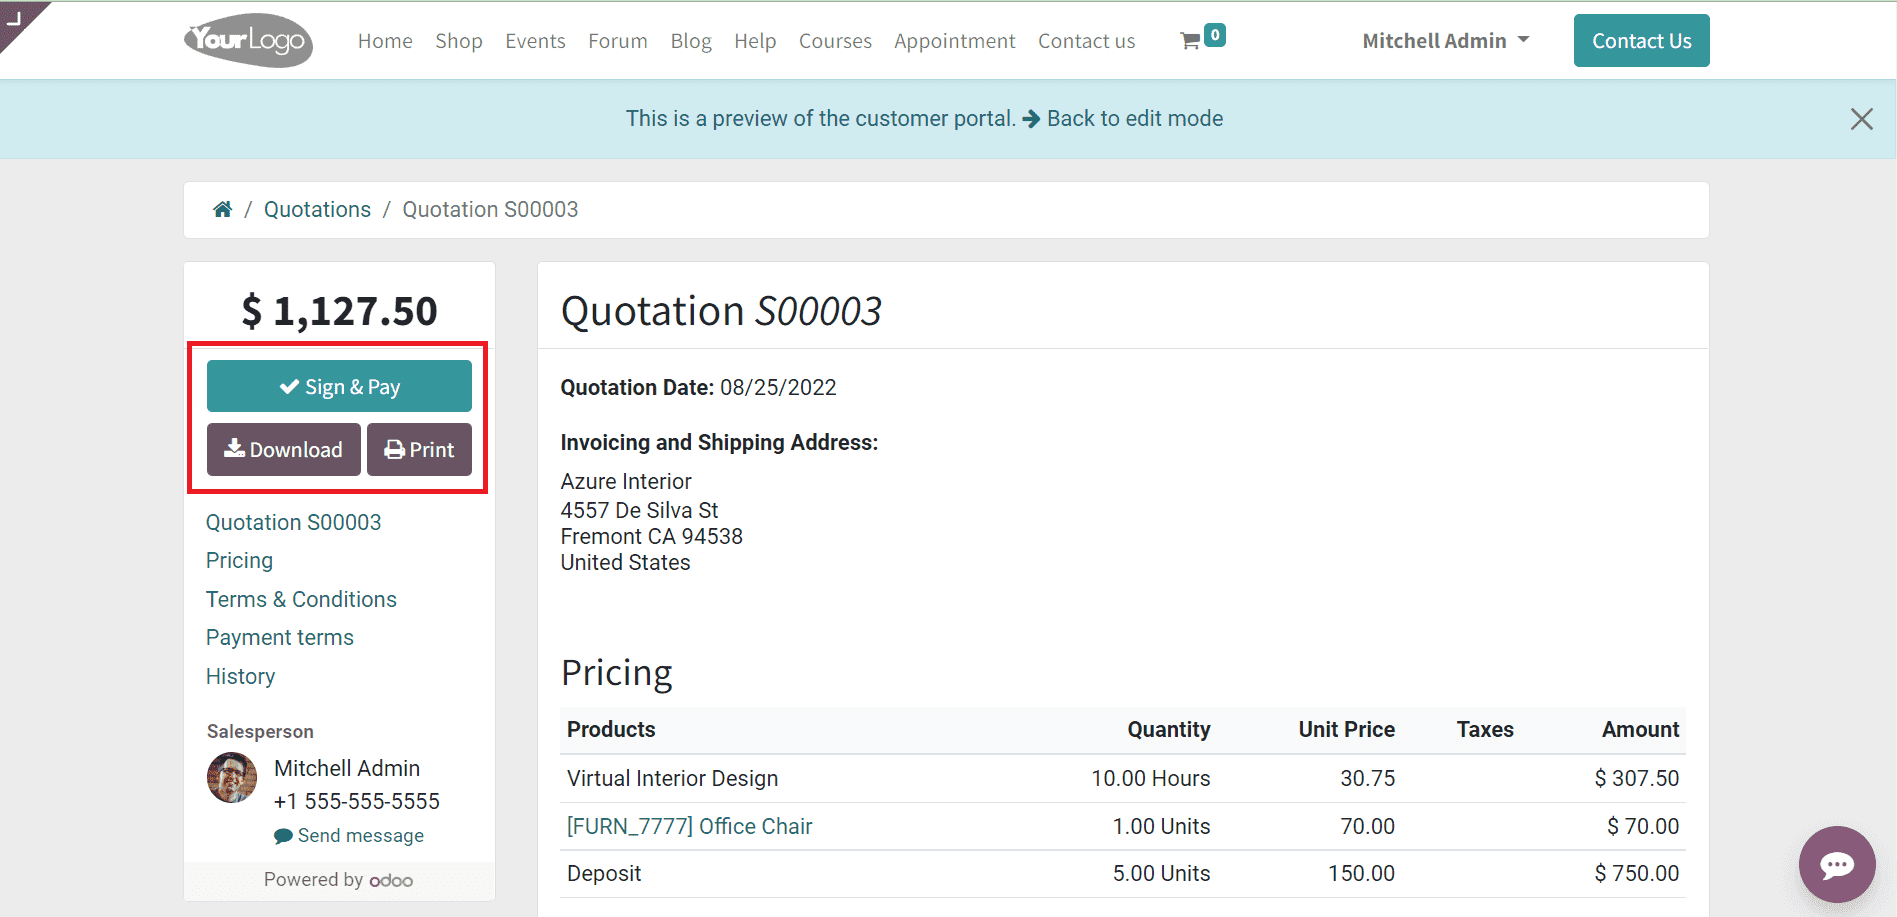
Using the Sign & Pay button, the concerned customer can effortlessly sign and pay the quotation digitally. The Download and Print buttons can be used for downloading and taking printouts of the quotation respectively. The Feedback button will assist the customer to send feedback. The customer can use the Reject button to reject the quotation if they don’t want to move forward with this sales deal.
Now, let’s discuss what happens to a quotation when the customer confirms it.
Sales Order
Once the customer confirms the quotation, it will be automatically converted into a sales order. From the customer portal, the customer can confirm the quotation by clicking on the Sign & Pay button.

A pop-up window will appear as shown in the screenshot below to accept the quotation and sign.

The customer can click on the Accept & Sign button and complete the payment procedure. When you check the sales quotation in the backend, you can find that the Customer Signature tab is automatically uploaded with the details of the signature from the customer.

Now, you can click on the Confirm button. By clicking the Confirm button the status of the quotation will be changed to Sales Order as shown in the image below.

In the OTX Sales module, you will get a separate platform to manage all these sales orders under the Orders menu.

The list view of this platform will show the details of the Sales Order Number, Order Date, Website, Customer, Salesperson, Activities, Company, Total, and Invoice Status. OTX offers List, Kanban, Calendar, Pivot, Graph, and Activity views for this platform. The Filters and Group By options will help you to simplify the searching procedures with default as well as customizable options.
Now, let’s take a look at how to generate invoices from the confirmed sales orders.
Invoices
Invoices
Generating invoices for sales orders is an easy task with the assistance of the OTX ERP system. When you confirm a sales order, you will get an additional button on the sales window to create an invoice as marked in the screenshot below.

Click the Create Invoice button. A popup will appear to select the invoice type.

You can select a Regular Invoice, Down Payment (percentage), or Down Payment (fixed amount) based on your company’s invoicing policies. Click on the Create and View Invoice button. OTX will lead you to a new window that will show the draft form of the invoice.

By clicking on the Confirm button, you will be able to confirm the invoice.
Register Payment
The next step after confirming an invoice is the registration of payment. In order to enable the payment procedure, OTX offers the Register Payment button.

You can register the customer’s payment with the help of this button.

A new wizard will appear where you can define the Journal, Payment Bank, Recipient Bank Account, Amount, Payment Date, and Memo. Click on the Create Payment button.
The status of the Invoice can be seen as In Payment. Once the customer completes the payment procedures, the status will be changed to Paid .

The Send & Print button will help you to send the invoice to the respective customer and take print of it. If you reset the invoice to draft, you can use the Reset to Draft button.
Sometimes, there will be situations where the customer asks for a refund for their purchase. In such cases, you can use the Add Credit Note button to refund an order.

A pop-up will appear to mention the Reason, Reversal Date, Specific Journal, and Refund Date.

Clicking on the Reverse button will generate a draft form of the Customer Credit Note as shown in the image below.

You can confirm the refund by clicking on the Confirm button.
OTX enabled a separate menu in the Sales module for keeping track of the invoices under the To Invoice menu.

Here, you can find two sub-menus such as Orders to Invoice and Orders to Upsell. The preview of each platform will show the sales Number, Order Date, Website, Customer, Salesperson, Activities, Company, Total, Invoice, and Status. A sales order will be moved to the Orders to Upsell menu when the delivered quantity is greater than the invoiced quantity. For example, a customer ordered for 8 units of a product with the invoicing policy on ordered quantity and 10 units got delivered. In such cases, it is necessary to invoice the extra quantity delivered to the customer. For the extra delivered quantities, OTX will create an Order to Upsell in the Sales module.
Quotation Template
In the OTX Sales module, you will be able to create a predefined format for the sales quotations that you create in this module. OTX will help you to create various such quotation templates so that you can easily use them while creating new quotations. Creating quotation templates is not a difficult task using the OTX Sales module. In order to get access to the quotation template creating platform, you have to activate the Quotation Templates feature from the Settings menu of the Sales module.

Along with this feature, you are allowed to activate the Quotation Builder also so that you can easily design your quotation templates with the help of the advanced building blocks offered by the OTX Website.
The option to configure new Quotation Templates can be seen under the Configuration menu of the module.

You will be able to get the already created templates on this platform with the details of the title and Company. Click the Create button to create a new quotation template. A new quotation template creation window will appear on your screen.

The name of the Quotation Template can be mentioned in the given space. In the Quotation expires after field, you can mention the number of days for the validity date computation of the quotation. By activating the Signature feature in the Online Confirmation field, you can request an online signature from the customer in order to confirm the sales order automatically. Activating the Payment field will allow the customer to pay the orders via online payment methods. In the Confirmation Mail field, you can specify an email template that will be sent on confirmation. You can mention the name of your company in the Company field. The invoice email template can be added in the Invoice Email field.
Just like we discussed in the configuration of Sales Quotation, you will be able to get the tab to add the list of products in this window also. Under the Lines tab, you can add products, sections, and notes using the Add a Product, Add a Section and Add a Note buttons respectively. The optional products allowed for this sale can be added under the Optional Products tab.

The Terms & Conditions tab will help you to define the terms and conditions related to this quotation template. After completing all required fields, the new quotation template will be automatically added to your system.

If you want to design the newly created quotation template, you can click on the Design Template button. This will lead you to the OTX Website where you can enhance the preview of the quotation using advanced building blocks.

The Edit button given on the top right corner of the screen can be used to edit and design the template. As soon as you click on the Edit button, a new editing panel will appear on the screen as shown in the screenshot below with multiple building blocks.

Each of these building blocks encompasses unique features which will make your quotation template even better. All you need to do is, just drag and drop the required snippets from the editing panel to your quotation.
As we are clear on how to create new quotation templates in the Sales module now let’s look at the configuration of the Sales Tags.
Adding tags to the operations while saving them in your database will always help you to easily retrieve the data when required. OTX allows you to filter the configured operations based on the tags added to them. In the OTX Sales module, you can configure such sales tags for the sales operations effortlessly from the Configuration menu of the module. As shown in the image below, you will get access to the Sales Tags platform from the Configuration menu.

The list of the pre-configured tags will appear on your screen with the details of the Tag Name and Color.

Clicking on the Create button will give a new line under the existing list of tags where you can mention the name of your new sales tag and select a suitable color for the tag. Use the Save button to add the new tag to the list.
The available shipping methods in the OTX 16 Sales module are discussed in the next section.
Shipping Methods
When a customer orders a product or service from your company, you must ensure the best methods or routes to deliver the product or service at the customer’s location without any delay or defect. In the OTX ERP system, you can save the records and manage the transportation methods used by a company to ship their products to respective customers. Delivering the product at the right time without causing any damage to the product at a fair shipping cost will help your company to create a good impression on your customers. The company can deliver products directly to the customers or seek help from third-party shipping companies. In both these shipping methods, OTX will ensure seamless workflow by ensuring accurate monitoring of the delivery processes.
You can activate the shipping feature in the OTX 16 from the Settings menu of the Sales module. Go to the Shipping tab available in the Settings menu as highlighted in the image below.

You can activate the Delivery Methods here which will help you to compute shipping costs on orders. The window will also show all available third-party shippers such as FedEx Connector, bpost Connector, Sendcloud Connector, UPS Connector, DHL Express Connector, USPS Connector, and EasyPost Connector. Using the external link available near each shipping party, you can configure shipping methods for respective shipping parties. We are going to discuss the general method of shipping method configuration. For this, you can go to the Configuration menu where you will get access to the Shipping Method platform.

The list of already configured shipping methods can be found on this platform. It shows the information regarding the Delivery Method, Provider, Is Published, Website, Company, and Countries. Let’s create a new shipping method for product deliveries using the Create Button.

The name of the Shipping Method can be mentioned in the given field. Mention the Website id to make this shipping available on your eCommerce site. In the Provider field, you are allowed to select suitable shipping providers for your delivery.

From the drop-down menu, you can select one provider, or else you can install more providers using the corresponding option. Clicking on the Install more Providers will direct you to the AppStore from where you can install suitable providers.

After selecting Provider, you can specify Company and Delivery Product in the respective fields. The percentage mentioned in the Margin on Rate field will be added to the shipping cost.

Activate the Free if order amount is above field if you want to provide free shipping for orders with an amount equal to or more than the value specified in the Amount field. The tab available in this window will change based on the Provider you select. Here, we select the Fixed Price option. So we will get a tab named Pricing where you can mention the Fixed Price of this shipping method.
In the Destination Availability tab, you can specify the destinations where this shipping method is available.

You can specify the Countries, States, and Zip Prefixes in the corresponding fields. Any notes related to this shipping method can be specified under the Description tab. This is how we create shipping methods in the OTX Sales module. After confirming a sales order, you can specify the shipping method for the delivery using the Add Shipping button as shown in the image below.

A pop up will appear to select the Shipping Method and the Cost will be displayed according to the selected shipping method.

Now, let’s look at the configuration of the units of measure in the OTX Sales module.
Units of Measure
Configuring units of measure is essential to measure the quantities of the products configured in your database. When purchasing and selling products, you need to depend on different types of measures. You can easily configure such units of measure in the OTX Sales module. To get this feature, you can go to the Settings menu.

As shown in the image above, you can enable the Units of Measure feature from the Product Catalog tab. After activating this feature, you can configure new units of measure from the settings menu itself using the external link given near the UoM option. Or else you can go to the Configuration menu from where you will get access to the UoM platform.
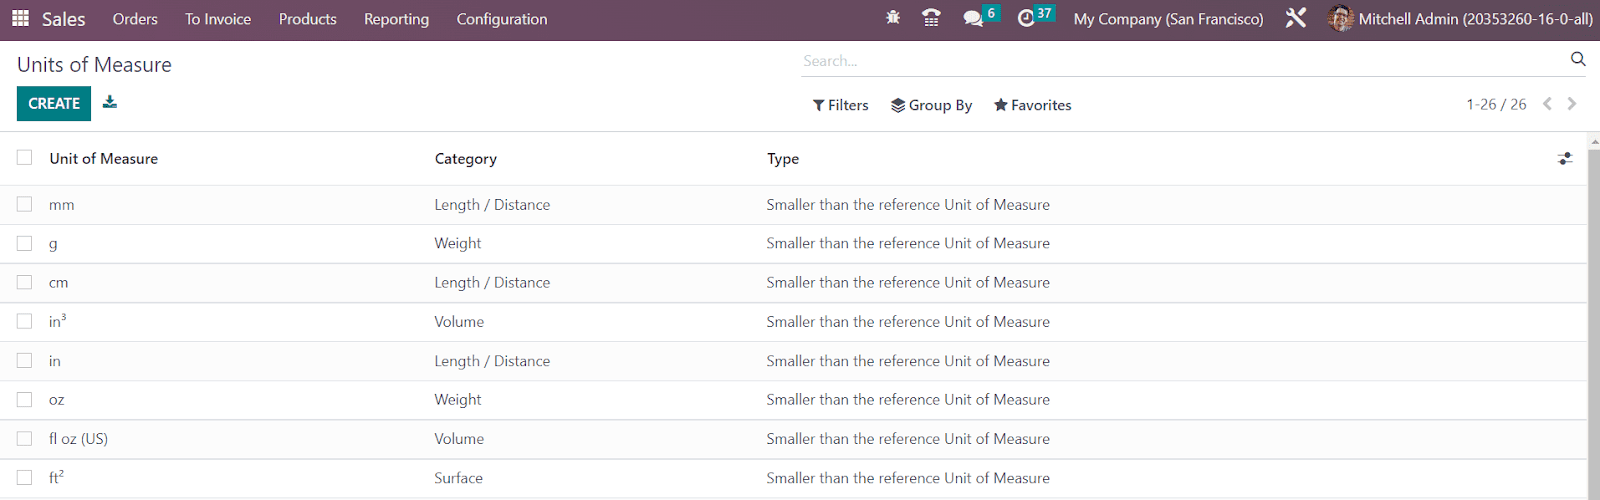
The list will show already configured Units of Measure with the details of the respective category and type. Using the Create button, you can create a new UoM.

The name of the new UoM can be specified in the Unit of Measure field. Specify the Category of the UoM in the respective field. Conversion between units of measure will be only possible if they belong to the same category. The UoM Type can be the Reference Unit of measure for the category, Smaller than the reference Unit of measure, or Larger than the reference Unit of measure. You can select a suitable type for the new UoM. The UNSPSC code of this UoM can be mentioned in the UNSPSC Category. In the Rounding Precision field, you can add the rounding value to calculate the most appropriate value of the UoM. By enabling the Active field, you can activate the new UoM.
From the Configuration menu, you will get another option called Units of Measure Categories which will help you to define the category of each UoM. As you can see in the image below, you will get the list view with the details of the Unit of Measure Category, Group Products in PoS, and UoM.

Click the Create button. A new window will appear to configure a new UoM category. You can start the configuration by mentioning the name of the UoM Category.

If you want to group products of this category in point of sales, you can activate the Group Products in POS field. Under the Unit of Measure tab, you can add the list of UoM that belong to this category one by one with the help of the Add a Line button.
Now let’s check the options available under the Settings menu of the Sales module.
Settings
The Settings menu of the Sales module encompasses several advanced features that help you to improve the performance of the module. OTX will aid you to execute an advanced implementation of such features in the sales module by allowing you to activate them based on your requirements. You can enable or disable these features from the Settings menu based on the task you operate. Let’s discuss each of these features in detail.
Product Catalog
While discussing the product configuration in the Sales module, we mentioned how to configure variants for a product. By activating the Variants option from the Product Catalog tab, OTX will allow you to set multiple variants of products with their attributes.

Configuring multiple measuring units for products is an important step in the sales management process. By enabling the Units of Measure option, you can effortlessly configure different Units for measuring products. It is possible to sell products in packages and manage them with OTX 16. This can be done by activating the Product Packagings option. You can define the packaging type for products while configuring them. In the product configuration window, you will get additional options to mention the packages under the Inventory tab.

You can manage the product packages with more efficiency with the help of the Inventory module.
You can activate the Variant Grid Entry feature to add multiple variants to a sales order from a grid.

If you are creating a sales order with a product with multiple variants, you can use this feature. While configuring this product in your system, you are allowed to specify its variants under the Attributes & Variants tab of the product configuration window.

You will get an additional field under this tab called Sales Variant Selection which will help you to define the method of variant selection while creating a sales order with this product. There are two methods available, Product Configurator and Order Grid Entry. While creating a sales order with this product, you will get a pop-up window to select its variants.
1. Product Configurator

2. Order Grid Entry

This is how Variant Grid Entry works in the OTX Sales module.
You can send a product-specific email to the customer once the invoice is validated by activating the Deliver Content by Email feature from the Settings menu.

If you want to share any specific information related to the product, you can send an email to the other party. It is possible to set an email template for this from the product detail form.
Discount
From the Pricing tab of the Settings menu, you can enable the Discounts feature that will allow you to add discounts on sales order lines.

You can apply discounts manually as shown in the image below under the Sales Order Lines or OTX will automatically display the discount computed from the respective pricelist.

Margins
To get margins in sales orders or quotations, you can activate the Margins feature from the Settings menu as shown below.

Generally, the margin is calculated as the sum of the product sales prices minus the cost set in their detail form.

Online Payment
By activating the Online Payment option, you can allow your customers to make online payments to confirm sales orders.

You can add more payment providers to your sales operations by clicking on the Payment Providers button. This will lead you to a new window where you can find several payment providers.

You can activate the required payment providers from this window.
Default Quotation Validity
If you want to set a default validity on your quotations, you can enable the Default Quotation Validity feature from the Settings menu.

The default validity in a particular number of days can be mentioned here. While creating a new sales order or quotation, you will get the Expiration date on the window. It will be calculated based on the default validity.

Lock Confirmed Sales
OTX allows you to lock a sales order once it is confirmed. By locking, OTX will restrict the sales order from editing. You can activate this feature from the Quotation & Orders tab of the Settings menu.

As shown in the image below, you can find the Lock option in the sales order that will help you to lock the confirmed sales order.

You can Unlock the sales order by using the specified button.

Pro-Forma Invoice
OTX permits you to send Pro-Forma Invoice to your customers by enabling the corresponding option from the Settings menu of the Sales module.

Based on the cost mentioned in the sales order, you can generate a Pro-forma invoice before the customer bill generation. It will give a comprehensive understanding of what the company offers to its customers.

You will get the Send Pro-Forma Invoice on the sales order window as shown in the image above. When you click on this button, a pop-up will appear on the screen.

The auto-generated mail will show the details of the sales order number and amount. You can edit the content of the mail as per your need. You can also attach sales quotations in this mail so that the customer will get an exact idea of the price, terms & conditions, and other offers proposed by the company. Click on the Send button.
Invoicing
You can define the Invoicing Policy of your sales operations from the Settings menu.

In OTX , you can invoice products in two different ways. By selecting the Invoice what is Ordered option as the Invoicing Policy, you can invoice all quantities ordered by the customer. In the case of the Invoice what is delivered, OTX allows you to invoice the quantities that are delivered to the customer. You can not invoice products before delivery in the second method.
It is possible to define the Invoicing Policy of a product in the product detail form.

Down Payments
In OTX , the down payment is created as a separate product. The product used for down payment can be mentioned in the Down Payments section available under the Invoicing tab in the Settings menu.

Using the external link available here, you can manage the product.
Connectors
In order to import amazon orders to your sales module, you can activate the Amazon Sync option. By activating this field, you can manage amazon orders in the sales module and sync deliveries.

We will be looking at the reporting features of the Sales module in the next section.
Reporting
Analyzing sales operations in a regular interval of time will benefit you to understand your workflow quickly. An effective sales reporting system will assist you to get a comprehensive idea of the sales management activities done in your organization. The OTX ERP system can assist you in generating reports of sales within seconds. You can use this report to analyze the current sales performance and thereby locate the areas that require improvement. Clicking on the Reporting option from the main menu of the Sales module will lead you to the Sales Analysis window.
You will get the analysis report in graphical as well as pivot tables.
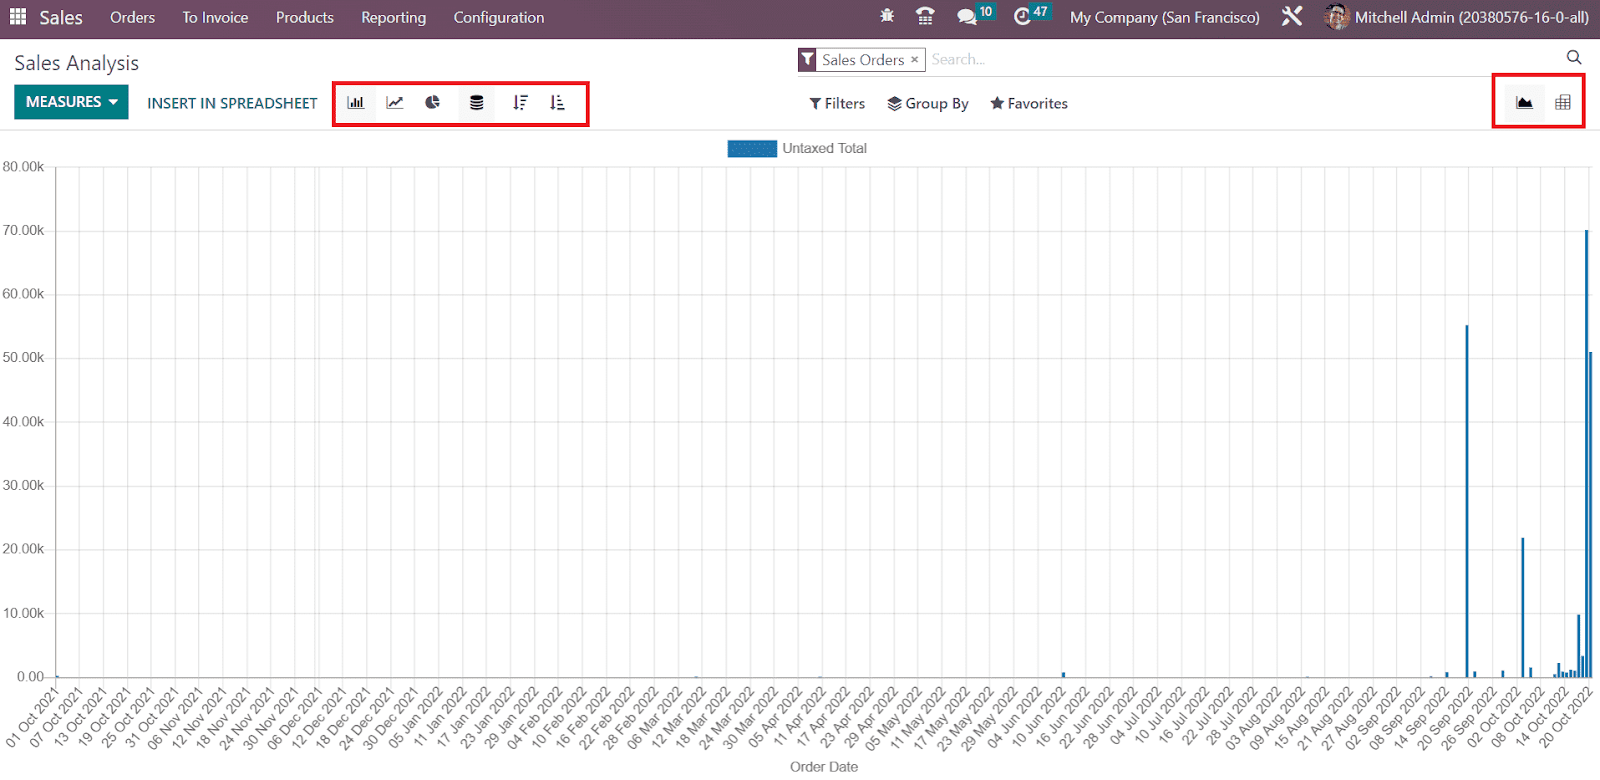
The above-shown screenshot is the Bar Chart of the sales report based on the Order Date. It is possible to organize the Bar Chart in Ascending and Descending orders at your convenience. The report can be observed in the Line chart and Pie Chart also as shown in the screenshots below.
Line Chart
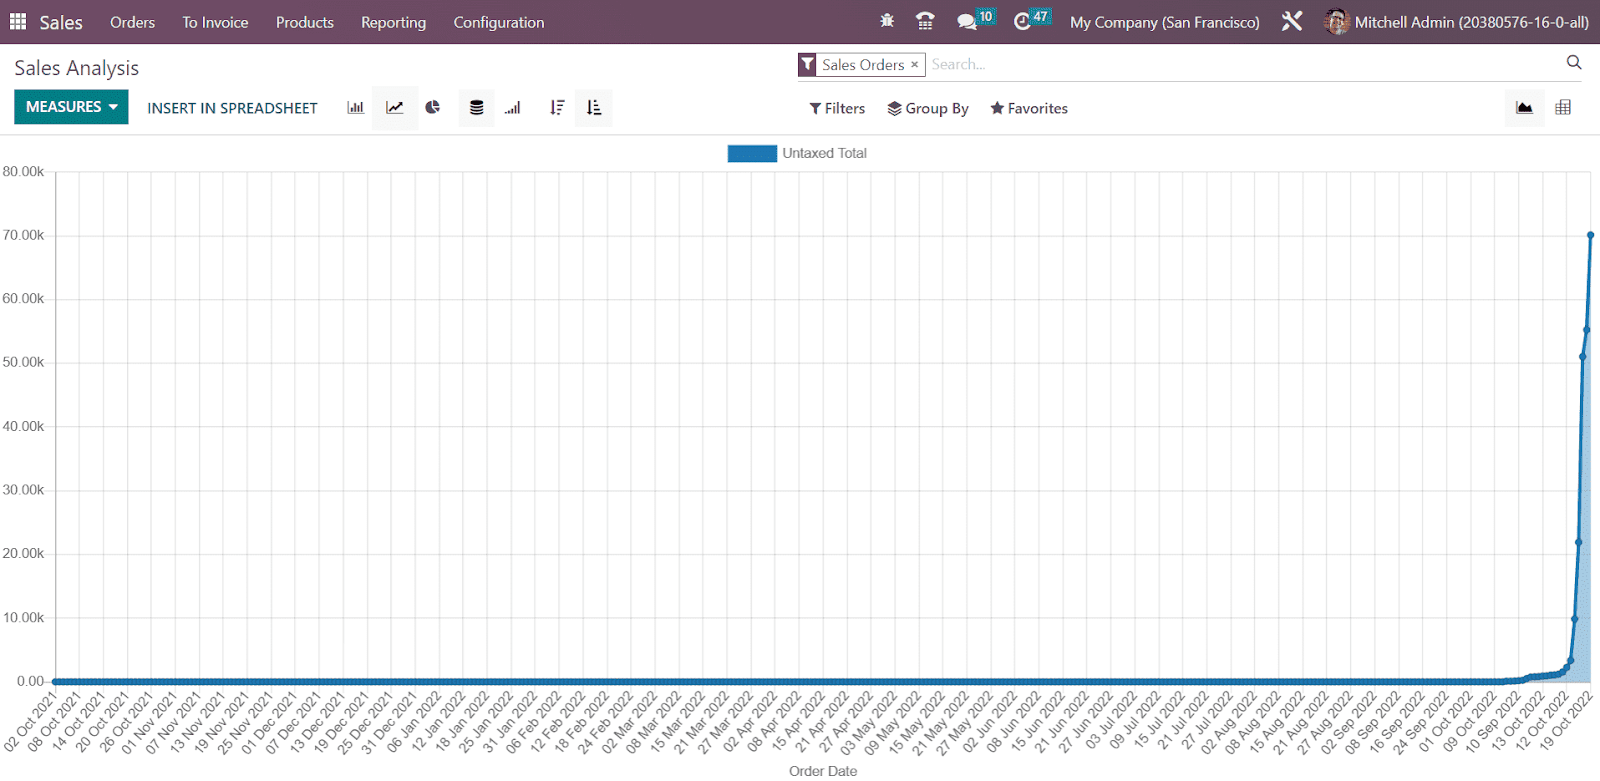
Pie Chart
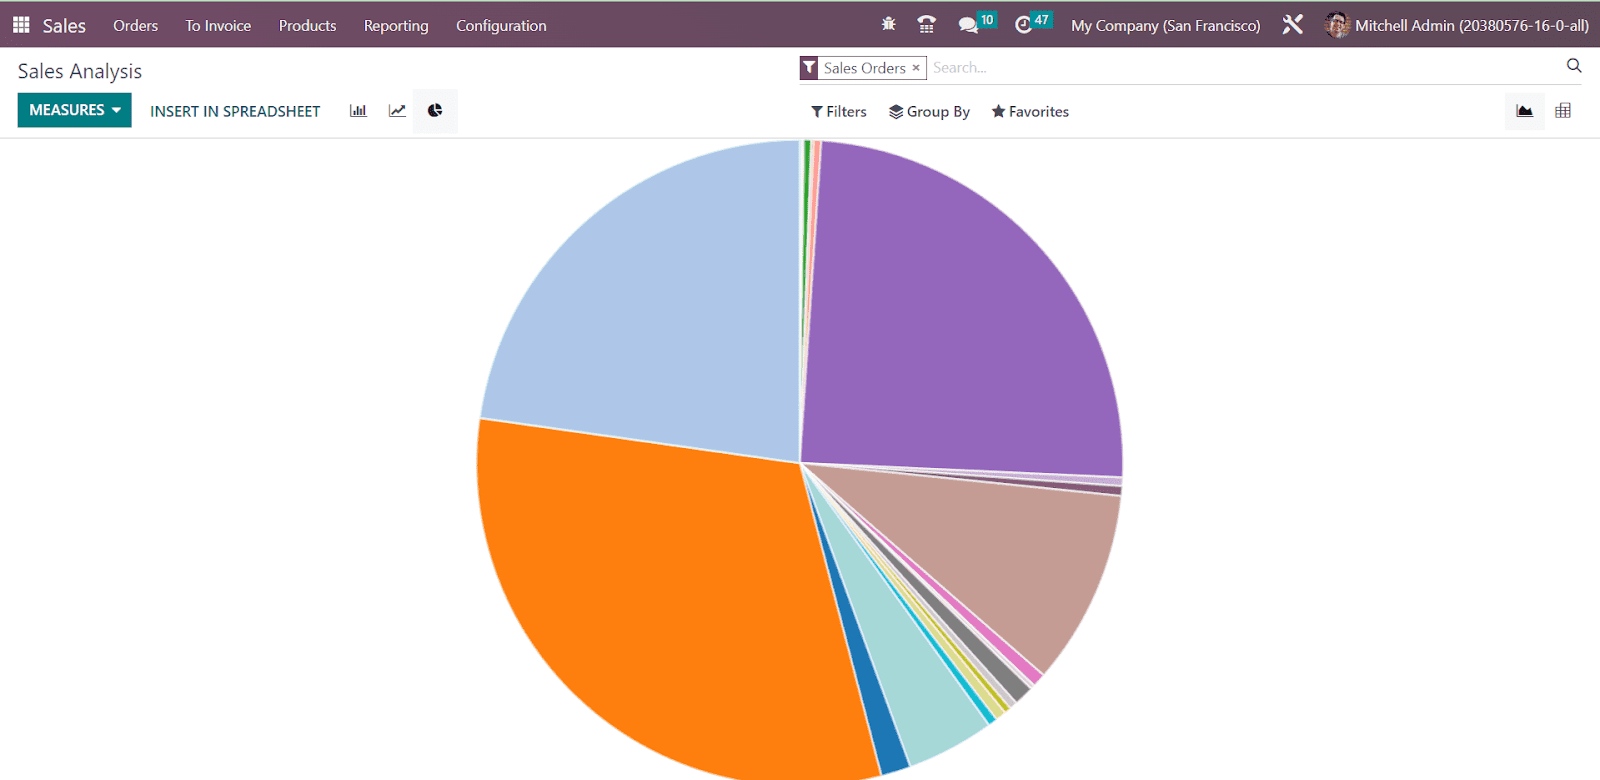
You can generate required sales reports by adjusting the Measures.

Using the available Measures, you can generate sales reports of Discount %, Discount Amount, Gross Weight, Quantity Delivered, Quantity Invoiced, Quantity Ordered, Quantity To Deliver, Quantity to Invoice, Total, Untaxed Amount Invoiced, Untaxed Amount To Invoice, Untaxed Total, Volume, and Count.
The Filters will help you to create reports based on Sales Orders, Quotations, and Order Dates. Making customized reports is an easy task with the help of OTX . for this, you can add custom filters on reports using the Add Custom Filters button.
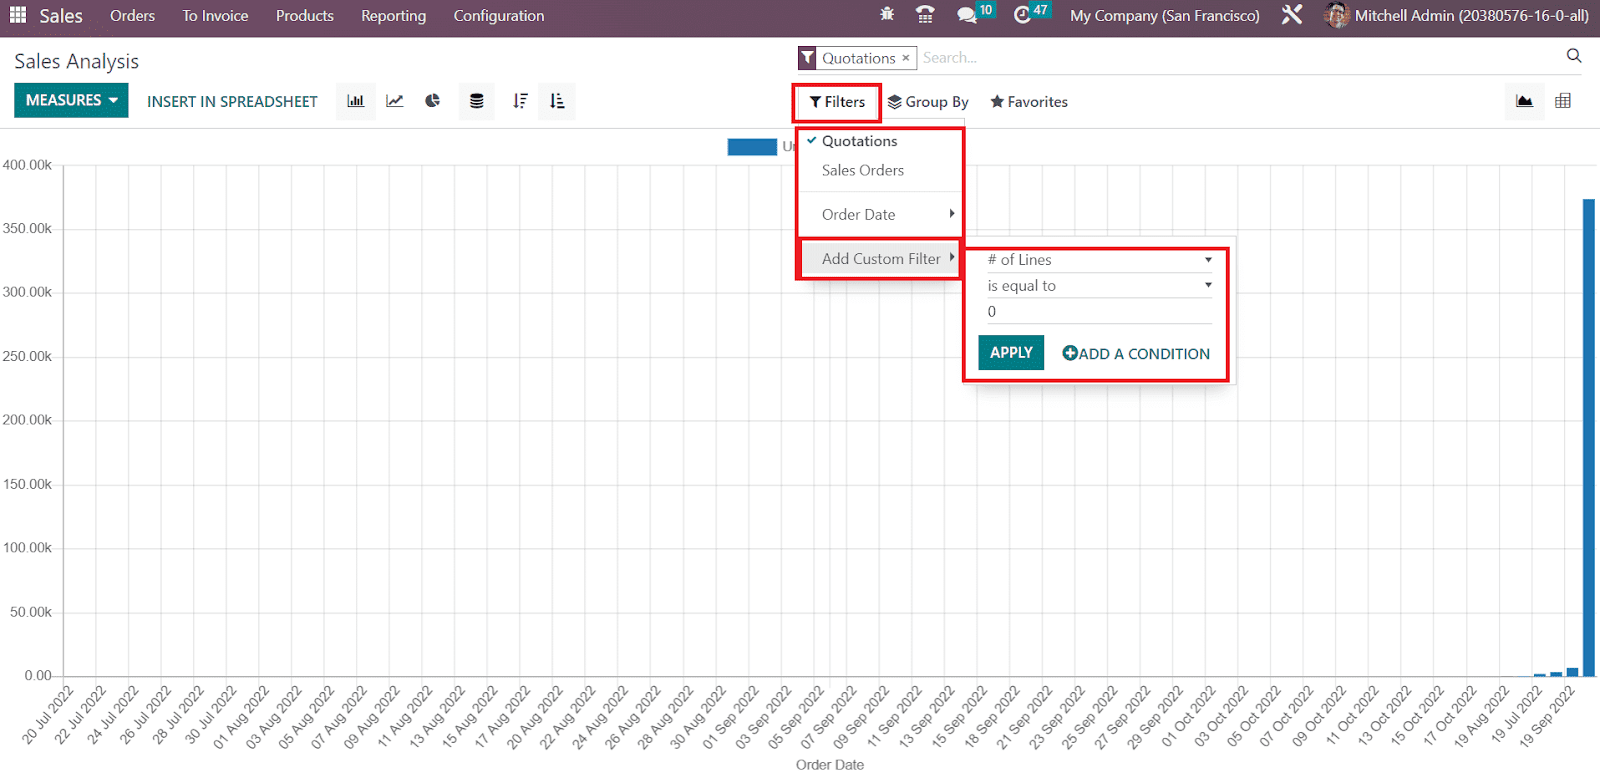
You can group the report based on Salesperson, Sales Team, Customer, Customer Country, Customer Industry, Product, Product Category, Status, Company, and Order Date as default. You can create customized grouping options using the Add Custom Group button.

The Measures, Filters, and Group By options are available in the Pivot view also.

Using the + icon, you can add suitable grouping options to the pivot table. The axis of the table can be flipped using the Flip Axis button.

The available data can be shifted into a spreadsheet using the Insert in Spreadsheet button. A pop-up will appear to select the spreadsheet as shown in the image below.

After selecting the suitable spreadsheet for your sales report, you can click on the Confirm button.

The spreadsheet will be saved as a document in your database.
OTX 16 Sales module is the best option for the complete management of sales processes in your company. It will ensure accuracy in each step and enhance your sales performance by offering advanced tools as solutions for sales management operations.
Purchases
The Purchase management offered by the OTX ERP system will ensure to automate all purchase operations with maximum efficiency. Based on your stock levels, you can manage your inventory by sending quotations to vendors with the assistance of OTX . In order to meet various business requirements, an organization must go through various purchase procedures on a daily basis. Considering this fact, management of purchase-related activities is a crucial process to run a business successfully. Having a dynamic ERP system like OTX will benefit you in streamlining your administration processes. The OTX Purchase module is designed in such a way that the user can seamlessly manage purchase operations, vendor, vendor bills, product updates, and many more activities within a few clicks.
OTX never disappoints its user in ensuring advanced performance by integrating the module with other modules like Sales, Inventory, Accounting, Manufacturing and so on. The Purchase module will act as a comprehensive solution for your organization. In this chapter, we will be discussing the Purchasing module in OTX 16 in detail.
Product Management
The products that you want to purchase from particular vendors can be configured and managed using the Purchase module. The Products menu available in the Purchase module works in the same way that we discussed in the Sales module.

Under the Products menu, you will get the Products and Product Variants options which will help you to configure purchasable products and their variants respectively. Using the filter ‘Can be Purchased’ , you will be able to get the list of products that can be purchased with the help of the Purchase module.
While configuring a product in the Purchase module, you can activate the ‘Can be Purchased’ option to configure this product as a purchasable product.

Under the Purchase tab in the product configuration window, you will be able to mention the list of vendors from which you are intending to purchase this product. Using the Add a Line button, you can add the vendors one by one. Here, you can add multiple vendors to a product. You can select the name of the Vendor from the given list or configure the new vendor in your contact list. If the selected vendor is a subcontractor, you can activate the Subcontractor field. In OTX , you can subcontract products which we will discuss while detailing the Manufacturing module. Mention the suitable currency for the vendor in the Currency field. The quantity of the product that you want to purchase from this vendor can be specified in the Quantity field. The default UoM used for purchase orders of this product can be defined in the Unit of Measures field. Mention the price to purchase this product in the Price field. The Delivery Lead Time indicates the lead time in days between the confirmation of the purchase order and the receipt of the product in your warehouse.

The Vendor Taxes field is used to mention the default taxes used when purchasing this product. You can set the Control Policy on Ordered Quantities or Received Quantities.
On Ordered Quantities: Control bills based on ordered quantities.
On Received Quantities: Control bills based on received quantities.
You can set a suitable Control Policy as default for all products from the Settings menu of the Purchase module.

Under the Invoicing tab, you can set the Bill Control for all products. This default value will be applied to all new products. If you want, you can change the bill control policy from the respective product detail form.
Under the Purchase Description field, you can add notes related to the product which will be later added to purchase orders. You can set warnings while purchasing this product under certain circumstances. This feature can be activated from the Settings menu of the module.

In the Orders tab, you will get the Warnings option to activate. As soon as you activate this feature, you will be able to get an additional field under the Purchase tab of the product details form as shown below.

Here, you can set Warnings for orders while purchasing this product. Detailed information regarding the configuration of Products, Product Variants, Product Attributes, and Product Categories will be discussed in the chapter of the Inventory module.
Now, let’s detail how OTX manages vendors using the Purchase module.
Vendor Management
When it comes to the management of purchase operations in an organization, maintaining a good relationship with the vendors of the products that you want to purchase is very important. The OTX Purchase module will assist you to create and maintain the contacts of vendors efficiently in your database. This will ensure quick access to the details of the vendors whenever you are in need. OTX ERP system makes the process of configuration and maintenance of vendor list easy for its users so that they can seamlessly manage vendors and vendor related operations at a single place.
The user will get access to the vendor management window from the Orders menu of the Purchase module.

Click the Vendors option given under the Orders menu which will direct you to a new window with the details of the all configured vendors as shown in the screenshot above. The user will get Kanban as well as List views on this platform and you can select a required view from the icons given on the top right corner of the screen. In the Kanban view, you will get the preview of the vendor profile along with the details of the name of the vendor, address, email address, tags, number of meetings scheduled, opportunities, purchases, sales, and many more.

Clicking on the small clock icon given on the vendor profile will assist you to schedule an activity with the respective vendor.
The list view of this platform will show the Name, Phone, Email, Salesperson, Activities, City, Country, and Company of the vendor.

You can expand the preview of the list view by adding more fields from the list highlighted in the screenshot above.

The Filters, Group By, and Favorites options can be used to sort the available list of vendors as per your requirements with default and customizable features. In order to configure a new vendor to your database, you can use the Create button.

The method of configuring a new vendor in the Purchase module is the same as that of the customer configuration in the Sales module. You can complete the Contacts & Addresses, Sales & Purchases, Accounting, Internal Notes, Partner Assignment, and Membership tabs by following the steps we discussed in the Sales chapter.
You will get some additional smart buttons on the vendor profile after completing the configuration process as shown in the image below.

The Meetings button will record all scheduled activities with this vendor. The total number of opportunities, sales, subscriptions, events, tasks, and tickets created from this vendor can be observed using the corresponding smart buttons. Clicking on the More option will show additional smart buttons such as Purchases, On-time Delivery, Due, Invoiced amount, Vendor Bills, Ledger, Certificates, Documents, and Direct Debit Mandates.

You will get a set of separate operation tools under the Action button. With the help of this button, you will get access to Archive, Duplicate, Delete, Send SMS Text Messages, Payslip lines, Download (vCard), Privacy Lookup, Grant Portal Access, and Process Follow-ups.
This is how we manage vendors in the Purchase module. Now, let’s move to the management of the vendor pricelist in OTX 16.
Vendor Pricelist
Pricelist acts as one of the inevitable factors that help to run the sales operations of a company successfully and profitably. Vendor price lists will help you to define a set of prices for specific vendors for a specific period of time on particular products. While purchasing products from a vendor, specific vendor pricelists are applied to the products. You can effortlessly create such vendor pricelists in the Purchase module using the Configuration menu.

The Vendor Pricelists option will be available under the Configuration menu as shown in the image above. As soon as you click on this option, OTX will display the vendor pricelists window where you can observe the list view with the details of the Vendor, Subcontracted, Product, Currency, Company, Quantity, Units of Measure, and Price.

OTX allows you to add custom fields to your list view using the Add Custom Field button shown in the image above. If you want to add more fields to the list view you can activate the options from the options shown in the screenshot above or create a new custom field. Just like any other platforms in OTX , you will be able to use the default and customizable filters and group by options in this platform also.
The Create button will guide you to the widow for the creation of a new vendor pricelist. Here, you can mention the name of the Vendor in the given field.

Then you can mention the Vendor Product Name which will be used when printing a request for quotation by using this vendor pricelist. You can keep it empty if you want to use the internal one. Similarly, you can mention the Vendor Product Code also in the corresponding field. Mention the Delivery Lead Time in days in the given field. It is the number of days usually calculated between the confirmation of the purchase order and the generation of the receipt of the delivery order.
Under the Pricelist tab, you can mention the Product and its Variants that you want to add to this vendor pricelist. Along with this, the quantity of the product that you are intending to purchase from this vendor can be specified in the Quantity field. Mention the Unit Price, Validity of the pricelist, and Company in the respective fields. The Save button will help you to save the new vendor pricelist.
Now, let’s check how to create a request for quotation in the Purchase module.
Request for Quotation
If you want to purchase any product from a particular supplier, you can send a purchase quotation to that supplier so that you will be able to get a clear idea regarding the products and their service. You can completely rely on the OTX 16 Purchase module for creating such requests for quotations. OTX will let you send requests for quotations to multiple vendors which will help you to figure out the best service provider for your purchase.
In the OTX Purchase module, you will get a separate platform for the management of all RQFs created in the module. You will get access to this platform from the Orders menu. As shown in the image below, OTX will organize all your RFQs in a systematic manner so that you can easily monitor all operations without any chaos.
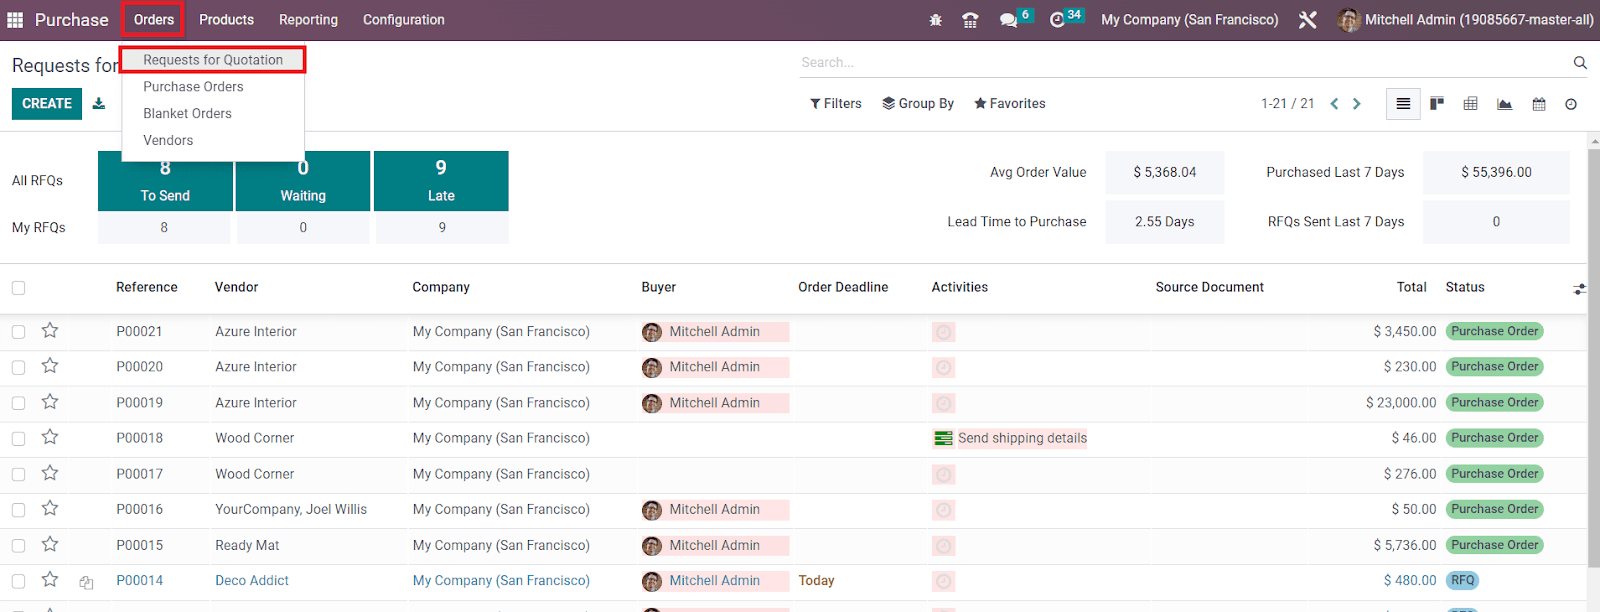
In the screenshot above, you will get the list view of the Request for Quotation with the information of Reference, Vendor, Company, Buyer, Order Deadline, Activities, Source Document, Total, and Status of each RFQ. Apart from the List view, the user can shift the view of the platform into Kanban, Pivot, Graph, Calendar, and Activity views also based on demand.
The availability of default and customizable features in the Filters and Group By option will benefit you in simplifying the searching process. You can easily locate required data from the available RFQs using these sorting options within seconds.
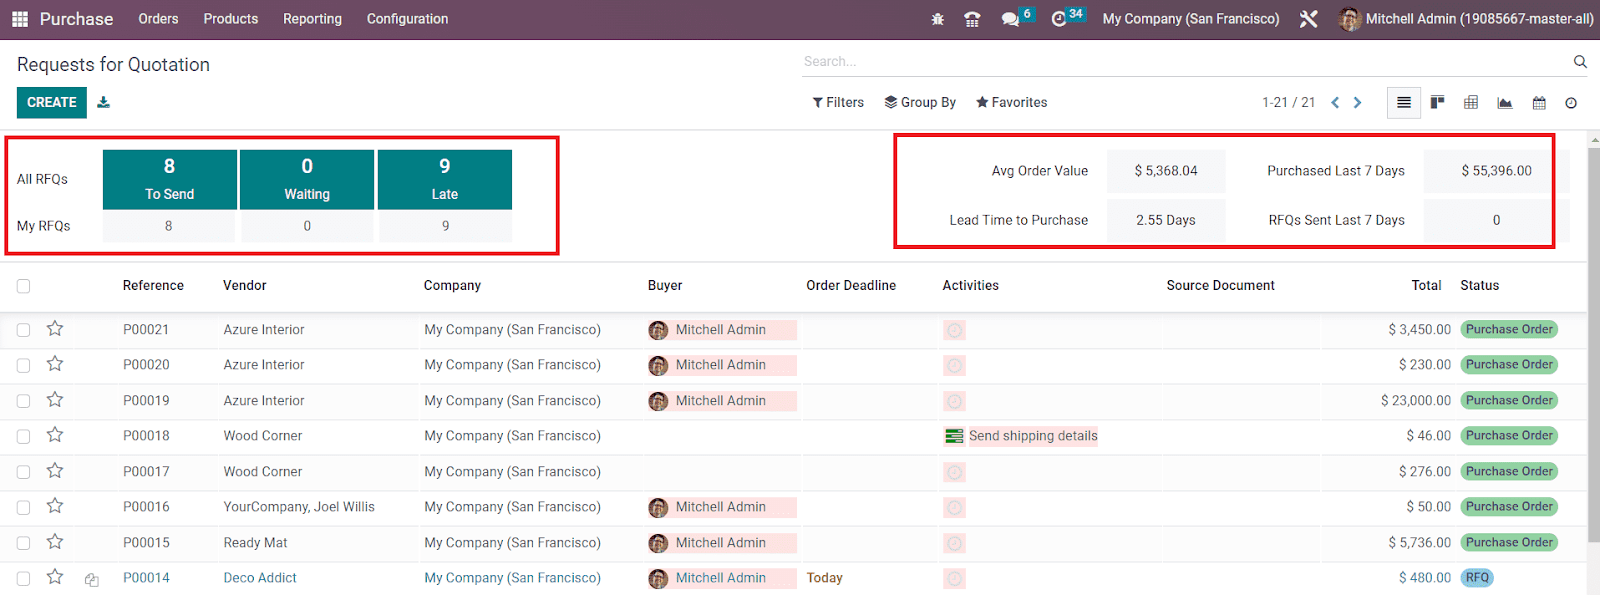
As highlighted in the image above, you will be able to get the number of All RFQs as well as MY RFQs (the RFQs created by you or assigned to you) in the RFQ window. These fields will show the total number of RFQs to send to respective vendors, RFQs waiting for the confirmation from vendors, and late RFQs separately. Additionally, you will get the details of the Average Order Value, Purchased Last 7 Days (total amount of products purchased within last 7 days), Lead Time to Purchase (average lead time in days from the confirmation of purchases orders to purchase), and RFQs Sent Last 7 Days (total number of RFQs sent within last 7days).
The star icon given on the left side of the list view can be used to priorotize your RFQs.
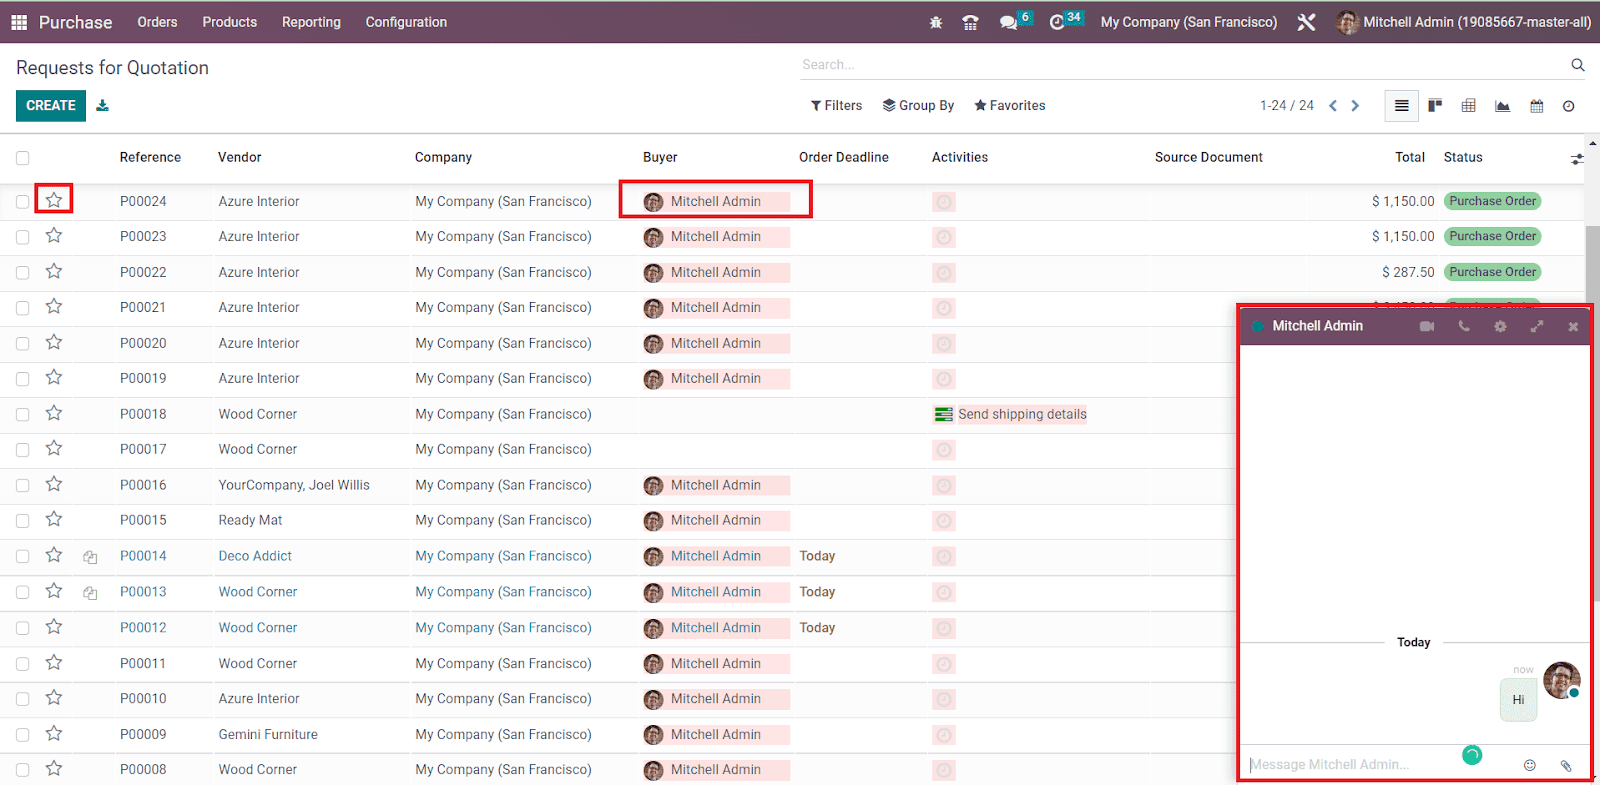
OTX offers an easy way to communicate with the buyer from the preview of the RFQs itself. Clicking on the name of the Buyer will open a chat box in the window as shown in the image above that will assist you to connect with the buyer.
Now, let’s discuss the creation of a new request for quotations. If you want to make changes in the already created RFQs, you are allowed to select the required one from the given list and use the Edit button. Here, we are discussing the configuration of a new request for quotation. For that, you need to click on the Create button and OTX will lead you to a new creation window as depicted below.
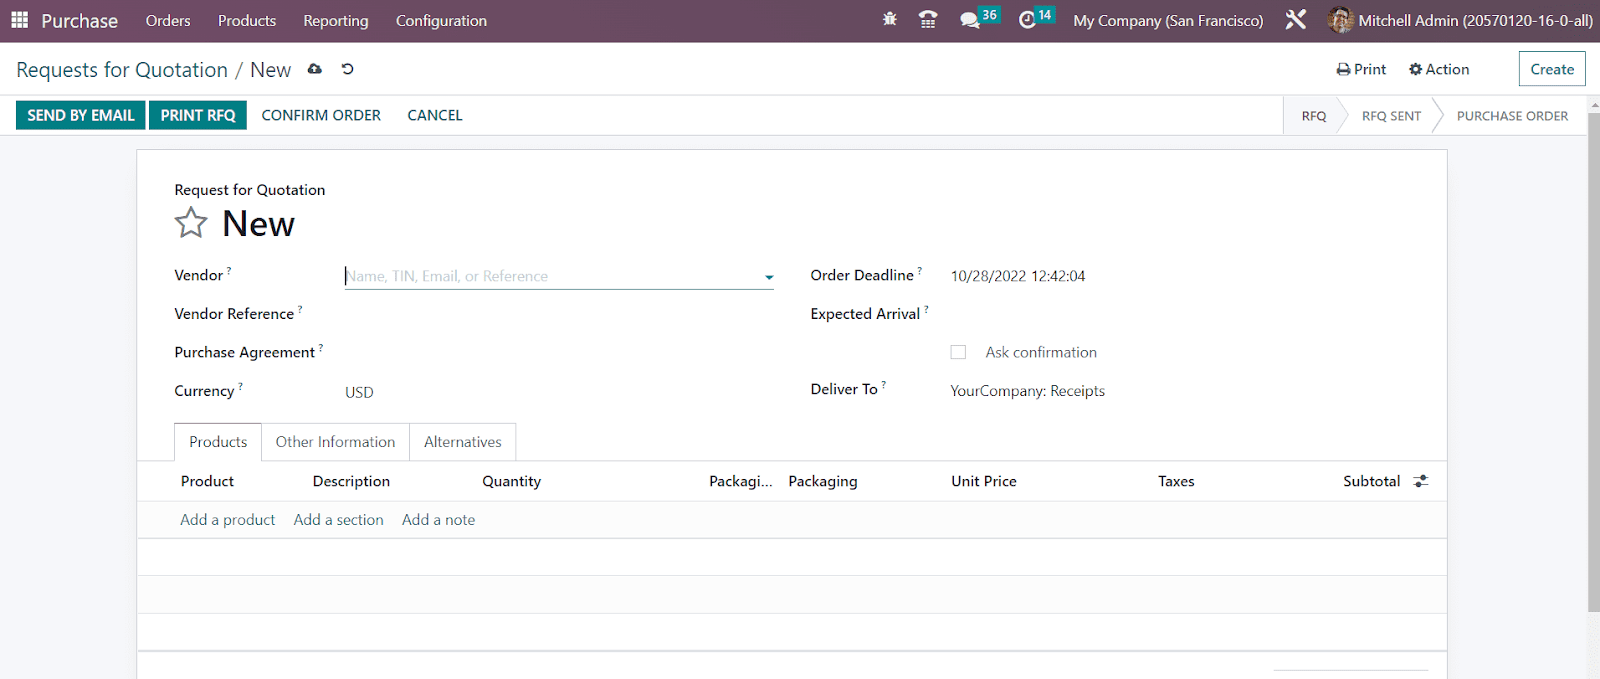
We already discussed the configuration of Vendors in the earlier section. Here, you will get the list of vendors configured in the Purchase module in the Vendor field where you can select a suitable vendor you are interested in. In the Vendor Reference field, you can mention the reference of the sales order or bid sent by the vendor. It is used to do the matching when you receive the products as this reference is usually written on the delivery order sent by your vendor. In the Purchase Agreement field, you can select a draft agreement agreed by both parties. In OTX , you will get an additional platform to manage and configure purchase agreements which we will discuss later. The Currency suitable for your purchase procedures can be defined in the corresponding field. The Order Deadline field depicts the within which the quotation must be confirmed and converted into a purchase order. The Expected Arrival indicates the delivery date offered by the supplier. You can ask the vendor to confirm the date by sending an automatic confirmation mail with the help of the Ask Confirmation button. The stock picking type mentioned in the Delivery To field will determine the operation type of the incoming shipment.
The products that you want to purchase from the respective vendor can be specified under the Products tab using the Add a Product button.
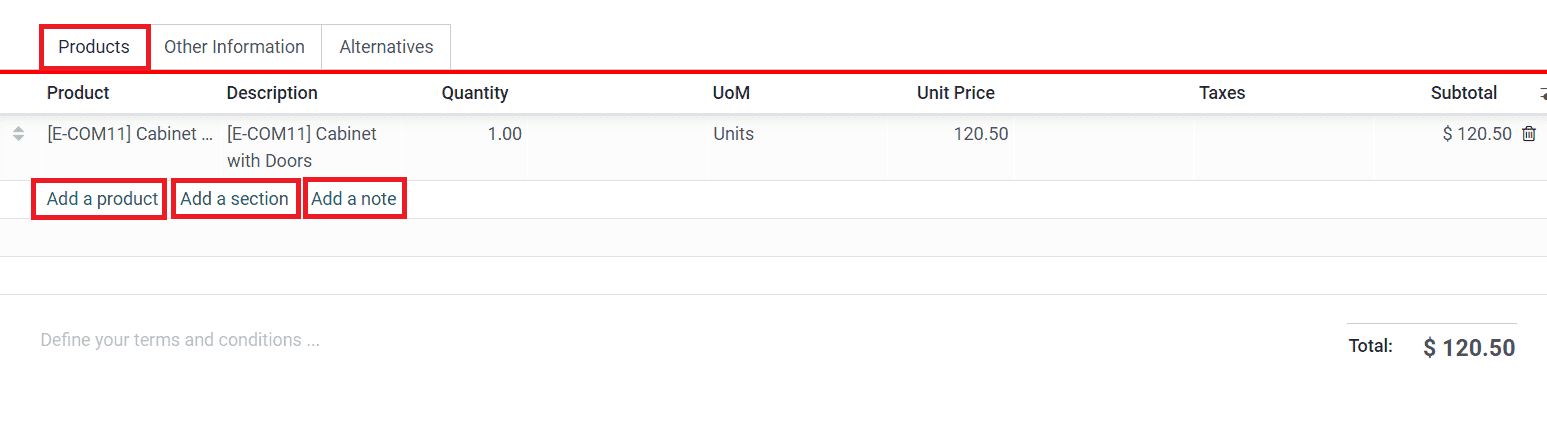
The product line will include the details of the Product, Description, Quantity, UoM, Unit Price, Taxes, and Subtotal. After adding all products, the total amount of the purchase will be shown under the Products tab on the right side of the screen. The Add a Section and Add a Note buttons are used to add sections and notes under the Products tab respectively. There will be an additional field available in this tab to define the terms and conditions used for this purchase.
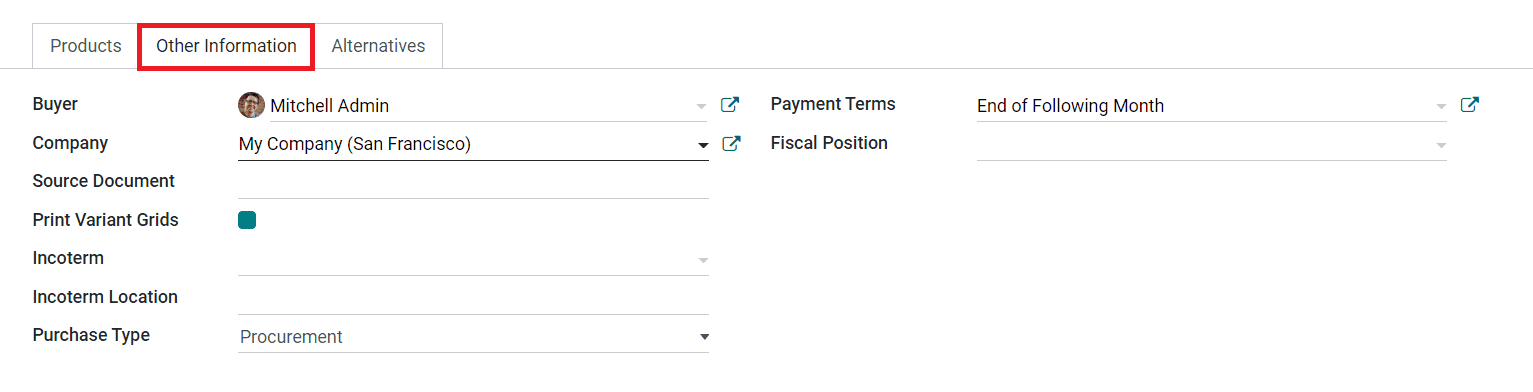
Additional details regarding the quotation can be added under the Other Information tab. Here, you can specify the name of the Buyer, Company, and Source Document in the respective fields. If the Print Variant Grids field is activated, the matrix of the configurable products will be shown on the report of this order. In the Incoterm field, you can specify the international commercial term which is a series of predefined commercial terms used in international transactions along with the Incoterm Location . The type of purchase can be selected as Procurement or Commission according to the agreement in the Purchase Type field. The Payment Terms and Fiscal Positions used for this purchase operation can be defined in the corresponding fields.
The Alternatives tab is a new feature in the OTX 16 Purchase module. Here, you can add alternative purchase orders with the same products from different vendors. This tab will help you to create a call for tender by adding alternative requests for quotations to different suppliers. You can create your choices by choosing the best combination of lead time, OTD reference, and total amount.

By comparing product lines of different suppliers, you can easily decide to order some products from one vendor and others from another vendor. In order to create alternatives, you can click on the Create Alternative button which will open a wizard as depicted below.
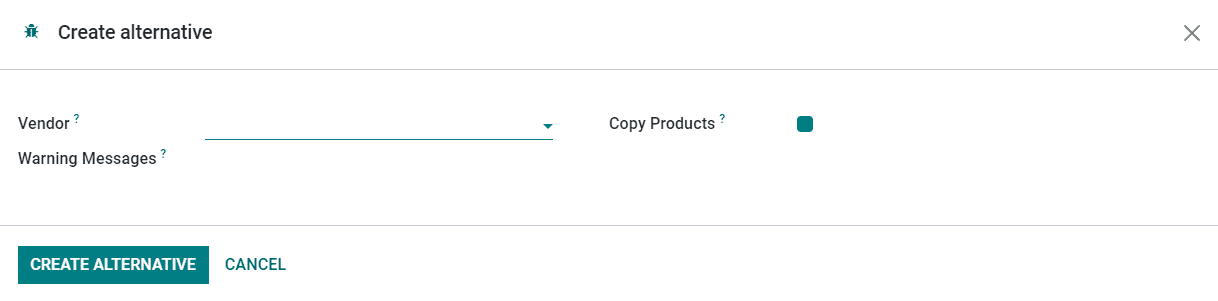
Here, you can choose a vendor for the alternative purchase order. The Copy Products option can be activated to copy the product quantities of the original purchase orders. Now, click the Create Alternative button. Once you complete the creation of the alternative purchase orders, they will be listed under the Alternatives tab as shown below.
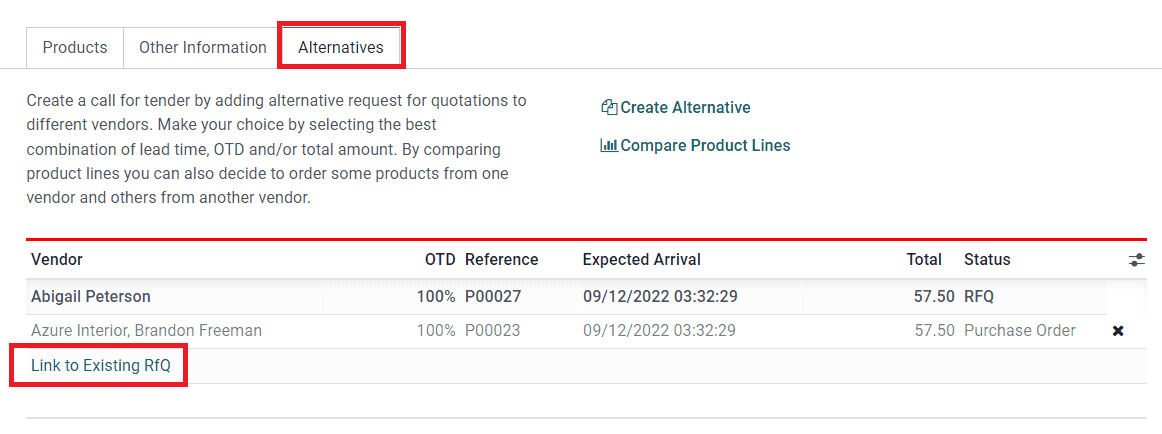
Using the Link to Existing RFQ button, it is possible to link the purchase orders with other alternative POs. When you click on this button, a pop-up will appear to select alternatives. You can select suitable alternatives from this pop-up and add to the Alternatives tab.

OTX lets you compare the product line with the help of the Compare Product Lines button. Clicking on this button will direct you to a comparison window where you will get the list view of the alternative purchase orders with the details of the Product, Vendor, OTD Reference, Description, Expected Arrival, Quantity, Unit of Measures, Unit Price, Total, and Currency.
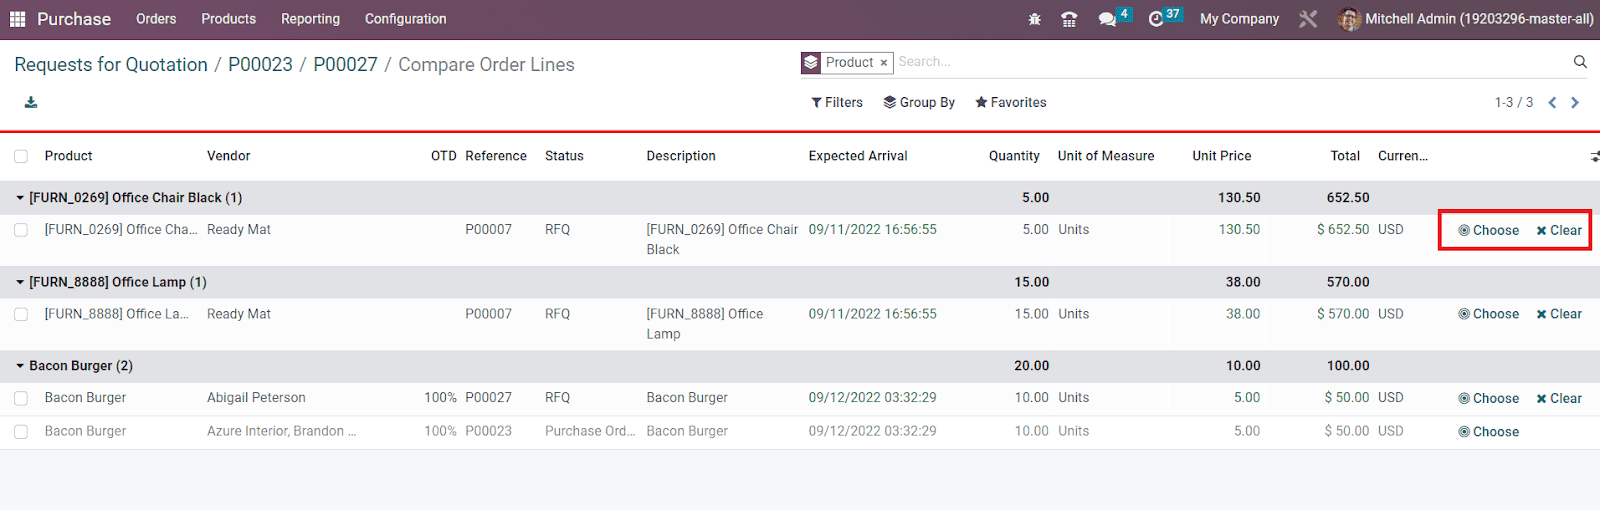
You can make your choice from the alternatives instead of the original purchase order by clicking on the Choose button. The Clear button will assist you to cancel the alternatives.
After completing all fields in the Request for Quotation form, you can now click on the Save button.

Use the Send By Email button to send this request for quotation to the respective vendor via mail. Once you click on this option, OTX will generate an automated email template as shown below where you can add the name of the recipients in the Recipients field. You can add additional attachments to the mail using the Attachments button.

Click the Send button to send the mail to the mentioned recipients.
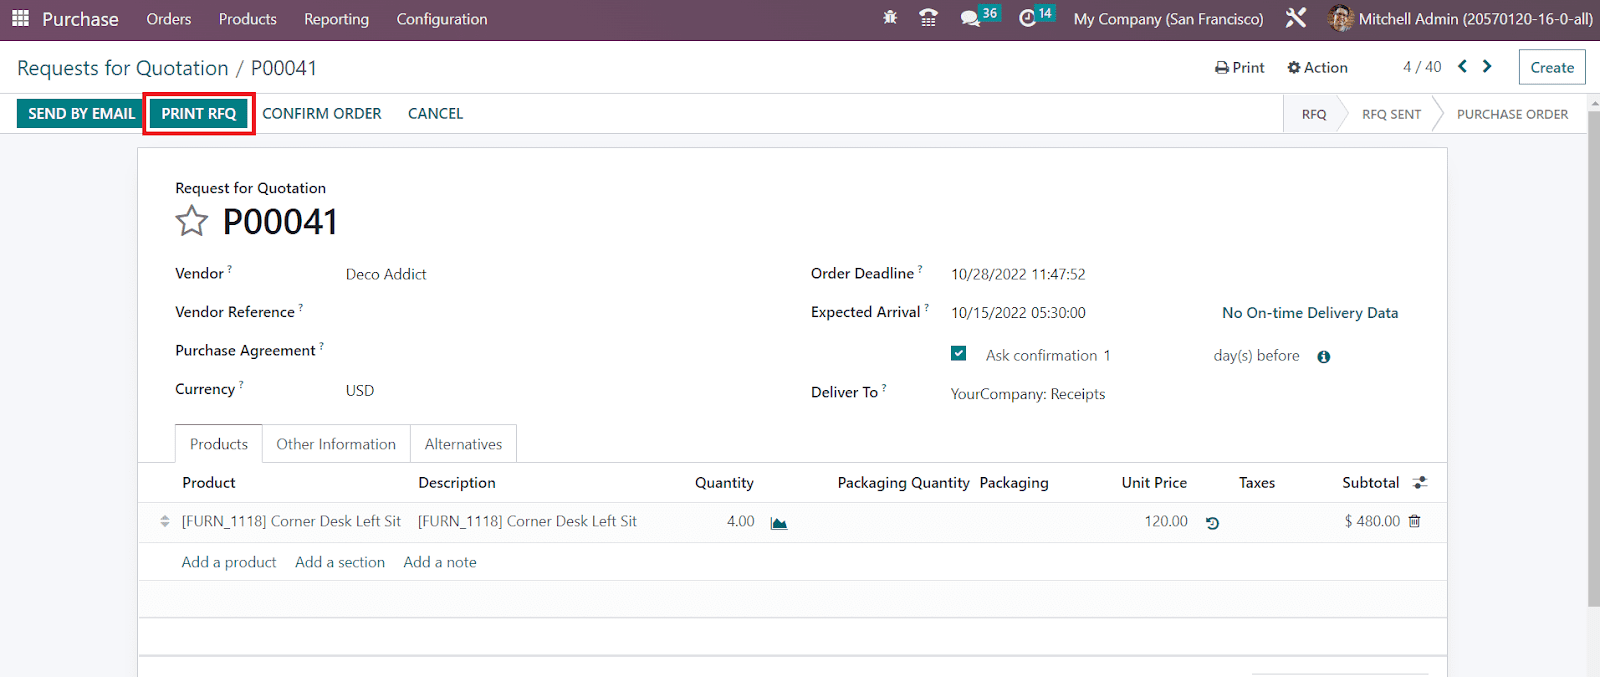
After sending the RFQ to the respective vendors, you can find its status as RFQ SENT . If you want to cancel the request, you are allowed to use the Cancel button. Using the Print RFQ, OTX will allow you to print the RFQ. You will get a pop-up to set the layout of the document.
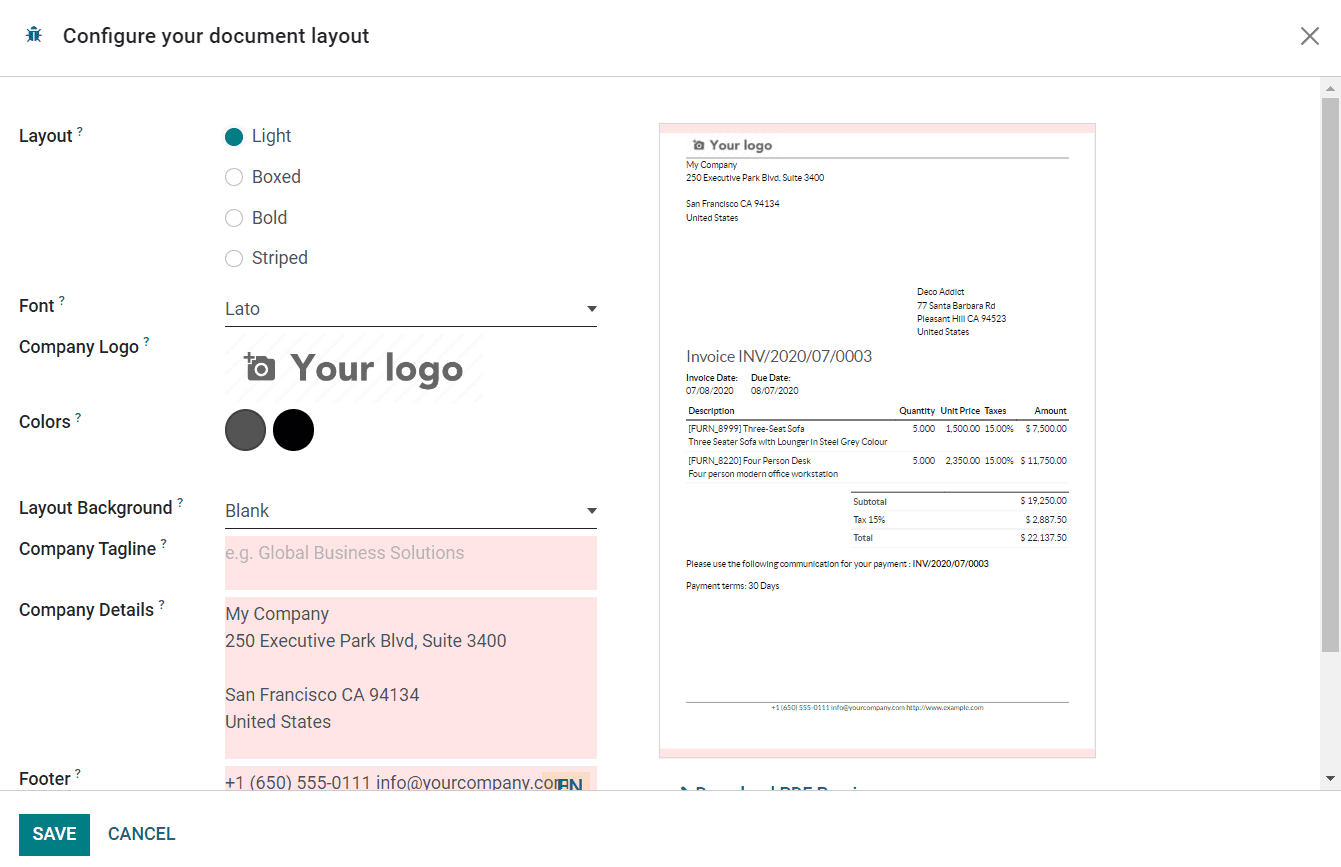
Here, you can select a suitable Layout, Font, Company Logo, Colors, Layout Background, Company Tagline, Company Details, Footer, and Paper Format. The preview of the document based on the option you selected will appear on the right side of the wizard. Clicking the Save button will print your document within seconds.
We detailed the creation of RFQ in the Purchase module and now, we are going to take a look at the management of the Purchase Order in OTX .
Purchase Order
Once you complete the creation of the request for quotation, you can send it to the respective vendor to get their approval. After sending RFQ to the vendor, the next step is the confirmation of the purchase order. In OTX , you will get a dedicated platform in the Orders menu of the Purchase module for the management of the Purchase Orders.

This window is similar to that of the Request for Quotation management window. You will get the details of the Reference, Confirmation Date, Vendor, Company, Buyer, Activities, Source Document, Total, Billing Status, and Expected Arrival date. The Create button can help you to create a new purchase order.
If both parties are satisfied with the terms and conditions mentioned in the request for quotation, the RFQ can be converted into a Purchase Order using the Confirm button.

The status of the RFQ can be observed as Purchase Order once you click on the Confirm button.

In the Purchase Order window, you will get options such as Receive Products to manage received products, Confirm Receipt Date to confirm the date of the receipt, Create Bill to generate vendor bill, and Cancel to cancel the purchase order.
In OTX , it is possible to automatically lock purchase orders to prevent editing. This can be done by activating the Lock Confirmed Orders from the Settings menu of the module.

Once you activate this feature, the confirmed orders will be automatically locked. If you want to make any changes to a purchase order, you can click on the Unlock button.
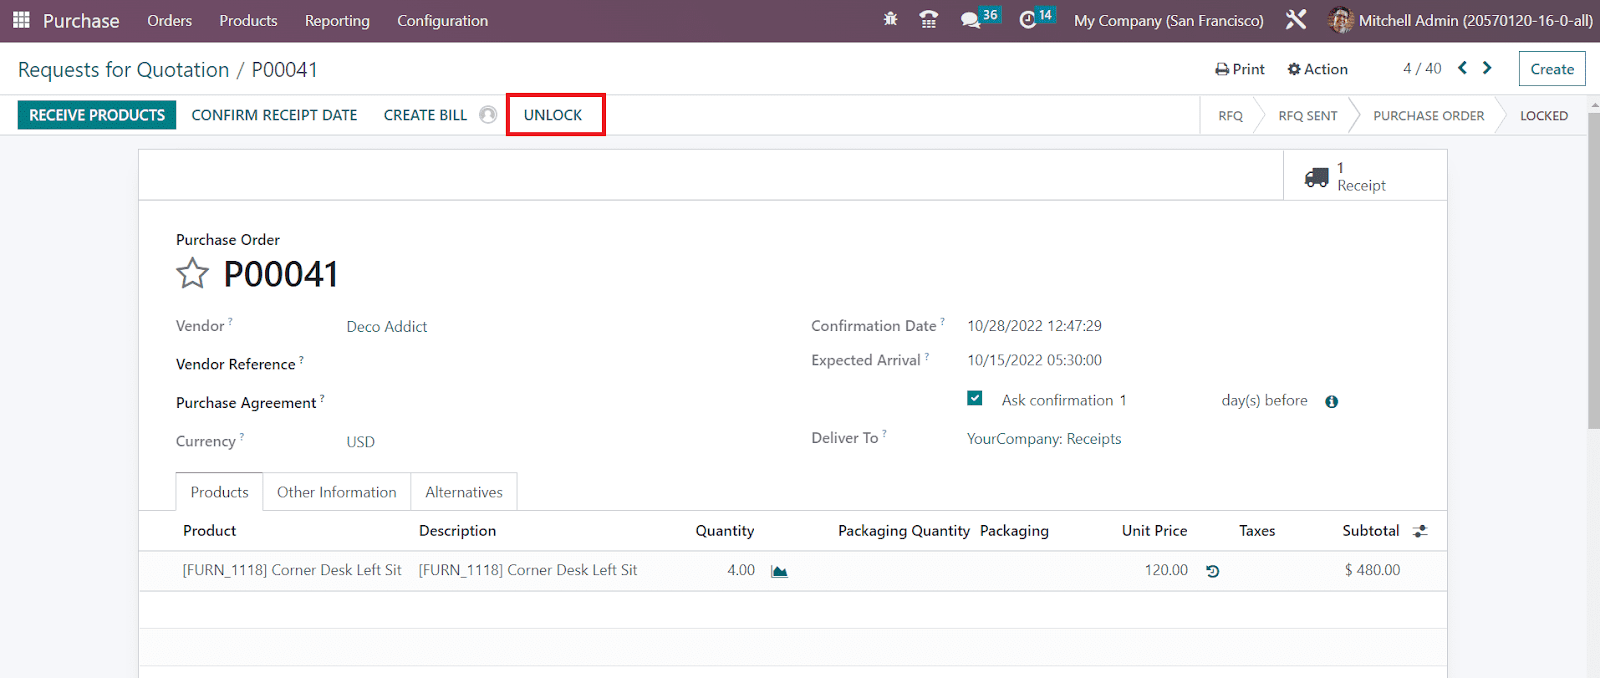
Receive Products
The vendor will send products to your location mentioned in the purchase order after confirming the order. OTX will assist you in the procedures of receiving products as well. When the vendor sends the products to your company, you can click on the Receive Products button while receiving the products.

This will lead you to a new window with details of the incoming shipments. You will get access to this window using the smart button Receipt available on the respective purchase order window.

You can validate the delivery receipt using the Validate button after checking the details. The Receive From field will show the name of the supplier of the products. The Destination Location will show the delivery location mentioned by you while creating the purchase order. In the corresponding fields, you will get the Scheduled Date, Deadline, and Source Document of the delivery receipt.
Details such as Product, Demand, Done, and Unit of Measure can be seen under the Operations tab.

The Demand field will show the quantity of the products from an inventory point of view. Near this field, you will get a button to observe the Forecast Report of the product.

Similarly, you will get an additional button near the Unit of Measure field that will show the detailed operations view.
The Additional Information tab will help you to get the Shipping Information and Other Information related to the delivery of the product.

In the Shipping Information section, you will get the details of the Carrier, Tracking Reference, Weight, and Weight for Shipping. The Other Information section will show the name of the Responsible employee, Procurement Group, and Company in the respective fields. The Note tab will show the related notes of the incoming shipment.
After checking all details, you can confirm the delivery by clicking on the Validate button.

The status of the receipt has changed to Done which indicates that the transfer has been processed.
Vendor Bills
Generating vendor bills is one of the crucial steps in the operation of purchase that requires utmost attention and accuracy. The payment to the vendor will be registered in the form of a vendor bill with the assistance of OTX without any difficulties. Such generated vendor bills will be directly linked to the vendors configured in OTX . The vendor bills can be generated based on the ordered quantities or the delivered quantities based on your company policies. You can set this billing policy from the Settings menu of the Purchase module.
The screenshot of the Settings menu of the Purchase module is given below.

Here, you will be able to see the Bill Control option under the Invoicing tab which will help you to set the policy to create vendor bills. You can decide how the vendor bills should be controlled with the help of this option. The control policy you select here will decide when the vendor bill needs to be paid after confirming a purchase order. You can pay your vendor bills before receiving products or after receiving products. After confirming a purchase order, you can immediately pay your vendor bill for the products that you ordered using the Ordered Quantities bill control option. Here, the quantities mentioned in the respective purchase order will be considered to generate a draft vendor bill. The Received Quantities option can be used to generate vendor bills after receiving the ordered products. You can pay the vendor bill using this option based on the quantities you have received.
Once you choose a suitable Bill Control option from the Settings menu, OTX will set this control policy as default on all new products created. If you want to change the default control policy of a particular product, it can be done from the product detail form of that product.

As highlighted in the image above, you will get the option to manage the Control Policy under the Purchase tab of the product. This option is available for all products. You can use this feature to directly control the billing policy of required products.
Now, let’s take a look at the creation of the vendor bill and its payment procedures.
After confirming a purchase order, you will get the option Create Bill as highlighted in the screenshot below in order to generate the vendor bill.

As soon as you click on this button, OTX will lead you to a new screen where you will get the draft form of the vendor bill.

You can check the details given in the draft vendor bill before confirming it. It includes the details of the Vendor, Bill Reference, Bill Date, Accounting Date, Payment Reference, Recipient Bank, Journal and Due Date. You can add a past bill or purchase order to auto complete the form.
In the Invoice Lines , you can see the list of products you ordered. The journal items and other information regarding the vendor bill can be observed in the corresponding fields. Click the Confirm button to confirm the vendor bill.

After completing all payment procedures, the status of the vendor bill can be seen as Paid as depicted in the image above. This is how we generate vendor bills for the received products.
As we are clear on how OTX generates vendor bills, now let’s discuss the creation of purchase agreements in the Purchase module.
Purchase Agreements
As the name indicates, a purchase agreement is a kind of agreement or contract made between a vendor and a customer regarding the terms and conditions of the purchase. Before confirming the purchase order, it is necessary to make sure that the purchase agreement created between the vendor and the customer is agreed by both parties. OTX offers a separate platform for creating and managing purchase agreements in the Purchase module. You are allowed to use this platform to create multiple agreements with the same or different vendors with multiple products also. These agreements can be used while creating purchase orders in OTX .
In order to get this feature in your OTX Purchase module, you need to activate the Purchase Agreement option from the Settings menu of the module.

Activate the Purchase Agreement option from the Orders tab. Earlier in OTX 15, you can find an additional platform to define the agreement types under the Configuration menu after activating this option. But in OTX 16, there are some changes in the configuration of agreement types.
In OTX 16, you can find mainly two types of purchase agreements such as Call for Tender and Blanket Orders. When you want to generate requests for quotations with multiple vendors for a particular set of products, you can use the Call for Tender to compare the offers provided by different vendors. You will get this feature while creating a new RFQ. In the RFQ creation window, you will get the Alternatives tab as shown in the image below where you can create a call for tender by adding alternative requests for quotations to multiple vendors.
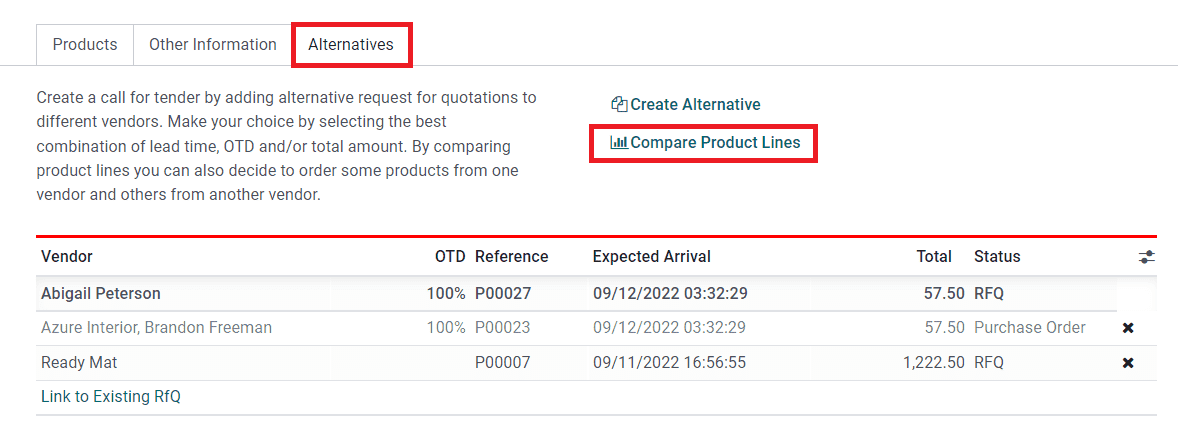
This will help you to choose the most convenient quotation based on your requirements. After comparing the product lines, you can seamlessly select the suitable quotation from the given alternatives and reject the other ones.
The Blanket Order feature available in OTX will help a company to create a purchase agreement with your regular customers. This feature will be helpful to customize products and pricelists for certain customers. If you are intending to do repetitive purchases from the same vendor, for the same product from multiple suppliers, or for different products in various deliveries from the same vendor within a certain time period, you can use this type of purchase agreement.
In the OTX 16 Purchase module, you can configure and manage Blanket Orders by selecting the corresponding option from the Orders menu.

The preview of the list will show the Reference, Purchase Representative, Company, Ordering Date, Agreement Deadline, Source Document, and Status. This window provides the option to get a Kanban view also. Creating a new Blanket Order is not a difficult task since we have OTX .
Using the Create button will direct you to a new window where you can provide the necessary information in order to create a new blanket order.
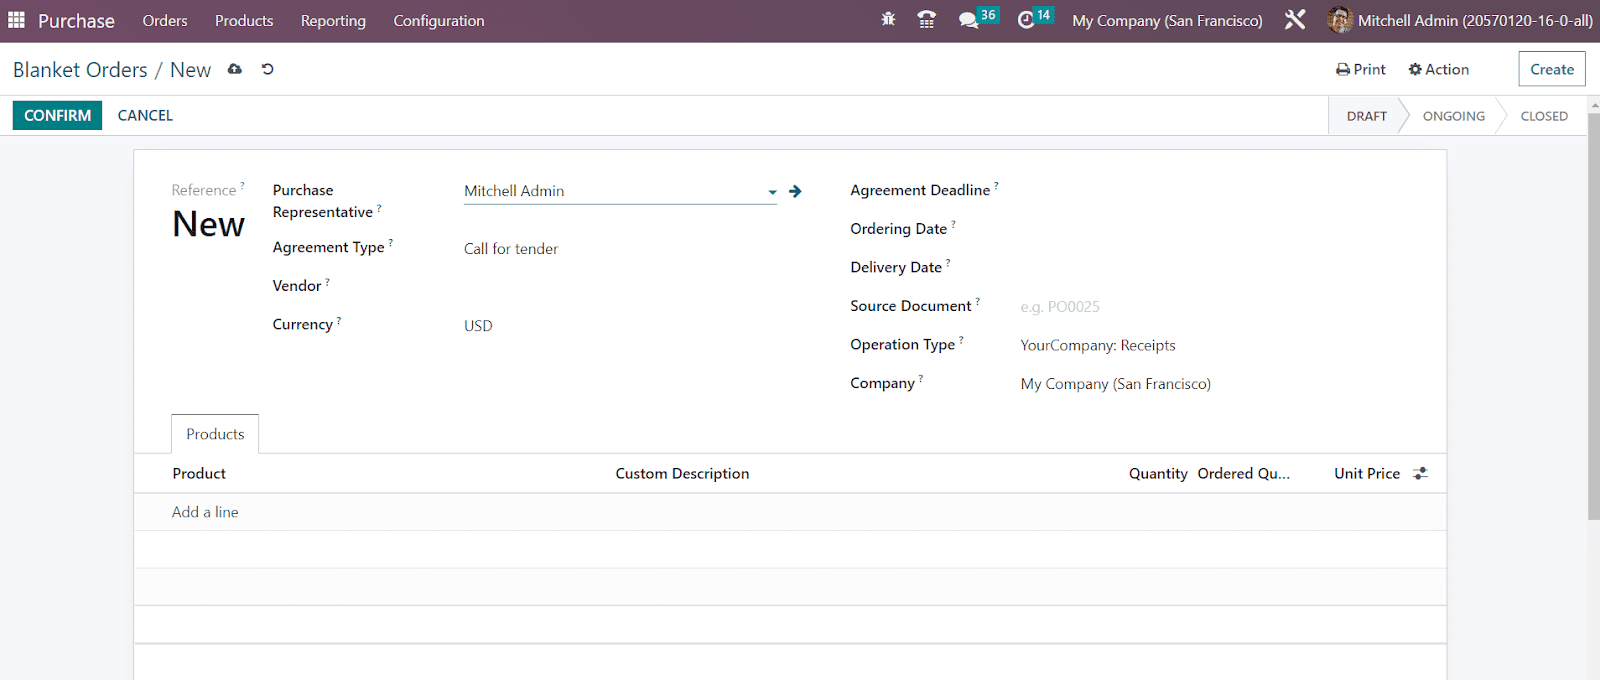
In the field of Purchase Representative , you mention the name of your purchase representative. The Agreement Type will be available as Blanket Order in the corresponding field. The name of the vendor can be selected from your contact list in the Vendor field. Mention the Currency used for the transaction in the given field. The Agreement Deadline field can be used to set a deadline for the blanket order. Mention the Ordering Date and Delivery Date in the corresponding fields. Here, the delivery date is considered as the expected and scheduled delivery date when all the products will be delivered. In the respective fields, you can specify the Source Document, Operation Type, and Company details.
Using the Add a Line button, the products that you want to include in the purchase agreement can be added one by one under the Products tab. Don’t forget to mention the Unit Price of the products that you added to the contract.
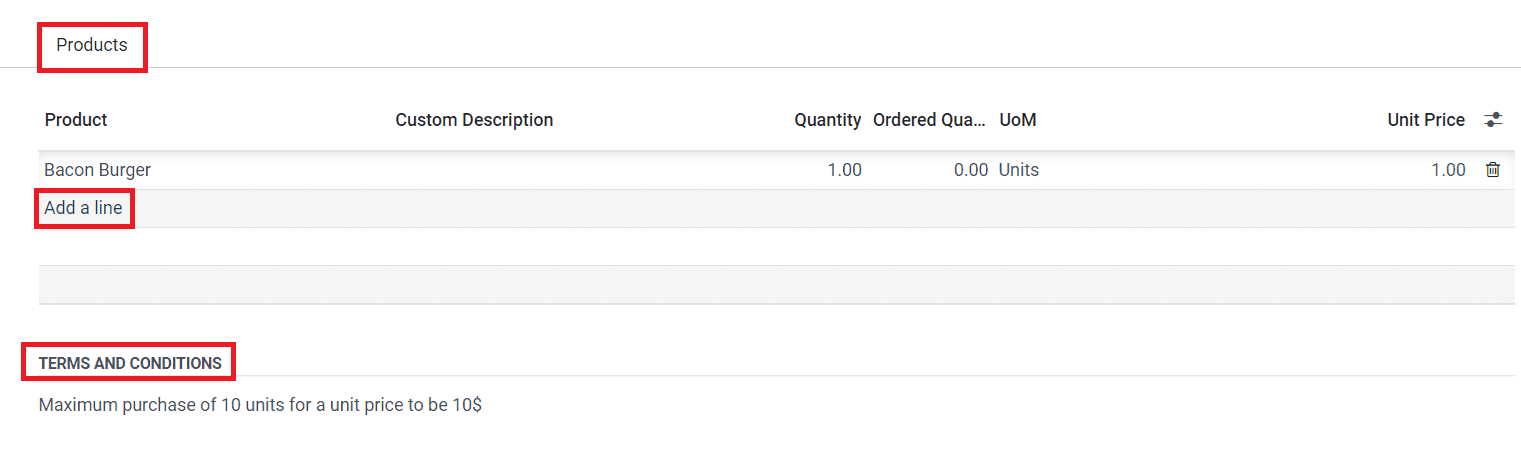
There will be an additional field available to mention the Terms and Conditions related to the agreement.
We have created a draft form of the purchase agreement here.
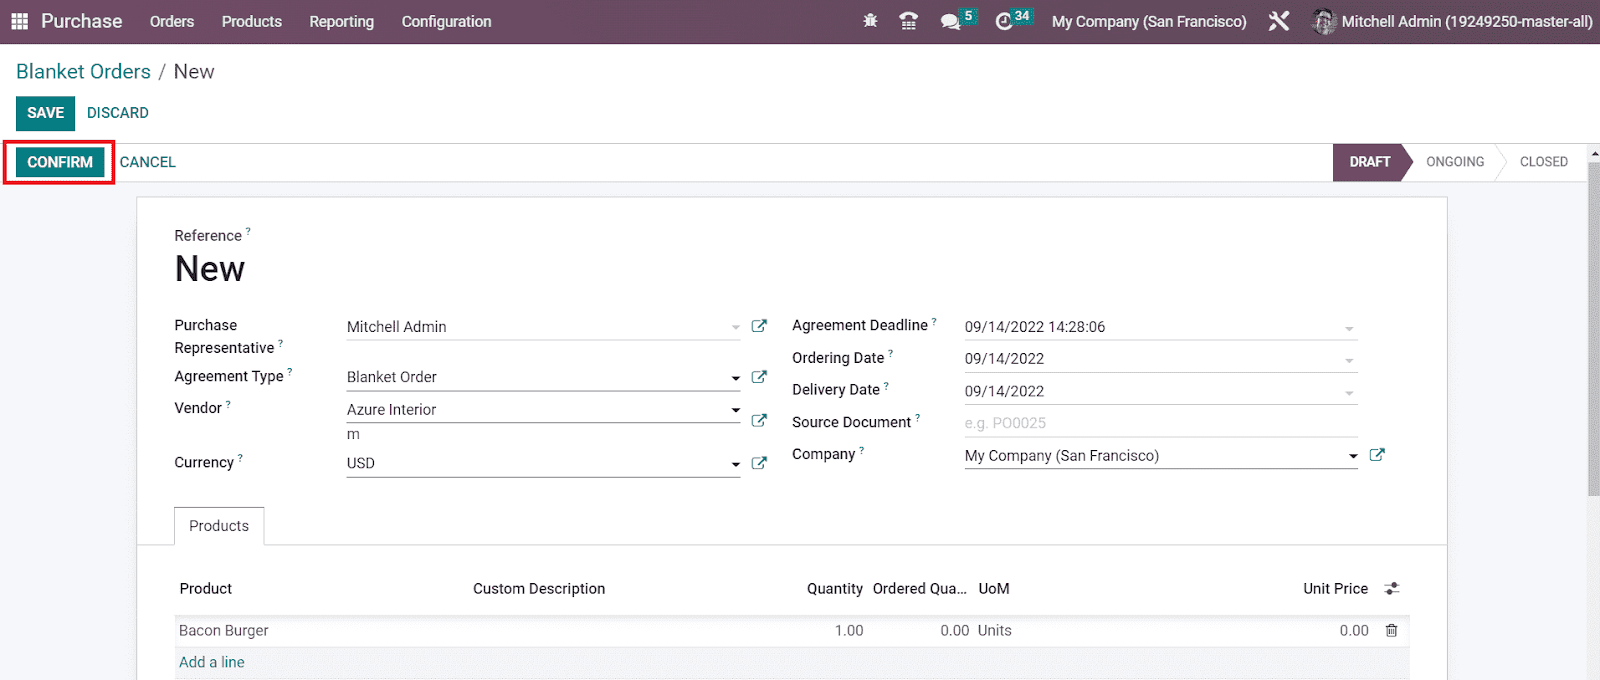
Now, you can confirm the banket order using the Confirm button. As soon as you confirm the blanket order, OTX will change its status from Draft to Ongoing. The agreement will be moved to the Closed status automatically once it reaches the agreed deadline.
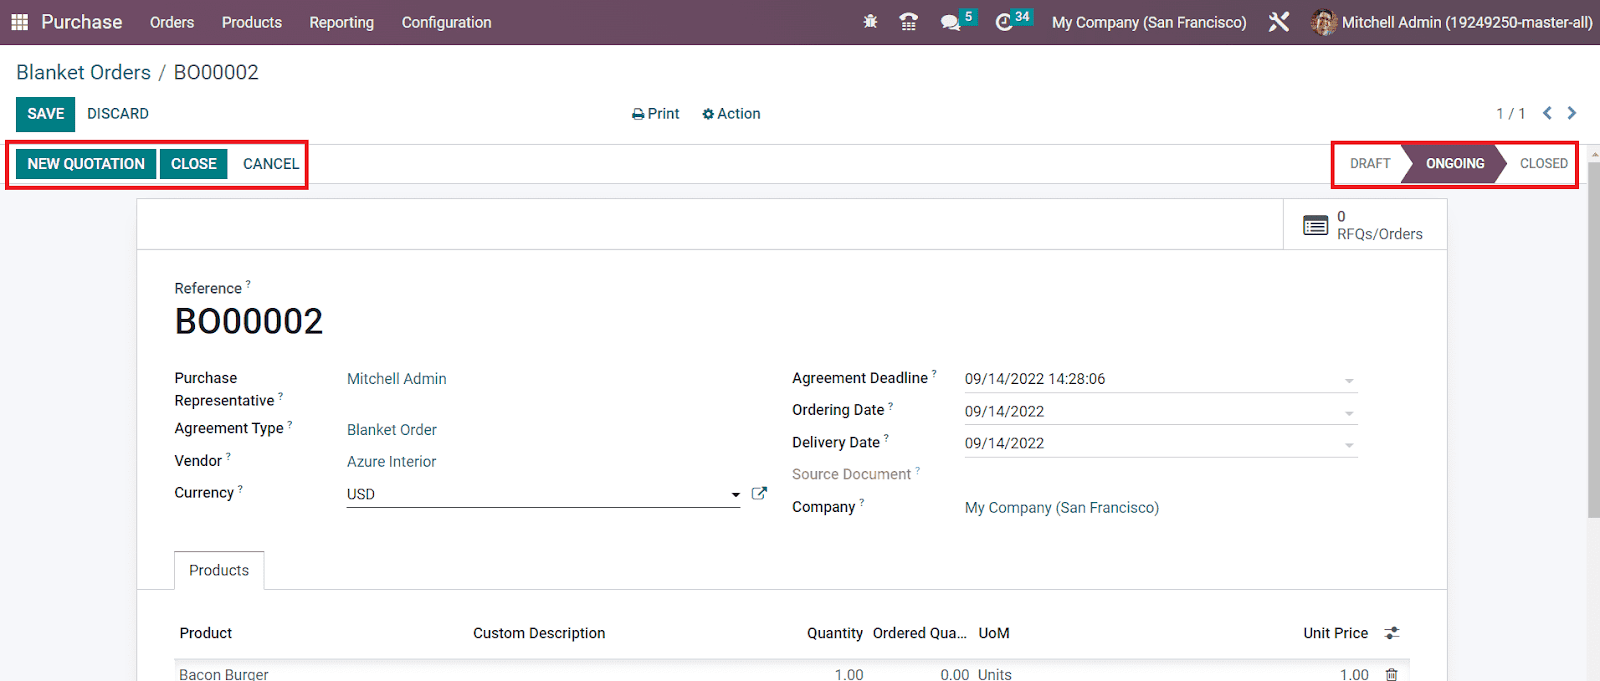
Using this blanket order, you can create new RFQs and Purchase Orders in OTX . In order to make this process easier, OTX has enabled the New Quotation button on the blanket order window itself which will directly lead you to the quotation creation window.
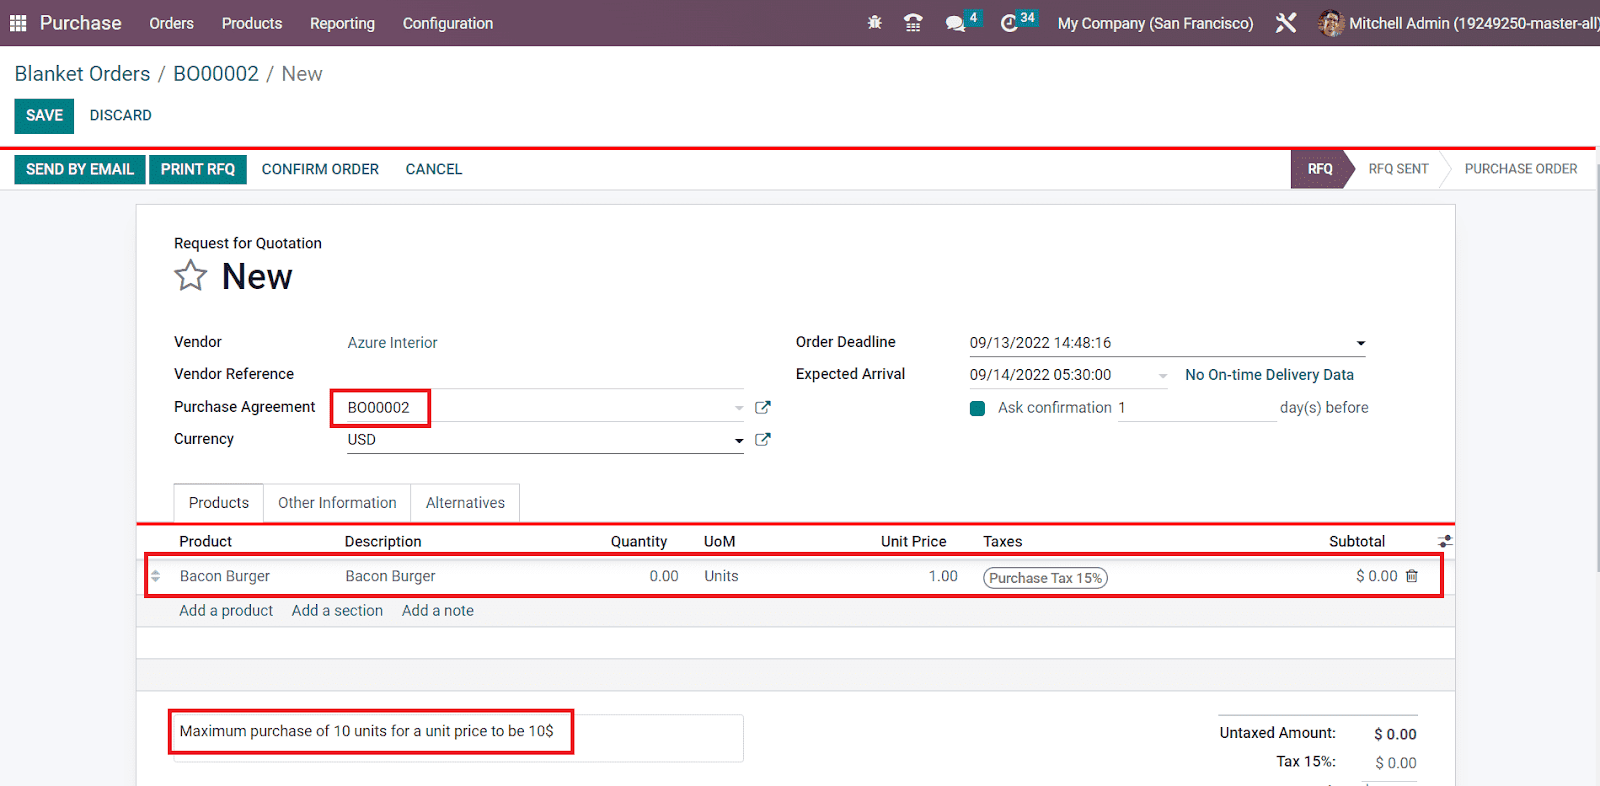
The details mentioned in the purchase agreement will automatically appear in the respective fields of the RFQ as shown in the image above. You can verify the details and manage the RFQ just as we discussed earlier in the section Request for Quotation. You can use this blanket order multiple times to purchase the same product from the same vendor within the agreed deadline.
Warning Messages
OTX always ensures protection in the management of purchase operations done by an enterprise. The warning messages feature available in OTX will benefit you to generate warnings or block messages on purchase orders according to the vendors or products included in the purchase order. You can use this feature whenever you face any difficulties with particular vendors or products. Let’s take a look at how this feature works in the Purchase module.
From the Settings menu of the module, you can activate the Warnings option available under the Orders tab.

After activating this feature, make sure to click the Save button to save the new changes. Now, you can set warning messages for vendors and products in your Purchase module.
In the vendor management window, you will get an additional option to set Warning Messages for the particular vendor as shown in the screenshot below.

Under the Internal Notes tab, you will get the Warning on the Purchase Order option where you can select a suitable operation from the given options for the purchase order with this vendor. If you don’t want to generate any kind of warning message, you can select the No Message option. In case you face any difficulties from this vendor, you can raise warnings using the Warning option and block messages using the Blocking Message option respectively.
This feature will be available for the products also. You can check the product details window as shown below where you can find the Warning feature under the Purchase tab.

When you confirm a purchase order with a vendor or product with a warning, OTX will automatically raise a warning message so that you will be notified regarding the issue with the selected vendor or product.
Now, we are going to discuss the 3-way matching purchase receptions and bills.
3 Way Matching Purchase Receptions and Bills
The 3 Way Matching Purchase Receptions and Bills feature in the OTX 16 Purchase module will help you in ensuring that you only pay the vendor bill for the products which are delivered to your address. You may receive vendor bills from vendors before receiving the ordered products in the purchase order. However, you may desire to postpone the payment until the products are delivered. In such cases, you can use the 3 Way Matching Purchase Receptions and Bills feature available in OTX to decide whether the vendor bill should be paid or not. This will compare the information available on the purchase order, vendor bill, and receipt. This feature will stop you from paying inaccurate or fake vendor bills.
Initially, you have to activate the 3 Way Matching Purchase Receptions and Bills feature from the Settings menu of the Purchase module.

You will get this feature under the Invoicing tab as shown in the image above. Remember that the bill control policy must be set on the Received Quantities. You can set the control policy from the Settings menu or the product details window of the product that you want to order.
After activating the 3-way matching purchase receptions and bills feature and defining the control policy for bills, you can create a new purchase order with the products that have the control policy on received quantities. The vendor bill of this purchase order will show the information that whether you should pay the bill or not. OTX will display one of the three possible default values mentioned below on the vendor bill.
- Yes: This indicates that the products are delivered and the bill must be paid.
- No: This indicates that the products you bought are not delivered yet and you shouldn’t pay the bill.
- Exception: This indicates that there is a difference between the quantities you ordered, billed and received.
OTX will set this value automatically on the vendor bill. Let’s check how this works in OTX .
After confirming the purchase order, you can receive the products you ordered by clicking on the Receive Products button.

You can validate the receipt and generate a vendor bill for this purchase.

The Create Bill button will help you to generate a new vendor bill. Under the Other Information tab of the vendor bill, OTX will automatically display whether you need to pay the bill or not.

As you can observe in the image above, it shows Yes which indicates that you should pay this vendor bill because you have received the products that you ordered.
Now, let’s discuss the Dropshipping feature available in the Purchase module.
Dropshipping
The Dropshipping method is one of the convenient shipping methods available for suppliers who are not intending to keep an inventory. This method will allow you to ship products directly from vendor to customer. It will be more beneficial to the retailers because the deliveries are straight from the suppliers to the customer, there is no need to keep warehouses. Instead of keeping an inventory, the dropshipping method will help you to ship the products to the customer directly from the supplier or manufacturer.
The Dropshipping method in OTX can be activated from the Settings menu of the Purchase module. As you can see in the image below, the option will be available under the Logistics tab.
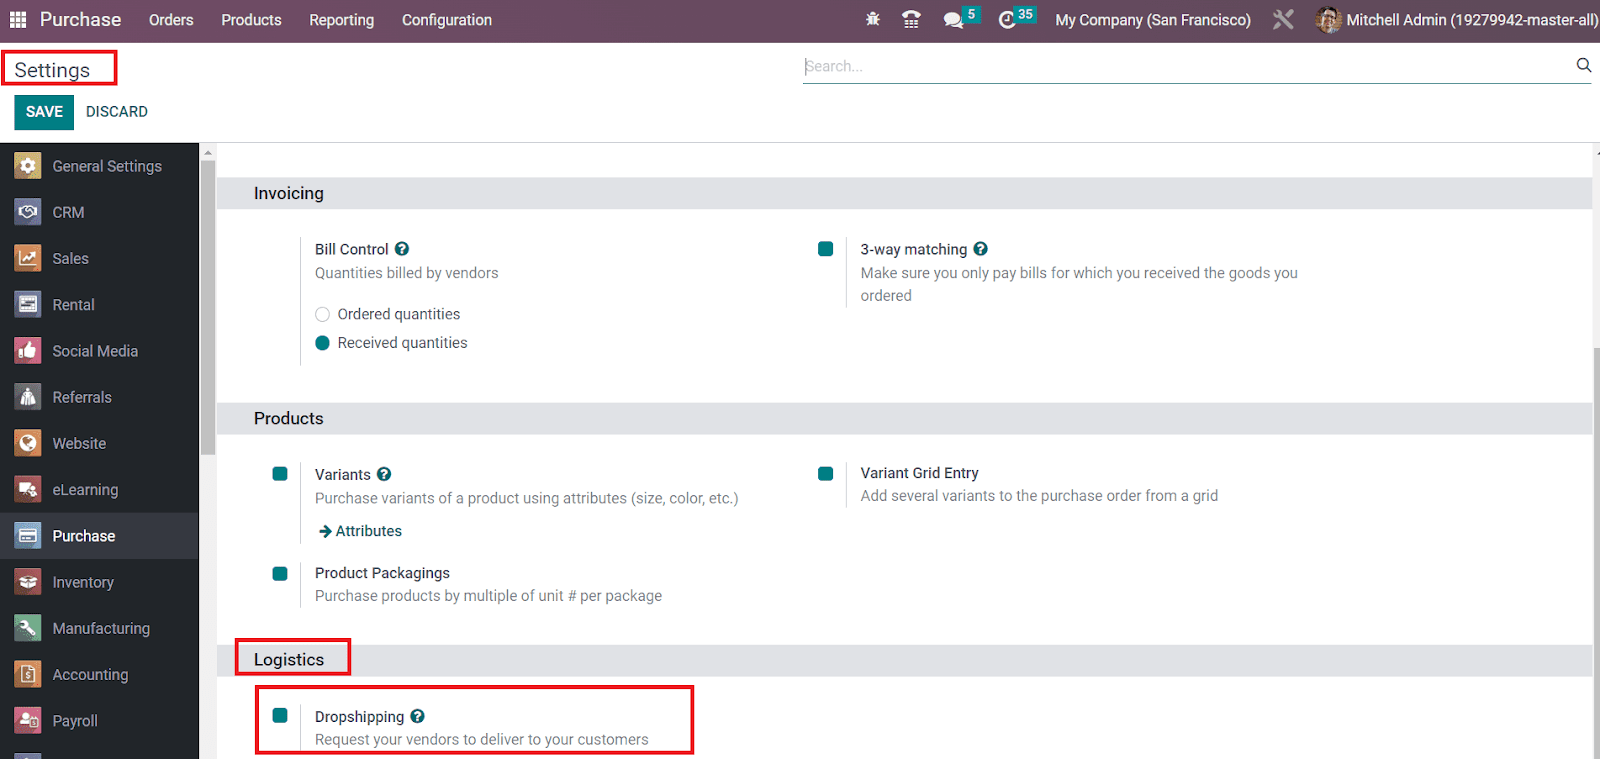
Now, you can configure the product that you want to dropship and set the routes of operation as Dropship as shown in the image below. The option can be seen under the Inventory tab of the product detail form.
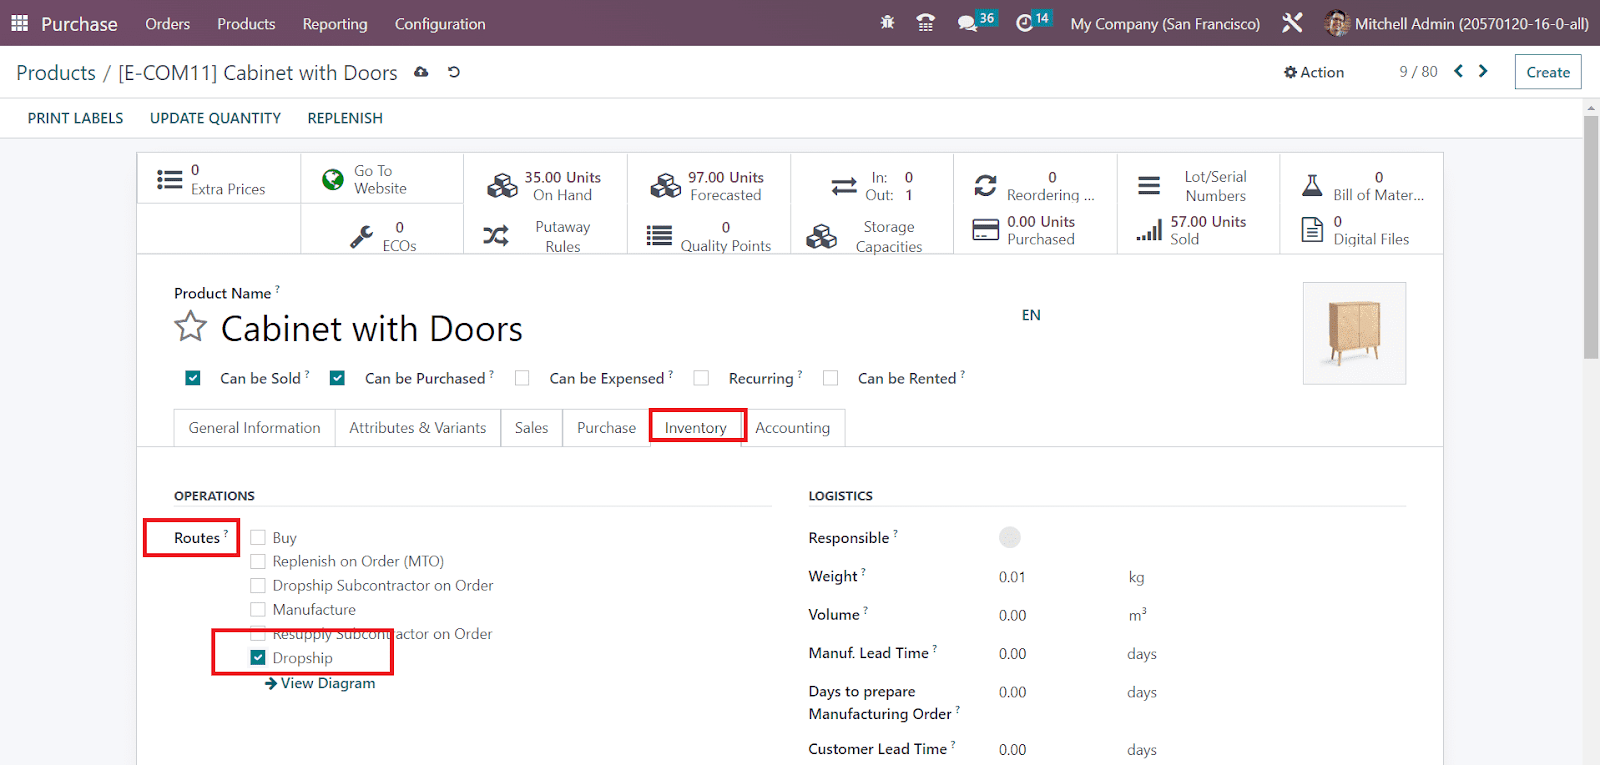
You can manage the routes of operations of a product with the assistance of the Inventory module.
Now, you can create a sales order for this product from the Sales module. The details of the customer can be mentioned in the respective field.
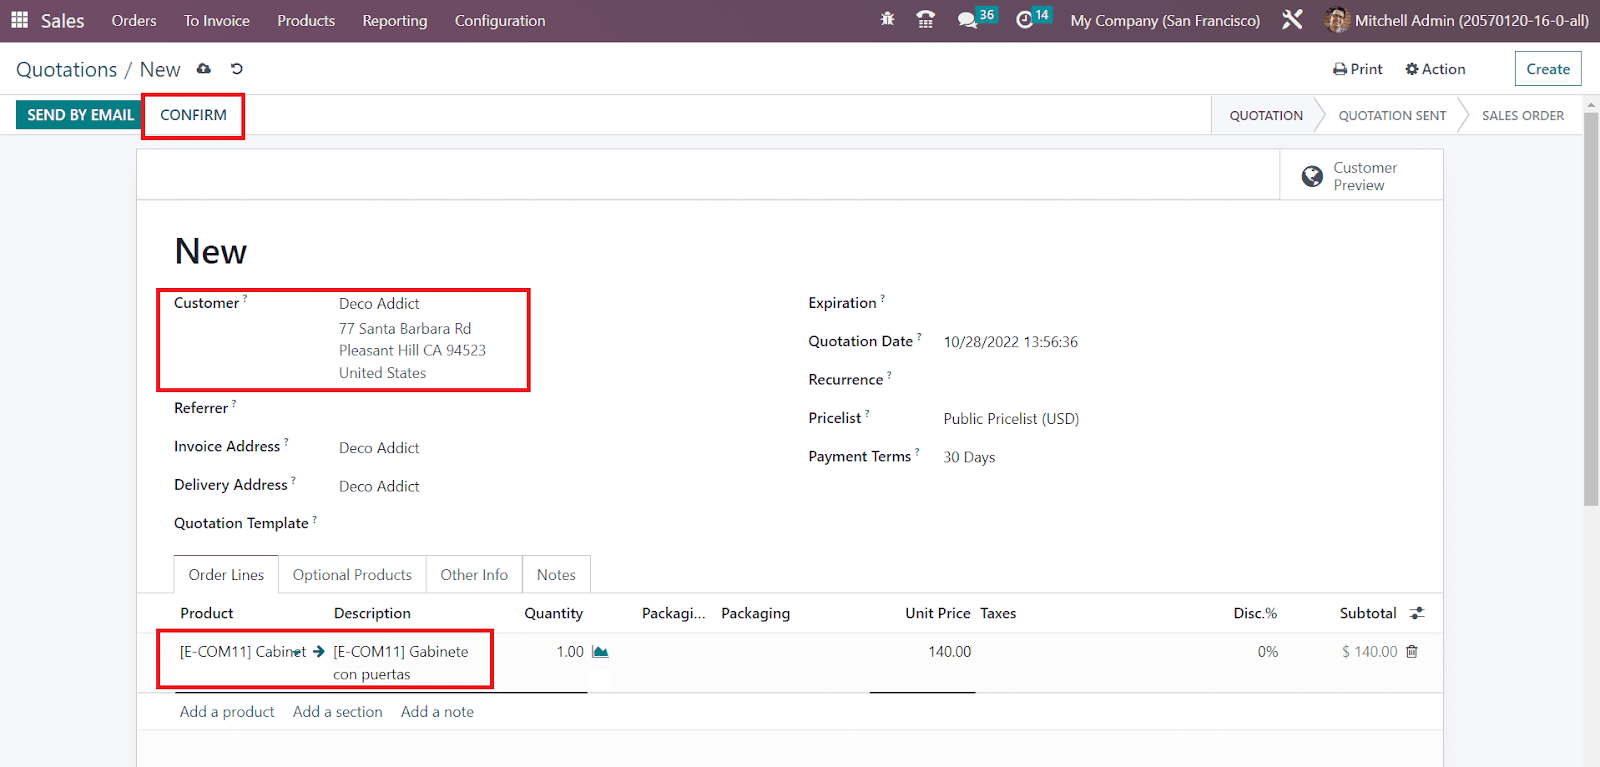
As soon as you confirm the sales order by clicking on the Confirm button, an order to purchase this product from the respective vendor will be automatically generated.
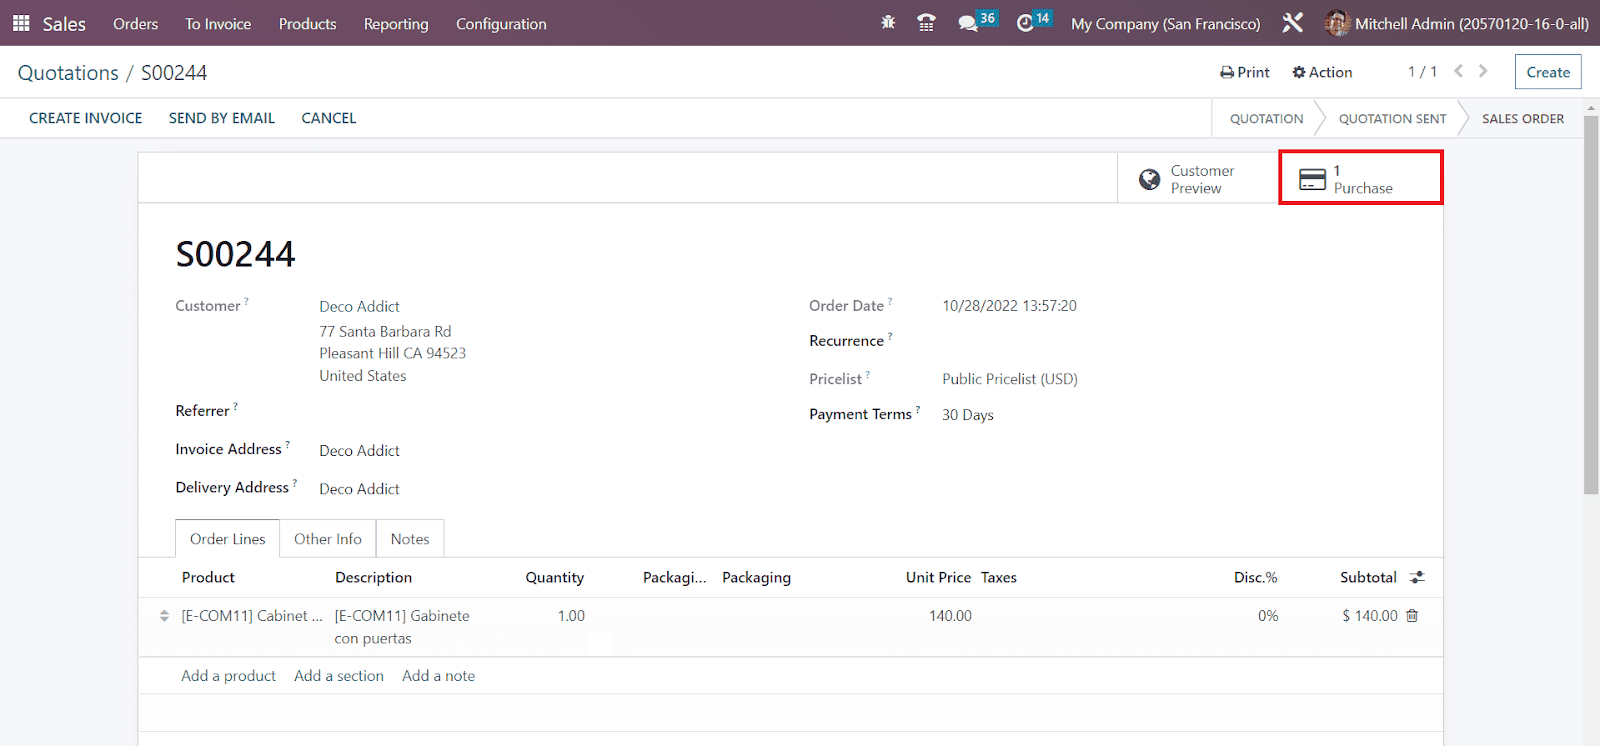
You can observe the newly generated purchase order using the smart button available on the window.

Here, you will get the operation type of the incoming shipment and the Dropship Address. Once you confirm the purchase order, the product will be directly delivered to the customer from the respective vendor. You don’t need to keep an inventory for this product in the case of the dropship.
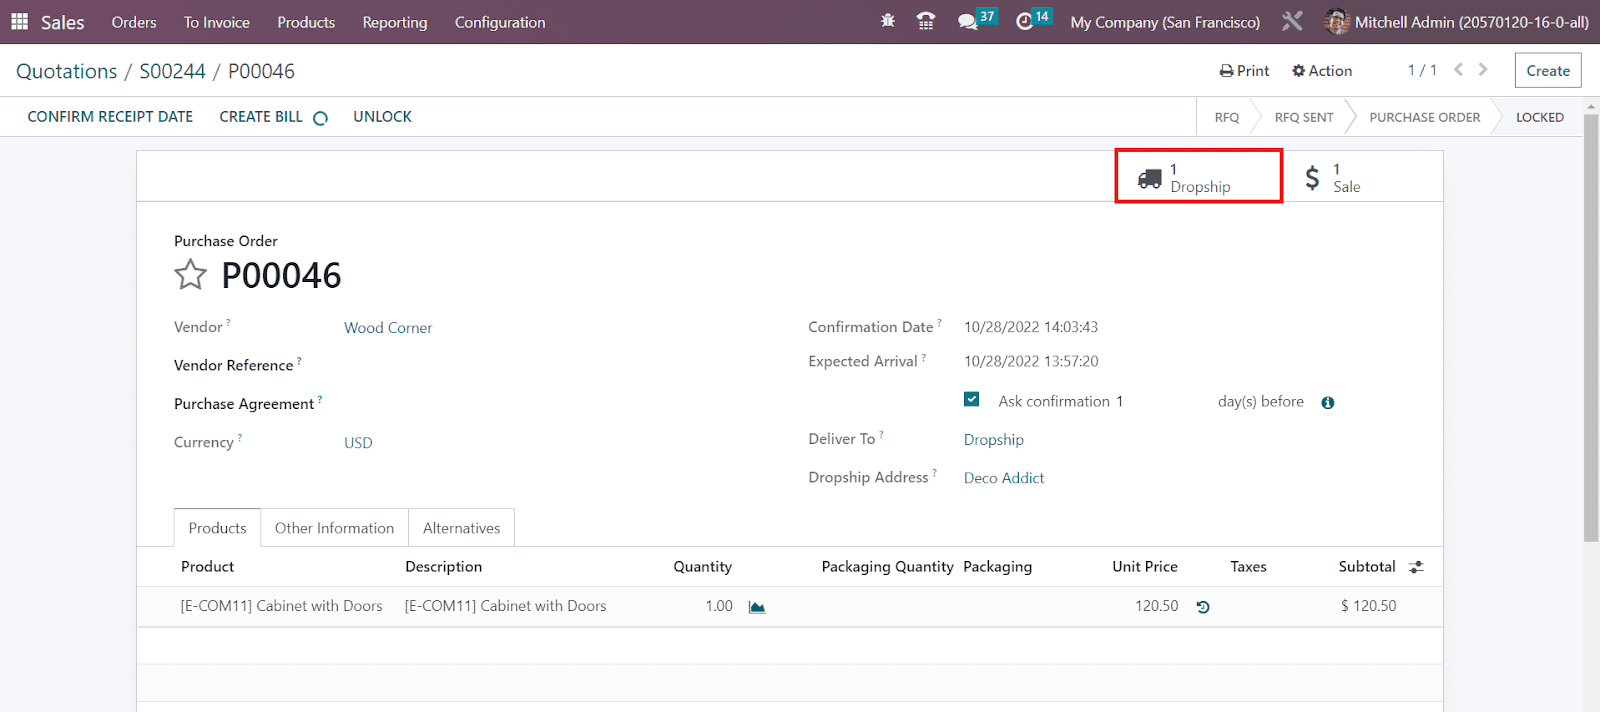
Clicking on the Dropship smart button will lead you to a new window where you can Validate the Dropship.
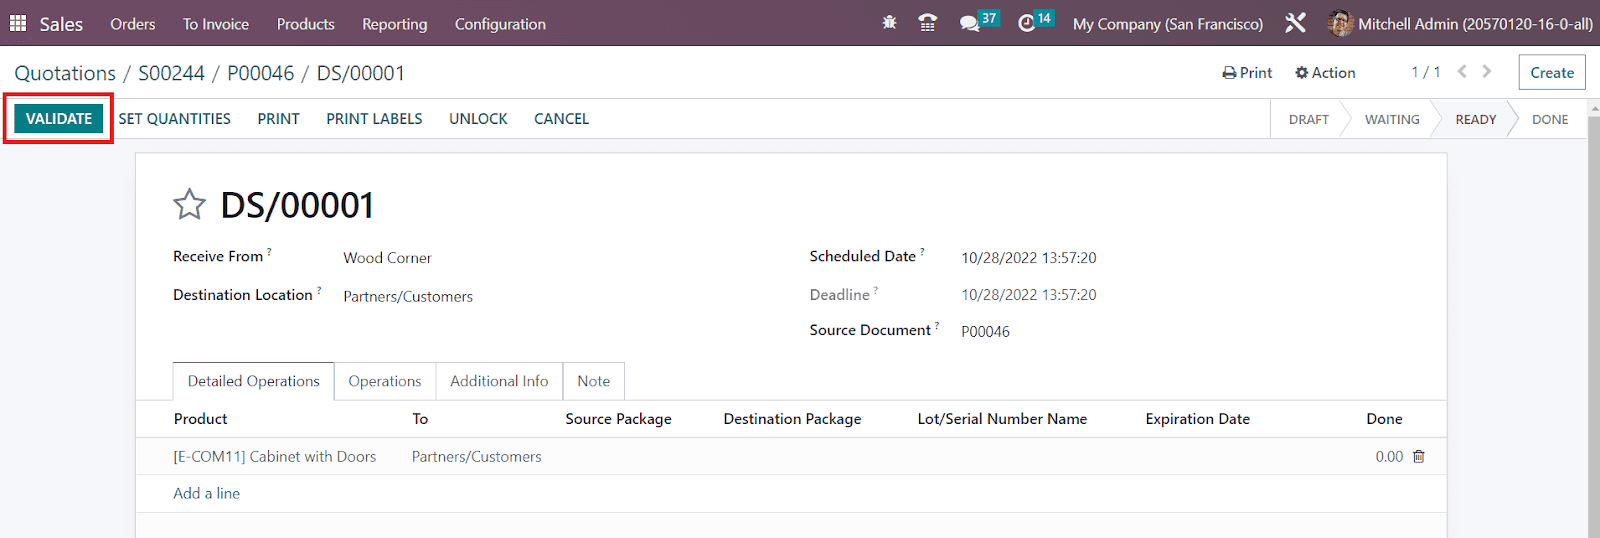
This is how OTX manages dropships
Purchase Order Approval
In the OTX Purchase module, you can request your manager to approve orders above a minimum amount. This can be done by activating the Purchase Order Approval feature from the Settings menu as shown below.
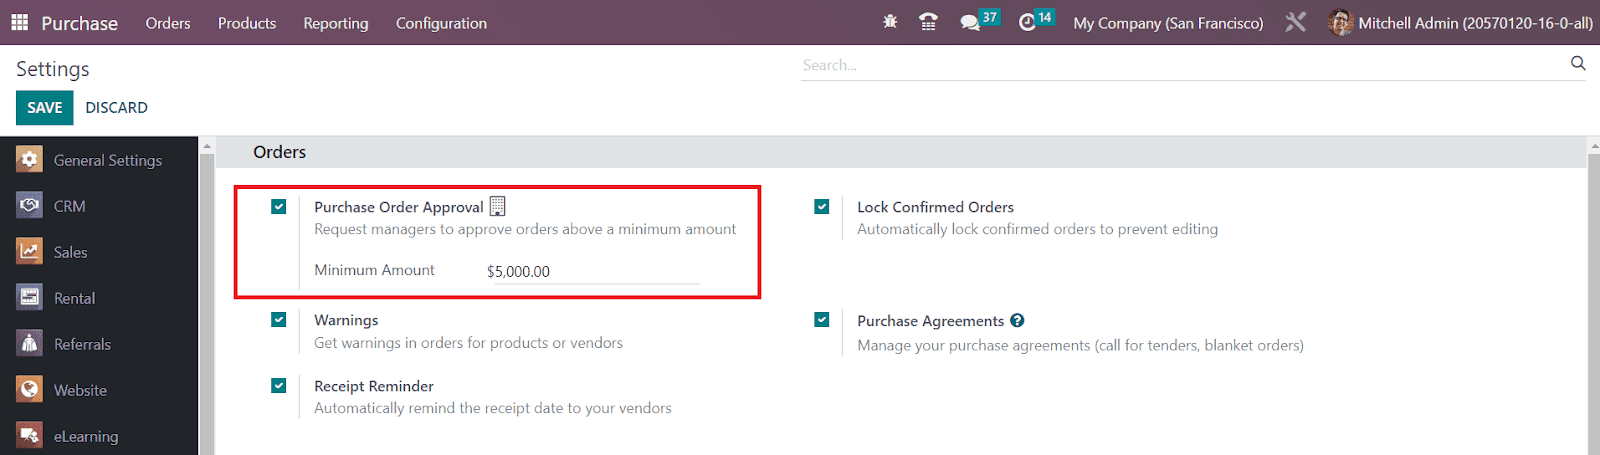
As soon as you activate this feature, you will be able to get an additional field to mention the Minimum Amount.
Reporting
The advanced Reporting feature available in the OTX 16 Purchase module will give effective reports about the purchase operations done in your company. You can generate reports on a daily, monthly, or yearly basis and use them to analyze your purchase activities. The dynamic purchase reporting platform will help you to analyze data in graphical as well as pivot tables.
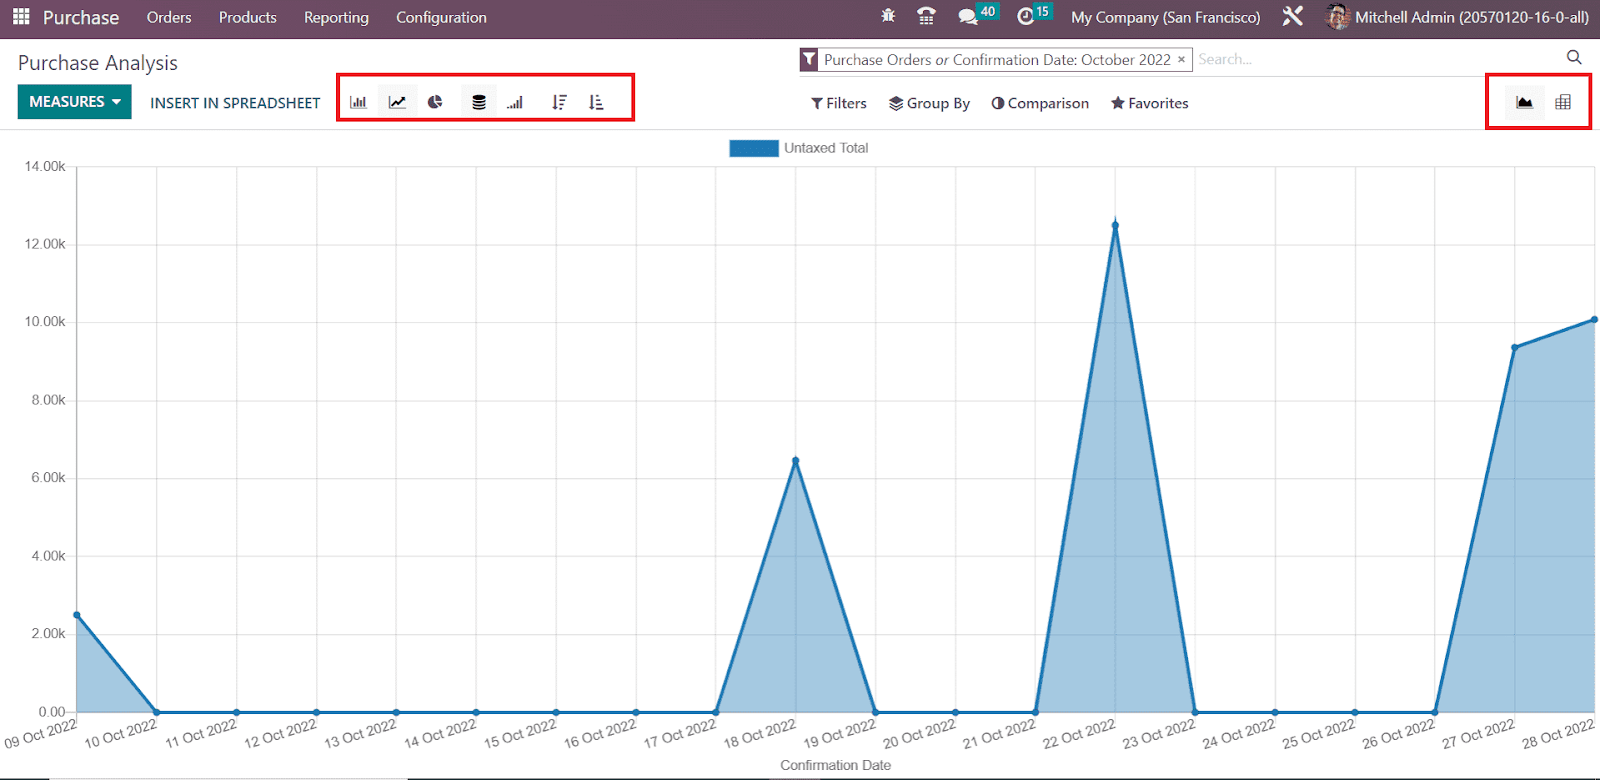
The screenshot shown above is the line chart of the Untaxed Total of the purchases based on their confirmation date. You can observe the Graphical reports in Line, Bar, and Pie Charts based on your convenience. The Line and Bar charts can be arranged in ascending or descending order.

You can set the Measures as Average Cost, Days to Confirm, Days to Receive, Gross Weight, Quantity Billed, Quantity Ordered, Quantity Received, Quantity to be Billed, Total, Untaxed Total, Volume, and Count.
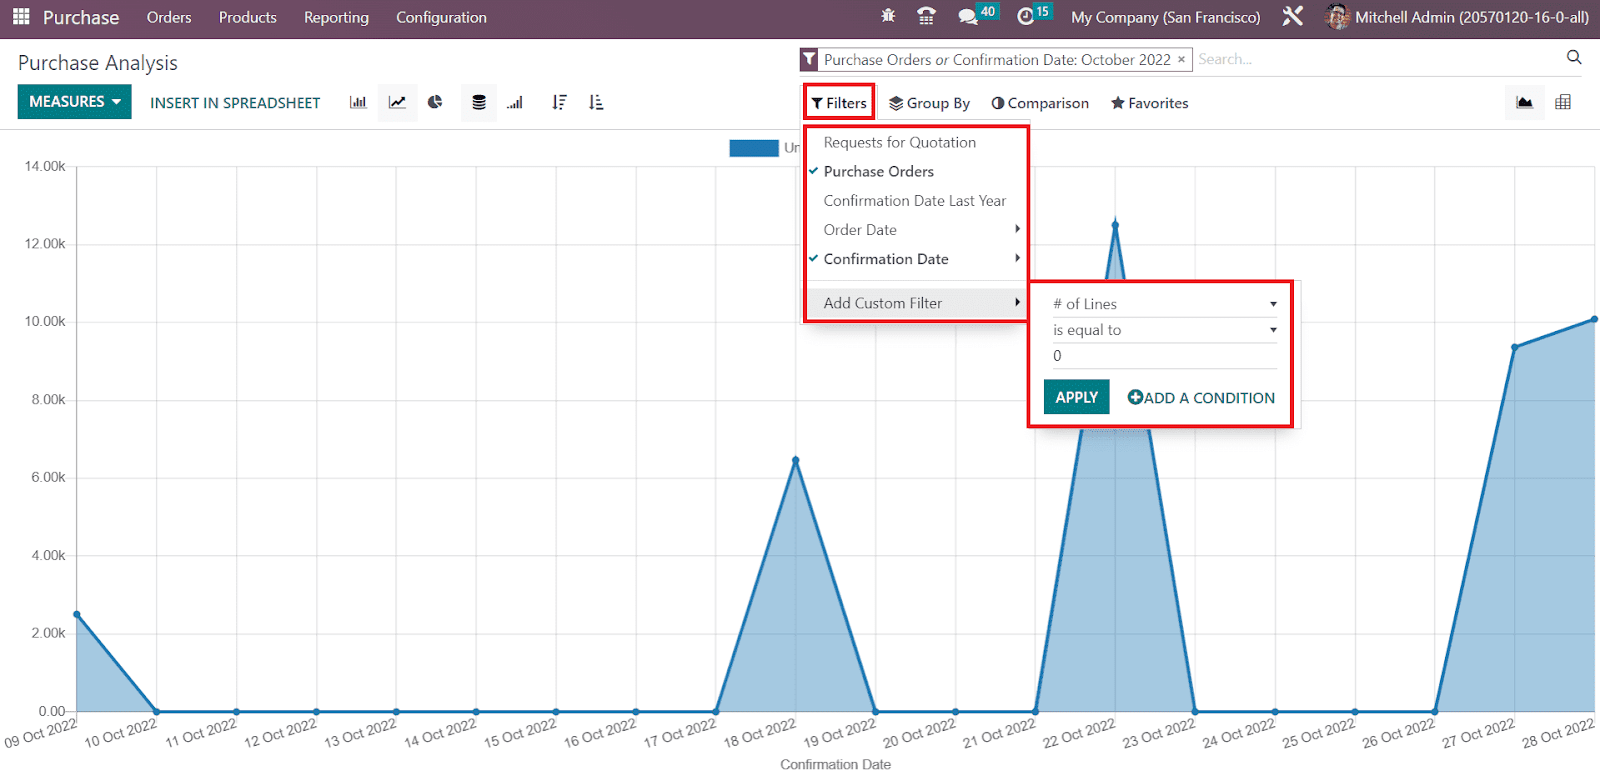
You can filter the report based on the Request for Quotations, Purchase Orders, Confirmation Date Last Year, Order Date, and Confirmation Date. Using the Add Custom Filter option, you can create new custom filters for your reports.
Similarly, you will get default Group By options also in the purchase reporting platform
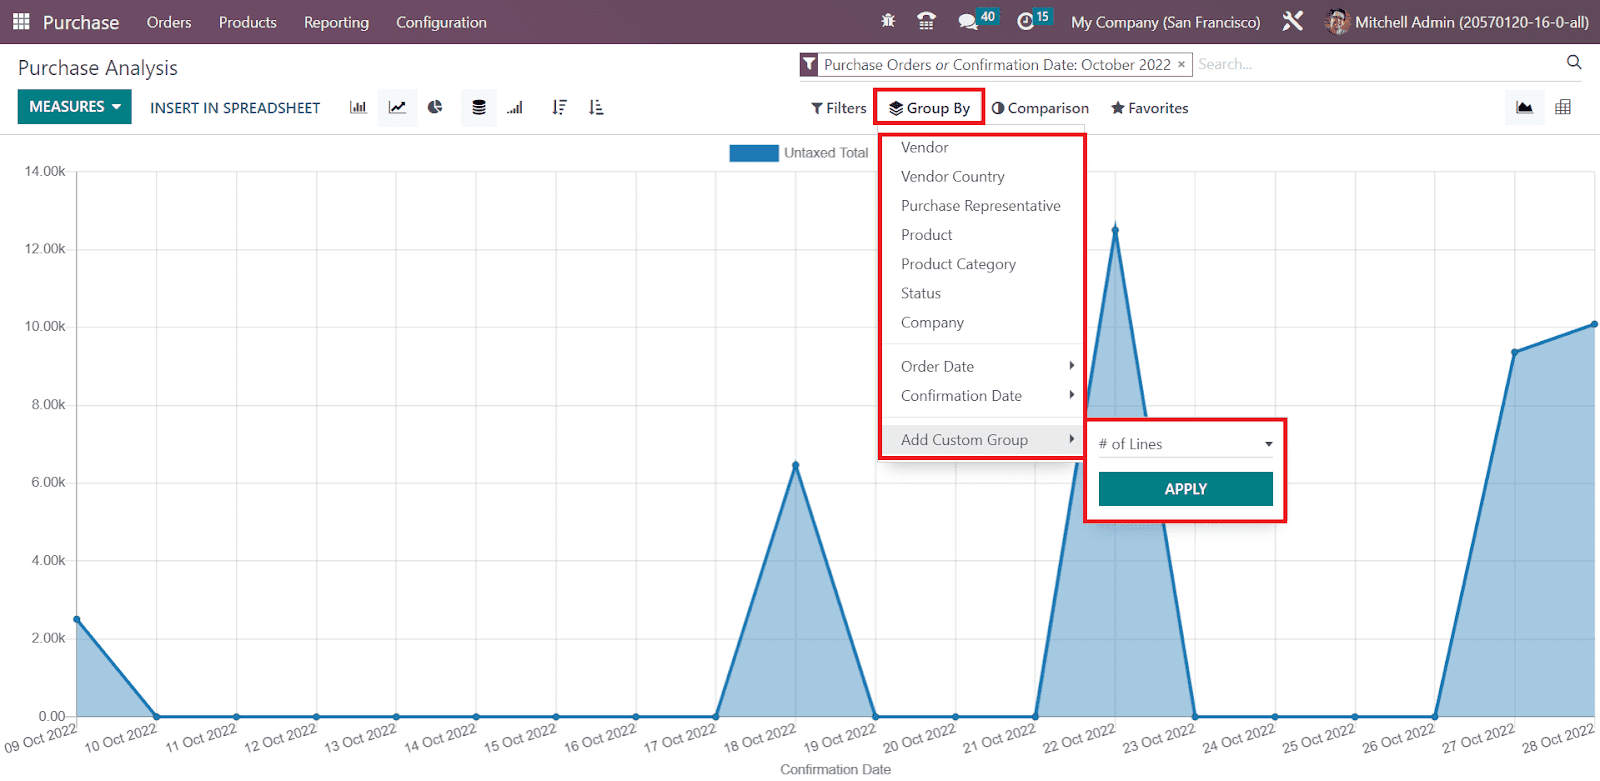
You can group the reports based on Vendor, Vendor Country, Purchase Representative, Product, Product Category, Status, Company, Order Date, and Confirmation Date. Use the Add Custom Group button to create custom group by options.
While using the filter Confirmation Date, you will get the Comparison option that helps you to compare the current report with previous period as well as year.

Now, let’s check the Pivot view of the Purchase report.
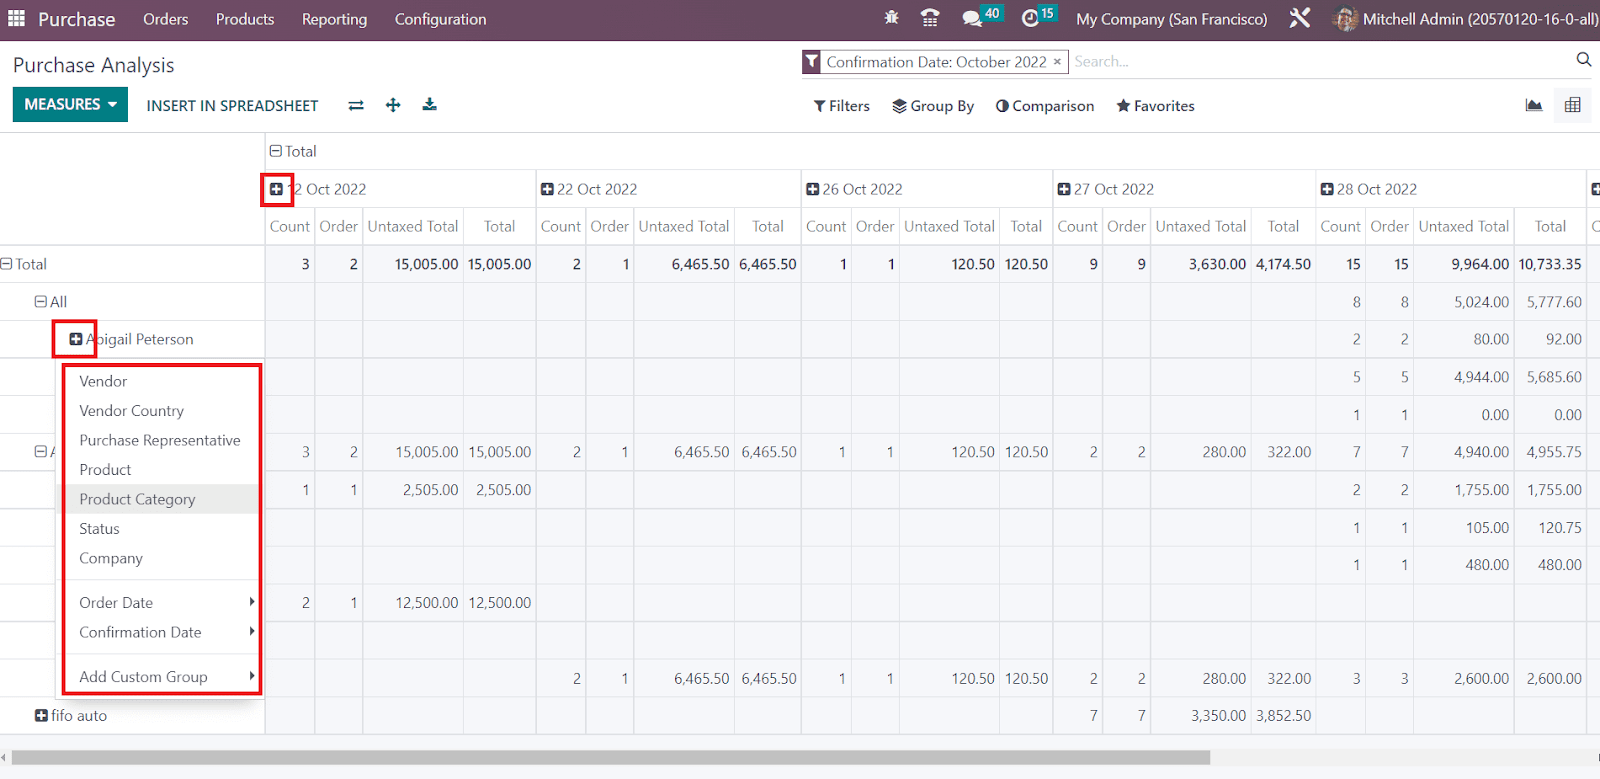
Using the small + icon will help you to expand the table with additional data. You can convert the report into a spreadsheet using the Insert Spreadsheet button. Based on your requirements, you can customize the purchase reports and analyze them without any confusion.
With assistance from the dedicated purchase management system included in the new OTX 16, you can manage all your purchase related operations hasslefree.
Project Management
Managing and completing tasks included in a project will be tiring if it is not organized in a systematic manner. Each company adopts an appropriate management system to simplify the control of tasks related to respective company projects. When we talk about project management, it includes planning, task creation, assigning responsible employees, recording timesheets, completing milestones, and invoicing the completed projects. What if we have an all-in-one solution for the effective management of the entire projects of a company? The latest version of OTX will come to your help in order to manage projects in an organized way. The Project module can be used to create and record projects. Project management will be performed in a systematic manner because the user can divide a project into several tasks and milestones. It is possible to assign each task in different stages in order to understand the progression of the main project.
OTX will lead you to the main dashboard of the project module when you click on project module. The Kanban view of the project dashboard is shown below.

You can observe the already configured projects from the kanban view. Each project shows the scheduled date, partner, customer rating, number of tasks included, milestones, and remaining hours to complete the work. The status of each project can be seen in different colors, and each color indicates a different meaning, such as At Risk, Off Track, On Hold, and On Track. You can use the star icon to add the project to your favorites list.

When you click on the small clock icon, you will be able to get a pop-up to schedule various activities for the respective project.

The small three dots available on the top right corner of each project will provide options to view the Task, Milestones, Timesheets, Documents, Planning, and Project Updates. This menu can be also used to get the reports of the Task Analysis, Burndown Chart, Timesheets and Planning Analysis, and Customer Ratings.
If you want to create a new project, you can click on the New button, and a pop-up will appear as shown below.

In the given space, provide the Name of the project. Activate the Billable field if you want to invoice this project to customers. You can record time on tasks under this project by activating the Timesheets field. It is possible to plan your resources on project tasks by activating the Planning button. Finally, you can click on the Create Project button which will create a new project and will lead you to a new window where you can add tasks to this project.

Before creating tasks for the project, you can set stages for the tasks. For this, you can mention the stage name in the given space and click on the Add button.

Like this, you can set new stages for the tasks.

The small settings icon available next to the title of the stage will provide options for Fold, Edit Stage, Delete, Archive All, and Unarchive All.

You can use the + icon to quickly add new tasks under a particular stage. You need to mention the Task Title and Assignees in the respective fields. For adding more details, you can click on the Edit button.

The name of the task, project, and assignees will be available here. You can mention Milestone in the given field, which will help to deliver your services automatically when a milestone is reached by linking it to a sales order item. Mention the Customer and Sales Order Item in order to invoice the time spent on the project to the respective customer. Set a Deadline for the project and add suitable Labels. Here, you will get a new option called Add a Property in OTX 16. Using this feature, you can add new fields to the form view.

Here, you can add a title to the new field and set the Field Type. This feature will help you to expand the form view of the task.
Under the Description tab, you can add a detailed description of the task. If you want to track the time spent on a project or task, you can activate the Timesheet option from the Settings menu of the module.

After activating this option, you will get the Timesheet tab in the form view of the task as default.

The planned hours can be mentioned in the Allocated Hours field. You can manually record the time worked by the employees using the Add a Line button. Based on the total hours spent on the task, you will get the Progress of the task under this tab.
It is possible to split your tasks into sub-milestones to organize the project smoothly. Go to the Settings menu to activate the Sub-Tasks feature.

Activating this feature will help you to create sub-tasks.

Under the Sub-Tasks tab, you can add them one by one using the Add a Line button. The details include the Title, Assignees, Deadline, and Stage. Once you add a sub-task, you will get a view task button in this tab to get a detailed view of the sub-task.
Some projects may contain various tasks to perform. In such cases, it is essential to define the order of the tasks. Go to the Settings menu, where you can find the Task Dependencies feature.

This feature will help to determine the order of the tasks to perform. When you activate this feature, you will get a new tab called Blocked By in the form view of the task.

If you want to perform this task before the other task, you can block the other task by adding using the Add a Line button.

In order to repeat the task at regular intervals, you can activate the Recurrent option and mention the interval in the given field. Based on the selected interval, you will get a chart under this tab that shows the dates to perform this task.

The Extra Info tab can be used to mention the Parent Task, Analytic Account, Company, Sequence, Email cc, and Cover Image. The Assigning Date and Last Stage Update will be available in the respective fields. This is how we add tasks to a new project.
Once you complete the configuration of the task, you will be able to get some smart buttons on the window, as shown in the image below.

These smart buttons will show the Sub-tasks and Documents related to the current task. Here, you will get the Start button which can be used to record the time you spent on this particular task. As soon as you click on this button, OTX will start to record the time.

You will get the Pause and Stop buttons to perform the respective actions. After completing the task, you can click on the Stop button. This will open a pop-up window to confirm the recorded time.

The Hours Spent will be available in the pop-up window and you can add a description of your activity in the given space. Then, click on the Save button.
Now, the recorded time can be observed under the Timesheets tab of the form view.

You can observe the Progress and Remaining Hours of the task in this tab.
The My Tasks menu available in the Project module will record and track all tasks assigned to you. You can manage these tasks in Kanban, List, Gantt, Calendar, Activity, Map, Pivot, Graph, and Activity views.

New Projects
Apart from the main dashboard, you will get a dedicated option under the Configuration menu to configure new projects. Select the Project option from the Configuration menu of the module. The window will show all projects available in the module.
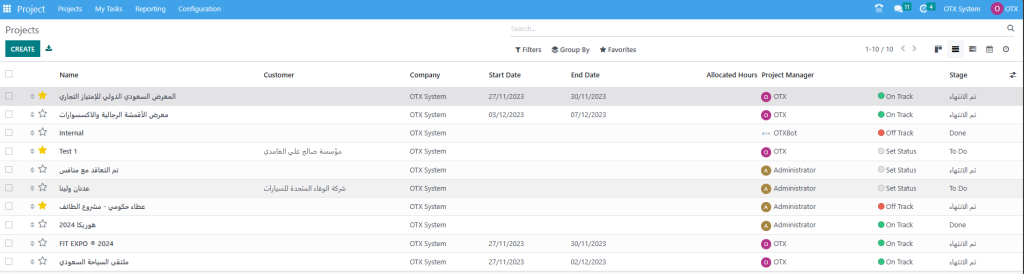
As you can see in the screenshot above, the preview includes the Name, Customer, Company, Start Date, End Date, Allocated Hours, Project Manager, Status, and Stage of each project. This window can be viewed in Kanban, List, Gantt, Calendar, and Activity views. Use the New button to add a new project.
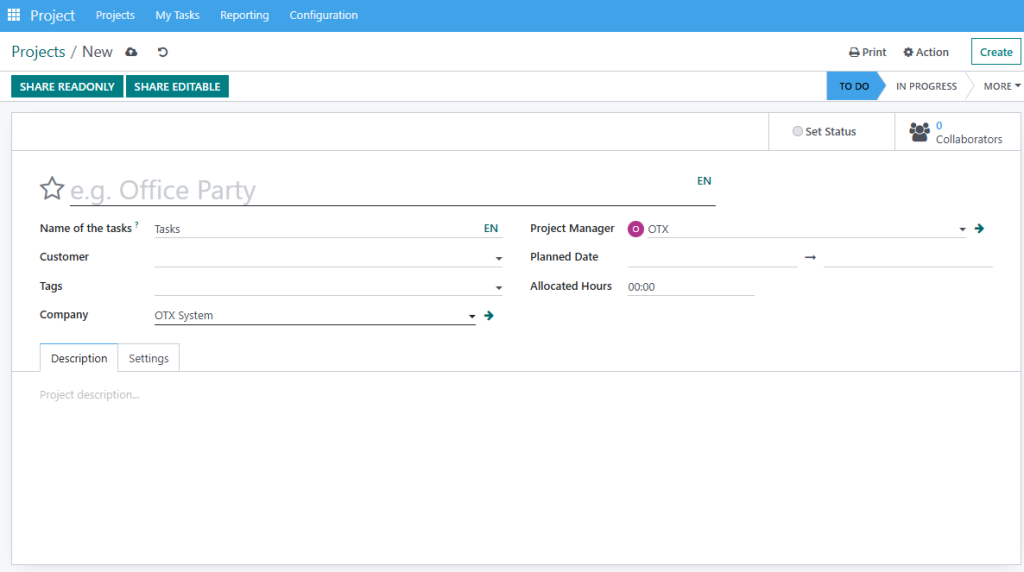
In the corresponding field, you can provide the name of the project. The Name of the Tasks indicates the name used to refer to the tasks of the particular project. Add Customer, Tags, Company, Project Manager, Planned Date, and Allocated Hours in the respective fields. The Description tab can be used to add notes related to the project.
Under the Settings tab, you will get the Analytic Account field, where you can mention an analytic account to link and track the costs and revenues of the tasks, timesheets, and other activities related to the project. The Visibility field will define to whom this project and its tasks will be visible. You can set the Visibility to Invited Internal Users, All Invited Users, and Invited Portal Users and all Internal Users.

From the Tasks Management and Time Management sessions, you can activate the Sub-tasks, Recurring Tasks, Task Dependencies, Milestones, Timesheets, and Planning. We already mentioned the usage of these features earlier. According to the option you activate, you will get corresponding fields in the form view of the tasks of this project.
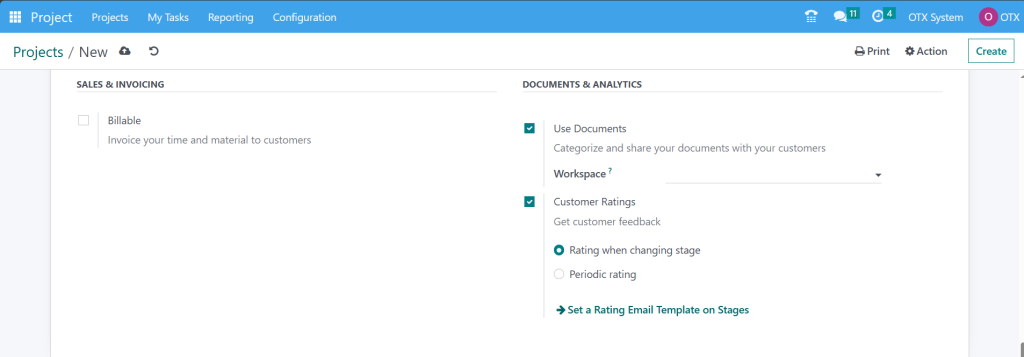
Under the Sales and Invoicing session, you can activate the Billable and Products on Tasks features. These features will help you to invoice your time and material to customers and Track the material used to complete tasks respectively. From the Documents and Analytics, you can enable the Documents feature to categorize and share your documents with your customers. The Workspace indicates a space in which all documents of this project will be categorized. To get customer feedback on projects, you can use the Customer Ratings feature. Activating the Field Service ` option will help you to manage the tasks in the field service module. The Worksheets option can be activated to create reports to be signed off by your customers.
When a project is shared in read-only, the portal user is redirected to their portal. They can view the tasks but not edit them. When a project is shared in edit, the portal user is redirected to the kanban and list views of the tasks. They can modify a selected number of fields on the tasks. In any case, an internal user with no project access can still access a task, provided that they are given the corresponding URL (and that they are part of the followers if the project is private).
Configuration
The Configuration option available in the Project module includes the options to manage Settings, Project, Project Stages, Task Stages, Tags, and Activity Types. We already detailed many of the options from the Settings menu while creating projects and tasks.
Project Stages
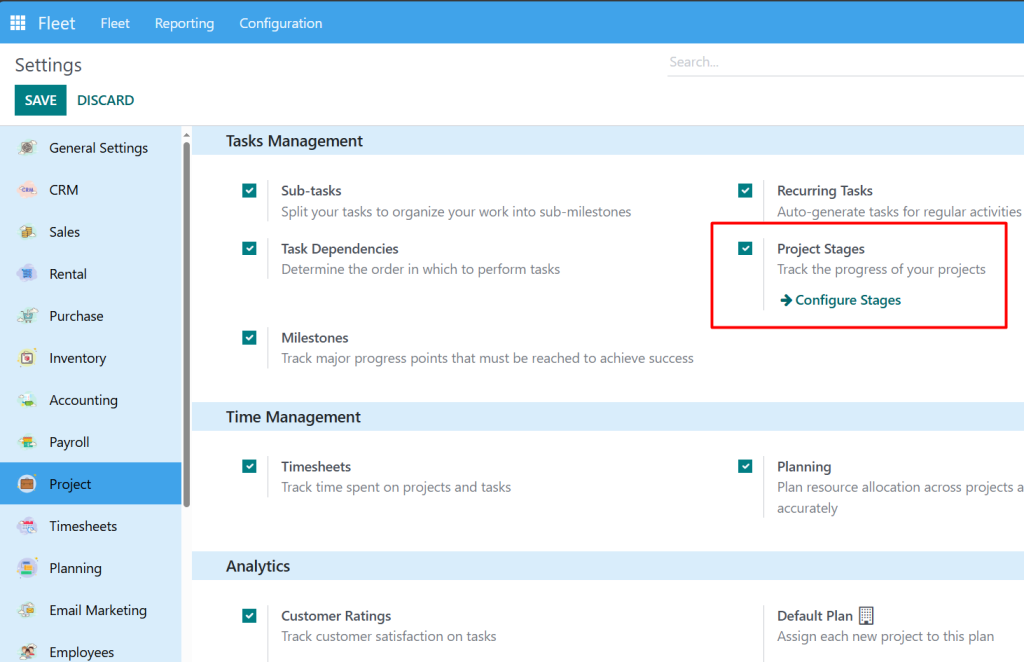
When you go to the Settings menu of the module, you can find the Project Stages feature to enable. Enabling this feature will help you to track the progress of your projects effectively. You can organize your projects according to their progress. Once you activate this feature, you will get the corresponding option under the Configuration menu of the module. This platform will show the pre-configured stages for your projects.
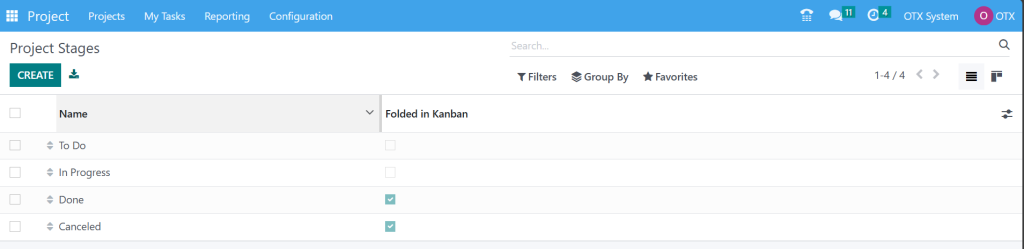
The name of the project stages can be viewed from here. If you want to create a new project stage, you can click on the New button. As soon as you click on this button, you will get a new line under the existing project stages where you can mention the name of the new project stage.
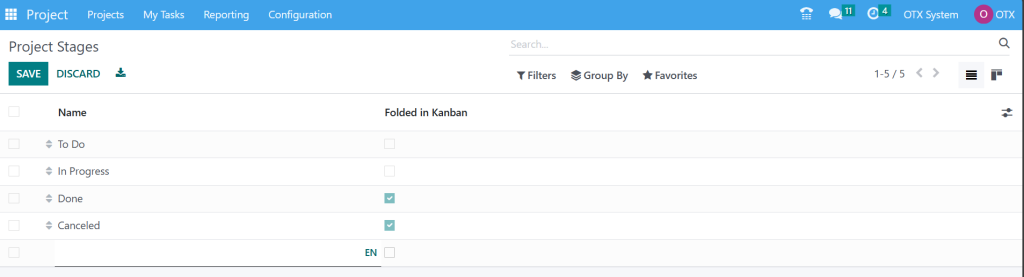
You can enable the Folded in Kanban field if you want to fold this stage in the kanban view of the project. Click on the Save button to save the new stage.
Default Plan
In the Settings menu, you can find the Default Plan feature under the Analytics tab. Any projects, its tasks, and timesheets are linked to an analytic account and any analytic account belongs to a plan.
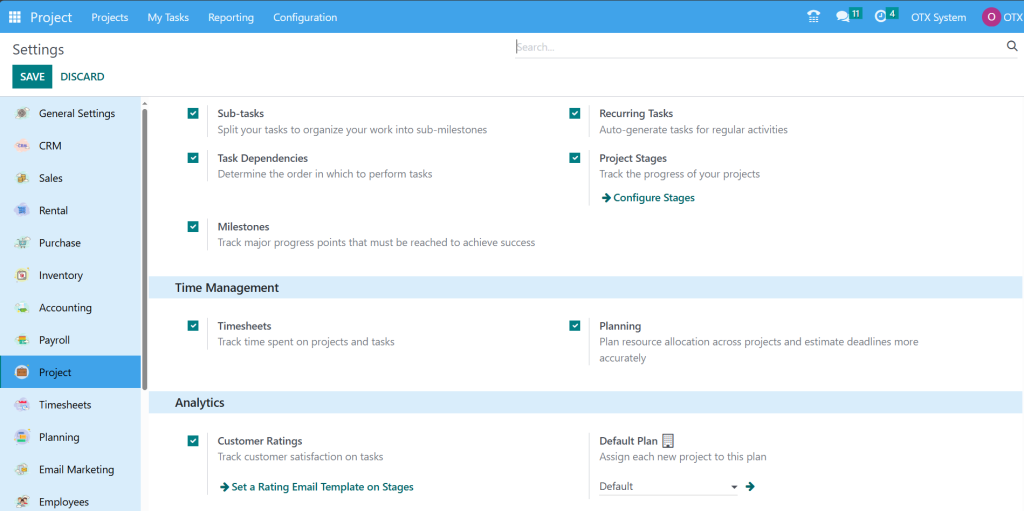
Here, you can set a default plan and OTX will automatically assign each new project to this plan. It will track the profitability of your project.
Task Stages
We discussed how to create new task stages while creating tasks for a project. Here, under the Configuration menu of the module, you will get a separate platform for managing task stages. Tracking tasks will become an easy process once you organize them in different stages based on their progress.
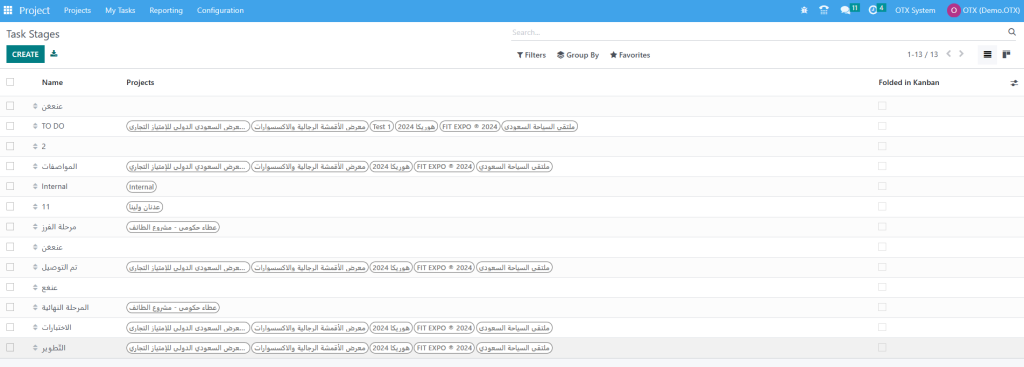
As you can see in the screenshot above, the list view of the task stages will show the Name and Projects of the respective task stages. Clicking on the Create button will open a form view where you can create a new task stage.
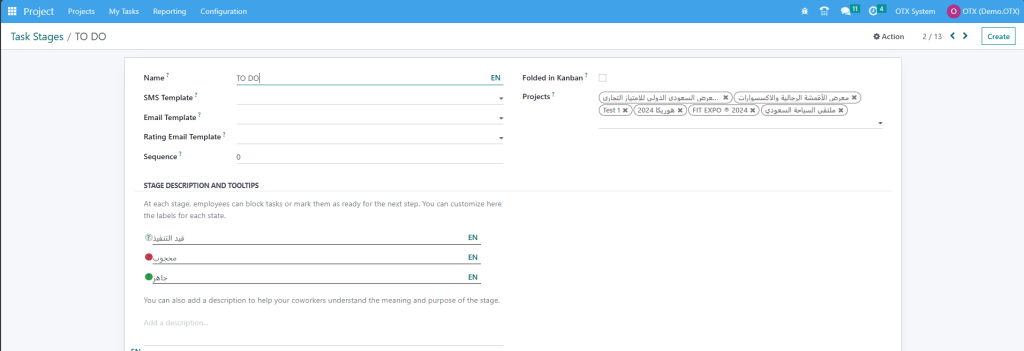
Provide a name for the task stages in the given space. You can add an SMS Template and Email Template in the corresponding fields. If set, an SMS text message and Email will be automatically sent to the customer when the task reaches this stage. By adding a Rating Email Template, OTX will automatically send a rating request to the customer when a particular task reaches this stage. The Sequence no of the stage will be available here, you can change it accordingly. In order to fold this stage in the kanban view, you can activate the Folded in Kanban option. If you want to add this stage to particular projects only, you can mention them in the Projects field. Additionally, you can customize the stage description and make changes using the tooltips as per your requirements.
Tags
The tags will always help you simplify the searching process. You can find the options to configure tags in the majority of the modules in OTX . In the Project module also, you can find the Tags option under the Configuration menu as shown below.

Clicking on the New button will open a new line where you can mention the name of the new tag. Use the Save button to save the new tag.
Reporting
The Reporting feature available in the OTX Project module can be used to analyze each project and task recorded in the database. It is important to analyze all activities related to a project in a regular interval of time so that you can easily identify the areas that need additional attention and improvement. Under the Reporting menu of the OTX Project module, you can find the Task Analysis platform, which can be used to examine the tasks recorded in OTX .
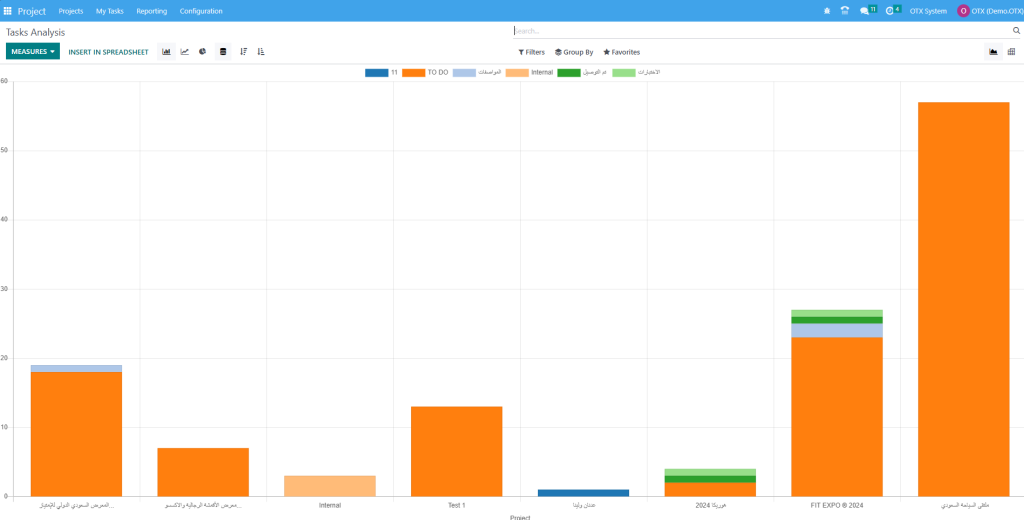
For reporting, you can use the default Filters My Tasks, Followed Tasks, My Team’s Task, My Department’s Task, Unassigned, My Projects, My Favorite Project, My Department’s Project, My Team’s Project, High Priority, Low Priority, Open, Closed, Late Milestones, Late Tasks, and Tasks in Overtime. You will get Stage, Personal Stage, Assignees, Ancestor Task, Milestone, Customer, Sales Order Item, Kanban State, Deadline, and Creation Date in the Group By option. You can use Graphical and Pivot views for the reports.
Here, you can set the Measures as Average Rating, Days to Deadline, Effective Hours, Overtime, Planned Hours, Progress, Rating Value, Remaining Hours, Working Days to Assign, Working Days to Close, Working Hours to Assign, Working Hours to Close, and Count.
Customer Rating
It is possible to track customer satisfaction on tasks in the OTX Project module. For this, you can go to the Settings menu and activate the Customer Ratings option.

Once you activate this feature, you will get the Customer Ratings platform under the Reporting menu. This platform will record ratings from the customers of your project.
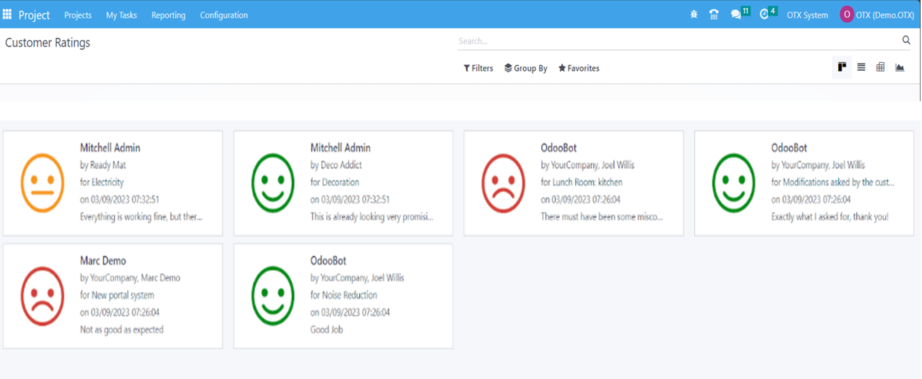
In order to track and manage projects and tasks of your company, you can rely on the OTX 16 Project module.
HR Management
The primary aspect of an organization’s human resource department is an effective recruitment strategy. This is the primary step toward an organization’s success. The efficient selection process and recruitment management will ensure whether your company staffing applies to an organization. It improvises the business productivity of your organization. You can get an idea about the best suitable hires for your company using the OTX 16 Recruitment module. You must install the Recruitment app from the OTX 16 application.

Once choosing the Recruitment module, you can see the dashboard window of the OTX 16 Recruitment module. The list of all job vacancies is visible to the user in the Job Positions window. In the Kanban view, the user can see the details of each job position, including department, published or not, number of applications, late activities, to recruit, company name, etc.

You can view applications, interviews, trackers, activities, and evaluate reports by clicking on the three-dot icon at the right end. Moreover, several sorting functionalities are viewable under Group By, Filters, and Favorites. It is possible to filter job positions based on favorites, published, archived, unread messages, and custom filters.

Below the Group By section, you can sort out job positions based on company, published, department, employment type and add a custom group. Inside the Favorites section, you can import records, insert link/view in articles, save a current search, and add to my dashboard. To define a new job position, select the CREATE icon in the Job Positions window.

A new window appears before use once clicking on the CREATE icon. In the Create a Job Position window, enter the job role name in the Job Position field. After applying for the job position, select the CREATE icon in the pop-up window.

Users can obtain the created job post in the Job Positions window. Now, it is easy to develop new job posts as a Content Writer.

Here, you can see the count of new applications and easy to publish the job. You will be directed to the job position window once clicking on the NEW APPLICATIONS icon. To define a new application, press the CREATE icon in the Applications window.

You can access recruitment information for a job post in the open window. Below the Recruitment section, add your company name and department concerning a specific job area.

The address of a laborer working is viewable in the Job Location option. You can specify the employee category as a permanent, replacement, or temporary and more within the Employment Type option. Add the employee count expected to recruit inside the Target field.

Users can enable the Is Published option if the job position is to be published on the website. Then, enter the recruiting person for employees in the Recruiter field. Additionally, mention the interviewers in the panel for employee recruitment. Apart from these, you must choose a form for an applicant in the Interview Form option.

Once selecting the form, pick a default template for the job post in the Contract Template option. Afterward, you can select the website regarding your job post.

Below the Job Summary tab, you can add detailed descriptions about the job. Moreover, various smart menus are available at the right end of the Job Position window. The count of total jobs is viewable in the Job Applications smart button. Also, you can view the entire list of files in the Documents smart menu. Once choosing the Trackers smart menu, it is easy to track each job post. Finally, you can publish the job position by clicking on the Go To Website smart button.

The website page appears before the user once choosing the Go To Website smart icon. To publish the job role, change the unpublished button to published. The description of the job post is visible to candidates on the website. Applicants who visit the website can register for the job by picking the APPLY NOW button.

After pressing the APPLY NOW icon, a Job Application form opens to the applicant. You need to fill in data regarding the job, including name, email, phone number, resume, introduction, and more.

A confirmation window opens to you once submitting the application form by the individual.

Now, move to the Job Positions window in OTX 16 Recruitment. You can see that the job post is published and that one new application is viewable in the specific job role.

Hence, creating a job post and publishing it on the company website using OTX 16 Recruitment is easy.
Applications
A form consisting of candidate details applied to a job in an organization is a job application. Each company receives various job applications once posting a job position through a website or any other platform. OTX 16 ensures you access information about each job applicant separately. You can attain a list of all applications once clicking on the All Applications menu in the Applications tab. The List view of the applications window gives an idea about each application data such as Applicants Name, Stage, Tags, Recruiter, Applied Job, Subject, etc. You can choose the CREATE icon if you need to formulate a new application.

In the open screen, add the email subject of the application and the title of a candidate in the Applicants Name field. Afterward, specify the applicant’s email in the Email field. Also, you must add the personal number of the candidate in the Phone option.

Apply for education qualification as Bachelor, Master or more in the Degree option. Also, mention the LinkedIn id of your profile in the Linkedin Profile field. Moreover, you can enter the necessary tags and names of the interviewers of the applicant. Make sure to add the recruiter name of a specific applicant applying to a particular job.

By selecting the star icon in the Appreciation field, you can mark the appreciated level of a candidate as good, very good, or excellent. Specify the link source of the application in the Source option and the dispatch method in the Medium field.

Below the Job section, you can select the job applied by the candidate and the job department. Later, choose your firm name from the Company option. Inside the Contract section, the user can mention the salary expected by the applicant in the Expected Salary field and given by the employer in the Proposed Salary option.

Users can specify the description of an application under the Application Summary tab. Moreover, it is possible to add the necessary skills of the applicant within the Skills tab once pressing the CREATE A NEW ENTRY icon.

All these details are saved manually in the OTX 16 Recruitment. You can change the stages based on employee progress in the application. The stages are classified as INITIAL QUALIFICATION, CONTRACT PROPOSAL, SECOND INTERVIEW, etc. Once selecting the No Meeting smart button, you can schedule a meeting with the applicant. Additionally, the contract details of the candidate are accessible through the Contracts smart button.

After completing all processes of the applicant, you can provide the offer letter by choosing the GENERATE OFFER button in the Applications window. To send an interview notification, you can click the SEND INTERVIEW icon.

Hence, it is easy to define new applications for your company in the OTX 16.
Configurations
We can configure applications, job positions, activities, and employees under the Configuration tab of OTX 16 Recruitment. To manage extra settings in the Recruitment module, choose the Settings menu in the Configuration tab. You can manage the recruitment process and job posting settings from the Settings window. Activating the Online Posting option under the Job Posting section assists you in posting existing jobs on the website. You can forward the interview survey to the candidate after enabling the Send Interview Survey option below the Recruitment Process. Additionally, users can mark the CV Display box to view the resume on the application form.

For digitization email and CV to extract names automatically, you must enable the CV Digitization(OCR) option. It is possible to manage CV digitization as per Digitize on-demand only, Do not digitize and Digitize automatically. You need to select the SAVE icon if any of the options in the Settings window is enabled.

Job Positions
Each company comprises various categories of employment types, including full-time, temporary, and part-time. Users can configure the employment types within the Job Positions section under Configuration. The list of pre-configured employment types is visible to the user in the open window. Users can view the names of all employment types, such as Replacement, Interim, Permanent, and more. To formulate a new employment type, choose the NEW icon, as noted in the screenshot below.

A new space opens before the user after selecting the NEW button. Add the employment type name in the visible space and select the SAVE icon.

Refuse Reasons
You can access the Refuse Reasons menu inside the Applications section of the Configuration tab. Users can view the details of each refusal reason, including the Email Template and Description, in the open window. To formulate a new refuse reason, select the CREATE button.

After clicking the CREATE icon, a new space appears at the bottom of the Refuse Reasons screen. You can mention the description and email template for your reason. Choose the SAVE button once applying the refuse reason details.

You can refuse the job application if you’re unsatisfied with the applicant’s qualifications or performance for a specific job. You need to select the particular application and press the REFUSE button for that purpose.

A Refuse Reason window opens to the user and chooses the reason for refusing in the Refuse Reason field. It is possible to pick your created Refuse Reason before. Once selecting the Refuse Reason, Send Email and Email Template options appear automatically. You can forward an email to an applicant regarding the reason once enabling the Send Email field. The template for your specific email is chosen easily within the Email Template field. After entering this information, click the SUBMIT icon.

Once submitted the reason, you can view a Red color REFUSED mark in the Applications window. So, it is simple to refuse necessary applications within the Recruitment module.

Departments
Most companies function under various departments for special services. Based on organization size, a huge number of departments exist for work management. You can obtain the Departments menu under the Employees section of the configuration tab. In the open window, each department list, such as Display Name, Employees, Company, and more is visible to the user. By choosing the CREATE button, we can describe a new department in your company.

On the open page, add your new department title in the Department Name field and name of the manager concerning your department in the Manager option. You can subcategorize various company departments once allocating a parent department.

You can apply default appraisal templates once activating the Custom Appraisal Templates field. After the activation, an Appraisal Templates tab is visible to the user, and you can manage the necessary templates.

You can apply the company name in the Company field and define the default survey template in the Appraisal Survey field. Each detail is saved automatically in the OTX 16 Recruitment. You can view the list of employees and other details under your department within the smart buttons Employees and Plans.

Hence, you can quickly manage the departments in your organization.
Activity Types
The different types of activities performed in a company are known as activity types. You can obtain a list of all created activities once choosing the Activity Types menu in Configuration. In the Activities window, the user can view the data concerning each activity, such as Name, Type, Default Summary, and more. You can design new activities by selecting the CREATE icon in the Activity Types window.

A new window opens to the user after clicking on CREATE icon. Add the activity type title in the Name field, and it is possible to manage the detailed settings of the activity. Below the ACTIVITY SETTINGS, you can pick an action such as Meeting, Tax report, Upload document, and more. Later, you can select a default user and enter a description of the activity type in the Default Summary field.

We can find additional data regarding the activity inside the Default Note section. Under the NEXT ACTIVITY section, the user can pick the chaining type as a trigger or suggest the next activity. If you select suggest trigger activity option in the Chaining Type field, a suggest option is visible, and you must add the suggestion for the next activity. On the other hand, a Trigger field appears to a user after choosing the Trigger next activity option.

Once choosing the Chaining Type, select a template for the next activity in the Email templates field. Moreover, in the Schedule option, you can specify the day count after the previous activity completion.

Each data regarding Activity Types is saved manually in the OTX 16 Recruitment. You can schedule different activities for several company operations within the OTX system. For example, it is possible to schedule activities once creating an application in your company. Move to the Applications window in OTX 16 Recruitment and select your application. You can access the Activities menu at the end of your Application screen, as pointed out in the screenshot below.

After selecting the Activities menu, a new window opens for the user. You can choose your created activity type and Summary in the Schedule Activity window. Furthermore, set the last date of the activity in the Due Date field and add the assigned person.

User can describe the additional details of scheduled activity inside the Log a note section. Once mentioning each data, click the SCHEDULE icon.

So, it is easy to plan various activities regarding your company’s recruitment applications.
Reporting
One of the essential aspects of a firm is developing reports on different activities and operations. A company can easily design marketing plans, understand business outcomes and trends once evaluating annual reports. The growth of the company tracks quickly with the best report management system. Below the Reporting section OTX Recruitment, we can manage Source analysis, team performance, recruitment analysis, and source analysis. Let’s look into each reporting feature separately.
Recruitment Analysis
You can evaluate candidate recruitment in a firm by choosing the Recruitment Analysis menu inside the Reporting tab. The graphical view of Recruitment Analysis describes Source data on X-axis, and Y-axis depicts the applicant count. You can analyze the hired and in-progress data separately in a company recruitment report. By choosing the MEASURES icon, we can apply various values, including Meetings, Hired Ratio, Process Duration, and more, into the graph.

Source Analysis
Users can analyze the sources of each recruitment process in the company through a reporting feature. Choose the Source Analysis menu inside the Reporting tab, and a graphical representation opens to the user. In the Graph view, the user can acquire source details on X-axis, and the applicant’s count is viewable on Y-axis.

By clicking the MEASURE button, you can evaluate source analysis through different values. Additionally, it is easy to view graphs in pie, line, and chart formats.

Time in Stage Analysis
You can evaluate the stages of each applicant recruitment process by choosing the Time in Stage Analysis menu in Reporting. The Pivot view of Time in the Stage Analysis window depicts a pivot table that shows the total count of each stage of the recruitment process based on each job role. Users can access the total days in the stage for initial qualification, second interview, contract proposal, and first interview separately in the Pivot table. The MEASURES icon assists you in applying the count of each stage into the Pivot table.

So, you can easily analyze the recruitment procedure stages that occur in each job post.
Team Performance
Analyzing the performance of each team in your company improves productivity and workflow. Using the Reporting feature of OTX 16, you can analyze each team’s performance. By selecting the Team Performance menu in Reporting, a graphical representation is acquirable to a user. You can see the Recruiter data on X-axis, and Y-axis denotes the Count in the Graph view. Moreover, the hired and in-progress details of the recruiter are visible in different colors. You can also sort out the team performance based on applicant, meetings, hired ratio, process duration, and more once choosing the MEASURES icon.

OTX 16 Recruitment module simplifies each recruitment procedure in a firm, such as interviews, onboarding, template generation, and hiring management. To automatize the recruitment procedure in your firm, OTX ERP software is the best solution.
CRM
OTX ERP system offers Customer Relationship Management software for the effective management of customers and the establishment of new business relationships. The CRM module permits you to monitor and operate all new leads and opportunities in one place. Having an adequate platform for the administration of leads, opportunities, and related operations will benefit a company in many ways. The business world around us is growing rapidly, and in order to cope with this growth, you must be ahead with customer management. Every year, OTX introduces its new version with a wide variety of new features that help a company improve its performance at multiple levels. OTX 16, the latest version of the OTX ERP system includes advanced tools to enhance the working efficiency of the CRM module.
The salesperson will get easy access to the sales pipeline which encompasses all information in one place. The well-visualized information available in the sales pipeline can be utilized to monitor CRM operations effectively. Data available in this pipeline will be segmented based on the progress in operations. Suitable stages can be assigned for leads and opportunities according to the progression. Improved visualization is one of the attractive features of the latest version of OTX CRM. Additional new features will be discussed while detailing the functionalities of the CRM module.
This chapter will provide complete guidance through the new OTX 16 CRM module. Let’s start with the main dashboard of the CRM module that appears as soon as you select the module from the OTX dashboard.
CRM Leads/Opportunities Pipeline
The window that appears as soon as you enter into the CRM module is considered as the main dashboard of the module. The pipeline operations can be seen as arranged in different stages. Leads/opportunities generated from various platforms in OTX are organized according to their progression in the sales pipeline. The highly integrated nature of OTX can be used to mine leads from the company website, email, SMS, live chat, help desk ticket, events, social media accounts, and many more. Leads from all these channels can be effectively managed with the assistance of OTX CRM. Based on the customer’s responses, these leads can be later converted into opportunities and then into sales quotations. The CRM module plays an important role in increasing sales opportunities in a business.
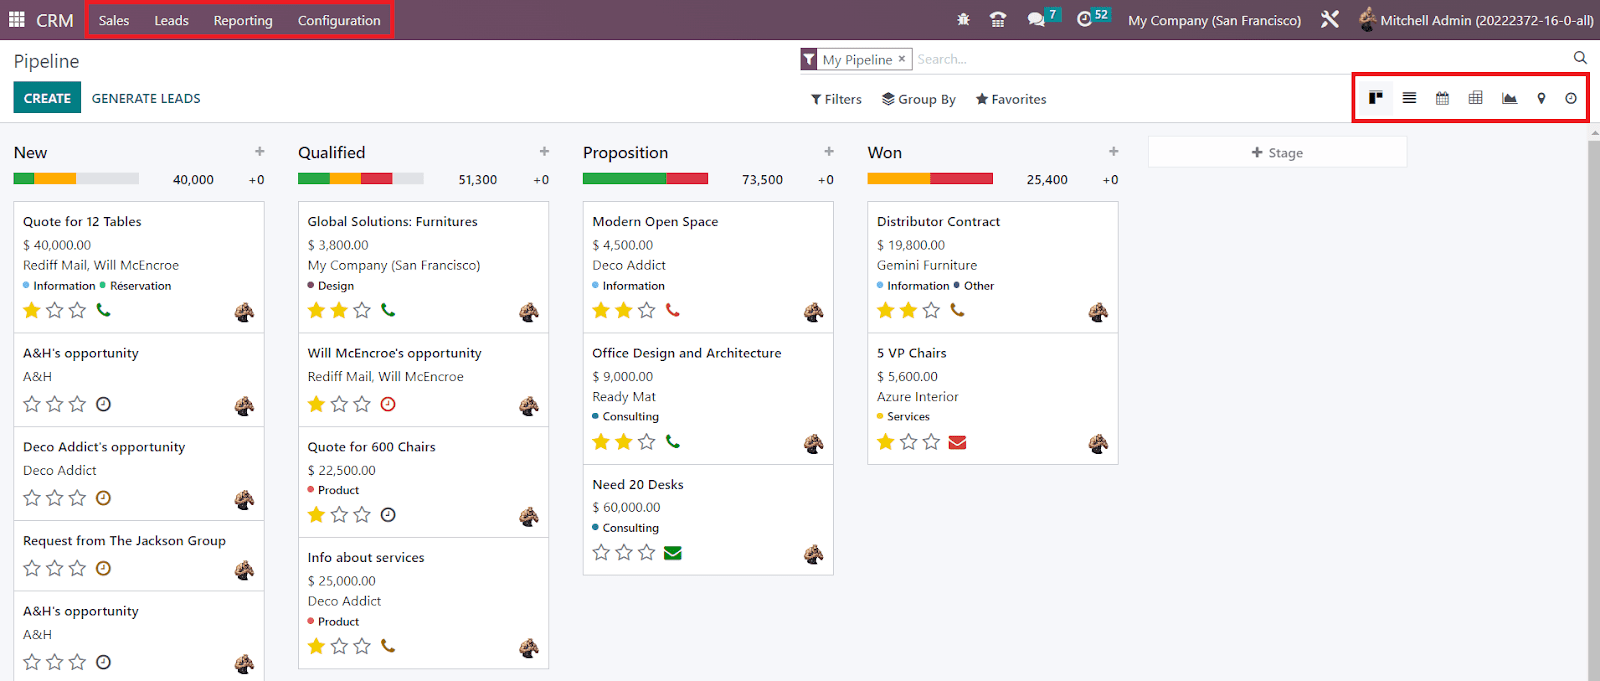
The screenshot above shows the main dashboard of the OTX 16 CRM module. This platform comes under the My Pipeline option which is available under the Sales menu in the module. As you can see in the screenshot, there are three main menus such as Sales, Reporting, Leads and Configurationavailable in the CRM module. Under each of these menus, you will be able to get several options to perform different tasks related to customer relationship management in OTX 16. The My Pipeline window will show the records of all leads generated from various channels. Just like in the older versions of OTX , you can alter the view of the platform into Kanban, List, Calendar, Pivot, Graph, Map, and Activity. As you can see in the image, the icons that represent the Kanban and List views have changed in OTX 16.
When we take a look at the Kanban view of the CRM pipeline, we can see that all records are being arranged in the window based on their progress in operations. Leads are organized in a way that the user will be able to easily identify the progress of each lead. Assigning different stages for leads in the CRM module is not a difficult task. According to your business requirement, you can customize the stages and arrange leads under suitable stages.
The screenshot shown below includes the stages such as New, Qualified, Proposition, and Won. As the titles of the stages indicate, all new leads will appear under the New stage. Among the new leads, only qualified leads based on certain criteria will be moved to the next stage called Qualified. The successful business leads can be moved to the stage Won after getting confirmation from the corresponding customer.

Similarly, you can create required stages for the leads effortlessly by using the +Stage button. When you click on this button, a new field will appear as shown in the image below to mention the title of the new stage.
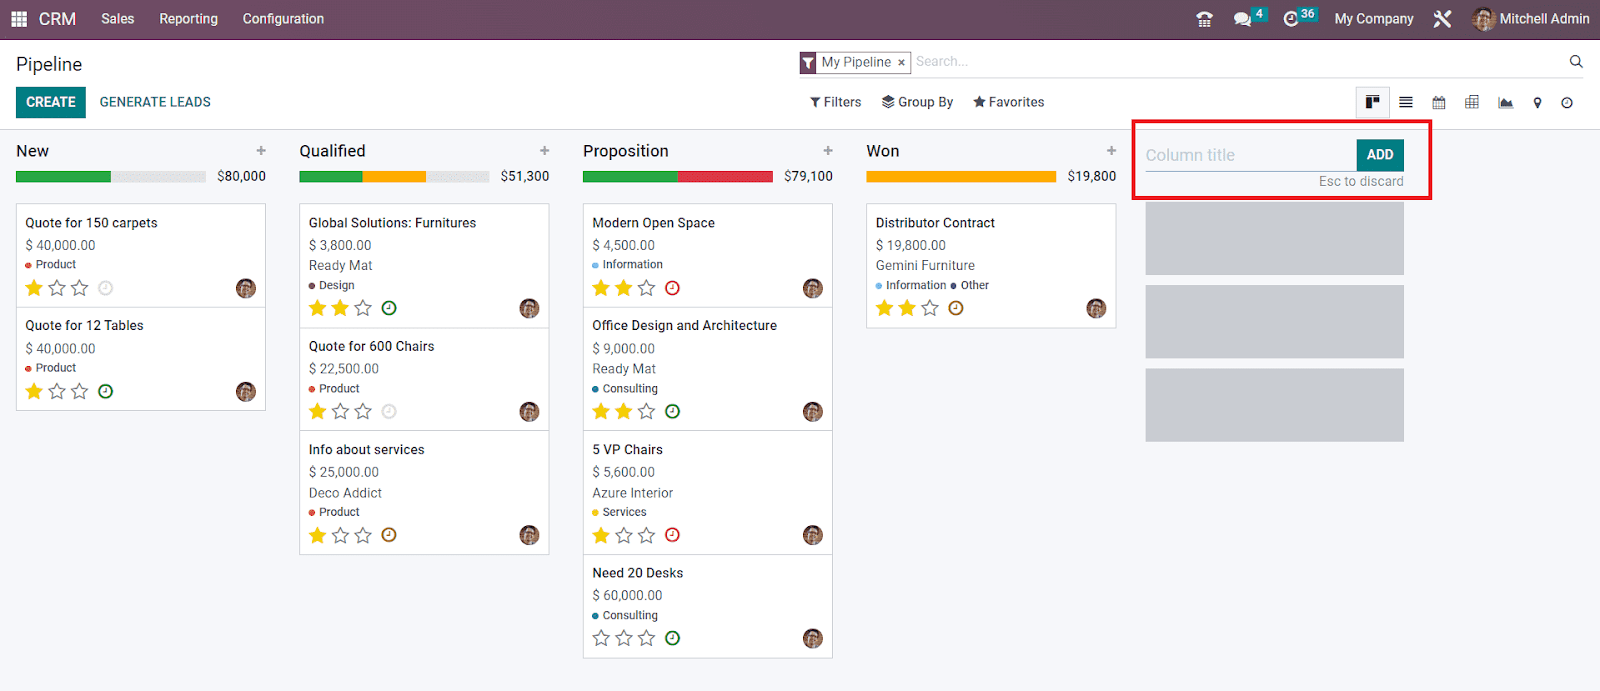
Specify the title in the given space and click the Add button. You can create as many as new stages for leads by following this method. Once you create a new stage, you can change the settings of the respective stage using the gear icon that appears near the title of the stage as shown in the screenshot below.
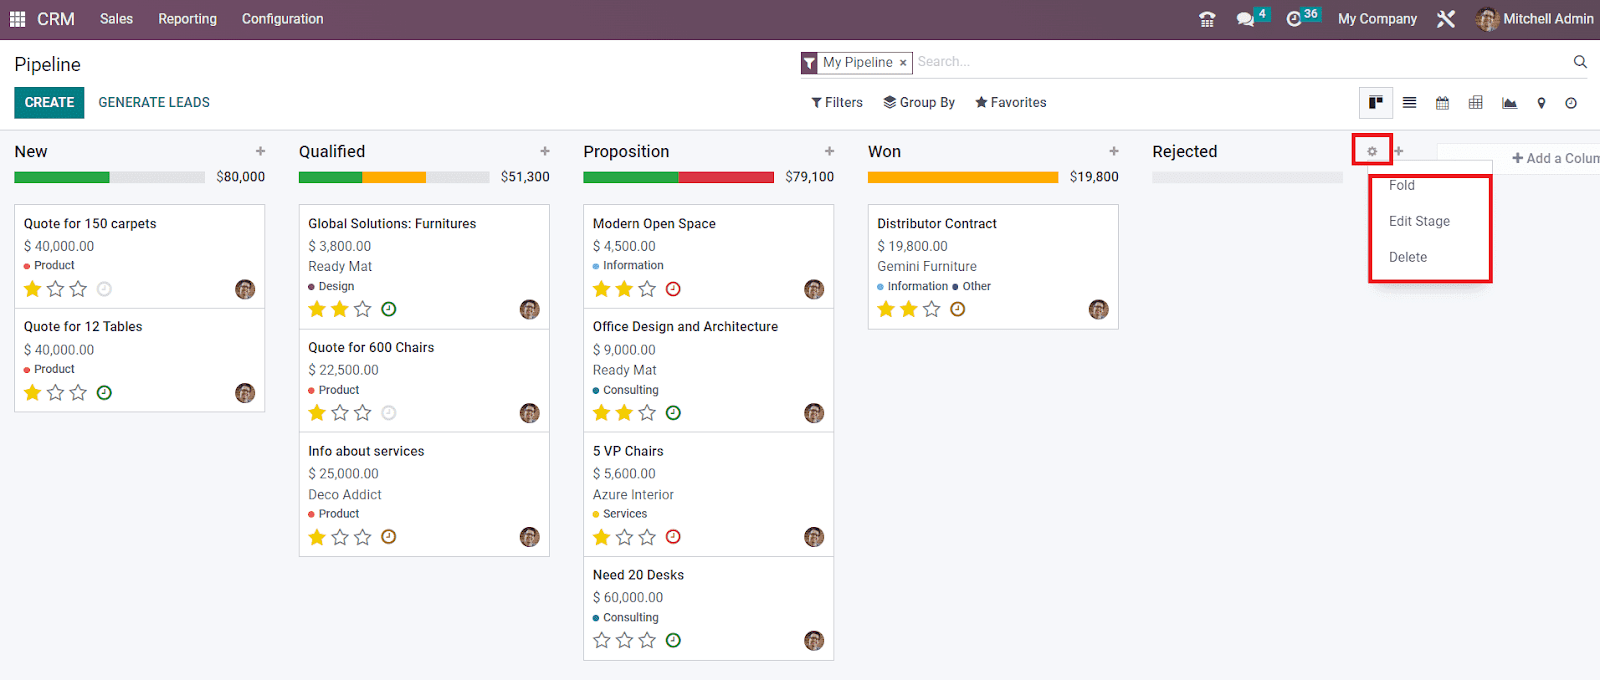
Using this icon, you will be able to Fold, Edit, and Delete the stage according to your requirements. When you click on the Edit button, you will get a pop-up window that can be used to edit the corresponding stage.

If you want to consider the selected stage as the Won Stage for leads, you can activate the field Is Won Stage?. It is possible to fold the corresponding stage in the kanban view by activating the Folded in Pipeline field. In the Sales Team field, you are allowed to mention a particular sales team who uses this stage. Other sales teams will not be able to see or use this stage than mentioned in the given field. The requirements to move leads to this stage can be specified in the Requirements field so that the team members will get an exact idea regarding the needs of this particular stage. After editing the column, don’t forget to click on the Save button to record all new changes.

The expected revenue from each stage can be seen in the top right corner of the corresponding columns as highlighted in the image above. You can change stages of leads by using the drag and drop feature. By changing the stage of one lead, the expected revenue will be automatically updated based on the new record.
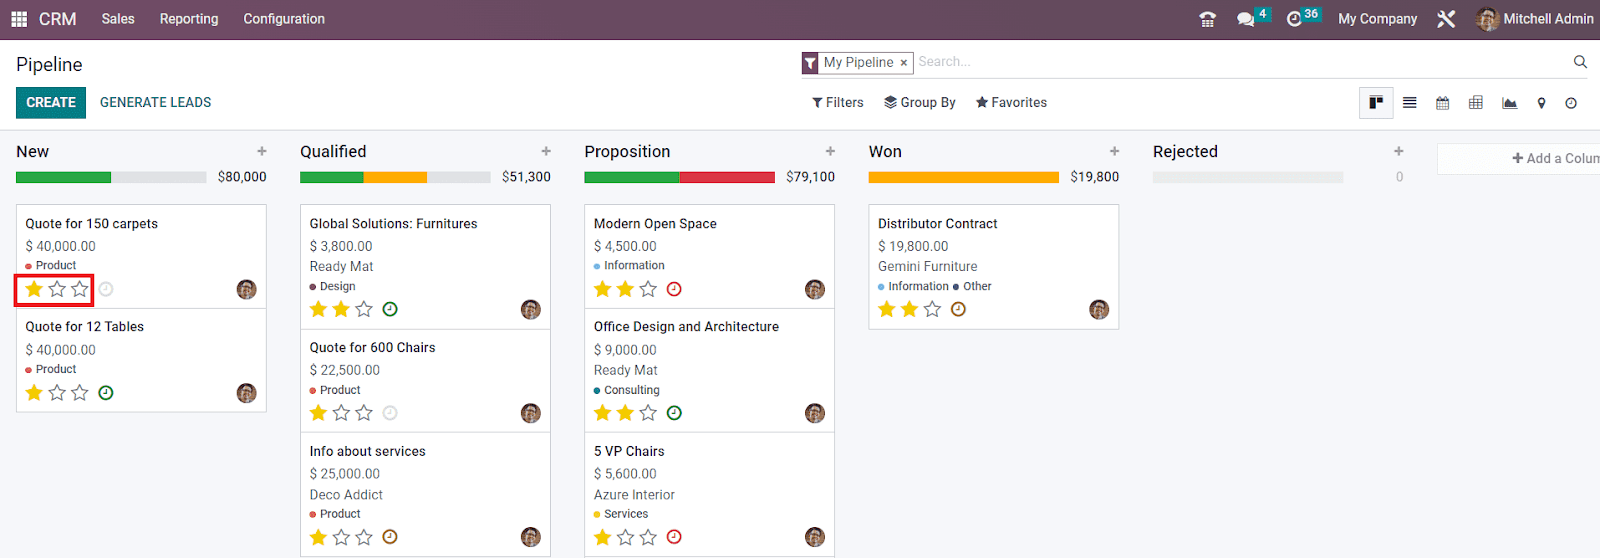
On each lead record, you will be able to find three stars to mark the priority of the lead. Based on the priority of the lead, you can give Medium, High, and Very High stars for leads. This will help to identify high-priority leads.
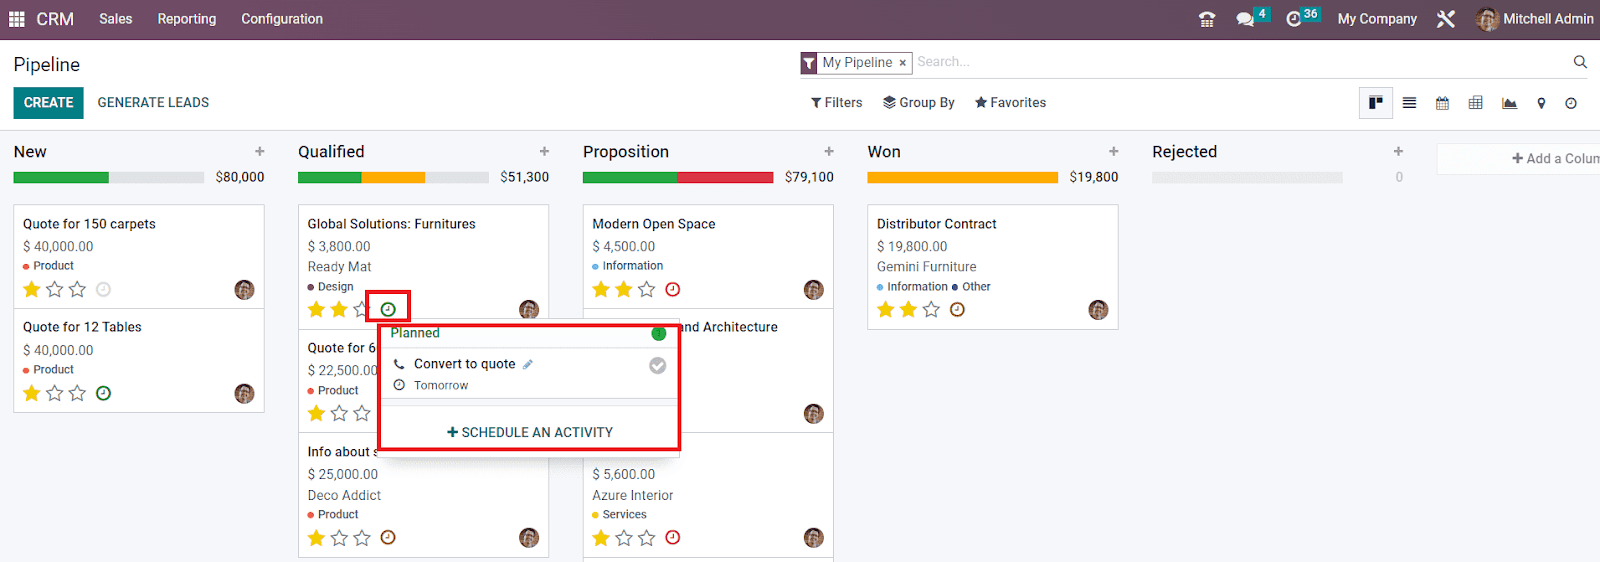
From the main dashboard itself, you can schedule different activities for the leads. As highlighted in the image above, the small clock icon will assist you in scheduling various activities. As soon as you click on this icon, OTX will show the list of scheduled activities if any activities are scheduled already. Otherwise, you can click on the Schedule An Activity button to plan a new one. OTX will direct you to a new wizard where you can plan new activities.

OTX offers you a separate platform to configure different types of activities in the Configuration menu which we will discuss later. Here, in the new activity schedule window, you can select the required activity that you are planning to schedule in the Activity Type field. Along with this, you can specify the Summary of the activity in a few words in the given space. Assign an employee to monitor this activity in the Assigned To field. Last but not least, don’t forget to mention the Due Date of the activity. Finally, you can schedule the activity by clicking on the Schedule button. Once you complete the activity, you can use the Mark as Done button. If you have already completed one scheduled activity and want to schedule a new one, you can click on the Done & Schedule Next button. In order to cancel the scheduled activity, use the Discard button. The planned activities can be seen in green color. The red color indicates overdue activities. Activities that are scheduled for today will be shown in brown color.

A new feature added in the OTX 16 CRM module is that now you can add customers to the call queue. This option can be found near the clock icon which is used for scheduling activities. With a single click, you can add leads to the call queue. Clicking again on the icon will remove it from the call queue.
You will get a Quick Add option on each column to quickly add leads under specific stages. This option will be available in the form of a ‘+’ icon near the title of each stage as shown in the image below.
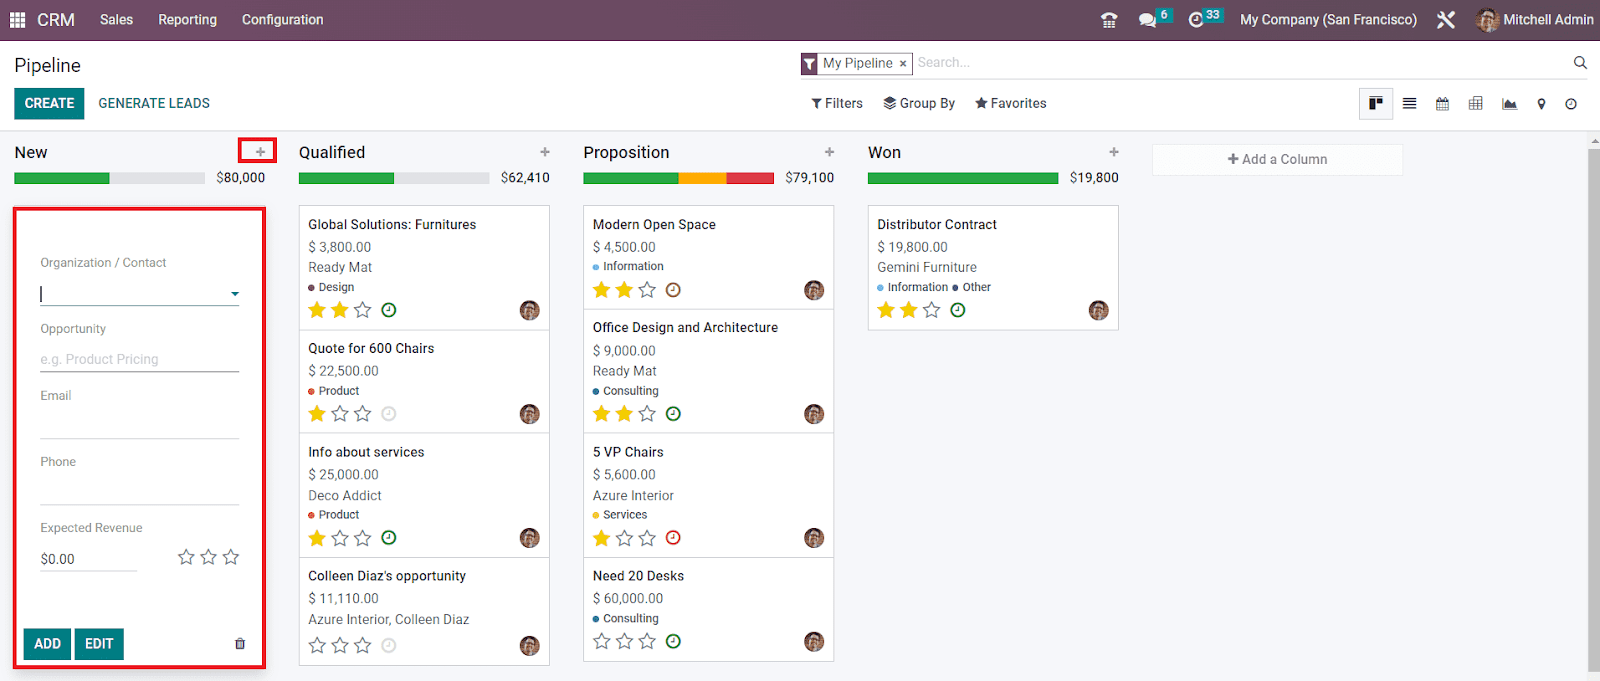
You can quickly add new leads under each stage using this option. Mention the name of the Organization/Contact in the given space. Along with this, you can add the title of the Opportunity, Email, Phone, and Expected Revenue in the respective fields. Clicking on the Add button will add the new lead to the corresponding stage. If you want to make changes to the lead details, you can use the Edit button.
The availability of the advanced sorting options will be helpful for simplifying the searching process in OTX . The Filters, Group By, and Favorites option in OTX CRM includes various sorting tools to easily retrieve required data within seconds.
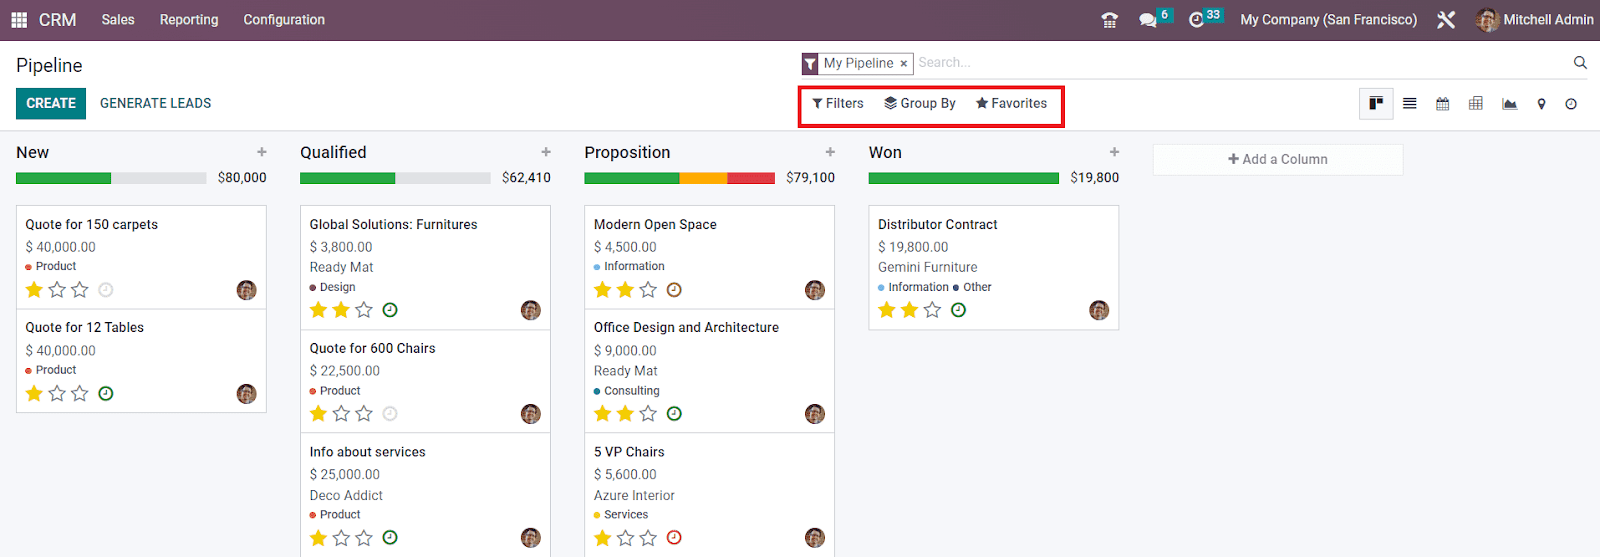
When we take a look at the List view of the CRM pipeline, you will get an advanced preview along with the details of the Opportunity, Contact Name, Email, Phone, Company, Salesperson, Next Activity, My Deadline, Expected Revenue, and Stage.

If you want to contact the salesperson, you can click on the name of that person which will directly connect you with the respective salesperson with the help of a message box. Additionally, you will get the Email and SMS options on each lead which will be helpful to connect with the corresponding customer.
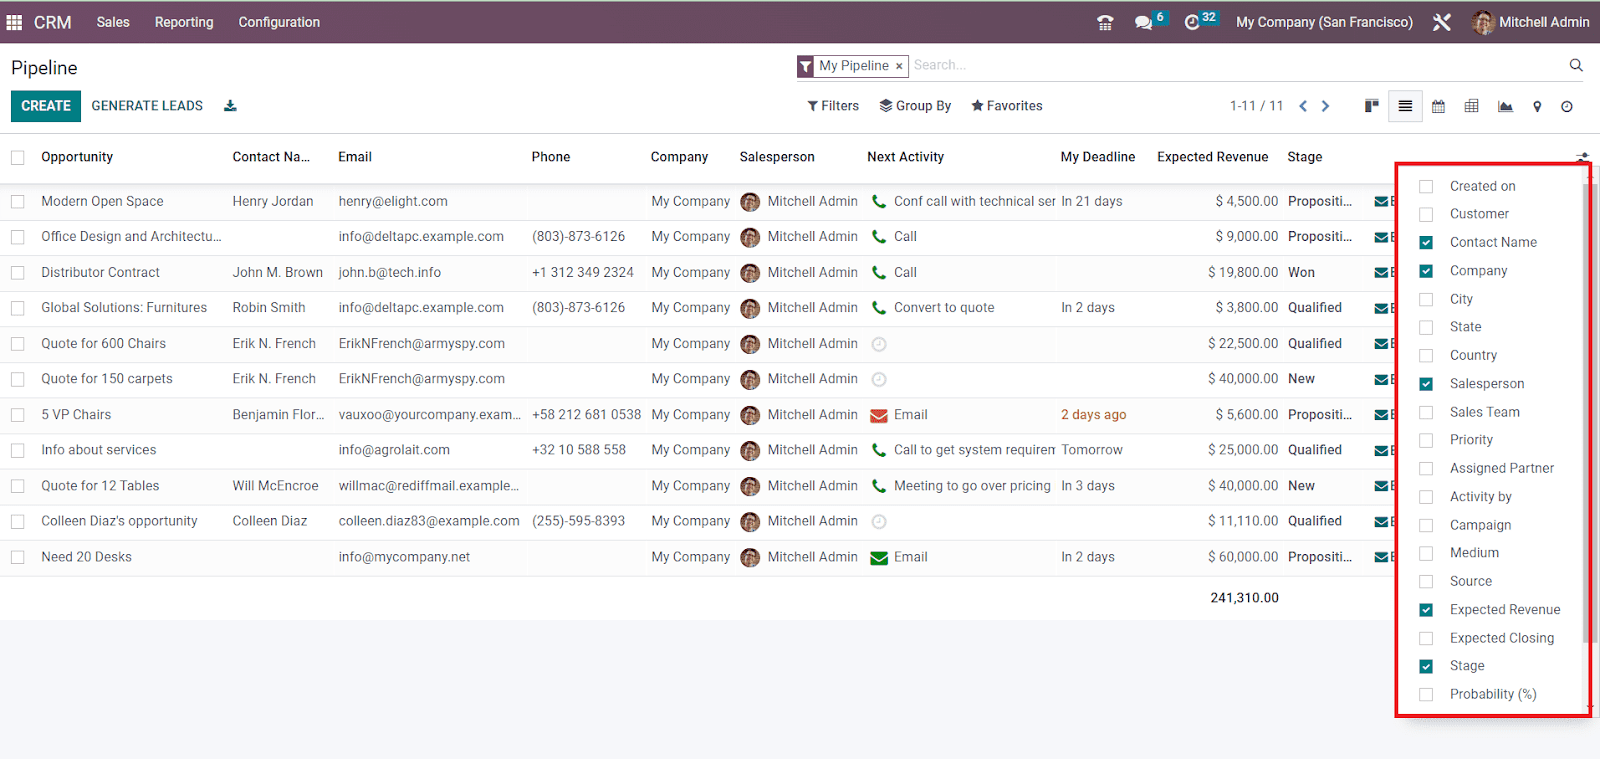
You can enrich the preview of the list by adding more details regarding a lead such as Created On, Customer, City, State, Country, Sales Team, Priority, Assigned Partner, Activity By, Campaign, Medium, Source, Expected Closing, and Probability.
So far we are discussing the My Pipeline window in the CRM module and now, let’s take a look at the My Activities window.
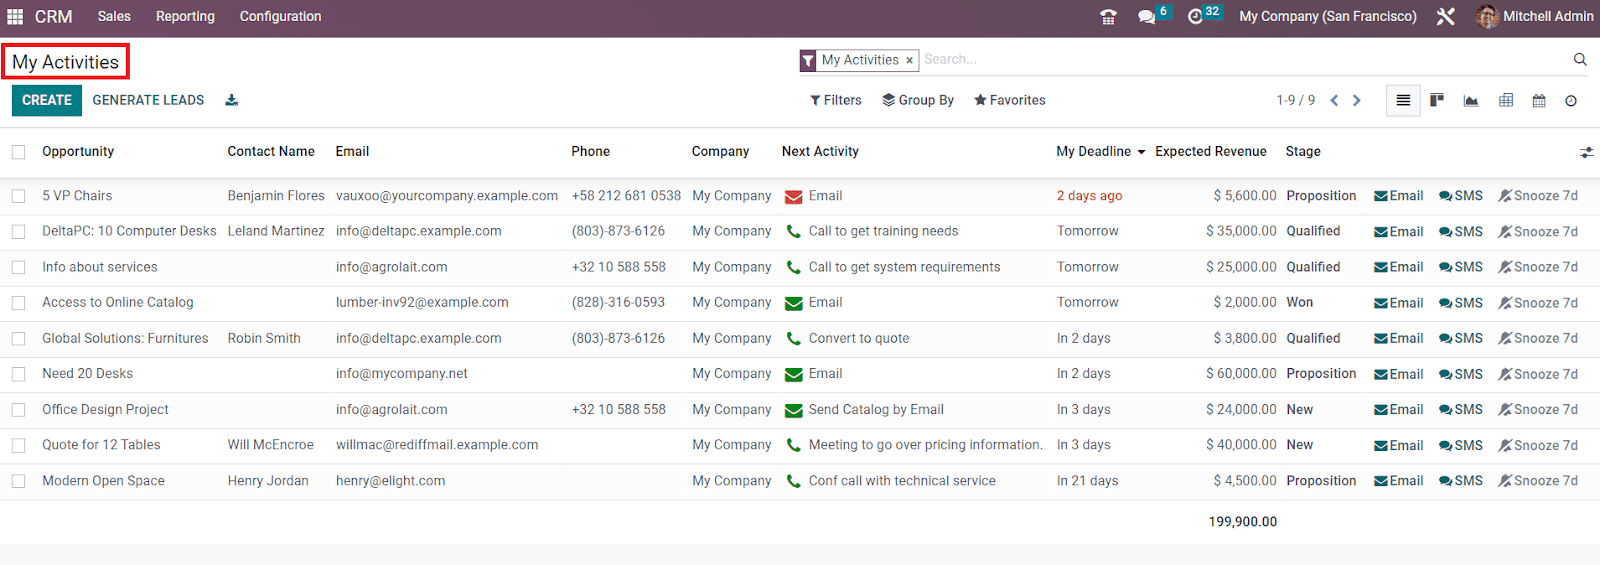
My Activities window is almost similar to that of the My Pipeline window. But, here, you can only find the leads/opportunities that are assigned to you.
Leads
Leads can be considered as the initial step before starting a business with a customer or organization. If a person or an organization is interested in your business, you can convert their interest into your business as a lead which can be later converted into sales opportunities. It is possible to collect leads from various sources with the assistance of the OTX CRM. Inquiry through phone calls, SMS, Email, Live Chat, Helpdesk Ticket, Events, Contact Forms, and many more can be converted into leads in OTX . Proper management of leads generated through such platforms should be carried out with utmost care and attention to improve the chances of success. OTX offers a separate platform for the management of leads in the CRM module.
In order to get access to the lead management window, you can go to the Settings menu of the module. As shown in the screenshot below, you can find the Lead option to activate under the CRM tab.

Once you activate this option, you will be able to get a new option in the main menubar called Leads This platform will show the list of all leads generated from various platforms in OTX . The list includes the details of the Lead, Email, Phone, Company, City, Country, Assigned Partner, Sales Person, and Sales Team. If you want, you can change the view of the platform to Kanban, Calendar, Pivot, Graph, and Activity views based on your requirements..

You can manually create records of new leads using the Create button or automatically generate leads based on specific criteria using the Generate Leads button.
First, let’s take a look at the manual creation of leads in the OTX 16 CRM module. For this, you have to click on the Create button given in the top left corner of the screen. Once you click on this button, a new window will appear as shown in the screenshot below to mention the details of the lead. First, let’s check the new features available in this window. As you can see, the Create and Action buttons are moved to the right corner of the screen. Additionally, OTX will automatically save the details added in this window without using the Save button. If you want, you can use the Save Manually icon to save the details. You can also find changes in the Discard button. OTX 16 has enabled a new icon for Discard Changes. In the latest version of the OTX , you will not get the Edit button, but you can click on the field where you want to make changes that will allow you to edit the respective field.

You can specify the title of the lead in the specified area. The name of the future partner company that will be created while converting the lead into an opportunity can be mentioned in the Company Name field. In the Address field, specify the address of the company. The website of the contact can be added in the Website field. Similarly mention the Language, Contact Name, Email, Email cc, Job Position, Phone, and Mobile in the corresponding fields. You can assign an employee and a team for the lead management in the Salesperson and Sales Team fields respectively. Based on the priority of the lead, you can give stars to the lead. Add suitable Tags for the leads in the given field.
The Add a Property field available in this window is a new feature introduced in OTX 16. With the help of this feature, you can add customized fields to the form view. Clicking on the Add a Property button will give a pop-up window as shown below.

Here, you can mention the name of the new field in the given space. For example, if you want to add the Country field in the form view, you can name the field as Country. You will get a drop-down menu in the Field Type from where you can select the type of the new field.

The Field Type can be Text, Checkbox, Integer, Decimal, Date, Date & Time, Selection, Tags, Many2one, or Many2many as per your preference. After defining the Field Type, you can set a Default Value for this new field in the respective field. It is possible to view this field in kanban by activating the View in Kanban field.
Now, you can find that a new field named Country is added to the form view of the lead.

You can add many such fields to the form view using the Add a Property button.
Additional notes regarding the lead can be mentioned in the Internal Notes Notes tab. Under the Extra Info tab, you can add the Marketing and Analysis details. The Bounce field can be used as a counter that will show the number of bounced emails for this contact.

Under the Marketing section, specify the Company, Campaign, Medium, Source, and Referred By. Under the Analysis field, you will get the details of the Assignment Date and Closed Date.

The Geolocation and Assigned Partner details can be specified under the Assigned Partner tab in the new lead creation window.
Generate leads
OTX offers an effortless way to generate leads from the CRM module itself. This feature is exclusively available on the enterprise edition only. In order to get this feature in your CRM module, you can activate the Lead Mining option from the Settings menu of the module. You can find this option under the Lead Generation tab as shown in the image below.

OTX 16 Enterprise users can use this feature to improve the lead generation process. As you can see in the screenshot given below, the Generate Leads button will assist you in automatically generating leads from the Leads management window.

Now, you can click on the Generate Leads button to set rules for leads. As soon as you click on this button, a pop-up will appear to mention the rules for generating leads. The pop-up window will look like this.

Here, you can mention the number of leads required from a specific target. You can set Companies or Companies and their Contacts as targets. Along with these details, you are allowed to specify the Countries, States, and Industries of the target lead. Activate the Filter on Size field to filter the leads based on their size. You can assign a Sales Team and Salesperson in the corresponding fields in order to manage the leads. Add suitable tags for the leads in the Default Tags field. Once you complete all the fields, you can click on the Generate Leads button which will generate leads based on the already mentioned details. Don’t forget that this is a paid service and you need certain credits to generate leads in the CRM module.
In the OTX 16 CRM module, you will get a separate platform in the Configuration menu for the generation of leads based on certain criteria. In order to get access to this platform, you can go to the Configuration menu of the module where you can find the Lead Mining Requests option under the Lead Generation tab .

This platform will show all such lead generation requests along with the details of the Request Number, Number of Leads, Target, Countries, Sales Team, Salesperson, Tags, and Status . Using the Create button you can create a new lead mining request just like we did earlier.

You can create new lead mining requests by mentioning the number of leads required, Countries, States, Industries, Type, Sales Team, Salesperson, and Default Tags in the corresponding fields. Using these lead mining requests, you can effortlessly mine leads as well as opportunities. For this, you can select the corresponding option in the Type field. OTX will automatically save all these details in your database and you can submit the request with the help of the Submit button.
Now let’s take a look at the other options available in the OTX CRM module for generating leads.
Visits to Leads Rules
The user can effortlessly convert their website visitors into leads with the assistance of the OTX CRM module. In the Configuration menu of the module, you will get access to the Visits to Leads Rules platform under the Lead Generation tab which can be used to create rules for the conversion of visitors to new leads. In order to get this feature, you must activate the Visit to Leads option from the Lead Generation tab which is available in the Settings menu. You can perform data enrichment based on the visitor’s IP address.

This feature works integrated with the Website module in OTX . So, before using this feature, make sure to install the Website module into your database. As you can see in the screenshot below, the Visits to Leads Rules platform will show already configured rules with the details of the Rule Name and Type.

In order to create new rules for the conversion of website visitors into leads, you are allowed to use the Create button. As soon as you click on the Create button, a new window will appear where you can specify the required details to convert visitors to new leads.

First, you can specify a suitable name for the rule in the Rule Name field. Later, select the target of the Data Tracking. It can be either Companies or Companies and their Contacts. Clicking on the Active button will activate the newly created rule. Since we are converting visitors from the website, you need to set certain conditions in the Website Traffic Conditions tab. You can specify particular countries in the Countries field so that the visitors from the specified countries will be converted into leads or opportunities. This will work using GeoIP. Similarly, you can restrict lead generation to specific websites only by mentioning them in the Website field. If you want to track particular web pages, you can mention the URL Expression in the corresponding field. You can leave this field blank if you want to track the entire website. Mention the Sequence which is used to order the rules with the same URL and countries. Rules with a lower sequence number will be considered first.

Under the Opportunity Generation Conditions tab, you can set conditions for opportunities. In the Industries field, you can mention the industries from which you want to generate leads. This field can be left blank to always match leads. You can filter companies based on their size by activating the Filter on Size option. By activating this field, you will be able to get an additional field to specify the Company Size. The company size can be defined based on the number of employees working in that particular company.
Now, under the Opportunity Data tab, you can select the Type Type as Lead or Opportunity as per your demand. Mention the Suffix in the given space and this will be appended in the name of generated leads so that you can easily identify leads/opportunities which are generated with this rule. Assign a Sales Team and Salesperson for the management of leads generated using this newly created rule. In the Tags field, you can add suitable tags, and using stars you can highlight the Priority of the lead. Once you complete all the fields required for converting visitors to new leads, you can click on the Save button to save manually. This is how we create new rules for the conversion of website visitors to leads/opportunities with the help of the OTX CRM module.
Converting Leads into Opportunities
We discussed all available methods for the generation of leads with the help of the OTX 16 CRM module. Now, we will be discussing the conversion of leads into opportunities. Creating new leads has become an effortless task with the introduction of the CRM module. After getting a positive response from the customers, you can easily convert these leads into successful opportunities within a few clicks. If the terms and conditions are agreeable for both parties, you can convert a lead into an opportunity using the CRM module. In some cases, you can directly convert a lead into a sales quotation according to the level of interest that the customer shows in your business.
For converting a lead into an opportunity, you can select one from the Leads menu. You can also create a new lead using the Create button and later convert it into an opportunity.

As you can see in the screenshot above, here we selected an already generated lead from the given list. You will get options such as Convert To Opportunity, Enrich, Lost, and Convert To Ticket buttons. In order to convert this lead to an opportunity, you can click on the Convert To Opportunity button. As soon as you click on this button, a pop-up will appear to mention the details regarding the opportunity.
You have to select Conversion Action from the given options. You are allowed to convert this lead to opportunity or merge with existing opportunities. By selecting the Merge with existing opportunities option, you will get an additional field to specify the list of existing opportunities with which you want to merge this lead with.
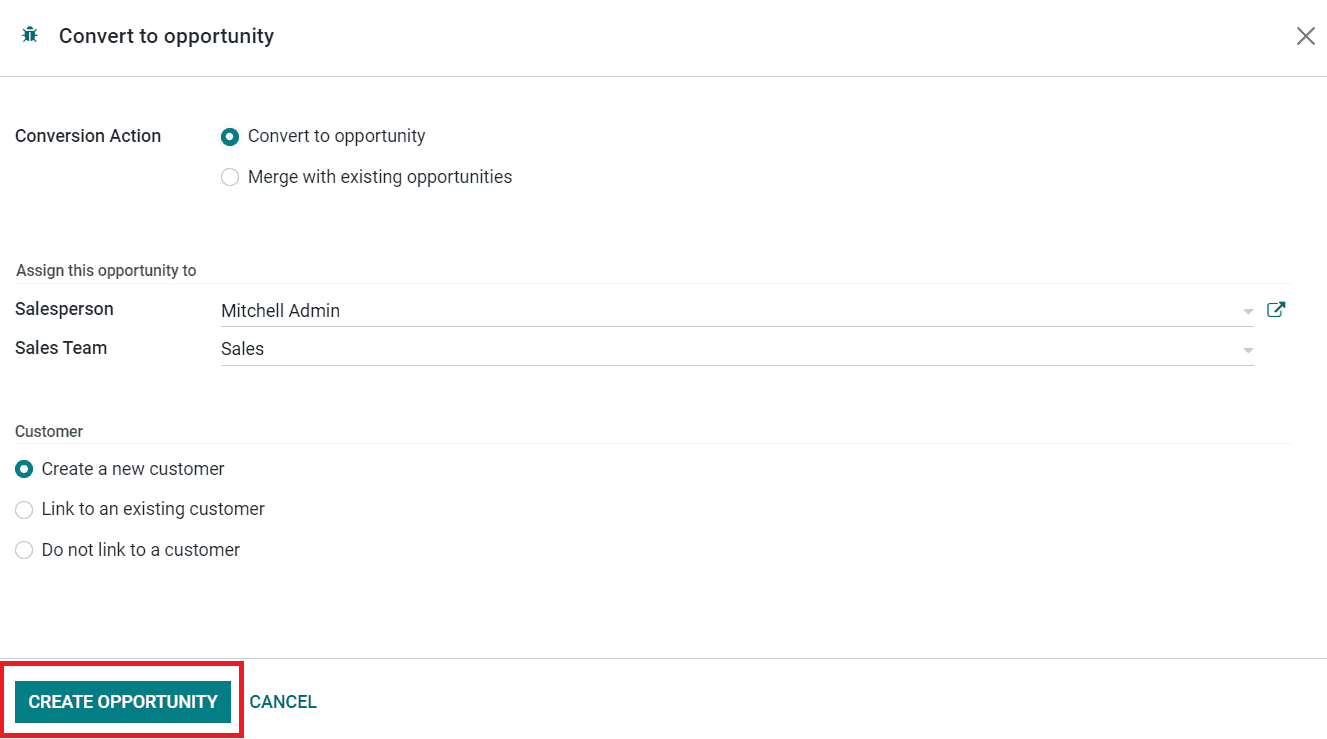
You can assign this opportunity to a particular Salesperson and Sales Team by mentioning their name in the corresponding fields. If you select the Convert to Opportunity option as the Conversion Action, you will get a field to define how to create a new customer record from this lead. You can create a new customer, link to an existing customer, or do not link to a customer as per your requirements. Finally, use the Create Opportunity button.

As you can see in the image above, the lead is now converted into a new opportunity. Now, you can convert this opportunity to a new sales quotation based on the request from the customer.
So far we are discussing the conversion of opportunity from lead and now let’s move to the conversion of sales quotation from an opportunity.
Converting Opportunity into Sales Quotation
Once you convert the lead into a new opportunity, OTX allows you to create a new sales quotation from the existing opportunity if the customer is interested in your business. We already discussed how to create a new lead and convert it into a new opportunity in the earlier parts of this chapter. Here, we will detail the conversion of an opportunity into a sales quotation using the OTX CRM module.
The screenshot given below shows an opportunity that we are going to convert into a new sales quotation. As you can in the image, you will get the New Quotation, New Rental, Won, Lost, and Enrich buttons on the screen.
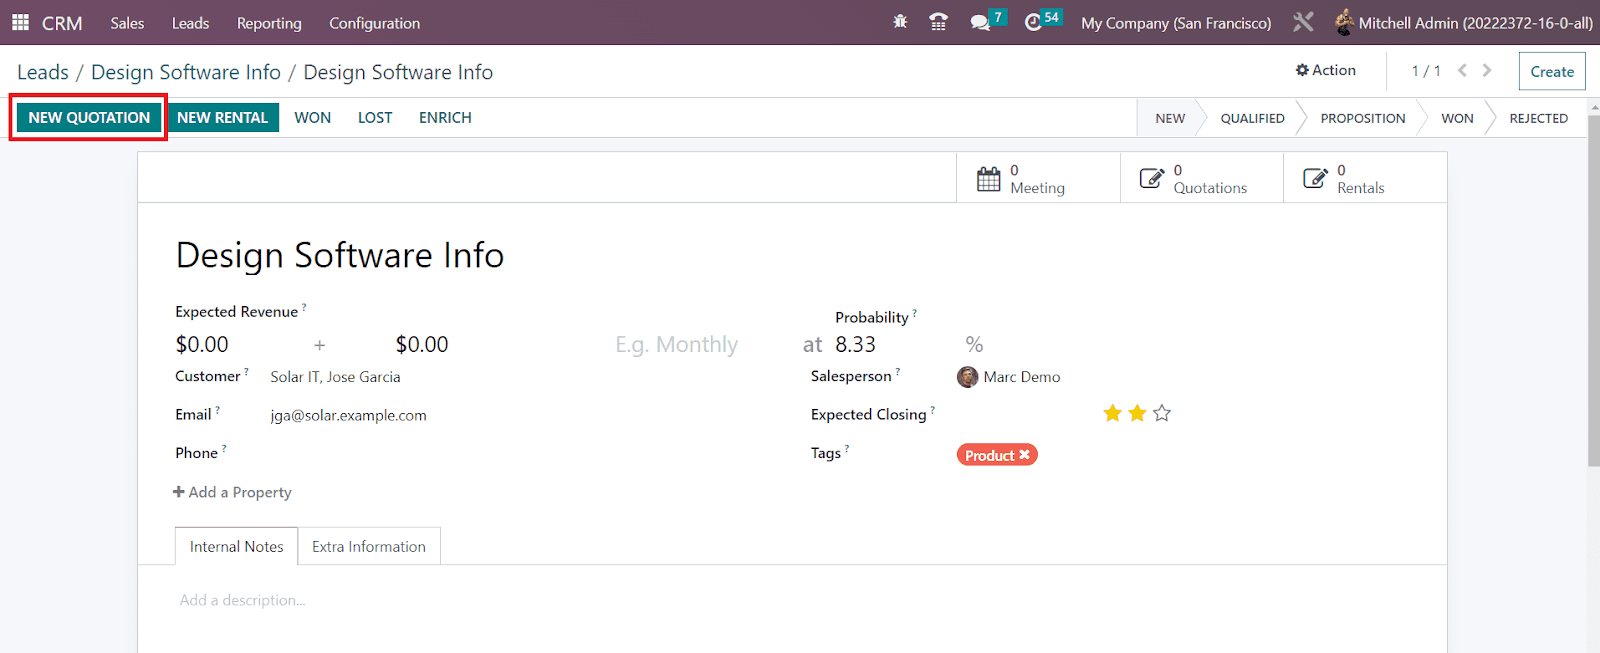
Here, you can click on the New Quotation button to create a new sales quotation. As soon as you click on this button, OTX will lead you to the sales quotation window of the respective opportunity. The image shown below is the sales quotation that we created from the opportunity.

The details in the quotation will be automatically filled based on the details available in the respective opportunity. You can specify additional details in the tabs such as Order Lines, Optional Products, Other Information, and Customer Signature. . After checking the details in the quotation you can send it by Email to the concerned customer using the Send By Email button.
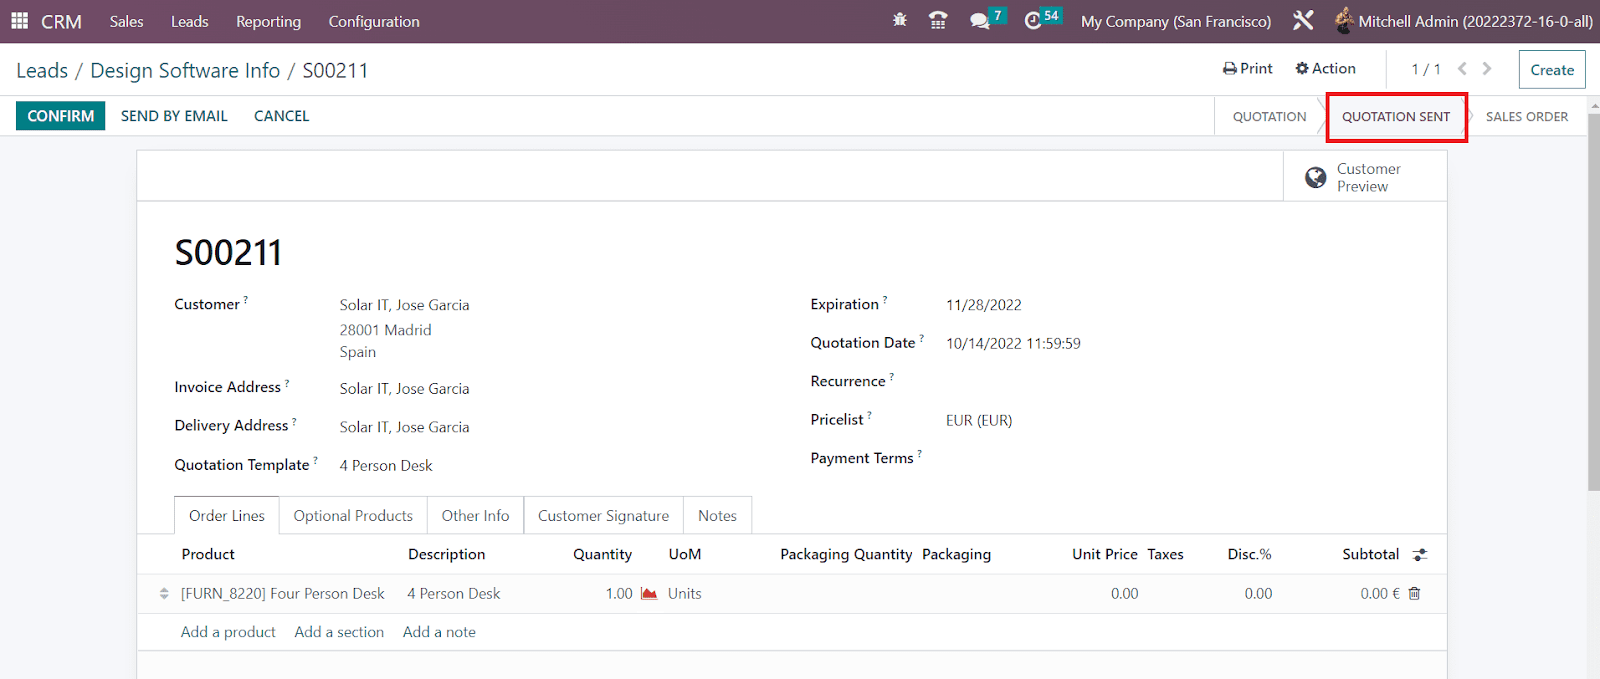
Once you send the quotation to the respective customer, the status of the quotation can be seen as sent as shown in the image above. We will discuss the creation of sales quotations and sales orders in detail in the coming chapter of this book. In the CRM module, you will get the Sales menu which includes an exclusive option called My Quotations where you can find all quotations created in the CRM module from leads/opportunities.
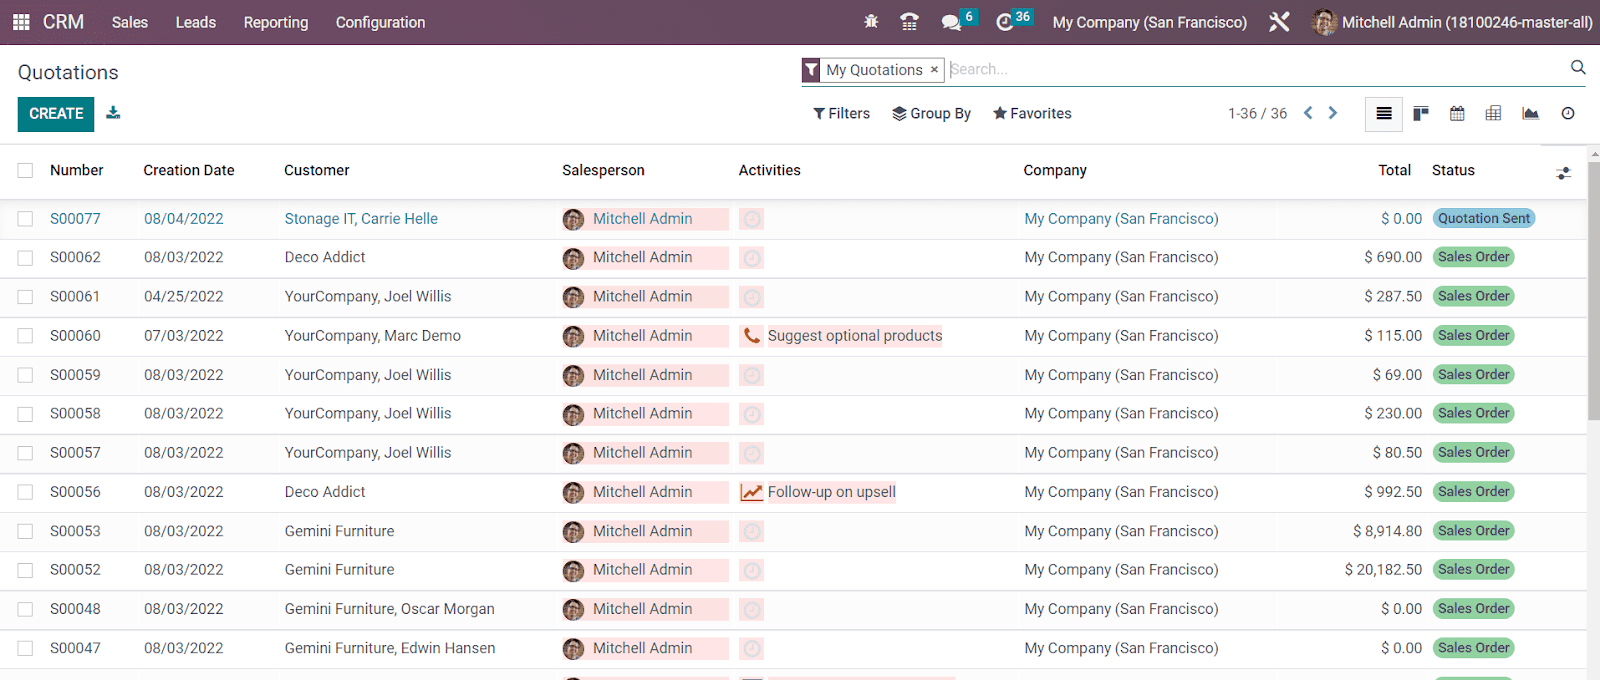
The list shows the details of the Number, Creation Date, Customer, Salesperson, Activities, Company, Total, and Status. Using the Create button, you can create new sales quotations in the CRM module. We will discuss the creation of quotations while discussing the Sales module.
Sales Teams
Under the Sales menu of the CRM module, you can find the Sales Teams option which gives access to the platform where all sales teams are managed. For the effective management of leads, opportunities, and other CRM-related operations, it is very essential to assign sales teams.

As you can see in the image above, you will get separate tabs for all configured sales teams in the CRM module. From the preview itself, you can see the total number of opportunities, quotations, and orders to invoice and the respective expected revenues. By clicking on the Pipeline button, OTX will direct you to the pipeline of the corresponding sales team.

By clicking on the three vertical dots given in the right corner of each sales team tab, you will get additional options to manage the respective sales team. There are options to view Leads, Opportunities, Quotations, Sales Orders, and Invoices assigned for that particular team. Under the New option, the members of the sales team will get options to create new Leads, Opportunities, and Quotations. The advanced Reporting menu available on each sales team will show the reports of the Leads, Opportunities, Quotations, Sales, Invoices, and Activities of the respective team. Apart from these options, you will also be able to get a Configuration button which will help you to make changes in the respective sales team.

To create and manage new sales teams in the OTX CRM module, you will get the Sales Teams option in the Configuration menu of the module as shown in the image above. The list of the already configured sales teams can be observed on this platform with the details of the Name of the Sales Team, Alias, Team Leader, and Company.

Using the Create button, you can configure a new team for the management of sales operations.

In the sales team creation window, you can specify the required details to create a sales team. Will discuss the configuration of the sales team in OTX in detail in the Sales module chapter.
The list of the team members included in each sales team can be observed separately using the Team Members option available under the Configuration window. As you can see in the image below, the list of team members can be seen under the respective sales teams.

It is easy to create new team members on this platform. For this, you can click on the Create button. A window will appear as shown below to mention the Salesperson .

By mentioning the Sales Team in the given field, that employee will be added to the mentioned sales team.
The Sales menu includes another option called Customers which will maintain a record of all customers created from various sources in OTX .

All new customers created from leads will be recorded on this platform.
Activity Types
In order to take a lead to the next level of operation, it is essential to keep in touch with the concerned customers regularly. OTX allows you to schedule various activities with the customer with the help of the schedule activity feature. This feature is available in almost all sales-related and customer management modules in OTX . Using this feature, you can connect with your customers through scheduled programs. Configuring different types of activities in OTX 16 is an easy task now. You can find the Activity Types option in the Configuration menu which will help you to create new activity types.

As you can see in the screenshot above, the already configured activity types can be observed on this platform along with the details of the Name, Default Summary, Planned In, Type, Model, and Icon. Now, let’s take a look at the creation of a new Activity Type on this platform. For this, you are allowed to click on the Create button. In the new activity type creation window, first, you can mention the Name of the activity in the given space.

Once you mention the name of the activity, you can select suitable Action from the given list. Actions may trigger specific behavior like opening a calendar view or automatically mark as done when a document is uploaded. You can set Action as Upload Document, Phone Call, Meeting, Reminder, Request Signature, Tax Report, or None. Mention the Default User of this activity type and Model in the corresponding fields. By mentioning the Model, this activity type will be specific for the mentioned model only and not available when managing activities for other models. In the Default Summary field, you can specify a few words about the activity and it will be set as the default summary of this activity type. The Icon, Decoration Type, and Default Note regarding the activity type can be mentioned in the respective fields.
While defining a new activity type, you will get an additional tab to mention the details regarding the next activity.

Under the Next Activity tab, you can set the Chaining Type action as Suggest Next Activity or Trigger Next Activity. By selecting the Suggest Next Activity option, you will get a field to mention the next activity as a suggestion. By doing so, OTX will suggest the mentioned activity once the current one is marked as done. In the case of Trigger Next Activity, you can mention the next activity in the Trigger field. Once the current activity is done, OTX will automatically trigger the next activity. In the Email Template field, you can add email templates that can be used to send emails to the concerned customers once this activity is scheduled with them. You can plan the action deadline in the Schedule field. Here, you can specify the number of days/weeks/months before executing this activity. By following these steps, you can effortlessly create new activity types in OTX .
Now, let’s discuss the creation of new stages in the OTX CRM pipeline.
Stages
discussing the main dashboard of the OTX CRM module, we mentioned the arrangements of leads/opportunities in different stages in the pipeline. Assigning different stages for records will always help you to easily recognize the progress of each operation. Based on your requirements, you can categorize records into various stages. Once you achieve the requirements of a particular stage, you can simply drag and drop the record into the next stage. It is easy to create new stages from the dashboard itself. The method of creating new stages from the pipeline is already explained in the earlier part of this chapter. Now, let’s look at the creation of stages using the Stages option available under the Configuration menu.

The list of already configured stages can be seen in this window as shown in the image above. You can make changes in the existing stages by simply clicking on the required stage from the given list. If you want to create a new stage for the leads/opportunities in your pipeline, you can click on the Create button given in the top left corner of the screen.

Give a suitable title for the stage in the Stage Name field. You can activate the Is Won Stage if you want to consider this particular stage as the won stage for the leads/opportunities. It is possible to fold this stage in the pipeline by activating the Folded in Pipeline option. You can mention specific teams that use this stage in the Sales Team field. By mentioning this, other teams will not be able to see or use this particular stage. Finally, you can specify some requirements in the Requirements field to move a lead/opportunity to this stage. Once you complete all necessary fields, the new stage will be added to the existing list of stages.
Lost Reasons
While working with leads/opportunities, you might lose some of them due to certain reasons. In OTX CRM, it is possible to keep track of such leads/opportunities along with the reasons. Later, you can regain these lost opportunities with the assistance of OTX . Under the Configuration menu of the CRM module, you will be able to get the Lost Reasons option which will give access to the platform to configure the reasons for losing leads/opportunities.

You can find some already configured Lost Reasons on this platform. Now, using the Create button, we can create a new lost reason. This can be done within a few clicks. As soon as you click on the Create button, a new line will appear under the existing line where you can simply mention the lost reason.

After mentioning the reason, the new Lost Reason will be saved in your database. Now, let’s take a look at how to use these reasons for a lost lead/opportunity. While managing a lead/opportunity in the OTX CRM module, you will be able to get the option to mark the opportunity as Won or Lost.

If you lose an opportunity, you can use the Lost button. As soon as you click on this button a pop-up will appear to mention the lost reason.

In the drop-down menu, you will get the list of lost reasons that we configured earlier. You can select a suitable reason from the given list and click on the Submit button.
After submitting the lost reason, your opportunity will be marked as Lost as shown in the screenshot below.

If you want to regain the lost opportunity, you are allowed to use the Restore button. If there is any possibility to restart the business from a lost opportunity, you can use this button and create a new opportunity.
Partner Levels
OTX ERP system allows you to configure resellers and you will get a chance to share some leads and opportunities with them. This feature is associated with the Resellers module that comes with OTX by default. The list of resellers will be listed under the Resellers tab on your website. In the OTX CRM module, you can assign different partner levels for the resellers.
The Partner Levels option under the Configuration menu will help you to configure different levels for the partners.
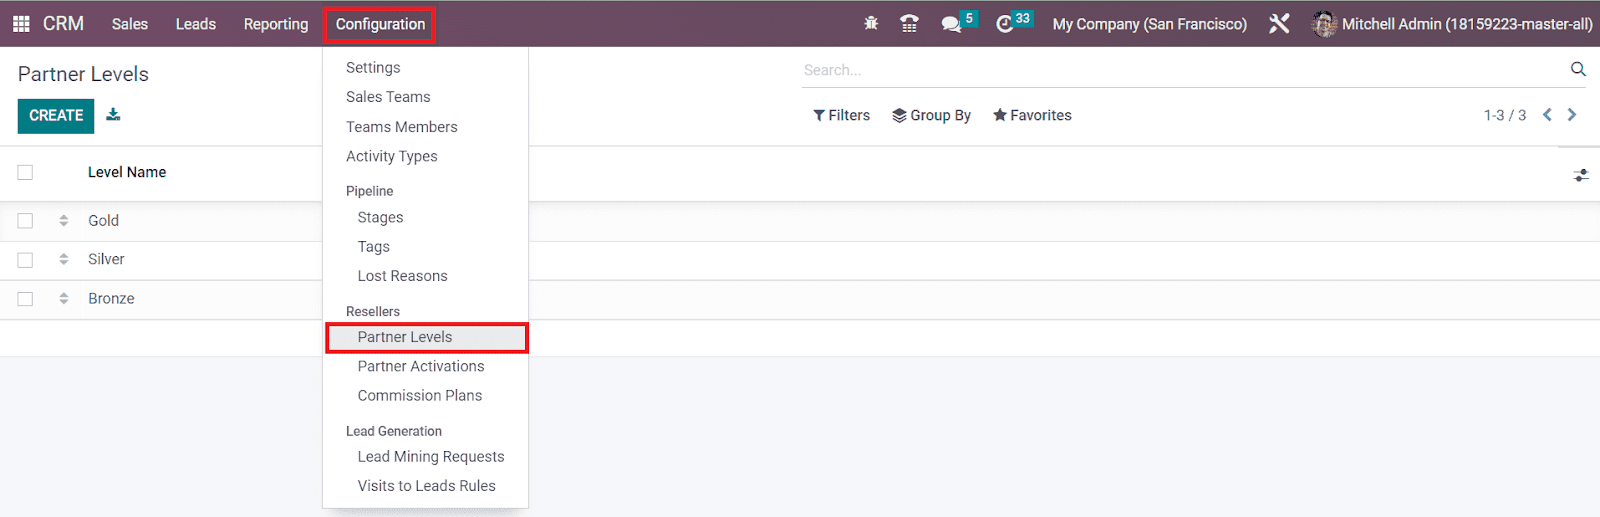
By default, you will get some partner levels on this platform. With the help of the Create button, you can assign a new level for the partners.
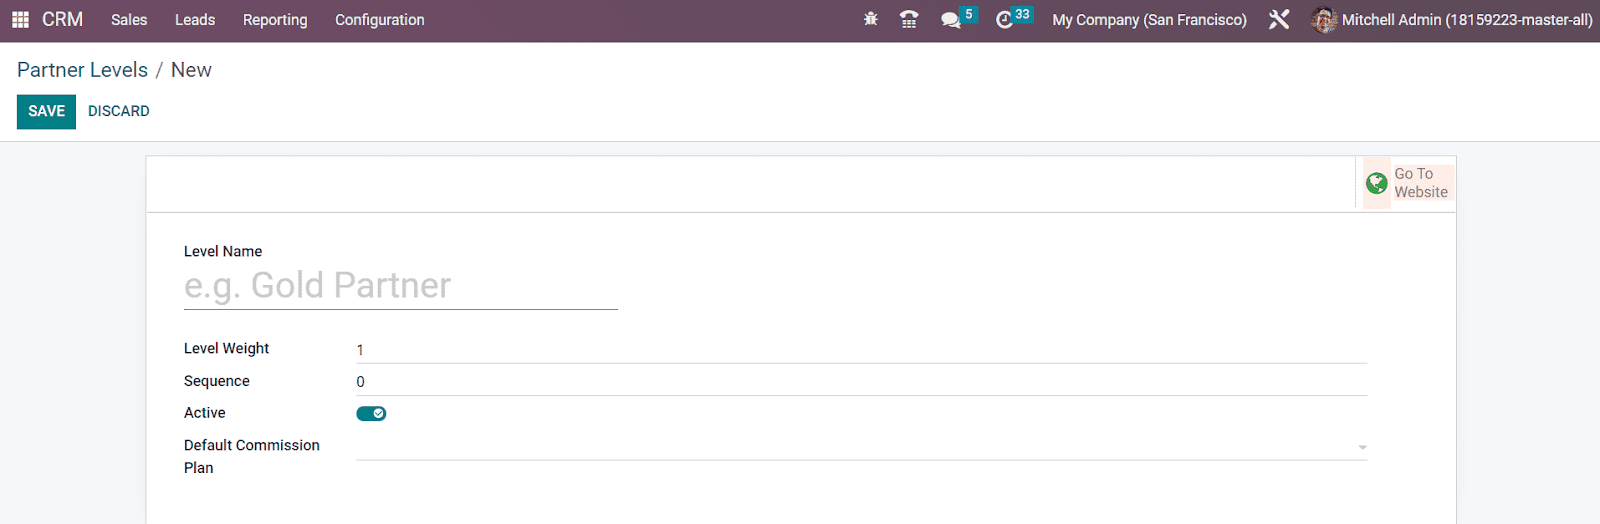
You can specify the Level Name in the given space. In the Level Weight field, you can mention the probability to assign a lead to the partners in this level. The Sequence number of the level can be seen in this window. Clicking on the Active button will activate this level. Mention a commission plan in the Default Commission Plan for this partner level. Clicking on the Save button will save the new partner level to the existing list.
Partner Activations
The Partner Activations option in the Resellers tab available under the Configuration menu will help you to create various partner activation methods. Using the Create button, you can easily mention the title of the Partner Activation in the given space.
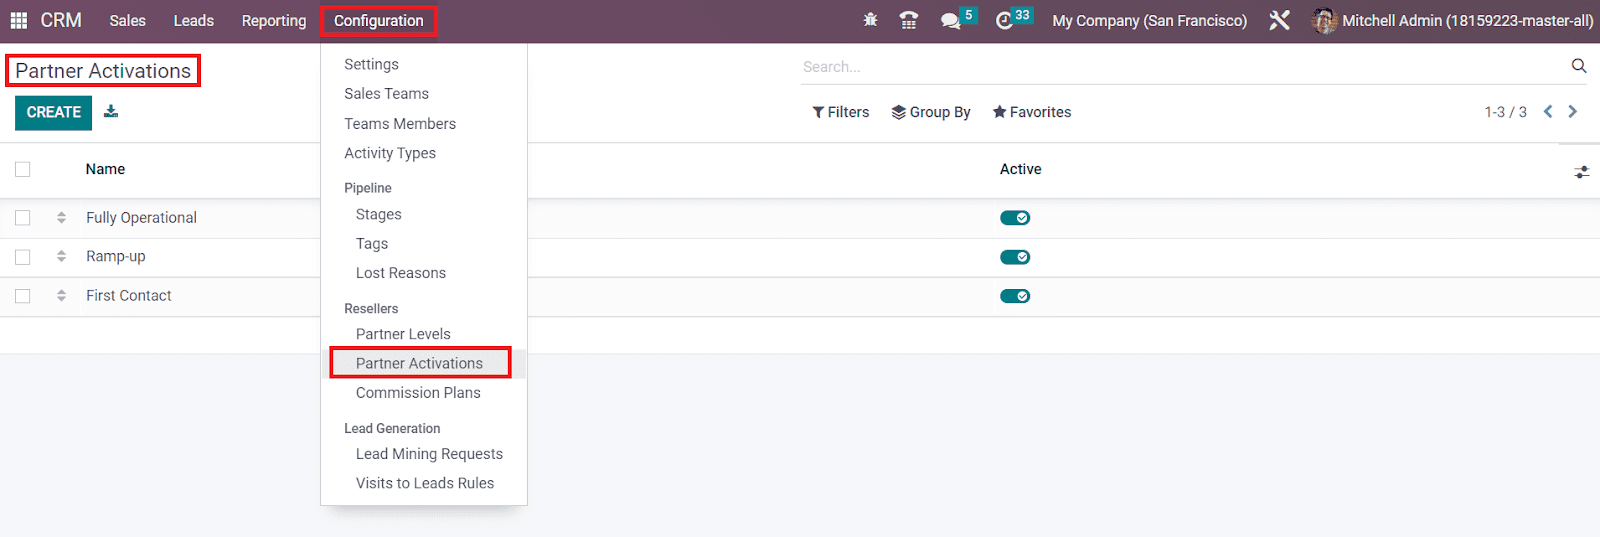
Commission Plans
OTX provides you with opportunities to do business with partners. You can share your leads and opportunities with them to improve the relationship between partners and thereby enhance the business. If you get any sales opportunities from one of your partners, you can pay them a commission once the sales order is confirmed. This marketing strategy will help you to grow your business together with your business partners. With the help of the commission plan feature in the OTX ERP system, you can pay a particular amount of the total invoiced amount to the partner who referred the sales opportunity to your company.
The option to configure new Commission Plans can be found under the Resellers tab in the Configuration menu.

Click on the Create button to create a new Commission Plan.

You can mention the title of the commission plan in the Name field. If you want to give 10% of the invoiced amount as the commission for a partner, you can give the title of the commission plan as ‘Commission 10%’. The Purchase Default Product can be seen as Commission in the respective field. This is a service product that will be used to create a purchase order for the commission operations. By mentioning the purchase default product, a purchase order will be automatically created in the Purchase module. Mention the name of the company in the Company field. The rules of the commission plan can be added under the Rules tab. Using the Add a Line button, you can mention the Product Category, Product, Sales Order Number, Pricelist, Rate, Capped, and Maximum Commission. Click the Save button after adding all detail to the new commission plan.
Now, you can assign this commission plan to your partner company. This can be done easily by selecting the contact of the partner from the Customers menu.
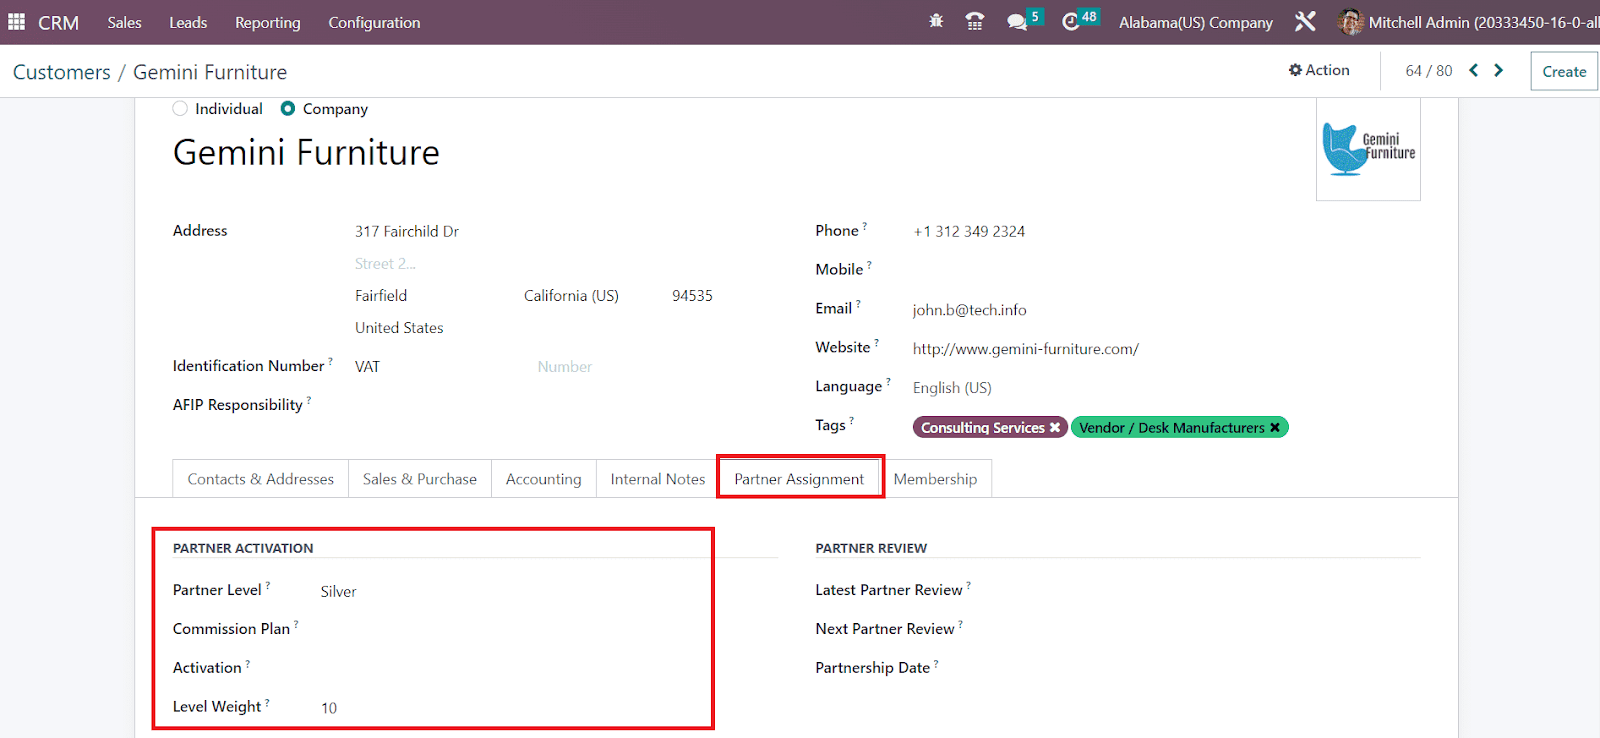
Under the Partner Assignment tab, you will get the Partner Activation section where you can mention the Commission Plan .
Once a customer, referred by your partners, purchases a product from the defined product category, 10% of the invoiced amount will be transferred to the partner as a commission. While creating a sales order for the customer, you will get a field to mention the Referrer where you can mention the id of your partner.
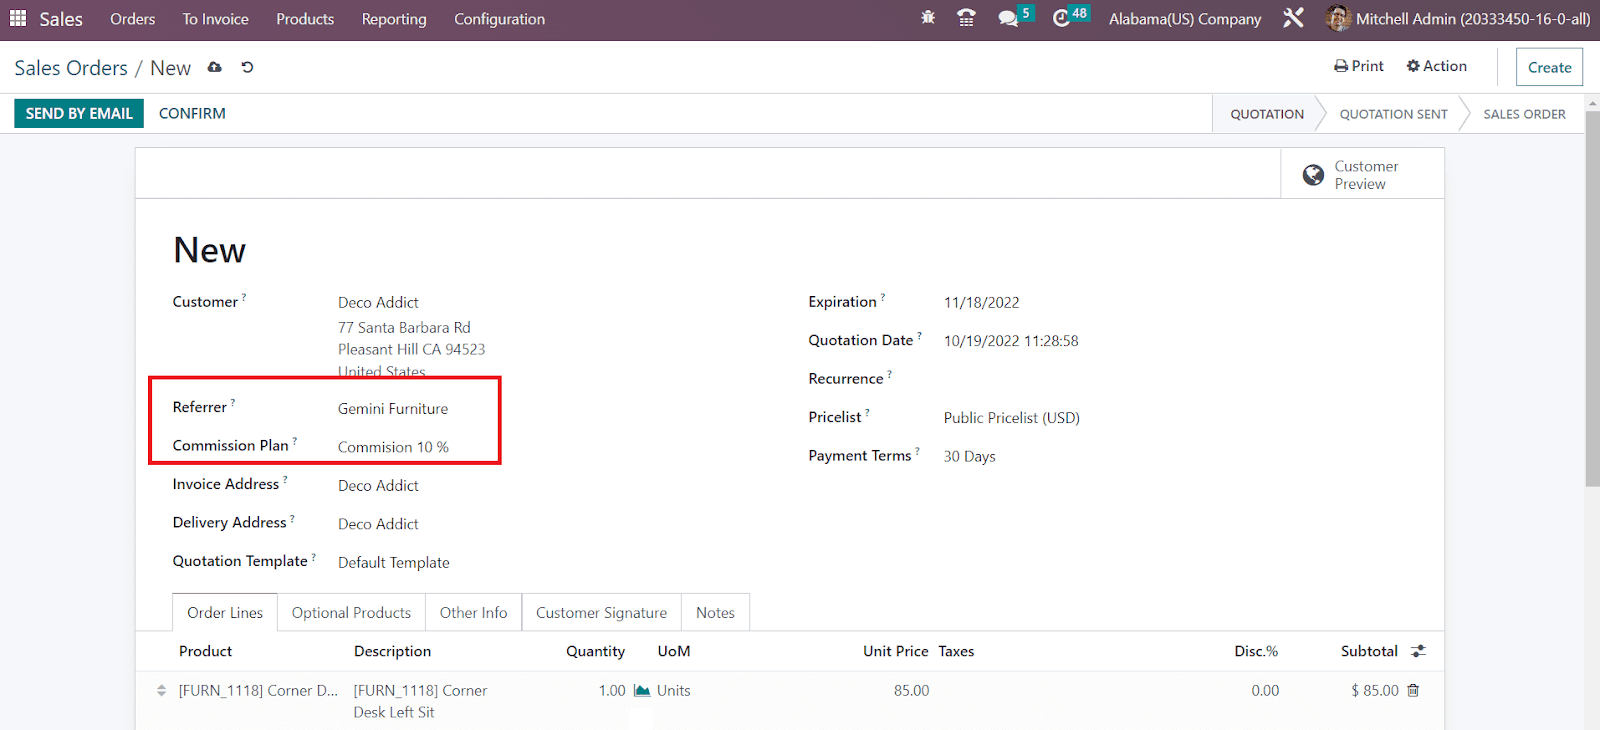
The Commission Plan will automatically appear in the respective field since we have already configured a particular commission plan for the partner. Now, you can Confirm the sales order and generate an invoice.
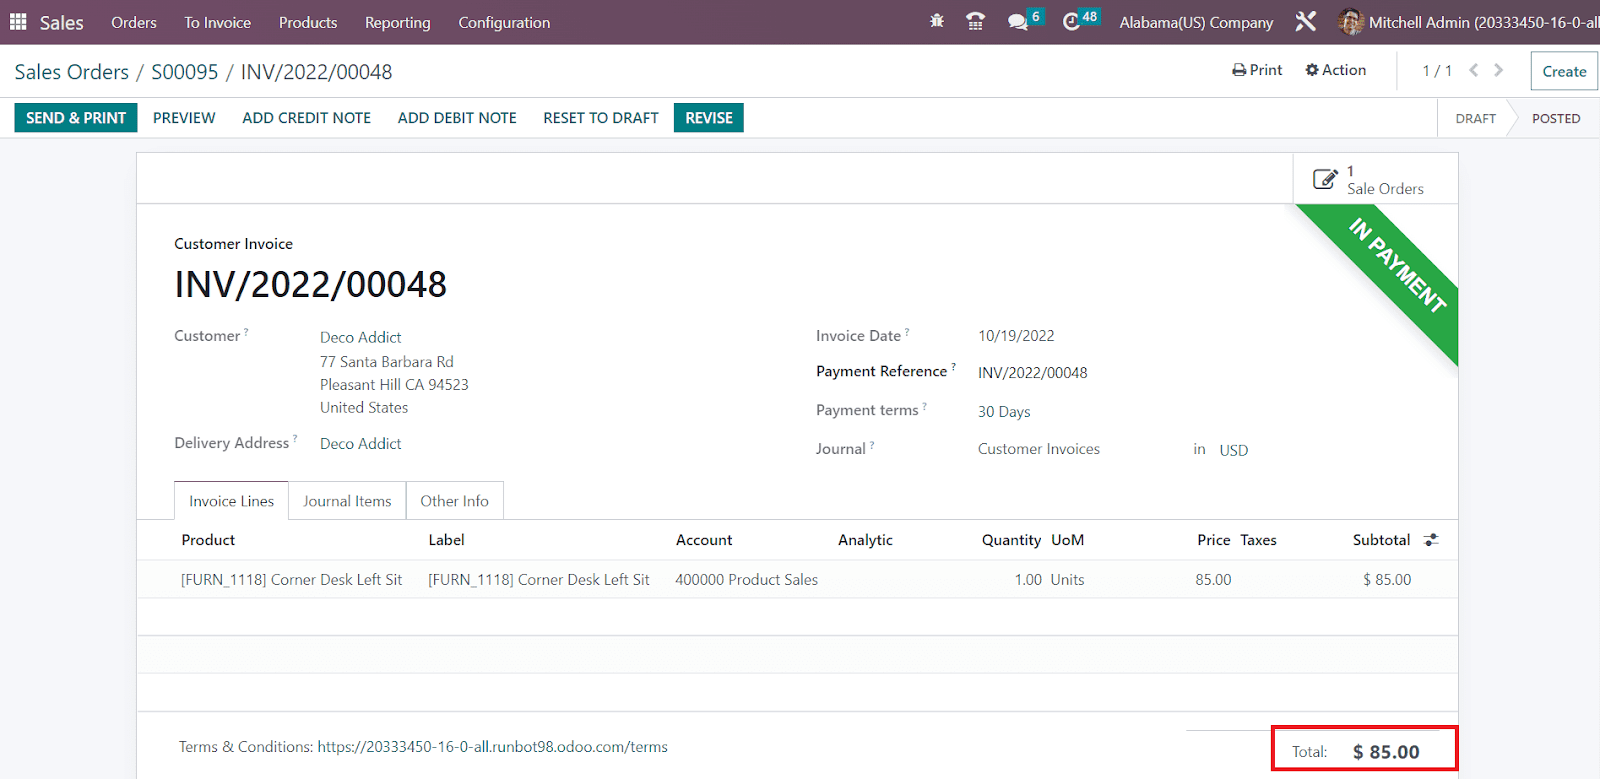
After the customer completes the payment, 10% of the invoiced amount will be transferred to the partner account. An RFQ will be generated in the Purchase module for your partner with the product Commission.

You can confirm the order and create the vendor bill. After that, you can pay the commission amount to your partner.
Settings
In the OTX 16 CRM module, the user will get various settings options to adjust. Under the CRM, Lead Generation, and Partner Commissions tab, you can find different options to activate in order to improve the performance of the CRM module. Let’s discuss each of these options in detail.

Recurring Revenues
Under the CRM tab, you will get the Recurring Revenues field to activate which can be used to define recurring plans and revenues on opportunities. As soon as you activate this option, you will get an external link to manage the recurring plans. Using this external link, you will get access to a new platform where you can configure new recurring plans as shown in the image below.

Using the Create button, you can simply mention the Plan Name in the given space. You can observe recurring revenues on opportunities as shown below.

Multi Teams
By activating the Multi Teams option from the Settings platform, you can easily assign a salesperson to multiple sales teams

Let’s check this feature with a demo. Here, we created a new Sales Team named Team 1 as shown below with the members Mitchell Admin and Marc Demo.

After activating the Multi Teams feature in the CRM module, you can add a salesperson to multiple sales teams. Here, we created another sales team named Team 2 with the same members as that of the Team 1. The OTX CRM module will allow you to add a salesperson to different sales teams simultaneously with this advanced feature.

Predictive Lead Scoring
The Predictive Lead Scoring option will assist you to compute statistical probabilities to close a lead. The success rate is computed based on stage, phone quality, email quality, and many other factors for the leads created on a specific date.

You can update the factors that are used for success rate computation with the help of the Update Probabilities button. A new wizard will appear to add or remove the fields from the statistical analysis as per your demand.

You can mention a specific date here and OTX will consider leads created on the specified date. After defining fields and date, you can click the Confirm button and save the new changes. This can be used to calculate probability. Based on the factors set for success rate calculation, you will get the probability to win the opportunity as shown below.

Rule Based Assignment
The Rule Based Assignment feature can be used to automatically assign leads to salespersons based on certain criteria.

By activating this feature, OTX will periodically assign leads based on rules. All sales teams will use this setting by default unless specified otherwise. You can perform the assignment Manually as well as Repeatedly. If you want to run this operation repeatedly, you can set an interval to repeat. The next run date will be automatically updated based on the interval. You can perform it manually by selecting the corresponding option. Here we selected the Manual option.
Now, you can create a new Sales Team. For that, go to the Configuration menu and click on the Sales Team option. After mentioning the required data for the new sales team, you will get an additional section on the screen named Assignment Rules .

You can click on the Edit Domain button to set the assignation rules. A pop-up window will appear as shown below.

You can add filters in this wizard. Based on the filters you select, OTX will assign the leads that satisfy the criteria to this sales team. Here, we selected the filter as Country contains US. So, leads from the country US will be automatically assigned to this sales team.
You can also set the domain for assignment for each salesperson also. It can be done easily while adding members to the team. When you click the Add button from the Members tab, a pop-up will appear as shown below.

Using the Add Filter button, you can add filters in the assignment domain. This can be done for each member of the team.

By clicking on the Assign Leads button, you can assign the leads to all members according to the domain set.
Lead Generation
Under the Lead Generation tab in the Setting menu, you will get some advanced options to improve the lead generation activities. You will get the Lead Enrichment, Lead Mining, and Visits to Leads options to activate on this platform. All these advanced options work based on credits and you can easily buy credits by clicking on the Buy Credit option.

The Lead Enrichment option can be activated to enrich your leads with company data based on their email addresses. You can enrich leads on demand as well as automatically by selecting the corresponding option from the lead enrichment tab.

The Lead Mining option will assist you to generate new leads based on their country, industry, size, etc. You can activate the Visits to Leads option to convert visitors of your website into leads and perform data enrichment based on their IP addresses.
Partners Commissions
You will be able to get the options to activate Automatic PO Frequency and Minimum PO Amount Total in the Partners Commissions tab.

The Automatic PO Frequency can be used to mention the frequency at which purchase orders will be automatically confirmed. The required minimum amount needed to automatically confirm purchase orders can be specified in the Minimum PO Amount Total field.
Now, let’s take a look at the reporting feature available in the OTX 16 CRM module.
Reporting
The Reporting feature offered by OTX is one of the most advantageous features available in any ERP system that helps us to understand the overall performance of a module. Using the Reporting menu in the CRM module, you can effectively analyze the CRM operations on a daily, monthly, and yearly basis. The result gleaned through such reports will be helpful to take necessary actions to enhance the productivity of the company better than in earlier times. OTX offers the reporting of Dashboard, Forcast, Pipeline, Leads, Activities, Partnerships, and Lead Generation views.
Forecast
The reports of the upcoming revenues can be analyzed with the help of the Forecast reporting feature available in the OTX CRM module.

This platform can be viewed in Kanban, Graph, Pivot, and List views. Using suitable measures, groups, and filters, you can improve the forecast reports.

The Kanban view will provide the forecast report for each month separately. You can observe the prorated revenue of each month in this view.
Pipeline Analysis
The analysis of all pipeline activities can be observed using the Pipeline Analysis option available under the Reporting menu of the OTX CRM module.

Leads Analysis
The reports of all leads generated through various platforms can be examined using the Leads reporting platform in the OTX CRM module. Using the advanced reporting tools, you can effectively analyze the leads in the module and take suitable decisions to improve the lead generation operations.

Activities
The Activities option in the Reporting menu will help you to get the reports of all scheduled as well as completed activities in the OTX CRM module.

Partnerships
The Partnerships Analysis platform available under the Reporting menu will display the graphical representation of the financial turnover with your partner. You can also generate reports of the opportunities generated with the help of partners using the corresponding option from the Measures .

The efficient OTX CRM module will assist you in managing leads from the time of generation from various mediums to conversion to successful sales orders. If you are searching for a dedicated software solution for the management of leads and opportunities, then OTX CRM is the best solution for your business.
Appraisal
A regular review of employee performance and contributions towards the organization is employee appraisal. Through appraisal, it is easy to recognize and reward employees. A company can quickly decide on salary hikes, promotions, and bonuses after evaluating employee performance. It is possible to improve employee morale and company culture with an effective appraisal system. Most individuals focus on company culture with a proper appraisal management system. A proper insight into the mission and goals of the organization is accessible to employees with an appraisal system.
Regular feedback is beneficial for an organization’s success. So that employees can achieve their ultimate goals easily. We can forward the appraisal activities smoothly with the help of the Appraisal module in OTX 16. Now, let’s check out a detailed overview of the OTX 16 Appraisal module.
The Kanban view of the Appraisal window denotes profiles of all employees. You can obtain details of employees, such as dates, names, and departments. On the left side of Appraisals, you can sort out based on COMPANY, STATUS, and DEPARTMENT. By choosing the CREATE icon, we can design a new appraisal for employees.

In the open window, add the employee name and manager concerning the chosen employee. Users can also set the appraisal date within the Appraisals window.

The details of the company and department related to appraisal are automatically visible in the window. By choosing the CONFIRM icon, it is easy to validate the employee appraisal.

After choosing the CONFIRM icon, the skill of the employee is activated under the Skills tab. Users can view each skill level of employees and apply a new one by selecting the ADD icon.

Below the Appraisal section, it is possible to manage the manager and employee feedback. Additionally, the total number of appraisals is accessible through the Appraisals smart button. We can look at the goals for workers in the Employees Goals smart button.

Within the Private Note section, you can specify additional notes regarding the appraisal. To schedule a meeting, click the No Meeting smart button in the Appraisals window. Once managing all details of your appraisal, you can mark it as done by choosing the MARK AS DONE icon.

Now, the appraisal stage will become DONE. To get any feedback, you can press the ASK FEEDBACK option in the Appraisals window.

Hence, it is easy to define employee appraisal in OTX 16.
Goals
Employee engagement is vital to attain company goals, and each firm consists of different goals. In OTX 16, you can assign various goals to employees in a firm. So, it is helpful for companies to check out how employees are working to achieve company goals. Select the Goals tab in OTX 16 Appraisal module. Kanban view of the Goals window depicts the Name, Progress, Employee name, Date, and more. Users can produce a new goal after clicking on the CREATE button.

In the new screen, you can apply the primary goal and choose the assigned employee.

We can mark employee progress to finish the goal, and it is shown as 0%, 50%, 25%, 100%, or 75%. Next, it is possible to add Deadline and Manager in the Goals window.

Inside the Description tab, you can apply extra information about the goal. After entering each data, you can press the MARK AS DONE icon. Each data in OTX 16 is saved automatically quickly.

Configuration
The Configuration feature in OTX 16 helps to manage all company requirements easily. You can manage the evaluation scale and settings within the Configuration tab of OTX 16 Appraisal. Let’s examine each menu separately below.
Settings
It is possible to send feedback templates for employees to answer questions regarding the work. We can set these questions previously, and they can be chosen after feedback request. You can pick the Settings menu in the Configuration tab to configure these templates. Below the Feedback Templates menu, we can specify the manager feedback template and employee feedback template. It is easy to add questions asked for managers and employees in respective boxes.

Next, we can manage the employee appraisals in the Settings window. It is easy to formulate appraisals automatically once enabling the Appraisals plans option under the Appraisals section. Below the Appraisals section, you can specify the months after recruitment clearly. Furthermore, you can ask employees to fill survey after enabling the 360 Feedback option.

After activating essential options, click the SAVE button in the Settings window.
Evaluation Scale
You can give final feedback about employee performance after employee evaluation. It is easy to finish the final rating option in the employee profile once finishing appraisal procedures. For that, you can set a few evaluation scales within the Configuration tab. List of all existing rates is viewable to a user after choosing the Evaluation scale menu in Configuration. In the Evaluation Scale window, you can view the Company and Name data. Click the CREATE icon in the Evaluation Scale window to describe a new one.
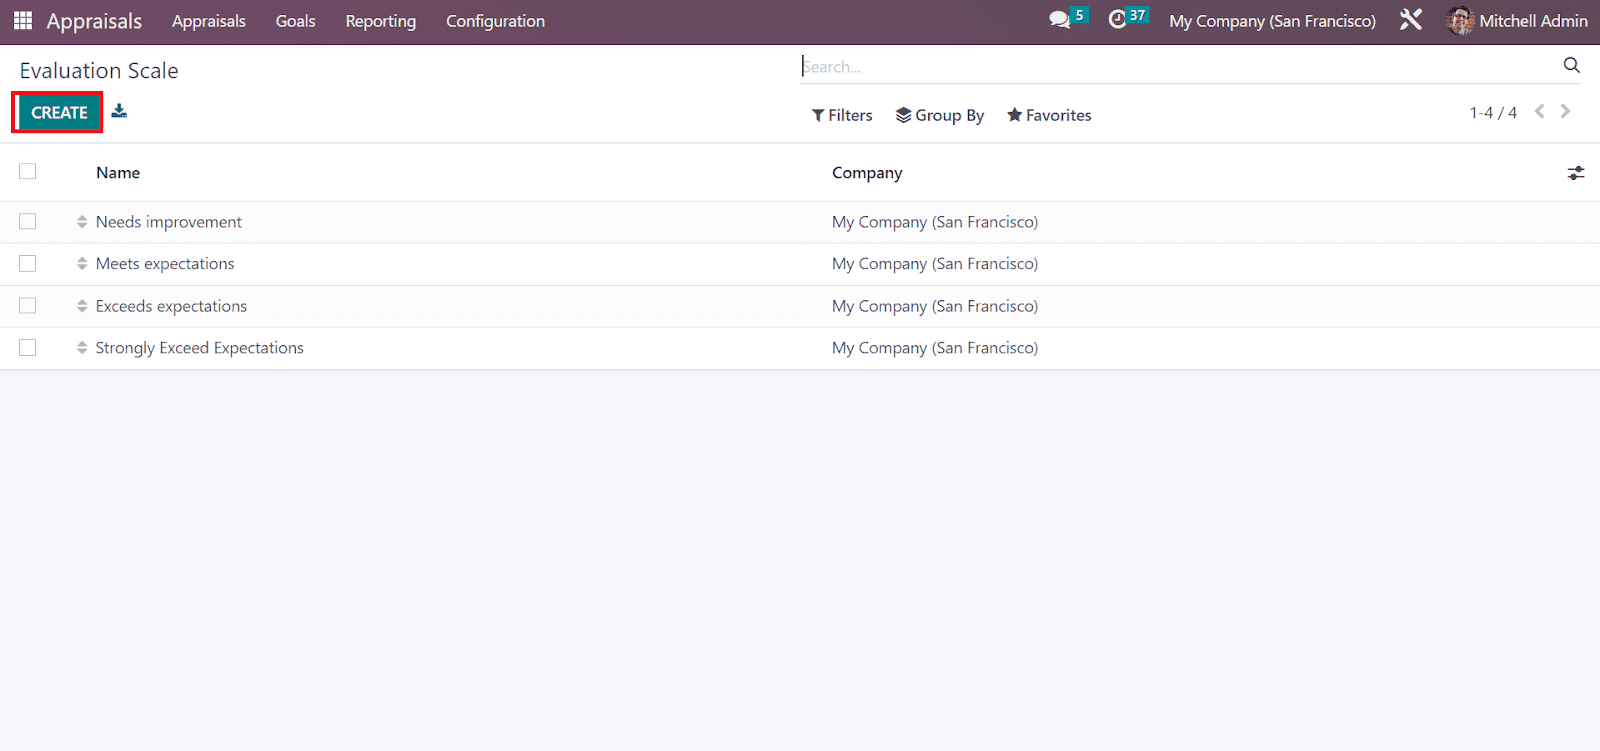
A new bar opens at the end after selecting the CREATE button. You can specify your Name and Company details in the open space and click the SAVE icon.

Hence, it is easy to manage the evaluation scale for employees.
Surveys
We can use different surveys to evaluate employee performance in a company. A detailed report of company overview and employee satisfaction analyze quickly through surveys. To obtain the Surveys menu, you need to enable the 360 Feedback option in the Settings window to give surveys to employees. After saving the data, you can see the Surveys menu in the Configuration tab.

In the surveys window, we can view the data regarding each survey, including average duration, completion, questions, registered, and more. Additionally, it is possible to start a live session, test, share, see results, and schedule activity within the Surveys window. By choosing the CREATE icon, you can describe a new survey for employees in a firm.
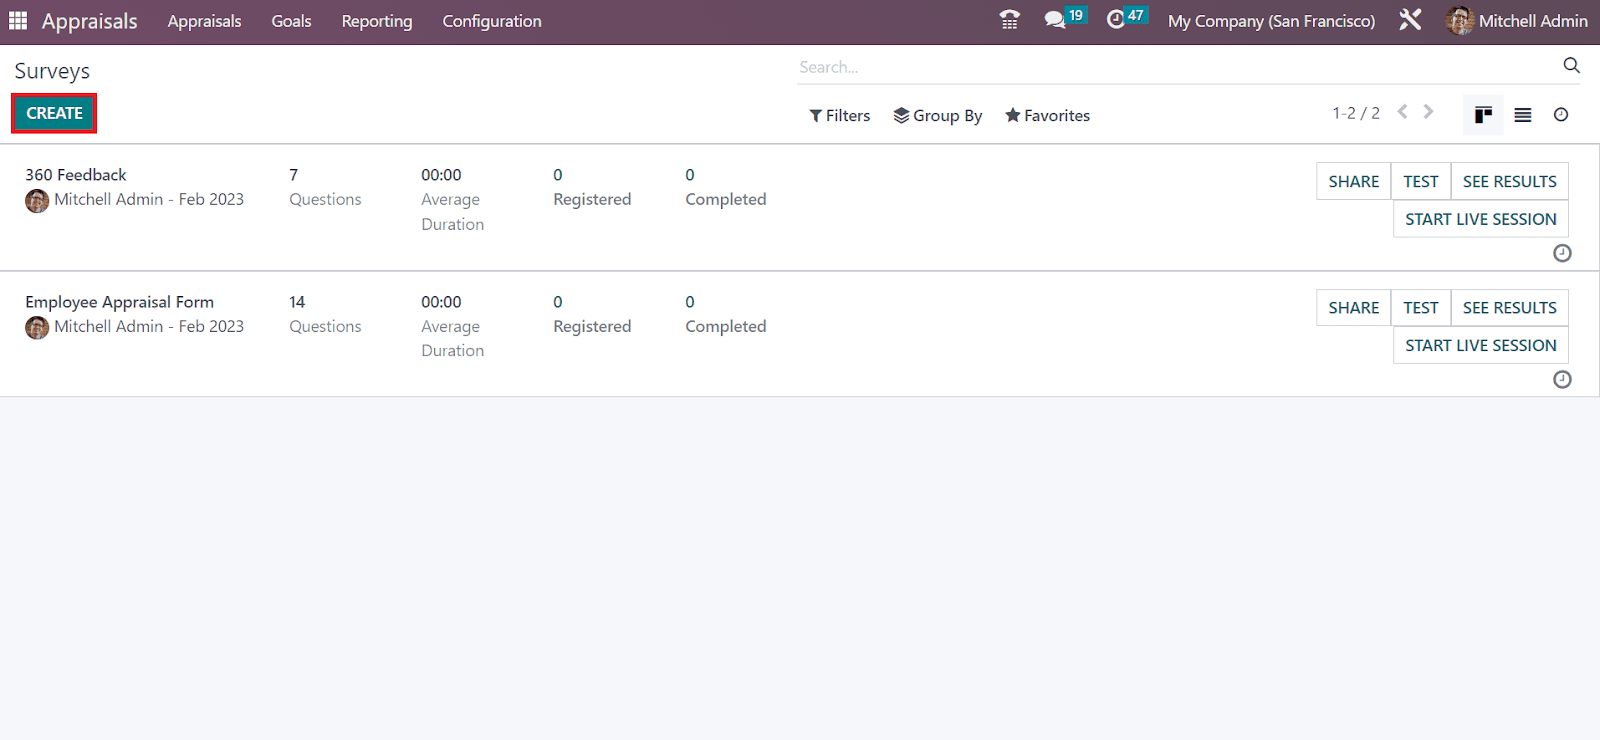
Reporting
Users can analyze the appraisals and skills reports of each employee in a company within the Reporting feature. In the Reporting tab, you can acquire Skills Evolution and Appraisal Analysis menus.
Appraisal Analysis
Select the Appraisal Analysis menu in Reporting to analyze all employee appraisal reports. The graph view of the Appraisal Analysis window denotes the Department data in X-axis, and Y-axis shows the total count of appraisals based on each department. Users can also check out the graph in various formats such as line, pie, and bar view.
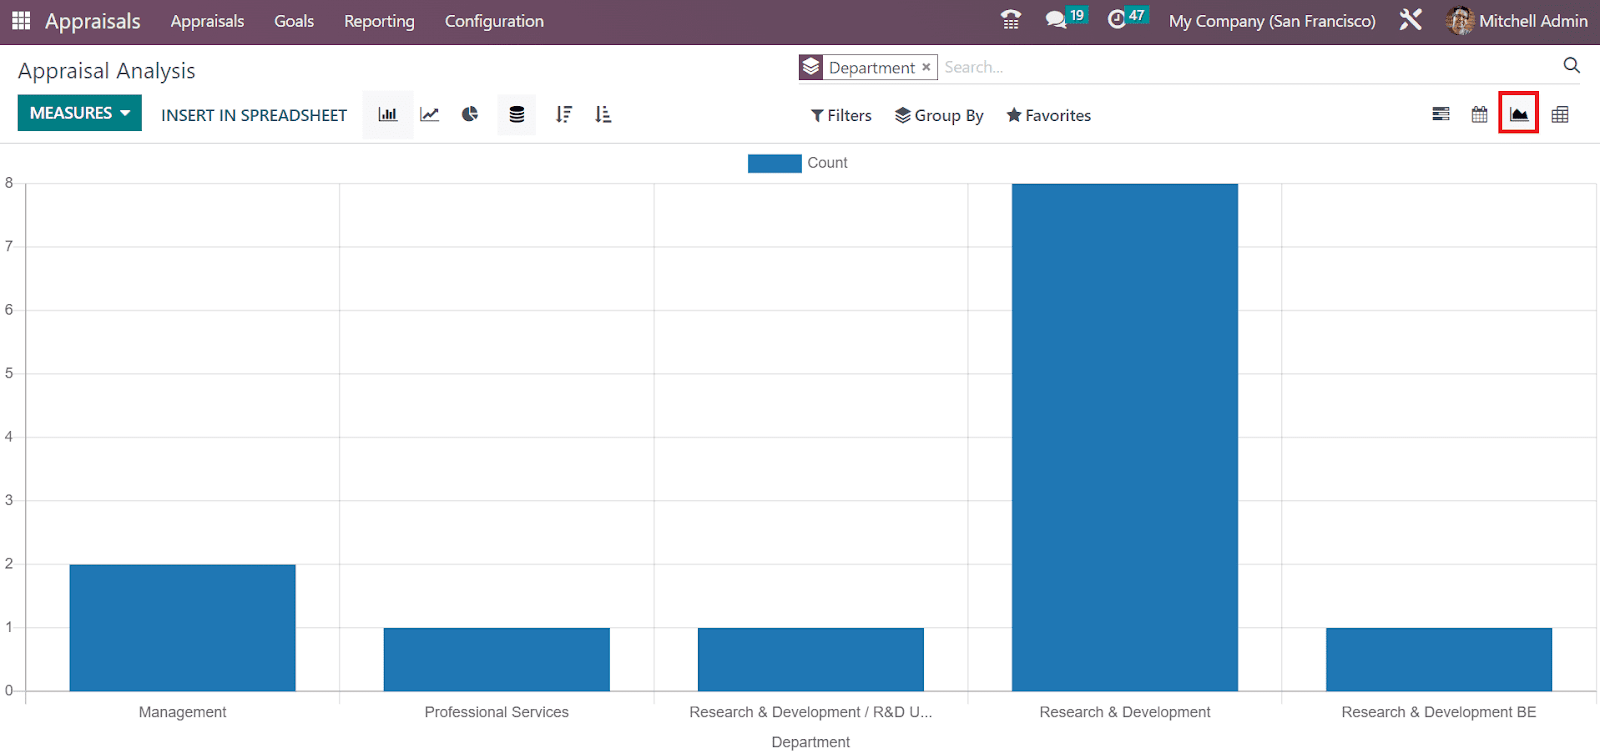
Appraisal Skills Report
You can access the skill reports of each employee once choosing the Skills Evolution menu in Reporting. In the Appraisal Skills Report window, you can view the data such as employee, skill, current skill level, justification, employee, and more.

Referral
One of the best digital solutions and techniques for referral programs is the OTX 16 Referral module. It is an accurate method that deals with qualitative recruitment procedures and becomes faster. An organization can demand recent employees to attain applicants for a specific job within their network using OTX 16 Referral module. This lessens the time and money spent by a firm on employee referrals.
Dashboard
By choosing the Dashboard tab, you can see the home screen page of the OTX 16 Referral module. The dashboard window provides a more user-friendly experience with additional looks and features. You can view the SKIP and NEXT buttons on the screen as defined in the screenshot below.

After clicking on the NEXT icon, a new page containing onboarding messages is visible to the user. So, by selecting the NEXT icon, the steps for the job referral program are accessible to a user. You will be directed to the main page once choosing the SKIP icon. On the open page, you can acquire the total number of referrals, ongoing and successful referrals separately. Moreover, we can see VIEW JOBS, REWARDS, and EMAIL A FRIEND icons in Level 1.

All the job positions are accessible to the user after clicking on the VIEW JOBS icon. We can see a number of open positions, job descriptions, total points, refer the job to a friend, and additional info in the Job Positions page of the Dashboard window.

Here, you can also share the job through Linkedin, Facebook, Twitter, and more. By choosing the EMAIL A FRIEND button, a Send Job Offer by Mail is viewable to user. You can specify the email id, body, and subject regarding the job to the respective person in the Send Job Offer by Mail window. Once added all data, click the SEND MAIL button to forward the job offer mail to your reference.

After selecting the REWARDS icon, you can see the total vouchers available to the user. In the Rewards window, you can obtain total points for each reward, description, and possible to buy the reward.

Configuration
The Configuration feature of OTX 16 Referrals contains levels, alerts, rewards, onboarding, and friends. Users can manage each of these functions easily in the OTX 16. Let’s discuss every feature in the Configuration below.
Rewards
Rewards are given in recognition of achievement, service, and effort. It is provided to a company or person once they become successful. The functioning of the OTX Referral module depends on rewards and points for each referral forwarded by employees within recruitment. These referral points can be used by workers for product buying from the company website or store. You can list out all rewards after choosing the Rewards menu in Configuration. The list view of the Rewards window denotes Cost, Company, Product Name, Activities, and Awarded employees. Pressing the CREATE icon, you can define a new reward.
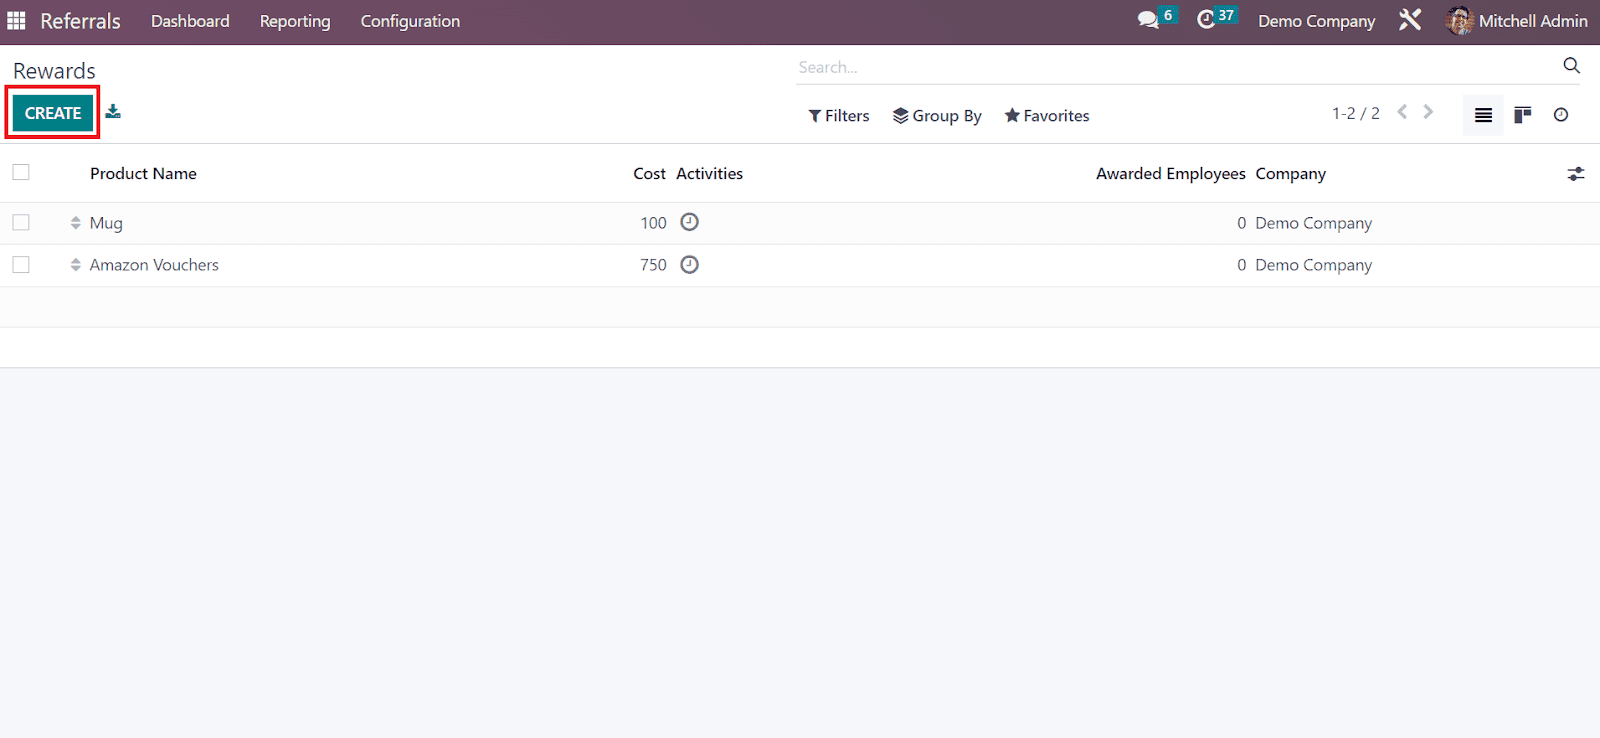
In the open screen, enter the Product Name and Cost per point. Later, you can pick the Company Name and choose the responsible user for the gift in the Gift Responsible field. You can mention the necessary details of the reward below the Description tab.
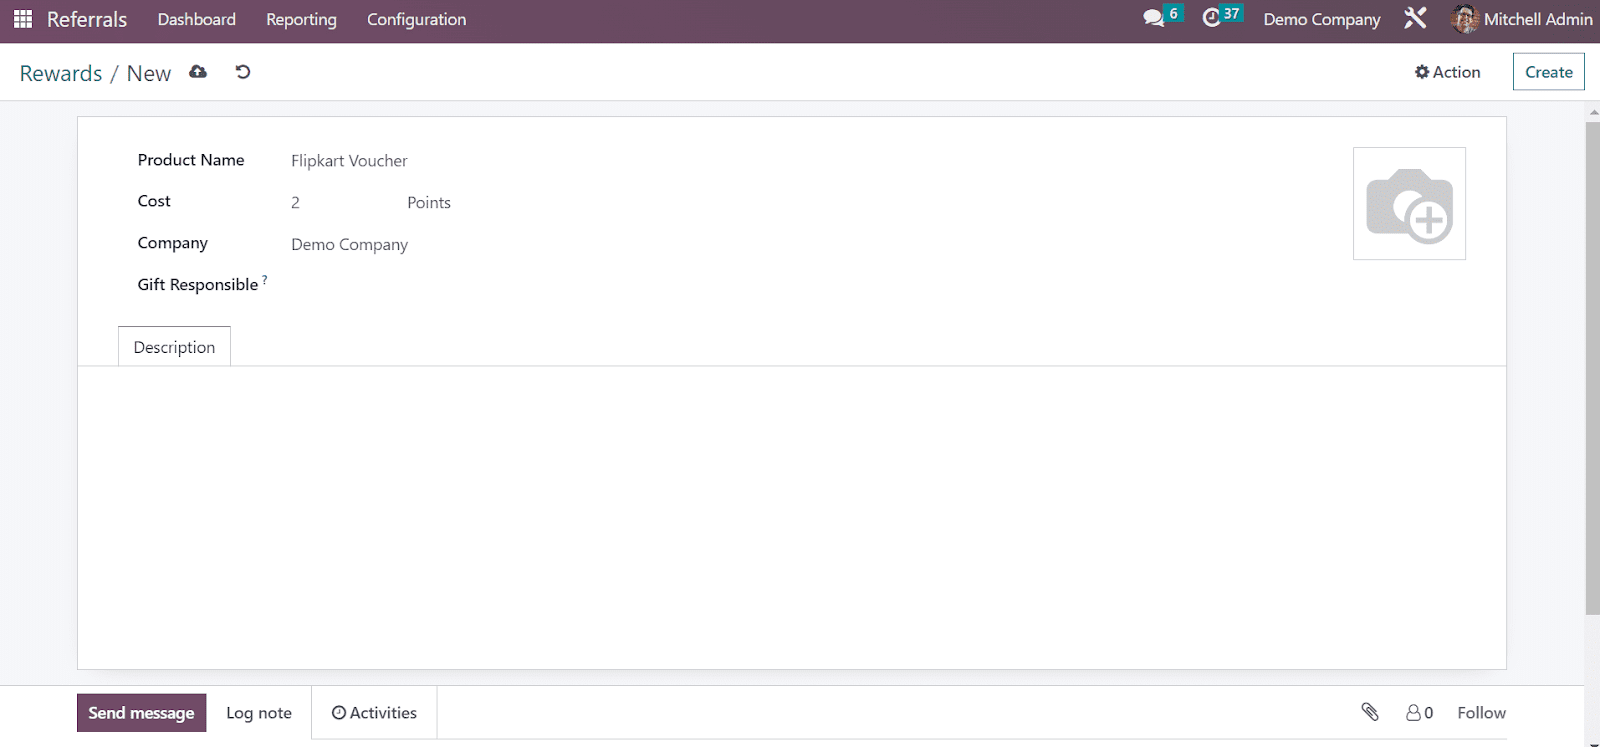
So, we can easily describe rewards within the OTX 16 Referral module.
Levels
It is easy to assign different levels of recruitment operations to employees related to each referral within the OTX system. Below the Configuration tab of OTX 16 Referral, you can view the Levels menu. Several levels contain data such as Level name, image, and points that are acquirable to a user in the Levels window. By choosing the CREATE button, users can define a new level.

In the Levels window, you can specify the Level Name and number of requirements in points. Users can also apply pictures related to the level in the Image option. After entering all data, each data is saved automatically in OTX 16.
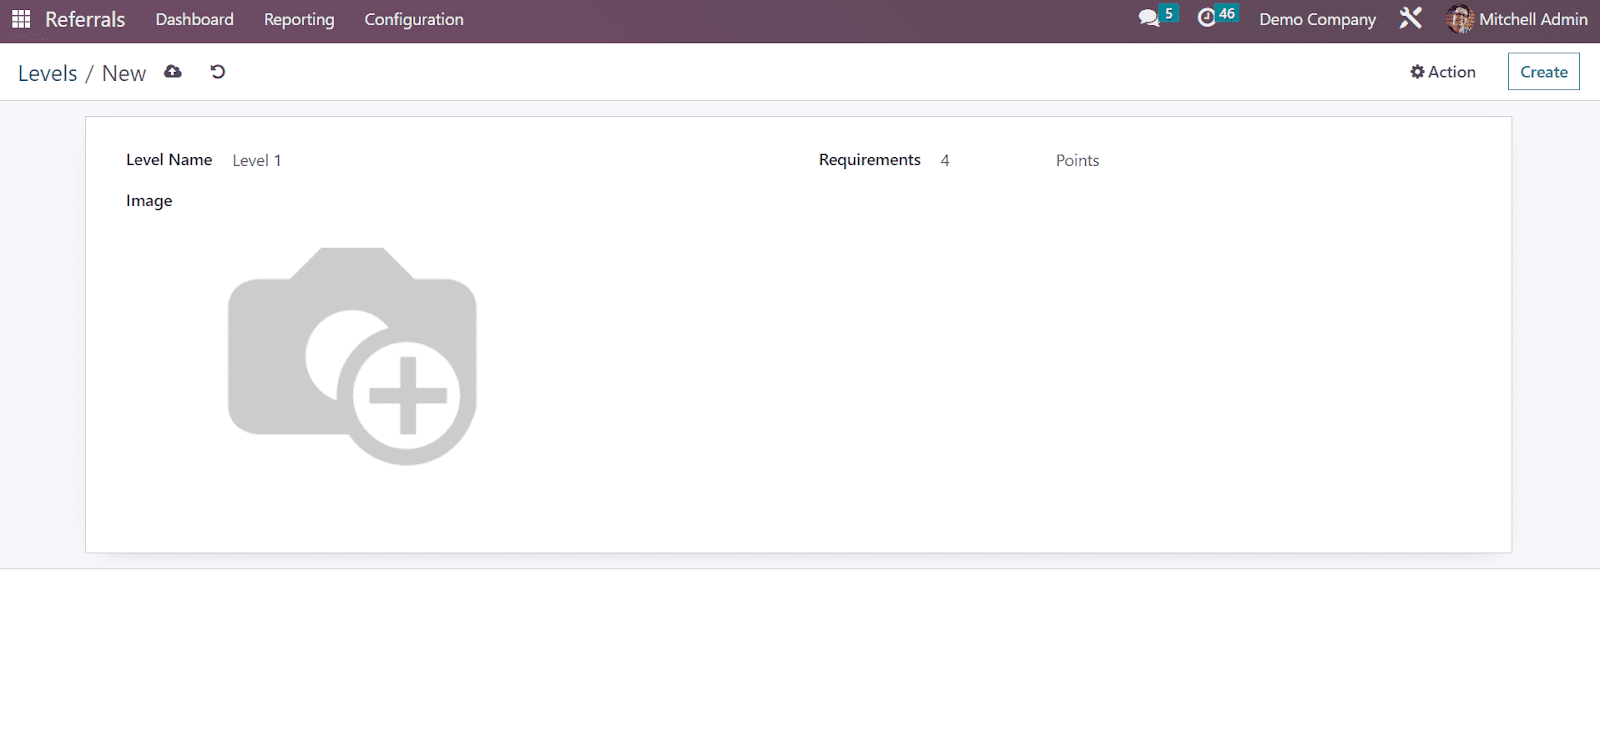
Friends
OTX Referral module functioning is also based on appealing options and different animations. We can manage different images and animations to illustrate applicants in specific referral operations in a firm. OTX configures a distinct Friends window to manage different animation images into a platform. Choose the Friends menu in Configuration, and all respective images are visible in the open window. You can obtain the Friend Name and Dashboard image on the Friends screen. It is possible to describe new friend data after selecting the CREATE button.

In the new Friends window, add the Friend Name, and you can set the Position as Back or Front. After mentioning these fields, you can apply images for the friend on a dashboard within the Dashboard Image field.
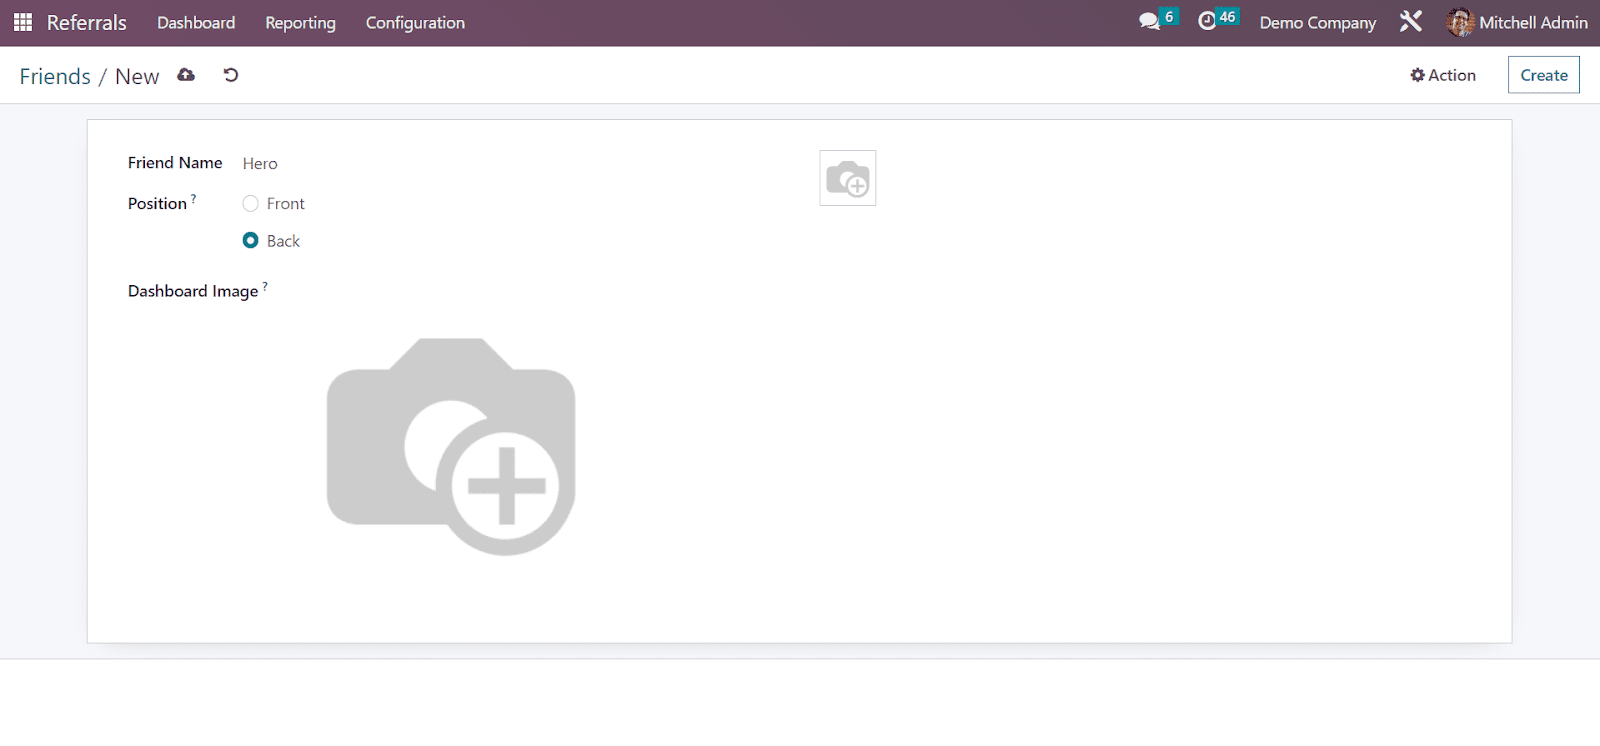
Hence, we can quickly describe the friends’ information in OTX 16.
Alerts
Users can set an informational alert by choosing Alerts menu in the Configuration tab. You can forward emergency alerts and messages within the Alerts window. This is helpful for receiving notifications and upcoming events for employees in an organization. In the Alerts window, a list of all pre-configured alerts is visible, containing the Date From, Alert name, and Date To information. Clicking on CREATE button ensures you provide new alert data.
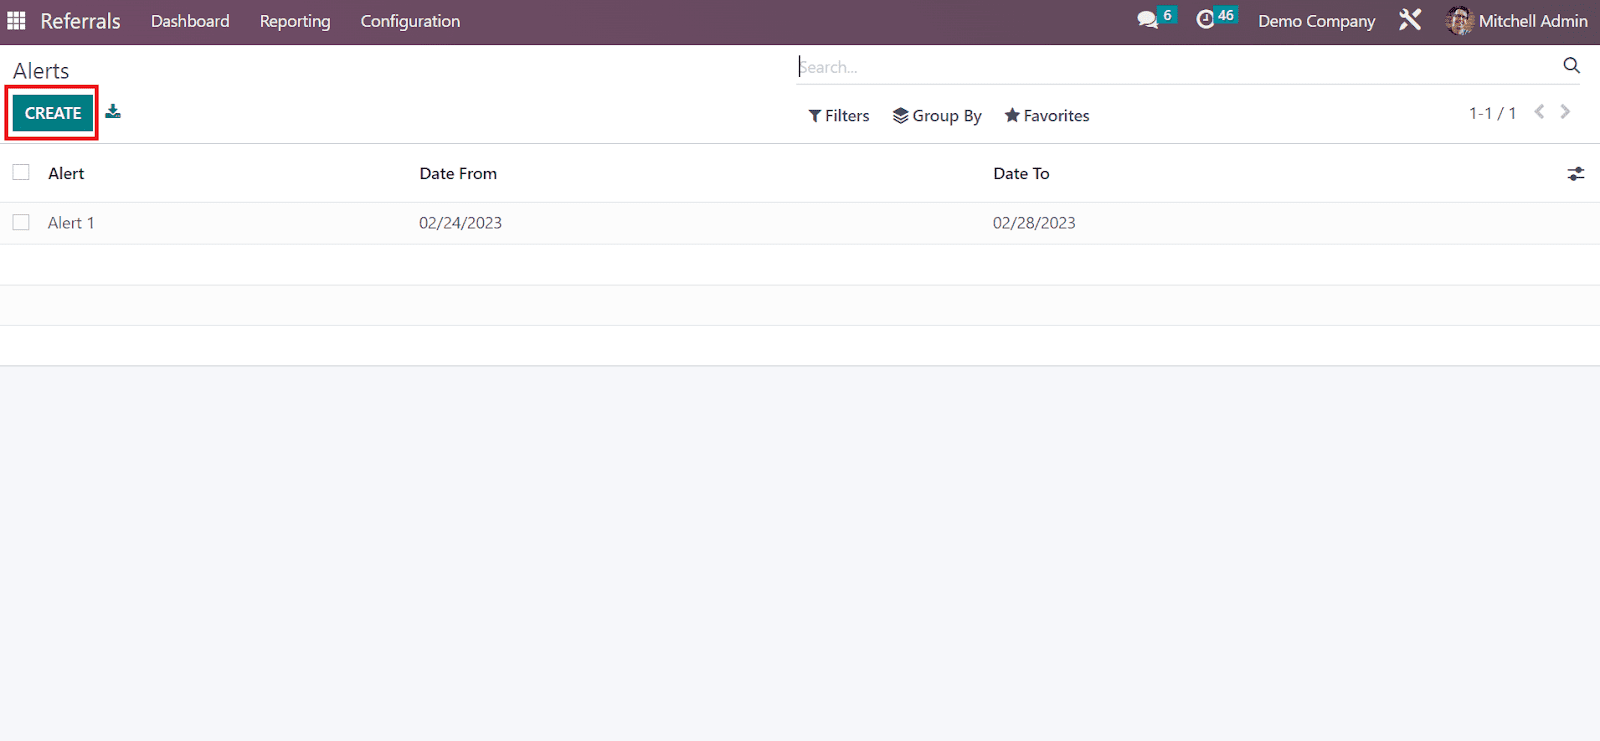
In the open page, enter the start date in Date From field and the last date in the Date To option. Additionally, you can mention the company name and name of the alert in Alert field.

In the On Click field, you can choose options like Go to All Jobs, Not Clickable, and Specify URL. To forward the alert mail to employees, click SEND MAIL button in the Alerts window.

Onboarding
All list of onboarding messages is accessible to the user after selecting the Onboarding menu in Configuration. It is possible to view all created texts within the Onboarding window. By choosing the CREATE button, we can formulate a new onboarding message.
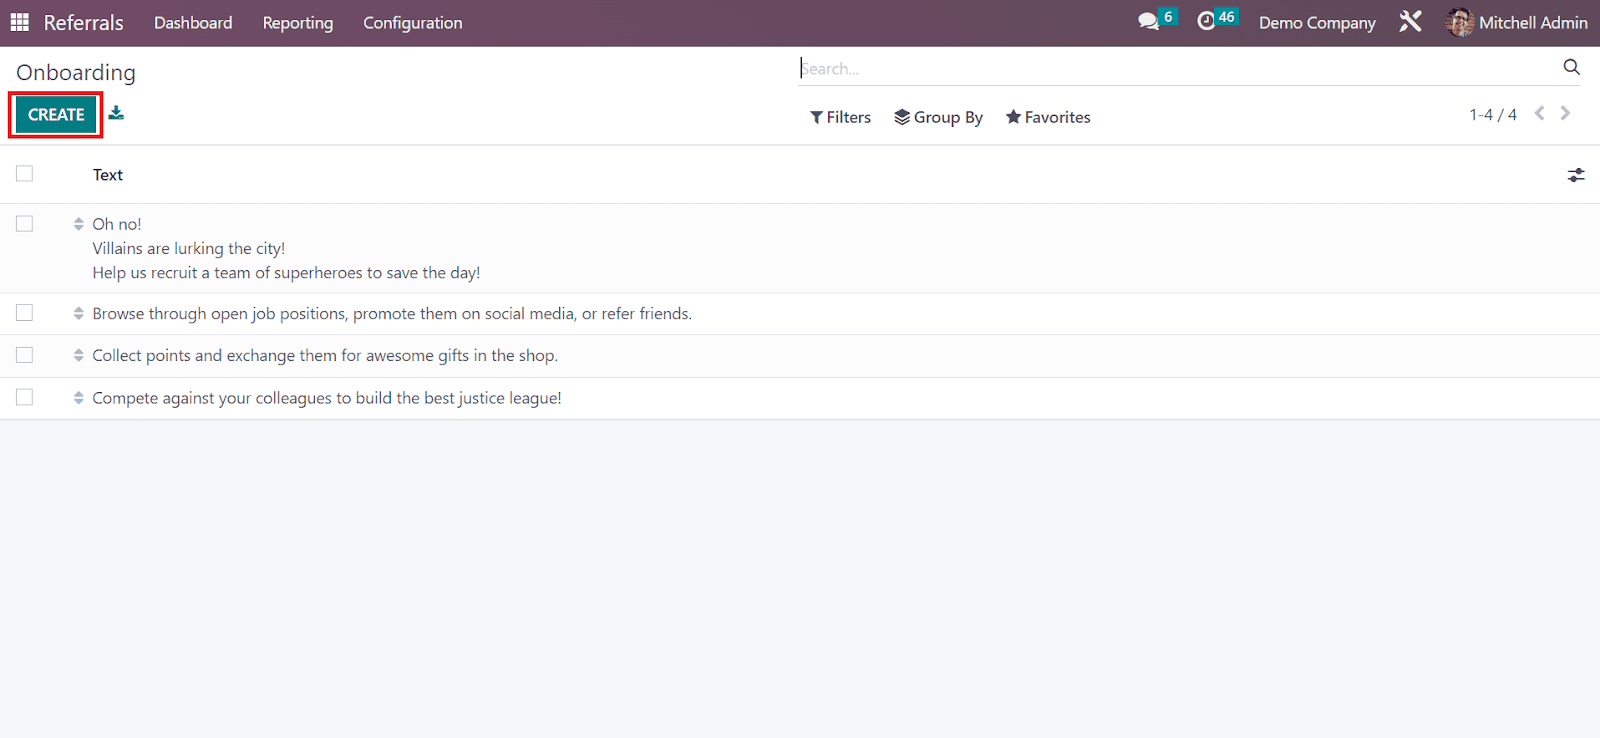
On the new page, apply the onboarding message in a Text field and choose the Company. After specifying each data, all data are saved easily in the OTX 16 automatically.
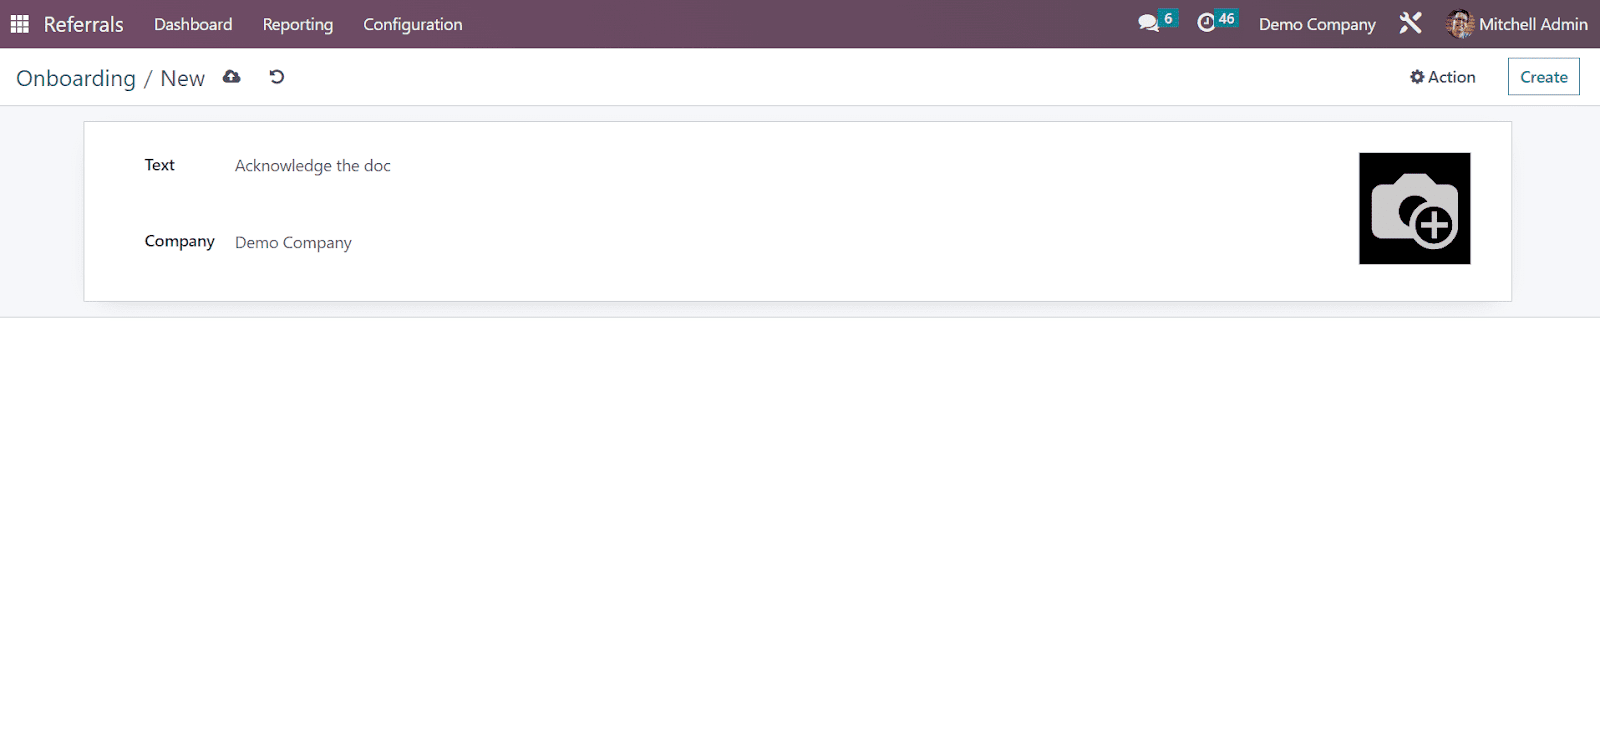
Functionalities of OTX 16 Referral
Let’s define working principles of the OTX 16 Referral module. For that, we can move to the Dashboard screen of the OTX Referral module. The LEVEL UP option concerning the respective employee profiles is visible at the top of the Dashboard window. The reward will enhance the referred individual employee if the applicant moves to the next stage of recruitment. Besides the LEVEL UP option, you can see the Total and To spend points. By selecting the LEVEL UP button, you can enhance the level.
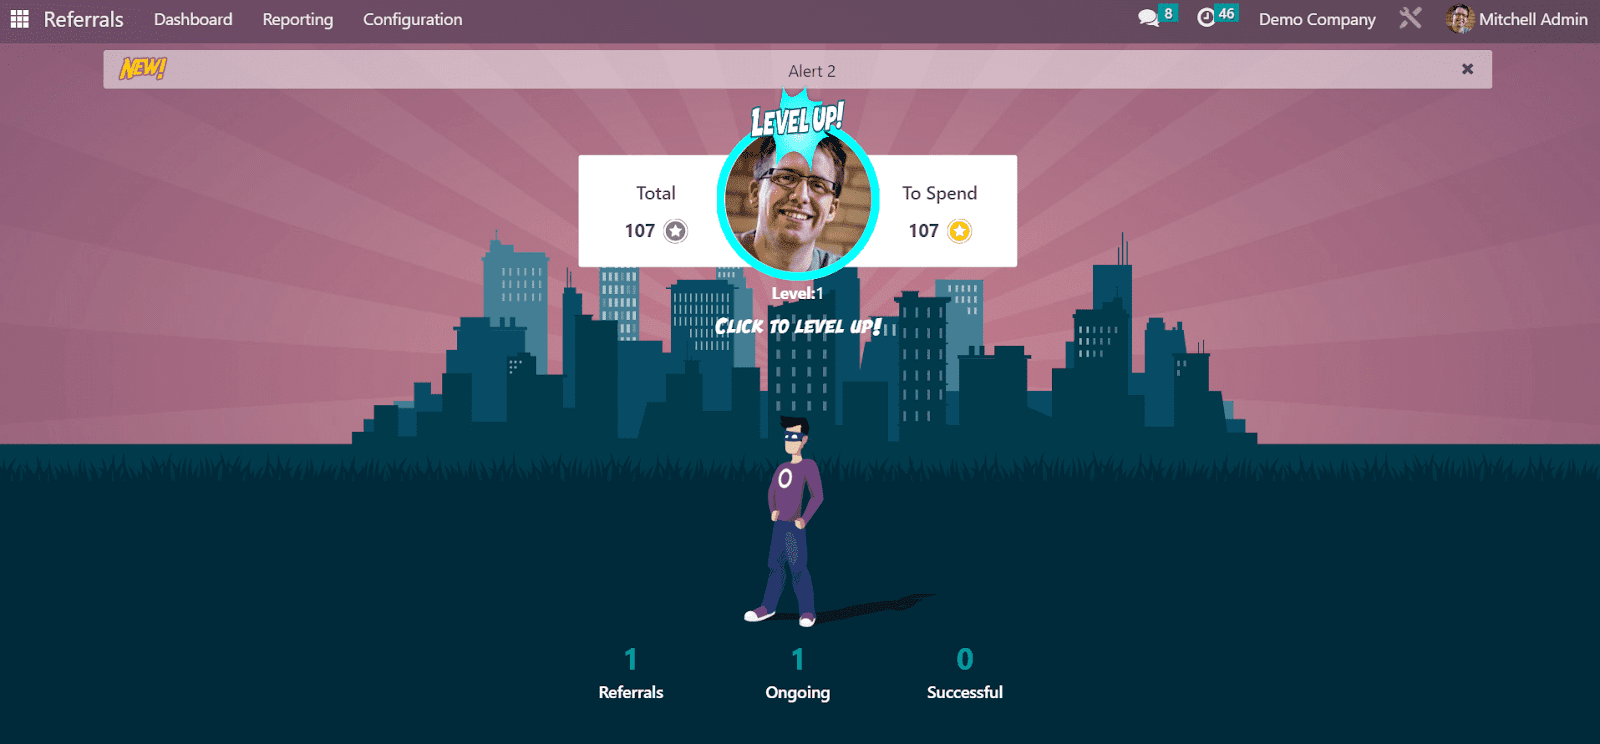
We can see the status of referrals in the Dashboard window. You can obtain the total count of ongoing, successful, and other referrals.
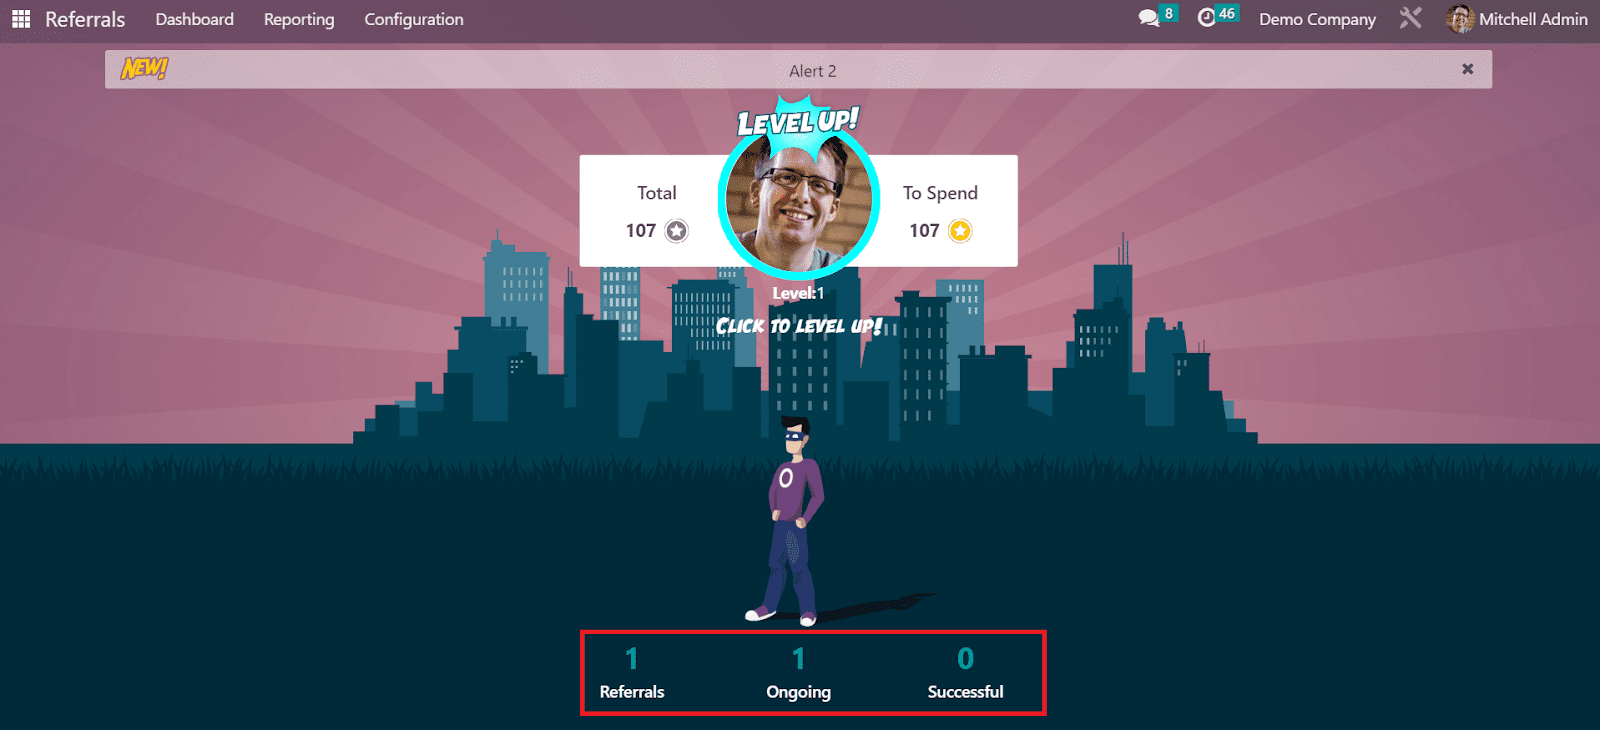
All referrals made by employees are visible once choosing the Referrals option. The details of the referral person concerning the employee are visible in the My Referral window. You can access the name, job position, gained points, department, and more of the referral. Specific points are rewarded based on candidate qualification at each stage. The various level of stages includes Initial qualification, second interview, contract signed, first interview, and more.
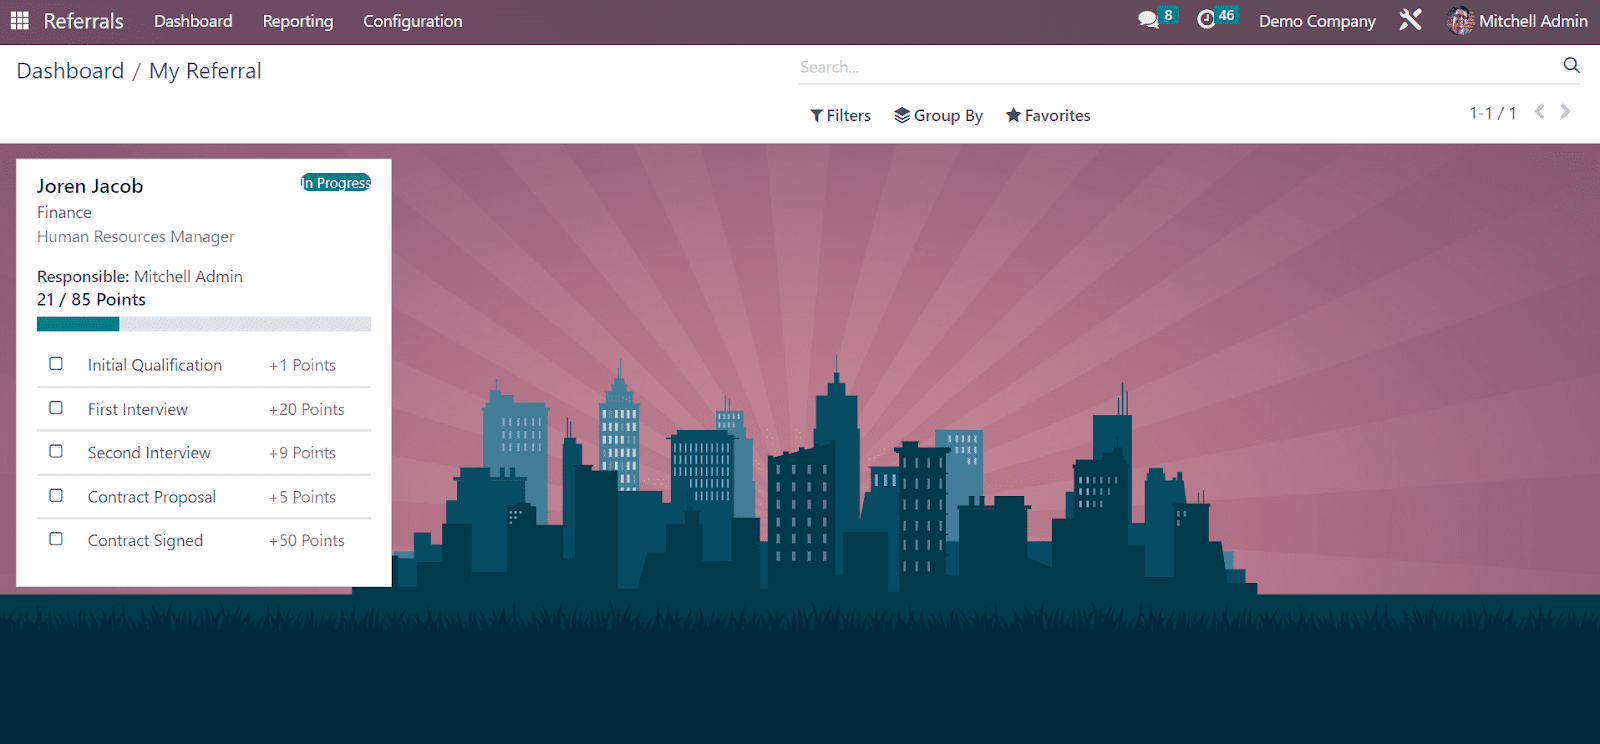
Now, let’s see how OTX 16 Referral module specifies recently hired candidates in the platform. For that purpose, choose a hired applicant ‘ Hawak Williams’ from the OTX 16 Recruitment module. You can identify the referral of that applicant from the Referred by User field in the Applicant window.

Now, let’s move to OTX 16 Referral module and we can see that Hawak Williams has been hired.

Next, you can pick an avatar for your hired person. After picking your avatar, you can see the new avatar on the Referrals option.

By selecting the Successful option, you can also access the Hawak Williams hired data.

So, the functioning of the referral module is easily understandable by users.
Reporting
For the quick analysis of employee referrals, you can get an exclusive reporting section within the OTX 16 Referrals module. An Employee Referral Analysis window appears before the user once choosing the Reporting tab in OTX 16 Referral. You can view a pivot table in the Pivot view of the Employee Referral Analysis window. The pivot table shows the total earned points, employee referral reduced, hired, and applicant data of each employee separately. Additionally, you can specify more values, such as count and points given for not hired into the pivot table, after selecting the MEASURES icon.
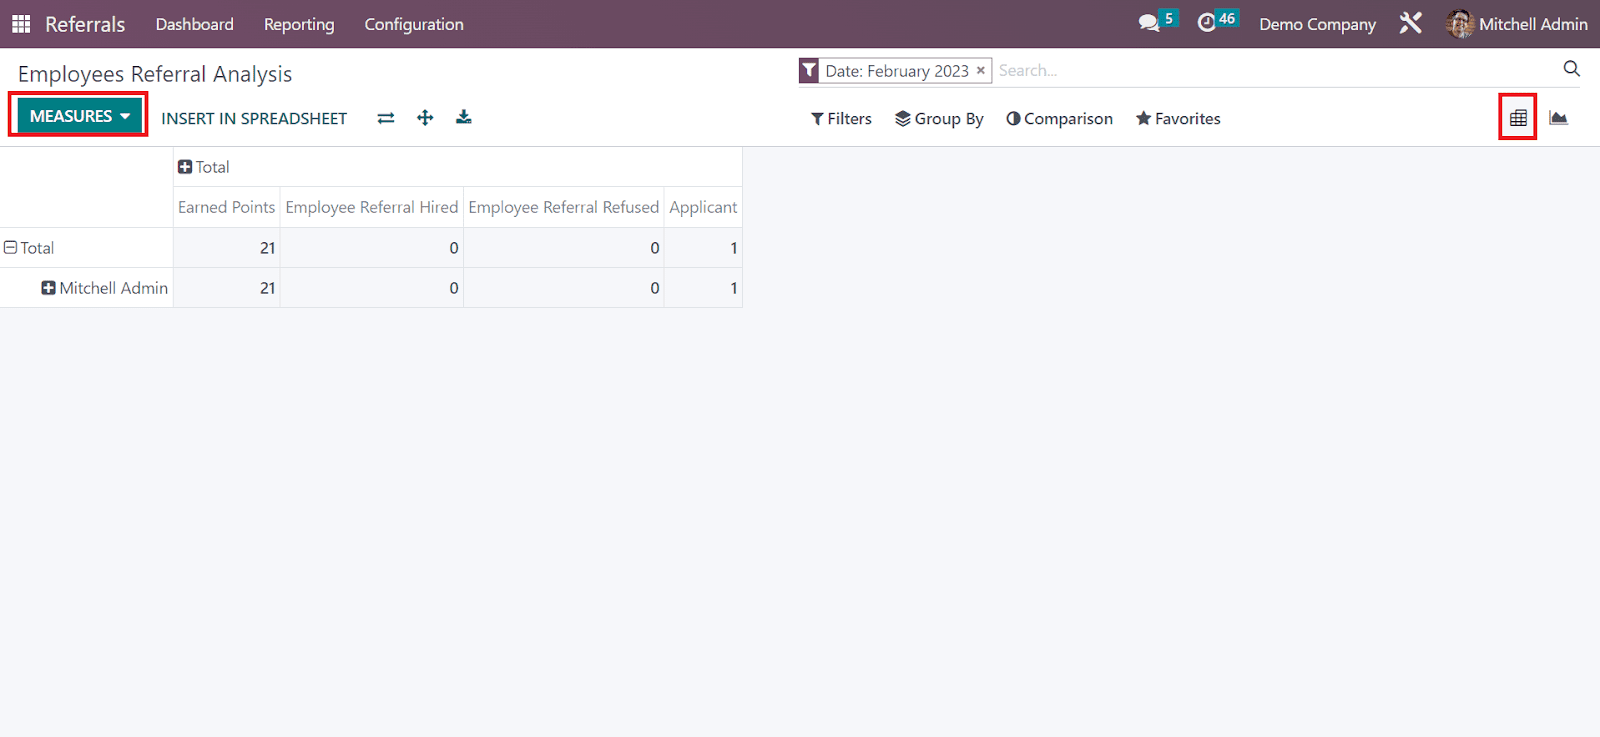
The Graph view of the Employee Referral Analysis window denotes Medium in X-axis and Applicants rate in Y-axis. It is easy to apply various measures to the graph once choosing the MEASURES icon. We can specify the measures like Earned points, count, employee referral hired, and more to the graph.
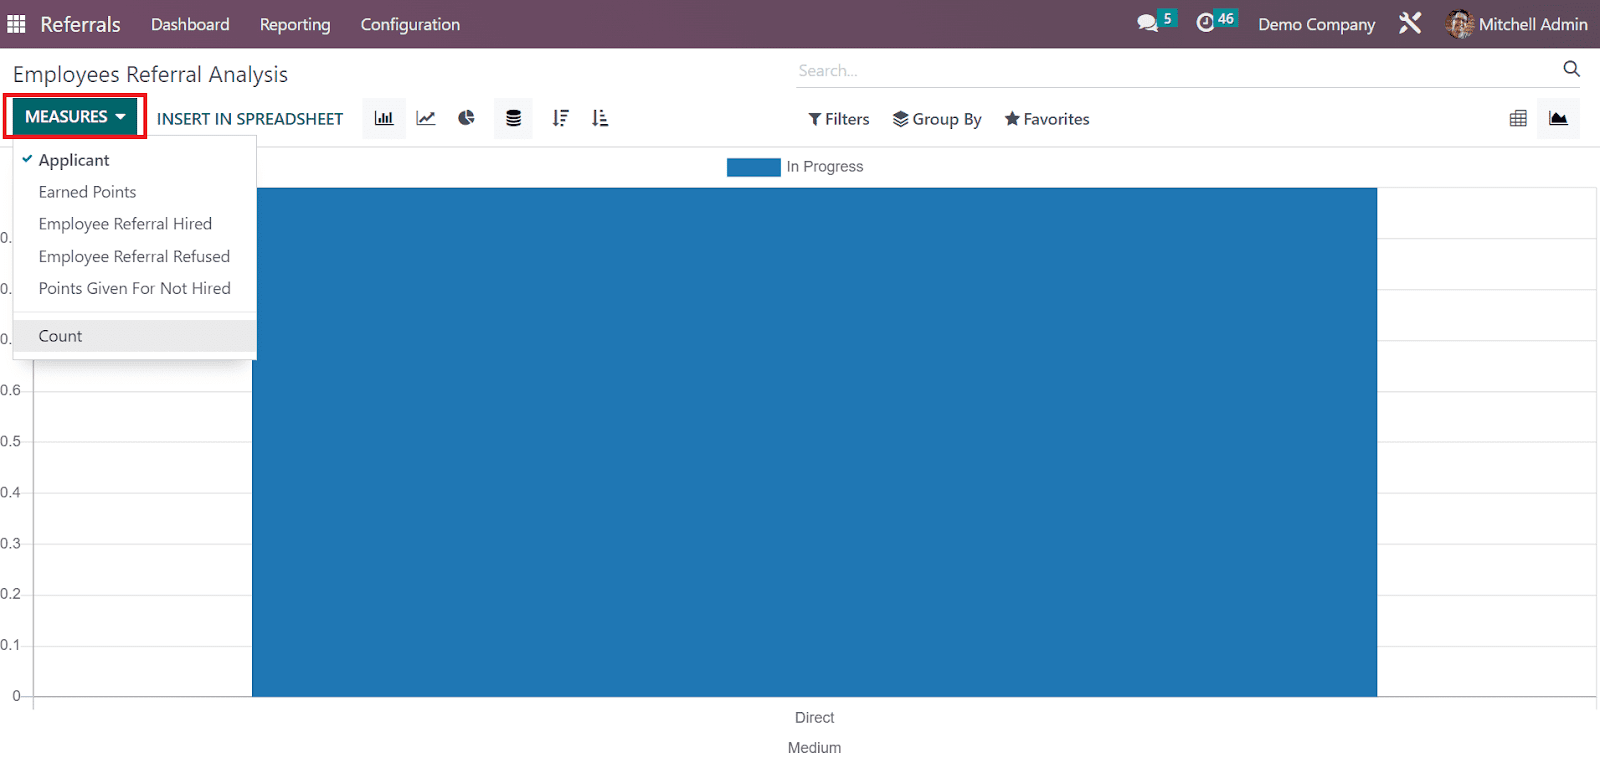
We can view the graph in bar, pie, and line charts format. So, it is simple to evaluate employee referrals in the OTX 16.

Expenses
The company expenditure manages effortlessly using the OTX 16 Expenses module. Employees in a firm can easily submit their expenses without any hindrance. So, managers can evaluate and approve the expenses quickly. It is beneficial for accountants to record and move forward with the payment for further transactions.
My Expenses
You can access the dashboard of the expense module once choosing the My Expenses menu inside the My Expenses tab. The record of already submitted expenses is accessible to a user in the My Expenses window. In the List view, we can obtain the data related to expenses, including Expense date, Employee, Company, Status, Description, Activity, and more. At the window top, you can see expenses to report, reimbursed amount, and under validation cost. A clear portrait of expense status is viewable to a user after viewing the report.

The SCAN icon assists you in uploading an expense report from your system. Additionally, you can formulate a new report once clicking on the CREATE REPORT button. To define a new expense, select the CREATE icon in the My Expenses window.

In the New window, add details about your expense in the Description field and set the Category for a specific expense. Different categories available to users for expenses include Communication, Gifts, Travel & Accommodation, Others, etc. Users can mention the total price spent for specific expenses in the Total field.

You can pick the specific worker’s name in the Employee option. Also, you can select the person who needs to pay for the expense in the Paid By field. It is possible to pay by Company and Employee. If the employee is paid, the company will reimburse the price spent by the worker later. Moreover, we can add the Bill Reference and Expense Date depicts the billing date of your expense.

You can choose the expected expense account in the Account option. Furthermore, we can select the category for customers to invoice and the company name. Each piece of information is saved automatically in the OTX 16. You can also put the expense in various stages like TO SUBMIT, APPROVED, REFUSED, SUBMITTED, and PAID.

To upload any receipt of your expense, click the ATTACH RECEIPT icon. Also, you can divide the expense after choosing the SPLIT EXPENSE button. An expense report is defined easily by clicking on the CREATE REPORT icon in the My Expenses window.

My Reports
Below the My Expenses tab, you can obtain the My Reports menu, and all existing reports are viewable to the user. Each minute detail of reports such as Employee, Activities, Payment Status, Expense Report, Company, and more are displayed to the user. By choosing the SCAN icon, you can quickly upload report data to OTX 16. It is simple to describe a new report once selecting the CREATE icon.

Expense Reports
reports record is obtainable to a user once choosing the Expense Reports tab. The List view of the Expense Reports window mentions report data such as Employee, Company, Status, Payment, and more. It is possible to sort out the reports based on CATEGORIES, STATUS, and EMPLOYEE. All these are viewable in the left corner of the window to users. Moreover, you can insert a record by choosing the SCAN button. The CREATE button ensures you describe a new report for an employee.

By clicking on the CREATE icon, a new page opens to you, and adds a report description in the Expense Report Summary field. Later, you can select the employee and company. Pick the respective manager of your report in the Manager field.

After clicking the Add a line option under Expense tab, you can mention the expense data regarding the report. The total untaxed amount appears to the user once choosing the expenses. After entering all data, you can forward the report to the manager by selecting the SUBMIT TO MANAGER button.

Once submitted the report to a manager, an expense document is generated, and you can see it by selecting the Expenses smart button. The stage is also changed into SUBMITTED. The respective manager can validate the report by clicking on the APPROVE icon.

So, it is easy to manage reports within the OTX 16 Expenses module.
Configurations
We can manage the expense settings and categories within the Configuration feature of OTX 16. Let’s define each of the menus in the configuration tab now.
Settings
It is easy to configure default journals and expenses once selecting the Settings menu in the Configuration tab. Users can formulate expenses from receiving emails after activating the Incoming Emails option under the Expenses section. Firstly, you must set up a domain alias. You can forward an email with an attachment receipt once setting a domain alias.

You can digitize all your receipts with artificial intelligence and OCR after enabling the Expense Digitization(OCR) option. Users can choose an essential method of expense digitalization in three ways: Do not Digitize, Digitize automatically, and Digitize on-demand only. To obtain expenses on employee payslips, we must activate the Reimburse in Payslips option under the Expenses tab.

Inside the Default Journals section, you can pick a default account journal regarding employee-paid expenses in the Employee Expense Journal field. Also, you can select default accounting journals paid by the company for expenses within the Company Expense Journal option. After enabling all essential fields, you need to select the SAVE icon to view further changes in OTX 16.

Expense Categories
OTX 16 Expense module assists you in managing product categories. It is easy to sort out product expenses based on each category means expense categories. To define a new category, choose the Expense Categories menu in Configuration. In the open Expense categories screen, you can obtain data for each category, such as Name, Sales price, Vendor taxes, Internal references, re-invoice expenses, and more. You can design an expense category once choosing the CREATE icon.

Hence, we can quickly describe expense categories for commodities in the OTX 16.
Reporting
We can evaluate company expenses with the use of Reporting feature in the OTX 16 Expenses. By choosing the Expenses Analysis menu in Reporting, a graphical representation appears before you. The Graph view denotes the Expense Date on X-axis, and Y-axis points out the total expense count. We can view the expense count of each employee in various colors on the graph. Also, you can apply different values to the graph after clicking on the MEASURES icon.
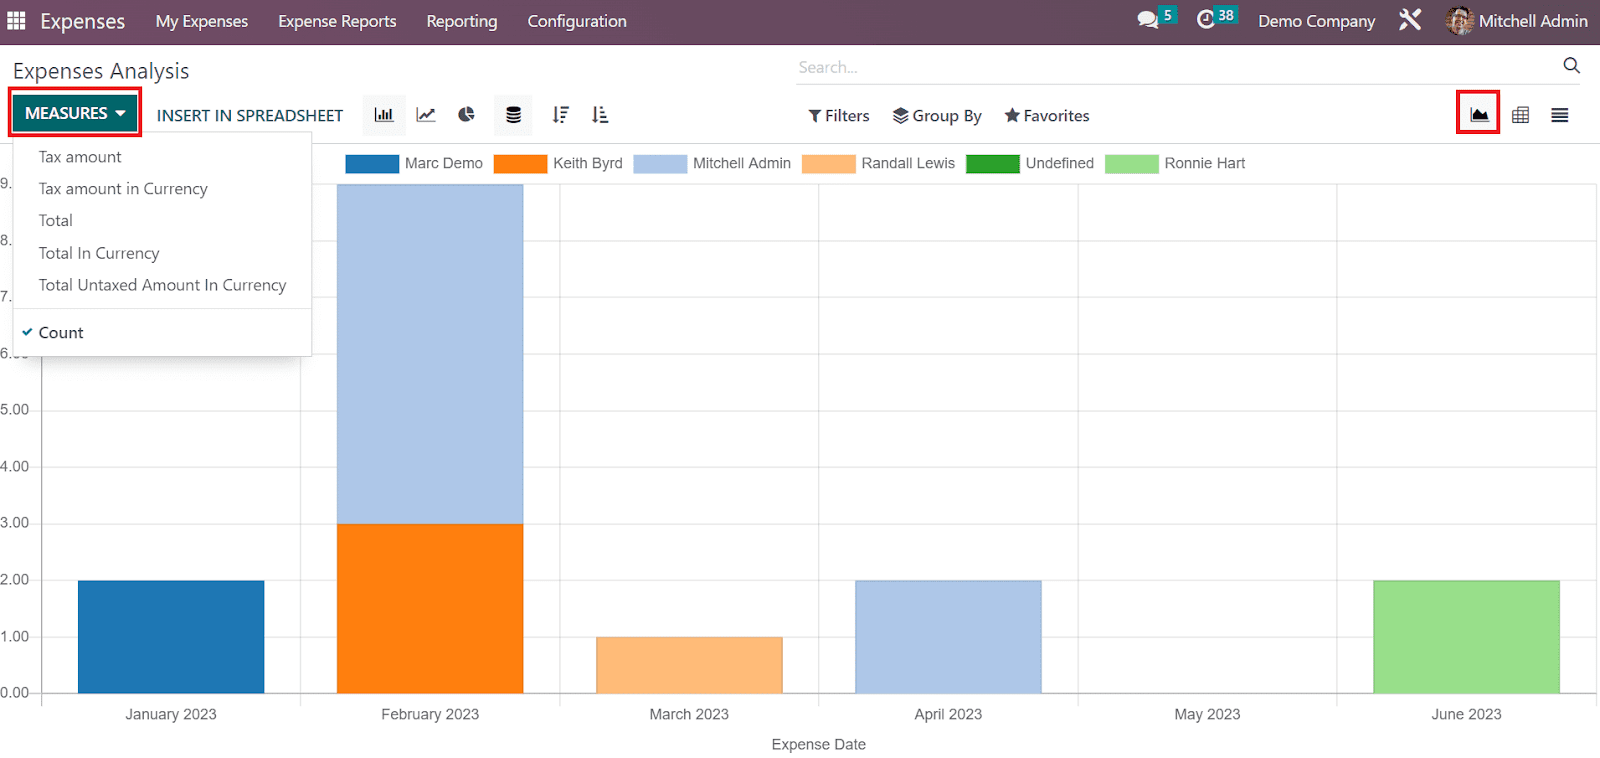
A few of the measures include Tax amount, Total, Total untaxed amount in currency, tax amount in currency, count, and more. It is possible to view the graph in bar, pie, and line chart formats. You can click the INSERT IN SPREADSHEET button if you need to upload a file.
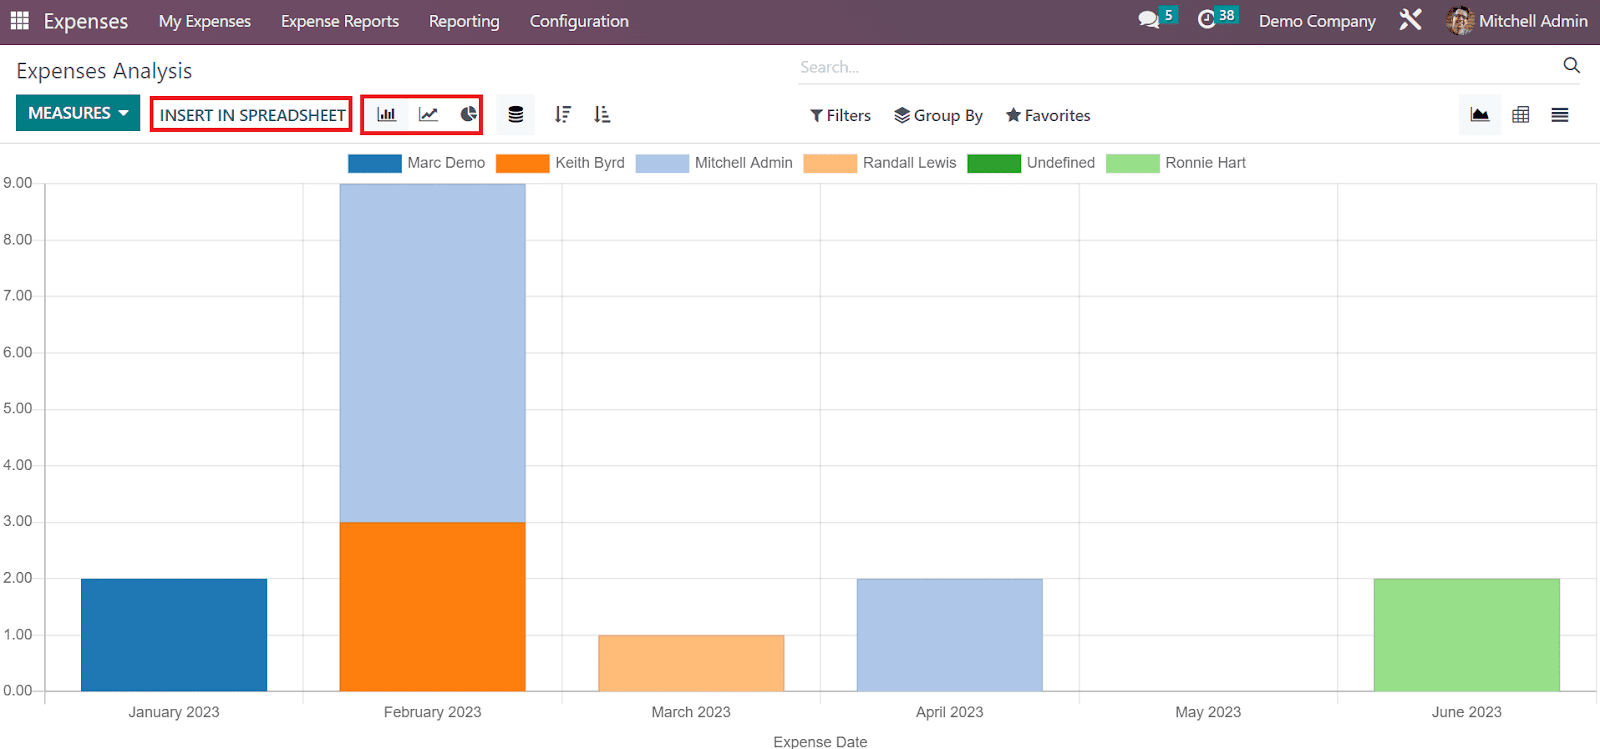
We get an overview of company expenses through the reporting feature of OTX 16.
Time-Off
The HR department of a company is required to manage various HR operations simultaneously. Management of leaves and time off requests of employees is one among such HR operations that should be done in a systematic manner. It is essential to keep time off records of the employees accurately since it is considered for the payroll calculation also. With the assistance of an ERP solution, you can easily manage the leave management of your company. Within the same platform, you can request time off, and the manager can approve them. Without opening any other applications, the leave records will be saved in the same database. We are talking about the OTX 16 Time Off module.
The Time Off module can simplify the process of leave applications. The advanced dashboard of the module will show the time off taken by employees so that the HR manager can easily identify each employee’s leave record. If an employee wants to apply for leave, they can create a leave application from the dashboard itself. The request will be sent to the concerned department and the manager can approve or refuse the request from the same platform.
You can select the Time Off module from the main dashboard of OTX 16. As soon as you open the module, you will land on the My Time Off dashboard of the module. You can observe the time off taken by you on this dashboard.

As you can see in the screenshot above, the dashboard can be viewed on a daily, weekly, monthly, or yearly basis. Here, we selected the yearly time off calendar. The time off taken by the employee can be viewed in different colors on the dashboard according to the Time off Type. The available time off types is shown on the right side of the dashboard. The patterns on time off dashboard will change based on whether it is Validated, Approved, or Refused. The pattern for each type is shown on the right side of the dashboard. The total Paid Time Off and Compensatory Days available for the employee in the working period can be seen on the screen.
The available Filters for this window are To Approve, Need Second Approval, Approved Time Off, Current Year, Start Date, Active Time Off, Archived Time Off, and Canceled Time Off. In order to create a new Time Off request, you can click on the New Time Off button. You can also click on the date on which you want to take a leave of absence. It will open a pop-up window as shown below.

Here, you can specify the Time Off Type in the given space. You can select the suitable one from the drop-down menu. The Dates of time off can be selected in the corresponding field and according to the selected days, the Duration of the time off will automatically appear. In the Description field, you can add a description related to the time off. Click on the Save & Close button, and the request will be sent to the concerned manager for approval.

The Overview menu available in the Time Off module will show the time off calendar of all employees. The HR manager can use this window to monitor the time off calendar of all employees in a company. The time off taken by each employee will be shown in different colors. The colors assigned for each employee can be viewed on the right side of the dashboard.
Approvals
The Configuration menu of the Time Off module includes the Time Off Types option that will help you to create various types of time off easily. The list view of this platform is shown below. You can observe the Display Name and Approval here.

According to your requirements, you can create suitable types for time off from this window. Click on the New button to create a new one.

Clicking on the New button will lead you to a form view as shown above. Provide a name for this time off type in the given space. Under the Time Off Requests tab, you can set rules for Approval. If you want to remove approvals on time off, you can select the No Validation option. Otherwise, you can set the Approval as By Time Off Officer or By Employee’s Approver. Selecting the By Employee’s Approver and Time Off Officer indicates that the request requires double approval to get confirmation. You will get an additional field called Responsible Time Off Officer, where you can select the Time Off Officer who will be notified to approve allocation or Time Off requests.
In the Take Time Off in field, you can set the period of the time off as Day, Half Day, or Hours. By activating the Deduct Extra Hours feature, extra hours from the attendance will be deducted once a time off of this type is approved. You can allow attaching supporting documents by activating the corresponding field. The Kind of Time Off can be set as Absence or Worked Time in the given field. The distinction between working time and absence will be used in the computation of the accrual’s plan rate. The name of the Company will be auto-populated in the respective field.
Under the Allocation Requests tab, you can find the field Requires Allocation. Selecting the Yes option indicates that the Time Off requests need to have a valid allocation. It can be set as No Limit if the Time Off requests can be taken without any prior allocation. Once you select the Yes option, you will get a new field called Employee Requests. Here, the user can request an allocation for himself by choosing the Extra Days Requests Allowed option. By selecting the Not Allowed option, the user cannot request an allocation.

In the Payroll tab, select a suitable Work Entry Type from the drop-down menu. Set Color and Cover Image for display. After adding the required data, the new Time Off type is ready.
Allocation Requests
In the main dashboard of the time off, you will get an option called Allocation Request. This option is used to create allocation requests in special conditions. If the employee requires extra leaves than the permitted leaves, they can request to get special permission by sending allocation requests.

You can easily generate new allocation requests by clicking on the give option. This will open a new pop-up window.

Here, you can provide the name of the allocation request and select the suitable Time Off Type from the given fields. The number of days you require in addition can be specified in the Duration field. In the specified field, mention the reason for requesting additional time off.
You can use the My Allocation menu available under the My Time Off to manage your allocation requests.

The list view of this platform shows the Time Off Type, Description, Duration, Allocation Type, and Status. You can click on the New button to create a new allocation request for you. You can mention the details in the specified fields.

The status of the request is ‘To Submit’ now. You can click on the Confirm button to confirm the request.

As soon as you click on the Confirm button, the status of the request will be changed to ‘To Approve’. This indicates that the request has been sent to the manager for approval. The manager can now approve or reject the request from the Approvals tab.
Time Off Types
The Configuration menu of the Time Off module includes the Time Off Types option that will help you to create various types of time off easily. The list view of this platform is shown below. You can observe the Display Name and Approval here.

According to your requirements, you can create suitable types for time off from this window. Click on the New button to create a new one.

Clicking on the New button will lead you to a form view as shown above. Provide a name for this time off type in the given space. Under the Time Off Requests tab, you can set rules for Approval. If you want to remove approvals on time off, you can select the No Validation option. Otherwise, you can set the Approval as By Time Off Officer or By Employee’s Approver. Selecting the By Employee’s Approver and Time Off Officer indicates that the request requires double approval to get confirmation. You will get an additional field called Responsible Time Off Officer, where you can select the Time Off Officer who will be notified to approve allocation or Time Off requests.
In the Take Time Off in field, you can set the period of the time off as Day, Half Day, or Hours. By activating the Deduct Extra Hours feature, extra hours from the attendance will be deducted once a time off of this type is approved. You can allow attaching supporting documents by activating the corresponding field. The Kind of Time Off can be set as Absence or Worked Time in the given field. The distinction between working time and absence will be used in the computation of the accrual’s plan rate. The name of the Company will be auto-populated in the respective field.
Under the Allocation Requests tab, you can find the field Requires Allocation. Selecting the Yes option indicates that the Time Off requests need to have a valid allocation. It can be set as No Limit if the Time Off requests can be taken without any prior allocation. Once you select the Yes option, you will get a new field called Employee Requests. Here, the user can request an allocation for himself by choosing the Extra Days Requests Allowed option. By selecting the Not Allowed option, the user cannot request an allocation.

In the Payroll tab, select a suitable Work Entry Type from the drop-down menu. Set Color and Cover Image for display. After adding the required data, the new Time Off type is ready.
Accrual Plans
For accrual-type allocations, it is necessary to configure suitable accrual plans in the Time Off module. These plans will help the employees to accrue their paid Time Offs. Using accrual plans, the employee will get extra time off allocations based on certain rules. From the Configuration menu of the Time Off module, you can set these rules to automate the accrual allocation of time offs.

The above-shown screenshot is the list view of the Accrual Plans window. The list view will display the Name, Levels, Time Off Type, and Employees. Using the New button, you can effortlessly create new accrual plans. The form view that appears after clicking on the New button is shown below.
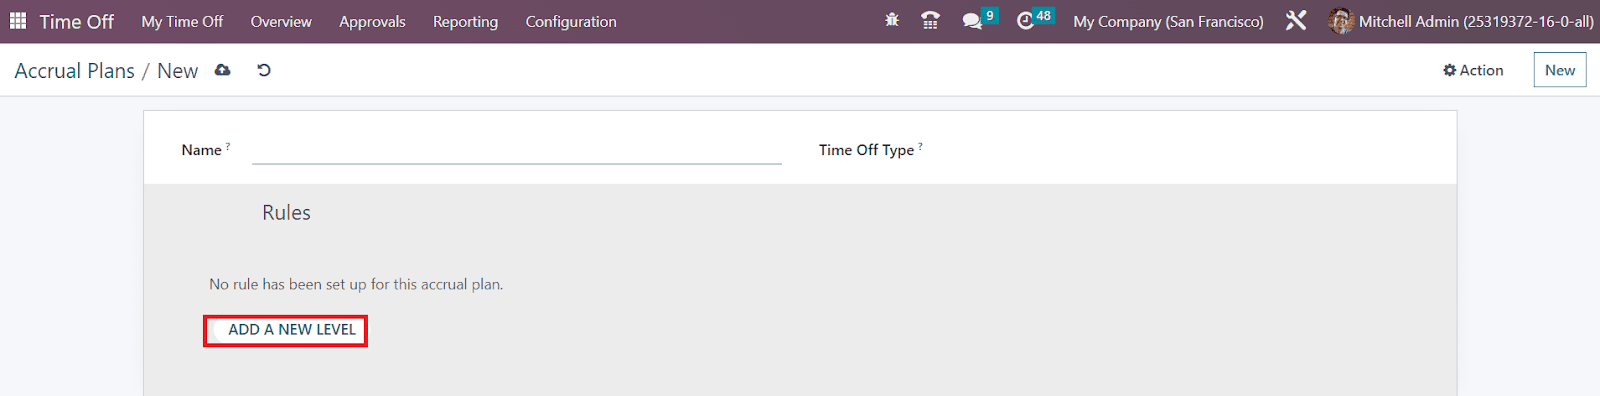
You can provide a name for the accrual plan in the Name field. If this accrual plan can only be used with a particular Time Off Type, you can mention that time off type in the given space. Otherwise, you can leave this field blank to use with any time off type. Now, you can set new levels for the accrual plan. For this, you can click on the Add a New Level button. As soon as you click on this button, OTX will display a new pop-up as shown below.
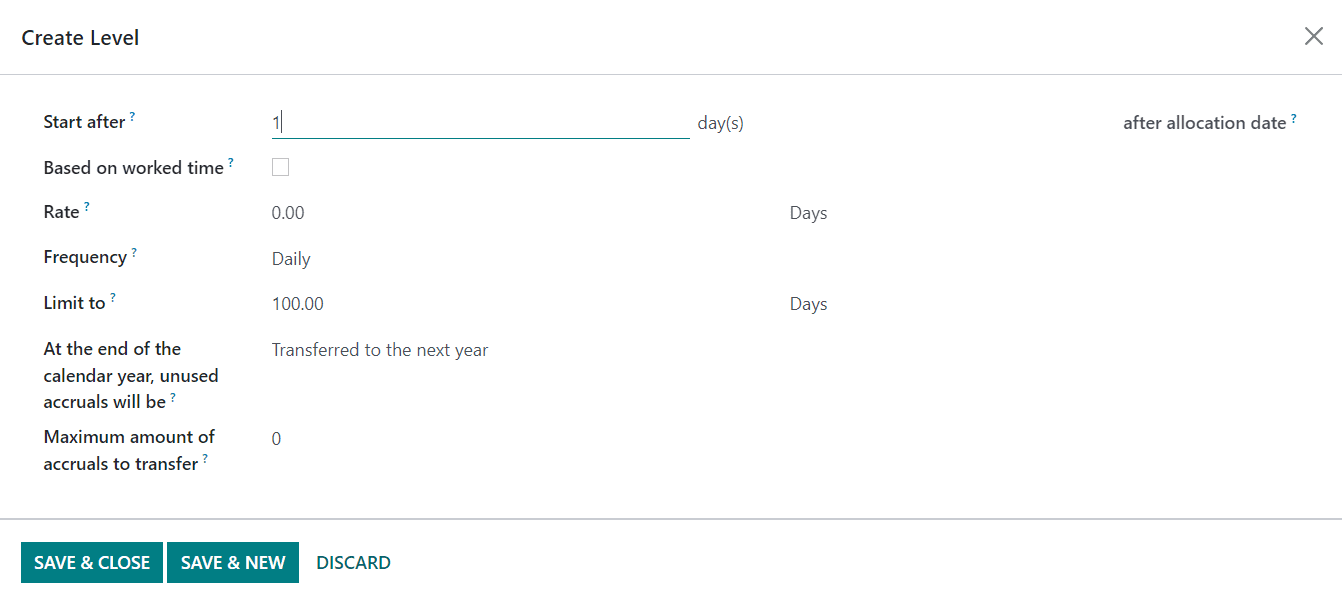
In the Start after field, you can mention a defined period. The accrual plan will start after this mentioned period from the allocation start date. By activating the Based on Worked Time, the rate will be prorated on the time off type where the type is set on Working Time in the configuration. You can mention the Rate based on hours or days that will be incremented in the mentioned time off type for every period. Set a suitable Frequency from the given drop-down menu. The Limit to field can be used to set a cap for each accrual. You can decide what should be done with the unused accruals at the end of the calendar year in the given field. It can be either transferred to the next year or mark it as lost. Additionally, you can define the maximum amount of accruals to transfer to the next year in this window. After adding details, you can click on the Save & Close button.
Public Holidays
From the Configuration menu of the Time Off module, you will get access to the Public Holidays platform where you can configure the details of the public holidays available in a year. The list view of this platform is shown below.
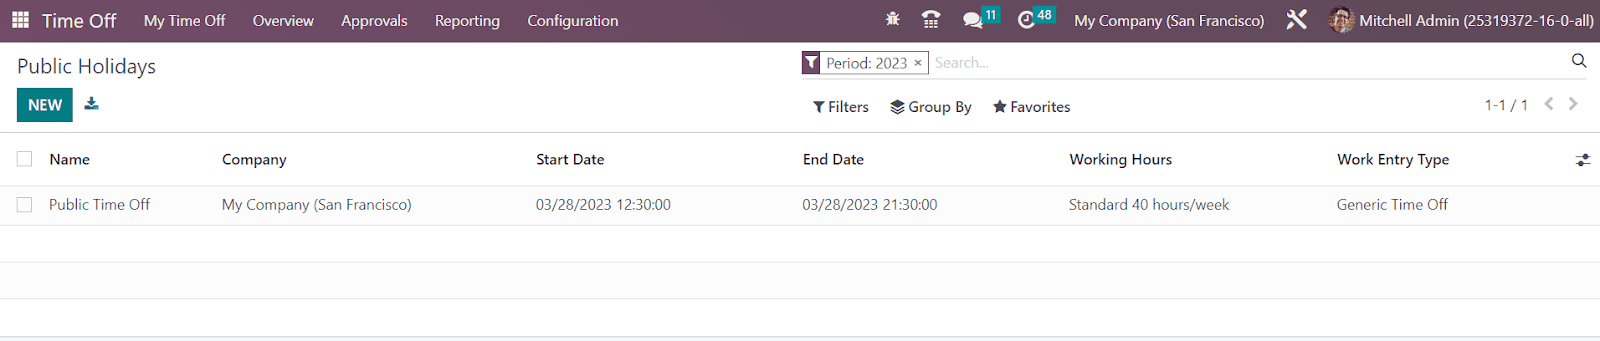
In order to record a public holiday in this module, you can use the New button. When you click on this button, OTX will display a new line on the screen where you can mention the Name, Company, Start Date, End Date, Working Hours, and Work Entry Type. Click the Save button to record the public holiday in your database.
Stress Day
The Stress Day option is a new feature introduced in OTX 16. This option can be used to create a list of stress days so that the employee will be able to ensure their presence on such days. In case, your company wants to meet the target within a particular period, you can set those days as Stress days. It will inform the employees about their presence during that specific period. You can find the Stress Days option from the Configuration menu of the module.

The list view of the Stress Days is shown above. This window displays the Name, Start Date, End Date, Color, and Departments. Using the New button will help you to add a new stress day. You will get a new line where you can mention the necessary details in the respective fields. Use the Save button to save the new stress day.
Reporting
In order to perform the Time Off analysis, you can go to the Reporting menu of the Time Off module. OTX offers efficient reports on this platform, which will help you to understand the time off taken by your employees and other factors related to time off requests and allocations. You will get Time Off reports By Employee and By Type. Let’s detail each of these reports in this section.
The Time Off Analysis by Employee will show the report of the time off based on employees. The user will get Pivot, Graph, and Calendar views on this platform. The graphical report of the time off based on employees is shown below.

In the Graph view itself, you will get Bar, Pie, and Line graph options. The line and bar graphs can be altered based on ascending and descending order. The Filers available for the reports are To Approve, Need Second Approval, Approved Time Off, My Time Off, My Team, My Department, Active Employee, Current Year, Start Date, Active Time Off, Archived Time Off, and Canceled Time Off. You can group the reports based on Employee, Type, Status, Company, and Start Date.

You can use Duration and Count as Measures for the reports.
In the Time Off Analysis by Type platform, you will get a list view of the time off based on types.

The user will get the option to view this platform in the List view and Pivot view. The list view is shown above. It displays the details of the Employee, Number of Days, Request Type, Start Date, End Date, Status, and Description.
In an effective manner, OTX will organize and manage everything related to leave management in your organization with the assistance of the Time Off module.
Fleet Management
The help of a customized fleet management system will enhance the efficiency of tracking the assets of a company. An adequate management system can control an extensive amount of data, and exceptional adaptability facilitates vast customization possibilities according to the particular needs of the organization. In a constantly expanding business environment, more and more new operations and factors to track will emerge. In the case of fleet management of a company, each vehicle is important. It is necessary to create and record the maintenance schedule, availability of spare parts, power consumption control, and many more. Following the old-fashioned method of managing the fleet will make the process too complex to control.
Since manually managing all these records is difficult and time-consuming, your company requires a dedicated software solution. The fleet management solution offered by OTX ERP is the best option selected by thousands of companies to improve their working efficiency. With the assistance of the OTX 16 Fleet module, successful fleet management can be easily achieved. It offers an excellent platform to manage contracts of the vehicle, cost, insurance, fuel log entries, and many more within a single module. The users are allowed to expand the feature of this module by integrating it with other modules in OTX . The fleet management module will perform the duties of a tracking system for the entire fleet of your company.
When you enter the Fleet module, you will get the dashboard of the module, which includes the preview of all configured vehicles in your database.

The Kanban view of the dashboard is shown above. As you can see in the image, the vehicles are arranged in the Kanban view according to their status. The preview of a vehicle includes the details such as name, vehicle logo, tags, responsible, location, and contacts. Using the Activity icon, you are allowed to schedule an activity for the respective vehicle.

When you move the cursor near the title of a stage, you can find the settings icon, as shown in the image above. Using this option, you can Fold, Edit, Delete, Archive, and Unarchive that particular stage.
If you want to add a new vehicle under a particular stage, you can click on the small plus icon given next to the settings icon, as highlighted in the screenshot below.

Clicking on the plus icon will give you a new space where you can mention the title. Use the Add button to add the vehicle to that particular stage. The Edit button will lead you to the editing window for that particular vehicle.

In order to add a new stage to the Kanban view of the fleet, you can use the +State button. The available details of the fleet can be filtered based on Available, Bikes, Cars, Trailer Hook, Planned for Change, Need Action, and Archived. Use the Add Custom Filter option to add customized filters. The Group By feature includes Status, Model, Brand, and Fuel Type.
Here, you will get Kanban, List, Activity, and Pivot views. The list view of this platform is shown below.

The preview of the list view encompasses the License Plate number, Model, Category, Driver, Future Driver, Immatriculation Date, and Tags. Use the Create button to configure the details of a new vehicle.

As soon as you click on the Create button, a new window will open, as shown above, where you can add the details of the vehicle. Provide the name of the vehicle Model in the given space. The License Plate number of the vehicle can be added under the specific field. In the Tags field, you can add suitable tags for the vehicle. The Driver section can be used to specify the details of the driver. Mention the driver’s address of the vehicle in the given space along with the Mobility Card. The address of the next driver of the vehicle can be added in the Future Driver field. The Assignment Date indicates the date on which this vehicle will be available. If the field is empty, it implies that the vehicle is available instantly. The name of your company will be displayed in the Company field. Under the Vehicle section, you can provide the Category, Chassis Number (Unique number written on the vehicle motor), Fleet Manager, and the current Location of the vehicle.
Now, let’s look at the Tax Info tab of the vehicle configuration window.

The Fiscality section includes the fields to mention the Horsepower Taxation and Disallowed Expenses Rate. Using the Add a Line button, you can add the Start Date of the taxes and its percentage. The Contract section will show the First Contract Date, Catalog Value, Purchase Value, and Residual Value.

The fields to mention the model details of the vehicle will be available under the Model tab. It includes Model Year, Transmission, Color, Horsepower, Power, Fuel Type, CO2 Emissions, and CO2 Standard.

Any other information related to the vehicle can be specified in the Notes tab.

Once you complete the configuration, you will get some additional smart buttons on the window as shown above. You will get smart buttons to observe the Employees, Drivers’ History, Contracts, Services, and Odometer. The window will show the status of the vehicle also. You can configure the details of your fleet by following the steps detailed in this section.
If you want to create a new status for the vehicle, you can go to the Configuration menu of the module and select the Status option.

Here, you will get the list of already created status for the vehicle. When you click on the Create button, you will get an additional line where you can mention the Name of the new status and click on the Save button.
Contracts
It is essential to maintain a record of the contracts of each vehicle in your system. For proper documentation of the vehicle contracts, you can go to the Contracts option available under the Fleet menu. OTX will open a list view of the contracts as shown in the screenshot below.

Here, you can observe the Name, Contract Start Date, Contract Expiration Date, Vehicle, Vendor, Driver, Recurring Cost, Recurring Cost Frequency, and Status. Along with the list view, OTX offers options for Kanban, Pivot, Activity, and Graphical views also. The available Filters are In Progress, Expired, and Archived. You can group the available contracts according to Vehicle. Customization feature is available in the Group By and Filters option. Use the Create button to create a contract for a vehicle.

Under the Contract Information section, the name of the Responsible employee will be available who is in charge of this contract. The cost type purchased with this cost can be specified in the Type field. In the respective fields, you can specify the Vendor, Reference, and Company. The Activation Cost can be considered as the cost which is paid only once at the creation of the contract. Mention the Recurring Cost and Depreciated Cost Amount in the corresponding fields. The details of the Vehicle and the address of the Driver can be mentioned under the Vehicle Information section. The date on which the cost has been executed will be available in the Invoice Date. The Contract Start Date indicates the date on which the coverage of the contract begins. The expiration date of the contract can be specified in the Contract Expiration Date field. The services included in the contract for the vehicles can be mentioned in the Included Services section. Additional information can be specified in the Terms and Conditions tab. Once you complete the configuration of the contract, you can see the status as In Progress. You will get the Close Contract button on the window to close the contract at any point of time. Once the contract reaches the expiration date, it will be moved to the Expired category.
Services
In order to ensure effective maintenance of the fleet of a company, it is essential to include advanced services for the vehicles in the contract. You can manage all types of services with the help of the OTX Fleet module. This module will assist you in defining services and service types according to your company policies. The Services menu will be available under the Fleet menu of the module. As depicted in the screenshot below, you will get a list view of the pre-configured services in your company.

The preview of the list includes the Date, Description, Service Type, Vehicle, Driver, Vendor, Notes, Cost, and Stage. The window can be viewed in List, Kanban, Graph, Pivot, and Activity views.

The Kanban view will be helpful to easily understand the stages of each service as shown above. Click on the Create button to create a new service for your vehicle. This will open a new window as shown in the screenshot below.

Here, you can add a Description for the service in the given space. Select suitable Service Type from the given options. In the corresponding fields, you can mention the Date, Cost, Vendor, Vehicle, Driver, and Odometer Value of the vehicle. Any additional information related to the service can be mentioned under the Notes section.
In order to define suitable Service Types, you can go to the Configuration menu of the module. Here, you can set different types for the services. When you select this platform, you will get the list of Service Types with their Name and Category.

In order to add a new category, you can use the Create button, which will provide a new line under the available list. You can mention the Name and Category of the Service Type and click on the Save button.
Odometer
To understand the mileage of a vehicle, you can use an Odometer reading. The Odometer option available in the OTX Fleet module will record the reading of each vehicle. This is usually used to find out the distance traveled by a vehicle. It is easy to record Odometer reading in the Fleet module. For this, you can select the Odometer option from the Fleet menu.

As shown in the image above, the list of Odometers includes the Date, Vehicle, Driver, Odometer Value, and Unit. In order to record a new reading, you can use the Create button.

The Create button will open a new line as shown in the image above. Here, you can mention the specified data in the corresponding fields and click on the Save button.
Configuration
The Configuration menu of the Fleet module includes advanced configuration options that will help to improve the main functionality of the module. You can find the Settings, Manufactures, Models, and Categories options under the Configuration menu. Let’s discuss each of these options in detail.
Settings
The Settings menu contains the Fleet Management tab, where you can set the End Date Contract Alert. You can set a date here, and OTX will send an alert particular days before the end date. This will help to get reminders about the end date of the vehicle contracts.

The New Vehicle Request field will help you to define conditions for new requests for vehicles. You can set a number here and the employee can not request a new vehicle if the available cars are more than the specified number.
Manufacturers
A company often keeps fleets from various manufacturers. You can keep a record of them under the Manufacturers menu in the Configuration option. The list of already configured manufacturers can be found here.

You can click on the Create button to add a new manufacturer. This will open a new window as shown below.

Here, you can mention the name of the new manufacturer and add an emblem of the manufacturer in the specified field.
Models
The Models menu available in the Configuration option can be used to configure multiple models for a vehicle. This platform will show the already configured models of vehicles in your system.

As you can see in the screenshot above, the Models window will show the details of the Manufacturer, Model Name, Vehicles, Category, and Vehicle Type. you can use the Create button to configure a new model.

Here, you can mention the name of the Model Name in the given space. In the corresponding fields, you can add the Manufacturer, Vehicle Type, and Category.

Under the Information tab, you can specify the Seats Number, Doors Number, Color, Model Year, and Trailer Hitch. Use the Engine section to mention the Fuel Type, CO2 Emissions, CO2 Standard, Transmission, Power, Horsepower, and Horsepower Taxation.

The Vendors of the model can be added under the Vendors tab using the Add button. You can configure multiple models of a vehicle using this platform.
Categories
The Categories option available in the Configuration menu can be used to set different categories for the vehicles. The configuration of the categories is an easy process. You can click on the Categories option which will open a new window with the lost of already configured categories. You can simply click on the Create button which will open a new line where you can mention the name of the category.

Reporting
You can perform the cost analysis of the fleet management using the reporting feature available in the OTX Fleet module. This option will benefit you to get an idea related to the cost of fleet management over a period of time.

The cost can be analyzed based on Service, Contract, and Date. You can group the report according to vehicle and driver. By selecting the Date filter, it is possible to compare the report with the previous year or previous period. The report can be also viewed in the Pivot table. You can convert the report into a spreadsheet as per your requirements. All operations related to fleet management in a company can be now easily managed and monitored with the help of the dedicated Fleet module in OTX 16.
Knowledge
Whenever OTX releases its latest version, it always makes sure to include some exciting features for users. When we check the versions of OTX from the last few years, we can observe the evolutionary path of OTX in accomplishing the fastest processing and enhanced implementation in the governance of multiple business functions simultaneously. The new Knowledge module is the latest addition introduced in OTX 16 that will assist users to build and share articles and documents more conveniently within an organization. This highly integrated module will work like a knowledge center where you can share knowledge among the employees which will benefit to maintain proper communication in the organization. You can create and share all kinds of work-related knowledge and articles in this module.

The new Knowledge module can act as a collaborative library to meet your needs. The aim of developing this module is to centralize all scattered company data and documents in a single place so that you can easily retrieve them in times of emergency.

The above-shown screenshot is the home page of your Knowledge module. You will get all menus related to this module on the left side of the screen. Using the Search bar, you can search for articles in this module. When you click on the search button, a new pop-up will appear as shown below.

Here, you can specify the name of the article. Using this same wizard, you can search for particular users, channels, and menus. For getting the list of users, you can use @. Using # will give the list of channels and / will show the available menus. Clicking on the Advanced Search button will lead you to a new platform where you will be able to get the list of all available articles in the Knowledge module.

From the list view, you can see the Name, Parent Article, Created By, and Created on details of the articles. You will be able to access this window using the Search menu available in the main menu bar of the module.

You can use the search bar to search for articles. The articles can be filtered based on Article Items, Favorite, Workspace, Shared, Private, and Trashed.

Additionally, you can set multiple custom filters for the articles with the help of the Add Custom Filter button. You can group the articles according to their Section and Menu Article using the default Group By option.

Use the Add Custom Group button to create a custom grouping option for articles.
Using the Star icon given on each article, you can add articles to your favorite list. You will get access to the list of your favorite articles from the home page itself. As shown in the image below, the Favorites menu given on the left side of the screen will show all the articles that you highlighted with the star icon.

Similarly, you will get separate menus for Workspace and Private documents.

From the Configuration menu of the module, you will get the Favorite option which will show the record of all your favorite articles with the details of the Article name and User name. Using the Create button, you can add an article to your favorites list by selecting the name of the Article and User in the respective column.
Let’s check how to create new articles in this module.
Create New Articles
Everything is well organized in this module. If you want to create a new article for your workspace, you can move your cursor near to the Workspace menu. A + icon will appear as shown below that will assist you to a new window to create a new article.
You can create a new article as per your requirement in this window.

While adding content to your article you can use the / icon which will provide multiple options to enhance your writing.

With the help of this, you can create a simple bulleted list, a list with numbering, track tasks with a checklist, insert a table, insert a horizontal rule separator, add a blockquote section, add a code section, add columns, adjust heading pattern, switch text’s direction, paragraph block, insert an image, link an article, add a link, add a button, add a specific appointment, schedule an appointment, insert rating, insert a list view of article items, show the first level of nested articles, insert a kanban view of article items, show all nested articles, add a table of content, embed a file, add a template section, and insert your signature.

To create a nested article under a parent article, you can follow the same method using the + icon.

After creating the article, you can add this to your favorite by using the star icon.
Sharing Articles
All internal users of the database will get access to the article created in the Workspace platform. It is easy to set access rights on an article in the Knowledge module. After completing the article, you can click on the Share button given in the top right corner of the screen.

By enabling the Share to web button, you can publish the article on the website and share it with anyone.

You will get a link to the article and you can copy it to share on other platforms. It is also possible to invite users to read or edit the article using the Invite button. A new wizard will appear as shown below.

While inviting users, you can set their access rights. If you want to restrict the article from any kind of edit and provide reading access only, you can select the Can Read option in the Permission field. By selecting the Can Write option will allow the users to read as well as edit the article. Selecting the No Access option will restrict the mentioned users from viewing and editing this article.

After mentioning the users in the Recipients field, you can click on the Invite button to invite them. Now, the Share button will show the list of users who have access to this article as shown in the screenshot below.

You can remove users from the list by clicking on the ❌ icon.
It is possible to define the access rights of the internal users also from this window.

You can set the access right as Can Read, Can Write, or No Access as per your demand.

You can initiate a chat with the users of the article with the assistance of the Open chatter icon.
Operation Tools
OTX offers several operation tools for an article in the three vertical dots given on the top right corner of the screen. You can perform different operations using these tools.

If you want to move this article to another folder, you can click on the Move To option which will give a pop-up window to select another folder or parent article as shown below.

After mentioning the folder name, you can click on the Move Article button which will move this article from the current folder to the mentioned folder.

Click the Lock option to lock your article. OTX will not allow any kind of edits on a locked article. You can use the Unlock button to unlock such articles.

Using the Delete button, you can delete the article. Once you click on the Delete button, it will be moved to the Trashed folder which can be observed from the Configuration menu.

The list of trashed articles will show the details regarding their Name, Parent Article, Last Edited By, Last Edit Date, and Deletion Date. If you want to retrieve the article from the trash, you can click on the respective article.

Click the Remove from Trash option and OTX will retrieve the article. There is a smart button available on the home screen called Open the Trash that will directly open the trash list in your Knowledge module.

The deleted articles will be stored in your trash for an extra 30 days before being permanently removed from your database.
You can make a copy of the article and store it in your private folder using the Create a Copy button.

Enabling the Full-Width option will give a full-width view of the article. Additionally, you will get the Last Edited By and Created By details of the article in this operation tools menu.
Members
In the OTX 16 Knowledge module, you will get a separate menu to manage the members of the articles. You can access this platform from the Configuration menu.

As you can see in the screenshot above, the list view will show the Article, Partner, and Permission granted to them. By clicking on a particular article, a window will appear on the screen.

If you want to change the access right of the partner, you can change it from the Permission field. The Inherited Permission of the member can be observed in this window. By clicking on the Create button given on the right corner of the screen, you can add a new member to any of the articles created by you and set permissions accordingly.
With the assistance of the new Knowledge management system in OTX 16, you can create and share knowledge with your colleagues effortlessly and systematically.
Help desk
When dealing with customers, it is important to ensure a customer support system in your company in order to grow your business effectively. Efficient customer service has to be a part of every company from day one. Offering the best customer support will help you to improve your marketing and sales opportunities. Meeting customer’s satisfaction and solving their problems without any delay is the best key to build a healthy relationship with your customers. The advanced OTX 16 Help Desk module offers a dedicated platform to perform the operations of a customer service provider. This module will assist you in solving all business-related queries and complaints from your customers. Once a customer raises a ticket for service, the help desk department of your company can use this module to take necessary actions to solve the reported issue. Let’s check how this module works in this chapter.
When you open this module, you will land on the main dashboard of the module as shown in the screenshot below.

This is the Helpdesk Overview of the module. Here, you will get an overview of the major operations of the module. You will get My Tickets and My Performance sessions in this window. In the My Ticket session, the window displays the number of open tickets, high-priority tickets, and urgent tickets. The Average open Hours of each ticket can be seen here. In the respective ticket fields, you will get the number of failed tickets. It is possible to do a performance analysis using the My Performance session. Here, you can obtain all the necessary information to evaluate the performance such as Closed Tickets, Success Rate, and Average Rating of the particular day and last 7 days. Additionally, the Daily Target is also shown in this field.
You can use My Teams, Followed Teams, and Archived as Filters. In the Group By option, you will get the Company as a grouping option.

From the dashboard itself, you can observe the helpdesk team configured in your database. The details of each help desk team are shown separately. The details include the closed tickets, success rate, average rating, number of open tickets, unassigned, urgent, and failed tickets. Clicking on the Tickets button will open the tickets assigned to the respective help desk team.

Clicking on the three vertical dots given on the top right corner of the help desk team tab will open a new menu bar as shown in the screenshot above. Here, you will get a view button to view the Tickets. The Reporting option includes the Ticket Analysis and SLA Status Analysis buttons. This dashboard can be used to get an overview of the operation included the Help Desk module.
Help Desk Team
In order to manage the tickets, you can create different help desk teams in the Help Desk module. This will help you to solve issues and queries raised by customers quickly and systematically. When a new ticket is being created in the module, the admin can assign that ticket to a team and that particular help desk team will be responsible for closing the ticket within the time limit. You can find the Help Desk Team option under the Configuration menu of the module.

Already configured help desk teams can be observed here. The preview of the list includes the Name, Email Alias, and Company. You can use the New button to create a new help desk team.

The form view of the Team creation window is shown above. Here, you can provide the name of the team in the given space. After mentioning the name of the team, you can add one tow line to describe this team to your colleagues and customers. Specify the name of the company in the given space. The Assignment & Visibility tab can be used to define the visibility of the team. Here, you can decide the people to whom this helpdesk team and its tickets will be visible. You can set the visibility to Invited internal users, All internal users, or Invited portal users and all internal. In the Followers field, you can mention the followers of this team so that they will receive notifications whenever tickets are created, rated, or discussed in this team. By activating the Automatic Assignment, you can automate the assignment of new tickets to the right people, and make sure all tickets are being handled. Here, you will get two options to decide the method of assignment such as Each user is assigned an equal number of tickets and Each user has an equal number of open tickets.
The Channels tab can be used to define the channels to collect the tickets. You can activate the Email Alias to create tickets by sending an email to an alias. It is possible to set the email Alias in the given space. Activating the Live Chat option allows you to enable a live chat option on your website so that you can easily get in touch with your website visitors. You can enable the Website Form to get tickets through an online form.

By activating the Timesheets option, you can track the time spent on tickets. Here, you can mention a project to which the timesheet of this helpdesk team’s tickets will be linked. In order to bill the time spent on your tickets to the respective customer, you can enable the Time Billing option from the Track & Bill Time tab.

Activating the SLA Policies will make sure that the tickets are handled on time. The working hours used to determine the deadline of the SLA Policies can be specified here. In order to track customer satisfaction on tickets, you can use the Customer Ratings option. Once you activate this option, you will get an additional field which can be enabled to publish this team’s ratings on your website.
You can use the Knowledge feature to centralize, manage, share, and grow your knowledge library. Set an Article in the given field on which the customer will land by default and to which the search will be restricted. The eLearning option can be activated to share presentations and videos and organize them into courses. The courses can be mentioned in the given space. You can let your customers answer each other’s questions on a forum by activating the Community Forum option. You will get a space to mention the Forums in this window. Activate the Automatic Closing option to close the inactive tickets automatically. By activating this option, you will get a space to mention the stage to which the closed tickets will be moved. You can also mention days of inactivity here so that OTX will automatically close tickets after the mentioned days of inactivity. Activating the Closure by Customer option will allow your customers to close their own tickets.

In the After Sales tab, you can activate the Refunds option to issue credit notes for customers, Returns option to return faulty products, Field Service option to plan onsite interventions, Coupons to grant discounts or free products, and Repairs to send broken products for repair respectively. Once you complete all fields, your new helpdesk team is ready to use.

As you can see in the screenshot above, the user will get some smart buttons on the form view to manage the operations related to the helpdesk team in a single place. The Tickets button will show the list of tickets assigned to this particular helpdesk team. The customer satisfaction rating for this team can be seen in the Satisfaction smart button. The total working hours recorded for this helpdesk team is shown in the Recorded button. The Repairs button can be used to manage the repair orders created from the tickets of this team. The SLA Policies associated with this will be available in the respective smart button. Using the Go To Website button, you can go to the website view of this team.

This is the customer preview of the helpdesk contact page. Here, you can view the description that you created for your team on the right side of the screen. The customer can submit a ticket using this form. They can mention their issue in this form and click on the Submit button. When the customer clicks on the Submit button, a new ticket will be created in the Helpdesk module and automatically assigned to the respective team.

The customer will get the ticket number and a message from the team, as shown in the screenshot above. Now, the assigned helpdesk team can work on this ticket and solve the issue as soon as possible. The operations related to this ticket can be managed in the Tickets menu available in the Helpdesk module.
Tickets
The customers can report their issues or ask queries via various channels in OTX 16. With the help of the Helpdesk module, you can provide support to your customers effortlessly. The customer can use live chat, message, contact us page, forum, website, email, and phone call options to get support from the helpdesk team of a company. When a customer asks for any kind of support from your company, you can register the issue by creating a ticket manually in the Helpdesk module. In OTX , it is possible to automate the process of helpdesk ticket creation. All such tickets will be managed in the Tickets menu of the Helpdesk module in OTX 16.
Under the Tickets menu, you can find My Tickets and All Tickets options. As the name indicates, the My Tickets platform will show the list of tickets assigned to you. The All Tickets platform can be used to observe the tickets of all helpdesk teams in your company.

The list view of the Tickets is shown above. Apart from the list view, you can use Kanban, Activity, Pivot, Graph, and Cohort views as per your demands. The preview of the list includes ID, Priority, Name, Team, Assigned to, Customer, Company, Activities, SLA Deadline, and Stage. The view can be expanded using additional fields which can be activated from the list that appear after clicking on the menu available in the right corner of the list view.

From this list, you can activate Sales Order Item, Hours Spent, Analytic Account, Product, SLSs, Creation Date, Last Updated On, Type, Tags, Rating, and Kanban State. On this platform, you can use My Tickets, My Team’s Tickets, My Department, Followed, Unassigned, Urgent, High Priority, Medium Priority, Low Priority, SLA Success, SLA in Progress, SLA Failed, Tickets in Overtime, Open, Closed, Closed in Last 7 Days, Closed in Last 30 Days, Satisfied, Okay, Dissatisfied, No Rating, Creation Date, and Archived as default filters. Use the Custom Filter option to create customized filters for tickets. As default, you can use Assigned to, Team, Stage, Type, Priority, Status, Customer, Company, Analytic Account, and Creation Date for grouping.
In order to create a new ticket manually, you can use the New button. This will lead you to a new form where you can mention the issue reported by the customer, as shown in the screenshot.

Provide a title for the ticket in the given space. According to the selected Helpdesk Team for this ticket, you can view the associated SLA Policies and SLA Deadline in the respective field. The ticket can be assigned to an employee by mentioning the user id in the Assigned to field. Based on the priority of the ticket, you can give stars in the Priority field. In the corresponding fields, you can specify the Type, Tags, and Company. The name of the customer can be selected from the drop-down. Based on the preconfigured details, the Email and Phone field will be auto-populated as soon as you select the customer name. If the ticket is being generated for support regarding any purchased item, you can add the respective sales order in the Sales Order Items field. Mention the Analytic Account to record the accounting details related to the operations of this ticket. If the ticket is related to any product of the company, you can specify it in the Product field. Additionally, you can add the Lot/Serial Number of the product also. Now, the Add a Property button can be used to add any customized fields to the form view.
In the Description field, you can detail the issue reported by the customer and the information related to the ticket. The Timesheet tab will record the time spent on the ticket to solve the issue. This can be done manually and automatically. Once you complete the creation of the ticket, you will be able to get various operation buttons on the screen as shown below.

The Start button can be used to record the time worked on this ticket by the respective helpdesk team. Whenever an employee from this team works on the ticket, the user can click on the Start button. OTX will start to record the time as shown below.

Once the work is completed, you can use the Stop button to stop the timer. This will open a pop-up window to confirm the time recorded by OTX .

After checking the time, you can use the additional space to describe the activity. Use the Save button to save time into a timesheet. Under the Timesheet tab, you can see the confirmed time.

It will show the Date, Employee, Description, and Hours Spent.
In some cases, companies often offer refunds to customers under certain rules and regulations. In order to offer a refund to a customer, you can use the Refund button available on the Ticket form view.

Clicking on the Refund button will open a pop-up window as shown below, which can be used to mention the details of the Refund.

Here, you can add Sales Order, Invoices to Refund, Reason, Reversal Date, and Journal in the respective fields. Clicking on the Reverse button will reverse the invoice and create a customer credit note.
If the customer wants to return the product purchased from your company, you can record the return using the Return button available on the ticket.

When you click on the Return button, you will get a pop-up window.

Here, the name of the product mentioned in the ticket will be available with Quantity and UoM. Additionally, you can add Sales Order, Delivery to Return, and Return Location details in this window and click on the Return button.

Now, you will get a return order as shown in the image above. You can click on the Validate button to confirm the return after checking the details available in this window.
If the product is damaged and the customer wants to repair it, you can generate a repair order for the product using the Repair button.

This will generate a repair order for the product.

You can check the repair order and click on the Confirm Repair button.
You can send rewards and coupons to your customers. The Coupons button will help you to send coupons to the respective customer.

Clicking on the coupon button will give a pop-up window as shown below. Here, you can mention the Coupon Program that you want to offer to your customer.

Click on the Generate button.

The coupon code will be available in this pop-up window. The Send button will help you to send the coupon to the respective customer.

As you can see in the screenshot above, OTX will generate an automated email with the details of the coupon with an attachment. By following this method, you can send coupons to your customers.
Some tickets demand field service operations to solve the issue raised by the customer. In such cases, you can use the Create Task button to create new tasks for field service operations.

When you click on this button, you will get a pop-up window to specify the details of the new task.

Here, you will get the Title, Project, Worksheet Template, and Customer details. You can check the information and click on the Create Task button. This will create a new task in the OTX Field Service module. You can manage the task from the Field Service module and close the ticket once the task is completed.
You can share the query or issue raised by a customer on forums which will allow others to share their thoughts on the issue. In order to share the ticket on forums, you can click on the Share on Forum button.

You will get a pop-up window as shown below.

Here, you can mention the Forum on which you want to post this ticket. Provide a Title along with suitable Description and Tags in this window. Clicking on the Create Post button will create a new post on the Forum you mentioned.

Based on the operations you perform on the ticket, the corresponding smart buttons will appear on the window, which can be used to manage the respective operation directly from this window.
Under the Configuration menu of the Helpdesk module, you can find the Types option, which can be used to create various types of tickets. Clicking on this option will open a new window with the list of already created ticket types.

If you want to create a new type for the tickets, you can click on the New button which will open a new line under the existing list

You can use this line to mention the Name of the new ticket type. Clicking on the Save button will add a new type to the ticket type in the OTX Helpdesk module.
Stages
Stages will help you to understand the progression of each helpdesk ticket. You can create various stages for tickets to organize them according to their progress. This will also help your teammates to easily recognize the status of the ticket by looking at the stage itself. In order to create new stages for the helpdesk tickets, you can go to the Configuration menu and select the Stages option.

Here, you can see the Name and Teams of each stage created in this module.

Using the New button will open a new form view to create a stage as shown in the screenshot above. Here, you can provide a Name for the stage in the given space. Add suitable Email and SMS Templates in the respective fields which will be sent to the corresponding customer whenever a new ticket reaches this stage. The Teams field can be used to mention the names of the helpdesk team to whom this stage will be visible. Add description to the stage in the Stage Description field so that your teammates will be able to understand the meaning of this new stage. After adding all details you can use this stage for the tickets to arrange them in a systematic manner.
SLA Policies
In the OTX Helpdesk module, you can use SLA Policies to define the terms and conditions between the service provider and the customer. No matter what service you are providing to your customers, it is important to set certain time validity and rules to perform the operations to solve the issues raised by the customer. SLA policies will assist both parties to come to terms concerning the helpdesk service. Using SLA Policies on tickets will define the target time to solve the issue. You can find the SLA Policies option under the Configuration menu of the module.

Here, the list view will provide the Name, Team, Priority, Types, Reach Stage, and In details of the SLA Policies. You can click on the New button to create a new one.

The name of the policy can be specified in the given field. You will get additional space to add a description related to the policy. Under the Criteria tab, you can specify the name of the Team who can use this policy. In the corresponding fields, you can set Priority, Types, Tags, Customers, and Sales Order Items to which this SLA Policy will be applicable. Under the Target tab, you can set Reach Stage which is the minimum stage a ticket needs to be reached in order to come under this policy. The In field can be used to mention the minimum working hours required to reach the target stage to satisfy this policy. You can add stages in the Excluding Stages field to exclude the time spent on that particular stage from the calculation of the SLA. This is how we create SLA Policies in the OTX Helpdesk module.
Canned Responses
It is possible to create canned responses in OTX to communicate with your customers. These predefined responses can be used to reply to your customers for commonly asked queries and questions. Go to the Configuration menu to create such Canned Responses in the Helpdesk module.

Here, you will be able to see the Shortcut and Substitution of various Canned Responses. Clicking on the New button will open a new line where you can create a new Canned Response. Use the Save button to save the new one to your system. You can use “:” in the chatbox to get the list of canned responses.
Reporting
In order to analyze the operations done in the Helpdesk module, you can use the Reporting platform available in the module. The dedicated reporting platform will give detailed reports of all helpdesk operations. This report will help you to evaluate the operations based on various criteria. Under the Reporting platform, you will get Ticket Analysis, SLA Status Analysis, and Custom Ratings options.
The Ticket Analysis platform will give detailed reports on tickets recorded in the module. You can create custom reports using the customization features available in the Group By and Filters options.
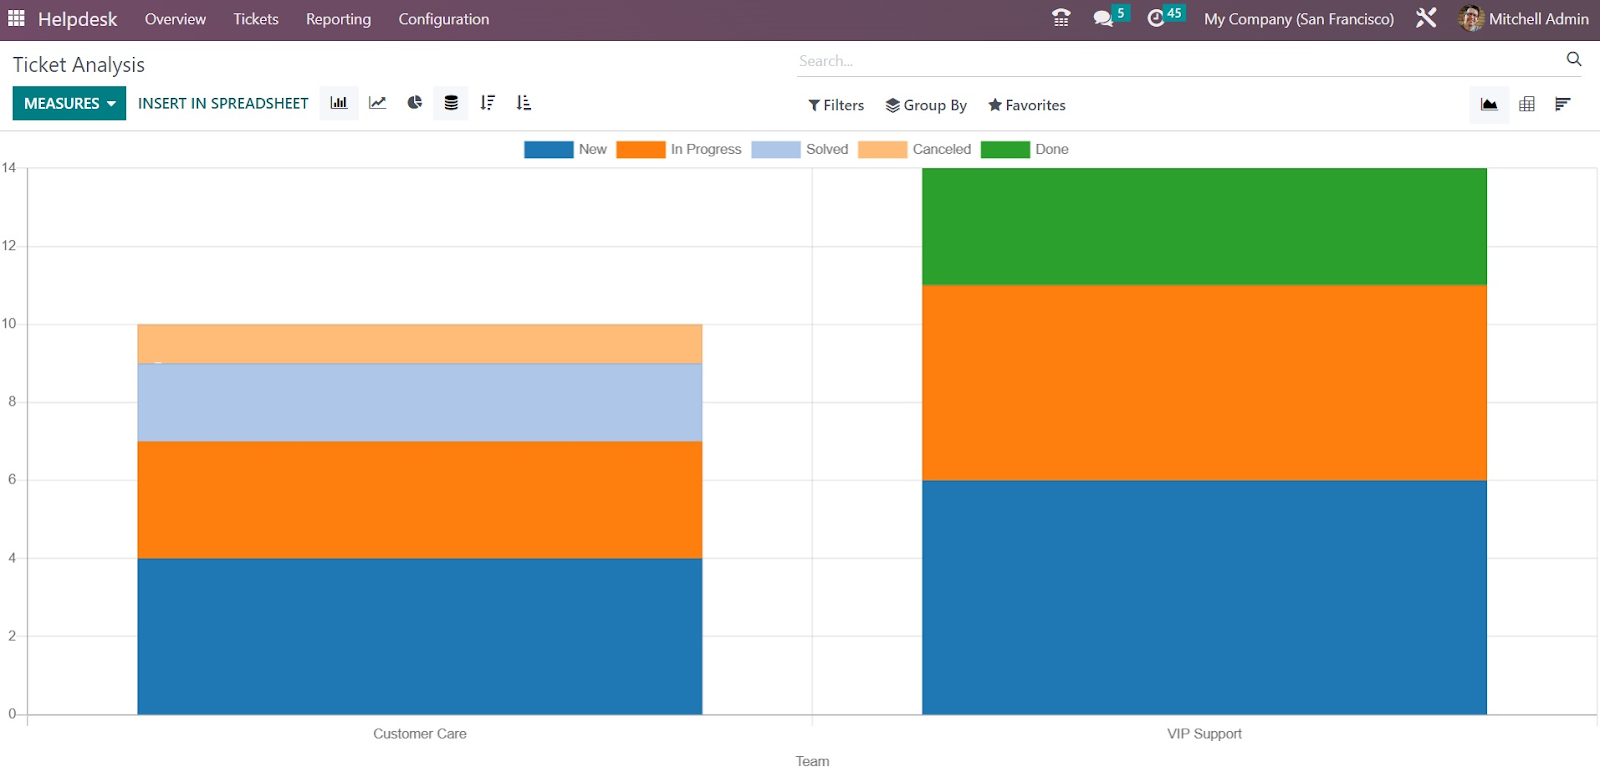
You will get My Tickets, My Team’s Tickets, My Department, Followed, Unassigned, Urgent, High Priority, Medium Priority, Low Priority, SLA Success, SLA in Progress, SLA Failed, Tickets in Overtime, Open, Closed, Closed in Last 7 Days, Closed in Last 30 Days, Satisfied, Okay, Dissatisfied, No Rating, Creation Date, and Archived as default filters. You can use Assigned to, Team, Stage, Type, Priority, Status, Customer, Company, Creation Date, SLA Deadline, and Closing Date as the default grouping option.

As Measures, you can use Average Hours to Respond, Hours Open, Hours Spent, Hours to Assign, Hours to Close, Hours to First Response, Hours to SLA Deadline, Rating, and Count. The view of the report can be altered between Graph, Pivot, and Cohort views.
The SLA Status Analysis platform will give an overview of the SLA policies used on different tickets. You can evaluate the status of such SLA policies on this platform.
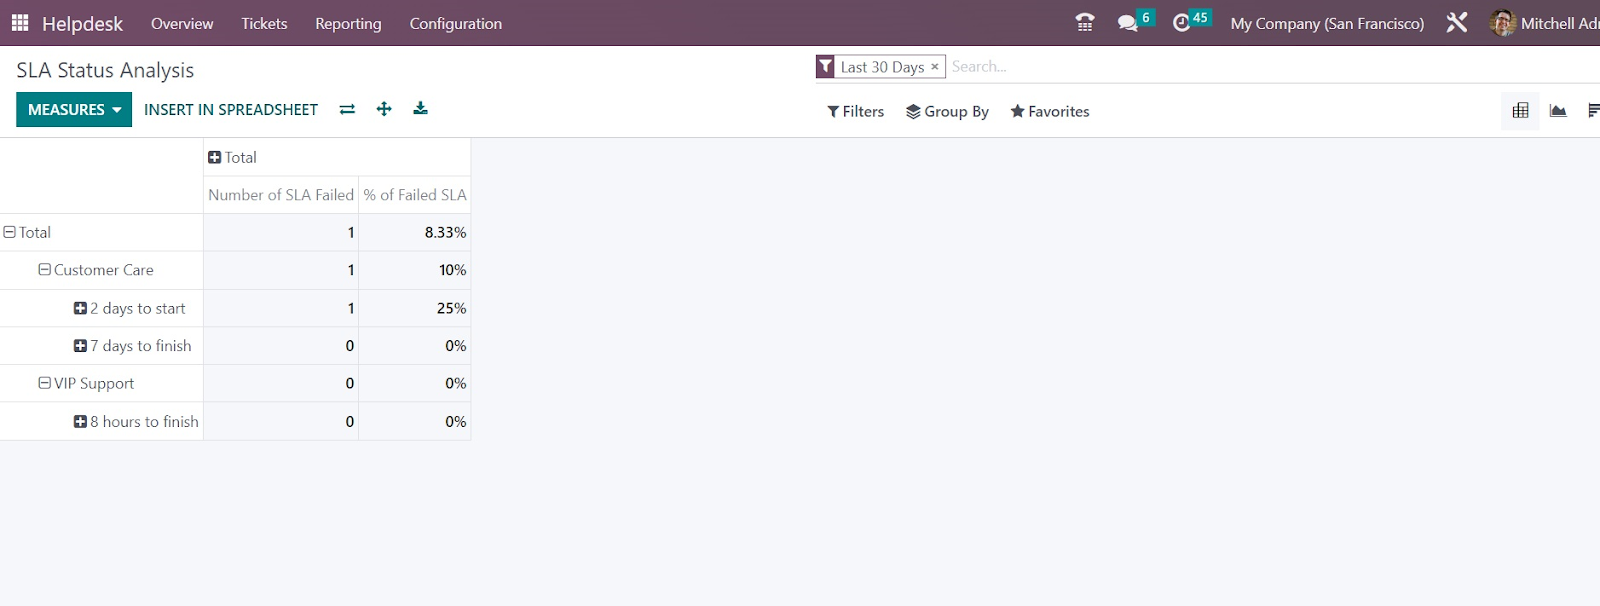
The Filters and Group By options will be available on this platform also, which will help you to get customized reports. Here, you can use % of Failed SLA, % of SLA in Progress, % of Successful SLA, Number of SLA Failed, Number of SLA Successful, Number of SLA in Progress, Working Hours to Assign, Working Hours to Close, Working Hours to Reach SLA, and Count as Measures for the reports.
The Customer Ratings platform will give an insight into the feedback from customers for your helpdesk services.
The window displays ratings from customers along with their name, responsible employee, name of the ticket, date, and comments about the service.
The OTX 16 Helpdesk module is the best solution for your company to manage your customer support services in a single place.
Field service
In order to run your business successfully, it is essential to prioritize your customers no matter what the situation might be. With the help of the OTX 16 Field Service module, you can serve your customers in field activities. Managing on-site work will be easy and systematic when you seek support from ERP software. What makes OTX 16 attractive among other software is the system will offer aid to all operations related to fieldwork. The software will keep track of each process of the registered field service. Sometimes customers require an expert’s assistance in implementing or installing services or products purchased from a company. In such cases, you can offer assistance to the customers by adding the service details in the Field Service module. This module will track the process from start to finish. It is possible to create a quotation for the field service and generate an invoice based on the completed tasks or hours spent.
When you open the Field Service module, you will get the My Tasks window, as shown in the screenshot below.

This window will show all tasks assigned to you in a Kanban view. The task can be managed according to the creation date. The user will get My Tasks, Followed, Unassigned, Favorite Projects, Timesheets, Last Stage Update, Open Tasks, Closed Tasks, Closed on, and Archived as Filters for the tasks on this window. You can group the tasks using the Group By options. The default Group By options are Assignees, Stage, Project, Worksheet Template, Milestone, Customer, Company, Creation Date, Assignment Date, and Last Stage Update
The platform can be viewed in Kanban, List, Map, Calendar, Gantt, Pivot, Graph, and Activity views. On each task, you will get the details of the task name, customer, assigned employees, tags, and scheduled date.

The star icon can be used to prioritize tasks. In order to schedule new activities for the task, you can use the small clock icon available on each task. You can directly assign employees from this window. As shown in the screenshot above, you will get a space to add the new employee to this task.

When you move the cursor to the profile of the assigned employee, you will get a cross icon that can be used to remove the respective employee from this task.

The three small vertical dots on the top right corner of each task will give options such as Set Cover Image, Share, and Edit.
Let’s check how to add a new task in this window. For this, you can directly click on the New button, which will direct you to the form view, as shown in the screenshot below.

The name of the task can be specified in the given field. In OTX , you can create a project for this service and arrange tasks under that project to track the progress. You can select the Project from the drop-down menu. Select a suitable Worksheet Template for this task from the available options. In the Assignees field, you can assign employees to this task. Suitable Tags for the task can be added in the respective field. In the Customer field, you can specify the details of the customer. In the Sales Order Item field, you can select a sales order to which you want to invoice this particular task. The total allowed time for this task can be defined in the Allocated Hours field. In the Planned Date field, you can set the scheduled date for the task. Additional details regarding the task can be detailed in the Description tab.

In the Timesheet tab, you can record the time worked by employees for this task using the Add a Line button. Here, you can add details of the Date, Employee, Description, and Hours Spent.

Under the Sub-tasks field, you can split this task into different sub-tasks to monitor the entire operation systematically. It is possible to assign employees to these sub-tasks from this tab.
In the form view, you can find the smart buttons Products and Worksheet, which will give the details of the products and worksheets associated with this task.

Once you complete the configuration, you can click on the Start button to automatically track the time spent on this task. As soon as you click on this button, OTX will start recording the time.

After completing the work, you can use the Stop button. You will get a pop-up window to confirm the time recorded by OTX .

You can confirm the time spent manually here. The tracked time will be recorded under the Timesheet tab of the task.

Once you complete the task, you can click the Mark as Done button. This will open a new button on the screen to create an invoice for the task. You can generate an invoice and complete the payment procedures after this.

Here, you can find the Send Report on the screen which can be used for sending the report of the worksheet to the concerned customer.

You can check the content of the report and add suitable attachments to the auto generated mail. Then click on the Send button.
The Sign Report button available in the form view of the task will lead you into the customer portal as shown in the screenshot below.

This is the preview of the customer portal where the customer can sign the document digitally.
Under the My Task menu, you will get the Map option that will provide a map view of the tasks as shown in the screenshot.

Here, you can use the View in Google Maps option to view the tasks in Google Maps. When you click on the task marked in the map, you will get a preview of the task details as shown in the screenshot below.

The details include Name, Address, Customer, Phone, Worksheet Template, Project, Assignees and Scheduled Date.
Tasks analysis
The Reporting menu of the Field Service module offers the Tasks Analysis option, which can be used to analyze the tasks recorded in the module. You can evaluate the field services tasks on this platform.

For effective analysis, you can use suitable Filters and Group By options. This platform offers Graphical and Pivot views. You can select a suitable view according to your demand. It is possible to generate customized reports using the Custom Filter and Group options. As Measures, you will get Days to Deadline, Effective Days, Overtime, Planned Days, Progress, Remaining Days, Remaining Hours on SO, Working Days to Assign, Working Days to Close, Working Hours to Assign, Working Hours to Close, and Count.
The OTX 16 Field Service module will assist you from start to end in performing all operations efficiently and systematically.
All Tasks
In the OTX Field Service module, you will get the All Tasks menu which will record the details of all field services tasks configured in your system. All tasks assigned to various employees can be observed here.

It is possible to view this platform in List, Kanban, Map, Calendar, Gantt, Pivot, Graph, and Activity views. The screenshot shown above is the List view of All Tasks. The preview of the list provides the details of the Title, Worksheet Template, Project, Customer, Assignees, Company, Start Date, End Date, Activities, and Tags. Using the New button, you can create a new task, just like we detailed in the earlier session.
Under the All Task menu, you will get the To Schedule and To Invoice sub-menus.

The tasks that are waiting to be scheduled can be observed from the To Schedule platform. In order to get this list, you can also use the To Schedule filter option from the All Task view.

The tasks that are waiting to be invoiced will appear in the To Invoice platform. You can select the task from this list and generate an invoice without any trouble.
Planning
Having a separate platform for planning tasks based on the availability of dates will make the field service scheduling more systematic and organized. In the OTX Field Service module, the user will get a dedicated platform where you can check the available dates and plan tasks and services based on Employees, Projects, and Worksheet Templates.
The Planning By User option will open a Gantt view where you can observe the assigned tasks according to users. The name of the user will be shown on the left side panel.
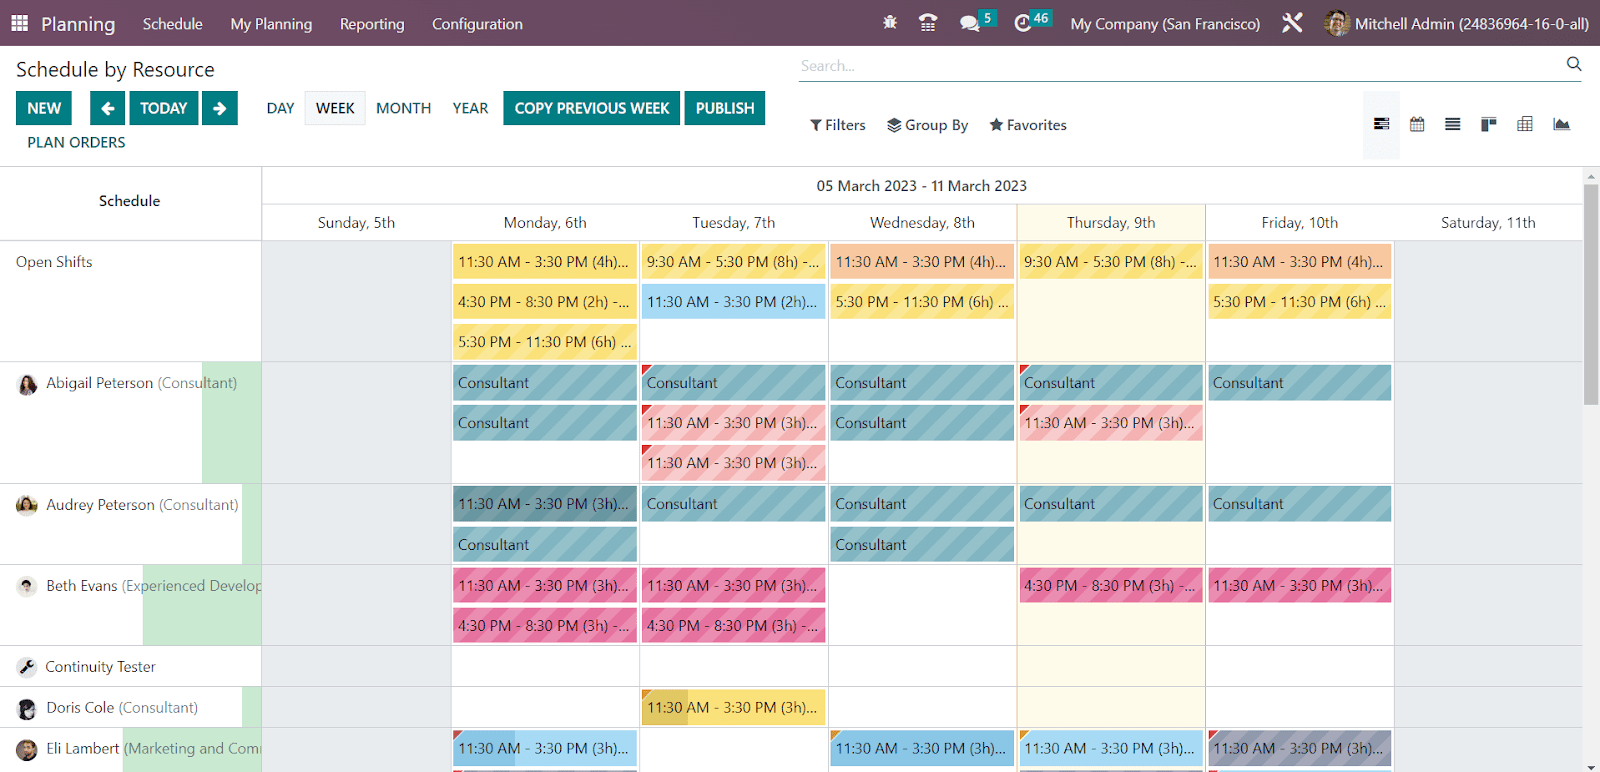
Based on the user, you will get the details of the task scheduled on particular dates. You can set the view according to Day, Week, Month, or Year. In order to plan a new task, you can use the New button. Otherwise, you can place the cursor on a particular date which will display a plus icon, as highlighted in the screenshot above. Clicking on this plus button will open a new pop-up where you can add the details of the new task.
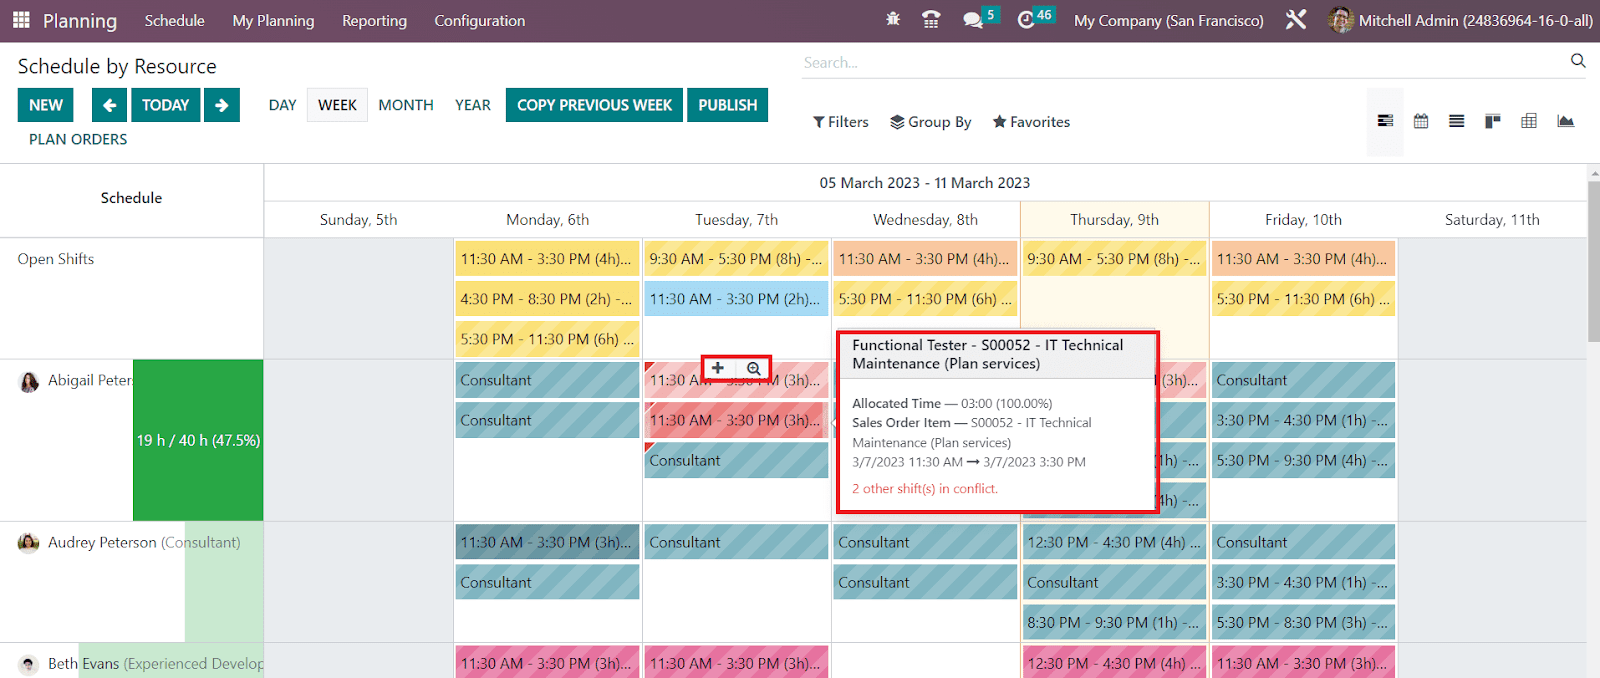
By doing so, the task will be automatically assigned to the respective employee.
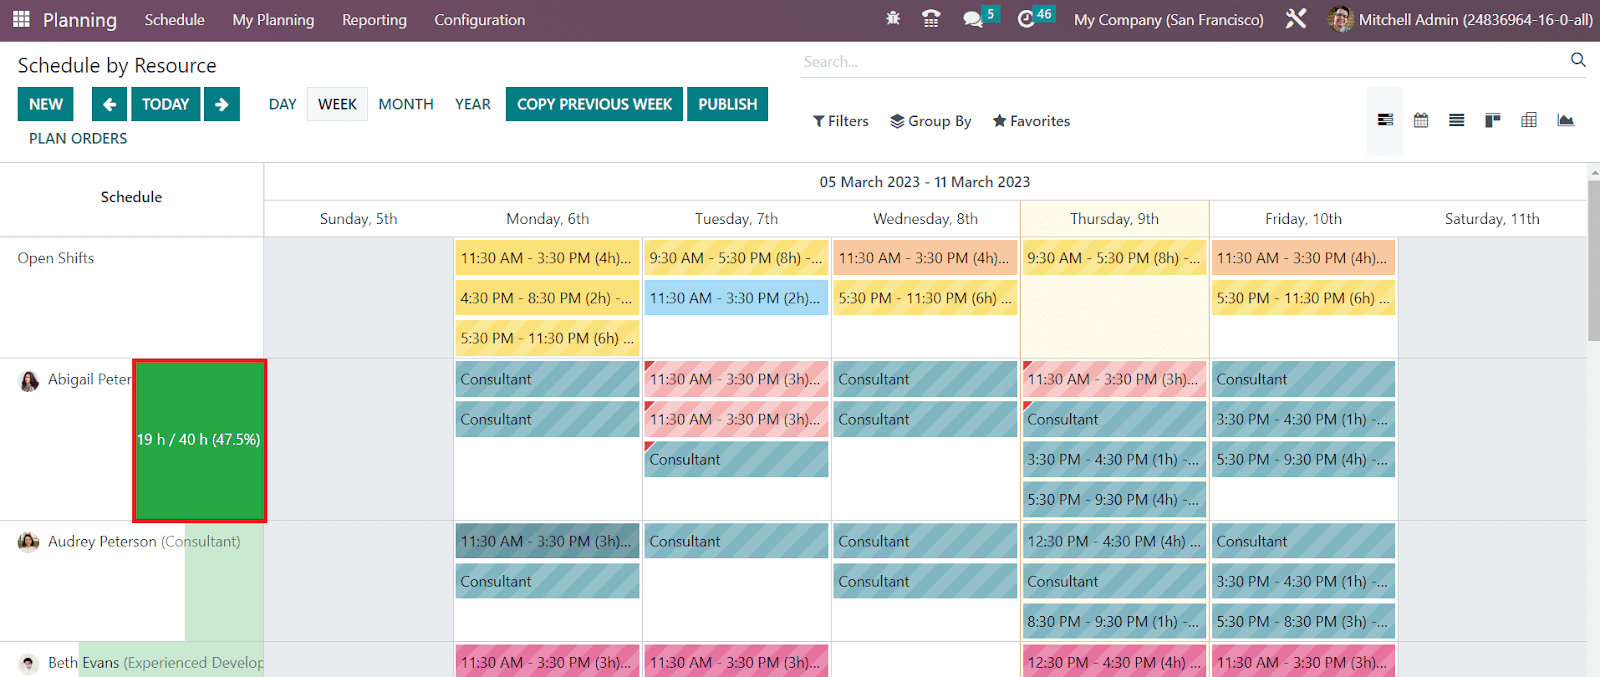
The total hours spent by an employee can be seen next to the name of the employee as shown above.
Using the Planning By Project option, you can directly plan and assign tasks to a particular project.
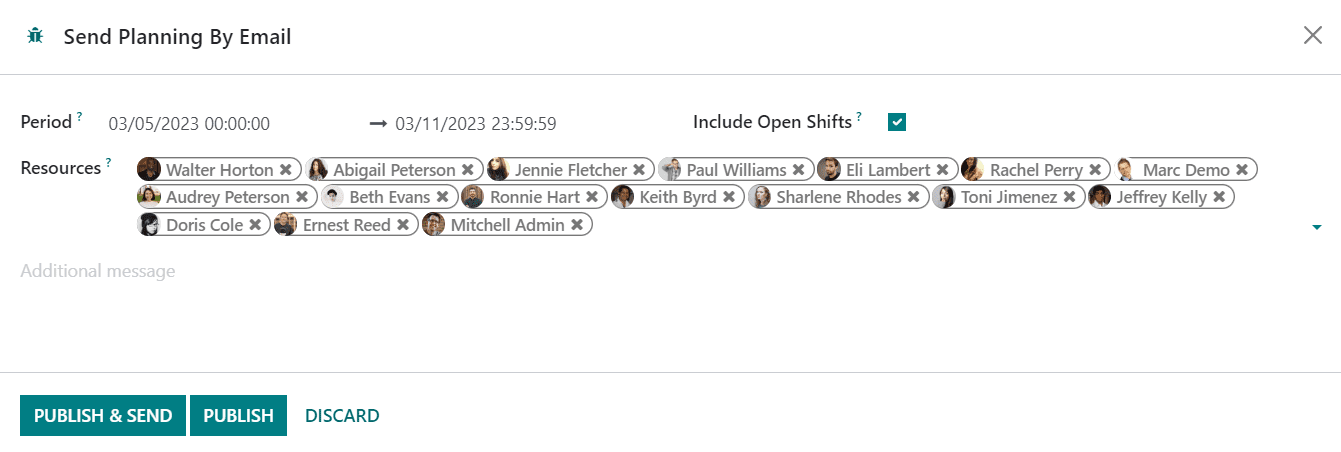
You can observe the tasks according to assigned projects on this window. You will get options to expand and collapse the rows of the Gantt view on this window. In order to create a new task under a particular project, you can select an available date from the respective row and click on the plus icon.

The Planning by Worksheet Template platform is shown above. Here, the task will be arranged according to the respective worksheet template.
Projects
You can create different projects for each field service. Based on the service you are going to perform, it is possible to create suitable projects in the Field Service module. When you create a new task for field service, you can add that task under a particular project if they belong to the same category. Configuring Projects earlier will benefit you while creating new tasks. You will get an option to select from these preconfigured projects at the time of task creation. The features of the Project menu are the same as those we discussed in the Project module. Here, you can find the Project menu under the Configuration menu.

The list of already created Projects will be displayed on this platform. It shows the Name, Worksheet Template, Company, Start Date, Enda Date, Allocated Hours, Project Manager, and Stage. Use the New button to create a new project.

As you can see in the screenshot above, clicking on the New button will open a new form view. The name of the project can be added to the specialized field. You can set a name to refer to the tasks under this project in the Name of the Tasks field. If this project is created for a particular Customer, you can mention that in the respective field. In the corresponding fields, you can add suitable Tags and mention the name of the Company. The name of the Project Manager can be viewed here. If any change in the Project Manager, you can set a new manager from the drop-down menu. The scheduled date of the project can be added in the Planned Date field. The total hours permitted to complete this project can be defined in the Allocated Hours field. Here, you will get the Description tab to detail additional information related to the project.

In the Settings tab, you can add an Analytic Account in the given field to link the tasks and timesheets of this project. This will track the costs and revenues of this project. You can set the Visibility of the project as Invited Internal Users, All Internal Users, or Invited Portal Users and all Internal Users in the specified field. This option will decide the access to the project and tasks under this project. In the Task Management session, you can activate the Sub-tasks option to split the tasks into small milestones. In order to allow the automatic scheduling of tasks in regular intervals, you can enable the Recurring Tasks option. Activating the Task Dependencies will help you to define the order to perform each task. The Milestone option can be used to track major progress points that must be completed to achieve success. You can enable the Timesheets option to track the time spent on tasks and record it in a timesheet. Activate the Planning option to plan your resources for this project.

Enabling the Billable option will let you invoice your time and material to the respective customer. It is possible to track the materials used for completing the tasks after activating the Products on Tasks option. You can enable the Documents option to categorize and share your documents with the concerned customer. Under the Field Service session, you can enable the Worksheet option to create worksheet reports of the tasks to be signed off by the respective customer.

Under the Invoicing tab, you can set Default Service for the invoicing process. This indicates the service that will be by default when invoicing the time spent on a task. It can be modified on each task individually by selecting a specific sales order item. Using the Add a Line button, you can add the Employee, Service, Unit Price, and Hourly Cost.
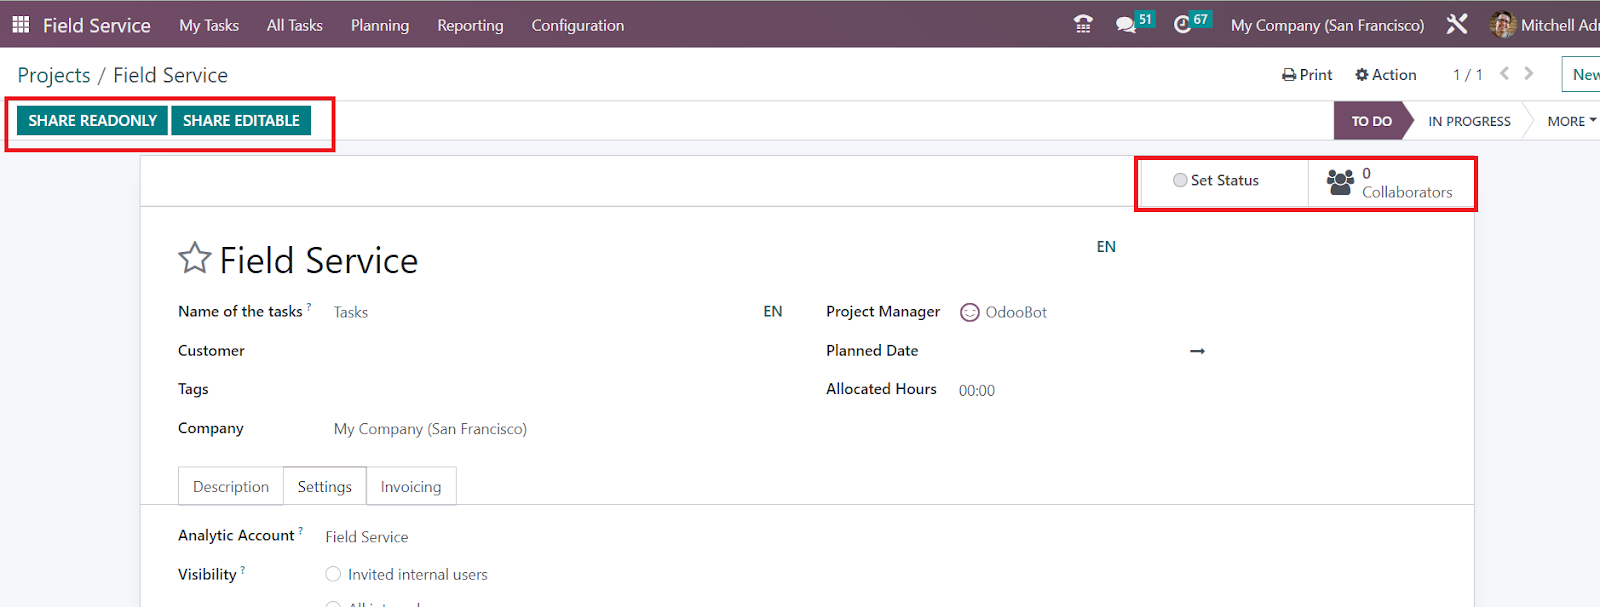
Once you complete the configuration of the project, you can share the read only access to others using the Share Read Only button. The Share Editable button can be used to share the editing access to others. Additionally, you will be able to get the Set Status smart button on this platform which will lead you to a new platform as shown below.

This platform will record the details of the field service’s updates. You can add the status of the project here and share its progress with the stakeholders. On the right side of the screen, you will get the Sales and Profitability details of the project. In order to add the updates to the project, you can use the New button.

A new window will appear as shown above. Provide a title to the status of the project in the given field. The Status of the project can be selected from the given drop-down menu. In the respective field, you will get the details of the Progress, Author, and Date of the project. You can use the Description tab to add the Summary and Activity details of the project.
Stages
In order to organize the field service tasks in a systematic way, you can create various stages for the tasks from the Configuration menu of the Field Service module. This will help you to arrange the tasks according to their progression. The Stages option can be found under the Configuration menu. This platform will show the already created stages with their Name as shown in the screenshot below.
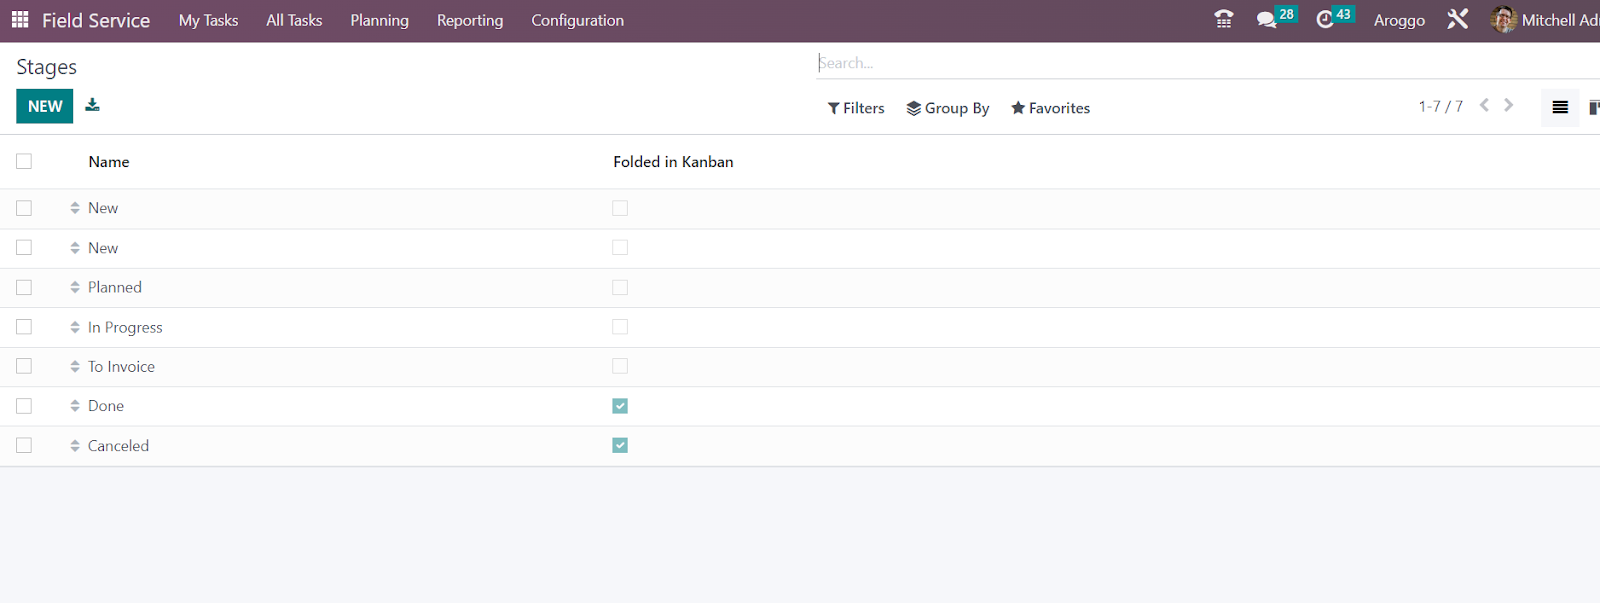
Use the New button to create a new stage for the field service tasks.
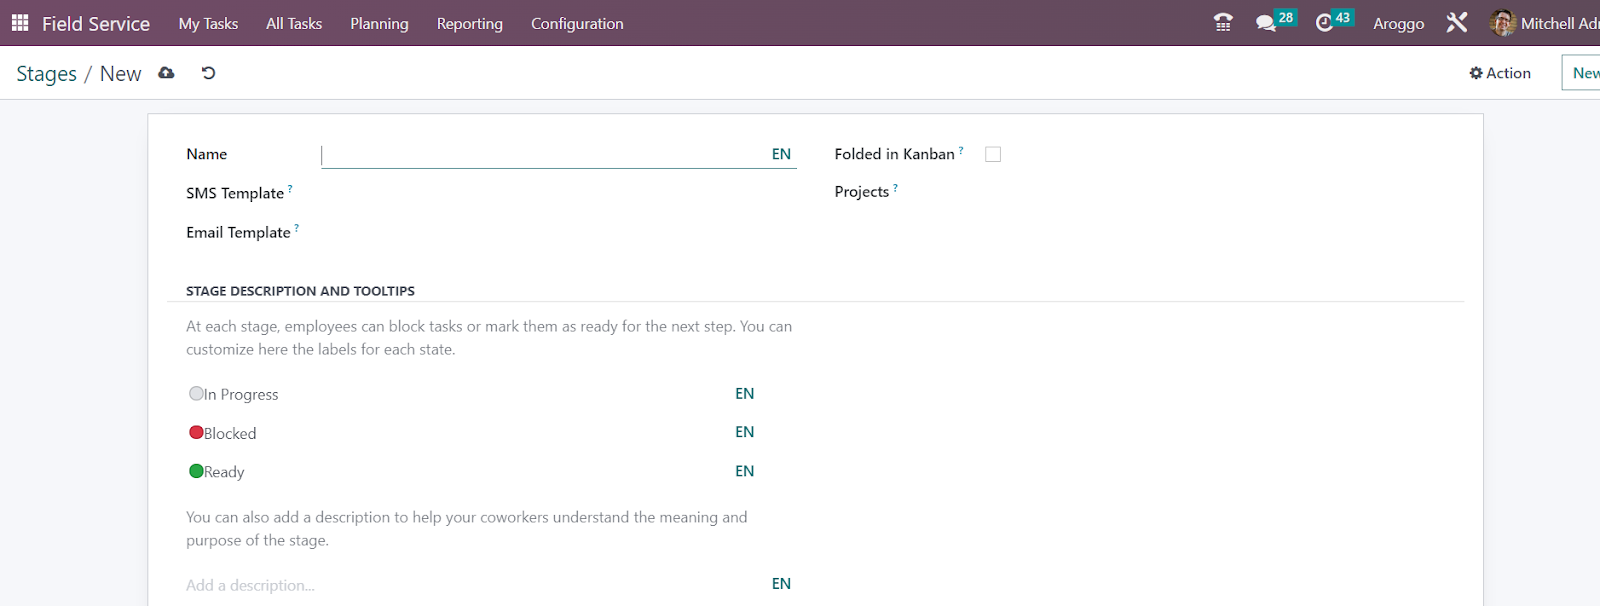
Clicking on the New button will open a new form view where you can add the details of the new stage. In the respective field, you can mention the Name of the stage. Set SMS and Email Templates so that OTX will send notifications via SMS and Email to the respective customer when the task reaches this stage. You can mention the name of the Project in this form to add this stage to that particular project. Activating the Folded in Kanban will fold this stage in the Kanban view. The assigned employee can block tasks or mark them as ready for the next stage using the labels and tooltips. Adding a stage description will help the coworkers to understand the purpose of the stage. Once you mention all the necessary details, the new stage is ready to use for tasks.
Worksheet Templates
Worksheets will help you to define how to perform a field service operation. You can plan your entire operation using such worksheets. It includes the details of the steps involved in a task, procedures that must be followed, components to perform the tasks, and other necessary factors required to complete the task successfully. Under the Configuration menu of the module, you can find the Worksheet Template option, which will help you to create templates for worksheets.

The pre-configured list of templates can be seen here with the details of Name, Companies, Worksheets, and Color. Click on the New button to create a new template.

Here, you can mention the Name and Companies in the respective field. Select a suitable color for the template from the given option.

After adding the required details, you can click on the Design Template button to design the template according to your need.

This will lead you to a new window where you will get advanced editing options to design the template. After creating the template, you can use them while creating new field services.

The Analysis button can be used to analyze the tasks performed using this template.
settings
From the Settings menu of the module, you can activate the Time and Material Invoicing option. Activating this option will keep track of the products used for your tasks and invoice your time and material to your customers.
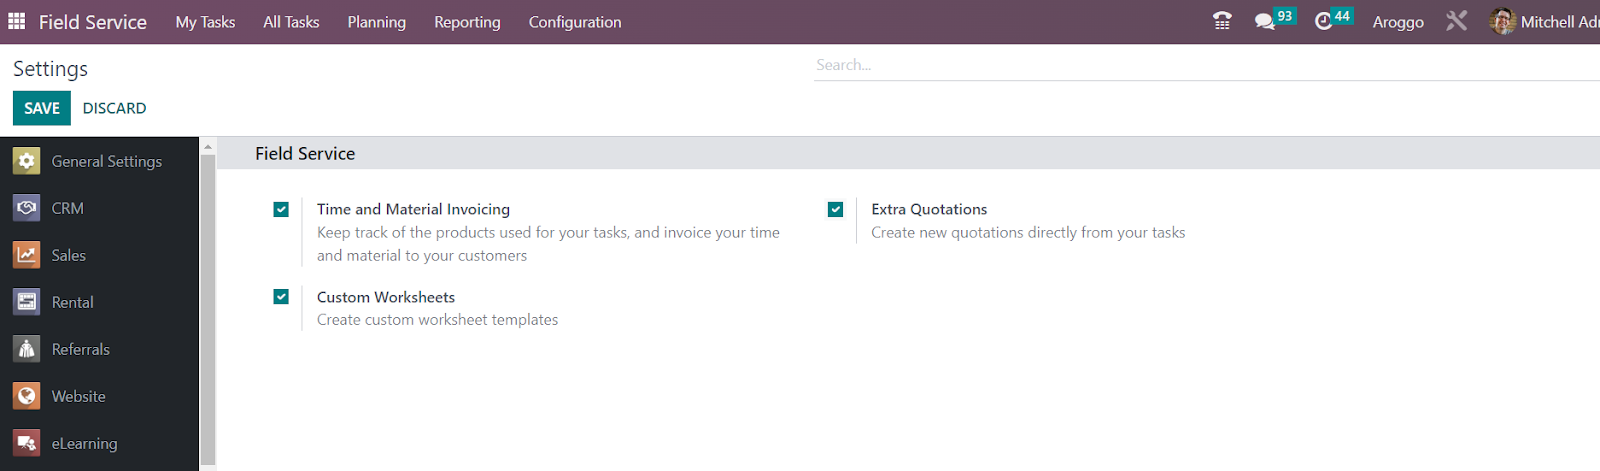
In order to create custom worksheet templates, you can activate the Custom Worksheets option. Activating the Extra Quotations will allow you to create new quotations directly from your tasks.
Payroll
Payroll management is the hardest task for the HR and accounting department in an organization. It acts as the primary need of business functioning. A company can manage payslips for employees at specific intervals through effective payroll management. In some instances, tax payments for employees and keeping effective records is a tedious processes. You can settle all these records and process them with an accurate payroll management system.
Dashboard:
OTX 16 Payroll dashboard defines the data related to warnings, batches, notes, graphical reports of employer cost, and employee trends. Users can identify necessary cautions concerning employee contracts below the Warnings section. Inside the Batches section, we can access confirmed or new payslips of employees.

It is easy to obtain additional summaries about payroll flow within the Note tab. By clicking on the + icon on the right end, you can add a new note regarding the payroll information. Additionally, we can evaluate employer cost and employer trends separately based on monthly/annual. Hence, the salary count of workers is analyzed easily with one look at the graphical representation.

Contracts
Users can manage the salary attachments and employee contract data within the Contracts tab of the OTX 16 Payroll module. Contracts, Employees, and Salary Attachments are the menus visible to you once choosing the Contracts tab. Let’s check out each of these options separately.
Employees
By selecting the Employees menu under the Contracts tab, you can obtain the list of contracts of employees. Users can see the all-new and running contracts of each employee distinctly. In the List view, we can view the Employee name, Start Date, Hire Date, Contract Name, and Status separately.

Users can also define a new contract for employees by clicking on the CREATE icon in the Contracts window. On the open page, you can specify the name of the contract and choose your Employee. Once selecting the employee, the job position, department, and contract type related to the respective employee is automatically visible to the user.

Define the start date of the contract in the Contract Start Date field and enter the last date in the Contract End Date field. It is possible to set the Salary structure type as worker and employee. After picking the salary structure type, you can choose the working schedule of employees in hours/week.

Next, we can describe the source for work entries in contact. Three different work entry sources include Planning, Working Schedule, and Attendances. Working entries formulates as per the working hours once choosing the Working Schedule option. By selecting the Planning option, working entries will be developed based on employee planning. Later, you can add the wage on the contract in the Wage on Payroll field and specify the responsible HR in the HR responsible field.

Below the Contact Details tab, you can add the Analytic Account field and apply the contract used to produce an offer to the applicant in the Contract Template field. Next, we can specify the default document to sign to acquire a contract offer in the New Contract Document Template field. Users can set the default document template for employees within the Contract update Document Template field.

Inside the Salary Information, the user can add the monthly gross wage salary per month in the Wage field. Moreover, you can enter the total yearly cost for an employer in Yearly Cost(Real) option.

Each of the details is saved automatically in the OTX 16 Payroll. By clicking on the SIGNATURE REQUEST icon, the user can request the document signature. It is possible to formulate a simulation link after pressing the GENERATE SIMULATION LINK button. Also, you can put the contract on various stages like NEW, EXPIRED, RUNNING, and CANCELLED.
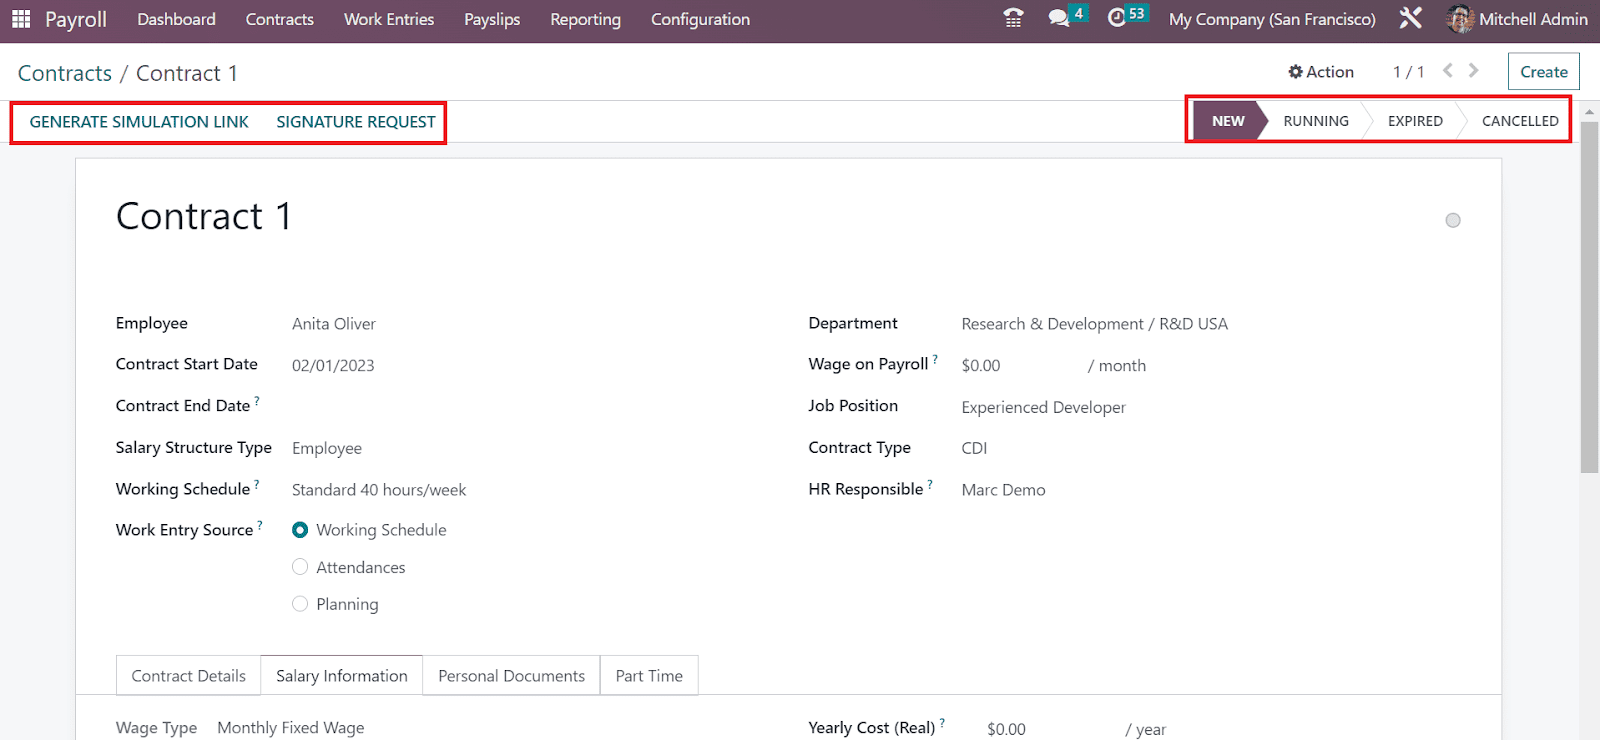
Salary Attachments
We can obtain the list of all salary attachments of employees by clicking on the Salary Attachments menu inside the Contracts tab. You can acquire the data concerning each salary attachment, including Employee, Type, Status, Description, Start Date, and more. By choosing the CREATE button, we can develop a new salary attachment in OTX 16 Payroll.

In the open window, the user can choose the Employee name and add the information about salary attachment in the Description field. Users can set the Type of salary attachment as Child support, Assignment of Salary, etc.

Next, we can apply the beginning date in a Start Date field. It is possible to upload any important files by clicking on the UPLOAD YOUR FILE icon in the Document field. Additionally, mention the cash to pay each month in the Monthly Amount field. You can apply the whole cost to be paid in the Total Amount field.

Each data is saved manually in the OTX 16 Payroll. You can mark the stage as COMPLETED once selecting the MARK AS COMPLETED icon. By choosing the CANCEL button, your specific salary attachment for an employee will be canceled.

Work Entries
Work entries are necessary to overview and manage real-time data in an organization. It acts as a record of the already scheduled work time of employees. Conflicts, Work Entries, and Time Off to Report are the menus available below the Work Entries tab. We can manage the conflicts, time off, and work entries of each employee below the Work Entries tab. Now, let’s define each menu under the Work Entries tab in OTX 16 Payroll.
Work Entries
Each work entry of an employee is managed quickly once choosing the Work Entries menu inside the Work Entries tab. We can see an overview of each employee’s work entry based on a particular month in the Gantt view. It is possible to sort out the employee work entry based on DAY, MONTH, and WEEK. To describe a new work entry, click the ADD button in the Work Entry window.
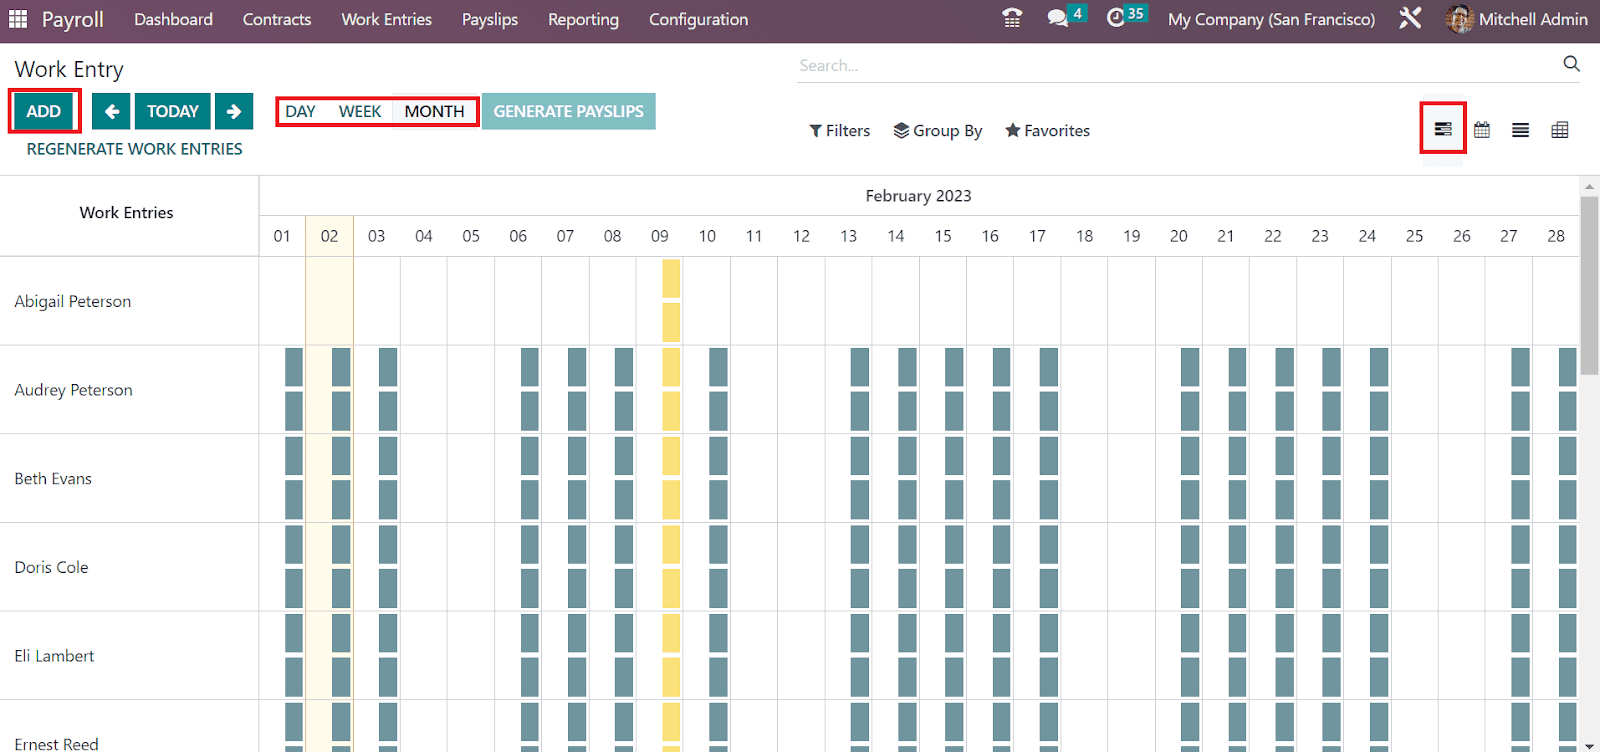
In the List view, we can view the work entry of employees separately, including the data such as Work Entry type, End, Name, Beginning, Period, State, etc. By choosing the CREATE button, we can develop a new work entry for employees.
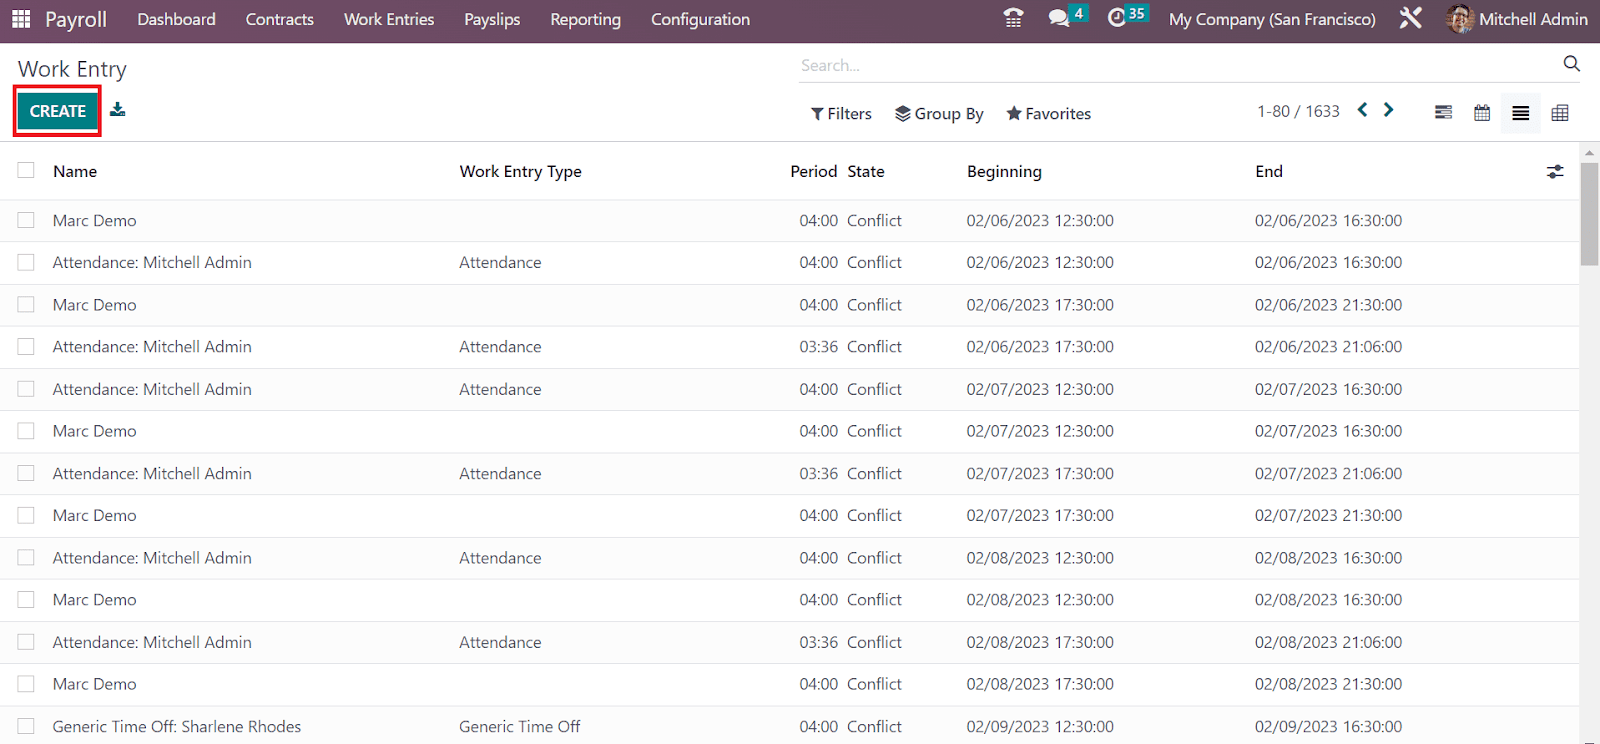
In the open screen, apply the work entry type name, and pick your employee. Later, you can select the Work Entry Type as Sick Time off, Extra hours, Attendance, etc.

You can specify the From and To date of employee work entry. In the Period option, you can apply the working hours of employees. Once adding all data, each detail is saved easily in the Work Entry window.
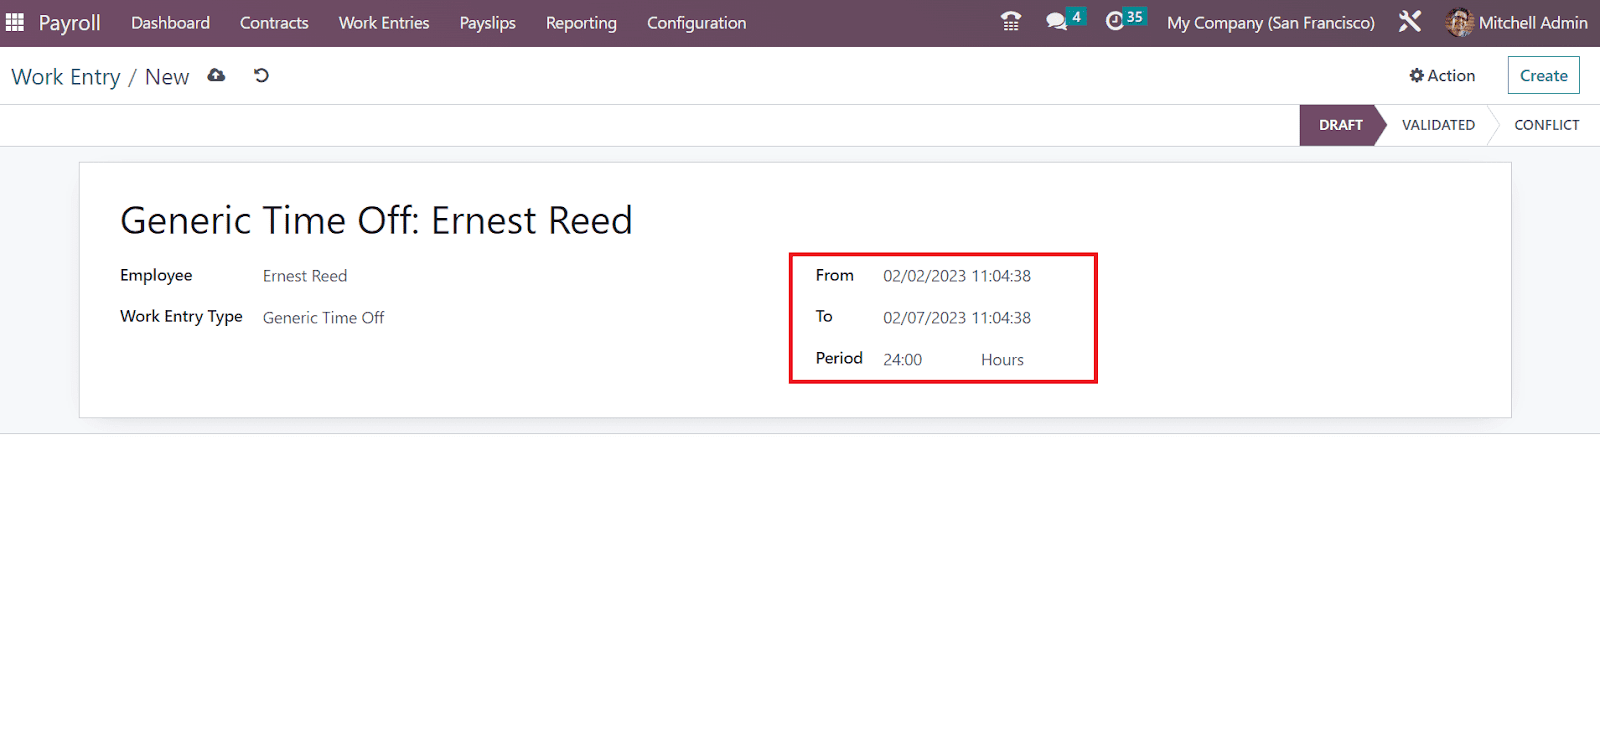
CONFLICTS
Users can describe the work entries’ conflict by picking the Conflicts menu under the Work Entries tab. All the conflicts are arranged in work entries by OTX 16. The Work Entry window specifies the employee name and conflicting work entries. In the Gantt view, undefined and not validated work entries are visible to the user in the Work Entry window. You can redevelop work entries after clicking on the REGENERATE WORK ENTRIES button.
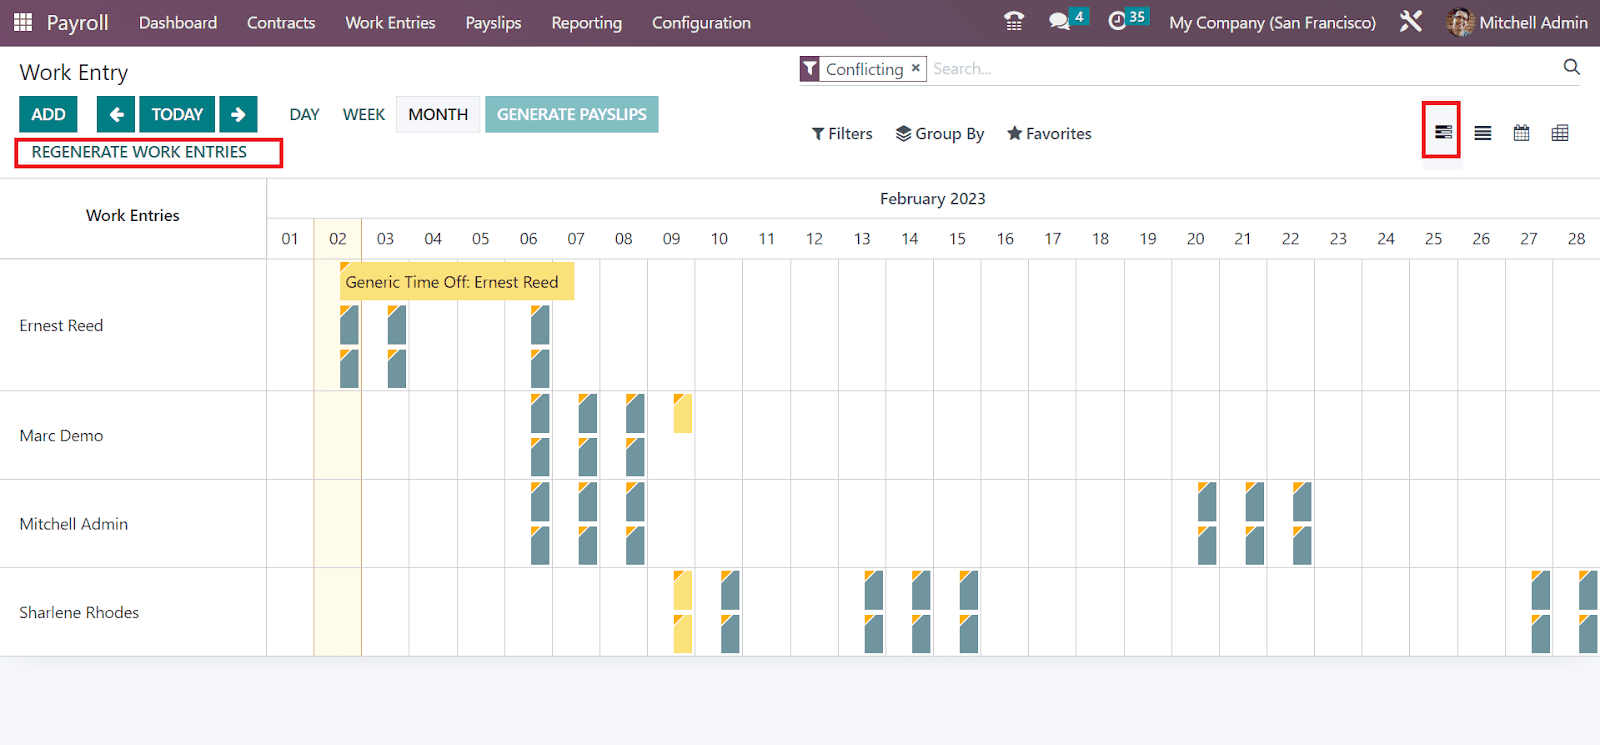
Choose the ADD icon to define a new conflict work entry. We can quickly produce payslips by pressing the GENERATE PAYSLIPS icon in the work entry window.
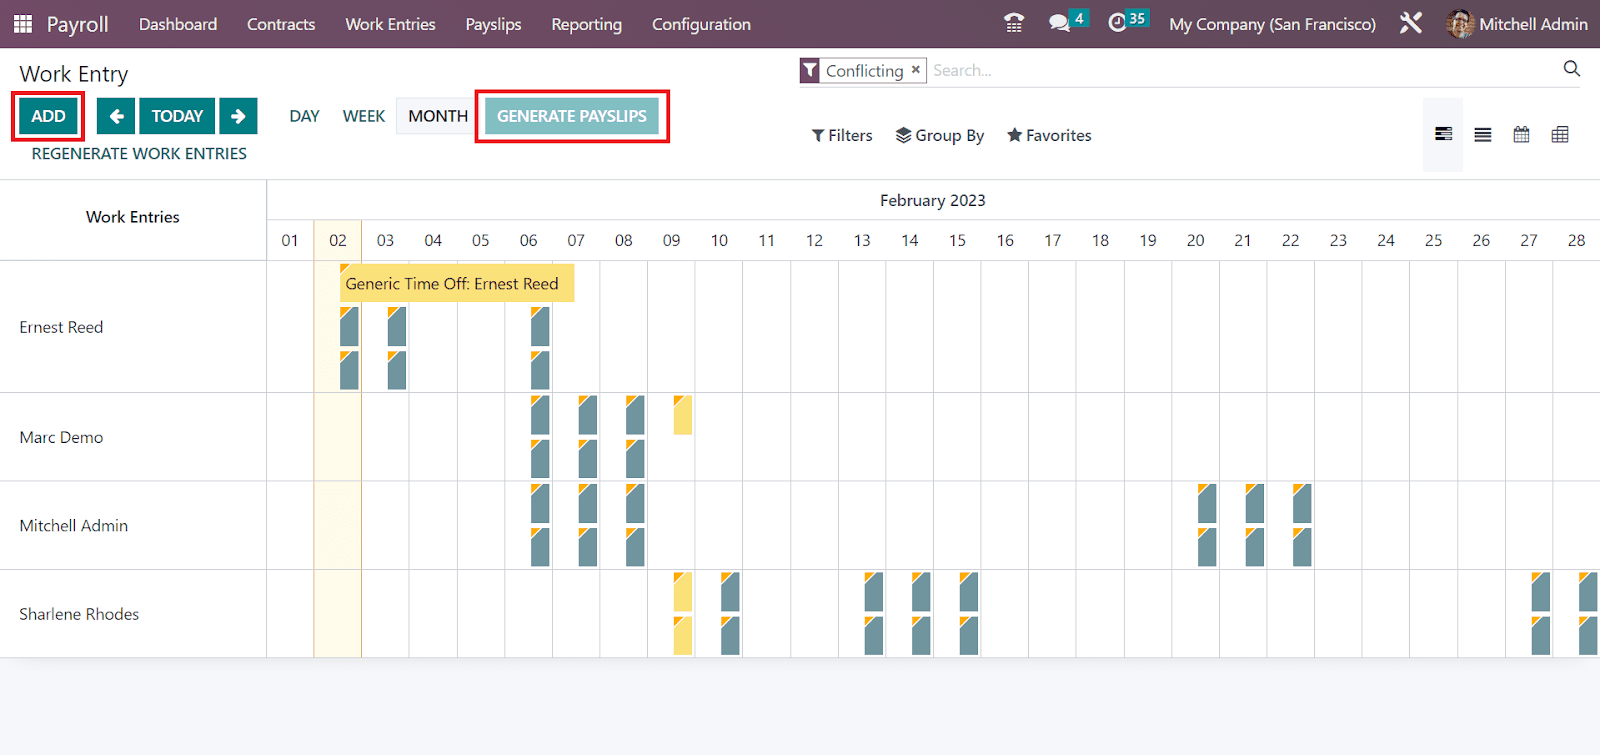
Time Off to Report
The time off details of each worker are viewable to a user once choosing the Time Off to Report menu under the Work Entries tab. In the List view of the Time Off window, you can see the details of each time off by employees, such as Start Date, Duration, Payslip state, Time Off Type, End Date, etc. Additionally, the left side of the window depicts the STATUS and DEPARTMENT sections separately. You can sort out the time off based on approval or approved and view respective changes on the Time Off window.

Users can access the Time Off window in different views such as Kanban, Activity, Gantt, Calendar, List, etc. To define a new Time off report for an employee, select the CREATE button in the Time Off screen.

Now, let’s move to the Configuration tab of OTX 16 Payroll.
Configuration
The Configuration tab in OTX 16 Payroll ensures you manage the salary package configurator, work entries, and salary details of employees. Let’s examine the primary features of configuration now.
Working Times
Users can manage their working times easily within the OTX 16 Payroll module. It helps you to improve organisational productivity. Employees and employers get the flexibility to attain maximum potential. Choose the Working Time menu within the Configuration tab of OTX 16 Payroll. In the Working Times window, we can see the data such as Work Time Rate, Contracts using it, Working Time, and Company. After clicking on the CREATE icon, you can design a new working time for employees.
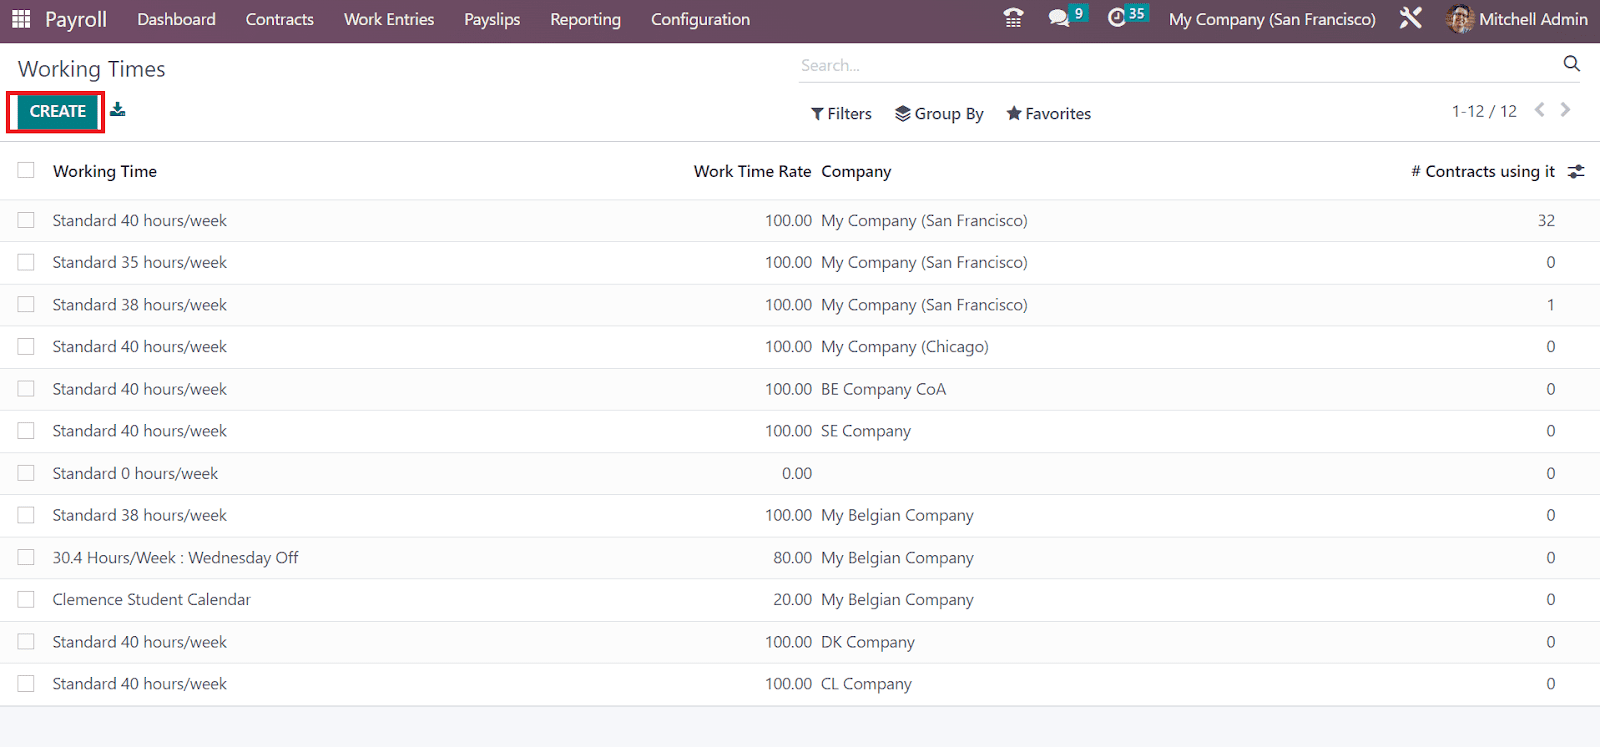
In the opened Working Times window, the user can apply the Company, Full Time, Average Hour per Day, and Timezone data. Several smart buttons like Work Resources, Contracts, and Public Time Off are visible in the Working Times window.

Inside the Working Hours tab, the user can apply a new working hour for an employee once choosing the Add a line option. User can specify the Name, Day period, Work Entry Type, Day of Week, Work from, etc, under the Working Hours section.
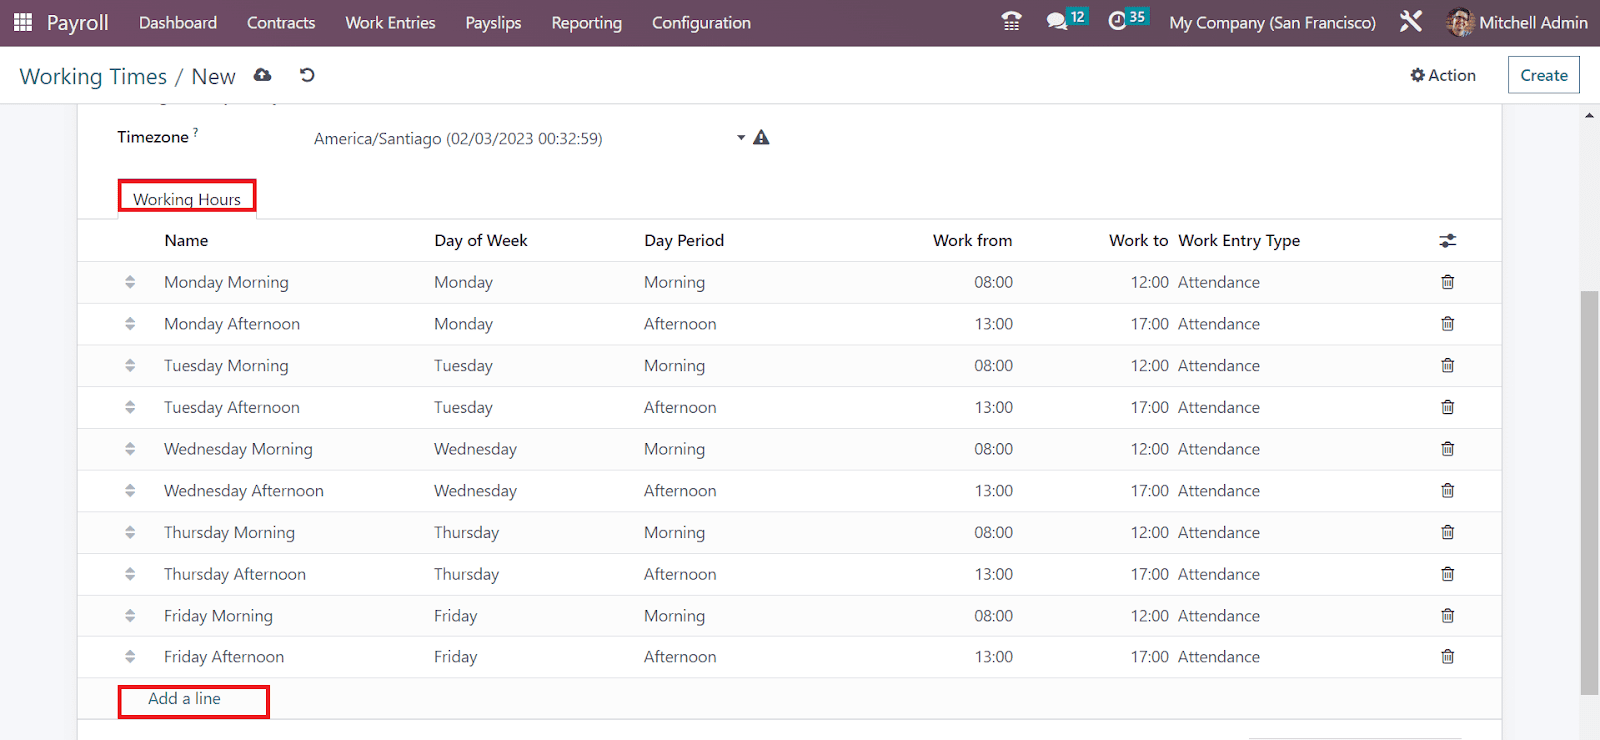
Under the Salary section of the Configuration tab, we can define salary structures and salary rules. A few menus available below the Salary section include Rules, Other Input types, Structure Types, Rule parameters, Rules, etc. Now, we can discuss each of them separately.
Structure Types
It is possible to configure new salary structure types within the OTX 16 Payroll. Within the OTX Payroll system, users can define salary structure for trainees, employees, and workers once describing the wage types on a monthly, hourly/weekly basis. Users can define the salary structures of employees after choosing the Salary structures menu in the Configuration tab. In the Structure Types window, we can attain information such as Wage Type, Default Scheduled Pay, Structure Type, Regular Pay Structure, and more. Once clicking on the CREATE button, we can design new structure types in OTX 16.
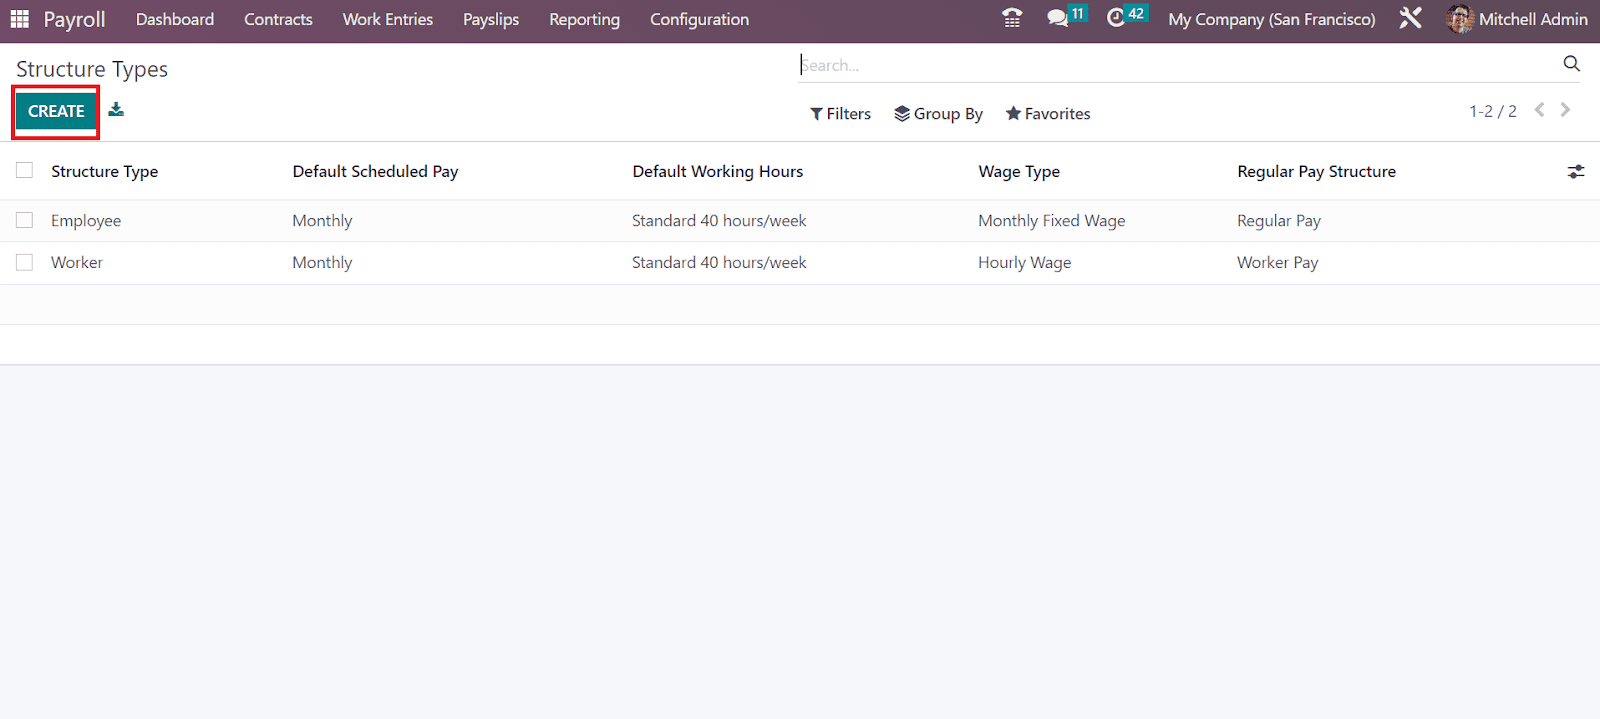
In the open window, enter the name of the structure type and choose your Country. It is easy to set the Wage Type as Hourly Wage and Monthly Fixed Wage.

Later, add the wage payment frequency in the Default Scheduled Pay field. Afterward, the user can specify the Default working hours of the salary structure type. We can mention the regular pay structure for employees in the Structure Type window. Finally, you can mention the work entry type concerning regular attendance within the Default Work Entry Type field.
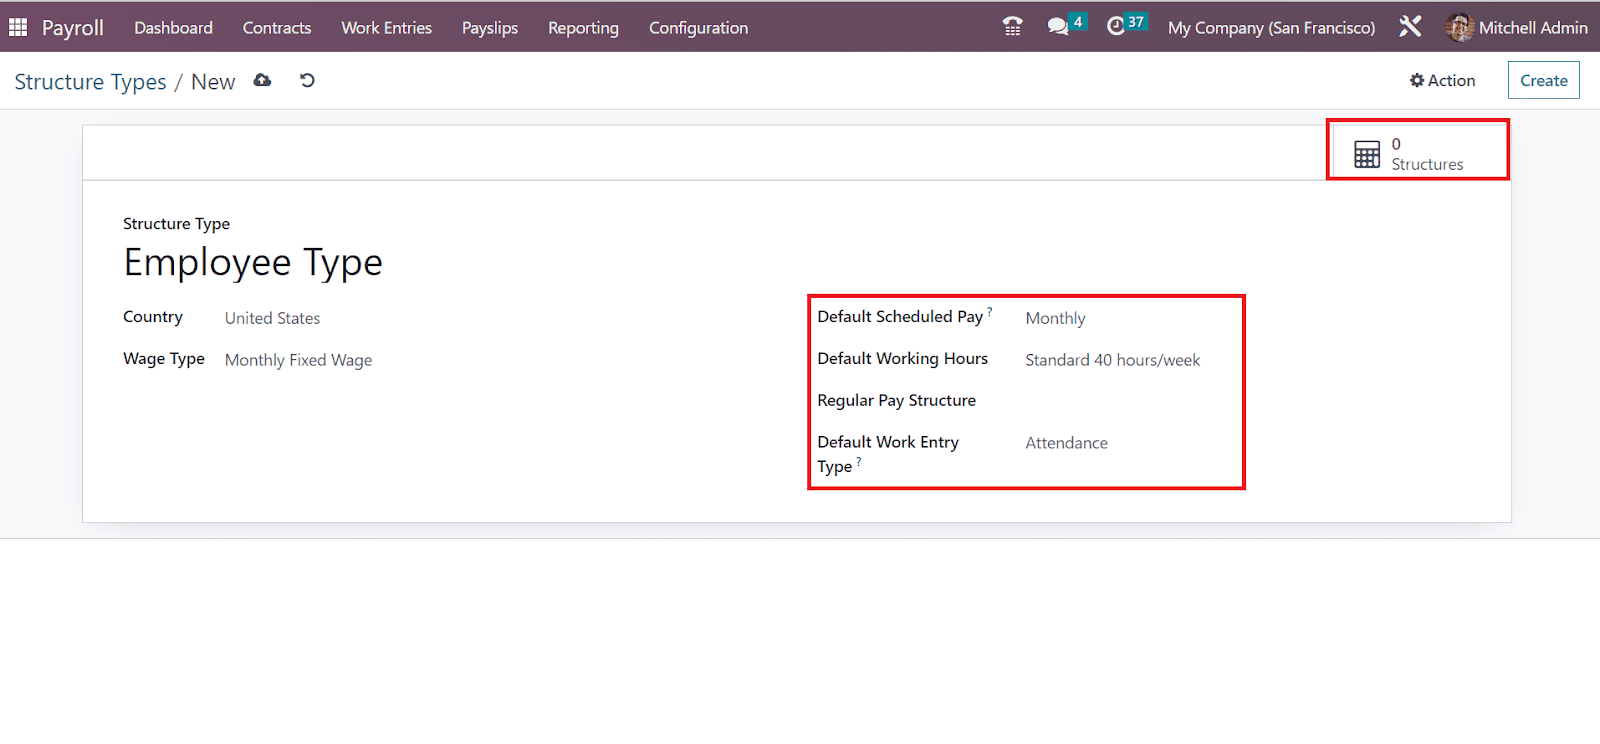
Each structure inside the structure types is viewable to a user once selecting the Structures smart button.
Salary Structures
We can compute employee salaries as per the job post and formulate a payslip for payroll within the salary structures. You can define various rules set inside a salary structure that is beneficial for computing the payslips. The whole department or group uses a single salary structure. Users can describe a new salary structure once choosing the Structures menu in Configuration. On the open page, you can acquire the salary structures of Worker and Employee separately. We can view the Salary Rules, Name, and Country of each worker and employee salary structure distinctly. To describe a new salary structure, choose the CREATE icon in the Salary Structures window.

In the new screen, you must enter the Structure Name and category of structure type as employee/worker in the Type field. To view worked days in employee payslip, enable the Use Worked Day Lines option. Also, mention the Country regarding the salary structure of employees.

Users can pick a Report of employee salary structure as Payslip, Termination, and more. Additionally, enter the wage payment as Weekly, Annually, Monthly, and more within the Scheduled Pay field. We can also choose a respective salary journal concerning the salary structure.

It is possible to apply specific rules related to employee salary structure. For that purpose, click the Add a line option under Salary Rules tab and mention the necessary rules for your employee salary structure. You can mention the Category, Name, Partner, and Code of each salary rule.

Salary Rules
A crucial part of an organisation is developing and maintaining a robust salary structure in the company. A few factors that help for effective management in a company include setting rules, fixing reliable salaries, and planning ahead. All these rules ensure you can decide salary amounts calculation for various categories. By choosing the Rules menu in Configuration, you can get the access to Salary Rules window. Each salary rule defined in OTX 16 is accessible to a user. The salary structures regarding each salary rule are viewable to the user include data such as Name, Category, Code, and Partner. After clicking on the CREATE button, we can produce a salary rule in OTX 16.

In the appeared page, add Rule Name, and set Category based on your added rule name. Users can specify a code to identify the rule easily. Also, make sure to mention a serial number to arrange sequence calculation.

By enabling the Appears on Payslip option, we can view the salary rule within a payslip. After activating the View on Employer Cost Dashboard, we can display employer cost value in the dashboard. To set the salary rule on payroll reporting, activate the View on Payroll Reporting field in the Salary Rules window.

Below the General tab, we can manage the computation, conditions, and company contribution. Add the condition for the salary rule as Range, Always True, and Python Condition in Condition based on field. The relevant wage rule for salary computation is set easily by choosing the Always True option. After picking the Range option, you need to apply details including Maximum Range, Range based on, and Minimum Range. Range Based option is used to compute field values allocated automatically.

OTX formulates equations in the default way once we choose Python Expression in Condition Based on field.

We can calculate the salary rules below the COMPUTATION section. For that, the user can specify a computation method in the Amount Type field as Percentage(%), Python Code, and Fixed Amount. According to the percentage, we can calculate the amount once selecting the Percentage as Amount Type. By choosing the Fixed Amount in the Amount Type field, we can set up a fixed amount. After selecting the Fixed Amount, you can mention the quantity and fixed amount of the salary rule.

Users can also compute the salary rule as per python code. For that, add Python Code inside the Amount Type field. Later, you can define the python code as per the python attributes. Inside the COMPANY CONTRIBUTION section, we can define the third party involved in employees salary payments.

Below the Description tab, you can mention the note concerning the salary rule. Inside the Accounting tab, you can specify Analytic Account, Debit Account, and Credit Account details. You can remove the net salary rule value after enabling the Not Computed in net accountability option within the Accounting section.

Each of the details is saved manually in the OTX 16 Payroll.
Salary Rule Parameters
The Rule Parameters menu is accessible under the Configuration tab to manage different rule parameters. In the Salary Rule Parameters window, you can obtain the Code and Name of each salary rule parameter. To define a new rule parameter, click the CREATE icon on the Salary Rule Parameters page.

In the open screen, apply the rule parameter title in the Name option. Add code used in the salary rule to mention the salary parameter. After defining these details, you can explain further information about the salary rule parameter inside the Description tab.

Other Input Types
Users can obtain the Other Input Types menu below the Configuration to define a payslip input type. In the List view, you can see the Code, Description, and Availability in Structure separately in the Payslip Other Input Types window. If you need to export the payslip input type, select your specific input types and choose the Action icon. You can pick the Export menu inside Action once choosing the necessary input types.

By selecting the CREATE button, we can formulate a new payslip other input types. Mention the Description and Code used for the salary rule. The input is accessible in all structures if you set up the Availability in Structure. It will be visible in all payslips if you keep the field empty.

Salary Package Configurator
We can manage the resume, advantages, and personal Info below the Salary Package Configurator within the Configuration tab. Now, let’s describe each detail separately here.
Advantages
You can obtain the Advantages menu within the Salary Package Configuration section of Configuration. It is possible to set up additional compensation benefits in the Advantages window. The details of configured advantages include the Advantage field, Name, and Salary Structure Type. By selecting the CREATE icon, we can define a new advantage.
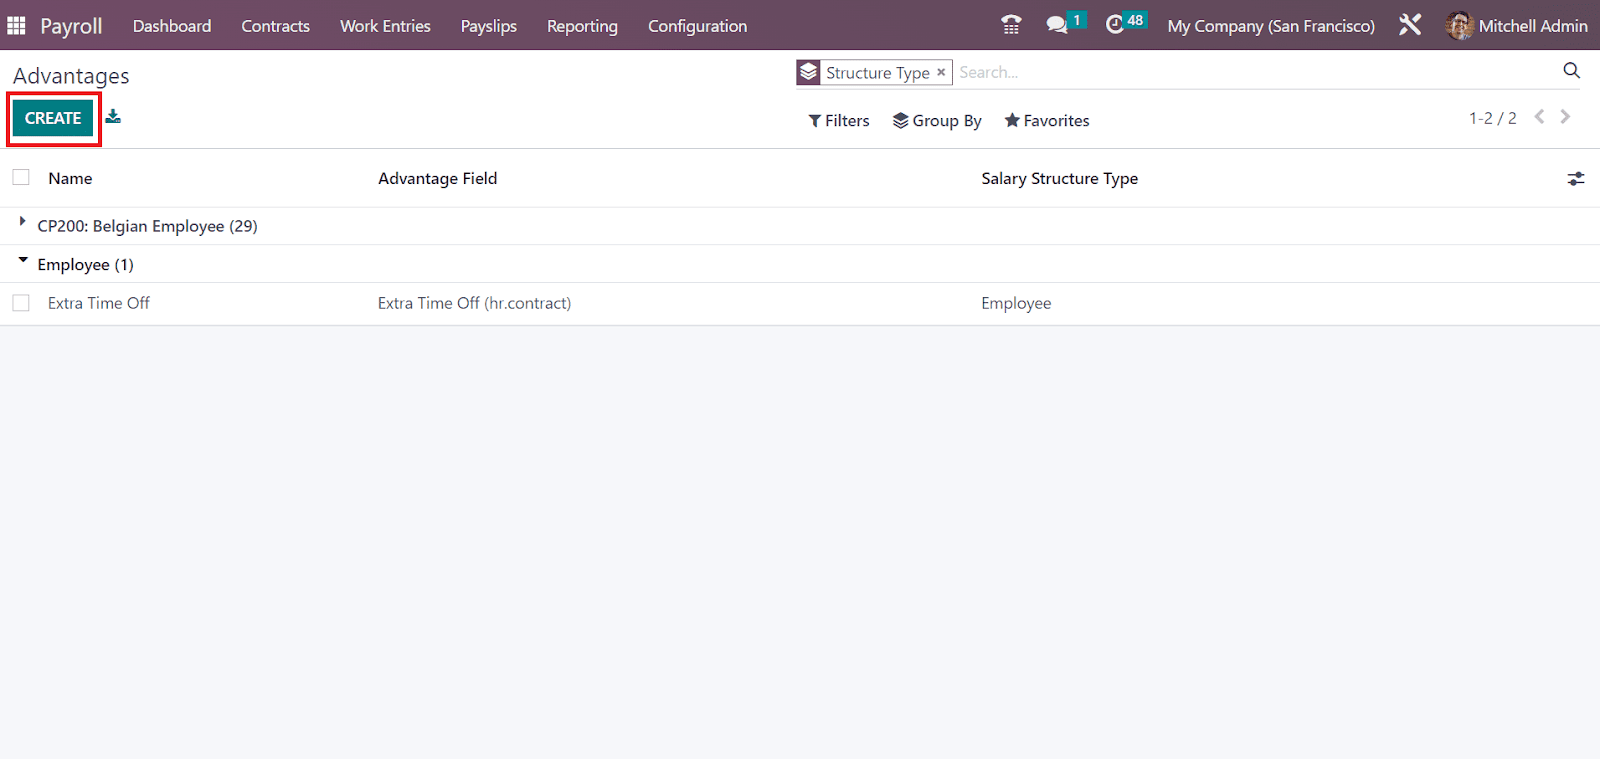
In the visible window, you must add the Advantage Name. Mention the contract field associated with an advantage in the Advantage field and the contract field related to advantage cost within the Cost field. Additionally, you can set the Advantage Type as Monthly Advantages in Cash, Non financial advantages, Monthly Benefit in Kind, and more.
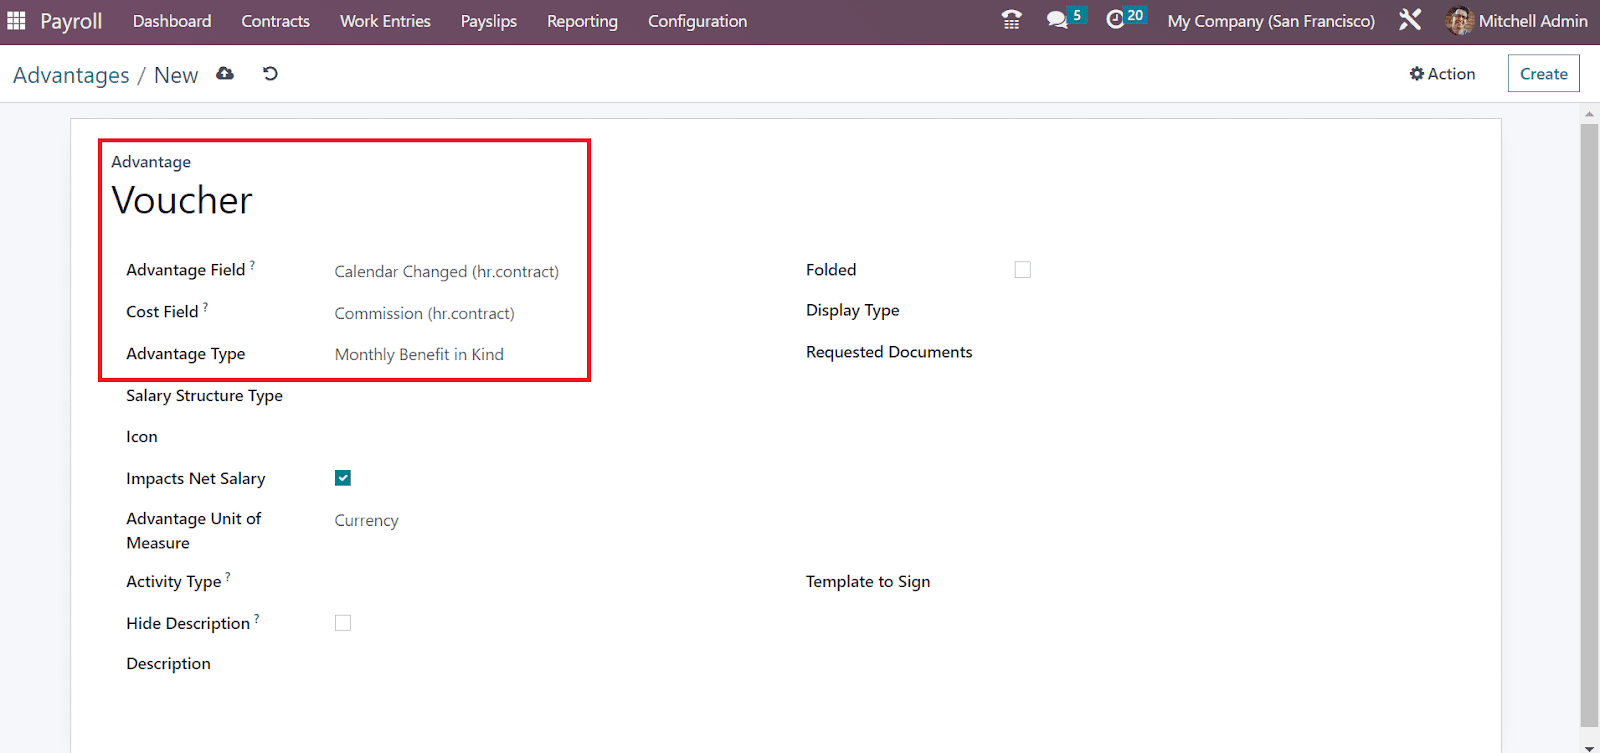
Next, we can choose the Salary Structure Type as Employee and Worker. Once applying the type, you need to assign an icon for advantage. To acquire the net salary, you must activate the Impacts Net Salary option. Later, we can specify units of measure for advantage as Currency, Days, and Percentage.
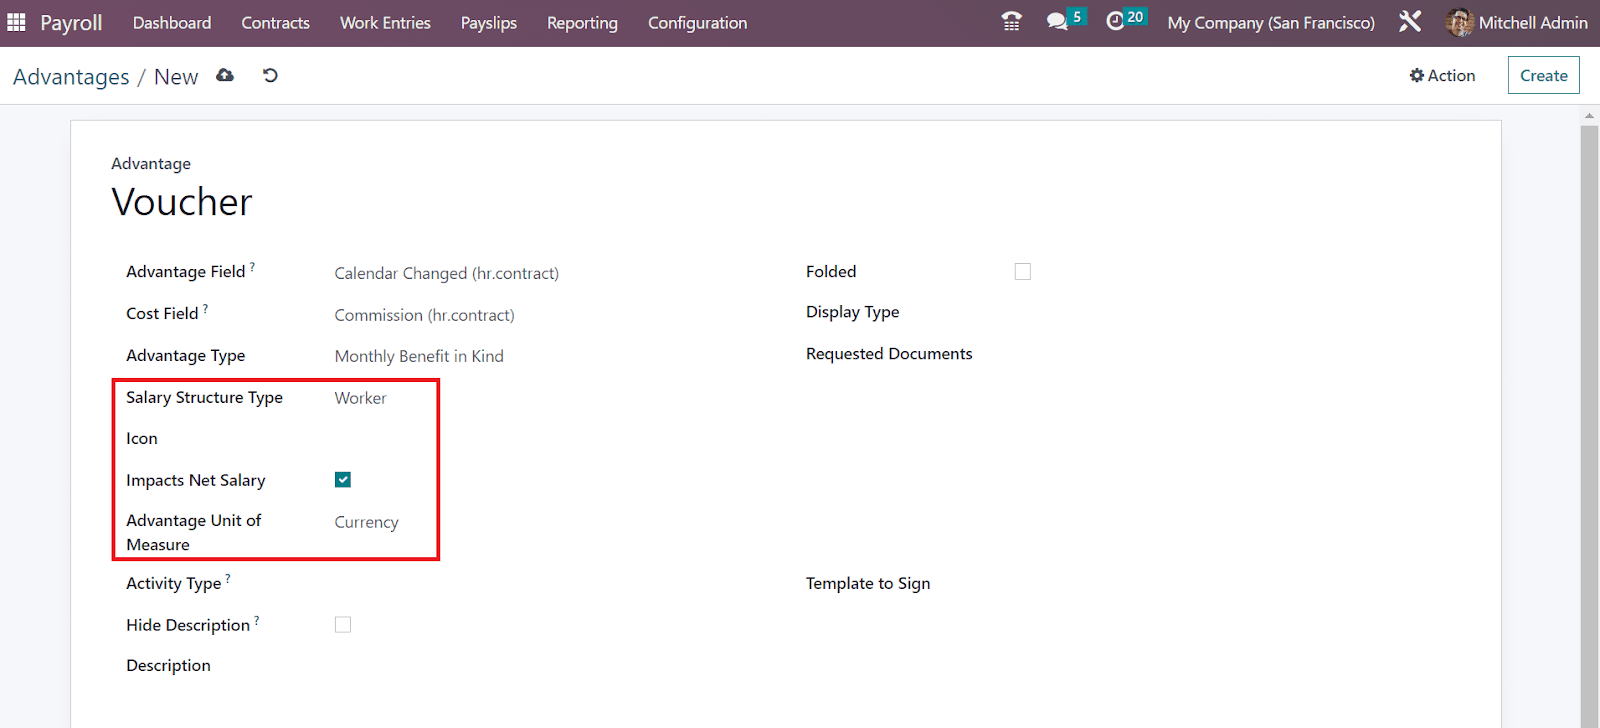
It is possible to set an activity type of advantage as Email, Meeting, Notification, Call, etc. Once the advantage is chosen by the employee, the activity type will be created automatically. We can add extra details of advantages in the Description field. You can conceal the description when the advantage is not taken hold of after activtaing the Hide Description field.

Users can disable or enable advantageous requirements within the Folded field. Furthermore, specify display type as Text, Slider, Dropdown, and more. You can also mention necessary documents for advantage in the Requested Documents field. Users can also select a template to sign the advantage for employees.

All these details are saved automatically in the OTX 16 Payroll.
Personal Info
The personal information concerning each employee’s payslips can be understood easily by selecting the Personal Info menu in Configuration. In the Personal Info window, we can acquire all preconfigured personal data such as Related field, Name, and Salary Structure Type separately. It is easy to describe a new record after selecting the CREATE button.

In the open window, add personal information and who it applies for, like an employee, bank account, and more in the Applies On field. Users can also specify the field name concerning personal info in the Related field. Also, you can add Info Type of personal info such as Address, personal documents, situation, and more.
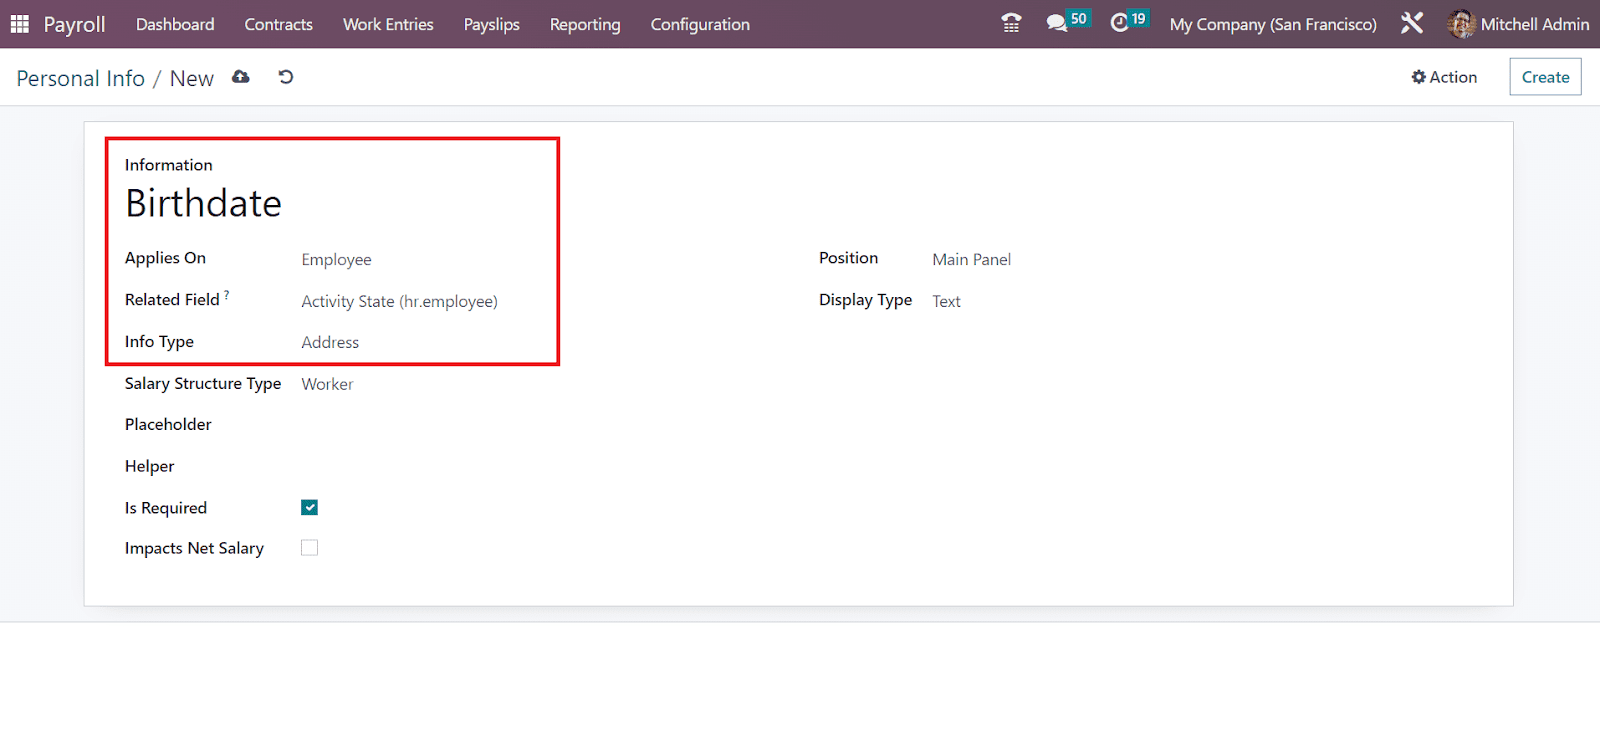
Next, set the salary structure type for personal info as Worker and Employee. Furthermore, you can mention the Placeholder and Helper regarding the personal info of employees.
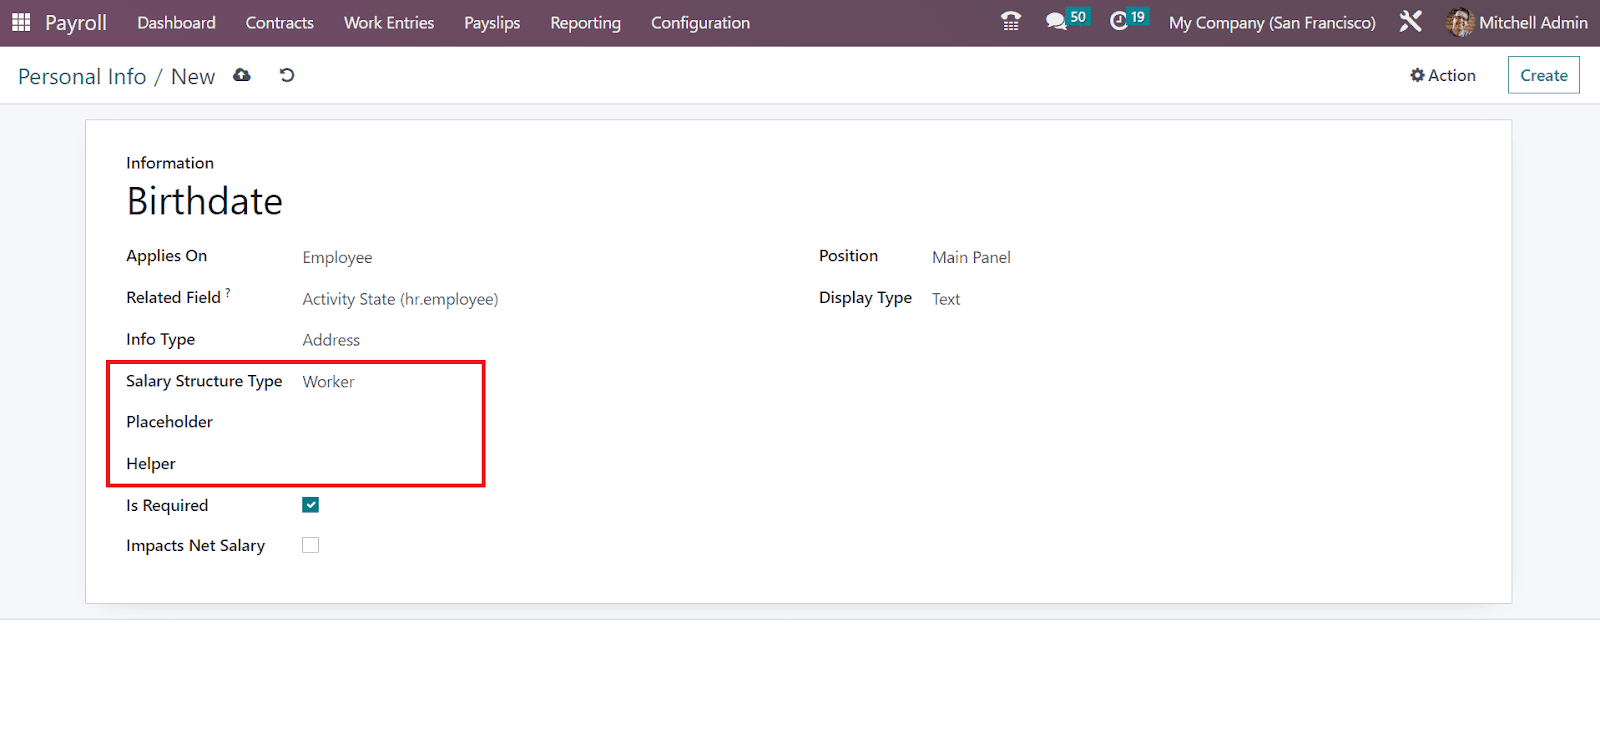
Users can apply for the position regarding Personal Info as Main Panel or Side Panel. Later, you can mention the Display Type as Text, Email, Radio, etc. So, it is easy to apply personal info data in OTX 16.
Resume
We can specify different resume types to a salary structure after choosing the Resume menu in the Configuration tab. The Resume window defines all created resume data such as Name, Value Type, Code, and Salary Structure Type. By clicking on the CREATE icon, we can describe a new resume.

In the open screen, mention the detailed overview in the Information field. You must choose the Category related to your resume, including Monthly Salary, Yearly Advantages, and more. Afterward, pick your Salary Structure Type concerning the resume.
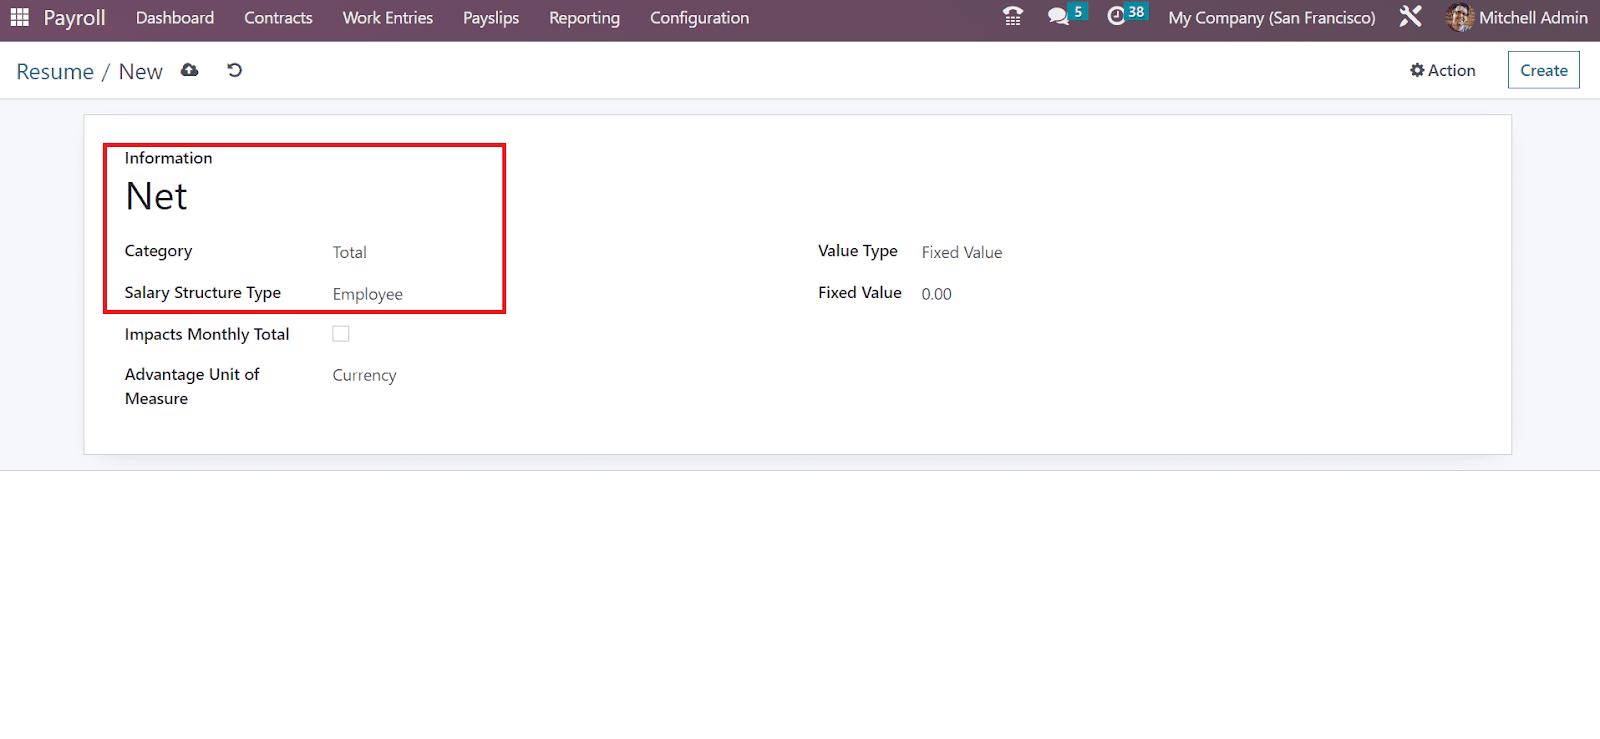
To access monthly cost on the resume, enable the Impacts Monthly Total option. Later, choose the Advantage Unit of Measure as Percent, Days, etc. Moreover, it is possible to set a value type as Payslip value, Fixed Value, Monthly Total, and more. After choosing the value type, the user can add the particular amount based on your selected value.
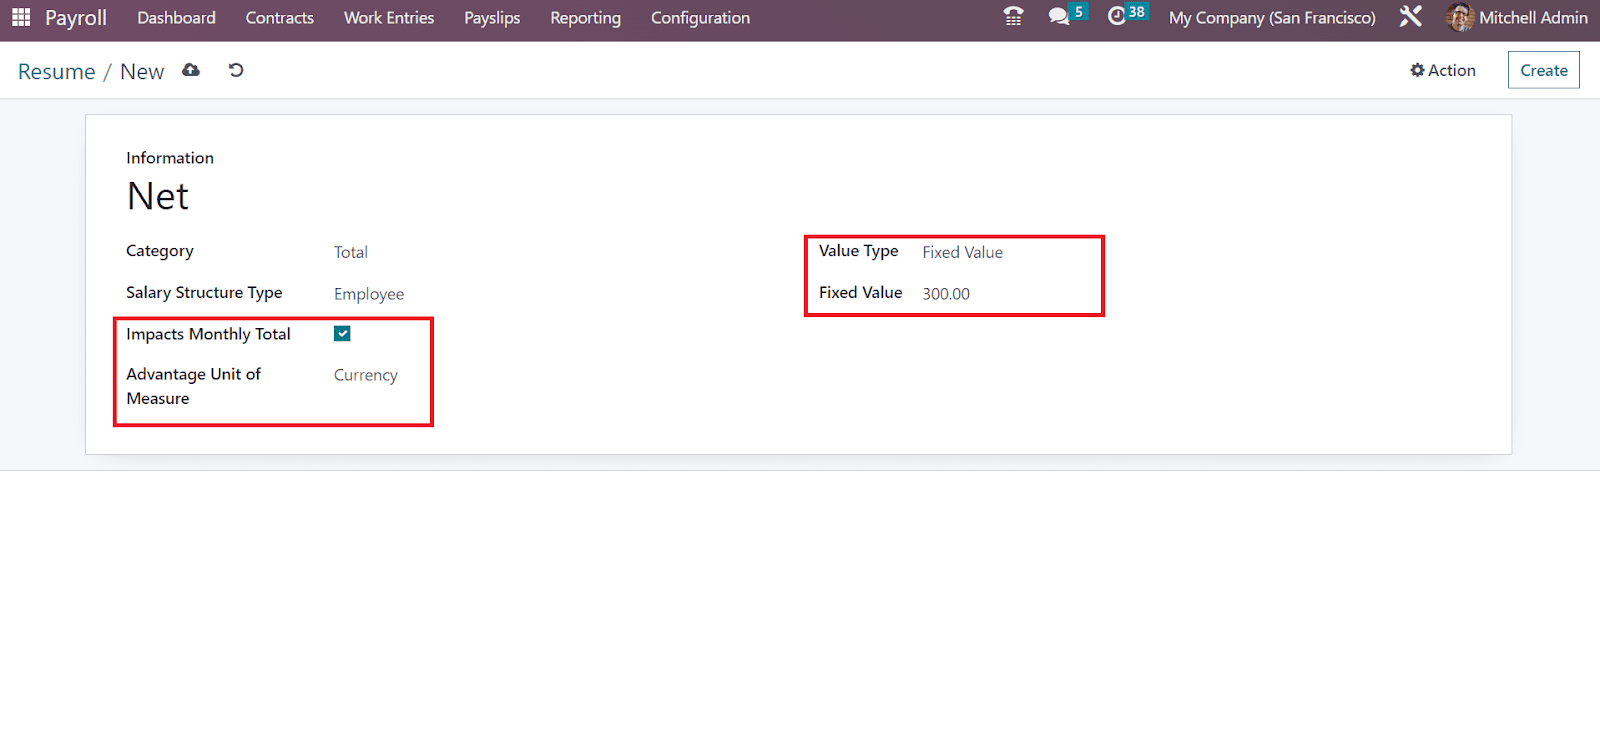
These are all about the Configuration feature of OTX 16 Payroll. Now, let’s discuss the steps to formulate a payslip in OTX 16.
Payslips
The complete payroll application in a firm manages efficiently within the OTX system. You can formulate a contract with a salary structure once defining payslips for employees. OTX 16 assists you in exporting payslips as pdf if a payslip was formulated. Additionally, we can describe journal entries on accounts in the OTX 16. It is easy to manage batches, to pay, and all payslips.
To Pay
Once selecting the To Pay menu within Payslips, we can view a list of all created payslips to pay. The data of each payslip to pay, including Reference, Batch Name, Basic wage, Status, and more, are accessible to a user. You can create a new payslip to pay after pressing the CREATE button.

Users can mention the Employee Name needed to generate payslips in Payslips to Pay window. Next, we can add the start and end date of the employee payslip in the Period field. Additionally, you can set the Contract and Batch regarding payslips to pay.
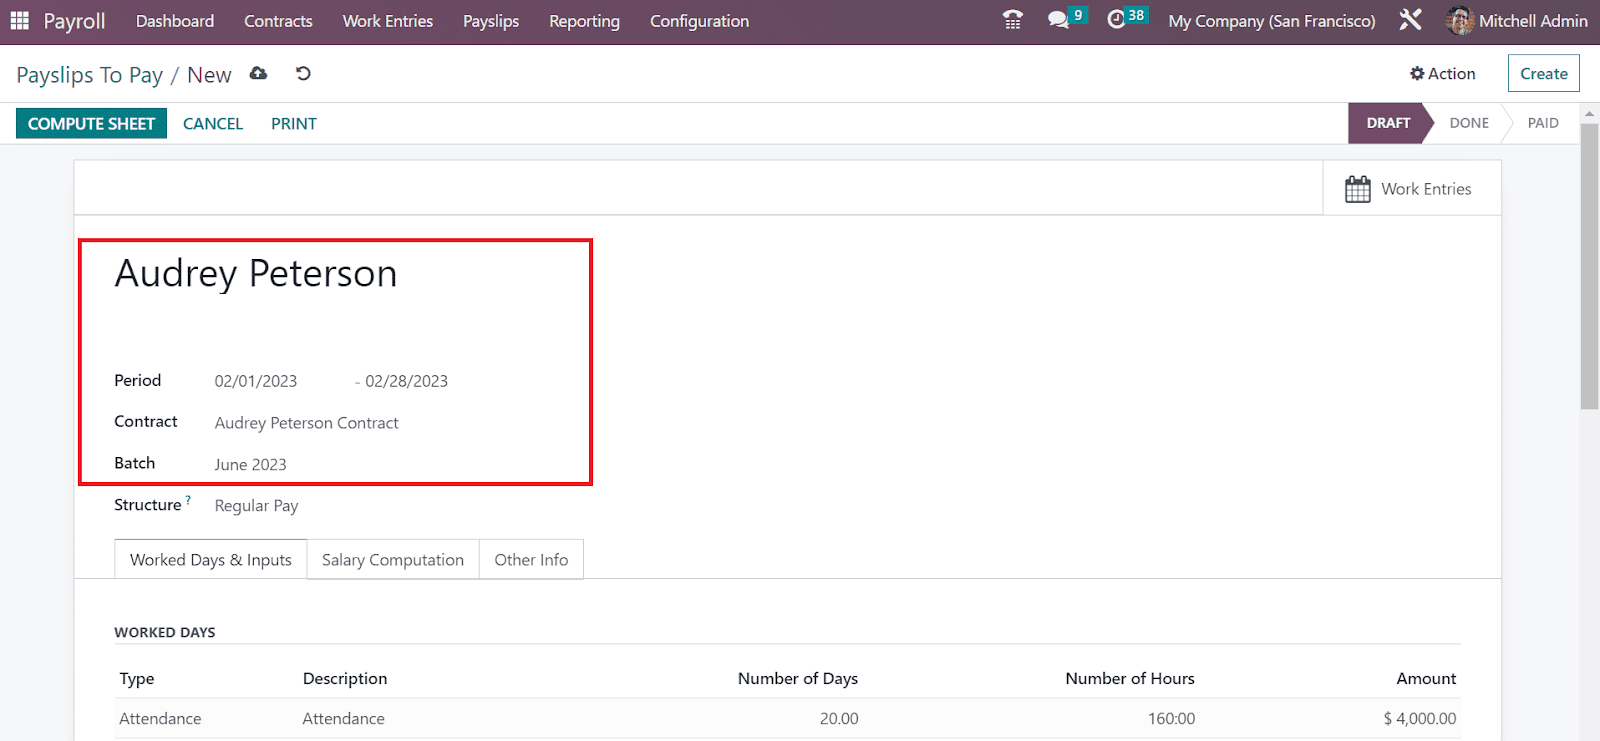
Users can specify rules applied to a payslip within the Structure field. The three tabs visible in the Payslips to Pay window include Worked Days & Inputs, Other Info, and Salary Computation. Below the Worked Days & Inputs tab, we can manage WORKED DAYS and OTHER INPUTS. Inside the WORKED DAYS section, we can configure Type, Number of Days, Amount, Description, and more. On other hand, below the OTHER INPUTS section, you can define the input type and necessary description.
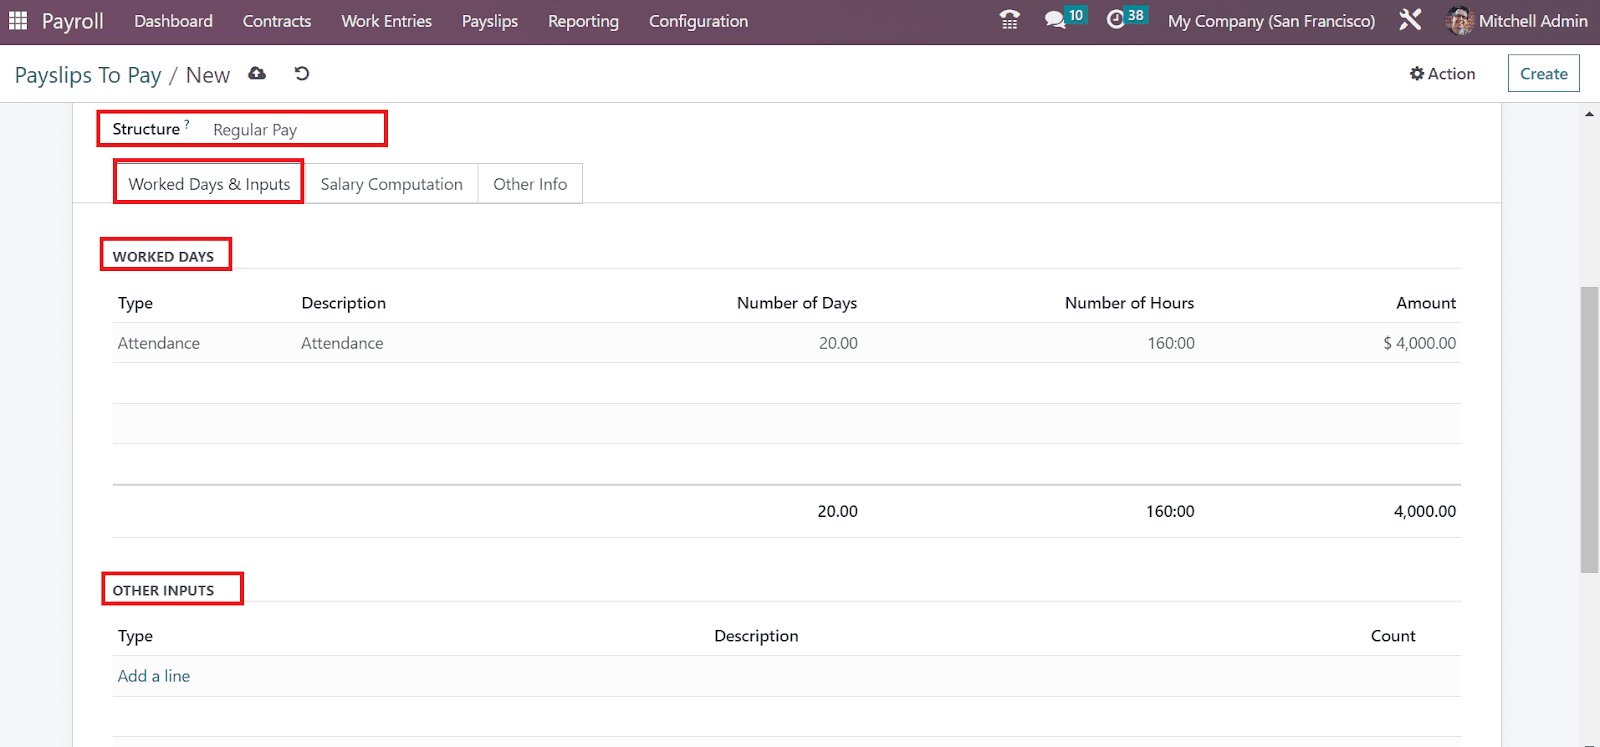
As per the salary rule and structure defined by employees, we can list salary computation that occurs in payslips with the help of the Salary Computation tab. You can see Name, Quantity, Amount and more inside the Salary Computation tab.

You can press the COMPUTE SHEET icon after choosing employee, contract, and necessary structure.

The computation details of employee salary are visible below the Salary Computation field once pressing the COMPUTE SHEET icon.
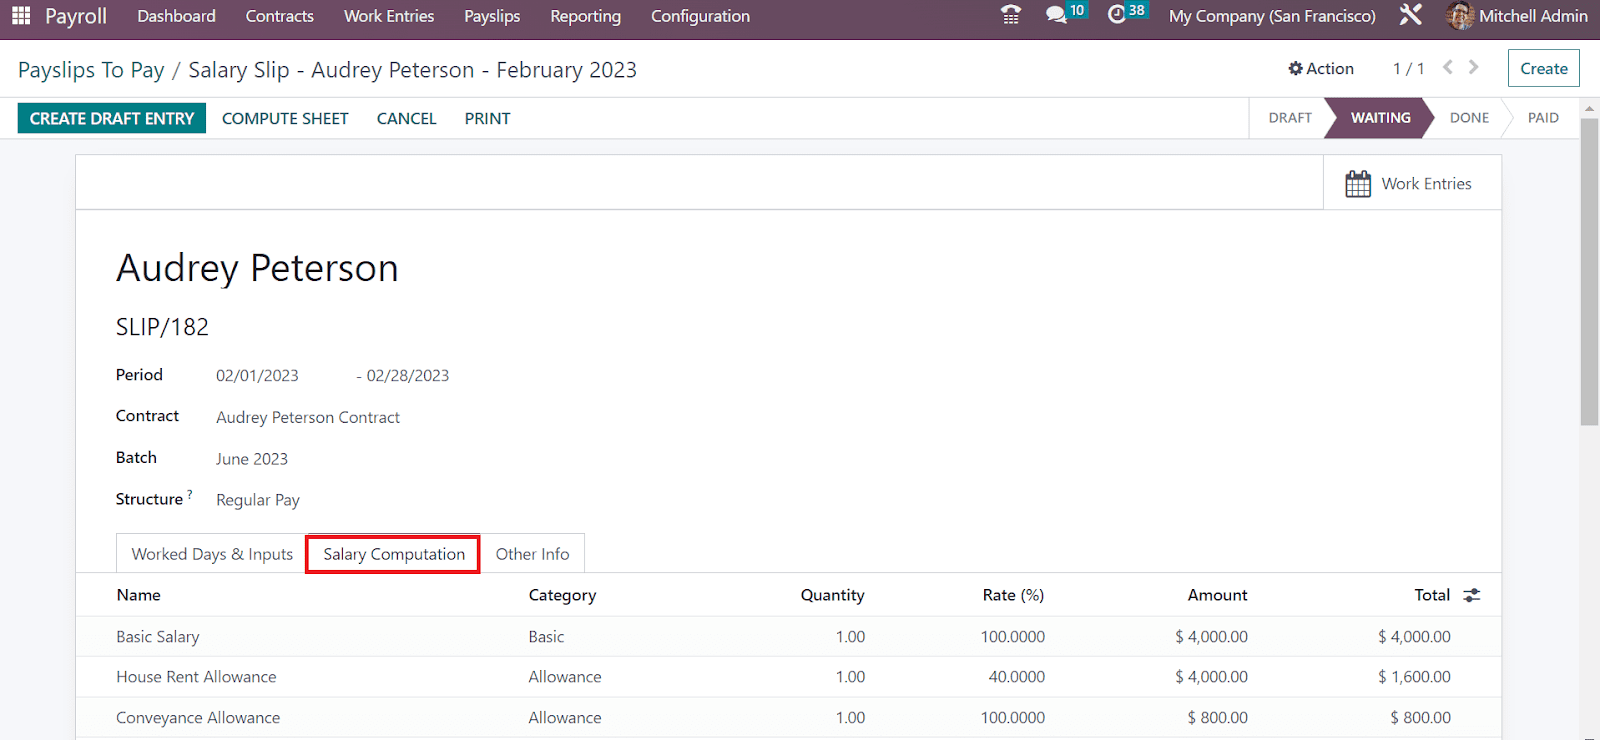
Users can describe the Company, Payslip Name, and other data of payslips to pay inside the Other Info tab. Also, we can obtain all work entries regarding the payslips to pay by an employee in the Work Entries smart button. Apart from these, you can download the payslips to pay inside the PRINT icon.

All Payslips
The information about payslips generated for all employees is accessible in the All Payslips window. For that, you must choose the All Payslips menu within the Payslips tab. In the List view, you can obtain data concerning employee payslips such as Reference, Batch Name, Basic wage, status, and more. By choosing the CREATE icon, we can define new payslips for employees quickly.
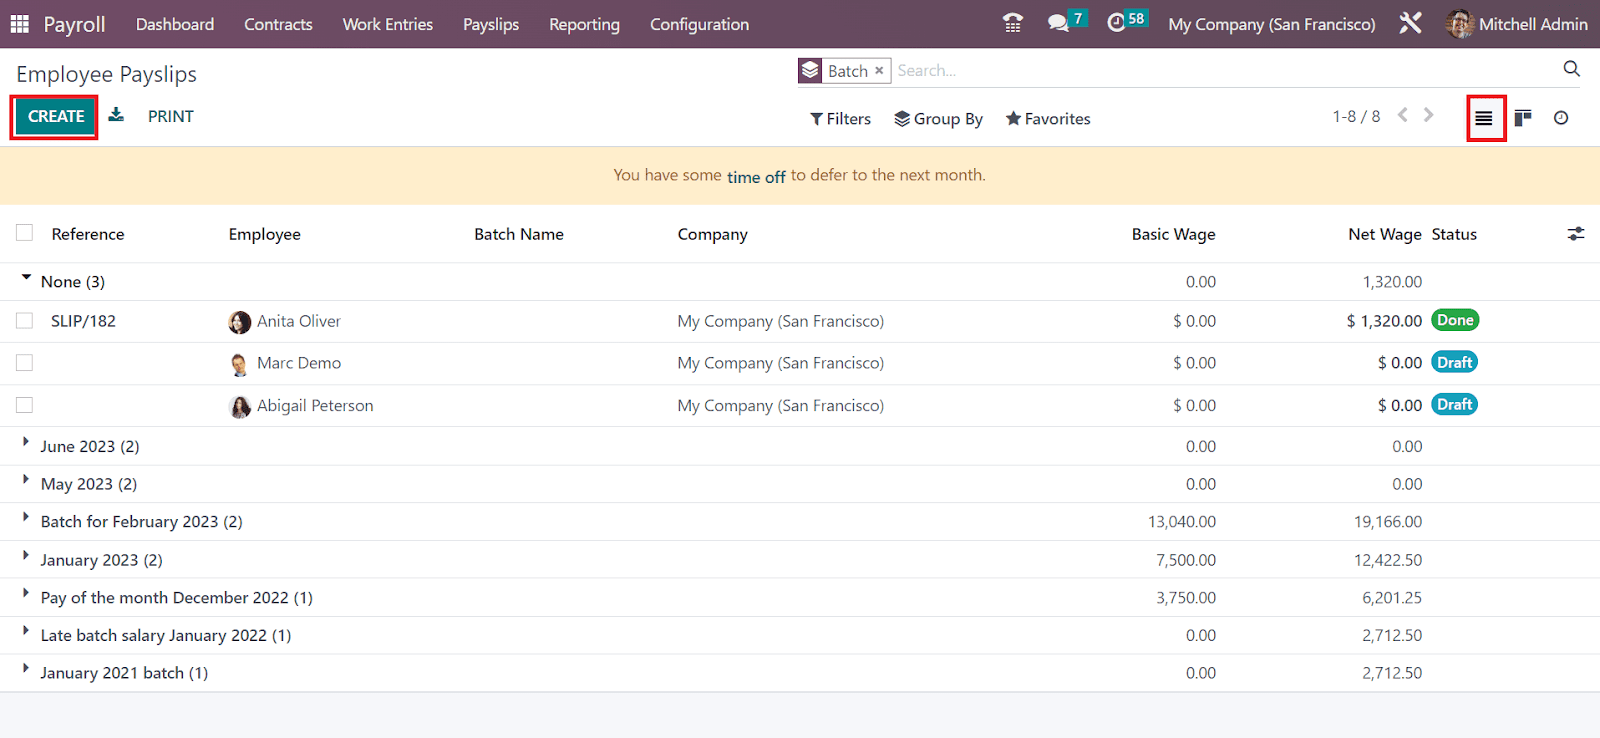
Batches
To formulate payslips for employee batches, you can select the Batches menu in the Payslips tab. The Payslip Batches window defines the data regarding each batch, including Name, Date To, Company, Date From, Status, and more. After clicking the CREATE, we can provide a new payslip batch data.
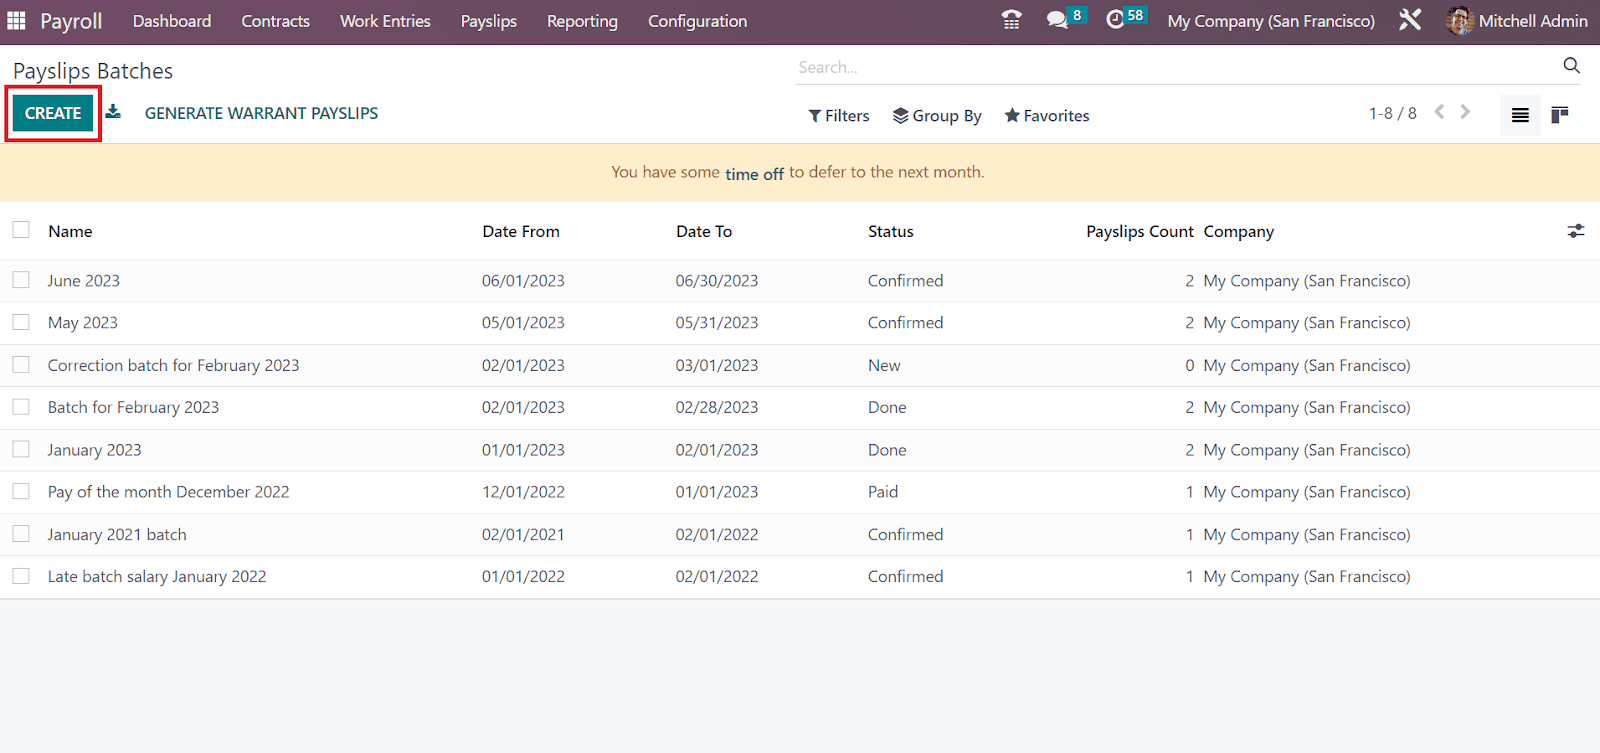
In the new screen, mention the Batch Name and time concerning your specific batch in the Period field. Users can specify the start and end date of a batch in the Period option. Additionally, enter the Company name, and each detail is saved automatically.
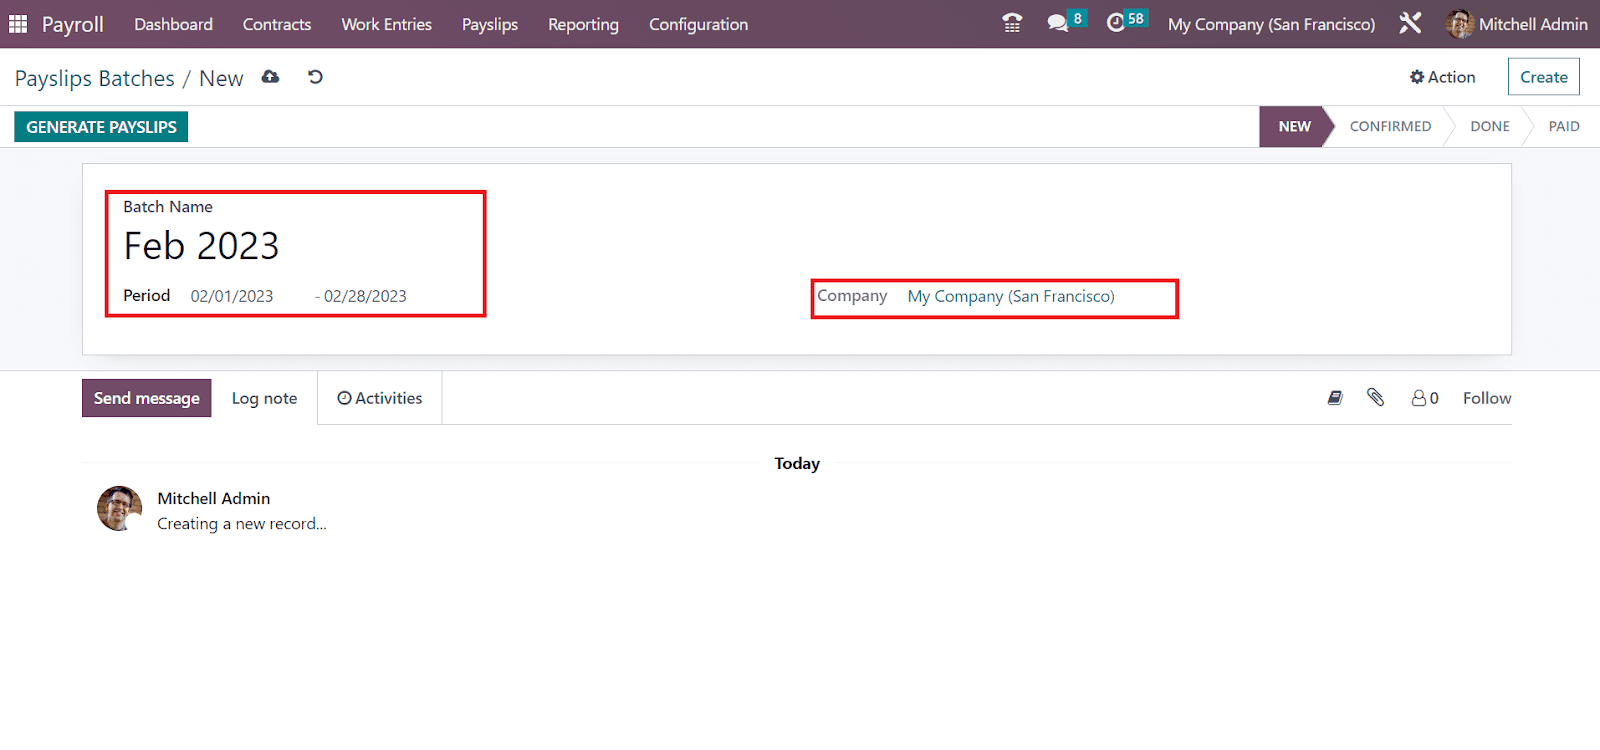
It is possible to put the payslip batch on each stage as per the further proceedings. After applying essential data, you can choose multiple employees by selecting the GENERATE PAYSLIPS button.

In the Generate Payslips window, the user can add a specific structure such as Worker Pay, Regular Pay, and more below the SALARY STRUCTURE section. Based on employee configuration, a regular payslip is generated if we make the field empty. Similarly, you can mention a particular department to choose employees inside the DEPARTMENT section.

We can specify an employee’s name after selecting the Add a line option under the EMPLOYEES tab. Once entering each data, select the GENERATE icon.
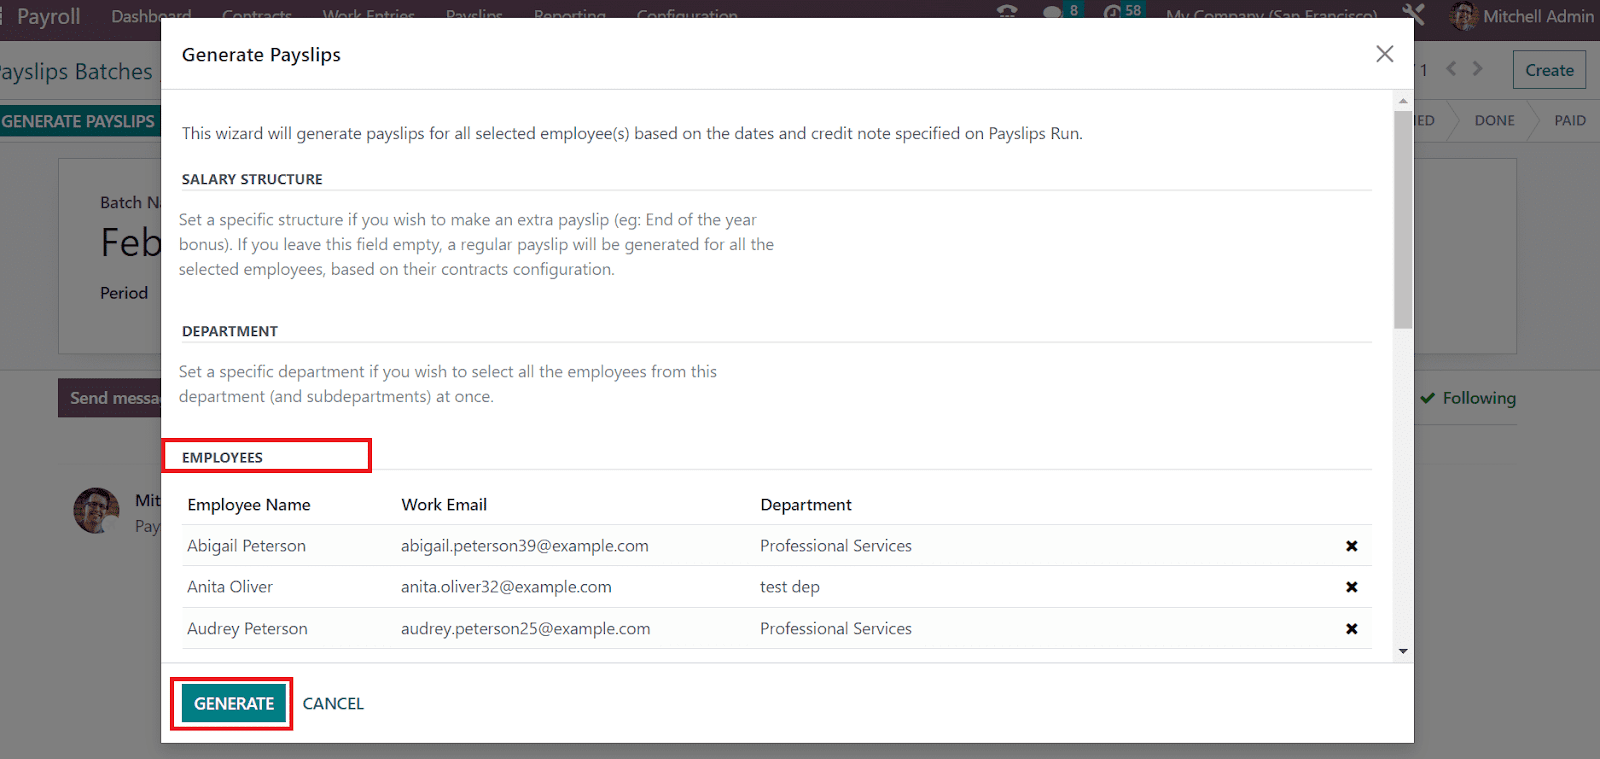
So, it is easy to produce payslips for employees based on batches.
Reporting
Users can manage th.e payroll expenses once evaluating the reports. We can evaluate the salary attachment report, payroll, and work entry analysis. It is easy to maintain reports at the end of a financial year or month in a company.
Payroll
We can analyse the company payroll data once picking the Payroll menu in Reporting tab. Graph view of the Payroll Analysis window shows Start Date in X-axis, and Y-axis depicts the Basic wage. By pressing the MEASURES icon, we can apply various values, including Gross Wage, Work Days, Number of Hours, Days of Unpaid Time Off, Work Hours, and more. Also, you can view the graph in different formats such as Pie chart, Graph chart, Line chart, and more.

Work Entry Analysis
A tabular report is visible to the user after selecting the Work Entry Analysis menu inside the Reporting tab. In the pivot table, you can acquire the work entry analysis as per the attendance, sick time off, unpaid and more. It is easy to analyse the work entry according to the measures like a day or count using the MEASURES button.

Salary Attachment Report
The report regarding employee salary attachment is viewable to a user once clicking on the Salary Attachment Report menu inside Reporting. The MEASURES tab in the Salary Attachment Report will assist you in managing Child support, Assignment of salary, and Attachment of salary.

Attendance
Users can run the attendance marking of employees and evaluate reports with a well-equipped attendance management system in OTX 16. Attendance management is an essential requirement for an organization nowadays. OTX assists the authorities and HR department with an equipped employee attendance monitoring system. You can acquire employees checking in and out times in a firm by using an attendance management system. The payment for employees according to their work time attendance is made possible through OTX 16 Attendance module.
OTX 16 Attendance
To configure employees’ attendance, you must download the Attendance module in OTX 16. Users can view the dashboard once entering the OTX 16 Attendance module. If an employee needs to log in to work, select the Check-in button in the dashboard window.

After you check-in, it is possible to access the employee name and check-in time as defined in the screenshot below.

Once completed the work hours, an employee can log out from the same page by choosing the Check Out button.

Here, a company can access the total work hours spent by employees. After an employee checks out from work, the manager will extract the time spent by an employee at work.
Kiosk Mode
Kiosk mode in OTX assists you in logging in to your firm in another method. By selecting the Kiosk Mode tab, you can acquire this method in the Attendance module.
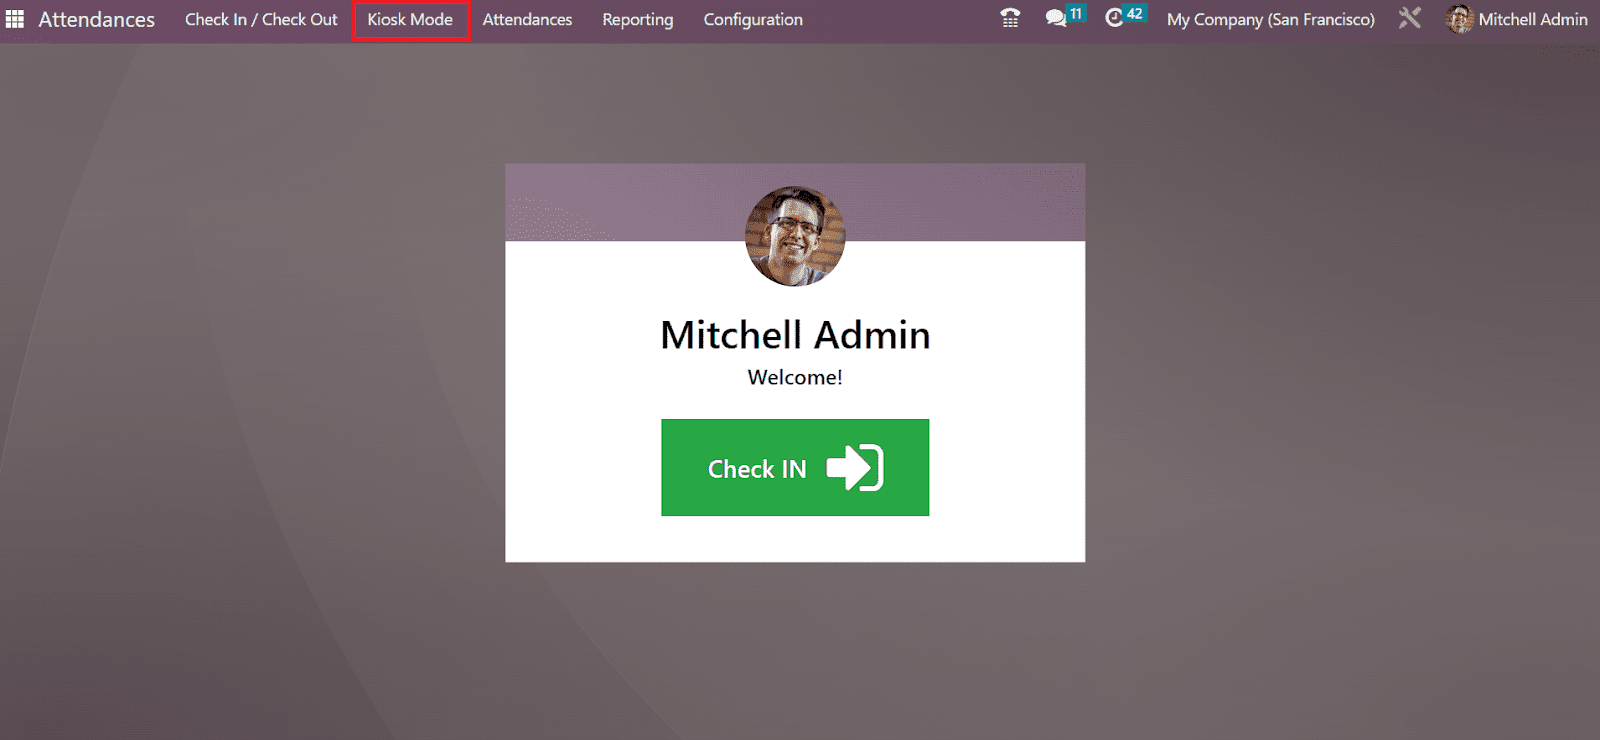
A new page appears before you after selecting the Kiosk mode. The options like Identify manually and TAP TO SCAN are visible to you. It is easy to scan your badges after clicking on the TAP TO SCAN button. You can manually identify the employee after pressing the Identify Manually option.
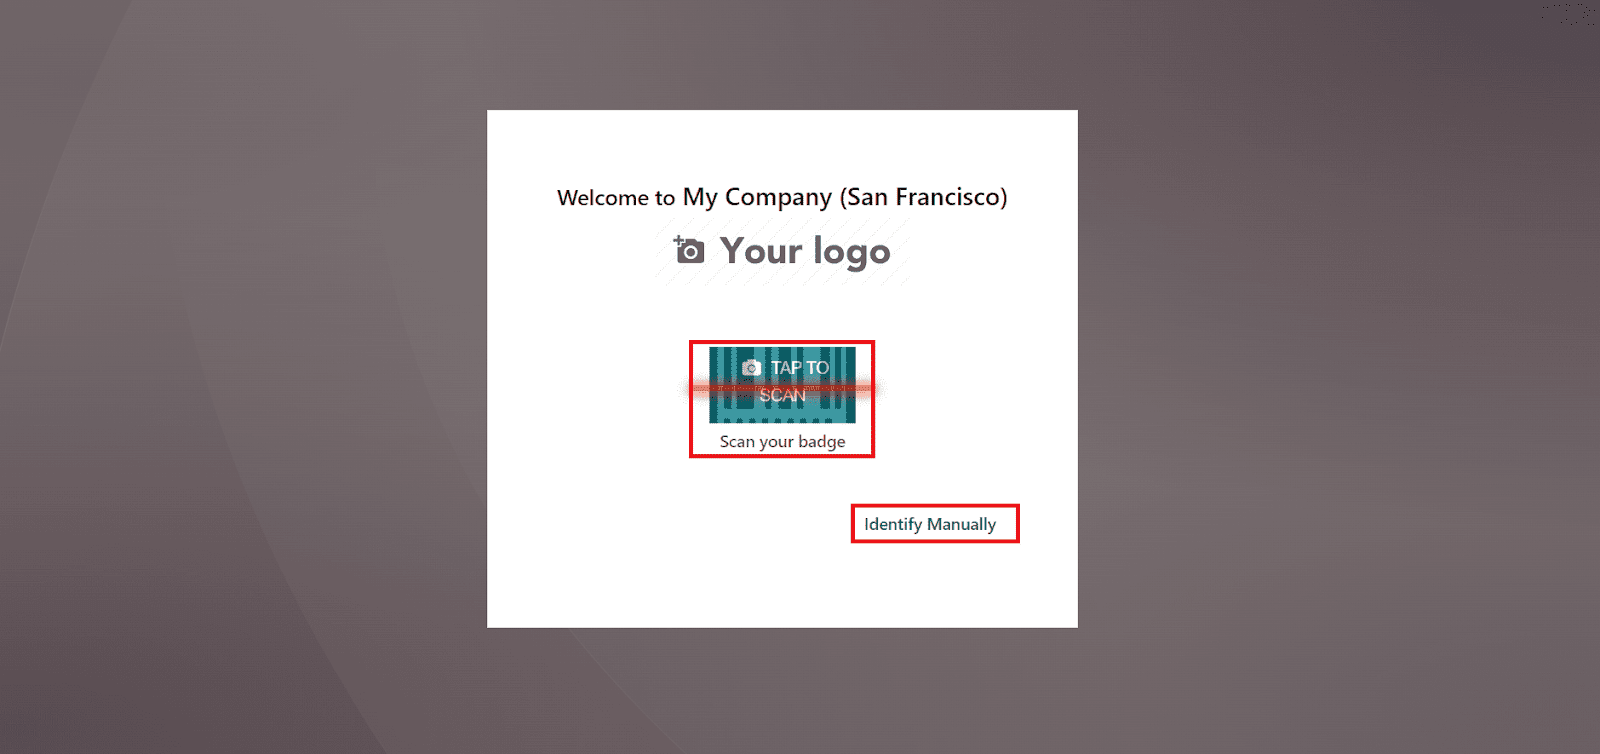
Barcode integration in the OTX system benefits different phases of company operations. It is possible to add a barcode to the employee identification card that is used for logging in and out of the platform. An employee can scan the barcode in the reader once they log in to the window. Inside an Employee window, you can define the employee barcode. For example, move to OTX 16 Employees module and select your employee. On the open page, choose the HR Settings tab, and the user can access the Badge ID option.

To formulate the Badge ID automatically, click the Generate option in the Badge ID field. So, badge id is generated automatically, and it is viewable in the Badge ID field. Later, select the Print Badge option to download the employee badge data.
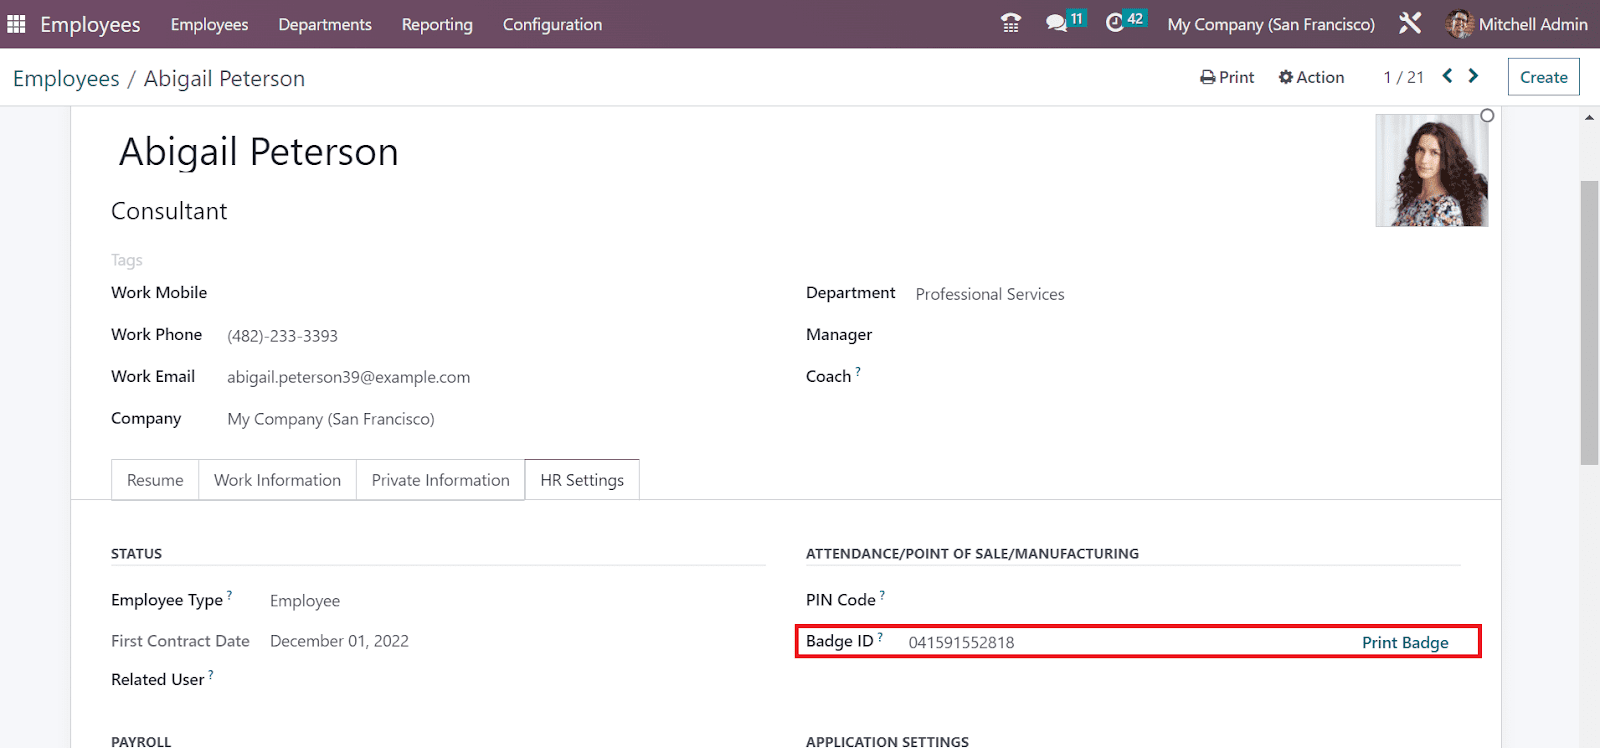
The badge id is printed into your system once selecting the Print Badge option. So, we can assign a badge ID for each employee in a firm.
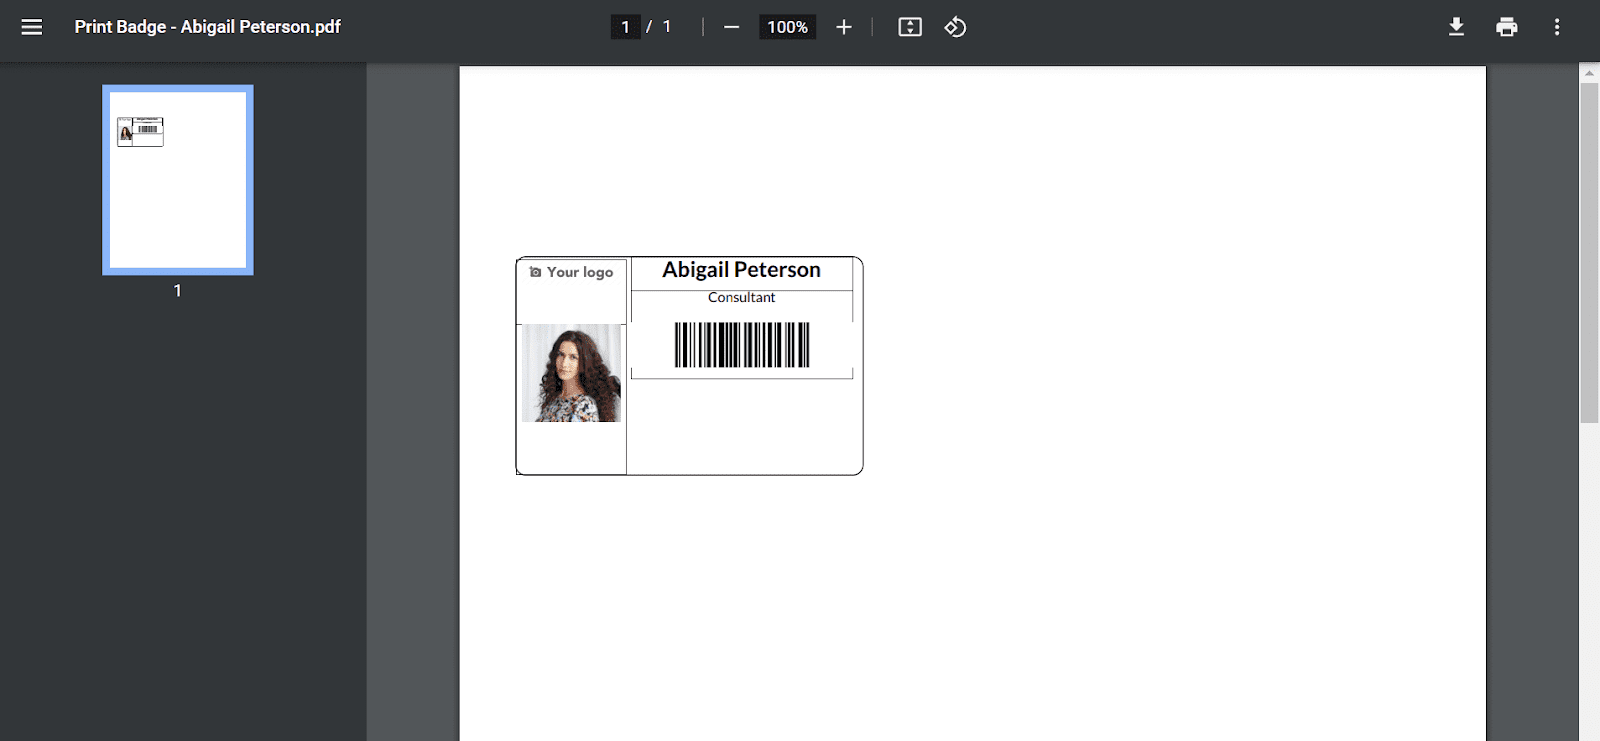
Similarly, we can also provide a PIN to each laborer in a company. For that purpose, you must move to the Settings window of the Attendance module and enable the Employee PIN option. It ensures you check in to your employee profile using a PIN code. After the activation, select the SAVE button on the Settings page.

You can assign a unique PIN number once creating employee information in OTX 16. A PIN Code option is available under the HR tab of the Employees window.

Once you set a pin operation, OTX shows a menu for entering the pin code once the employee tries to log into the platform. Now, let’s examine the working of the Identify Manually option in Kiosk mode. Users can view the list of employees after choosing the Identify Manually option. It is possible to choose respective employee names and use grouping and filtering options. You can pick your particular employee from the Employees window.

After selecting your employee record, the system displays the employee profile in Kiosk mode to check in once you enter the PIN number. You can log in to work once adding the PIN number.
An employee can mark their attendance with the help of their pin and badges manually enabled by Kiosk Mode in OTX 16 Attendance.
Attendances
We can manage each employee’s attendance in a firm using the OTX 16 Attendance module. All pre-figured list of attendance is viewable by selecting the Attendances menu. In the List view, you can obtain the attendance data such as Employee, Work Hours, Check In, and Check Out. To define a new employee’s attendance, press the CREATE icon in the Attendances window.
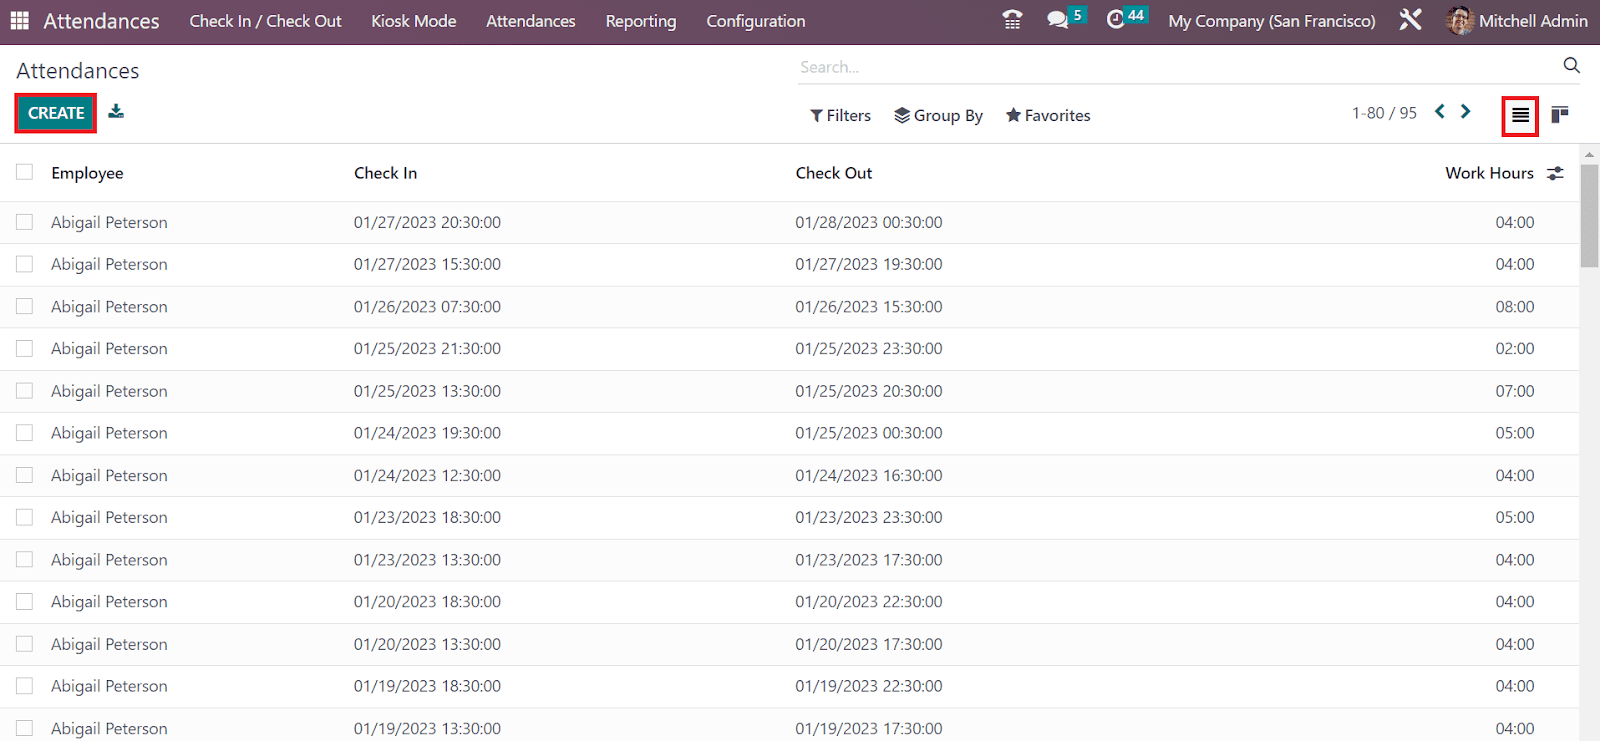
A new space opens at the end of the Attendances page once clicking on the CREATE icon. You can choose the employee name and select the time in that space. Once applying the details, click the SAVE icon in the Attendances window.

Hence, we can easily add the attendance of every worker in a company. It is more convenient for HR and managers in a firm.
Configuration
Additional settings concerning employee attendees are managed within the Configuration feature of OTX 16 Attendance. A Settings window opens to the user once choosing the Configurations tab. Two sections, including Extra hours and Check-In/Out in Kiosk Mode, are visible to the user in the Settings window. Users can identify each application once selecting an attendance mode. Below the Barcode Source option, you can discuss the camera used for the barcode scan.

You can set the time for playing a greeting message in seconds inside the Display Time option. Moreover, an employee can check in to work through PIN codes after activating the Employee PIN field. After setting each check-in/out data in Kiosk mode, click the SAVE icon.

Now, let’s manage the extra hours setting in the OTX 16 Attendance module. Below the Extra Hours section, you can acquire the Count Extra Hours option to assist in counting extra time for attendance. It is possible to enter the start date by enabling the Count Extra Hours option to contrast attendance based on employee working hours.

Under the Extra Hours tab, you can set tolerance time in favor of the company and employee. You can allow specific working hours that benefit for company inside Tolerance Time in Favor of the Company in minutes. Additionally, enter the period of time that helps an employee where extra time is not deducted under the Tolerance Time in Favor of Employee field. Click the SAVE icon inside the Settings window.

Reporting
Users can formulate attendance reports of employees based on week, monthly, and yearly basis. You can access attendance analysis reports once choosing the Reporting tab in OTX 16 Attendance. The Graph view of the Attendance Analysis window depicts the employee check-in data on X-axis, and Y-axis shows the count. Users can see the check-in data of each employee in different colors on the graphical representation. By choosing the MEASURES icon, we can add distinct values to the graph, such as Hours worked and Extra Hours of employees.
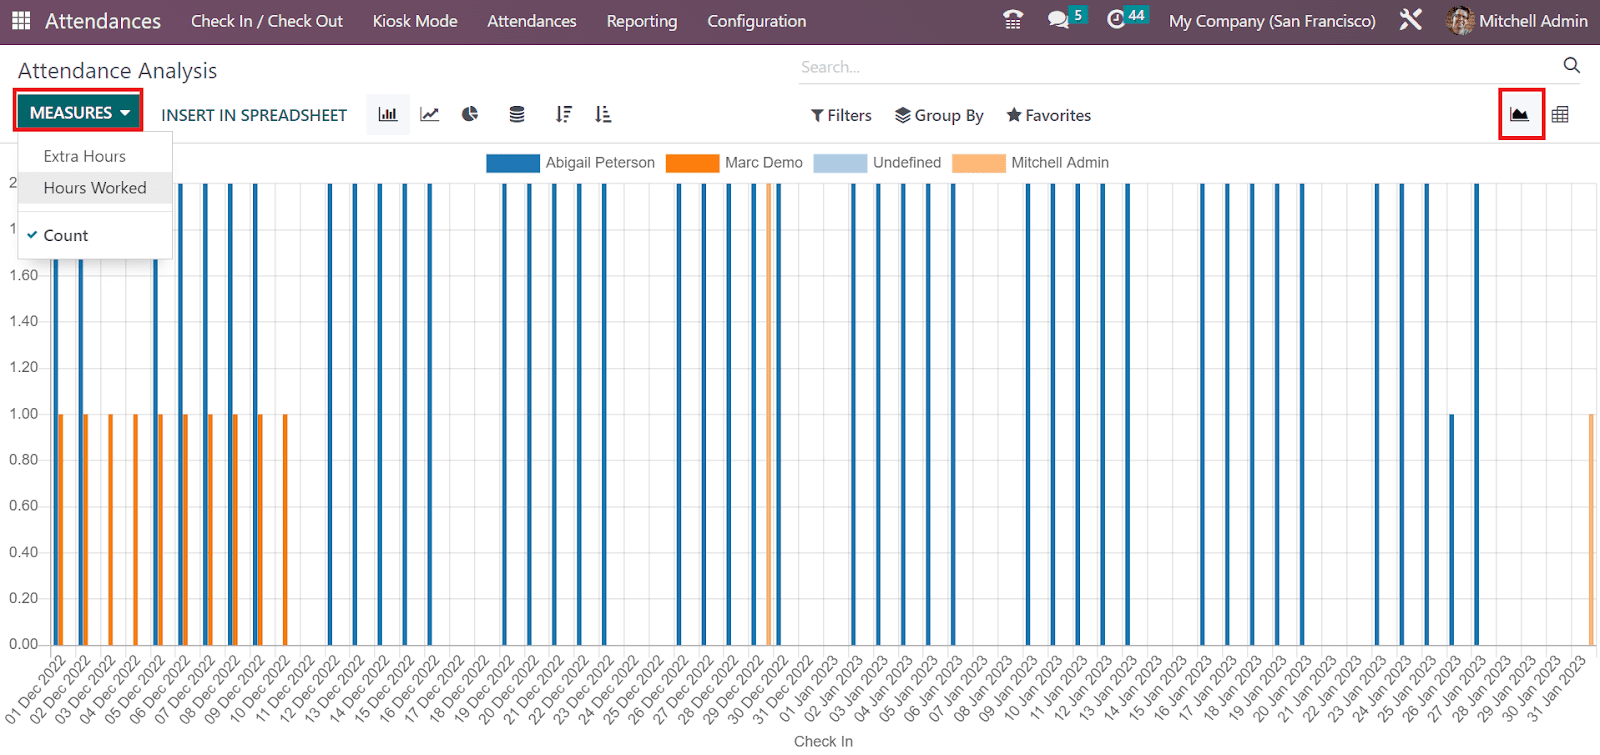
In the Pivot view, the user can see the pivot table that defines the total working hours of each employee separately. Based on each month, the user can identify the real working time of a worker in the company.
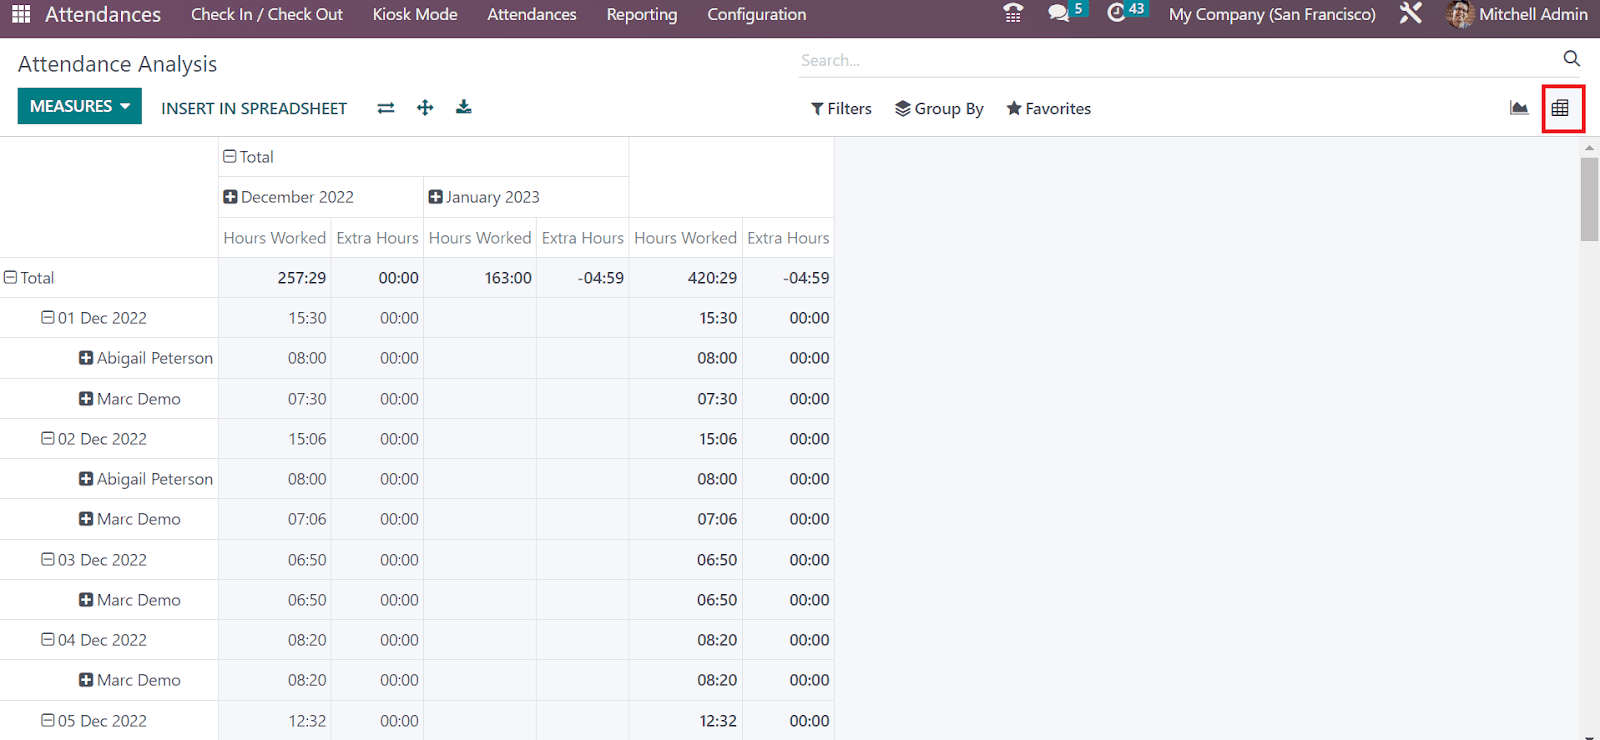
Actual working hours of employees in a firm manage quickly through OTX 16 Attendance module. By evaluating reports, a firm can understand employees’ working capabilities and make future changes.
Employees
Successful management of employees in an organization is a crucial task in all kinds of businesses. In order to ensure a seamless workflow within the organization, human resources should be monitored and managed adequately. You need a proper system to manage all types of employee-related activities. OTX ERP system will record all your employee data in a centralized database which helps you easily retrieve required information related to an employee within seconds. You can create records of employees in the OTX Employee module based on their job titles and working departments. The Employee module can be integrated with other HR modules available in OTX , which will expand the functionalities of the system.
This chapter will discuss the features and functionalities of the Employee module in OTX 16.
The Employee module can be used to create an employee profile which includes personal details, work information, contract, resume, and many more. Once you create an employee profile in the module, you can use the profile window to schedule or plan activities with the respective employee, view documents, timesheets, contracts, equipment, work entries, and payslips related to the employee. When you open the module, you will get a Kanban view of the employee profiles recorded in the system.

Each employee profile will show some basic information related to the respective employee such as name, job position, contact information, and photo. If you are working in a multi-company environment, you can easily categorize the employees of each company using the panel available on the left side of the screen. It is also possible to view employees based on their Departments.

The small green circle on the employee profile indicates that the employee is online. If the profile shows a small airplane icon, you can figure out that the employee is absent. The small clock icon given on each profile can be used to schedule various activities with the corresponding employee. You can use the chat icon to directly connect with that employee.

You will get Newly Hired, Absent Today, Unread Messages, Contract Warning, My Team, My Department, Fixed Hours, Flexible Hours, and Archived as default filters.

Use the Group By option to group the employees based on Manager, Presence, Department, Job, Skills, and Tags.

The list view of the employees will show the Employee’s Name, Work Phone, Work Email, First Contract, Activities, Next Activities, Company, Department, Job Position, and Manager. Now, you can click on the Create button to create a new profile.

A new form view will appear where you can configure the details of the employee. Mention the Name of the employee and Job Position in the company in the respective fields. Additionally, you can add suitable tags to the employee. You will get specific fields to mention the Work Mobile, Work Phone, Work Email, Company, Department, Manager, and Coach of the employee. A specified area will be available to upload an image of the employee.
Now, let’s add Resume and Skills to the employee profile. For this, you will get the Resume tab, as shown below.

Use the Create a New Entry button to add resume lines to your profile. You can add your education details, work experiences, internal certifications, training information, and additional qualifications under the Resume. When you click this button, a pop-up will appear, as shown below.

Specify the Title and select Type from the drop-down. It can be either Experience, Education, Internal Certifications, or Internal Training. You can also create a new Resume Line Type from the Configuration menu of the module. After mentioning the Type, you can set the Display Type as Classic, Certification, or Course. Mention the time period in the Date Start and Date End fields. Additional details related to this resume line can be added under the description field.

Once you add resume lines, this is how it looks. Using the Add button, you can add more resume lines to this tab. Now use the Create New Entry button available in the Skills field to add the skills of the employee.

You will get a pop-up where you can select the Skill Type of the employee and mention a particular Skill. In the Skill Level field, mark the skill level of the employee.

You can add new skills using the Add button available in the Resume tab.
The Work Information tab includes fields for the necessary work information related to the employee.

In the Location section, mention the Work Address and Work Location. The Approvers section can be used to mention the approvers of the Expense, Time Off, and Timesheet of this employee. The Schedule section will give information about the work schedule of the employee. If the employee is allowed to work flexible hours, you can activate the Flexible Hours field. Otherwise, you are required to mention the Working Hours of the employee per week. Set the Timezone in order to define in which timezone the resources will work. Mention the Role that the employee can fill in. When creating a shift for this employee, only the shift templates for these roles will be displayed. The role that will be selected by default when creating a shift for this employee can be specified in the Default Planning Role.
The Private Information tab can be used to mention details regarding Private Contact, Family Status, Education, Work Permit, and Citizenship.

Under the Private Contact section, mention the private Address of the employee, Email, Phone, Language, and Home-Work Distance. As Family Status, you can add the employee’s Marital Status, Number of Dependent Children, Emergency Contact Name, and Contact Phone.

Under the Education section, you can add details of the Certificate Level, Field of Study, and School. The Visa No, Work Permit No, Visa Expire Date, and Work Permit Expiration Date can be added under the respective fields. You will get a specified field to upload the Work Permit of the employee. The details of Citizenship include Nationality, Identification No, Passport No, Gender, Date of Birth, Place of Birth, and Country of Birth.

The HR Settings tab can be used to add the Status, Payroll, Attendance/PoS/Manufacturing, and Application Settings. The Employee Type can be set as Employee, Student, Trainee, Contractor, or Freelancer. A Related User name for the resource to manage its access can be added in the given field. Under the Payroll section, you can specify the Current Contract, Job Position, and Registration Number of the Employee. To log in to Attendance, PoS, and Manufacturing, you can set a PIN Code and Badge ID for the employee. In the Application Settings field, you can specify the Hourly Cost offered to the employee, Fleet Mobility Card, and Next Appraisal Date.

Once you complete the configuration of the employee profile, you will get various smart buttons on the form view to monitor the related operations of the employee. The Document button will display the related documents of the employee. If any equipment is assigned to the employee, you can manage them using the Equipment smart button.
● Various activities scheduled with this employee can be observed using the Planning smart button. The Gantt view will provide the details of the scheduled activities as shown below. It is possible to plan new activities with this employee from this window.

● The time off taken by the employee can be viewed on a monthly and yearly basis can be observed using the Time Off button.

● The Timesheets button will open the recorded timesheet of the employee. It will show the recorded hours on various tasks assigned to the employee.

● The vehicle assigned to the employee can be seen by clicking on the Cars button. The history of employee cars will show the details of the Vehicle, Start Date, End Date, and Number of Attachments.

● The Contract smart button will display the running contract of the employee.

● Work entries related to the employee can be seen using the respective smart button. The calendar view will show the work entries of the employee in a particular month.

● The Payslip smart button will show the payslip generated for the respective employee. The list view shows the Reference, Employee, Batch Name, Company, Basic Wage, Next Wage, and Status.

● The Attendance button will direct you to the attendance record of the employee which shows the Employee, Check In, Check Out, and Work Hours.

● If any extra hours are recorded for this particular employee, it can be monitored using the Extra Hours smart button as shown below.

● The related contacts button will show the profile of employees related to the current employee.

You will get the Request Appraisal button on the form view which can be used to generate a request for the appraisal for the employee.

You can launch onboarding and offboarding plans for the employee using the Launch Plan button. Use the Signature Request button to send a request for signature on particular documents. In order to deduct extra hours, use the corresponding option available on the window.
Contracts
You can select the All Contract menu available in the OTX Employees module to observe the contracts configured for different employees in the company. The Kanban view of the all contracts platform is given below.
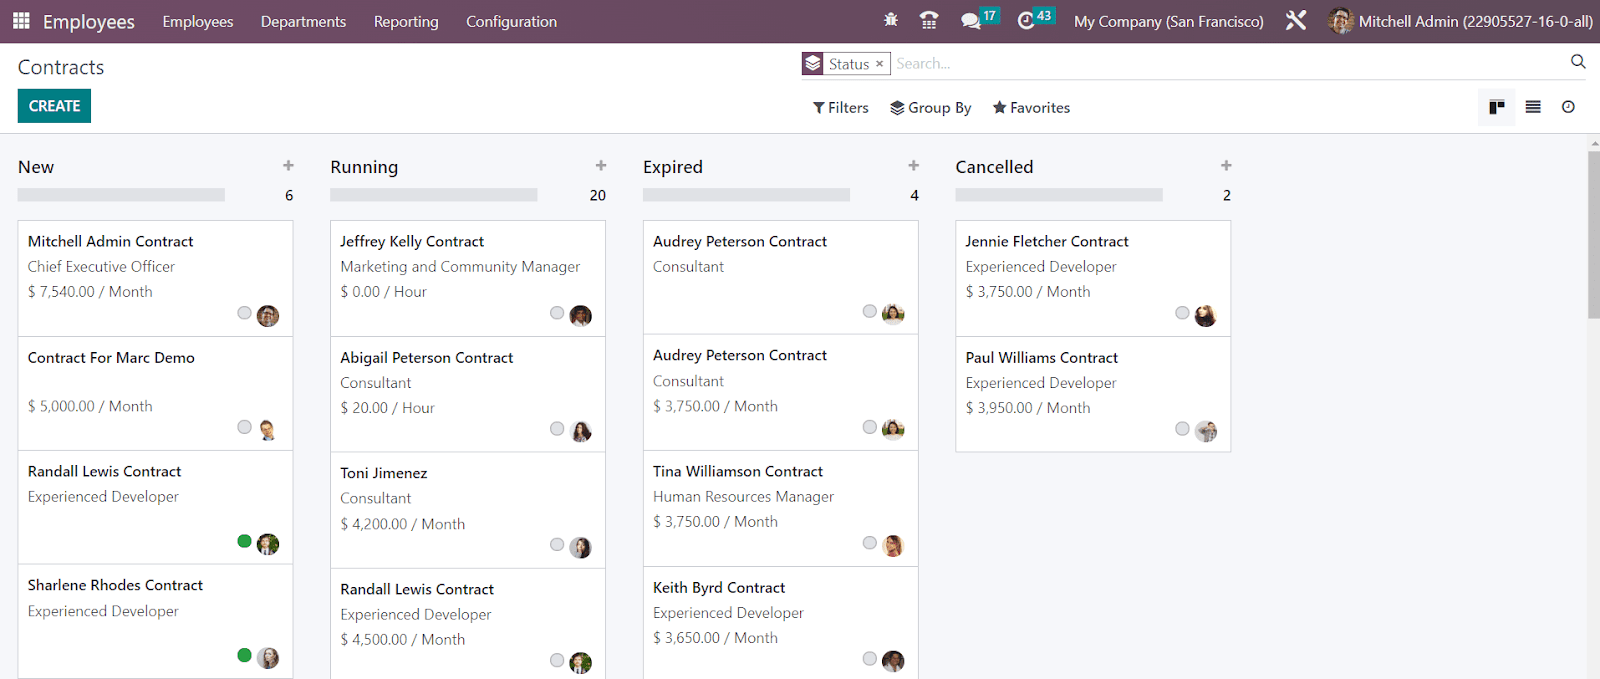
The contracts are arranged under different stages such as New, Running, Expired, and Canceled. Use the + icon to add a new contract under a specific stage. Each contract will show the name, job position, and salary of the respective employee.

The total number of contracts under each stage can be viewed on the top right side of each stage. The three small vertical dots available on each contract can be used to Edit and Delete the respective contract. You can use Running, Not Running, Change of Occupation, Employed, Archived, Late Activities, Today Activities, and Future Activities as Filters. In order to group the contracts, you can use Status, Employee, Start Date, Job Position, Working Schedule, and Salary Structure Type.
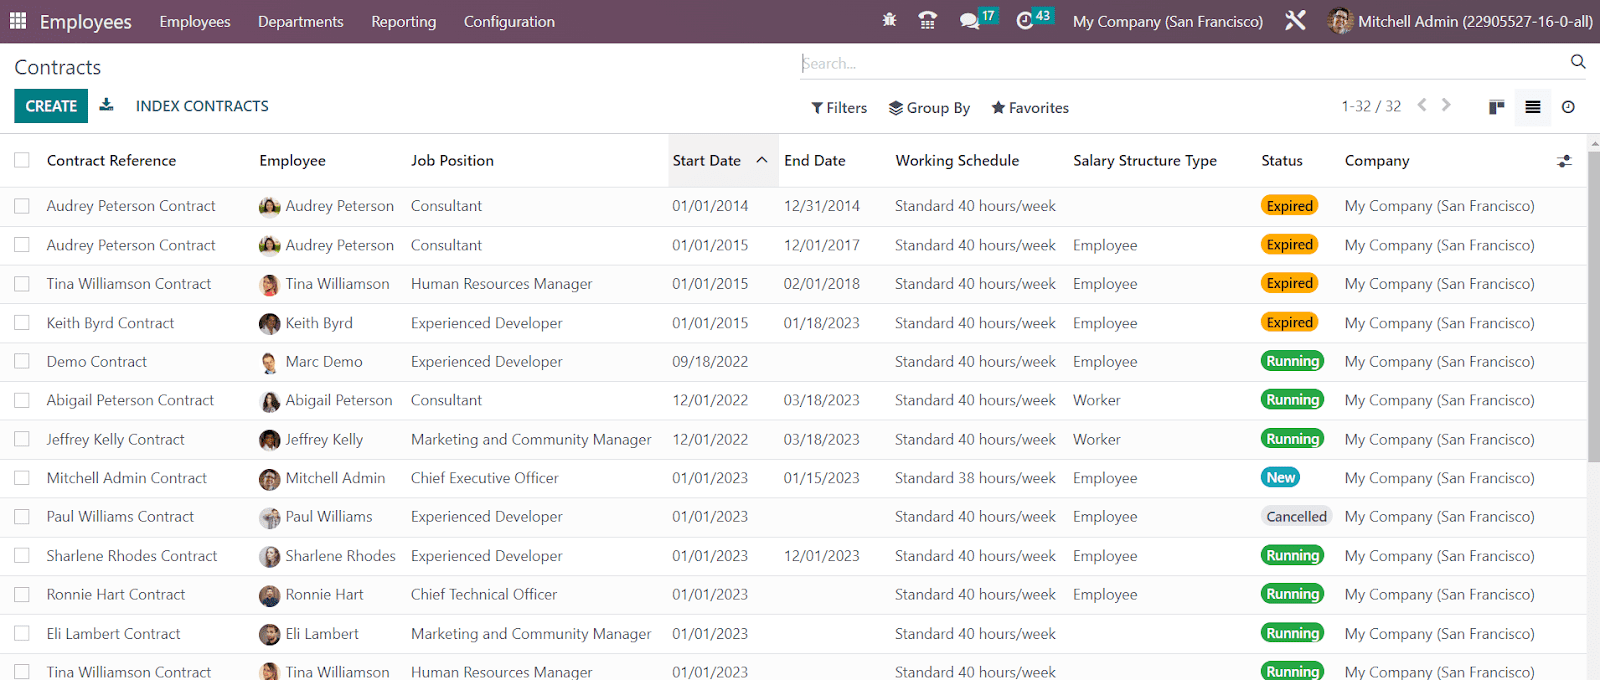
The list view of the Contracts shows the Contract Reference, Employee, Job Position, Start Date, End Date, Working Schedule, Salary Structure Type, Status, and Company. Now, click on the Create button to create a new contract.

As a contract reference, you can add a title to the contract. Mention the Contract Start Date, Contract End Date, Salary Structure Type, Working Schedule, Department, Wage on Payroll, Job Position, Contract Type, and HR Responsible in the corresponding fields. The Work Entry Source will define the source for work entries generation. The work entries can be generated from Working Schedule, Attendance, or Planning.
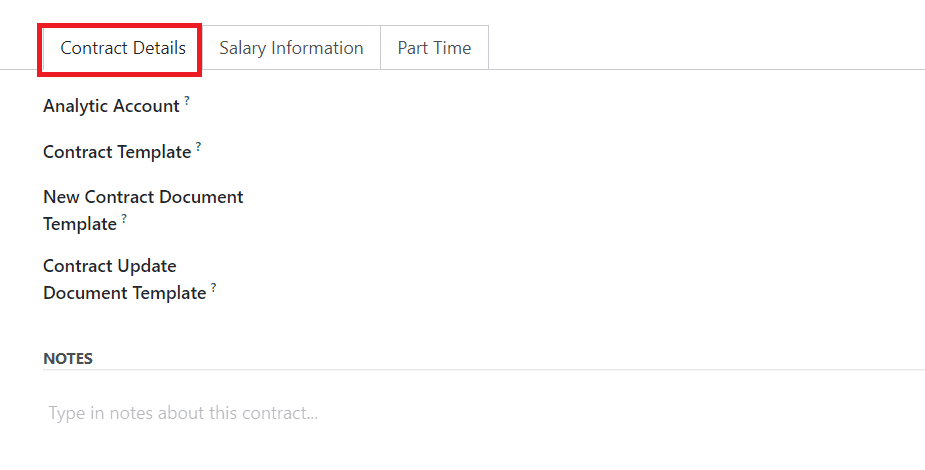
Under the Contract Detail tab, you can mention the Analytic Account. The default template used when making an offer to an applicant can be specified in the Contract Template field. The default document that the applicant will have to sign to accept a contract offer can be specified in the New Contract Document Template field. The Contract Update Document Template indicates the default document that the employee will have to sign to update the contract. The Notes field can be used to add notes about this contract.
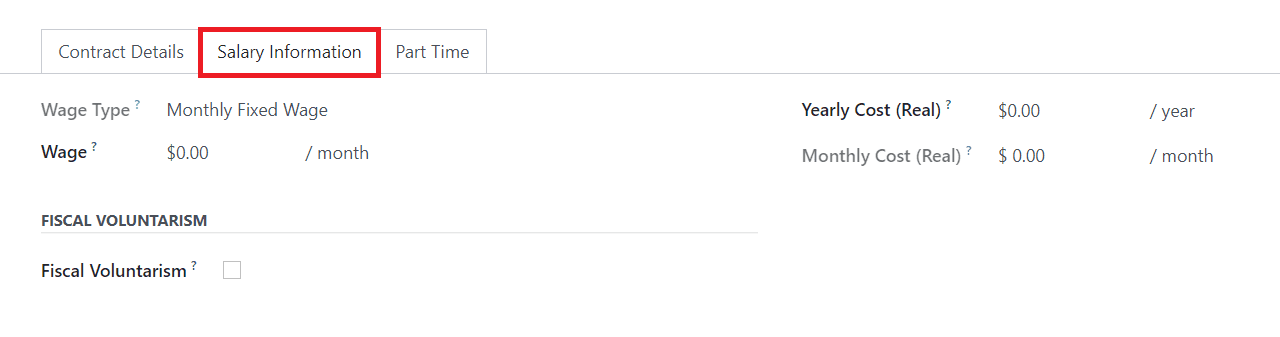
Select the Wage Type and set the monthly gross Wage of the employee under the Salary Information tab. The total real yearly and monthly cost of the employee for the employer can be obtained from the respective fields. Activating Fiscal Voluntarism will voluntarily increase the withholding tax rate. You will get an additional field to mention the Fiscal Voluntary Rate.
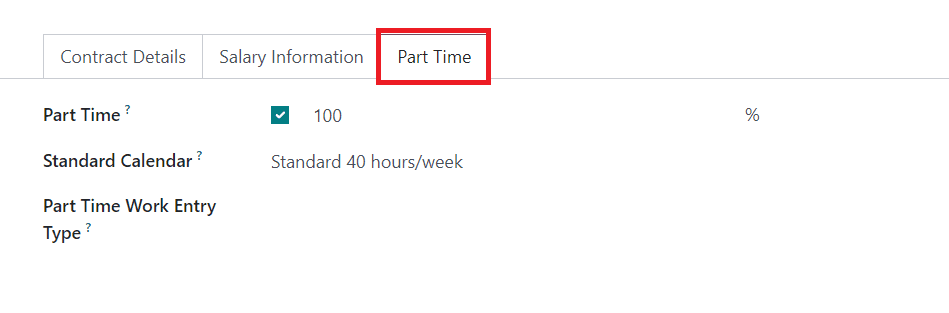
Under the Part Time, you will get the Part-Time option to activate for the contract for part-time employees. Set the Standard Calendar to compute the part-time percentage of the employee. The work entry type used when generating work entries to fit the full-time working schedule can be mentioned in the Part-Time Work Entry Type field.
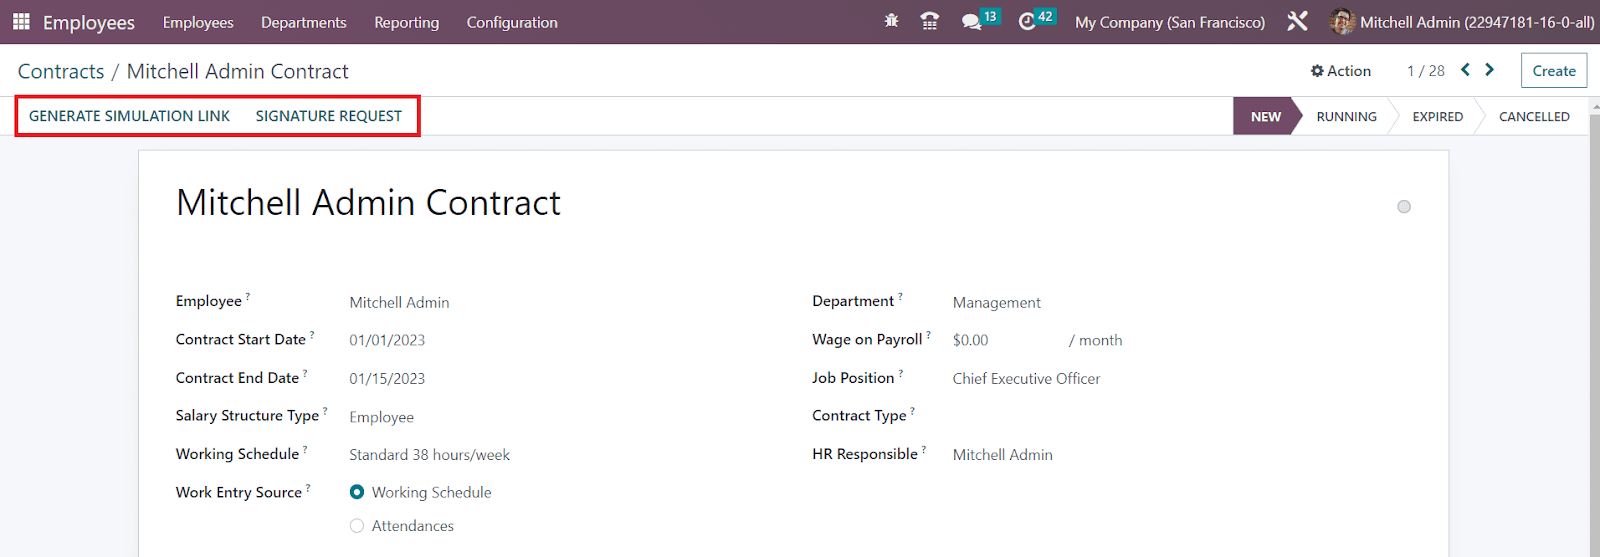
After completing the configuration of the employee contract, you will get the Generate Simulation Link option as shown in the image above which can be used to generate a link to send to the respective employee. As soon as you click on this button, you will get a pop-up window as shown below.

Here, you will get the details of the Offer Template, Job Title, Job Position, Department, Canteen Cost, Contract Type, and Yearly Cost. By activating the Force New Cars List, the employee will be able to choose a new car even if the maximum number of used cars available is reached. The Default Vehicle indicates the default employee’s company car. The Offer Link will be available in the pop-up window. You can click on the Send button to send to the respective employee.

The Signature Request button will help you to send a signature request to the corresponding employee. With the assistance of the Sign module, you can perform this operation. You will get a request window as shown below where you can add additional information for the request mail.

The details of the Documents to Sign and Employee will be available in the respective fields. Mention the Employee’s role on the templates to sign. The name of the Responsible employee can be seen here. You can add contacts in the Copy to field if you want to send a copy of this mail. Now, mention the Subject and add a message in the respective fields. After attaching the required documents, you can click the Send button to send the signature request to the respective employee. Once both parties agree and sign the document, the contract will come into effect.
Departments
In the OTX Employee module, you can configure the details of the departments available in your organization so that you can easily categorize employees according to their departments. For configuring Departments of your company, you can go to the Configuration menu and select the respective option. As shown in the screenshot below, you will get the pre-configured list of departments in the Employees module.
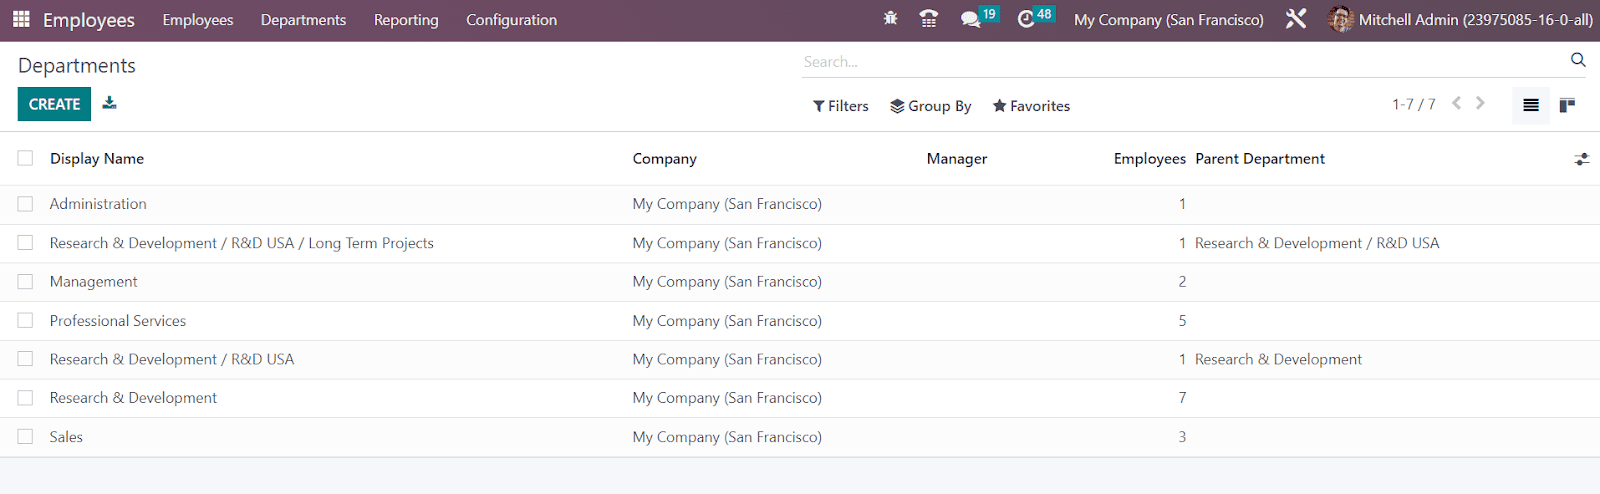
You will get the Display Name, Company, Manager, Number of Employees, and Parent Department details from this list view. Now, click the Create button to configure a new department.
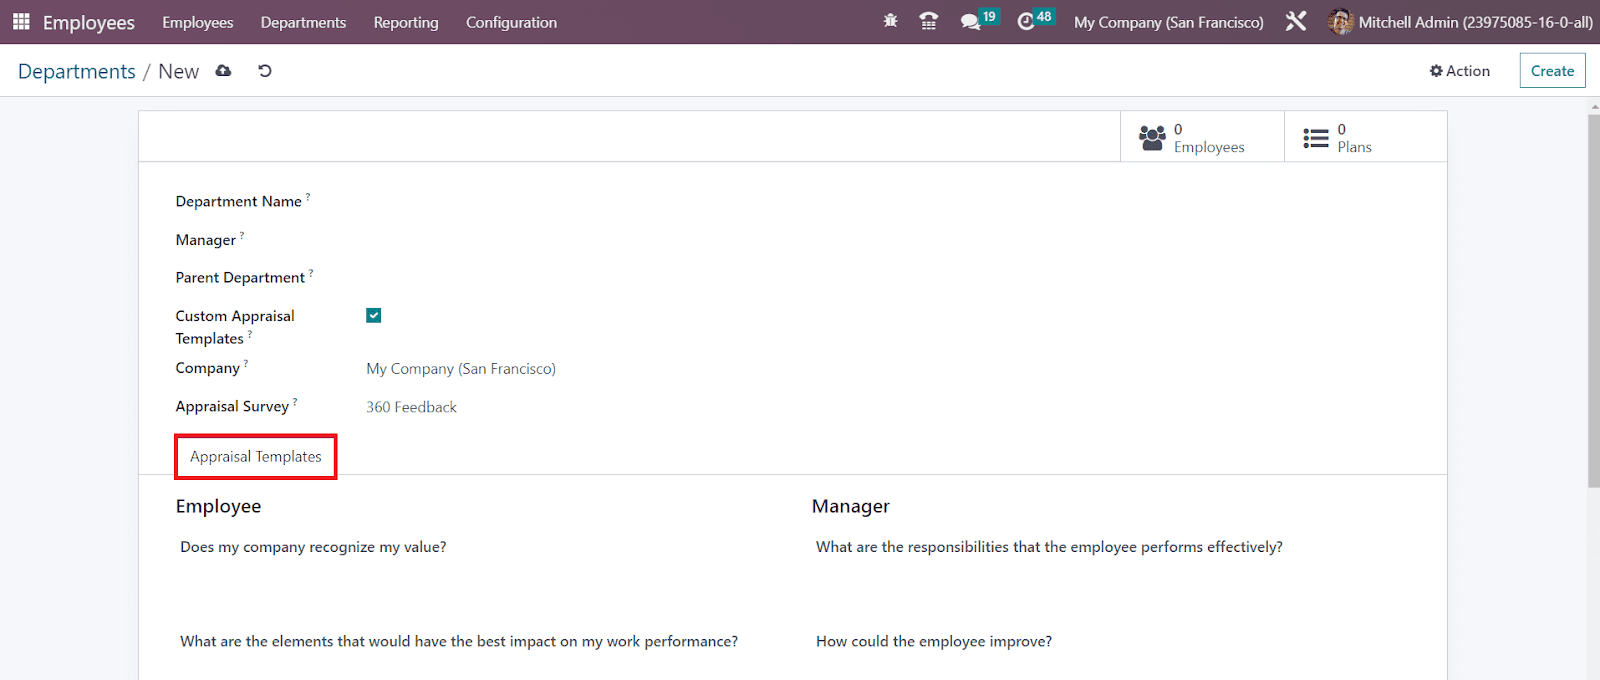
In the respective fields, you can mention the Department Name, Manager, and Parent Department. Activate the Custom Appraisal Templates if you want to customize an appraisal template for this department. As soon as you enable this option, you will get an additional tab called Appraisal Templates, where you can create a new appraisal template. The name of the Company will be automatically shown in the respective field. Specify the Appraisal Survey, which is used as a default survey template related to this department. After creating the record of the department, you will get the Employees smart button to observe the employees under this department and the Plans smart button to manage various plans for this department.
Job Positions
While creating an employee profile, it is necessary to mention the job position. Let’s look at the configuration of various job positions available in a company. For this, you can go to the Configuration menu and select the Job Positions option.

Here, you can see the list of pre-configured job positions. Use the Create button to configure new job positions.

OTX will open a new form view as shown above where you can configure the details of the new Job Position. After mentioning the Job Positions, you can add information in the Recruitment tab.
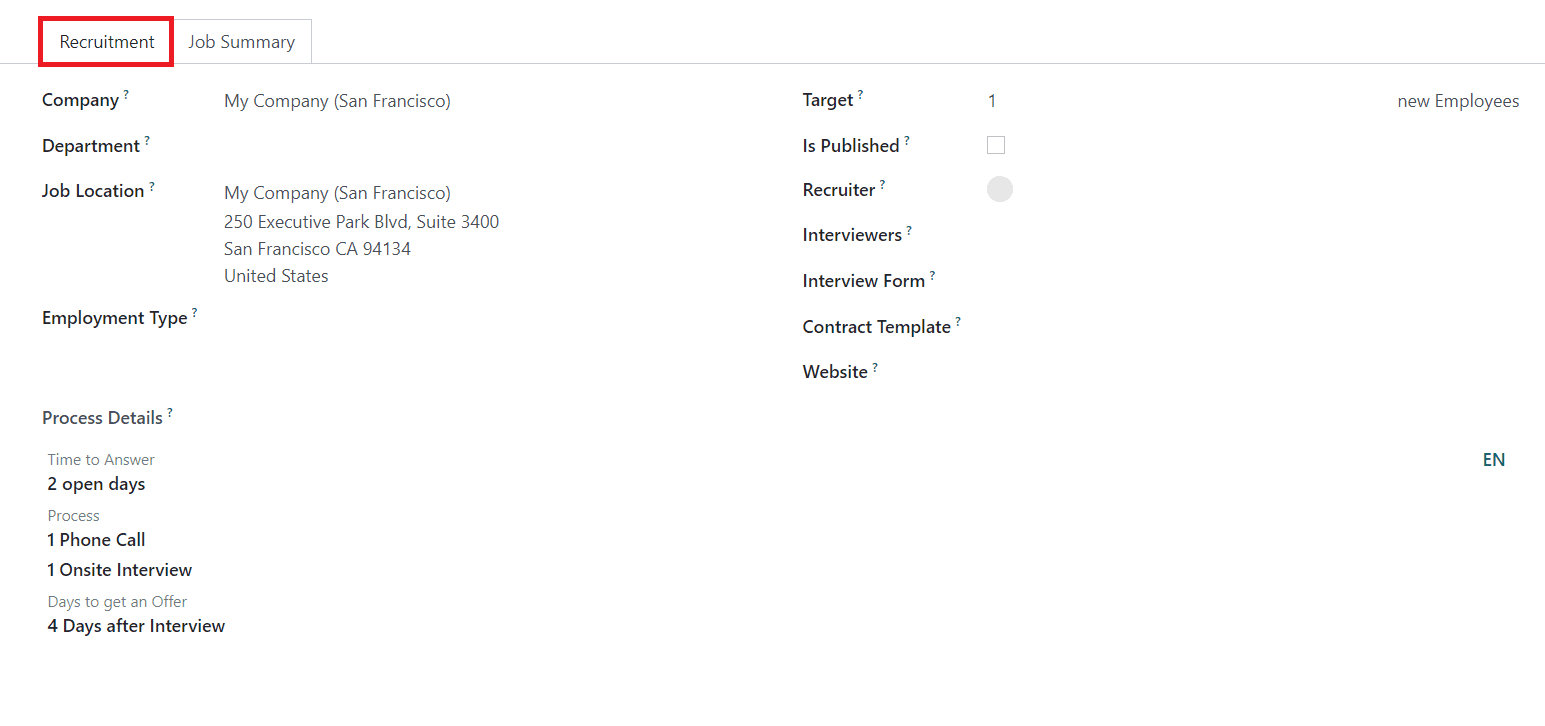
These details will be used for the operations of recruitment for this job position. Specify the Company, Department, Job Location, and Employment Type details in the respective fields. The complementary information that will appear on the job submission page can be specified in the Process Details section. It includes the Time to Answer, Process, and Days to Get and Offer details. The number of employees you expect to recruit for this particular job position can be mentioned in the Target field. Set the Is Published field, if the application is already published on the website of the company. Additionally, you can add Recruiter, Interviewer, Interview Form, Contract Template, and Website in the respective fields.
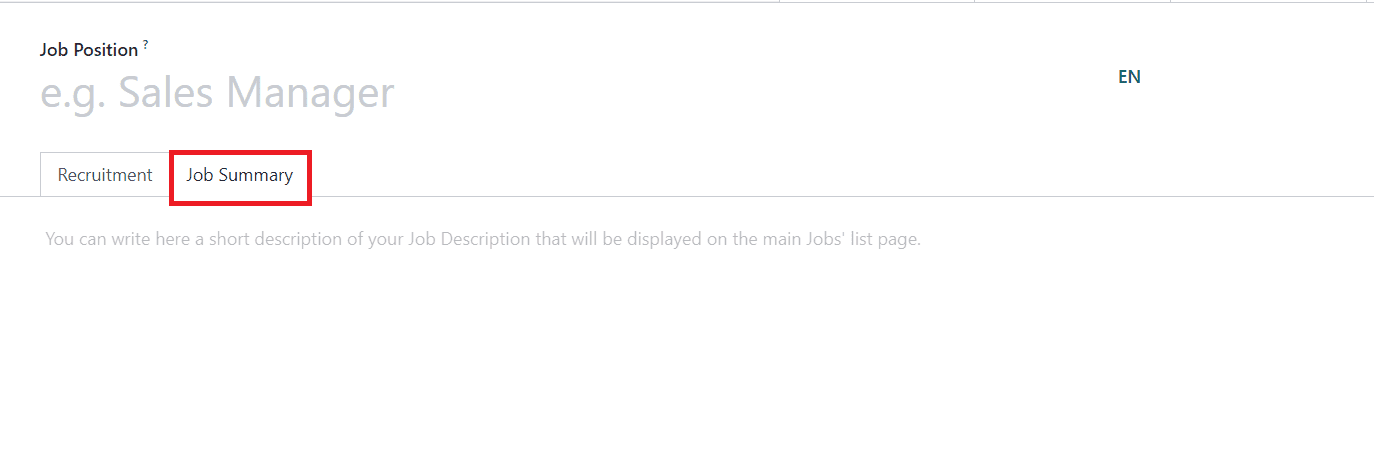
You can use the Job Summary field to add a description related to the job, which will be displayed on the job application.

All applications for this particular job position from various sources can be managed using the Job Applications smart button. The Documents button will display the documents related to this job position. The Trackers will show various job sources.
In a company, you will have various types of employees. Some may be permanent staff and some may be interns. You can use the Employment Types option available in the Configuration menu to configure the types of employees in your organization.

You can easily create Employment Types using the Create button. You need to mention the Employment Type in the given line and click on the Save button.
Work Locations
If your company owns different branches and work locations, you can create separate records for each work location using the new OTX Employees module. You will get the Work Location option from the Configuration menu that can be used to configure various locations of your company.

The list view of the Work Location includes the details of the Work Location, Work Address, and Company. Now, click on the Create button and OTX will open a new window to configure the new work location.

Here, you can provide the details of the Work Location. In the respective fields, specify the Work Location, Work Address, Location Number, and Company. Once you complete the configuration, the work location details will be saved in your database.
Departure Reasons
The Departure Reasons option included in the Configuration menu can be used to specify the reasons for the departure of an employee from the company. It is easy to create the departure reasons using the OTX Employees module. It only takes a few steps. First, select the Departure Reasons option from the Configuration menu. As shown in the screenshot below, you will get a window with the details of the already configured departure reasons.

If you want to add a new reason to the existing list, you can click on the Create button. As soon as you click on the Create button, a new line will appear under the existing list, where you can mention the new reason. Click the Save button and that’s it.
Skill Types
During the configuration of an employee profile, we detailed how to add new skills to the resume line. While specifying the skills of an employee, you will be asked to mention the skill type. From the Configuration menu, you will get the Skill Types option which will help you to define various skill types.

The window will show the list of skill types with their Name and Skills. Click on the Create button. As shown in the image below, you will get a new form view where you can specify the name of the Skill Type.

Now, you need to mention the Skills under the given space using the Add a Line button. You can set various levels for the skill under the Levels tab. Use the Add a Line button to set various skill levels. You will get a new pop-up as shown below.

Here, you can provide a Name for the level and set the Progress level.

You can set different levels for the skill like this. If you want to set a particular level as default, you can activate the Default Level field of that particular level.
Just like we configured skill types, you can also configure various Resume Line Types for the employee profile from the Configuration menu of the Employees module.

All you have to do is, click on the Create button and specify the Name of the Resume Line Type in the newly appeared line. Click the Save button and your new resume line is ready to use on employee profiles.
Contract Templates
In order to create templates for contracts, you can go to the Configuration menu of the Employee module. Here, you will get the Contract Templates option. Click on this option and OTX will open a new list view as shown below.

The preview of the Contract Templates encompasses the details of the Contract Reference, Department, Job Position, Working Schedule, Salary Structure Type, Status, and Company. Let’s check how to create a new template for the contract. You can use the Create button to get a new form just as shown below.

Here, you can provide the Contract Reference in the given space. Then, select the Salary Structure Type for the contract. In the respective field, you can set the Working Schedule of the employee. Using the external link available here, you can edit the working schedule according to your requirement. The Work Entry Source can be set as Working Schedule, Attendance, or Planning. It will define the source for work entry generation. The work entry will be generated from the working schedule, attendance, or the planning of the employee by selecting the corresponding option. In the respective fields, you can add the Department, Wage on Payroll, Job Position, Contract Type, and HR Responsible. Specify the New Contract Document Template, which will be used as the default document that the applicant will have to sign to accept a contract offer. The Contract Update Document Template will be the default document that the employee will have to sign to update his contract.

Under the Salary Information tab, you can add the Wage Type, Wage (Employee’s monthly gross wage), Yearly Cost (Total real yearly cost of the employee for the employer), and Monthly Cost (Total real monthly cost of the employee for the employer). Activating Fiscal Voluntarism will voluntarily increase the withholding tax rate. You will get an additional field to mention the Fiscal Voluntary Rate.

The Part Time tab can be used to activate the Part Time option if you are creating this contract template for a part-time job. By activating this option, you will get separate fields to specify the Standard Calendar and Part Time Work Entry Type. Once you complete the configuration of the contract template, you can use them for new employees.
Activity Planning
The Activity Planning option can be found in the Configuration menu of the Employee module. This option can be used for configuring various activity plans for the employees, just like onboarding and offboarding activities in a company. The Plans window will show the list of already configured plans as shown below.

Clicking on the Create button will open a new form view where you are allowed to create a new activity plan for the employees.

After mentioning the Plan Name, you can specify the Department and Company in the respective fields. Under the Activities To Generate tab, you can add activities using the Add a Line button.

Here, you will get a pop-up window as shown above. Mention the Activity Type, Summary, Company, Responsible, and Note related to the activity in the corresponding fields. After adding the required activities to the plan, the new plan will be saved in your database.
Badges
To develop a healthy working atmosphere in an organization, it is essential to appreciate your employees for their hard work. Companies often conduct appreciation and appraisal programs to encourage talents and show gratitude for their contribution to the company. Based on the performance of your employees, you can appreciate them by giving suitable rewards. In the OTX Employees module, you can find Badges which will perform the function of a reward. You can give badges to eligible candidates according to their performance. These badges will be displayed on their employee profile.
You can create and manage employee badges from the Configuration menu of the module. For this, go to the Configuration menu and select the Badges option.

Here, you can see various badges created for employees. The employee must satisfy the conditions to qualify for these badges. The administrator can grant a badge to an eligible employee by clicking on the Grant button. This will give a pop-up, as shown below.

The name of the employee can be specified in this pop-up window, along with a small description of what the employee did to get this badge.
Now, use the Create button to configure new badges.
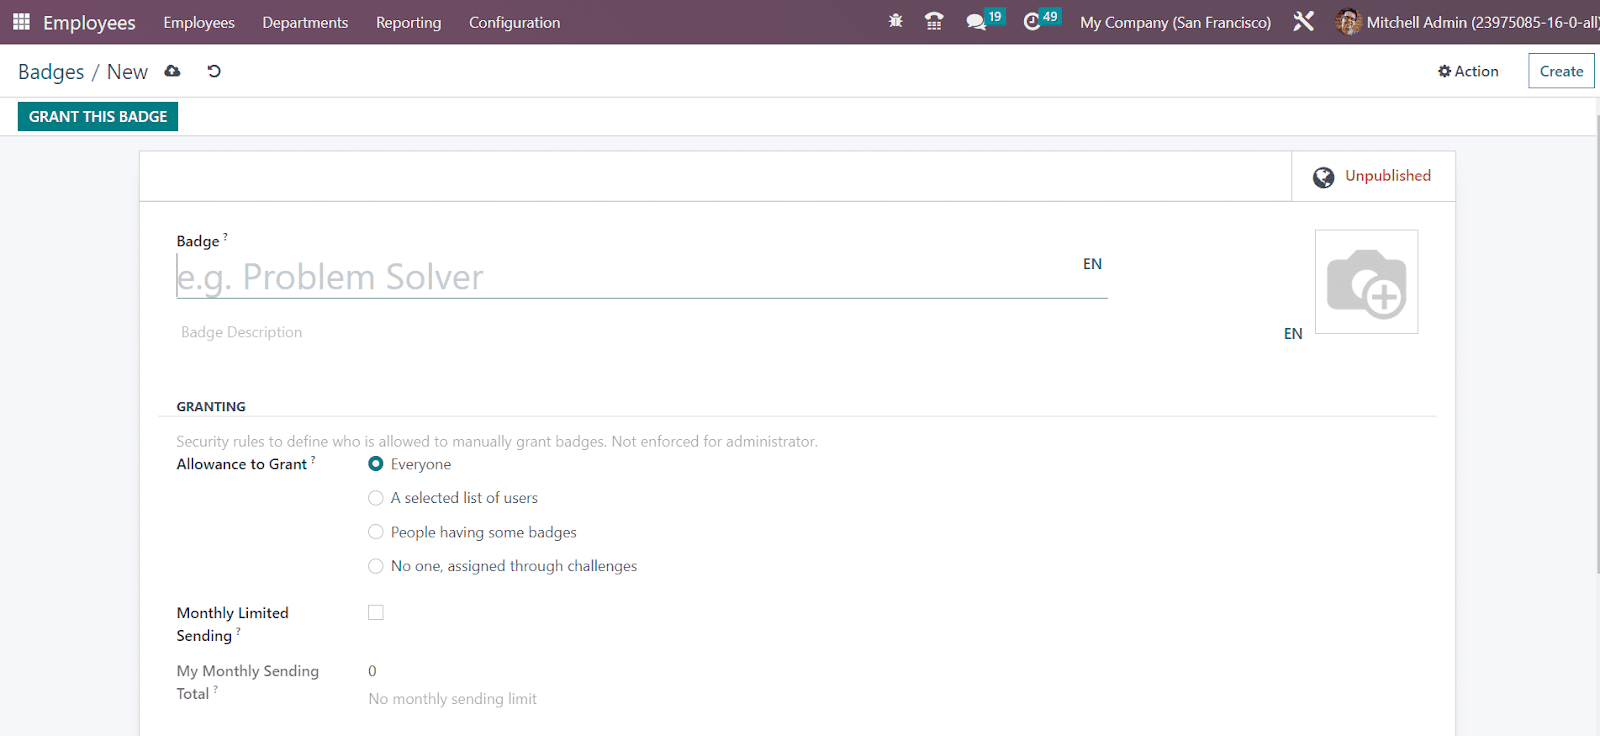
Provide a suitable name for the new badge in the given space. Add a small description also so that the users will be able to understand the features of this badge. The Granting tab can be used to set security rules to decide who is allowed to manually grant badges to employees. You can set this as Everyone, A selected list of users, People having some badges, or No one assigned through challenges. In order to set a monthly limit per person to send this badge, you can activate the Monthly Limited Sending option. Once you activate this option, you will get an additional field to mention the limit. The number of badges you send in a month will be shown in the My Monthly Sending Total field.
Under the Rewards for Challenges tab, you will get the Add button to add rewards for the challenges.

As soon as you click the Add button, you will get a pop-up window as shown below, with the list of pre-configured challenges.
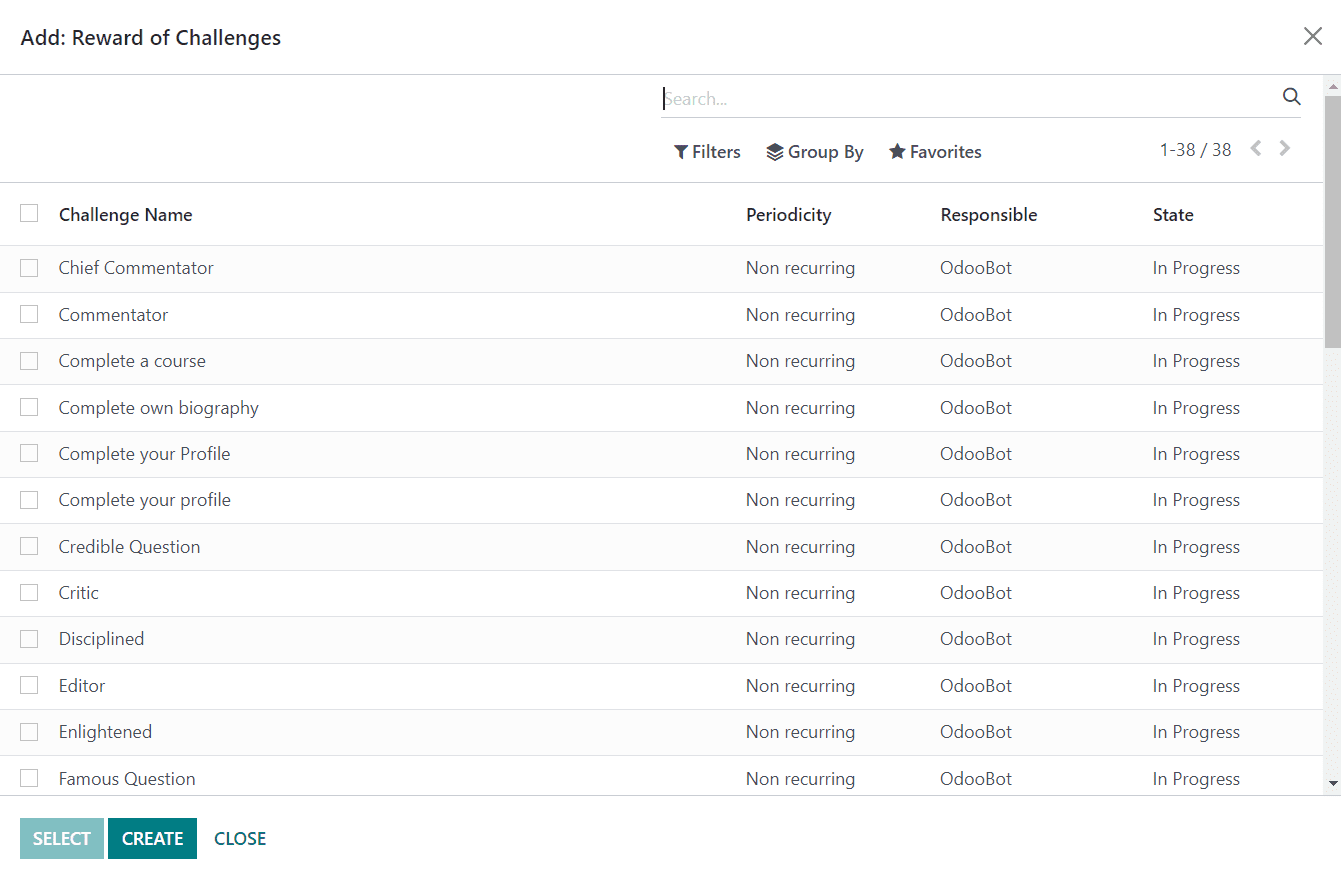
You can select suitable challenges for the reward from this window.

The Statistics tab will show the statistics related to this badge. It includes the Total number of times this badge has been received, Monthly Total, the Number of Users, My Total, and My Monthly Total. This is how we configure badges in the OTX Employees module.
Challenges
For qualifying badges, you can set certain challenges for the employees in the OTX Employees module. Once the employee completes the challenge, you can grant suitable badges for them. In order to configure such challenges for your employees, you can go to the Configuration menu of the module, where you can find the Challenges option. Clicking on this option will direct you to the window with the details of the already configured challenges, as shown in the image below.
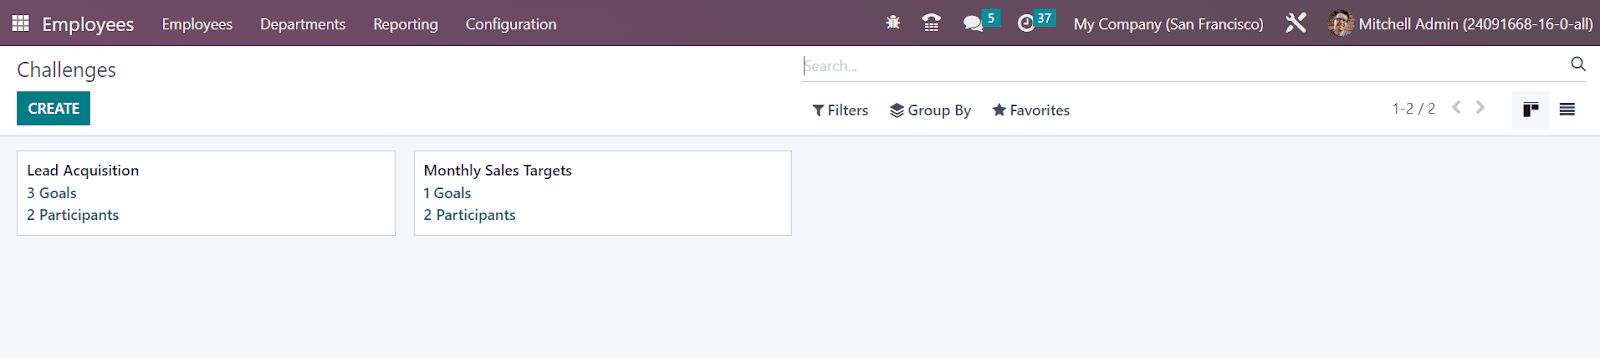
Each challenge shows the name, goals, and number of participants. You can click on them to get detailed information. If you want to create a new challenge, use the Create button.
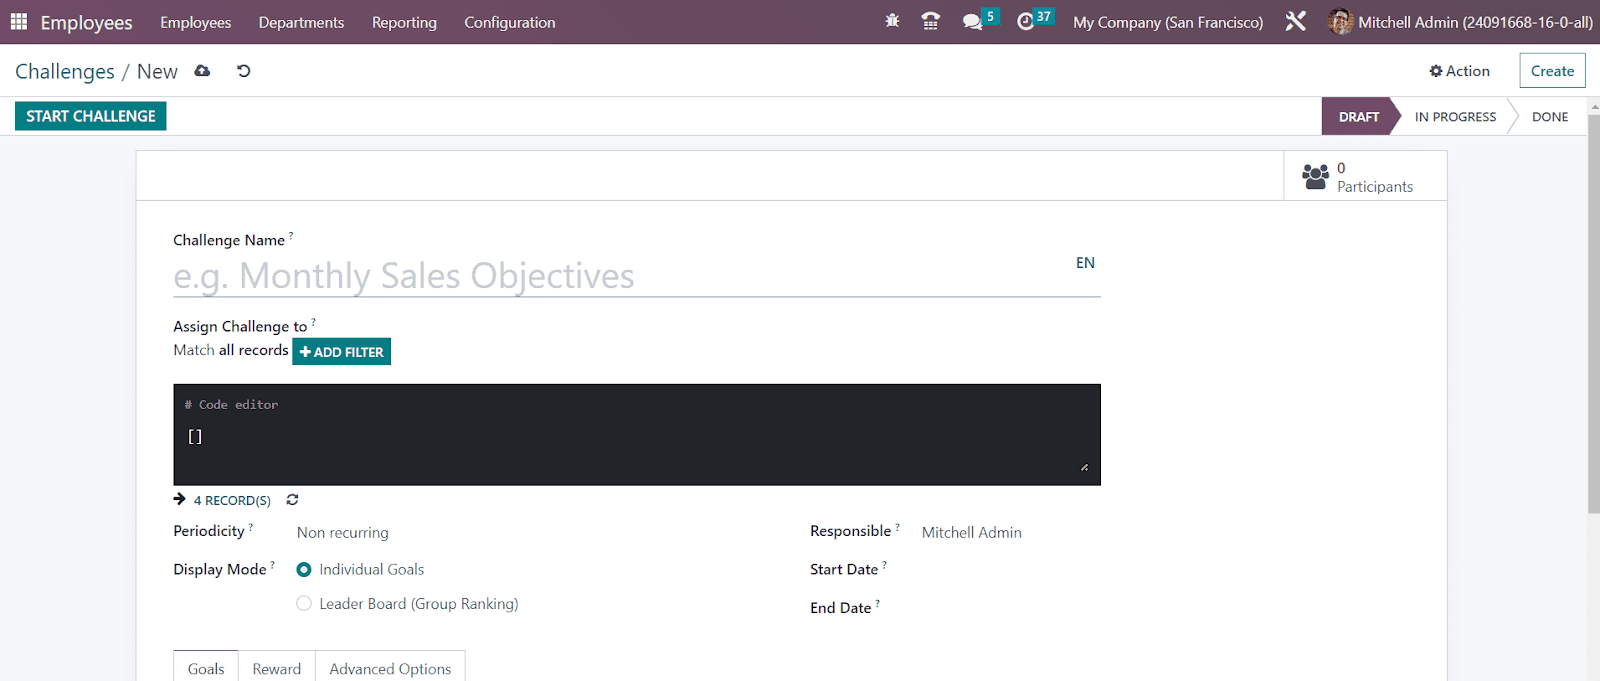
Here, you will get a specified field to mention the Challenge Name. Using the Add Filter option, you can set users so that OTX can assign challenges to the matching records. The period of automatic challenge assignation can be defined in the Periodicity field. It can be Daily, Weekly, Monthly, or Yearly. You can also set it as Non-Recurring if you don’t want to repeat the challenge. The Display Mode can be set as Individual Goals or Leader Boards. The employee who is in charge of the management of this challenge can be specified in the Responsible field. The duration of the challenge can be added in the Start and End date fields.
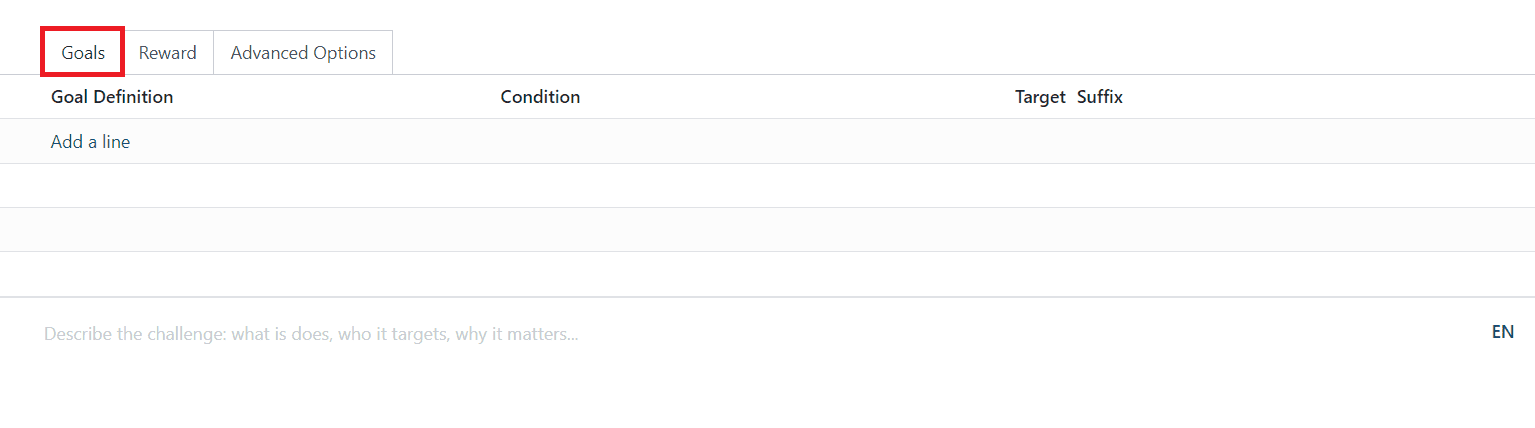
You can explain the challenge under the Goals tab using the Add a Line button. It will help a user to understand the conditions of the challenge. It includes Goal Definition, Condition, Target, and Suffix.

Under the Reward tab, you can add the rewards for the challenges. You can set rewards for Every Succeeding User and For 1st User. If you want to reward the employee as soon as the goal is completed, you can activate the Reward as soon as every goal is reached.
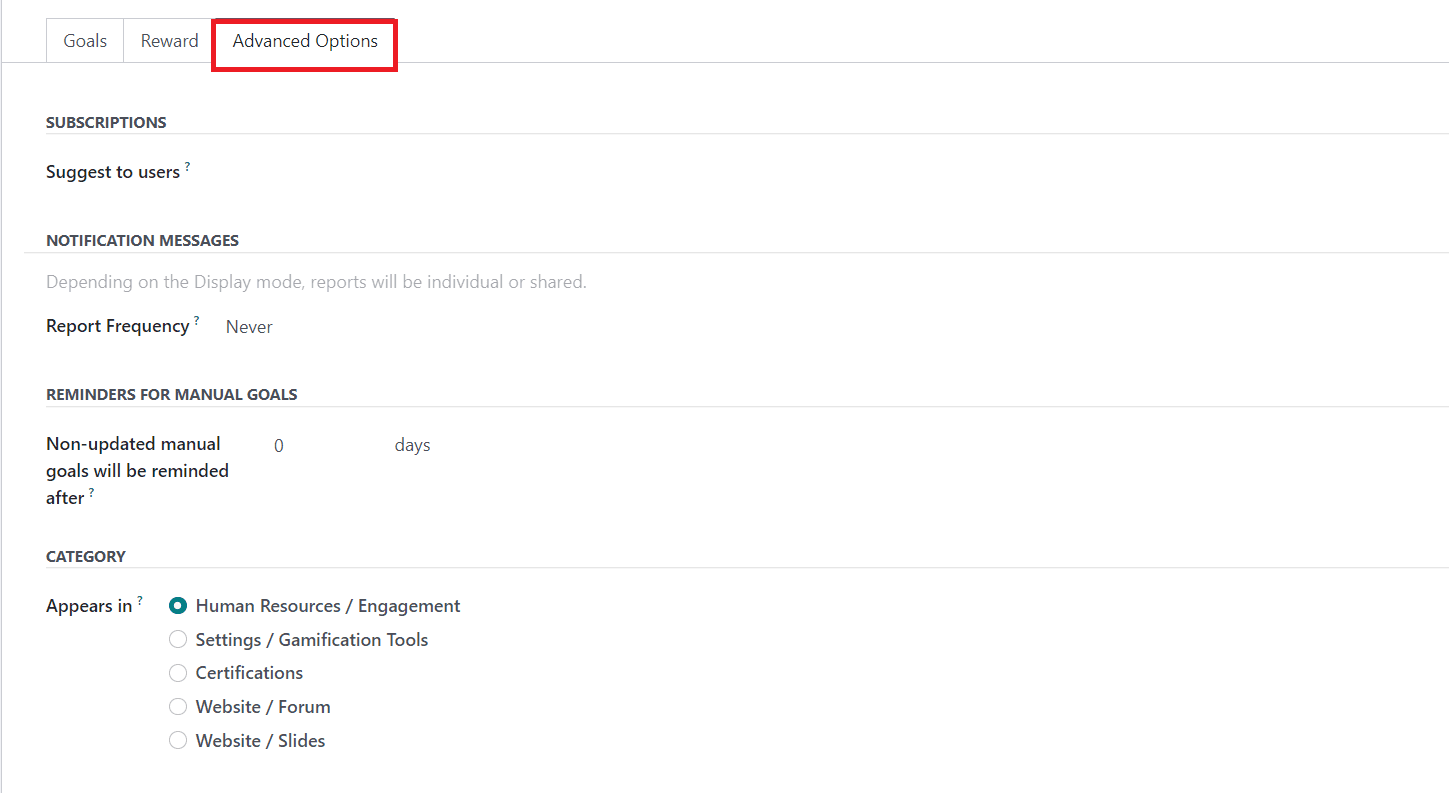
Under the Advanced Options tab, you can invite users by mentioning their ids in the Suggest to Users field. Add a notification message in the given space to notify the employees. Along with this, you can set the Report Frequency also. Set reminders for the manual goals in the corresponding field. Finally, define the visibility of the challenge through menus. Once you complete the configuration, you can use the Start Challenge button to start using this challenge.
Goal History
In order to examine the performance of the employees, you can go to the Configuration menu and select the Goal History option. This window will display the goal history of the employees.

You can use this platform to analyze the performance level of each employee. It shows the Start Date, End Date, Current Value, To Reach, and Completeness. Displaying goal history will keep the employees motivated.
Reporting
Along with the recording and management of employee data in an organization, the OTX Employees module makes sure to provide an adequate platform for analyzing the performance of employees based on certain criteria. Reporting and analyzing are always necessary to understand the current working flow, and it will also help to make new changes for the improvement of the current state. Here, we will be discussing the reporting features offered by the Employees module.
Contracts
By selecting the Contracts option from the Reporting menu, OTX will open an employee analysis window as shown below.

You can use this platform to analyze the performance of the employees based on suitable measures. OTX offers Pivot and Graphical views on this platform. You can filter the available report based on the Last 365 Days and Date. More filters can be created using the Add Custom Filter option. Use the Group By option to group the report as Department, Employee, and Company. Additional grouping options can be created using the Add Custom Group option.

The available Measures are Departure Employees, New Employees, Annual Employee Budget, Duration Contract, Fuel Card, Full Time Equivalent (Today), Wage, and Count. The Insert in Spreadsheet button will help you to copy this date into a spreadsheet.
Presence
As the name indicates, the Presence option available under the Reporting menu will assist you in getting the presence report of each employee. The Kanban view of the report is shown below, where you can observe the present and absent employees separately.

This window will help you to easily understand the employees who are absent on that particular day. You can view the present and absent employees based on the Company and their Department. Clicking on the tick mark will make the attendance of the employee as present. Along with you will get options to manage Time Off, SMS, and Log on each employee tab.
Skills
The Skills option under the Reporting menu will give reports of the skills recorded in each employee profile. The list view of the Skill shows the Employee, Skill Type, Skill, Skill Level, and Level Progress of each employee.

You can filter the data as Employees with Skills and Employees without Skills. The Group By option includes the Employee, Department, Skill, and Skill Type to group the details accordingly.

This is the Pivot view of the skills report. You can use the Level Progress as the Measure for this report.
The Employees module reduces the workload of the HR department of a company by offering advanced features and functions. You can rely on this module for effective and proper management of regular records of your employees.
Quality Management
The act of overseeing all tasks and activities to manage a desired level of excellence refers to Quality Management. This process includes creating quality planning, assurance, control, policy, and improvement. A company must run various quality-checking procedures for a commodity before implementing them to market for the customers. OTX 16 Quality module ensures you configure all activities under a single system. Firstly, you need to install a Quality module from the OTX Apps.

Quality Teams
The management of maintenance works in a company promoted by Quality teams in OTX . You can assign maintenance works by creating various teams as per your needs. The work becomes easier once designing different teams and handling maintenance by them. Once opening the Quality module, we can see an overview of the main quality team. The Quality Overview window depicts the count of quality checks in progress and quality alerts. Data regarding each quality alert is accessible to a user once selecting the QUALITY ALERTS icon. Similarly, you can also access ongoing quality checks within the checks in progress. Choosing the three-dot icon on the right end of the Main Quality Team will direct you to the configuration feature.

We can develop Quality Teams within the Configuration tab. A list of all preconfigured quality teams is visible to the user once selecting the Quality Teams menu from Configuration. In the List view of the Quality Teams window, we can view the company’s details and quality team name separately. To obtain more details about the team, you can choose it directly from the list. Select the CREATE icon in the Quality Teams screen for formulating a new team.

On the open page, add the title of your quality team in the Team Name field. Later, enter the alternate email address that an admin applies to the user’s primary email in the Email alias field. All emails sent from the email alias define as the primary email address.

Mention the policy to post a message on a document with the use of a mail gateway in the Accept Emails from option. It is possible to accept emails from everyone, followers, authenticated partners, and employers. After choosing email accessibility, specify your firm title in the Company field.

Each of the entered details is saved automatically in OTX 16. Select the Discard Changes option in the Quality Teams window to remove any changes. Moreover, you can also design a new team from the existing window once clicking on the CREATE icon at the right end.

Users can delete or duplicate the quality team by choosing the Action menu on the right end. A copy of your existing quality team is acquirable by selecting the Duplicate option. You can permanently remove the created team once choosing the Delete option in the Action menu.

After managing all details, you can obtain your created team information in the main Quality Teams window.
Quality Control Points
The stages in which an item is needed to check is attained with the help of quality control points. It is easy to determine the measures of checking a product’s quality. To acquire these factors, select the Control Points menu from the Quality Control tab. The List view of the Quality Control Points window describes details of each quality control point such as Reference, Products, Control Per, Team, Title, Company, Type, etc. You will get detailed information about quality control points by choosing each one from the list. Press the CREATE button to define new Quality Control Points.

In the open screen, you can access various options concerning the Quality Control Points. Apply the name decided to be given for the quality control point in the Title field. Next, you can pick the items that are applied to the quality control point in the Products field. Also, quality points are activated for items that fall under your chosen product category. Users can mention the product category concerning selected products in the Product Categories field.

In the Operations field, you can select the stage in which quality is to be checked. Afterward, pick the firm related to your creating quality control point in the Company field. Moreover, you can define the quality check request in the Control per field based on Product, Operation, and Quantity.

You can request a quality check at the operation level once picking the Operation option in Control per field. Additionally, the quality check based on product is accessible by choosing the Product field. To request a quality check for a registered new product quantity, select the Quantity option in Control per field. Users can mention particular intervals to check quality in the Control Frequency field. It is possible to acquire intervals Periodically, All, and Randomly.

We can describe the quality control point category in the Type field. It is classified as Instructions, Pass-Fail, Worksheet, Take a Picture, and Measure. At the time of quality check, you can use the above types. For example, you can view pass & fail options during the quality check process if you specify Pass-Fail in the Type field. This means you can mention the product status as pass or fail.

Pick your team which evaluates the quality control point in the Team field. Also, enter the employee who supervises your quality control point in the Responsible field. You can select the source document as a Custom or Specific page of the operation sheet in the Step Document field.

We can apply extra information regarding the quality control points below the Instructions tab. Most instructions will describe the quality checks to do for the product.

You can also enter any failure message for the product in the Message If Failure tab. Additionally, add the necessary details to perform the quality check under the Notes tab.

All the applied data is automatically saved in the OTX 16 Quality. Users can obtain the developed sample in the Quality Control Points window.
Quality Control Points
The stages in which an item is needed to check is attained with the help of quality control points. It is easy to determine the measures of checking a product’s quality. To acquire these factors, select the Control Points menu from the Quality Control tab. The List view of the Quality Control Points window describes details of each quality control point such as Reference, Products, Control Per, Team, Title, Company, Type, etc. You will get detailed information about quality control points by choosing each one from the list. Press the CREATE button to define new Quality Control Points.
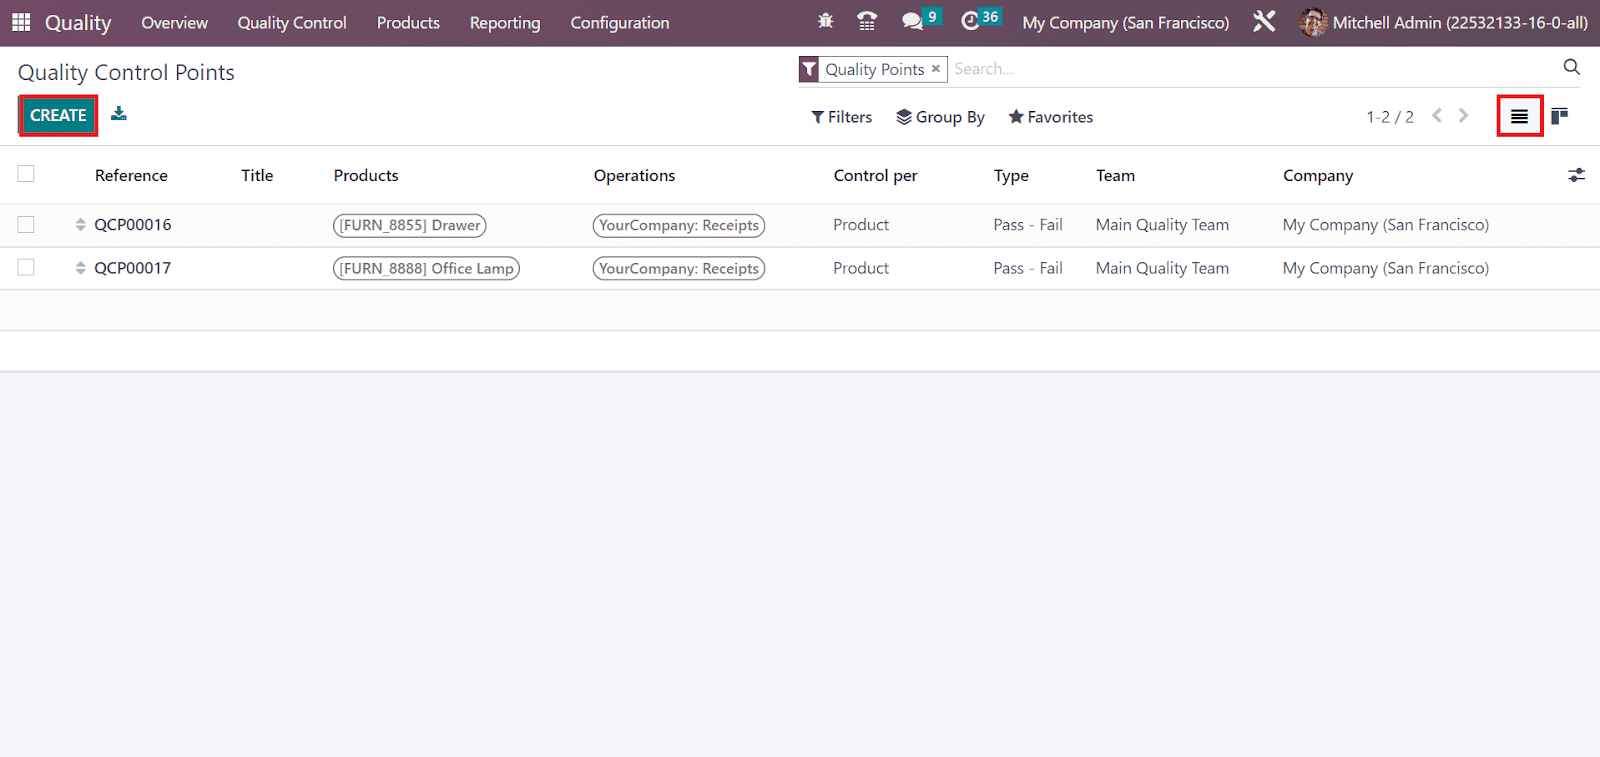
In the open screen, you can access various options concerning the Quality Control Points. Apply the name decided to be given for the quality control point in the Title field. Next, you can pick the items that are applied to the quality control point in the Products field. Also, quality points are activated for items that fall under your chosen product category. Users can mention the product category concerning selected products in the Product Categories field.
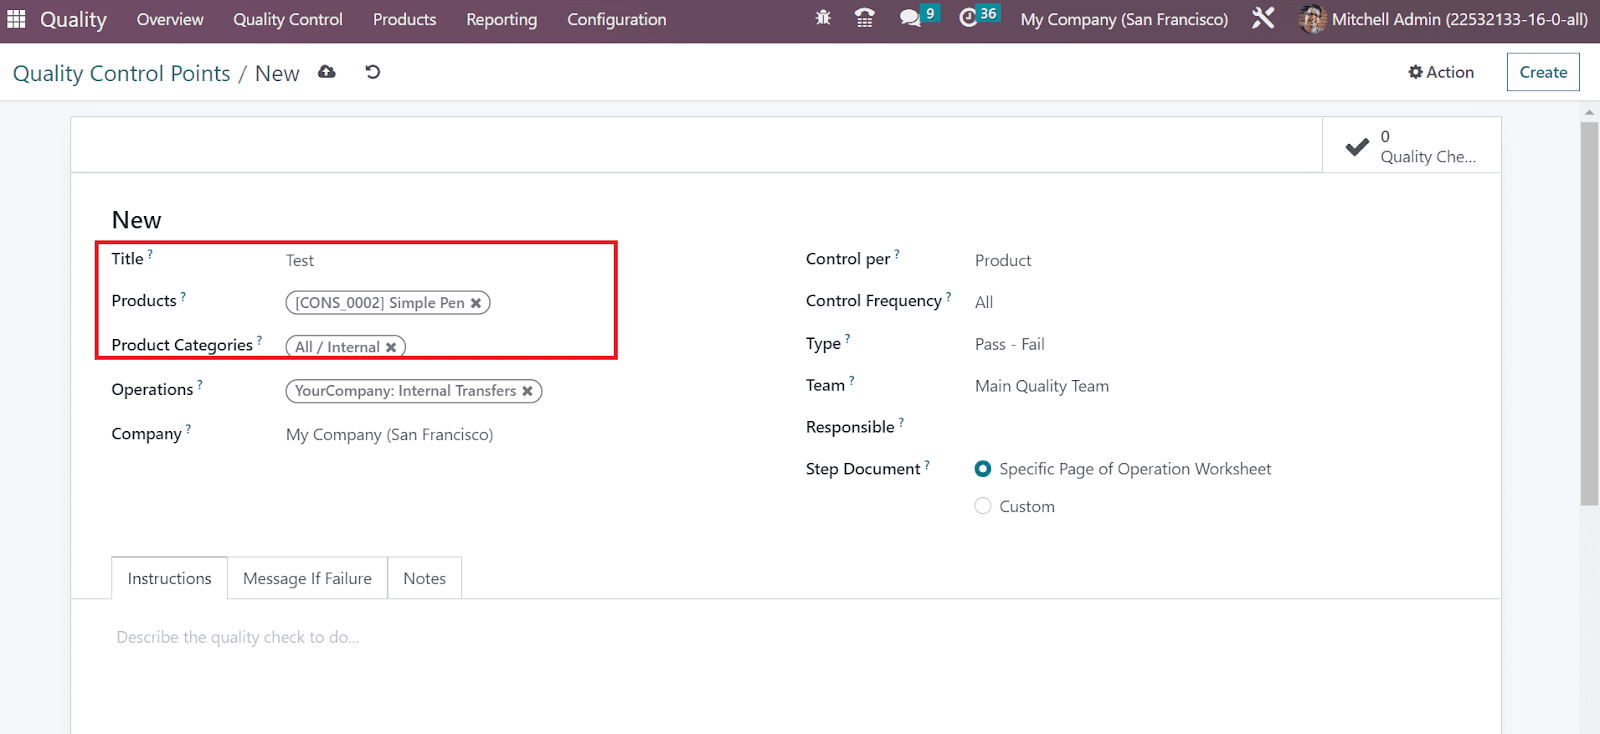
In the Operations field, you can select the stage in which quality is to be checked. Afterward, pick the firm related to your creating quality control point in the Company field. Moreover, you can define the quality check request in the Control per field based on Product, Operation, and Quantity.
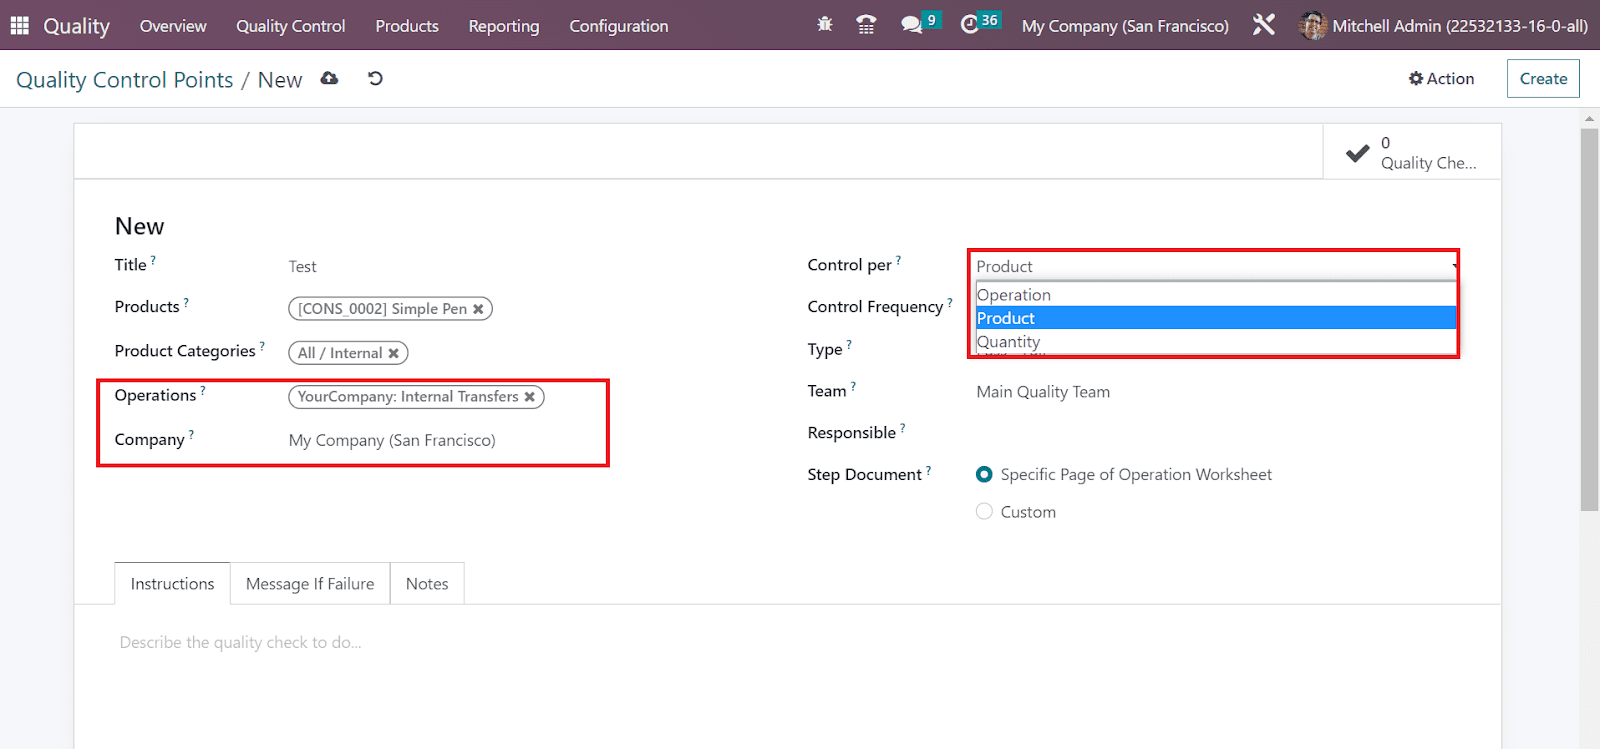
You can request a quality check at the operation level once picking the Operation option in Control per field. Additionally, the quality check based on product is accessible by choosing the Product field. To request a quality check for a registered new product quantity, select the Quantity option in Control per field. Users can mention particular intervals to check quality in the Control Frequency field. It is possible to acquire intervals Periodically, All, and Randomly.
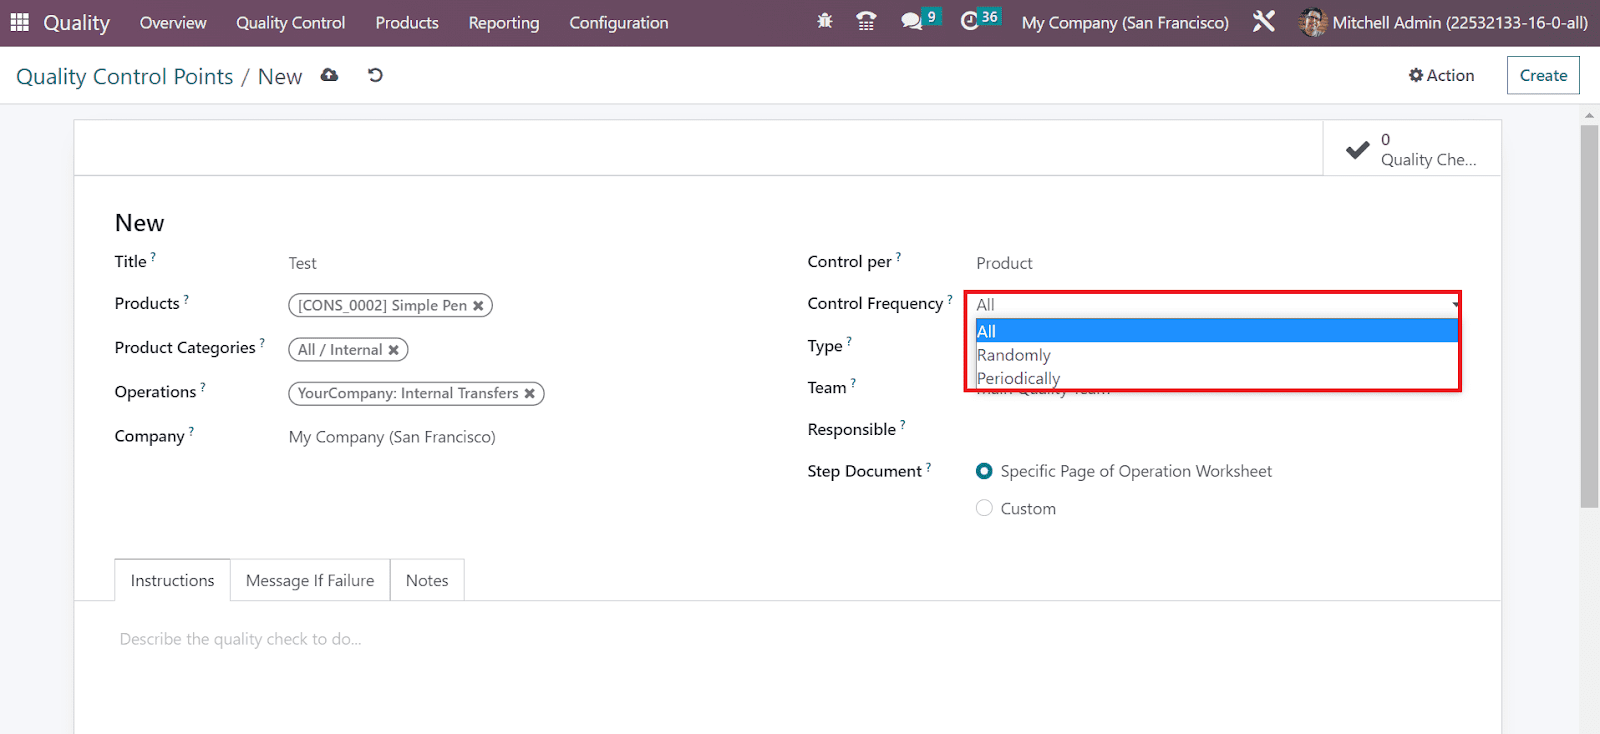
We can describe the quality control point category in the Type field. It is classified as Instructions, Pass-Fail, Worksheet, Take a Picture, and Measure. At the time of quality check, you can use the above types. For example, you can view pass & fail options during the quality check process if you specify Pass-Fail in the Type field. This means you can mention the product status as pass or fail.
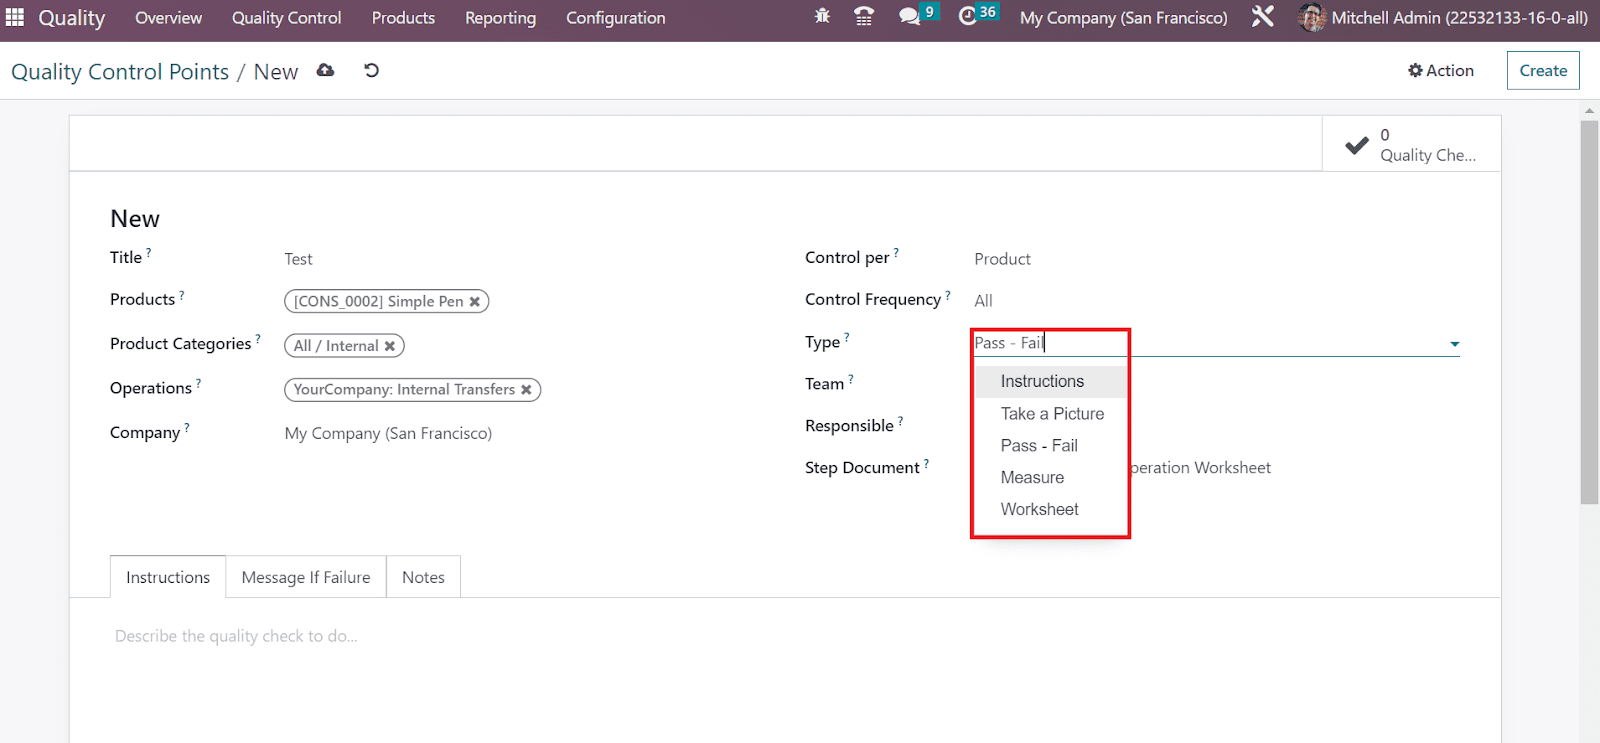
Pick your team which evaluates the quality control point in the Team field. Also, enter the employee who supervises your quality control point in the Responsible field. You can select the source document as a Custom or Specific page of the operation sheet in the Step Document field.

We can apply extra information regarding the quality control points below the Instructions tab. Most instructions will describe the quality checks to do for the product.
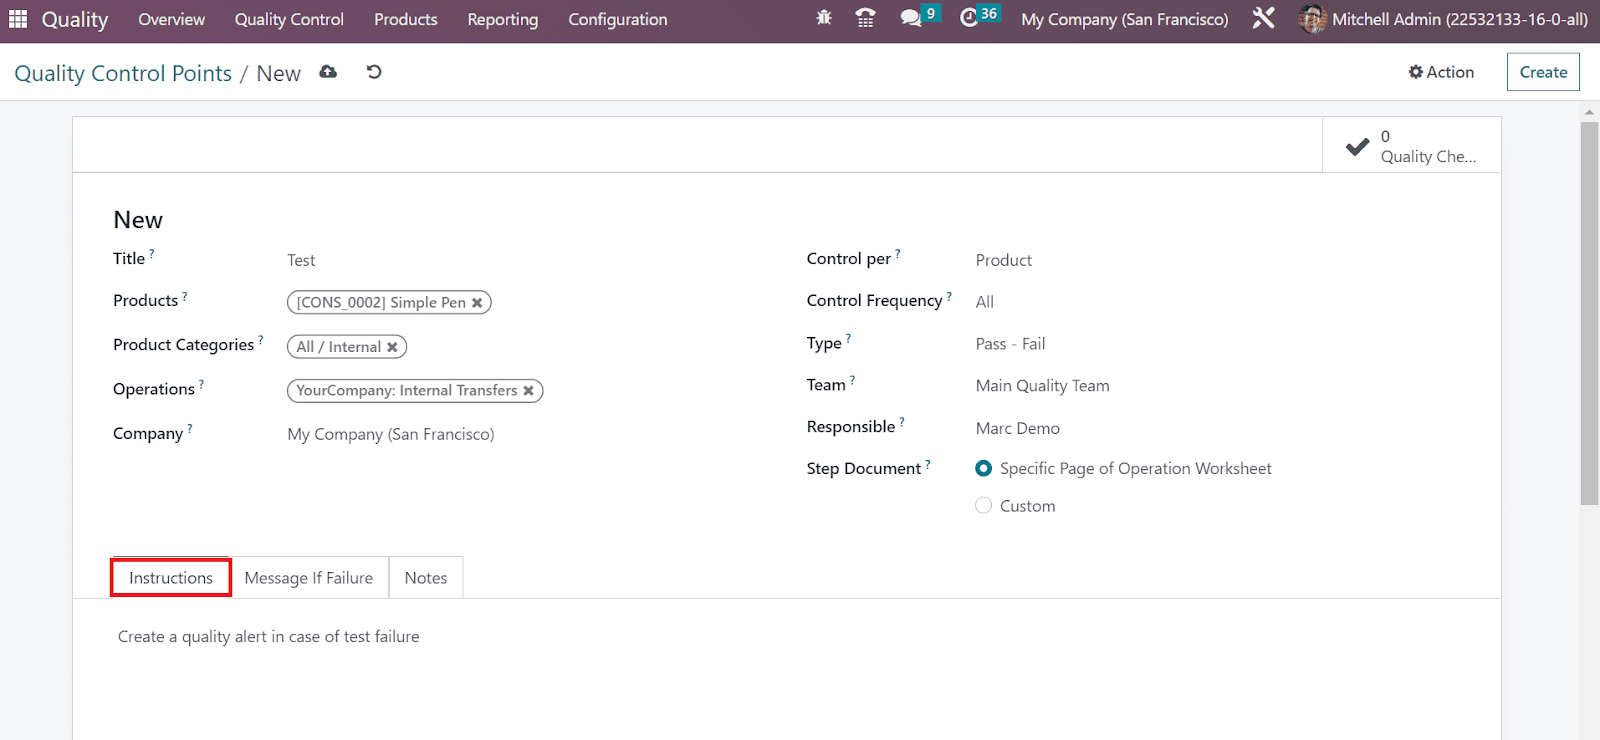
You can also enter any failure message for the product in the Message If Failure tab. Additionally, add the necessary details to perform the quality check under the Notes tab.
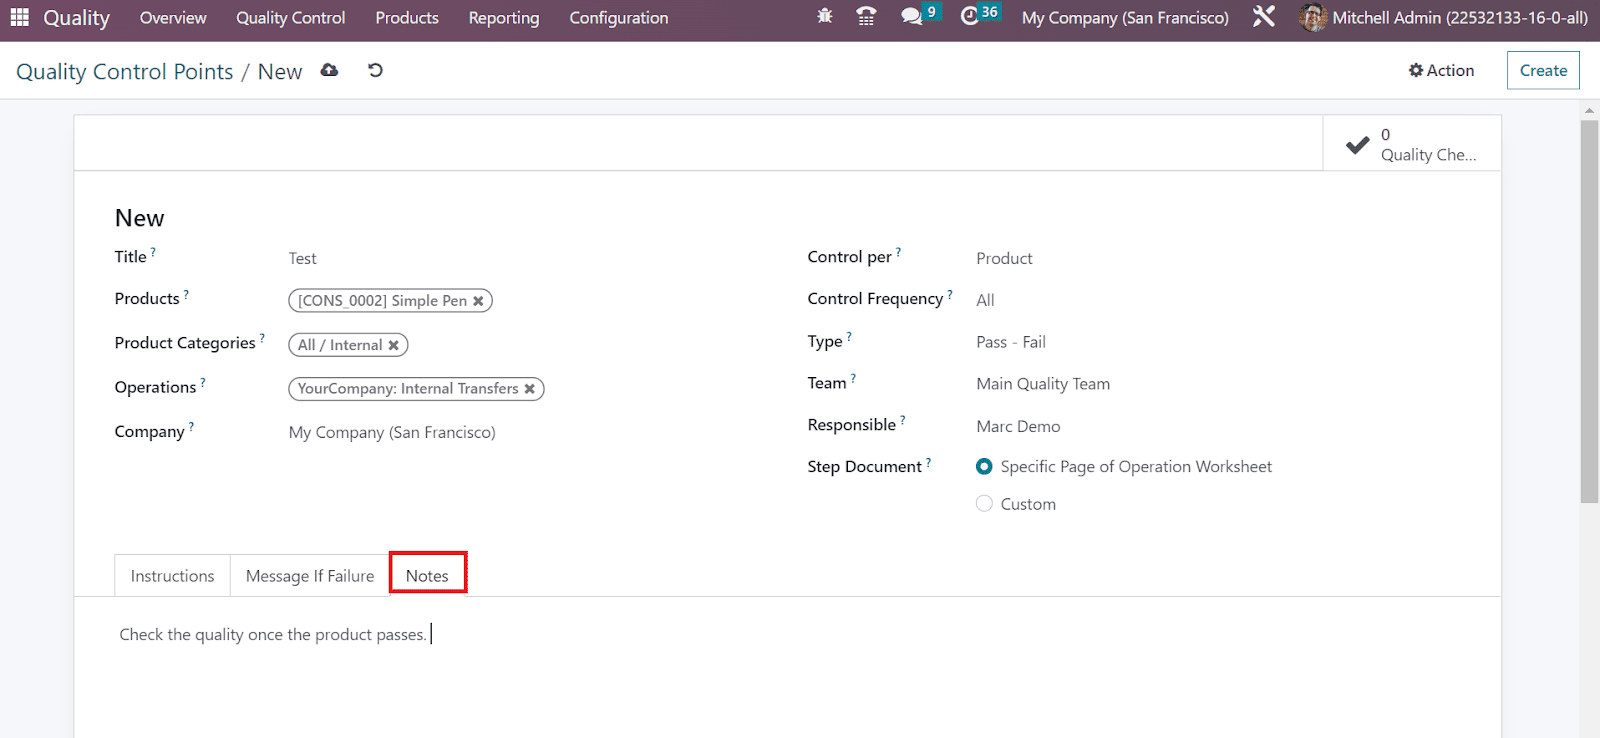
All the applied data is automatically saved in the OTX 16 Quality. Users can obtain the developed sample in the Quality Control Points window.
Quality Checks
Quality checks refer to verification for finding necessary errors in a specific product/service. It generates automatically during manufacturing orders and transfers. You can obtain the details of all products needed to be checked in your company once selecting the Quality Checks menu in the Quality Control tab. In the List view, we can see that each product data that needed to be checked included Reference, Product, Team, Lot/Serial, Status, etc. A new quality check formulates quickly by selecting the CREATE button in the Quality Checks window.
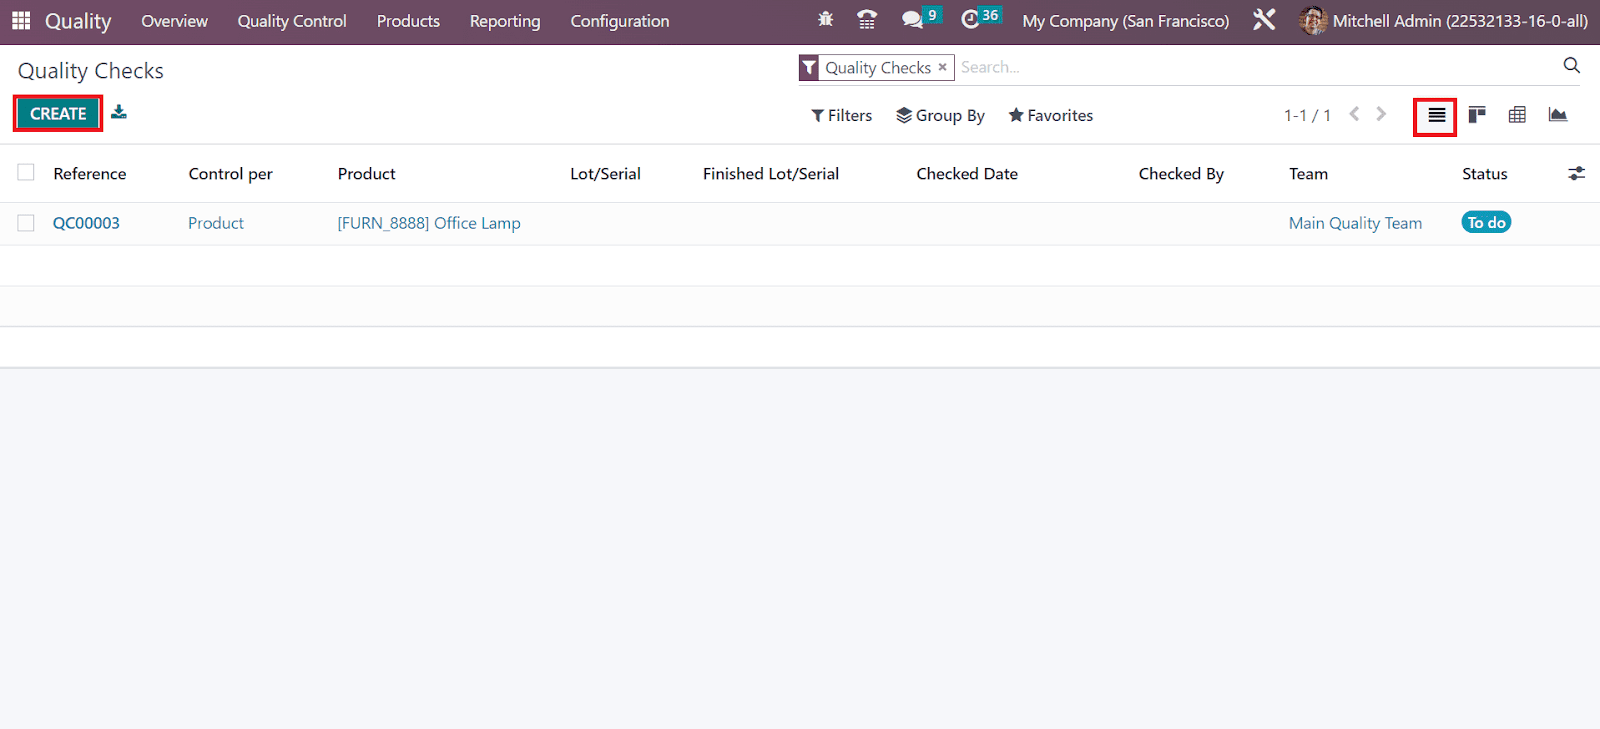
In the open screen, you can choose the commodity needed to be checked in the Product field. Define the process by which quality checks should do in Control per field. It is easy to run quality checks based on Quantity, Product, or Operation level. Later, mention the primary warehouse where manufacturing products are processed in the Picking field.
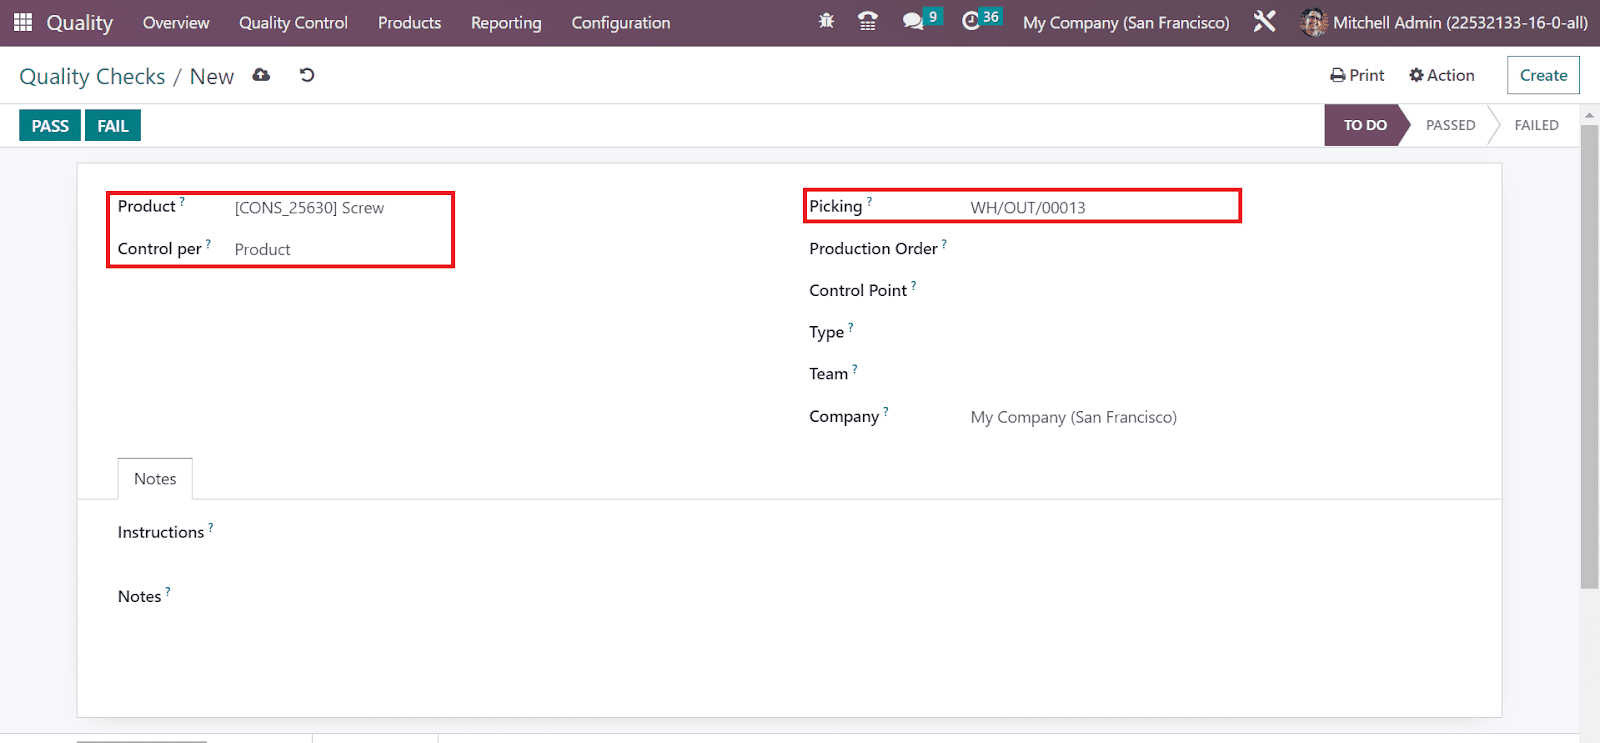
You can choose the item’s order number within the Production Order field. Moreover, you can select the point id of the product in the Control Point field. Afterward, pick your group for a quality check in the Type field. We can set the type as Worksheet, Print Label, Instructions, Measure, Pass-Fail, etc.
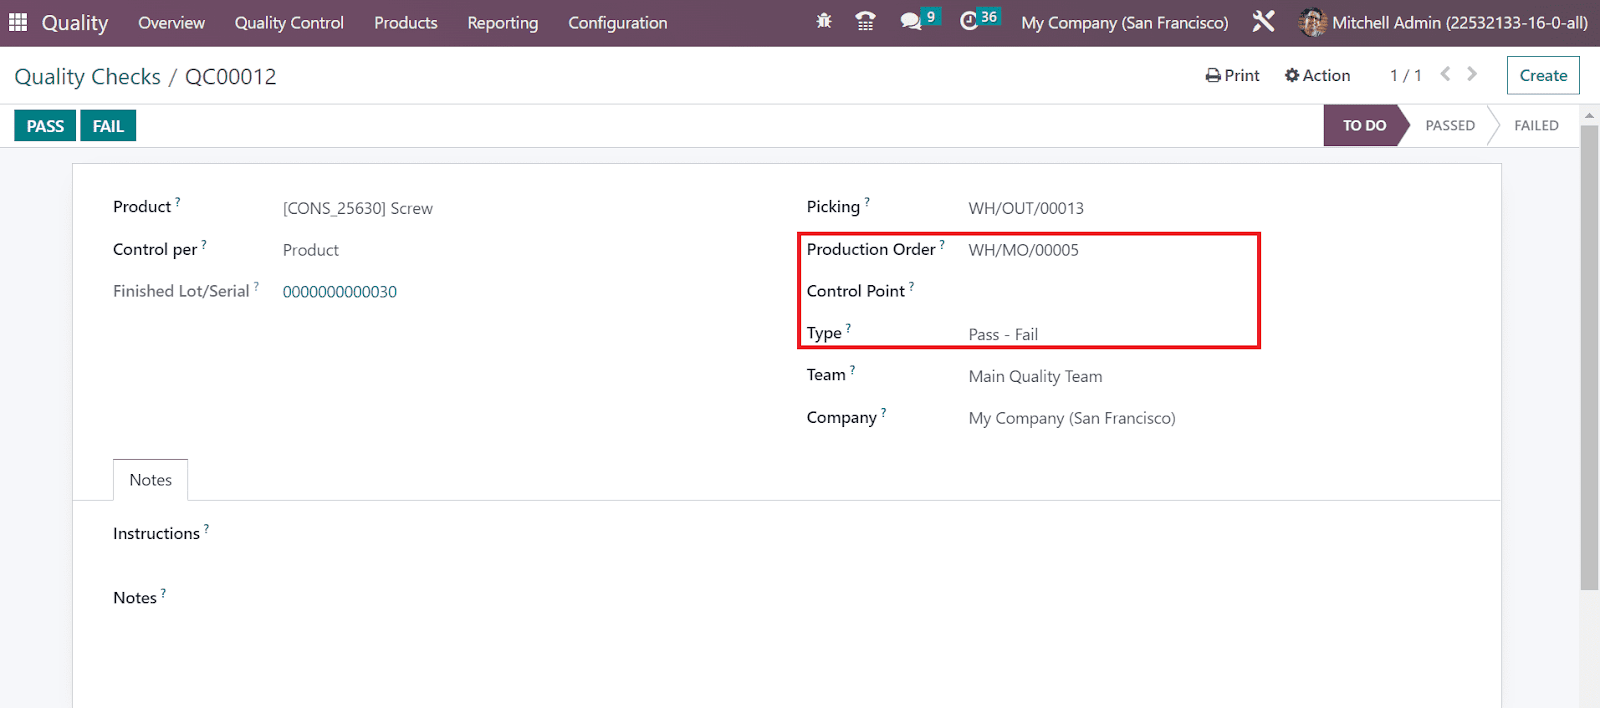
Assign the team to evaluate your product quality check in the Team field. Once selected the team, choose the company name within the Company field. Users can find extra information on product quality checks under the Notes tab. It is easy to apply additional remarks for your quality check in the Notes and Instructions fields inside the Notes tab.
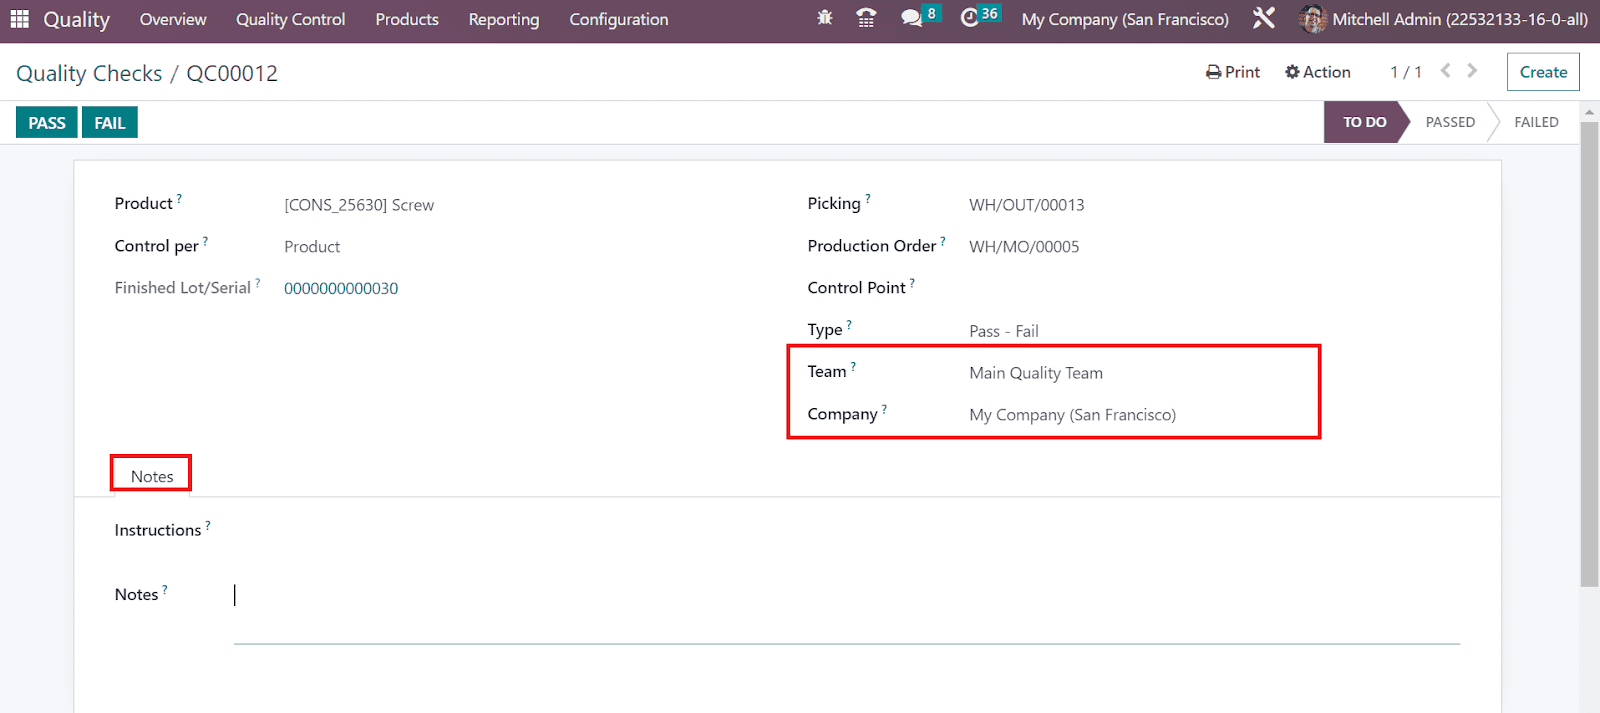
The PASS and FAIL buttons in the Quality Checks window assist you in determining whether the product is passed or failed. Users can select the quality check status of a product by choosing these buttons. If you select the PASS button, the stage changes to PASSED. In contrast, the FAIL button specifies the product failure, and the stage is viewable as FAILED.
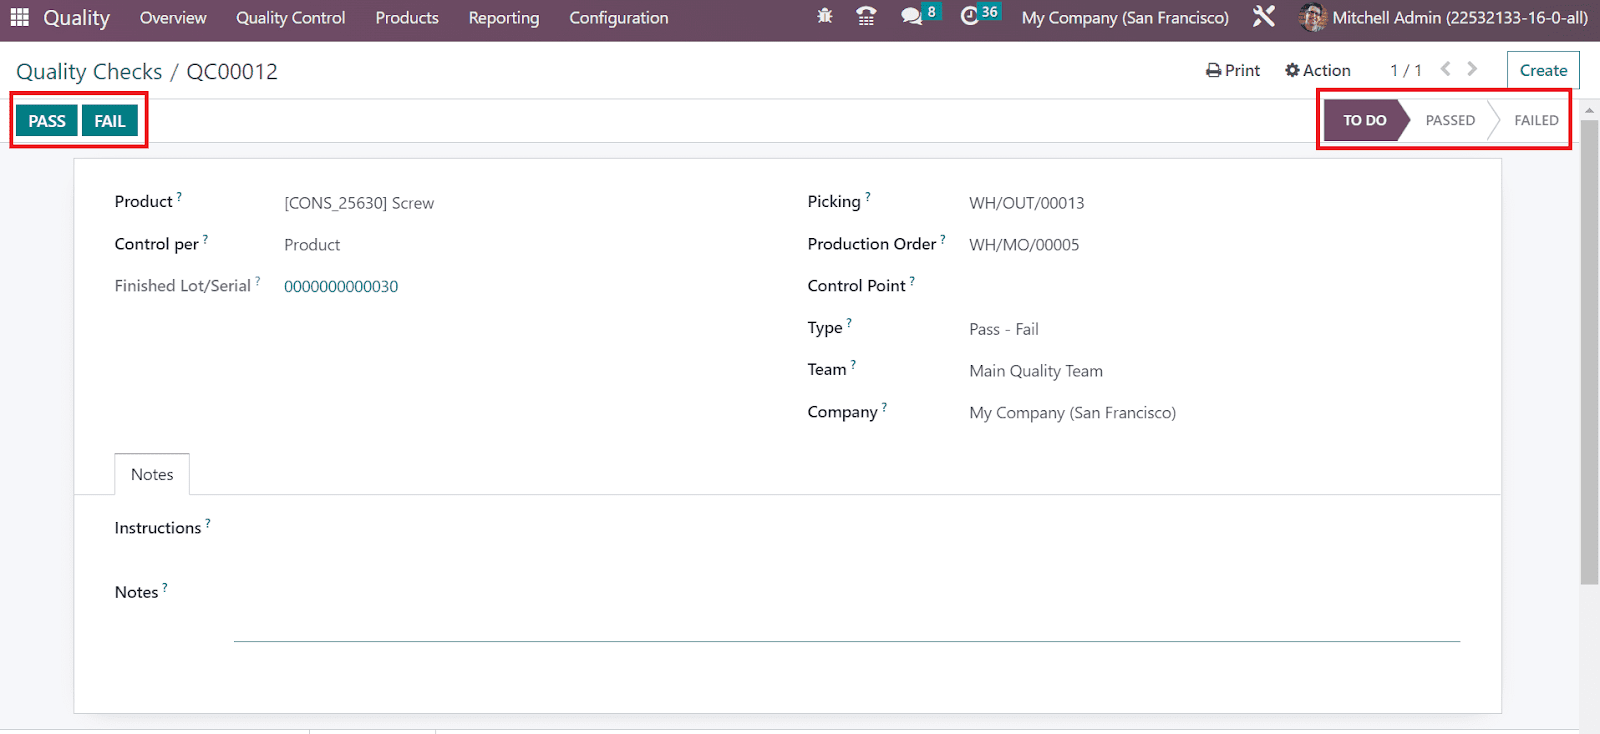
Quality Alerts
In OTX 16, we can set quality alerts for services and delivery instead of manufacturing orders. It is easy to remind the responsible person to check product/service quality once they set quality alerts. You can visible the data of quality alerts once choosing the Quality Alerts menu in the Quality Control tab. Details of each alert, such as Name, Work Center, Responsible, Date Assigned, Team, etc, are separately in the List view. To generate a new alert, click the CREATE icon in the Quality Alerts window.

We can insert various details on the displayed page. Let’s check out the details of each option in the Quality check window separately below:
Title; You can add the quality alert name in the Title field.
Product: A list of all items in your firm is visible in the Product field. Choose the specific product needed to set a quality alert in the Product option.
Product Variant: The combination of items refers to the product variant having different colors and sizes. Select the variant concerning to chosen commodity in the Product variant field.
Lot: The identification number of specific material or quantity from a single manufacturer is a lot number. In the Lot field, the user can add the lot id of the product.
Work Center: The unit where all manufacturing activities are carried out refers to a work center. Choose the primary center of your product /equipment situated in the Work Center field.
Picking: Set the product warehouse within the picking field. You can specify the picking id of your product to set the quality alerts.
Team: Allocate a team to verify the quality alert of products. Users can mention the team name from the Team field.
Responsible: Choose the user who validates the quality checks of products/services in the Responsible field.
Tags: A label attached for the identification purpose of specific products mentioned as tags. You can select necessary tags related to quality alerts in the Tag option.
Root Cause: We can add the reason for quality alert generation in the Root Cause. It is possible to set the reason as Workcenter failure, Work Operation, Parts Quality, Others, etc.
Priority: By choosing the star icon in the Priority field, you can specify the importance of quality alerts. The main team working in the backend will resolve the prior one easily.
Description: It is easy to define the root cause of the issue below the Description tab.
Corrective Actions: You can describe the actions to resolve product issues in the Corrective Actions tab.
Preventive Actions: The precautionary actions to save your commodity from failure are defined below the Preventive Actions tab.
Miscellaneous: Data related to a company, assigned date, vendor, and email are acquirable under the Miscellaneous tab.
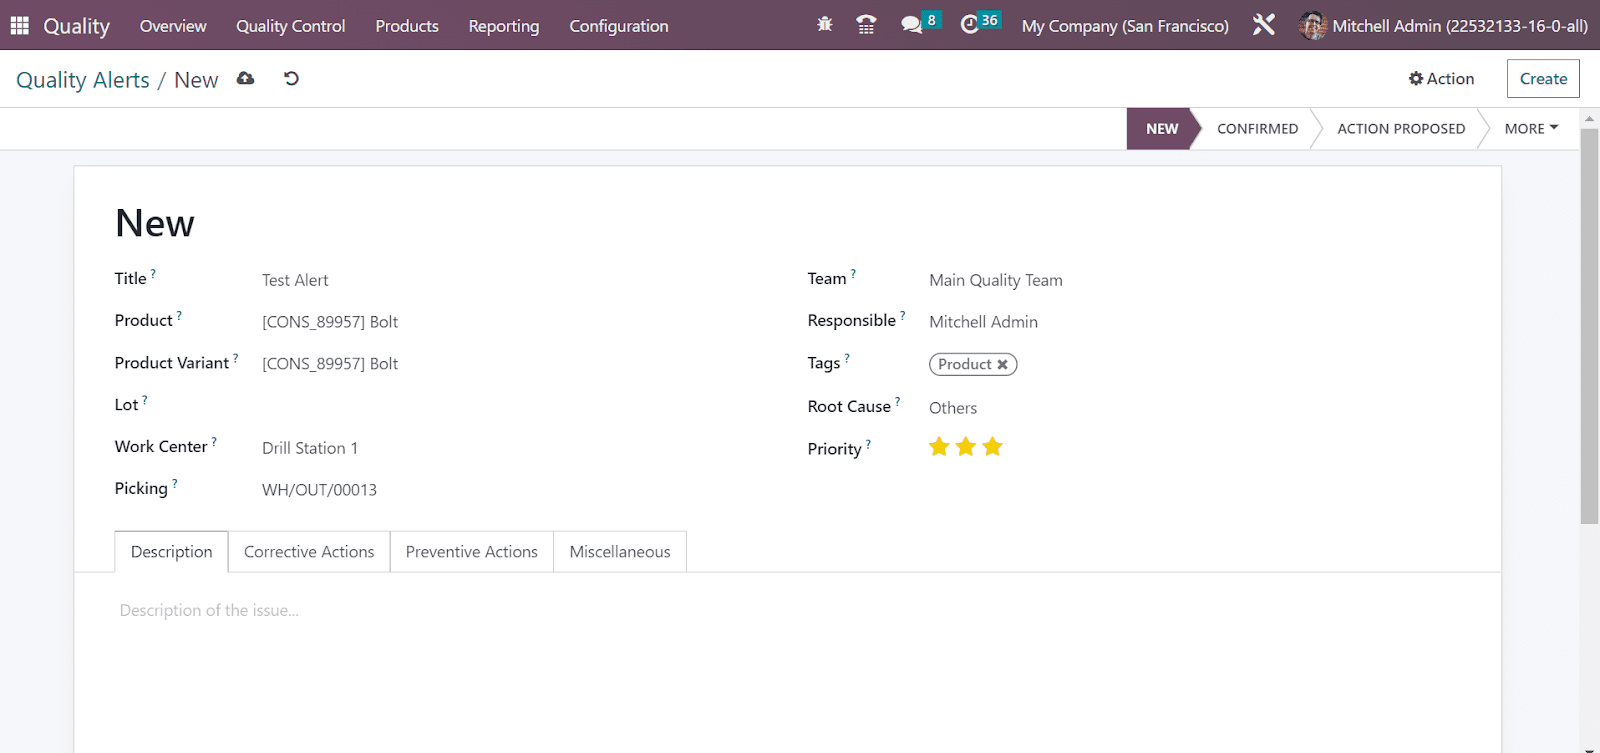
Each entered data is saved manually in the OTX 16 Quality module. The stages of Quality Alert consider NEW, CONFIRMED, ACTION PROPOSED, etc. and it varies based on each operation. Let’s see an example of a quality alert setup from a manufacturing order using the OTX 16. Select the Manufacturing Orders menu within the Operations tab. All created manufacturing orders list is acquirable to the user and depict the data such as Reference, Product, Component Status, Quantity, etc. Click the CREATE icon on the Manufacturing Orders page to generate a new order.
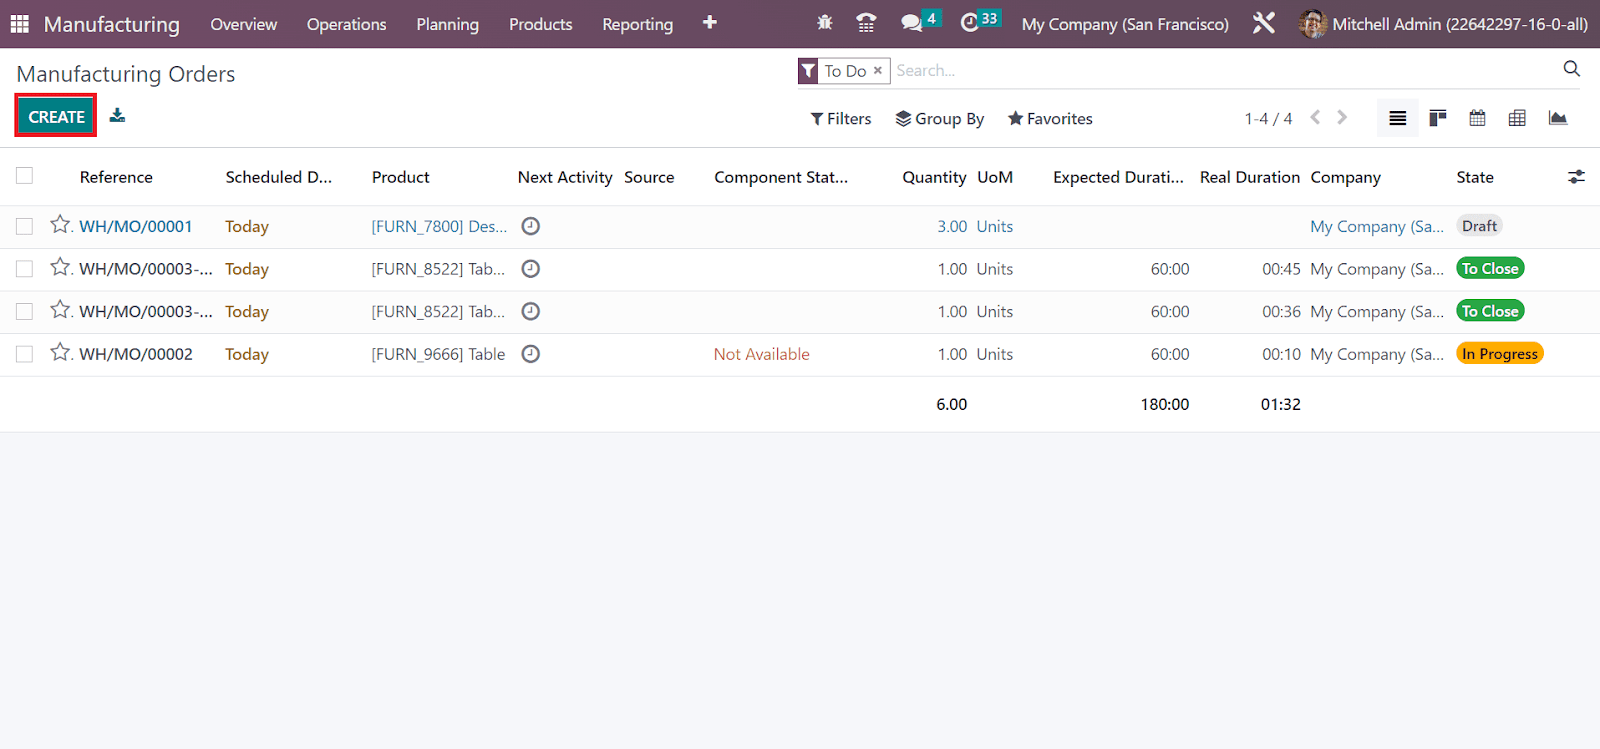
A new screen appears before you, and choose your commodity in the Product option. Next, select your created BoM Table, and the list of required items is visible under the Components tab.

Mention the number of units to produce in the Quantity field. Moreover, you can access the planned date of the manufacturing order in the Scheduled Date field. Later, set the user who is responsible for the manufacturing order in the Responsible option. Once managing each data, the details are saved manually in the OTX 16. Click the CONFIRM icon once saving your data.
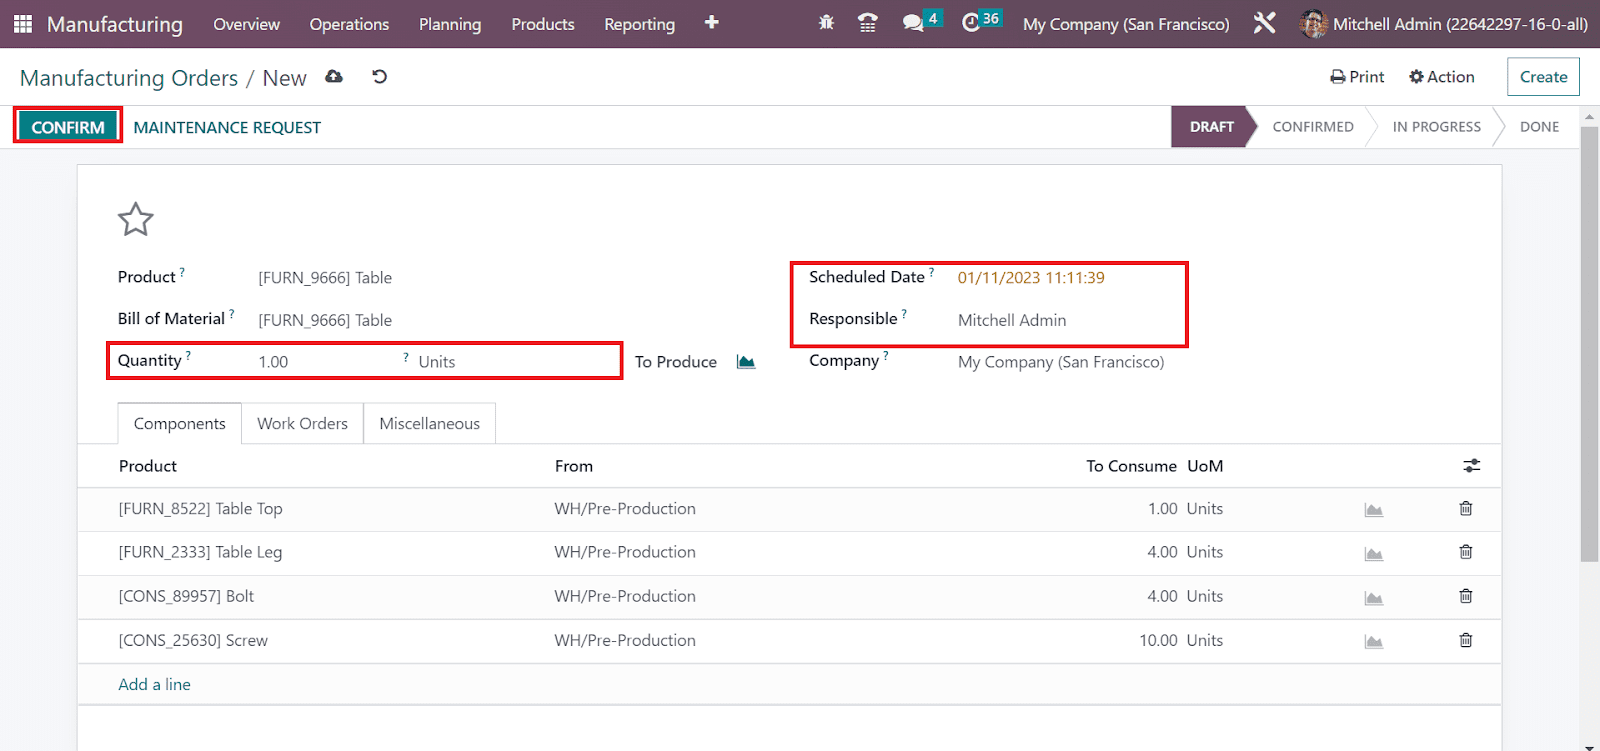
Afterward, press the PLAN button and select the tablet view under the Work Orders tab. You can view the information about the work center under the Work Orders tab.

You can obtain the product information in the new window. The employee can define a quality alert if they have encountered a problem. Select the Top left menu in the window, and various options, such as SCRAP, ADD COMPONENT, BLOCK, etc are visible to the user. Click the QUALITY ALERT menu visible to the user.

Add the quality alert name in the Title field, and other information is automatically updated for user. Below the Description tab, you can mention the reason for the product quality alert and select the SAVE icon.
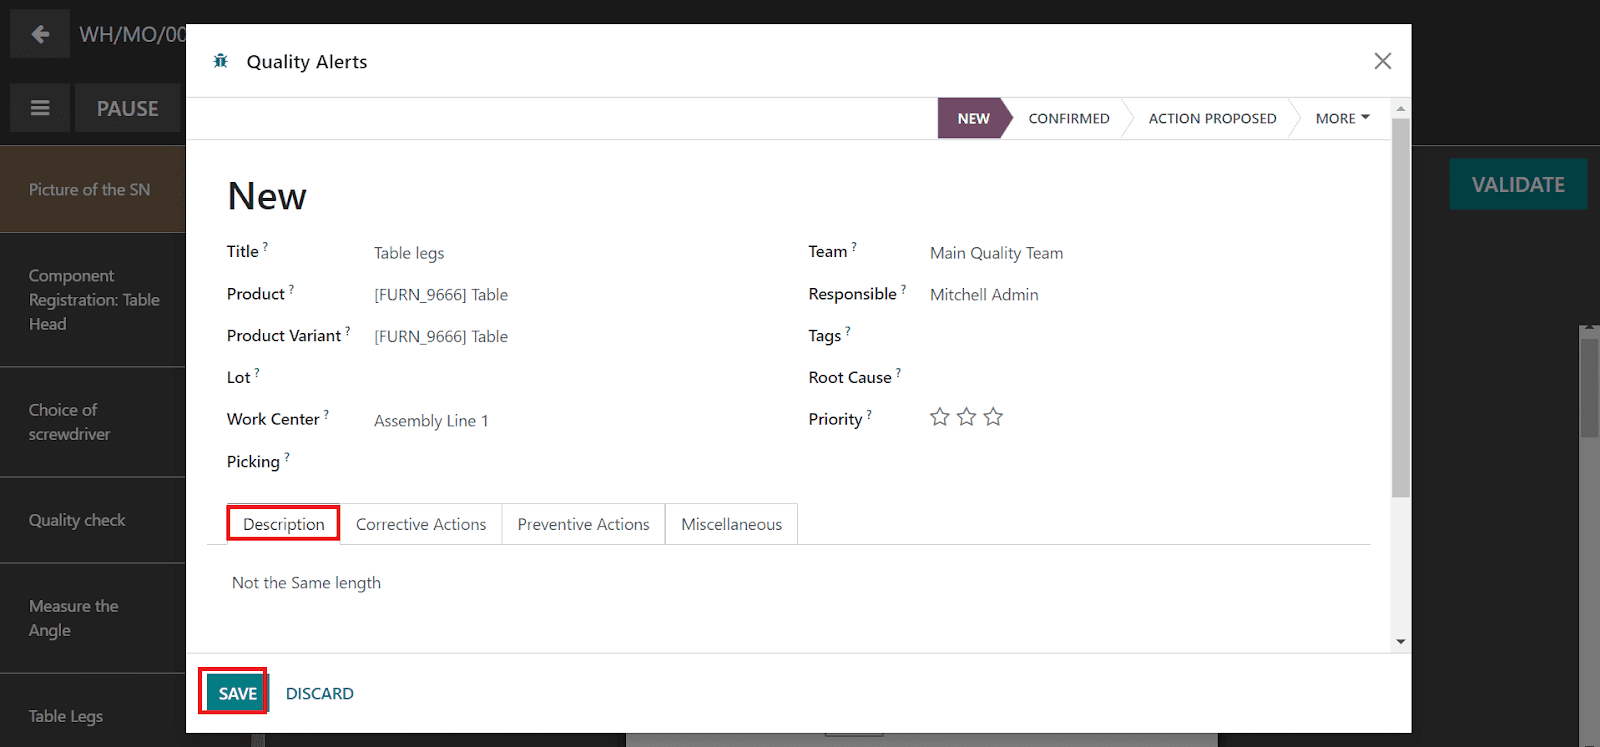
Now, let’s move to OTX 16 Quality module and check out the Quality Alerts window. You can see the created quality alert for Table inside the NEW stage.

Change the stage of quality alert into ROOT CAUSE ANALYSIS and add the tag security issue. Next, specify the reason for the product quality alert in the Root Cause field.
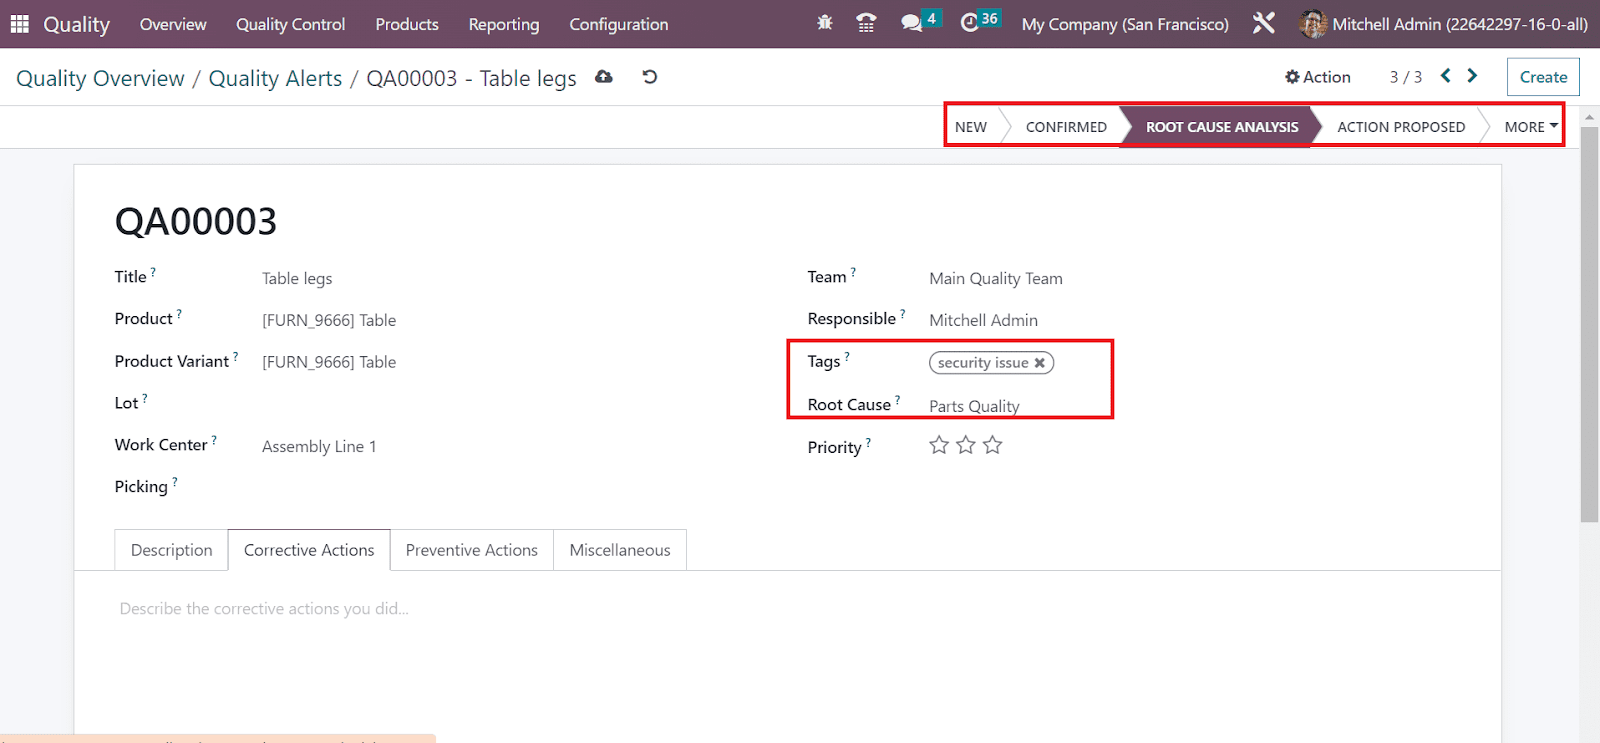
After managing the data, change the stage into ACTION PROPOSED.

Now, let’s move to the OTX 16 Manufacturing module and select your Manufacturing Order. We can see that one quality alert is generated for the order.
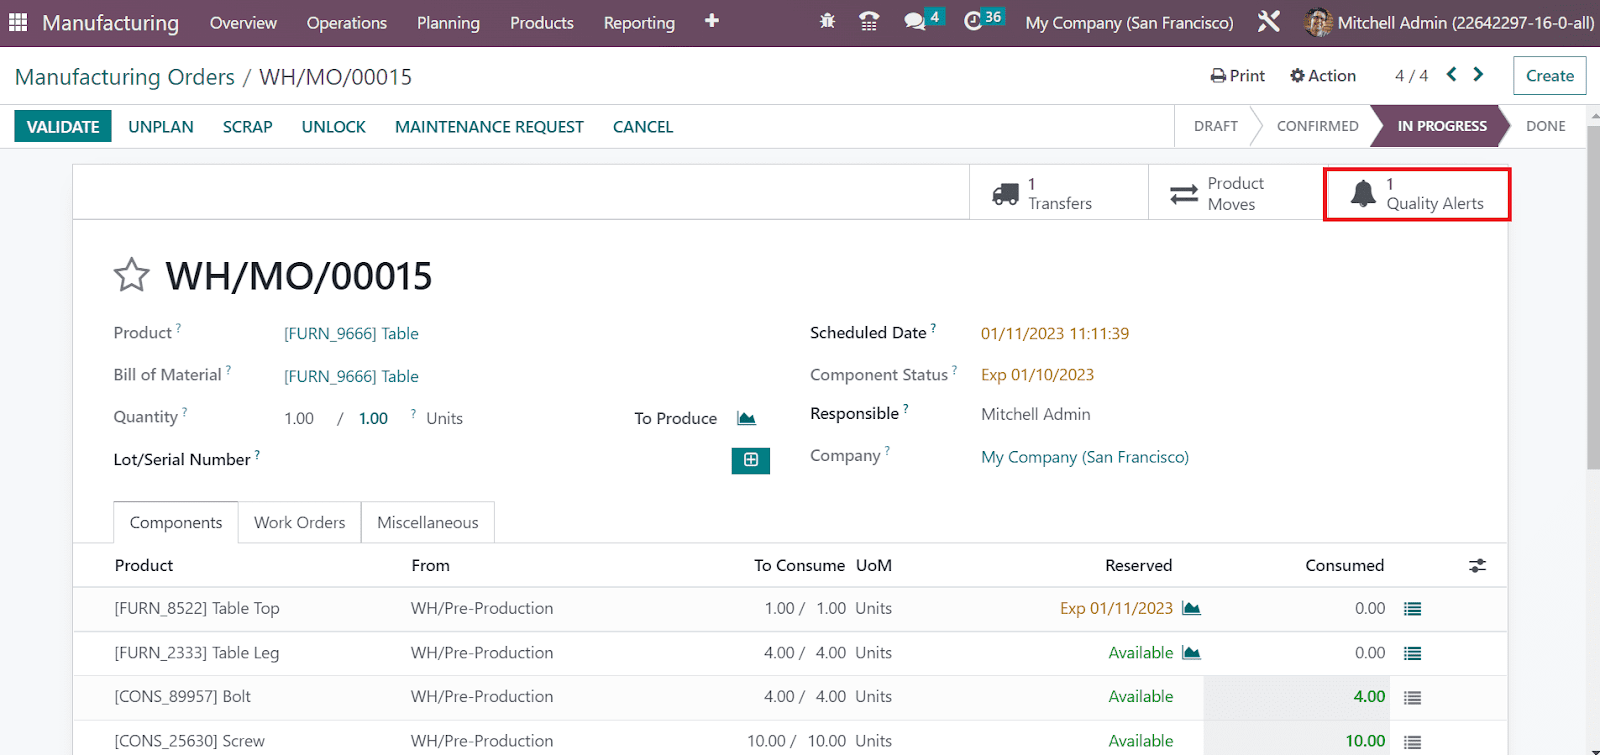
Hence, passing the quality alert within a manufacturing order is easy.
Products and Lots/Serial Numbers
Each company sells various products for customers based on their business. Details of each product in your firm are easily secure with the OTX 16 Quality module. The product tab of the OTX 16 Quality module defines Product Variants, Products, and Lot/Serial Numbers. To acquire all items in your company, choose the Products menu in the Products tab. In the Kanban view, we can see data regarding each product, such as price, on-hand unit, internal reference, etc. The detailed information is visible to the user by choosing the specific product from the Products window. You can describe new product data once selecting the CREATE icon.

By selecting the Product Variants menu in the Products tab, you can obtain several product variants owned by a firm. Different attributes such as material, price, color, and other features of a master product are referred to as product variants. For example, a stool consists of different variant values in colors such as grey, dark blue, red, etc. We can obtain all variant values of an item in the Product Variants window. To define a new variant value for a product, select the CREATE icon.

Lots/Serial Numbers
An identification number given to products at the manufacturing time is a lots/serial number. Each item contains a unique number different from other products in a company. All created serial numbers for products in a firm are viewable to a user once selecting the Lot/Serial Numbers menu in Products tab. Users can access the lot/serial number information of each commodity, such as Product, Company, Created date, etc. By clicking the CREATE, we can assign a new lot/serial number for a product.

In the displayed screen, mention a unique number for the product in the Lots/Serial Number option. Set the item which your lot/serial number contains in the Product field. Also, you can add the units for your specific product in the Quantity option.
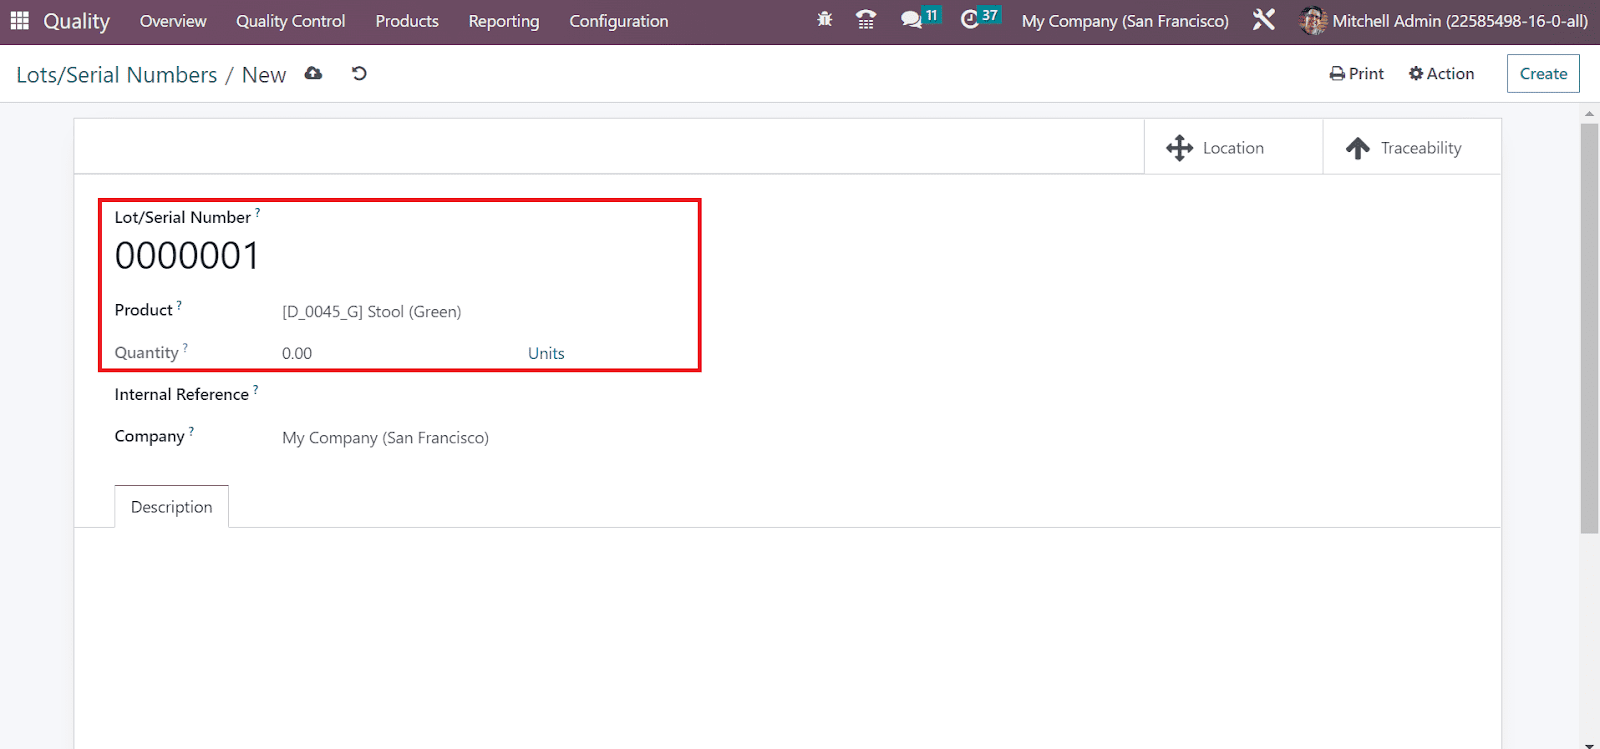
Users can apply for the reference number in case it’s unique from manufacturers’ lots/serial numbers. Once adding the Internal reference number, select your firm name in the Company field.
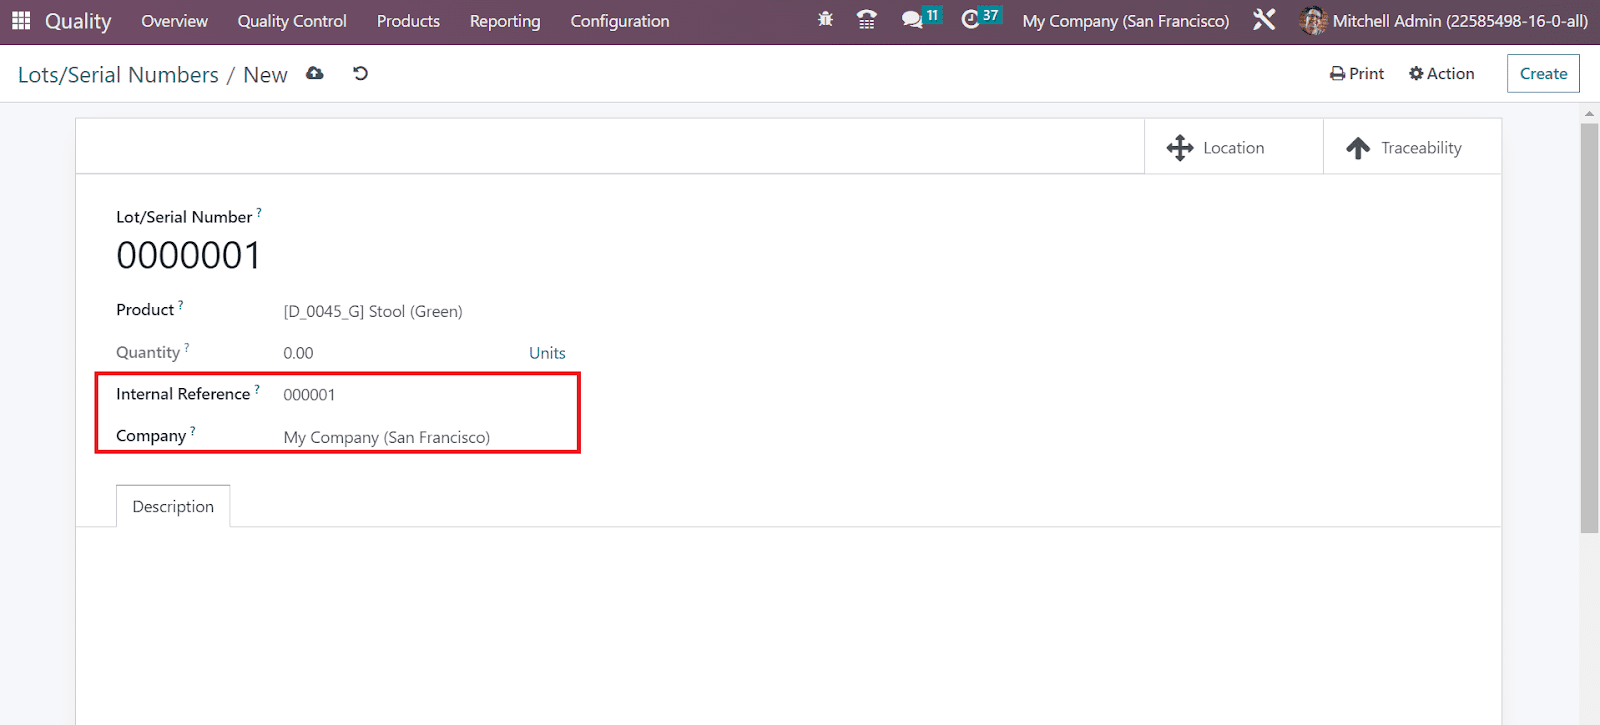
You can specify further information about product lots/serial numbers in the Description tab. Additionally, you will get the product’s recent stock level overview in the Location smart menu.
The operation report based on the product serial number is accessible in the Traceability smart menu.

Each data related to serial numbers is saved manually in the OTX 16.
Reporting
As per the recorded actions, OTX 16 provides various reporting features for each module. Reporting feature of the OTX 16 Quality module shows Quality Checks and Quality Alert reports. Choose Quality Checks in the Reporting tab, and a graphical representation of the quality check status is viewable in the new window. In the Graph view, you can see Status data on X-axis, and Y-axis depicts the Count. Users can apply various measures to graphical representation to analyze quality checks. By selecting the MEASURE icon, we can use the values such as Done, Measure, Finished Product Sequence Number, and Quantity Tested.

Here, quality checks are grouped based on the status. Other ways to group quality checks are based on Product, Finished Lot/Serial, Add Custom Group, Control Point, and Team. By choosing the Group menu, you can apply these values to the graph.

You can also view the graph in the form of line, pie, and bar chart formats. To evaluate Alerts, select the Quality Alerts menu in Reporting tab. On the displayed page, the quality alert report is entirely based on the root cause. Once analyzing the report, you can identify the issues and take corrective measures.

Quality Worksheet Templates
You can configure worksheets in the quality module within the Configuration tab. All pre-configured worksheet templates are visible in the open windows and show data such as Name, Color, Companies, and Worksheets. We can design a new template by selecting the CREATE button.

On the open page, enter the template title in the Name field and pick the name of the companies. Afterward, apply a color to identify the template quickly based on your requirements.

The count of all worksheets concerning your template is acquirable in the Worksheets smart menu. Also, it is possible to evaluate the worksheet in a detailed manner by choosing the ANALYSIS icon.

PLM
Product Lifecycle Management (PLM)
Managing the lifecycle of the product from the time of production to its delivery or disposal is a crucial task for manufacturing companies. Product lifecycle management offers a solution for the effective management of all information related to the product and operations which are done at various points of the product life cycle. Recording the product-related information in a unified system will help the manufacturers to get access to the required version of the product at any time. Based on engineering change orders, the system will record the product life cycle, which aids in getting an up-to-date report of the products manufactured in your company.
The PLM module available in the OTX 16 centralizes all details and processes regarding the product life cycle and gives reports of the items, parts, products, engineering change orders, documents, and quality workflow. This chapter will detail the features and functionalities of the OTX PLM module.
The main dashboard of the module will show the details of the engineering change orders created in this module. It will be arranged in the dashboard based on their ECO type. The number of engineering changes made under each ECO type can be observed from this dashboard. You can click on the respective ECO type to get a detailed view of the ECO under that specific ECO type.

The small three vertical dots given on the top right corner of each ECO type tab will give a Configuration option which leads you to the form view of the respective ECO type.
Engineering Change Orders
An Engineering Change Order outlines the proposed changes for a product. It details the new change or new design suggested for an existing product in a company. It is easy to create and manage such orders in the OTX PLM module. The Changes menu will lead you to a platform where you can manage the engineering change orders in your company. The screenshot shown below is the Kanban view of the engineering change orders configured in your system. Based on the stages you created for the ECO, the window will arrange them according to the progression.

For managing and creating stages for the ECo, you will get a separate platform under the Configuration menu.

The list view will show the details of the Reference, Bill of Materials, Responsible, Stage, Effective Date, and Company. Using the Create button, you can effortlessly create a new engineering change order for products.

Add a Description of the changes in the given field. The Type of engineering change order can be selected from the given drop-down menu. The changes mentioned in the order can be applied on either Bill of Material or the selected Product only. This can be specified in the Apply On field. Based on the option you select, mention the Product and Bill of Materials in the respective fields. The Company name will be displayed in the corresponding field. Assign an employee who is in charge of the ECO in the Responsible field. The date on which the changes will be applied to the product can be defined in the Effective field. You can apply the changes As soon as possible or At Date. By selecting the At Date option, you will be asked to select an Effective Date in the additional field. Add suitable Tags for the ECO.
Under the Note tab, you can give an internal note related to the changes and their reason. The description will be helpful in understanding the proposed changes for the product. The Approval tab will show the details of the officer whose approval is required to change the current stage of this ECO.

While configuring stages for the ECO, you can mention the details of the employee whose approval is required to change an ECO from that particular stage to another. The details include the Role, Approved By, Status, Approval Date, Approval Stage, and Requested Users.

Once you provide the Email cc under the Extra Info tab, the configuration is completed. The Start Revision button will help you to start revising the ECO.

According to the progress of the ECO, you can change the stages after getting approval from the specific officer.

The Document smart button will show files related to the ECO. When the ECO reaches the Validated stage, you will get the Apply Changes button to apply the proposed changes to the product.

After applying the changes, the new version of the product will be updated according to the Effective Date.
You can create engineering change orders for an existing BoM using the smart button available on the form view, as shown below.

Using this button, you can create ECO for the respective BOM.

Click the Create button.

Create a new ECO for the BoM and apply the changes.

After applying the changes, the version of the BoM can be observed under the Miscellaneous tab.
It is also possible to create ECO from the Manufacturing module. While continuing with a work order, you can add additional steps to the work order using the advanced menu bar available on the tablet view of the respective work order.

We already detailed this feature in the Manufacturing module. Here, you can use the Add Step button to add a new step to the work order in order to improve the workflow. Once you click this button, you will get a new pop-up to mention the new step.

Here, you can add a Title, Instructions related to the new step, and upload Document in the respective fields. By clicking the Propose Change button, a new ECO will be created in the PLM module. The responsible employee can check the ECO and apply changes after approving the order.

The additional changes in the operation can be observed in the Operation Changes tab of the ECO.

When the assigned employee approves the change, the version will change and the operation can be continued with the new version.
ECO Stage
In order to arrange the engineering change orders according to their progress of the operations, you can configure various stages from the Configuration menu of the module. The list of already configured stages will be visible in the screenshot.

It shows the details of the Name, Approval Roles, Folded in Kanban view, and Types. Click the Create button to create a new stage.

Here, you can mention the Name of the stage in the given space. If you are creating this stage for a particular ECO type, you can specify it in the Type field. Activating the Folded in Kanban view option will allow you to fold this stage in the kanban view of ECO. The Allow to apply changes option can be activated if you want to apply the proposed changes at this stage of an ECO. In order to set this stage as the Final Stage of the ECO, you can activate the respective field.
Under the Approvals tab, you can specify the user whose approval is required to move one ECO from this stage to the next stage. Specify the Role, Users, and Approval Type in the given fields. The available approval types are ‘Approves, but the approval is optional,’ ‘Is required to approve,’ and ‘Comments only.’ Using the Stage Description and Tooltips, you can set labels for the stage and add a description related to this stage so that other users will be able to understand the purpose of this stage.
ECO Types
Under the Configuration menu of the PLM module, you will get the ECO Types option which can be used to create various types for the engineering change orders. The already created list of the ECO Type can be viewed on this platform, as shown in the image below.

Clicking on the Create button will lead you to a new window where you can specify the anime of the new ECO type and Email Alias in the respective fields.

Once you complete the configuration, the new ECO Type is ready to use.
In order to create specific tags for the ECO, you can select the ECO Tags option from the Configuration menu. Creating new tags is easy here. When you click the Create button, a new line will appear, as shown below.

Mention the new Tag Name in the available space.
The Master Data menu comprises the options for managing the Bill of Materials and Work Centers. We already detailed the configuration of the BoM and Work Centers in the Manufacturing module. By integrating with the PLM module, you can manage the BoM changes in accordance with the ECO.

You can find a smart button on the bill of material form view which reports the engineering change orders created for a particular BoM.
Reporting
An analysis of the engineering change orders can be performed with the assistance of the Reporting feature available in the OTX PLM module. This feature allows you to get a real time report of the changes proposed for products in your company. The graphical view of the report is shown below.

The default filters available in this platform are My Changes, Awaiting My Validation, Awaiting Validation, To Apply, To Do, In Progress, Rebase, Conflict, Done, Effective Date, Bill of Materials, Routing, and Archived.

You can use the Group By option to group the reports based on Product, State, Stage, and Company. The available Measures are BoM Revision, Color, and Count. Use the Insert in Spreadsheet option to insert the pivot table into a spreadsheet for further reference.
Maintenance
A manufacturing company usually comprises various kinds of machines and equipment. Failure of any of such machines or equipment will delay the production process and cause productivity loss. In order to avoid these problems, proper maintenance is needed that will improve the life cycle of the machines and equipment. In order to get a perfectly finished product at the end of the production, it is essential to ensure the quality of the machines you use for the manufacturing process. Having a dedicated module to manage the maintenance orders of the company will lessen your burden. The OTX 16 Maintenance module can be used as an apt solution for monitoring all kinds of maintenance orders within a company.
Maintenance Team
For managing and monitoring the maintenance orders, you can assign a maintenance team in the OTX Maintenance module. While creating a maintenance request, you will be asked to mention the maintenance team. You can assign a team for the maintenance, and this team will be in charge of the entire maintenance operations. When you open the Maintenance module, you will get a dashboard as shown below, where you can find different maintenance teams of a company.

The number of maintenance requests to do can be seen on each maintenance team. In order to get additional operation tools, you can click on the three small vertical dots available on each tab in the top right corner.

This menubar will give access to view the maintenance requests according to their progression such as All, To Do, In Progress, and Done. The Reporting feature will help you to get the Maintenance Requests report. If you want to make any changes in a maintenance team, you can use the Configuration option.
To create a new maintenance team, you can go to the Configuration menu of the module and click on the Maintenance Teams option. This will open a new window with the list of already configured teams for maintenance.

Creating a new team is an easy task. When you click on the Create button, a new line will appear under the existing list as shown below.

Here, you can mention the Team Name, Team Members, and Company. Once you complete these fields, your new maintenance team is ready for operation.
Equipment
For the operations of maintenance, you need equipment and the record of the equipment should be also maintained. Using the Machines & Tools option available in the Maintenance module, you can create a list of all equipment used in your company for maintenance. This option will be available under the Equipment menu of the module.

From the Kanban view of the platform, you will see all configured equipment in your company. The small three dots on each equipment tab will give the Edit and Delete buttons for the respective operations. You can use default filters such as My Equipment, Assigned, Unassigned, Under Maintenance, Unread Messages, and Archived. The Group By feature offers the Technicians, Category, Owner, Vendor, Employee, and Department to group the equipment. Using the small clock icon, you can schedule various activities for the equipment.
Clicking on the Create button will lead you to a new configuration window as shown below. You can provide a Name of the equipment in the given space.
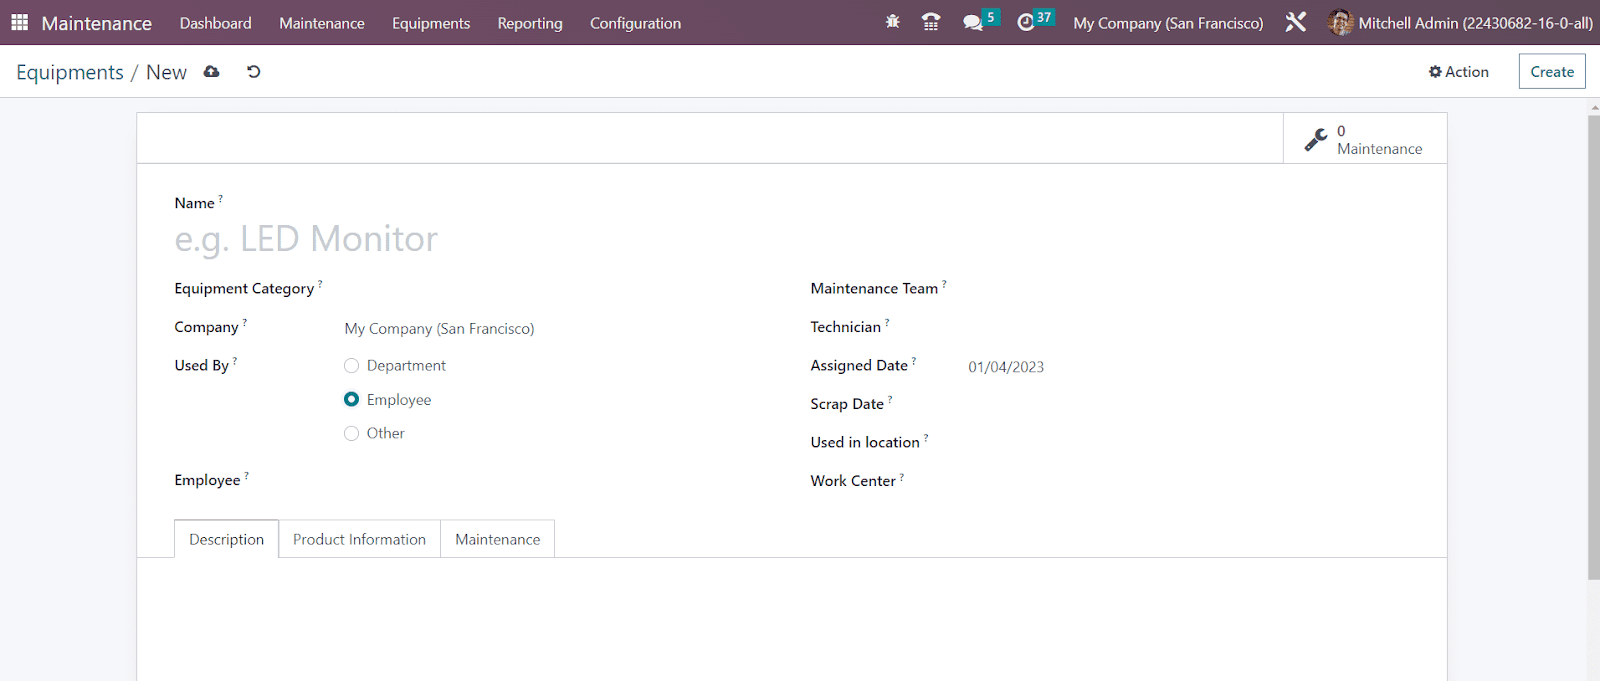
Select the suitable Equipment Category from the dropdown. The Company name will be auto-populated in the respective field. In the Used By field, you can specify to whom this equipment is assigned. It can be either Department, Employee, or Other. According to the option you select, you will get an additional field to specify the Employee or Department. Now, you can assign this equipment to a particular Maintenance Team by mentioning them in the given field. In the respective fields, mention the Technician who is in charge of this equipment, Assigned Date, Scrap Date, Used in Location, and Work Center. Under the Description tab, you can add a description of the equipment.
Now, go to the Product Information tab, where you can specify the details of the equipment. If the equipment is purchased from another company, you can mention the Vendor and Vendor Reference .

The Model and Serial Number of the equipment can be added in the respective fields. Effective Date indicates the date on which this equipment will become effective. You can use this date to compute the mean time between failures. Specify the Cost and Warranty Expiration Date in the corresponding fields.

The next action date of the equipment will be available in the Next Preventive Maintenance field. This will be available based on the Preventive Maintenance Frequency you set in the respective field. The Maintenance Duration using this equipment can be specified in hours. The Expected Mean Time Between Failures can be added in days. Based on the Effective Date you mentioned, the Mean Time Between Failures will be automatically computed. The Estimated Next Failure will be shown by considering the latest failure date and mean time between failures. The Latest Failure date will be available in the given field. The average time taken to repair the equipment can be seen in the Mean Time to Repair field. Once you specify all the necessary details, the equipment configuration will be completed.
In order to create different categories for the equipment, you can select the Equipment Categories option from the Configuration menu. The list of already configured equipment categories can be found in this window.
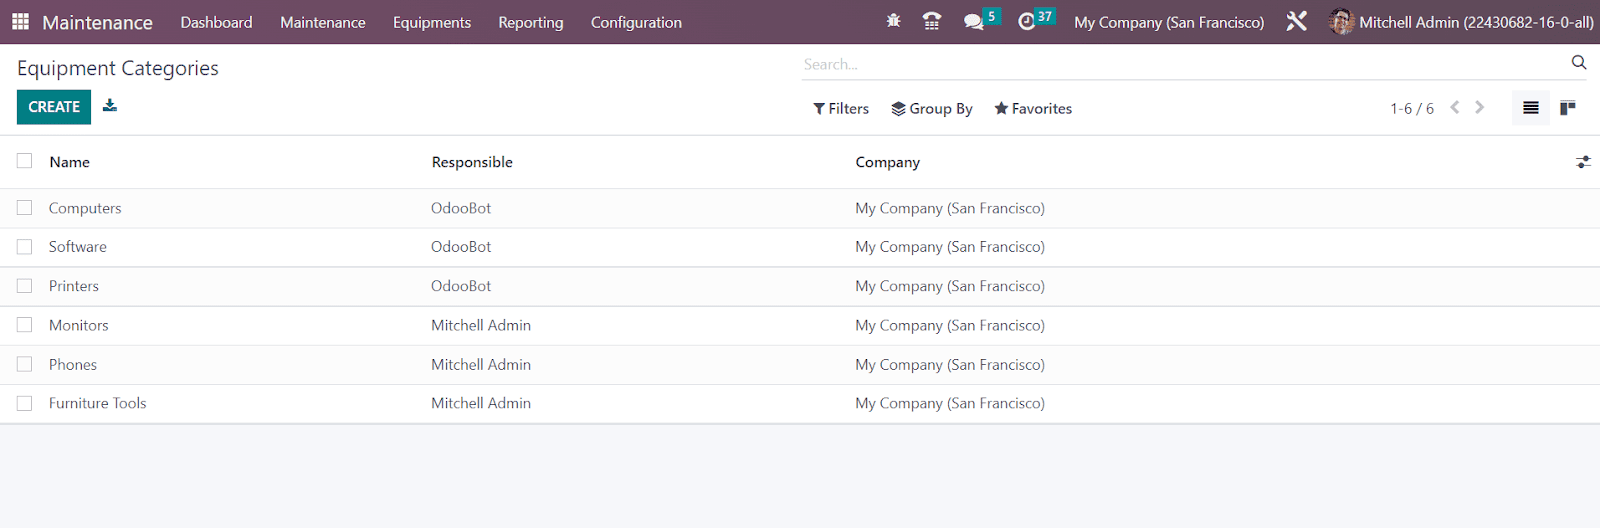
The list will show the Name, Responsible, and Company of the Equipment Category. Click the Create button. This will open a new window as shown below. Here, you can specify the Category Name in the given space.
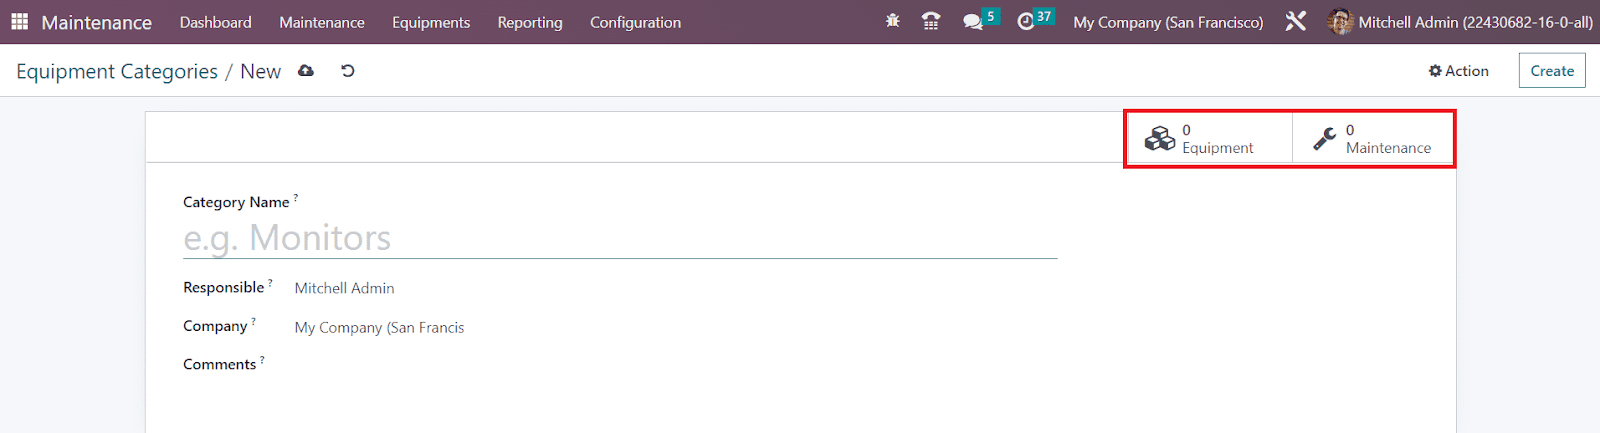
Assign an employee who is in charge of this equipment category in the Responsible field. The Company name will be available in the given field. Any note related to this equipment category can be added in the Comments field. After configuring the equipment category, you can use the Equipment smart button to get the details of the equipment assigned under this category. The Maintenance smart button will show the list of maintenance requests created for the equipment under this category.
Maintenance Requests
When an equipment failure happens, you can generate a maintenance request for the equipment from the Maintenance Request menu. The Kanban view of this platform is shown below.
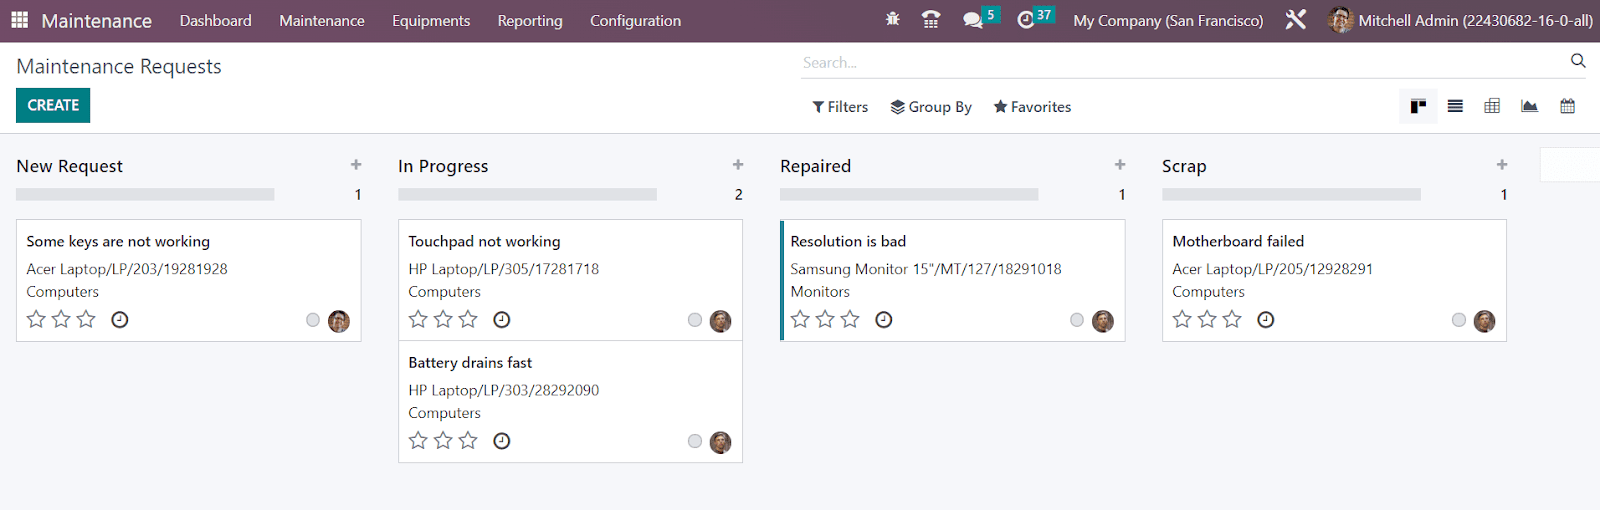
Here, you can observe the maintenance requests assigned under different stages.

You can use the options available in the small three dots on each maintenance request to Edit and Delete the respective request.
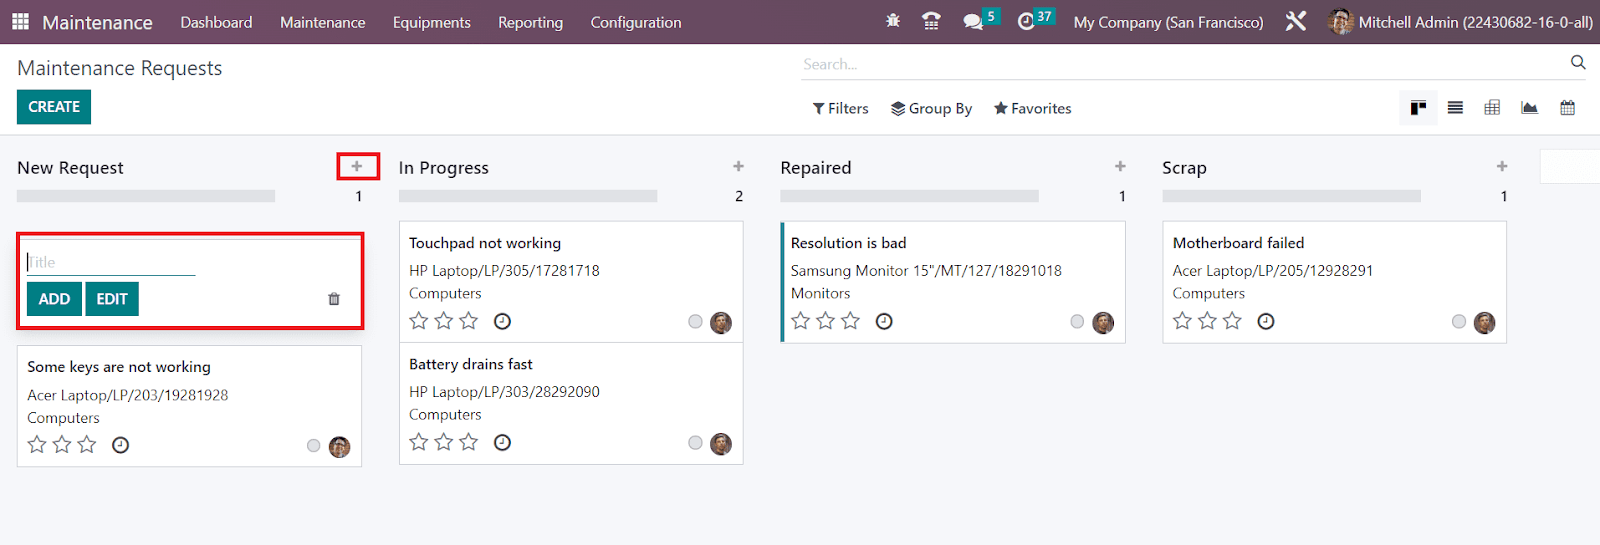
If you want to add a new request under a particular stage, you can click on the + icon given on the right side of the title of the stage. You will get a space to mention the title of the request. You click the Add button to add the new request to the particular stage and the Edit button to edit the details of the request.
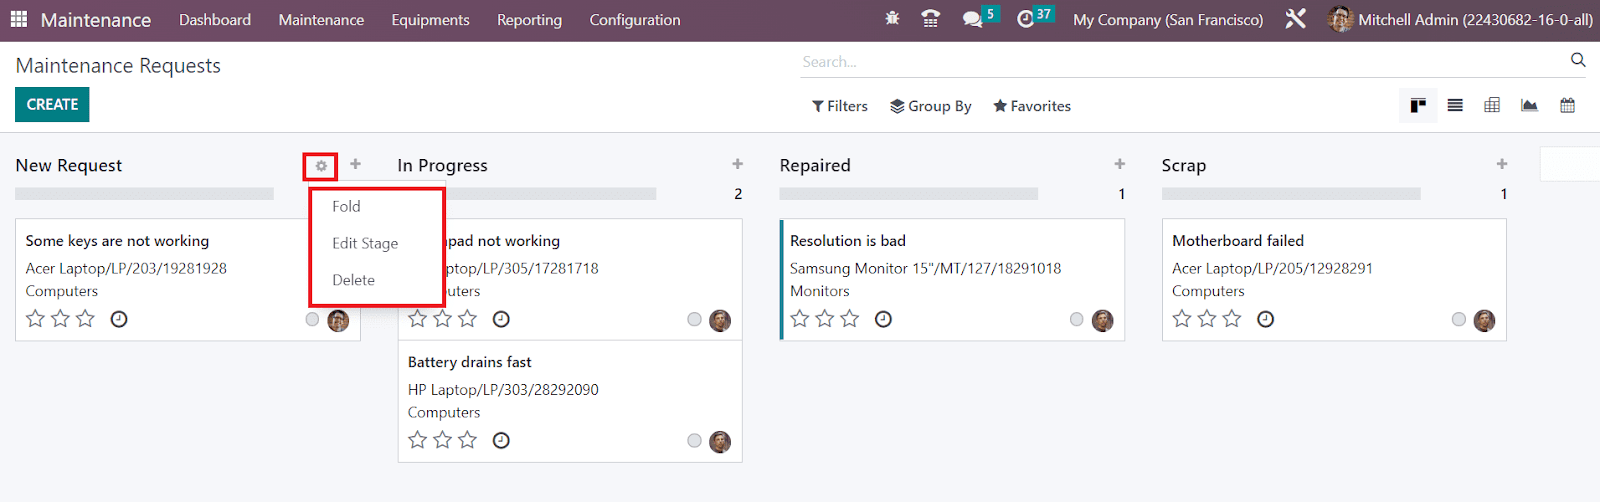
The settings icon available on the title of each stage will give options to Fold, Edit, and Delete the respective stage.
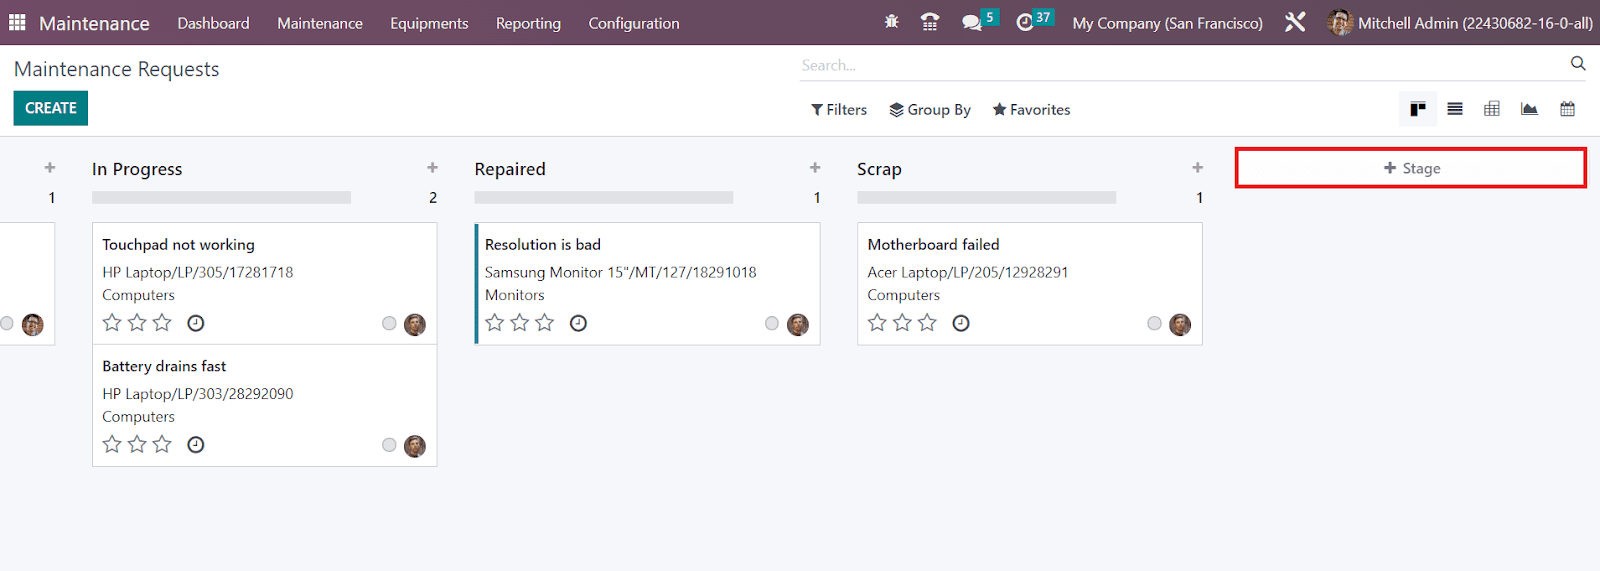
In order to add a new stage to the Kanban view, you can click on the +Stage option which will help you to create a new stage.

The stars can be used to prioritize the request based on emergency. Using the small clock icon, you can schedule activities for the maintenance request. You can observe the assigned employee on the maintenance request, as highlighted in the image. Clicking on this will open a chat box where you can initiate a chat with the respective employee.
Now, use the Create button to create a new maintenance request.

You can add the title of the maintenance request in the given space. The name of the employee who is creating the request can be seen in the Created By field. Mention the Equipment id that needs to be maintained in the respective field. The date on which you create the request will be considered as the Request Date. Mainly, there are two types of maintenance requests available in OTX , Corrective and Preventive . Preventive maintenance will be done in a regular interval to prevent the equipment from any unexpected failures. The Corrective maintenance will be done to repair the equipment when it fails to operate. If you have the Manufacturing Order of the equipment, you can specify that in the request. Add a Description to get additional details of the request.
In the Team field, you can assign a team for the maintenance of the equipment. Mention the Responsible who is in charge of this maintenance request. The date on which the team planned the maintenance can be specified in the Scheduled Date. The duration of the maintenance work can be defined as hours. Use the stars to indicate the Priority of the request. Add Email cc and Company in the respective fields, and the maintenance request is ready to proceed. According to the progress of the operation, you can change the stages of the request. The default stages are New Request, In Progress, Repaired, and Scrap.
From the Configuration menu of the module, you can create new stages for the maintenance requests. This will help you to arrange the requests according to their progress. The platform will show the already created stages as shown below.
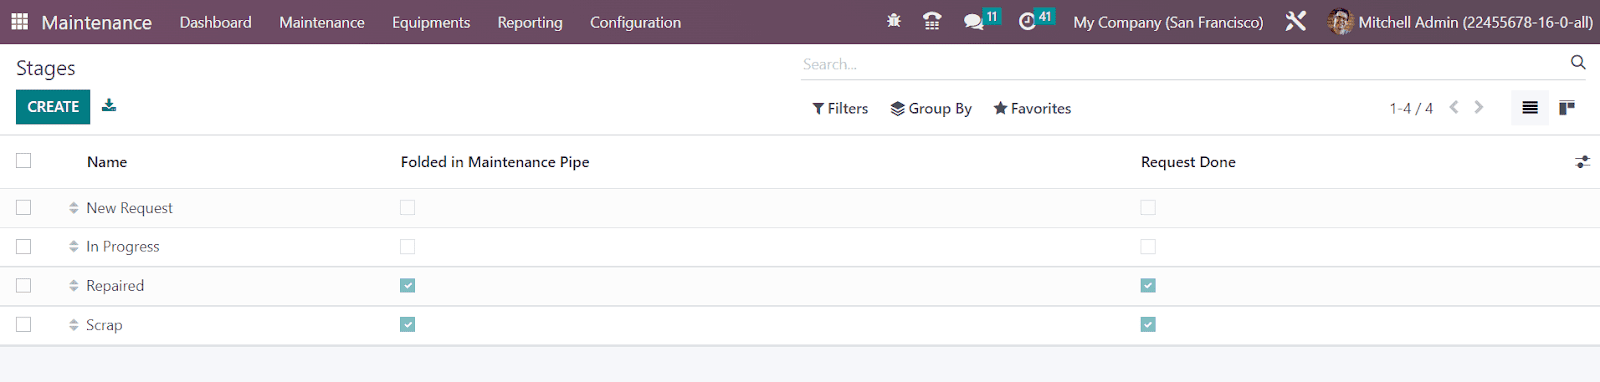
In order to create a new stage, you can click the Create button and you will get a new line to mention the stage name.
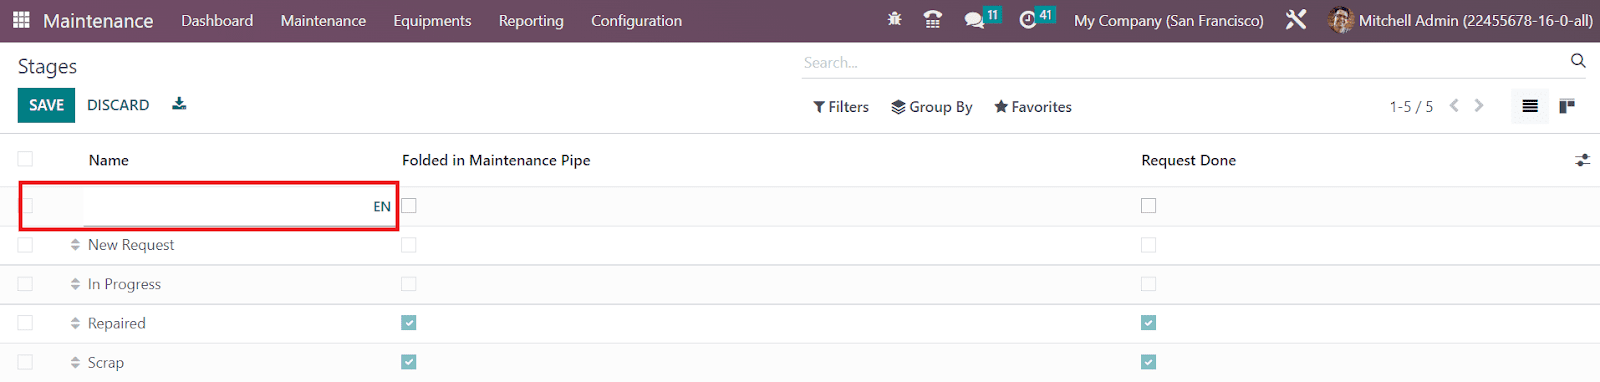
Here, you can specify the Name of the stage. If you want to fold this stage in the Kanban view of the Maintenance Requests, you can activate the Folded in Maintenance Pipe field. If you want to consider the requests under this stage as Done, you can activate the Request Done field.
Maintenance Calendar
The Maintenance Calendar option under the Maintenance menu will provide a calendar view of all requests created in your module. You can view the requests according to the Day, Week, Month, and Year. select the suitable calendar view according to your convenience. The scheduled maintenance requests can be seen on the calendar as shown below.
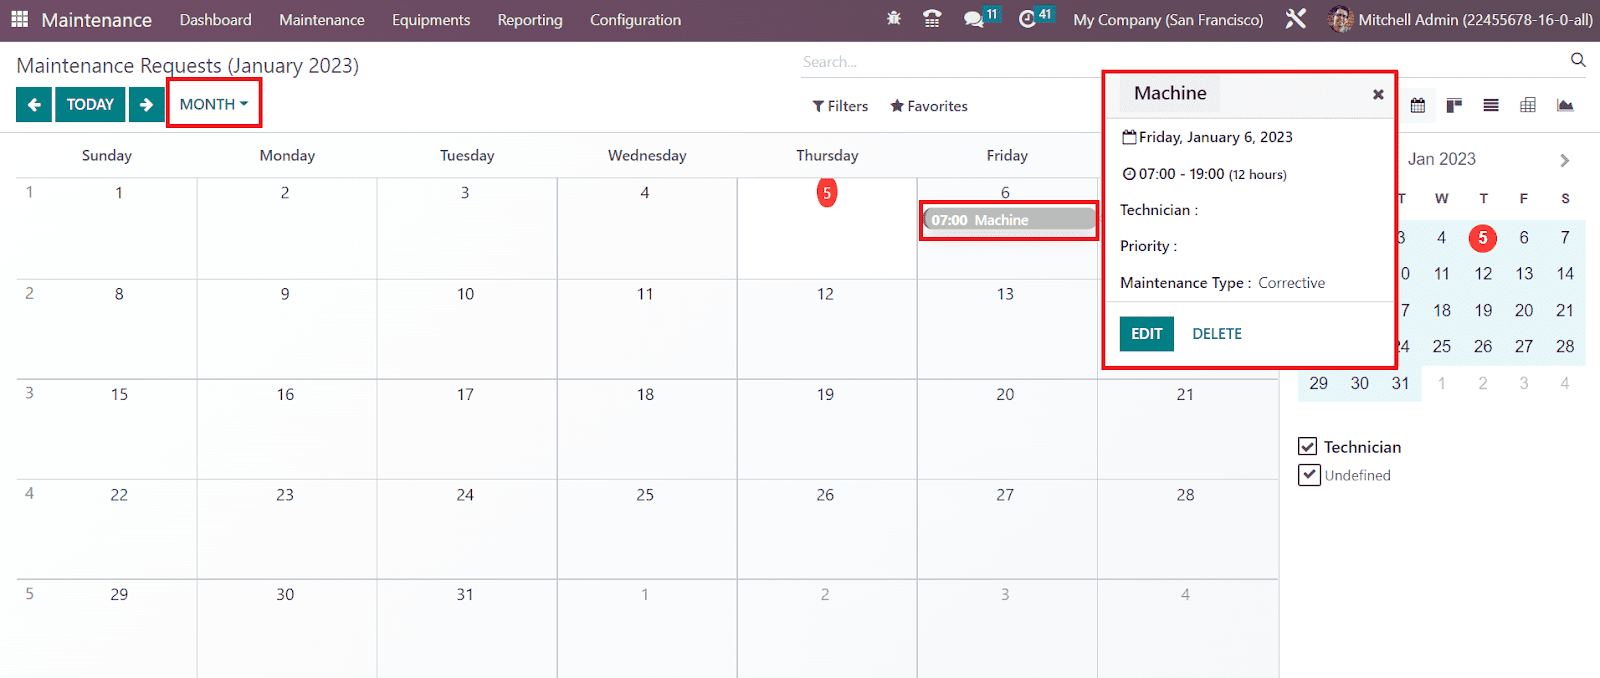
The preview will show the scheduled date and time, Technician, Priority, and Maintenance Type. It is also possible to create a maintenance request from the calendar view. For this, you can click on the date on which you want to schedule the maintenance. You will get a pop-up window as shown below.

Here, you can add the subject and click on the Create button. If you want to add additional information to the request, you can use the Edit button, which will lead you to the form view of the maintenance request creation window.
Reporting
In order to get the reports of all maintenance works done in your company, you can seek help from the Reporting menu available in the OTX Maintenance module. This platform will provide an effective analysis of the Maintenance Requests created in the module.

You will get Pivot and Graphical reports of the Maintenance Requests. The graphical view can be altered between Line, Bar, and Pie Charts. Use My Maintenance, To Do, Blocked, Ready, High-Priority, Unscheduled, Request Date, Scheduled Date, Close Date, Unread Messages, and Archived as filters. You will get reports based on Assigned To, Category, Stage, and Created By using the Group By option.

As Measures, you can use the Count and Duration of the maintenance request.
Having the assistance of the OTX Maintenance module will simplify the operation and improve the workflow of your company without wasting human resources and productive time.
Manufacturing
From assembling components for manufacturing to sending the finished product to the market, a manufacturing company has endless work to organize. Converting the raw materials into finished products needs to be monitored or controlled properly to ensure the quality of each product. Managing all these procedures will be exhausting and consume a major part of your working time if it is handled manually. Having an efficient system for managing all these operations related to manufacturing orders will benefit the company in order to guarantee quality products to their customers.
Using the assistance of the OTX ERP system, a company can adequately manage manufacturing orders, bills of materials, work centers, and track all operations of the manufacturing at each stage. You can completely rely on OTX 16 for the smooth organization of work orders. It is now easier to schedule and plan each stage of manufacturing with the dedicated module.
In this chapter, we are going to take a detailed look into the OTX 16 Manufacturing module.
When you open the Manufacturing module from the main dashboard of the OTX , you will land on the Overview window of the work centers in OTX . This platform will show all configured work centers in your system as shown in the image below.

It is possible to manage the work centers from this dashboard itself. Using the Work Orders button, you can monitor all work orders of the respective work center. For this, you can use the small monitor icon. Clicking on the three dots given in the top right corner of each work center tab, you will be able to get additional operation tools as shown below.

Using this menu, you can take actions to Plan Orders and Maintenance. It also shows buttons to generate reports regarding Overall Equipment Efficiency, Performance, and Waiting Availability. Use the Settings option to make necessary adjustments in the configuration of the work center. If the work center is blocked, you can see a small red dot on the corresponding work center. The yellow color PLAN ORDER indicates that no work orders are currently in progress in the particular work center.
Work Centers
A manufacturing order comprises various operations to get a perfectly finished product. In the OTX Manufacturing module, you can specify all these operations as Work Orders while configuring a manufacturing order. In the medium to large enterprises, the manufacturing process is controlled by unifying the operations of multiple work centers. It is possible to assign each stage of manufacturing to these work centers and coordinate them with the assistance of OTX 16.
In order to configure the work center to the OTX Manufacturing module, you can go to the Configuration menu and click on the Work Centers button. As shown in the screenshot below, the already configured list of work centers will be displayed with the details of the name of the Work Center, Code, Tag, Alternative Workcenters, Cost per hour, Capacity, Time Efficiency, and OEE Target.

The view can be altered into Kanban view also. Clicking on the Create button, you can configure a new Work Center.

For internal identification, you can provide a name for the work center in the Work Center Name field. Add suitable Tags for the work center in the given field. You can mention the Alternative Workcenters that can be used as substitutes for this work center to continue the production process if the actual workcenter is busy. In the corresponding fields, add the Code, Working Hours, and Company of this work center.
You will get some additional tabs to mention the details of this work center such as General Information, Specific Capacities, Equipment, and IoT Triggers. Under the General Information tab, specify the Production Information. It includes the Time Efficiency, Capacity, and OEE Target.

The Time Efficiency field will define the expected duration of the work orders performed in this work center. The Capacity indicates the default number of products that can be manufactured at the same time in this work center. The overall effective efficiency target in percentage can be observed in the OEE Target field. Under the Operations session, you can activate the Required Log In option if you want to allow only selected employees to the work center. You will get an additional field to specify the names of the employees who are allowed to log in to the work center.

Here, we mentioned the allowed employee in the respective field. Now, the employee can enter into the work center and manage the work orders by entering a Pin. Under the HR Settings tab of the employee form, you can find the Pin of the respective employee.

Now, you can create a manufacturing order and mention the work center while configuring the operations for the manufacturing order.
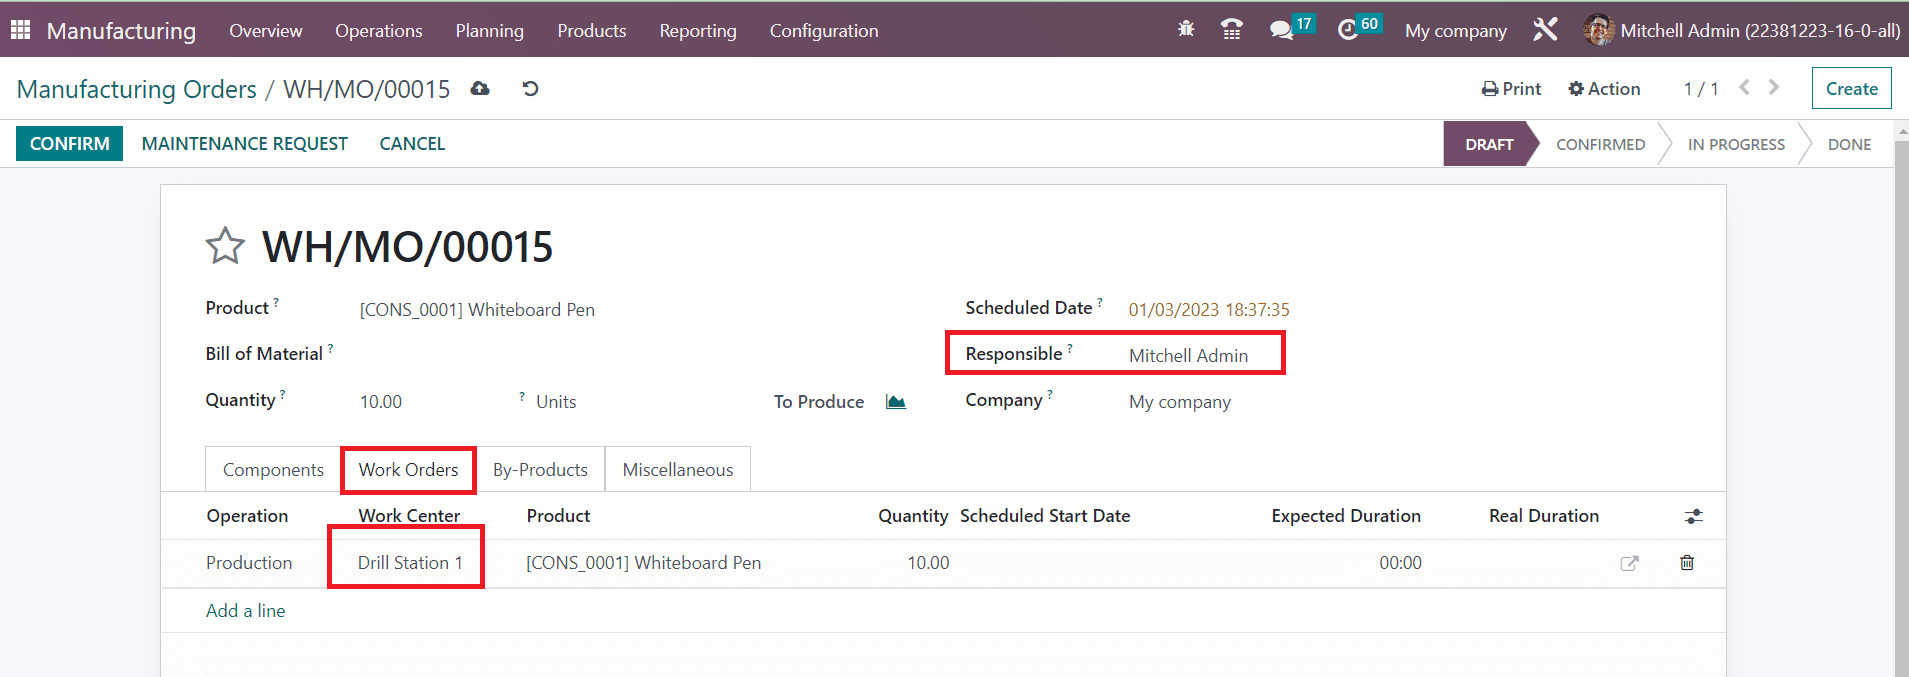
After confirming the order, you can check the work orders.

In order to get access to the tablet view of the work order, you can click on the icon marked in the screenshot.

Here, you will get the list of assigned employees. You can select your name and enter your pin.

After clicking on the Ok button, OTX will lead you to a new platform where you can manage the work order.

The cost of the work center and employee per hour can be specified in the Costing Information session. Mention a suitable Analytic Account in the given space to post entries related to components and operational costs. In the respective fields, specify the Setup Time and Cleanup Time of the work center. Any description related to the work center can be mentioned in the Description field.
The Specific Capacities tab can be used to specify the details regarding the capacity of the work center. You are allowed to use the Add a Line to mention the Products and Product UoM.

The number of pieces that can be produced in parallel for this product can be specified in the Capacity field.
The details of the equipment used in this work center for the production process can be added under the Equipment tab.

Use the Add a Line button and mention the Equipment Name, Technician, Equipment Category, MTBF (Mean Time Between Failure, computed based on done corrective maintenance), MTBF, and Next Failure. You will get a pop-up window to select from the already configured list of equipment.

The external devices that will be used or connected can be mentioned in the IoT Triggers tab. You can specify the Device id, Key, and Action using the Add a Line button.
After completing the configuration of the work center, you can start to use this work center to manage the work orders.
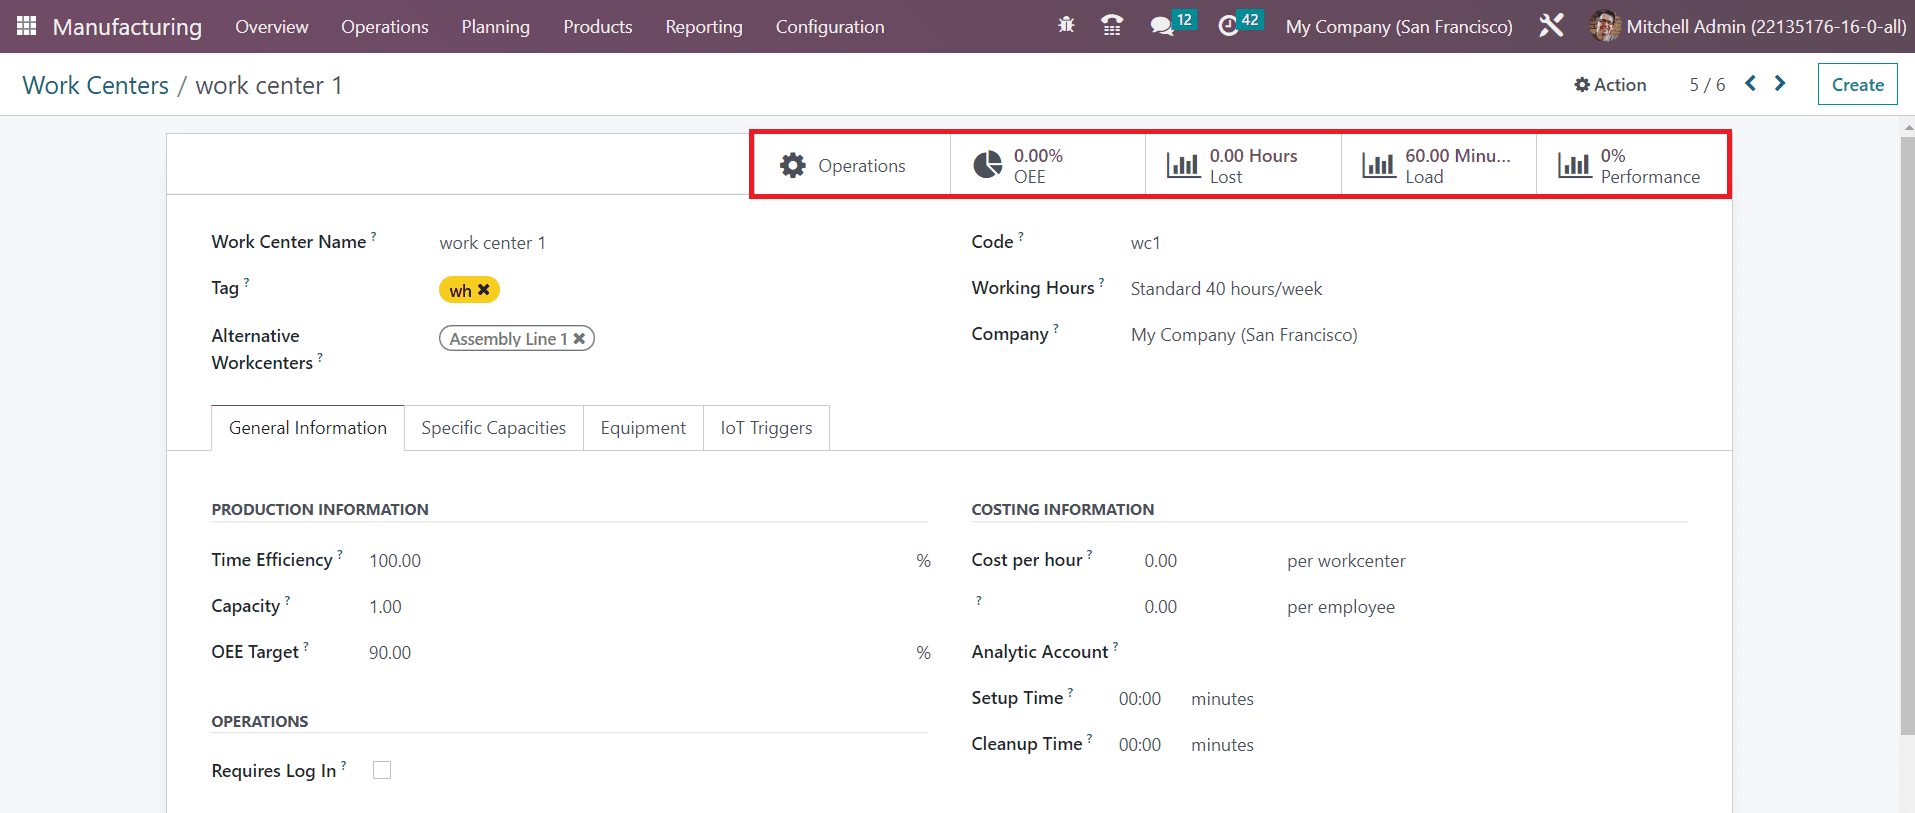
You will get smart buttons on the work center form view to monitor the Operations (operations planned in this work center), Overall Equipment Effectiveness, Productivity Losses, Work Center Loads, and performance of Work Orders. You can use the Overall Equipment Effectiveness button to get the performance analysis report of the work center based on employee cost, duration, user, and loss reasons. The report of Productivity Loss due to certain reasons, such as reduced speed and equipment failure, can be observed using the corresponding button. The ratio between real-time and expected time of work orders can be obtained from the Work Center Loads. The Performance button will provide the performance analysis report of the work orders assigned in this work center.
Manufacturing Orders
A manufacturing order comprises various operations to get a perfectly finished product. In the OTX Manufacturing module, you can specify all these operations as Work Orders while configuring a manufacturing order. For this, you can create manufacturing orders in OTX . Under the Operations menu in the Manufacturing module, you can find the Manufacturing Orders option. When you click on this option, OTX will open the list of manufacturing orders created in this module. You will get List, Kanban, Calendar, Pivot, and Graphical views for this platform.
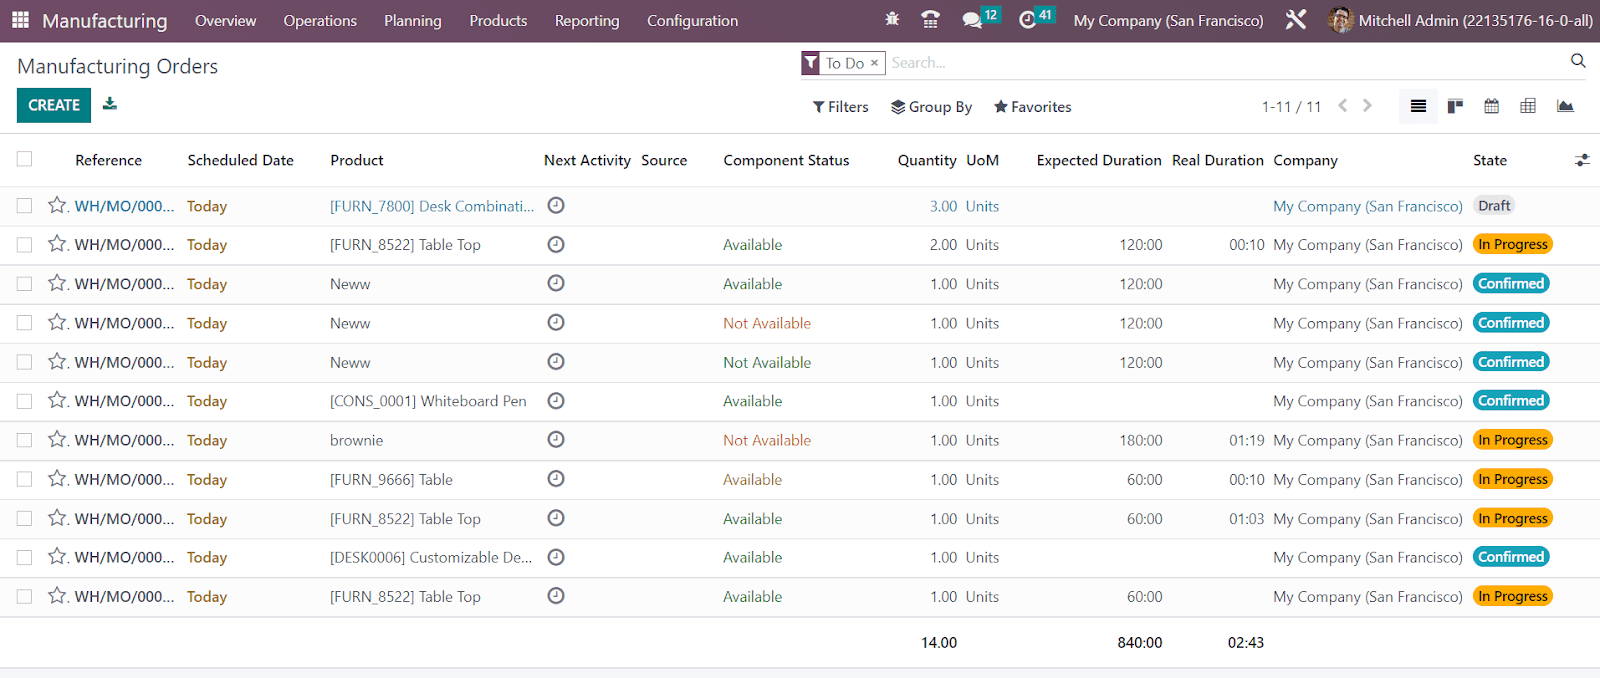
The preview of the list shows the Reference, Scheduled Date, Product, Next Activity Source, Component Status, Quantity, UoM, Expected Duration, Real Duration, Company, and State of the manufacturing orders. The state will be shown in different colors. You can use To Do, Starred, Unbuilt, Draft, Confirmed, Planned, In Progress, To Close, Done, Canceled, Waiting, Ready, Planning Issues, Scheduled Date, and Warning as default filters. The available data can be grouped based on Product, Status, Material Availability, Procurement Group, and Scheduled Date. The customization option is available in the case of both Filters and Group By options.
For creating a new manufacturing order, click on the Create button. A form view will appear as shown below.

The name of the product that you want to manufacture can be provided in the Product field. In the Bill of Material field, you are allowed to mention the list of components required to produce a finished product. In the Quantity field, provide the quantity of the product that you are going to produce. The date on which you are planning to start the production of the product can be defined in the Scheduled Date field. Assign an employee for monitoring the operations of this manufacturing order in the Responsible field and specify the Company.
Using the Add a Line button, you can specify the components required to produce this product one by one in the Components tab. The location of the components will be available in the From field. It will be a partner location if you are planning to subcontract the manufacturing operations. The To Consume field will show the quantity of products from an inventory point of view. Along with this, mention the UoM of the components.
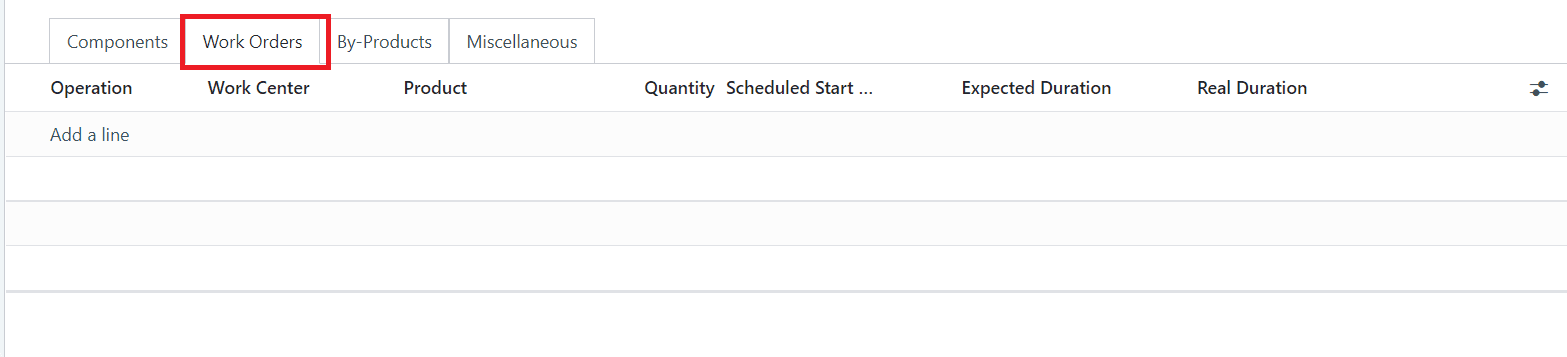
The operations of the manufacturing under each work center can be organized in the Work Orders tab. Using the Add a Line button, you can add the Operation, Work Center, Product, Quantity, Scheduled Starting Date, and Expected Duration. Once you confirm the manufacturing order and start the operation, the Real Duration will be auto-updated.
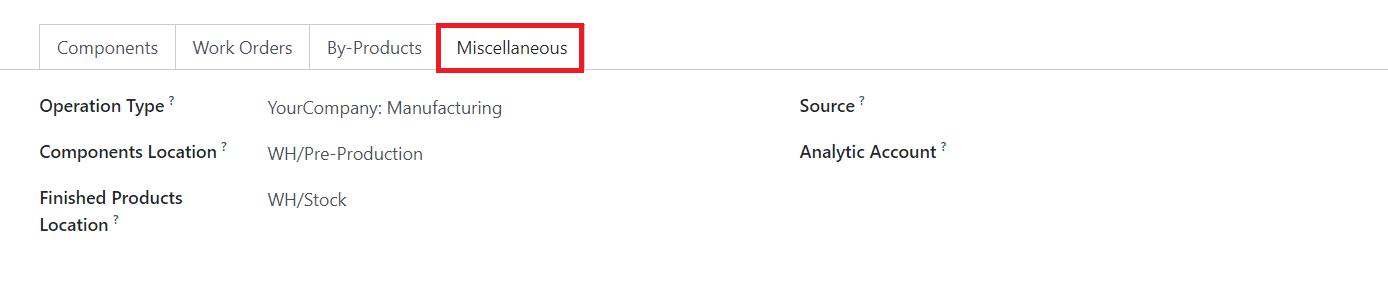
In the Miscellaneous tab, mention the Operation Type, Components Location (location of the components of the product), Finished Product Location (location where the system will store the finished product), Source (reference of the document that generated this manufacturing order), and Analytic Account. The cost and revenue entries related to this manufacturing order will be recorded in this analytic account.
Sometimes, you will get some additional products as a result of the actual production. These additional products are considered as byproducts. While creating the manufacturing order of the main product, you can mention the details of the By-products also. For this, go to the Settings menu and activate the By-products option as shown in the screenshot below.

Once you activate this feature, you will be able to get an additional tab in the form view of the manufacturing order.
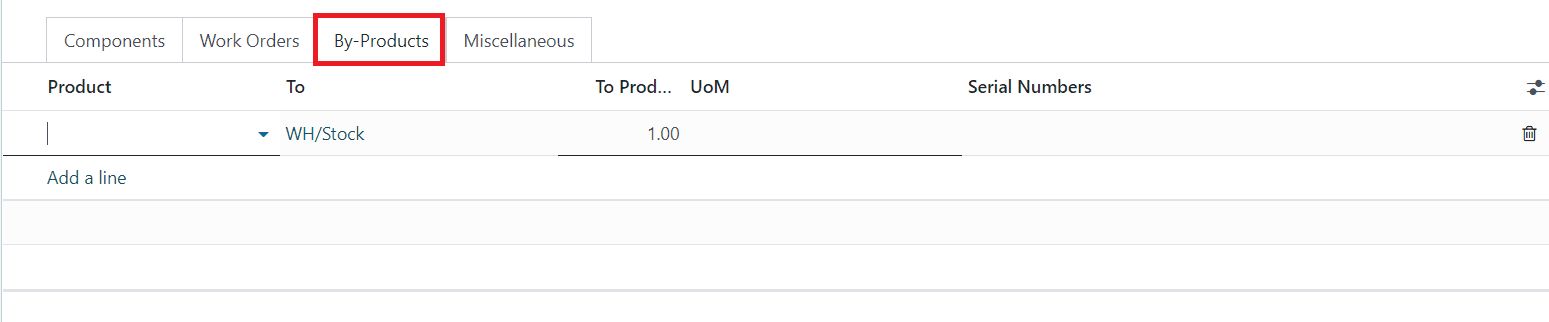
Here, you can specify the By-Products that come along with the main product one by one using the Add a Line button.
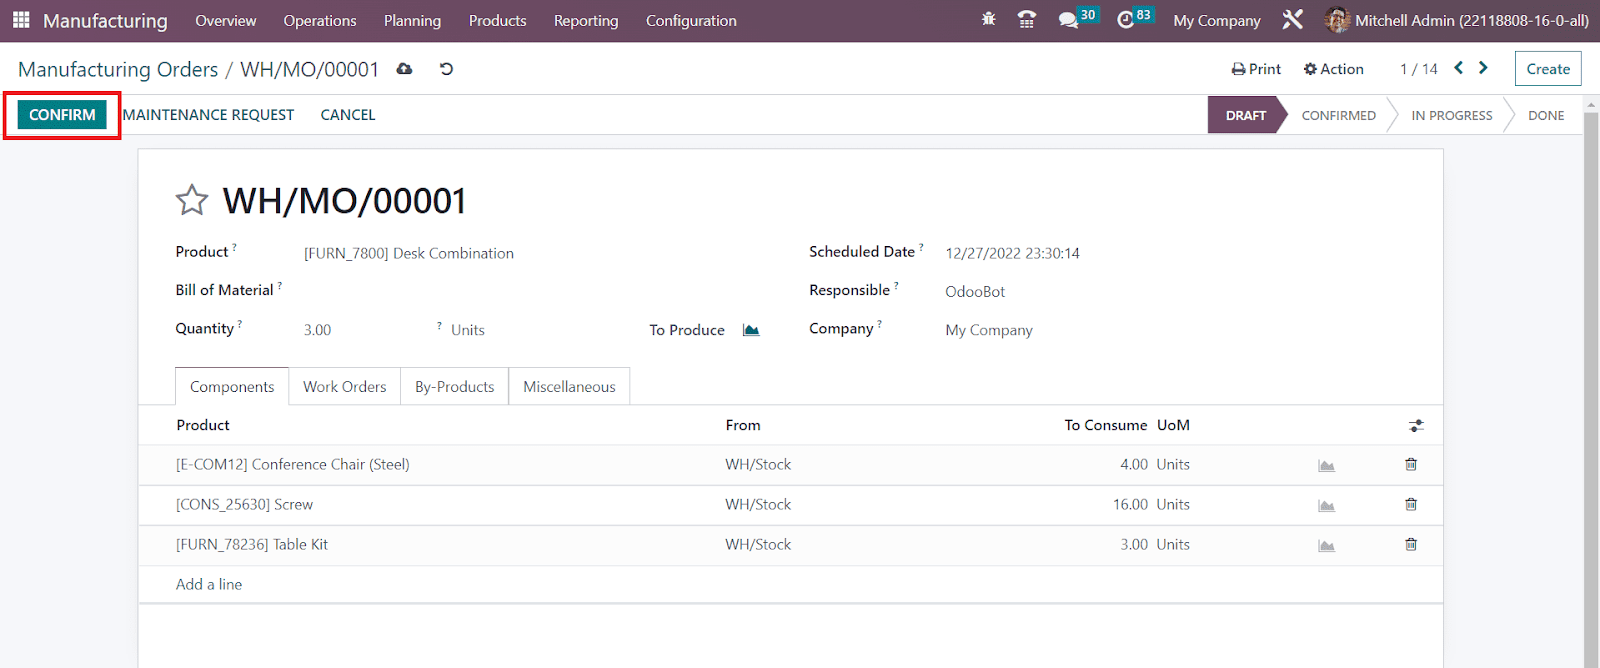
After mentioning all the necessary details for the manufacturing order, you can click the Confirm button.

When the production is completed, you can click the Mark as Done button to set the status of the manufacturing order as Done.
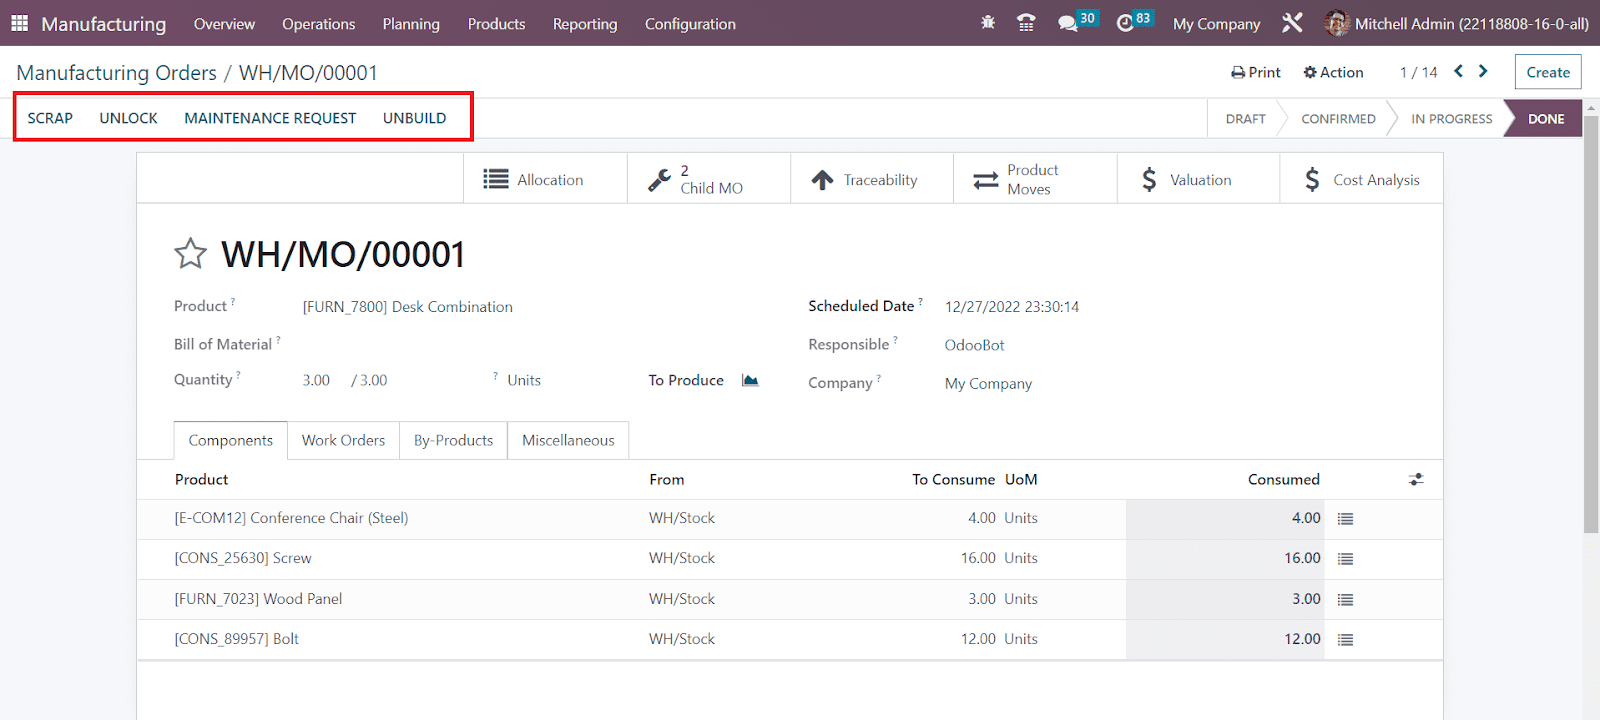
If you find any damages in the manufactured products, you can send the products to maintenance by generating a Maintenance Request. Clicking on this button will lead you to a new window where you can create a new maintenance request. We will discuss the management of maintenance requests in OTX while detailing the Maintenance module. If the product is completely damaged, you can move it to the scrap by clicking on the Scrap button. You will get a pop-up window to mention the Product, Quantity, Package, Owner, Source Location, and Scrap Location.
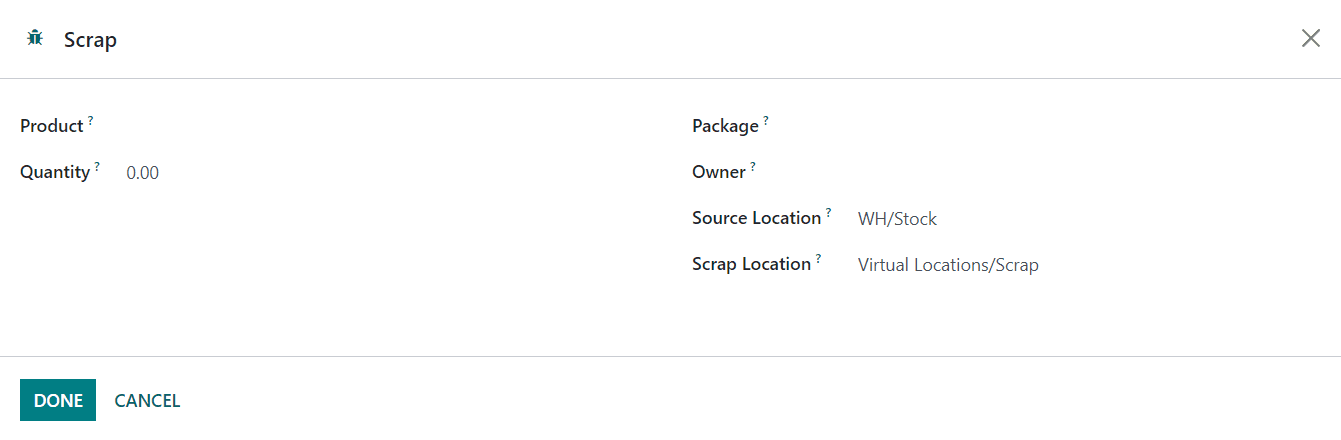
Click the Done button and the damaged product will be moved to the specified scrap location.
In the Settings menu of the module, you will get the Unlock Manufacturing Orders feature to activate.

Activating this feature allows you to make changes in the quantities to consume without the need for prior approval.
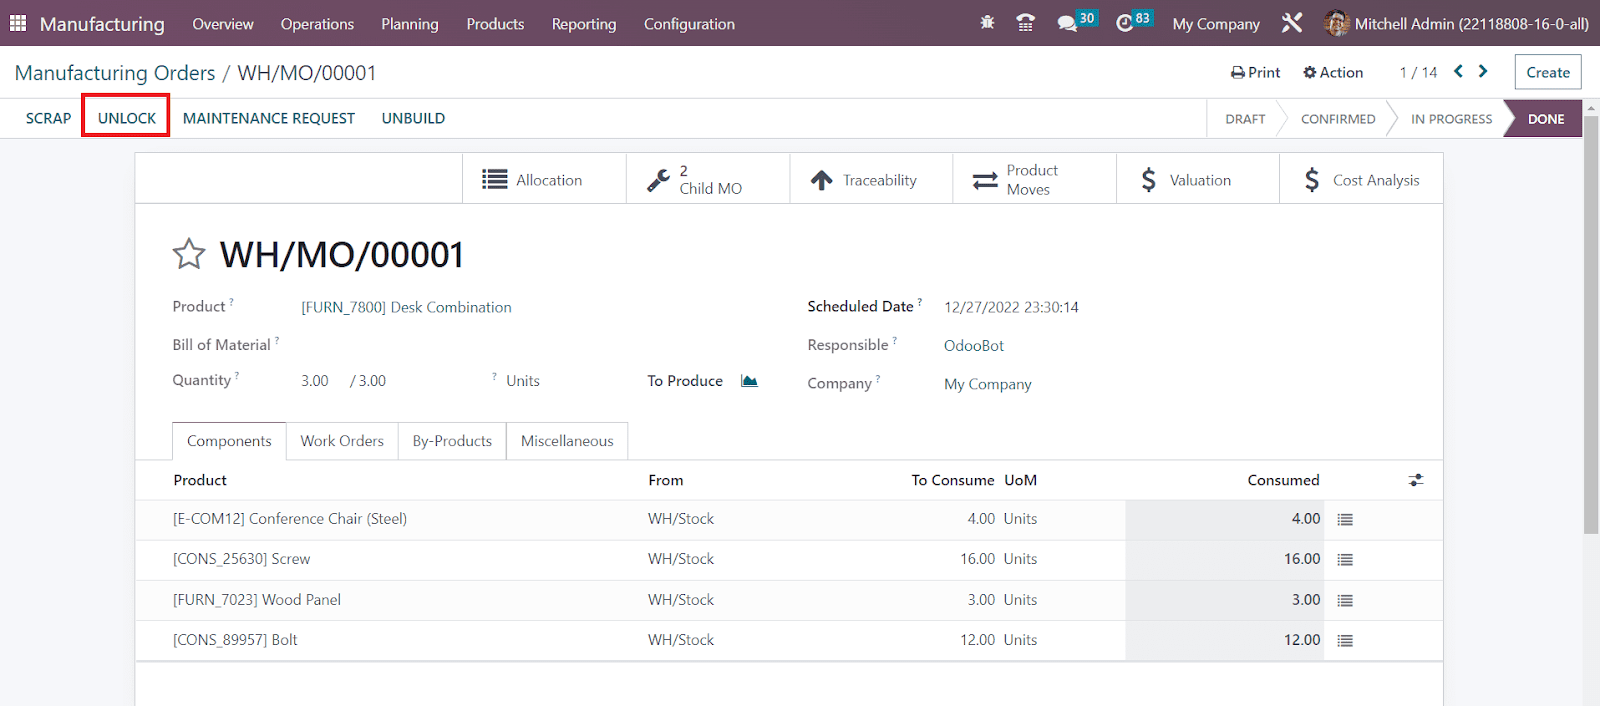
Clicking on the Unlock button will allow you to make necessary changes in the quantities. Using the Unbuild button, you can unbuild the manufactured product and record its data.
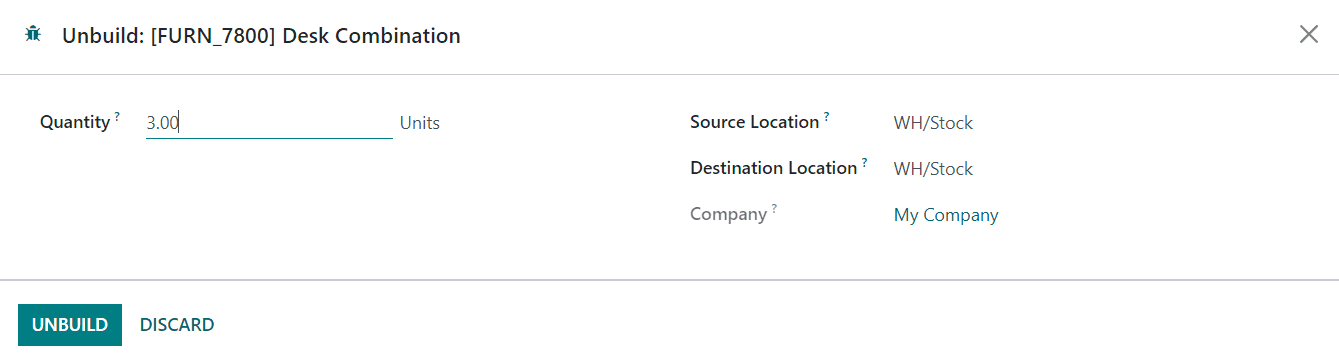
Here, you need to mention the Quantity of the product to unbuild. The location where the product you want to unbuild can be specified in the Source Location. The Destination Location will determine where you want to send the components resulting from the unbuild order. Click the Unbuild button.
You will get advanced smart buttons in the form view of the manufacturing order to observe various operations.
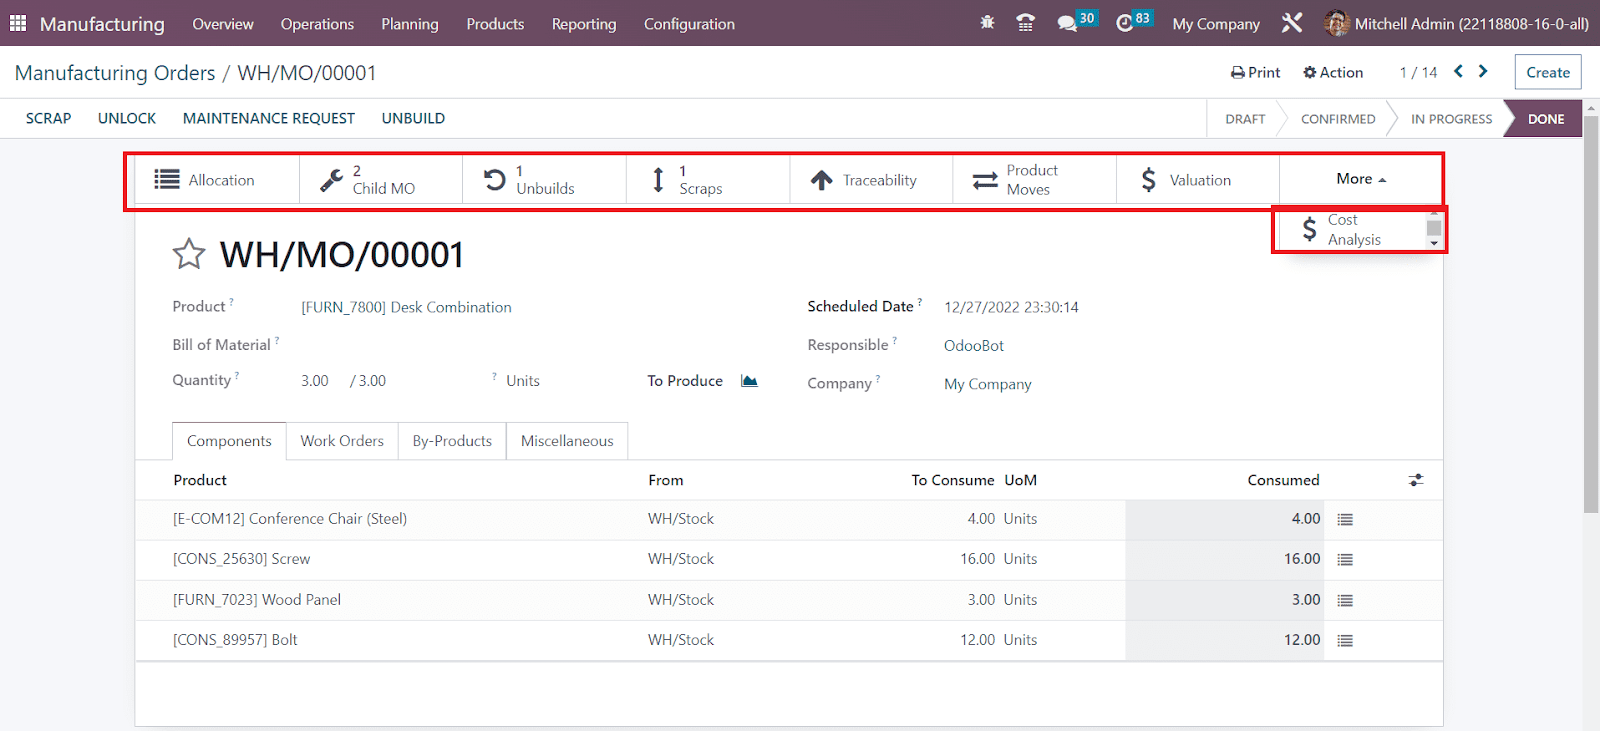
● Clicking on the Allocation button will provide the Reception Report of the product. Using the Assign button, you can assign the product to orders.

In order to get the Allocation Report for the manufactured quantities, you can activate the Allocation Report for Manufacturing Orders from the Settings menu of the module. This will allow you to view and allocate manufactured products.
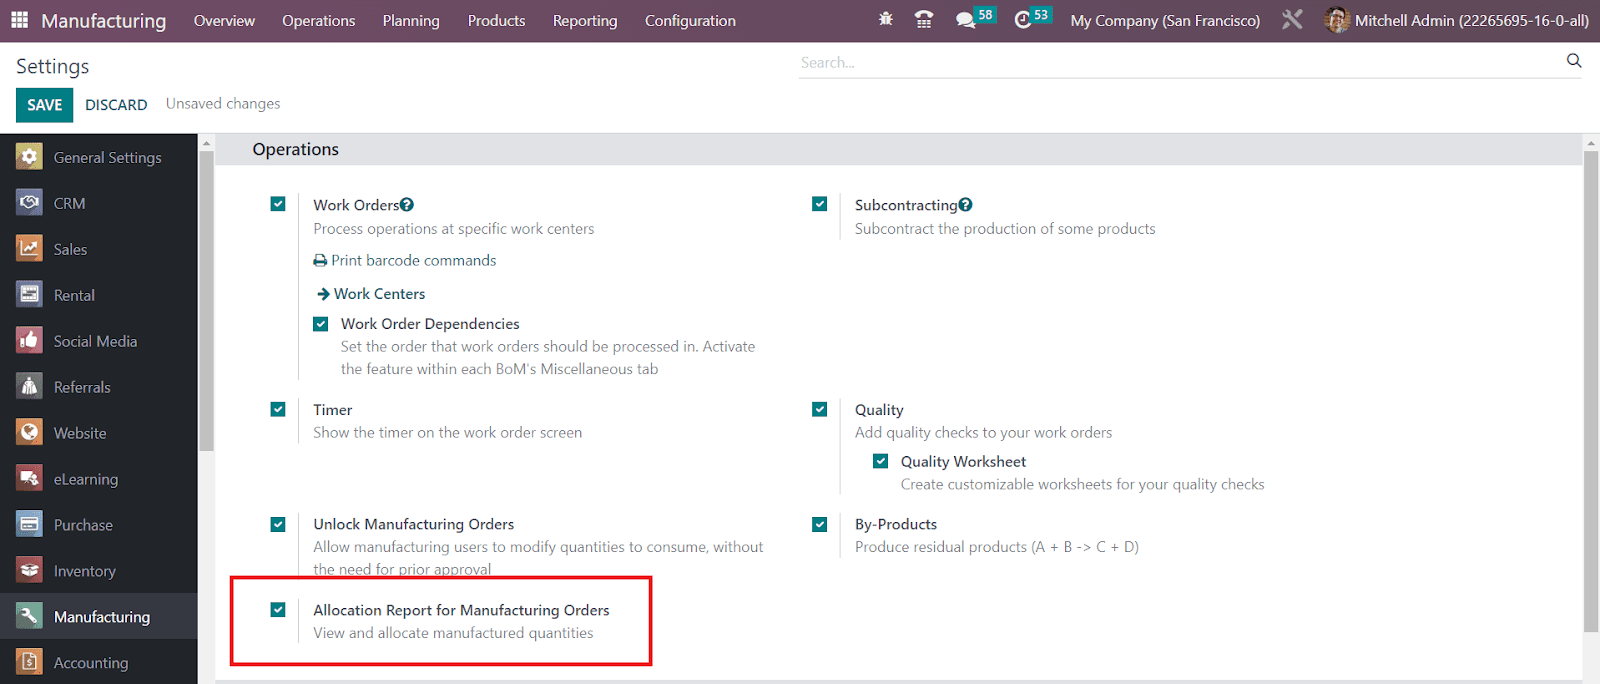
● The manufacturing orders related to the components of the main product can be observed using the Child MO button. It shows the Reference, Scheduled Date, Product, Next Activity, Source, Component Status, Quantity, UoM, Expected Duration, Real Duration, Company, and State.

● Click the Unbuilds button to observe the Unbuild Orders. The list of unbuild orders shows the Reference, Product, Bill of Material, Manufacturing Order, Lot/Serial Number, Quantity, Unit of Measure, Source Location, Company, and Status.
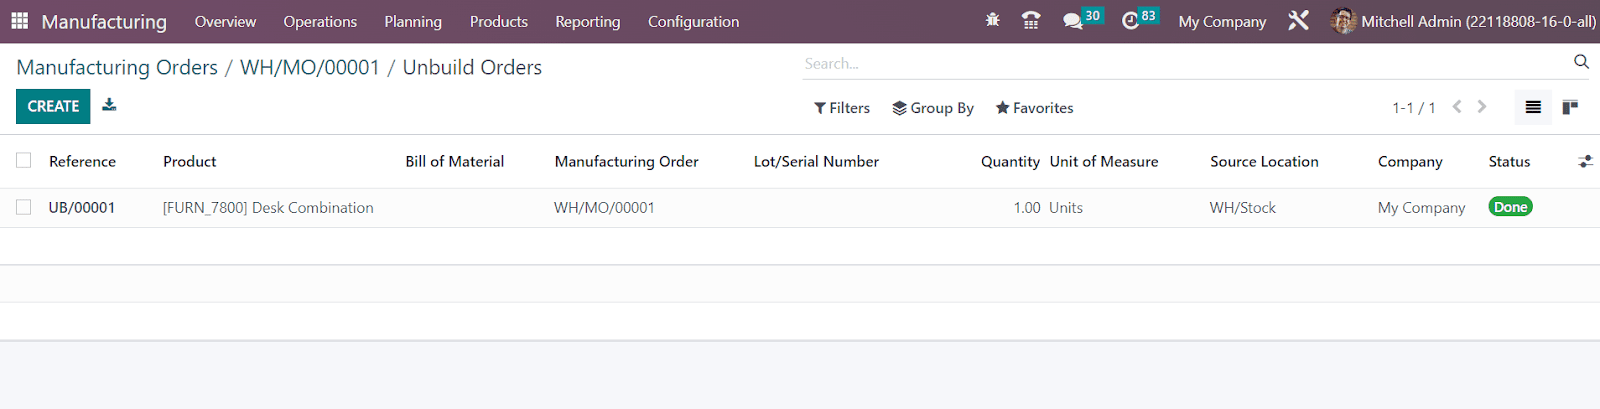
● You can observe scrap orders by clicking on the Scrap button. As shown in the image below, the window shows the Reference, Date, Product, Quantity, Unit of Measure, Source Location, Scrap Location, Company, and Status.
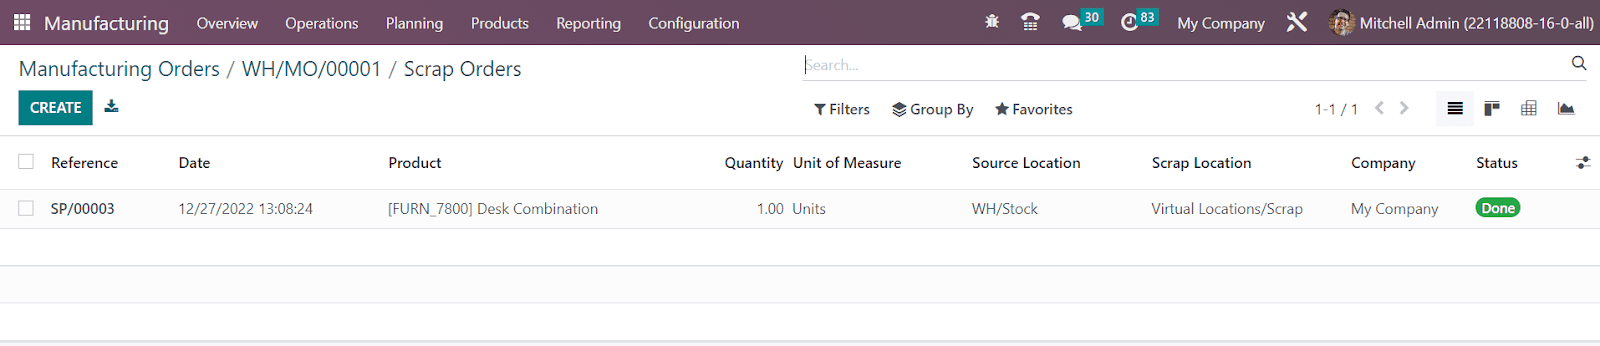
● You can generate a Traceability Report of the product using the Traceability button. The report shows the Reference, Product, Date, Lot/Serial, From, To, and Quantity details of the product.
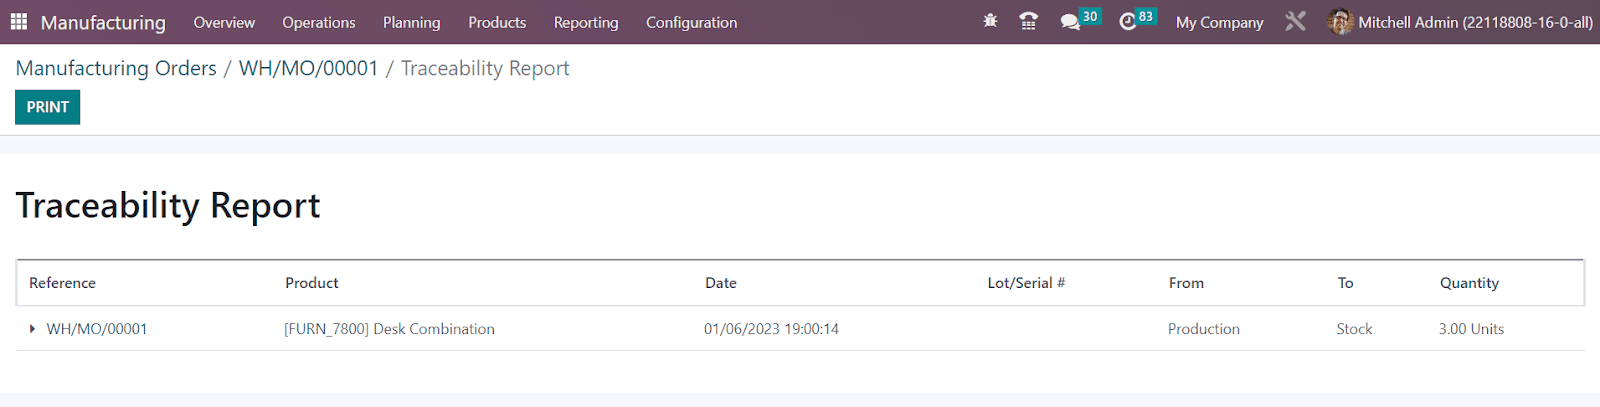
● The inventory moves of the product can be analyzed using the Product Moves button. The window shows the Date, Reference, Product, Lot/Serial Number, From, To, Quantity, Unit, and Status of the product and its components.
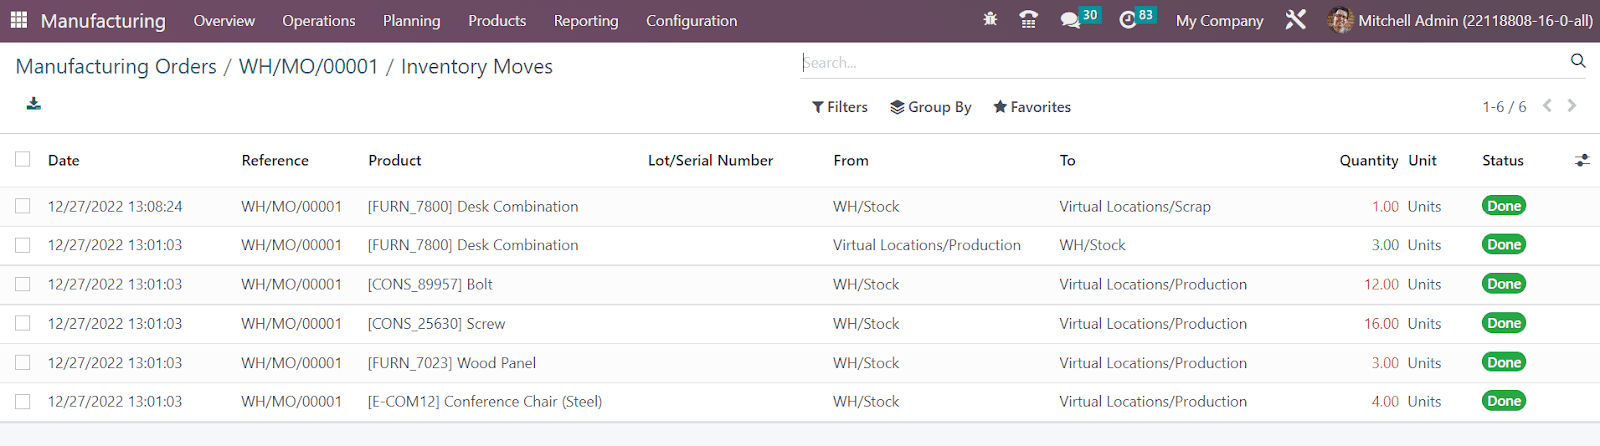
● You can perform the stock valuation of the product and its components by clicking on the Valuation button. The Stock Valuation window gives details regarding the Date, Reference, Product, company, Moved Quantity, Unit Value, UoM, and Total Value.

● Clicking on the Cost Analysis button will generate a Cost Analysis Report as shown below. You can observe the cost of the components and scraps separately in this report.

In the Settings menu of the Manufacturing module, you will get a feature named Security Lead Time.

You can activate this feature to schedule the manufacturing orders a specific day before. The number of days can be mentioned here and the manufacturing deadline will be scheduled earlier to avoid delays.
Work Orders
A manufacturing order comprises various operations to get a perfectly finished product. In the OTX Manufacturing module, you can specify all these operations as Work Orders while configuring a manufacturing order. These work orders will process operations at specific work centers. In order to get this option in the Manufacturing module, activate the Work Orders feature from the Settings menu.

This feature allows you to create and manage various manufacturing operations that should be performed in your work centers in order to manufacture a product.
Along with this, you can activate the Work Order Dependencies feature also, which will determine the order to perform the configured work orders. If the manufacturing of a product contains various elements, you can create a list of components required to get a finished product using the Bill of Material. Activating Work Order Dependencies will set an order to perform work orders to manufacture and combine the elements of this bill of material. You can activate this feature within the Miscellaneous tab of each Bill of Materials.
All operations related to a manufacturing process can be added under the Work Orders tab of the respective manufacturing order.

Using the Add a Line button, you can create and specify the details of a work order. The external link available in the operation line can be used to open the respective work order.

It shows the Planned Date, Manufacturing Order, and Expected Duration of the work. Under the Components tab, you can observe the components required in this work order.

The Time Tracking tab will show the tracked time of this work order with the details of the User, Duration, Start Date, End Date, and Productivity.

You can mention the instructions for the work order under the Work Instructions tab as shown in the image above.
Under the Operations menu of the Manufacturing module, you will get a separate platform to record all such work orders from various manufacturing orders. The list view shows the Operation, Work Center, Manufacturing Order, Product, Quantity, Scheduled Start, Expected Duration, Real Duration, and status. It is possible to alter the view between Kanban, List, Pivot, Calendar, Graph, and Gantt views.

You can use In Progress, Ready, Waiting, Pending, Draft, Finished, and Late as the default Filters. The available default Group By options are Work Center, Manufacturing Order, Status, and Scheduled Date.

Clicking on the Start button will start to record the Real Duration of the work order. During the break time, you can click the Pause button. If the work order is completed, you can click on the Done button. The Block button will allow you to block the work center based on specific reasons. You will get a pop-up to mention the reason.
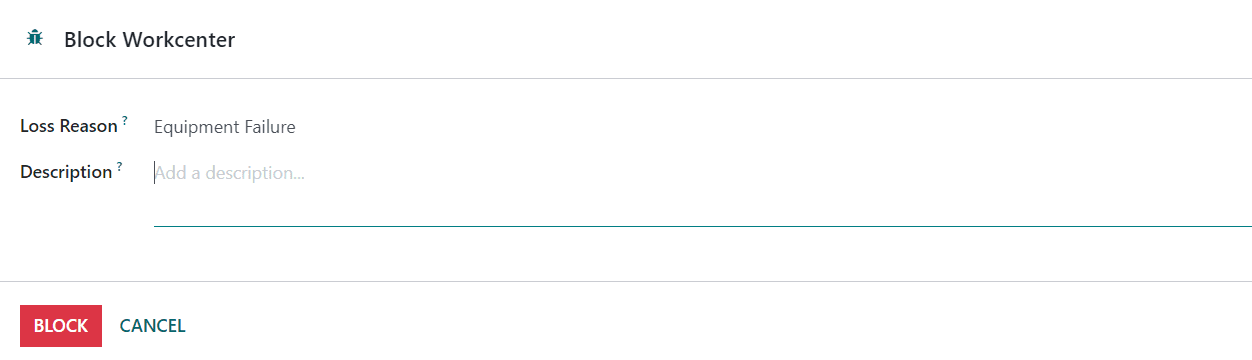
Provide a small description for the loss reason and click the Block button.

To get a tablet view of the work order, you can click on the small tablet icon highlighted in the image above.

It will open the tablet view of the respective work order.
To show the timer on the work order screen for recording the real duration of the tasks, you can activate the Timer feature from the Settings menu of the module.

You can activate the Quality Check feature from the Settings menu in order to add quality checks to your work orders.

Along with this feature, activate the Quality Worksheet option also, which allows you to create customizable worksheets for your quality checks. After activating this feature, you can perform quality checks on work orders.

From the Work Orders tab, you can use the tablet view to perform the quality check.

Here, you can create a quality sheet for the work order. Mention the serial number of the product and click the Fill in Worksheet button to specify details related to the quality of the product. This will open a pop-up window as shown below.

Here, you can mention the Product name, Wood Texture, Length, Date, and Responsible employee in the respective fields. After clicking the Save button, you will get the Summary of the quality check.

Click the Mark as Done button to complete the quality check operation. Near the Pause button, you can find a small icon which will open a new window with various operation tools as shown below.

This menu includes options to Block the work center, add product to Scrap, Add Component to the operation, Add By-Product, send Maintenance Request, and Quality Alert. You will also get some additional tools that will suggest a worksheet improvement. It includes the option to Update Instructions of the work order, Delete this Step, Add a Step to the operation, and Set a New Picture.
Unbuild Orders
Unbuilding a product means separating the components of the product. In a manufacturing company, there may be some situations where the product is required to be unbuilt. It can also happen in the case of purchased products. In such cases, it is necessary to keep a record of such unbuild orders. We already discussed how to create an unbuild order for a manufactured product from the Manufacturing Order form view. In order to manage the Unbuild Orders separately and create Unbuild Orders for purchased products, you will get a separate platform in the Manufacturing module as shown below.

The list of already created orders with the details of the Reference, Product, Bill of Material, Manufacturing Order, Lot/Serial Number, Quantity, Unit of Measure, Source Location, Company, and Status can be obtained from the screenshot. Use the Create button to create a new unbuild order.

A new form view will appear as shown in the image above where you can specify the name of the Product, Bill of Material, and Quantity . If the product is manufactured in your company, you can mention the Manufacturing Order in the respective field. The current location of the product can be defined in the Source Location field. The location where you want to store the components of the product after completing the unbuilding can be specified in the Destination Location. The Lot/Serial Number and Company can be added in the respective fields. Click the Unbuild button after completing the unbuild operation.

Once the unbuilding of the product is completed, you can observe the stock moves of the components using the Product Moves smart button.

The details of the stock moves include the Date, Reference, Product, Lot/Serial Number, From, To, Quantity, Unit, and Status.
Scrap Order
The unusable material or leftover after manufacturing a product can be considered as scrap. In some cases, the damaged products that can’t be repaired will be moved to scrap locations. We have already detailed scrap management in OTX in the Inventory module. If you want to know additional information related to the scrap location configuration and scrap management.
In the Manufacturing module, you can use the Scrap Order platform available under the Operations menu to manage the scrap orders of the manufactured products in your company.

The above-shown screenshot is the list view of the Scrap Orders in the Manufacturing module. The details include the Reference, Date, Product, Quantity, Unit of Measure, Source Location, Scrap Location, Company, and Status. If you want to create a new Scrap Order, you can click on the Create button.

Here, you can specify the name of the Product that you want to add to scrap, Quantity, Package, Package, Source Location, Scrap Location, Source Document, and Company in the respective fields. The Source Location indicates the current location of the product in your inventory. The location where the scraps are stored is called the Scrap Location. Once you click the Validate button, the date of the scrap order creation will automatically appear in the corresponding field as shown in the image below.

You can observe the Move History of the products which are recently added to the scrap location using the Product Moves button.

The preview of the history of the moves shows the Date, Reference, Product, Lot/Serial Number, From, To, Quantity, Unit, and Status. This is how we manage scrap orders in the Manufacturing module.
Planning
The Planning menu available in the OTX Manufacturing module allows you to plan activities according to the work orders and work centers. This feature assists you to schedule, plan, and operate various production activities. Let’s take a look at the options available for planning in the Planning menu.
Planning By Production
Planning work orders will help you to run operations smoothly. While creating a work order, you can specify the Planned Date of the production. OTX will automatically update these details and you can use the Planning By Production platform available under the Planning module to observe the scheduled work orders by production.

As shown in the image above, the window will display the dates on which various work orders are scheduled. Clicking on the highlighted date will give a preview of the respective work order with the details of its name, Start Date, Stop Date, and Workcenter. You can select the work order to get an expanded view.
Planning By Workcenter
The work orders planned according to the work center can be observed using the Planning By Workcenter option. If more than one work order is scheduled in the same work center on the same date, you can observe them from this window and reschedule the work order accordingly.
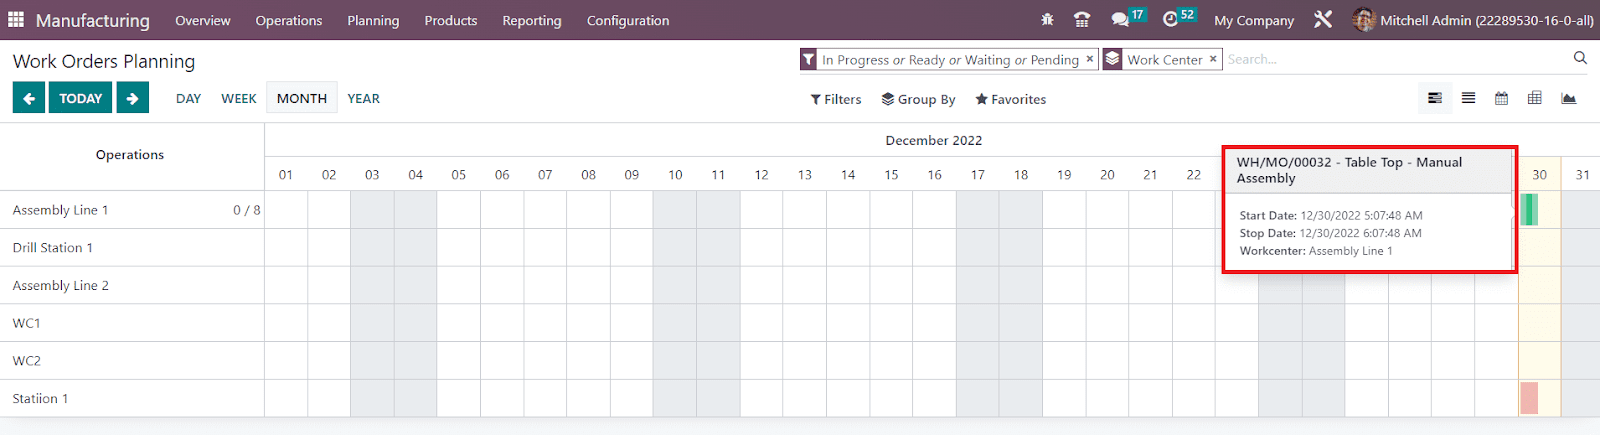
Apart from the Gantt view, you will get List, Calendar, Pivot, and Graph views in both Planning platforms.
Run Scheduler
We already mentioned the working pattern of the Run Scheduler in OTX while discussing the Inventory module. In the Manufacturing module also, you will get the Run Scheduler feature.

By clicking on the Run Scheduler option from the Planning menu, you will get a pop-up to start the scheduler. By activating this feature, the stock will be reserved for the operations which are waiting for the availability of the components and the reordering rules will be triggered in the case of insufficient stock at inventory.
Master Production Planning
Master Production Planning can be considered as a production forecasting mechanism based on the forecasted demand. The user will get access to this feature in the enterprise edition of the OTX 16 Manufacturing module. In order to plan the production, the manufacturers can use the Master Production Planning feature. It calculates the product demand according to forecasts. You can also adjust the value if the estimation is wrong. This feature is beneficial for planning production in accordance with the market demand. In order to meet the demand, this feature can assist the user in estimating the required quantities of the product that needs to be produced.
First, you need to activate the Master Production Schedule feature from the Planning tab of the Settings menu as shown in the image below.
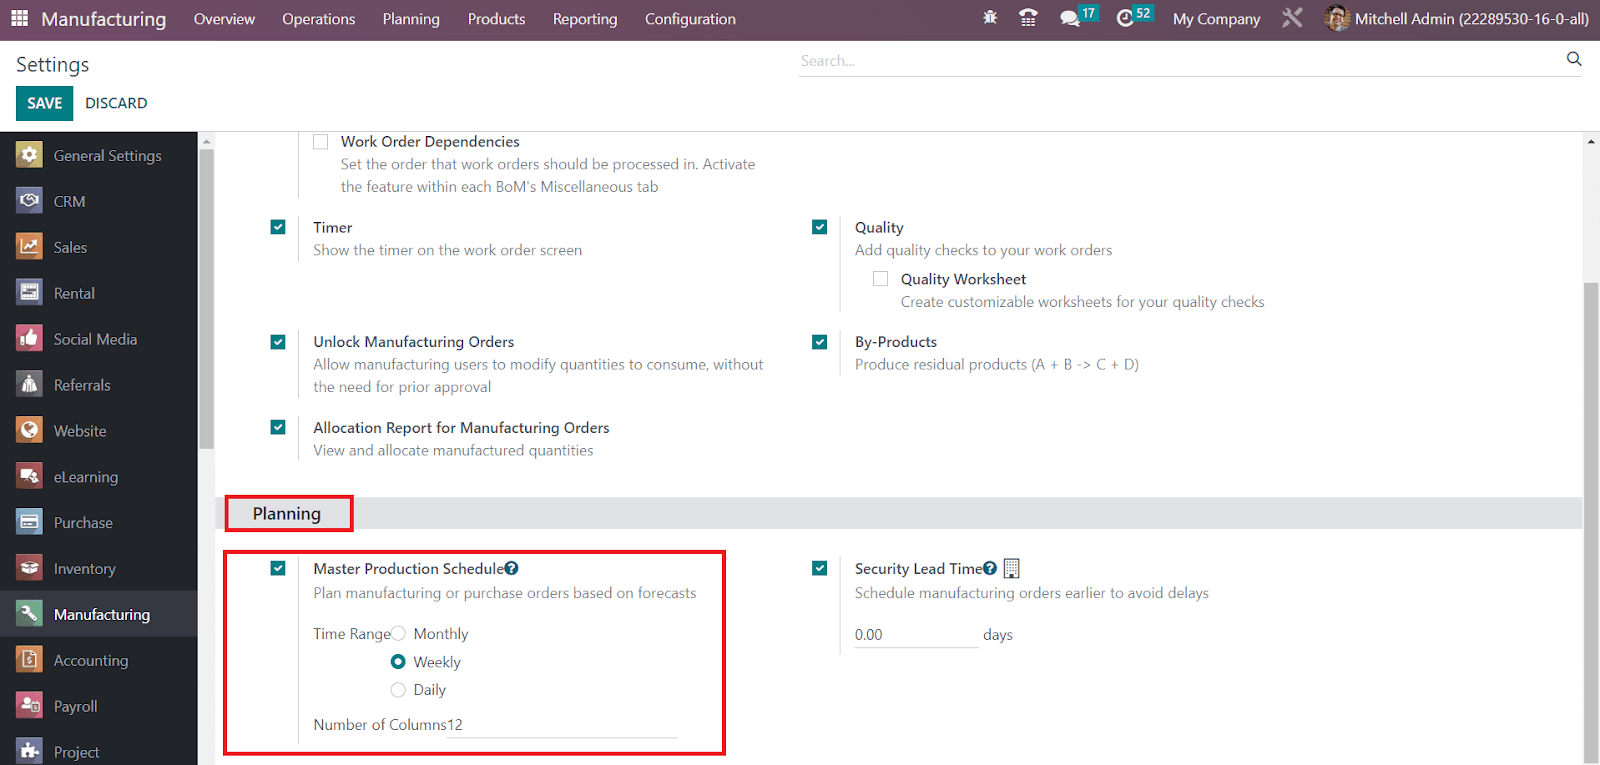
After enabling the feature, set the Time Range also. It can be Monthly, Weekly, or Daily. You can also mention the Number of Columns for the MPS reports in the given space. Now, you can go to the Planning menu and select the Master Production Schedule option.

Based on the Time Range you set, the screen will display columns accordingly. You can expand the details by adding additional rows to the window by activating corresponding options from the Rows menu. It includes Starting Inventory, Demand Forecast, Actual Demand, Indirect Demand Forecast, To Replenish, Actual Replenishment, Forecasted Stock, and Available to Promise.
When you add a product to the MPS, the route of operation of the respective product should be set as ‘Manufacturing’ then only OTX can generate a manufacturing order on replenishment. After making adjustments in the routes of operation, you can add the product into MPS by clicking on the Add a Product button. This will open a pop-up window as shown below.

Specify the Product, Bill of Materials, and Production Warehouse in the respective fields. In the Safety Stock Target field, mention the minimum free stock you want to maintain for the mentioned product at all times. You can mention the Minimum to Replenish and OTX will always at least replenish the mentioned quantity unless the demand is 0. The quantity mentioned in the Maximum to Replenish indicates the maximum replenishment you would like to launch for each product in the MPS. if the demand is higher than this quantity, the remaining quantity will be automatically transferred to the next period. Now, click the Save button.
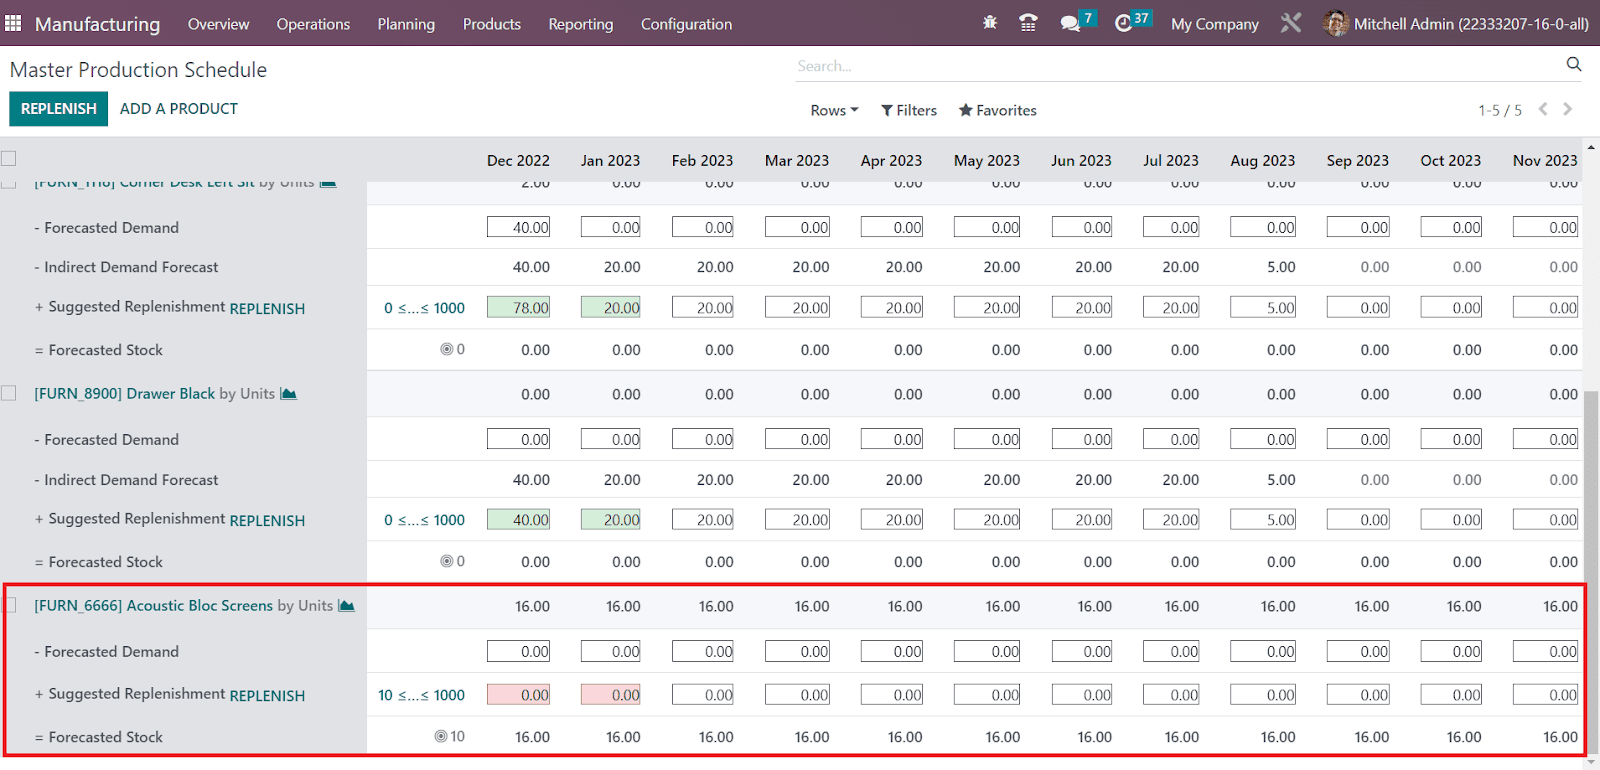
The starting inventory or the on-hand quantity of the product is 16. Stock details for the next 12 months can be found in this window. The starting stock of this month is 16. The estimated demand for this product for the current month can be specified manually in the Forecasted Demand field. The amount to be replenished via a purchase order or manufacturing order will be shown in the Suggested Replenishment. The Forecasted Stock indicated the estimated quantity available in inventory till the end of the period. When you click on the Replenish button, OTX will generate a manufacturing order or purchase order according to the route of operation of the product. You can check the Manufacturing Orders platform to view the orders generated to replenish the product. The Source of the orders can be seen as MPS.
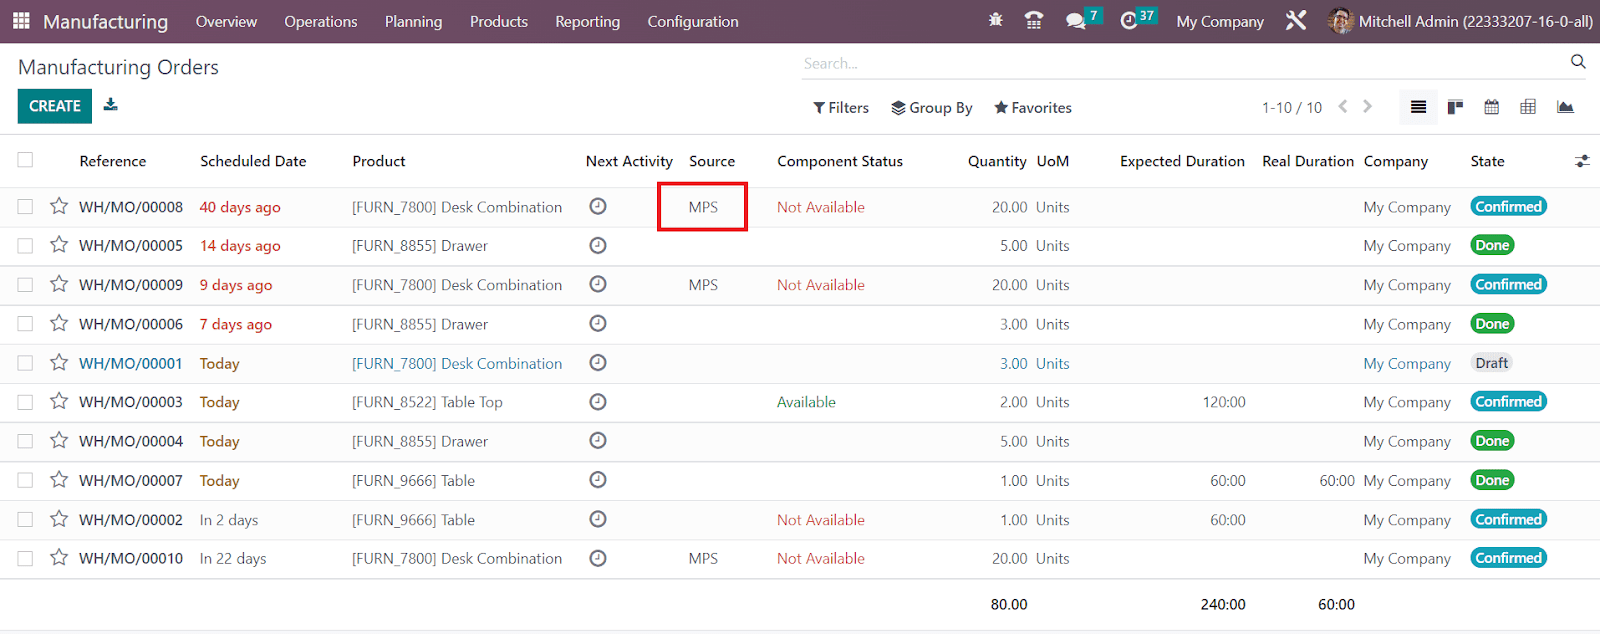
Bill of Material
Before creating a manufacturing order, it is necessary to configure the components of the product in the OTX Manufacturing module. Using the Bill of Material feature in the OTX Manufacturing module, you can create the list of raw materials or components required for the production of the product. This Bill of Material can be used while creating a manufacturing order and the components mentioned in the respective BoM will automatically appear in the Components tab of the manufacturing order. Let’s check how this works in the Manufacturing module.
In order to create a Bill of Material for a product, you can select the respective option from the Products menu of the Manufacturing module. The window will show the list of already configured BoM as shown in the image below.
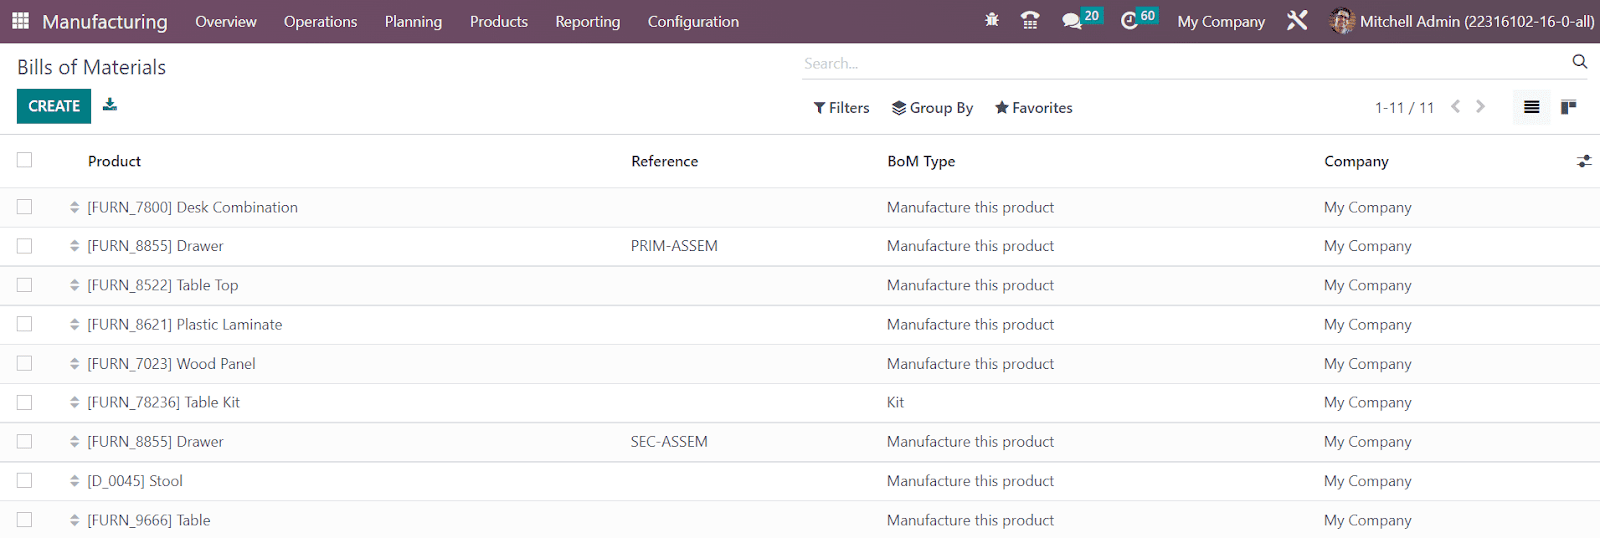
From the list view, you will get the details of the Product, Reference, BoM Type, and Company. You can click on the Create button to create a new BoM.

Mention the Product, Product Variant, Reference, and Quantity that you want to manufacture in the corresponding fields.
In OTX , you can create three types of bills of material. In the BoM Type field, you can select the type as Manufacture this Product, Kit, or Subcontracting. If you are creating this BoM for manufacturing this product, you can select the Manufacture this Product option. Selecting the Kit option will allow you to sell the components of this BoM as a kit. Selecting the Subcontracting type indicates that you are giving this BoM to a subcontractor and the assigned subcontractor will manufacture the product for you using this BoM.
We will take a look at each of these BoM Types separately. First, let’s discuss how to create a BoM for manufacturing a product. Under the Components tab, you can specify the raw materials required to produce the mentioned product one by one using the Add a Line button.
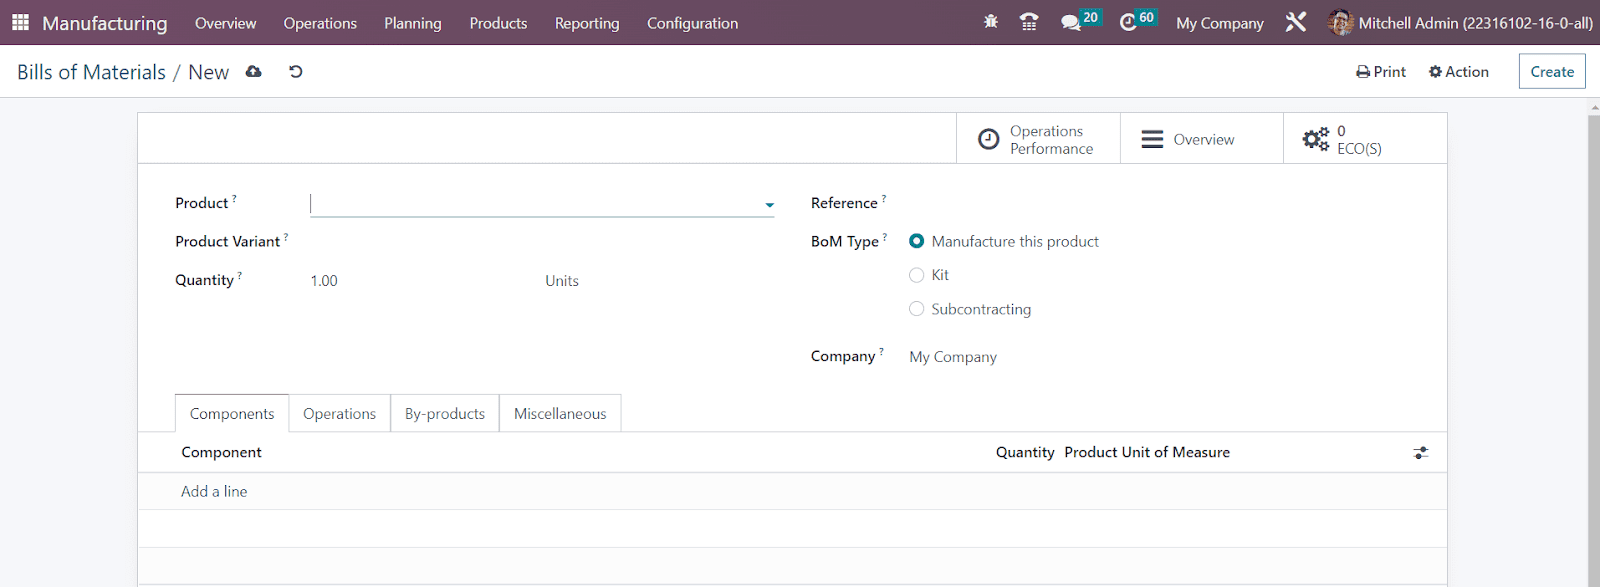
In the Quantity field, don’t forget to mention the quantity of the components required. Now, under the Operations tab, you can add the operations assigned for the work centers to complete the production of the product.
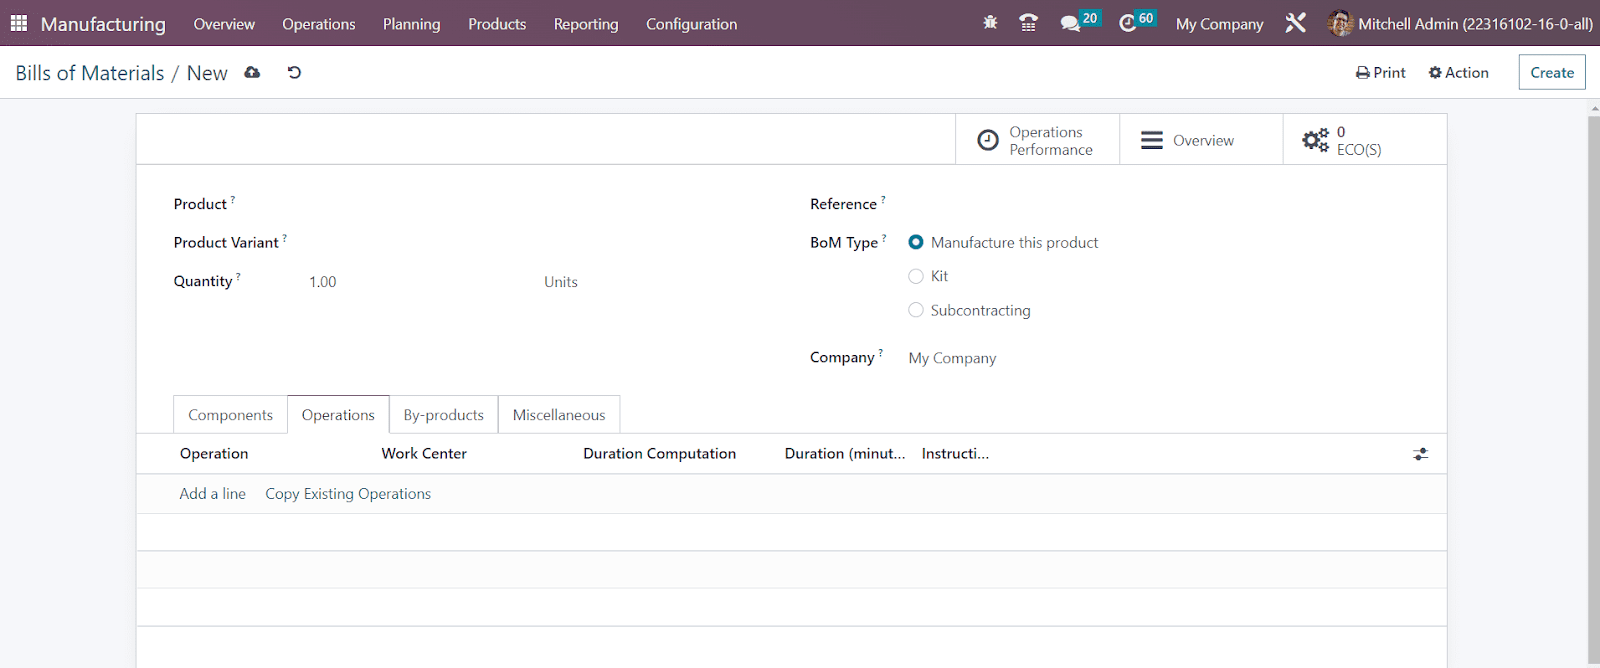
You can copy the existing operations assigned for the product earlier using the corresponding button available in the tab. Or else, click the Add a Line button.

A pop-up window will appear to mention the details of the operation. Mention the Operation and Work Center to perform this operation in the given fields. If the operation is applicable for the product variants also, you can specify them in the Apply on Variants field.
When you activate the Work Order Dependencies from the Settings menu of the module, OTX will allow you to decide the order to perform the work orders. Under the Miscellaneous tab of the BoM, you will get the Operation Dependencies button to activate, which helps you to decide the order of the operations. Once you activate this feature, you will get the Blocked By field in the Operation window, where you can block other operations to process this operation before the others. From Work Orders Planning, you can see an arrow on work orders to show the order to perform in the Gantt view.
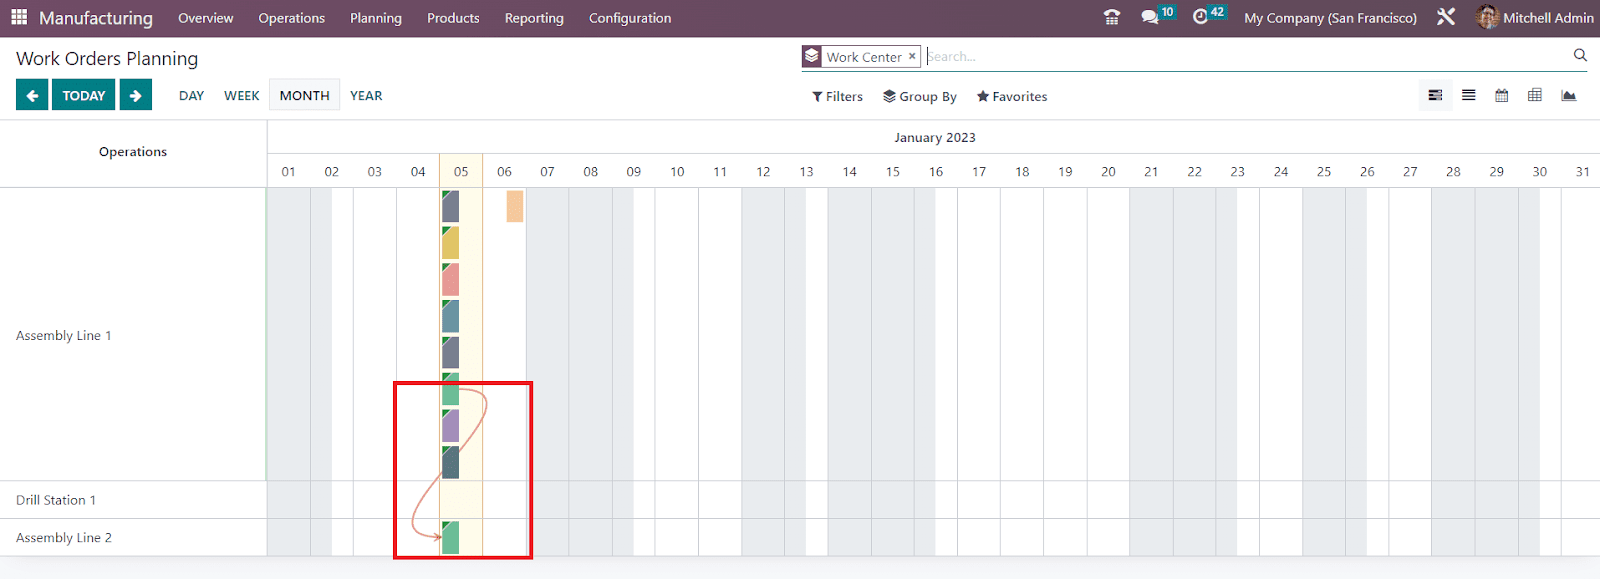
Set the Duration Computation as per your requirement. The duration of the operation can be computed based on tracked time, or you can set the duration manually. The default duration will be available here. The number of employees required to complete this operation can be specified in the Employee Capacity field. You can add the Work Sheet of the operation as PDF, Google Slide, or Text. Along with this, add a Description related to the procedures of the operation in the given space.

The By-products that come along with the main product can be added under the By-products tab.
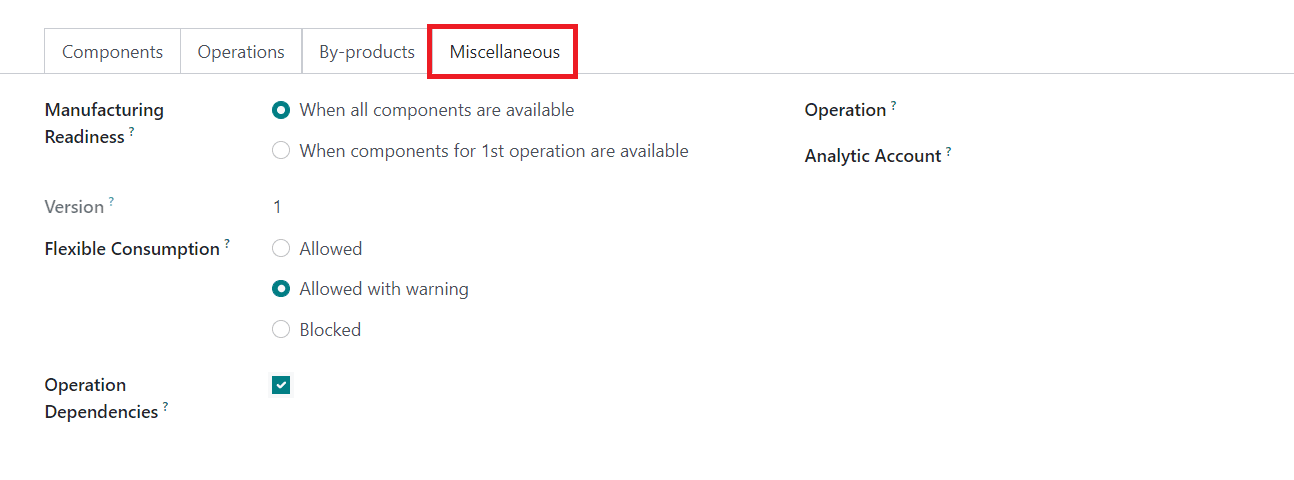
You can define when to start the manufacturing of the product in the Manufacturing Readiness field available in the Miscellaneous tab. If the manufacturing starts only after ensuring the availability of all components, you can set it as When all components are available. If the components are enough to process the first operation, you can start the manufacturing by selecting the When components for 1st operation are available option. The Flexible Consumption will define if you are allowed to consume more or less quantity of components than defined in the BoM. it can be set as Allowed, Allowed with Warning, or Blocked. Activating the Operation Dependencies will allow you to define the order to perform the operations of the BoM. Set an Operation for the BoM, and when procurement has a ‘manufacture’ route with an operation type set, it will try to create a manufacturing order for that product using a BoM of the same operation type. Finally, you can set up an Analytic Account to record the cost and revenue of the BoM.

Once you complete the configuration of the BoM, you can use them while creating a manufacturing order for the respective product.
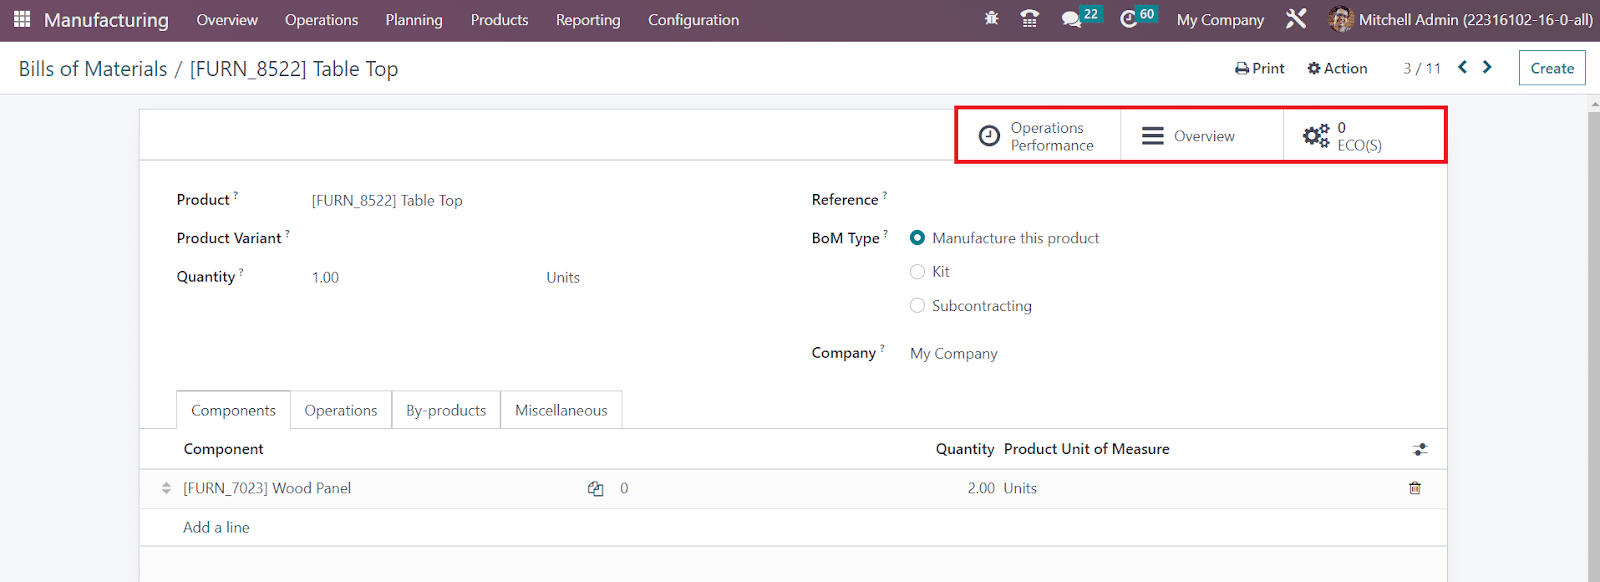
The Operations Performance smart will provide statistics about the work order duration related to this routing. The Overview smart button can be used to get an overview of the BoM as shown below.
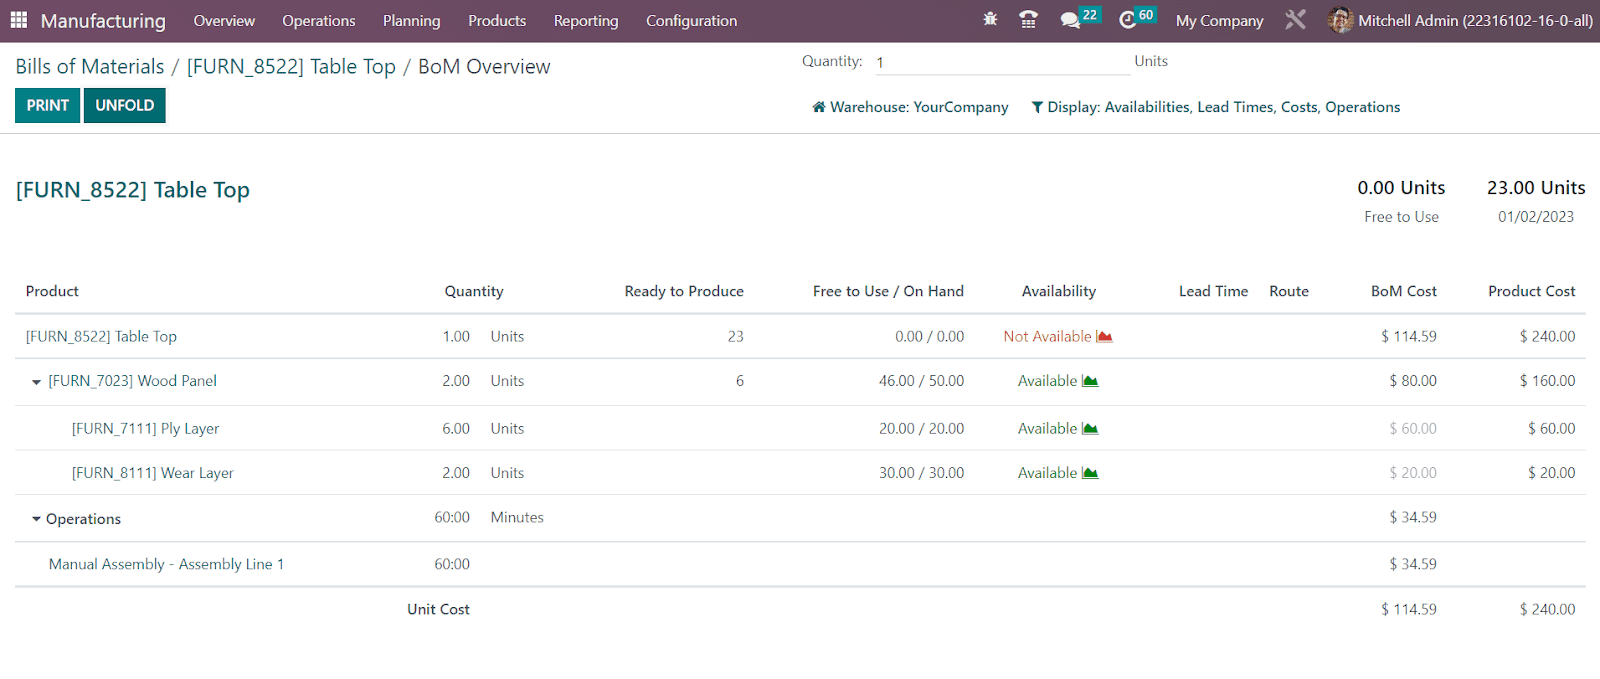
It includes the details of the Product, Operations, Quantity, Ready to Produce, Free to Use/On Hand, Availability, Lead Time, Route, BoM Cost, and Product Cost.
The ECO(S) smart button will show the data related to engineering change orders. You can manage your products and bills of materials changes with the assistance of ECOs. This platform will gather related documentation and receive the necessary approvals before applying your changes.
Kit
For a product that contains multiple components, you can assemble them as a kit and sell them together. While creating a bill of materials, you will be asked to select the BoM type. Here, you can find the Kit option, which allows you to put the components together in a kit and sell them as a single product. Any inventory adjustment on the kit will also reflect on the individual components. In the Products menu, you can configure a product in the name of the kit and set the Route of Operation as Manufacture as shown in the image below.

Now, you can go to the Bill of Materials configuration platform, where you can create a Bill of Materials for the main product. Select the BoM Type as Kit and specify the Components of the product one by one under the Components tab.

After configuring the Kit, you can sell this product by creating a sales order. In the Order Line of the sales order, you can select the main product.
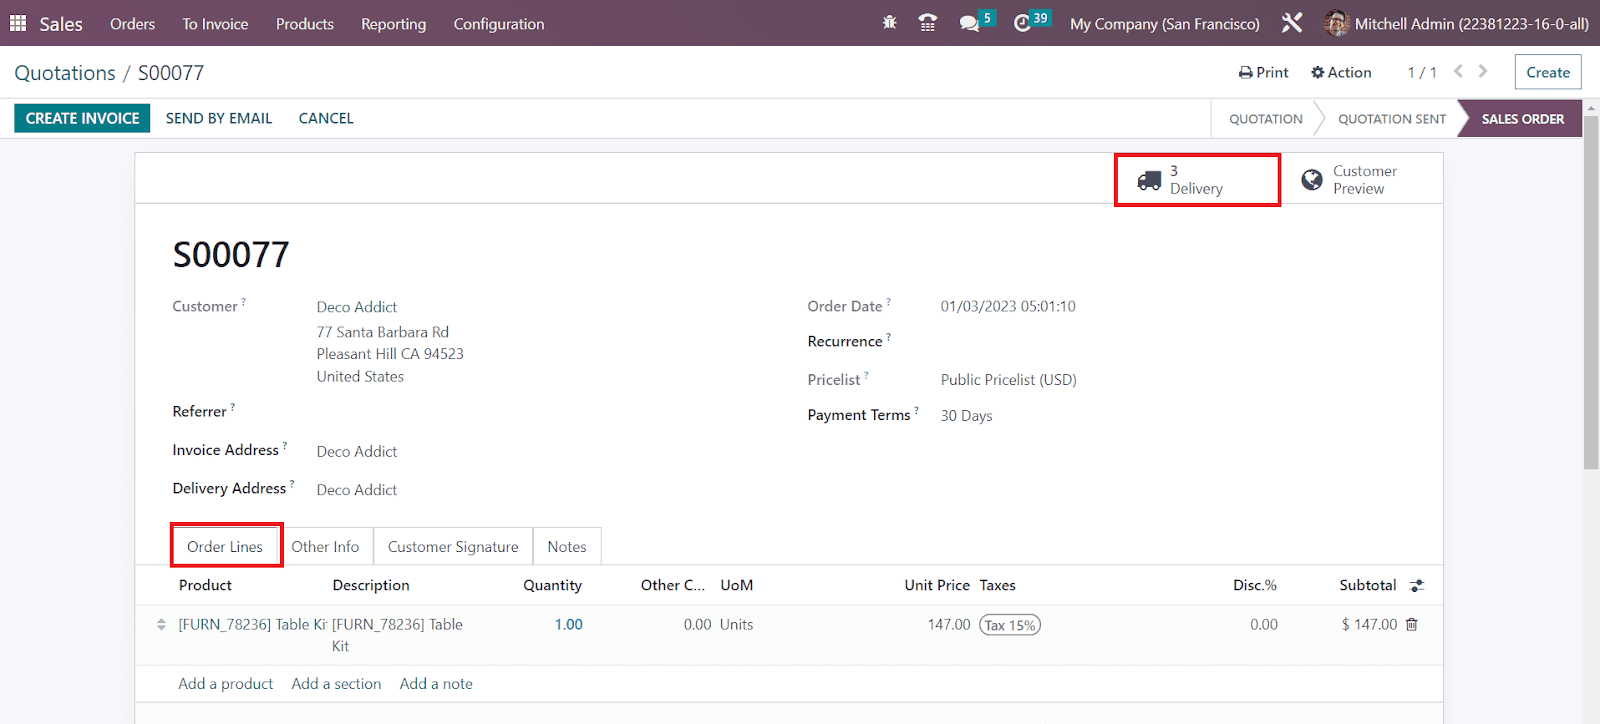
Once you confirm the sales order, check the Delivery Order where you can see the list of individual components of the kit under the Operations tab.

The components which are not available during the confirmation of the sales order can be replenished from the Inventory module.
Subcontracting
It is not necessary to manufacture all the components of the products within the company. Through subcontracting, you can assign a subcontractor to manufacture the components and focus more on assembling the purchased components. The inventory of the raw materials will be managed at the subcontractor’s place. In order to get this feature in your Manufacturing module, go to the Settings menu and activate the Subcontracting feature.
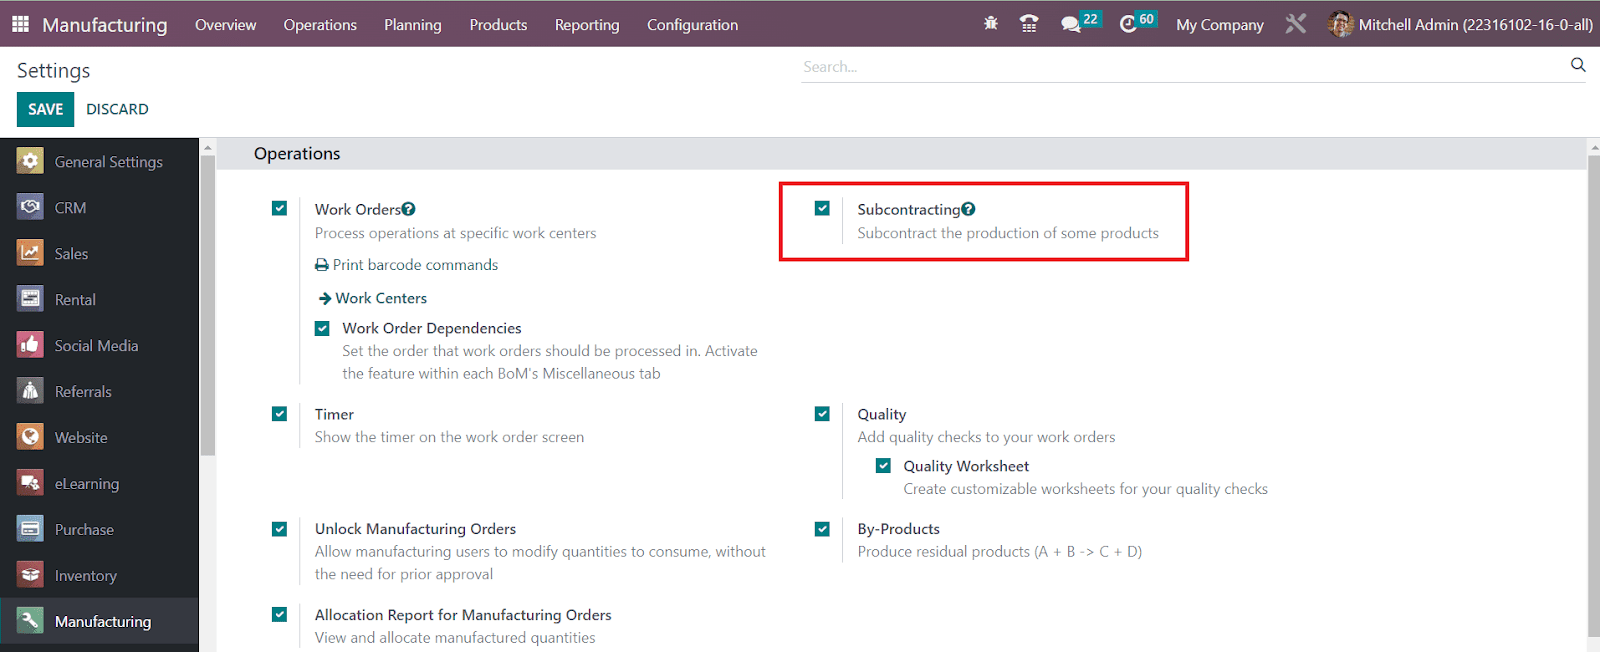
After enabling this feature, you can create a new Bill of Material for the product by selecting the BoM Type as Subcontracting.
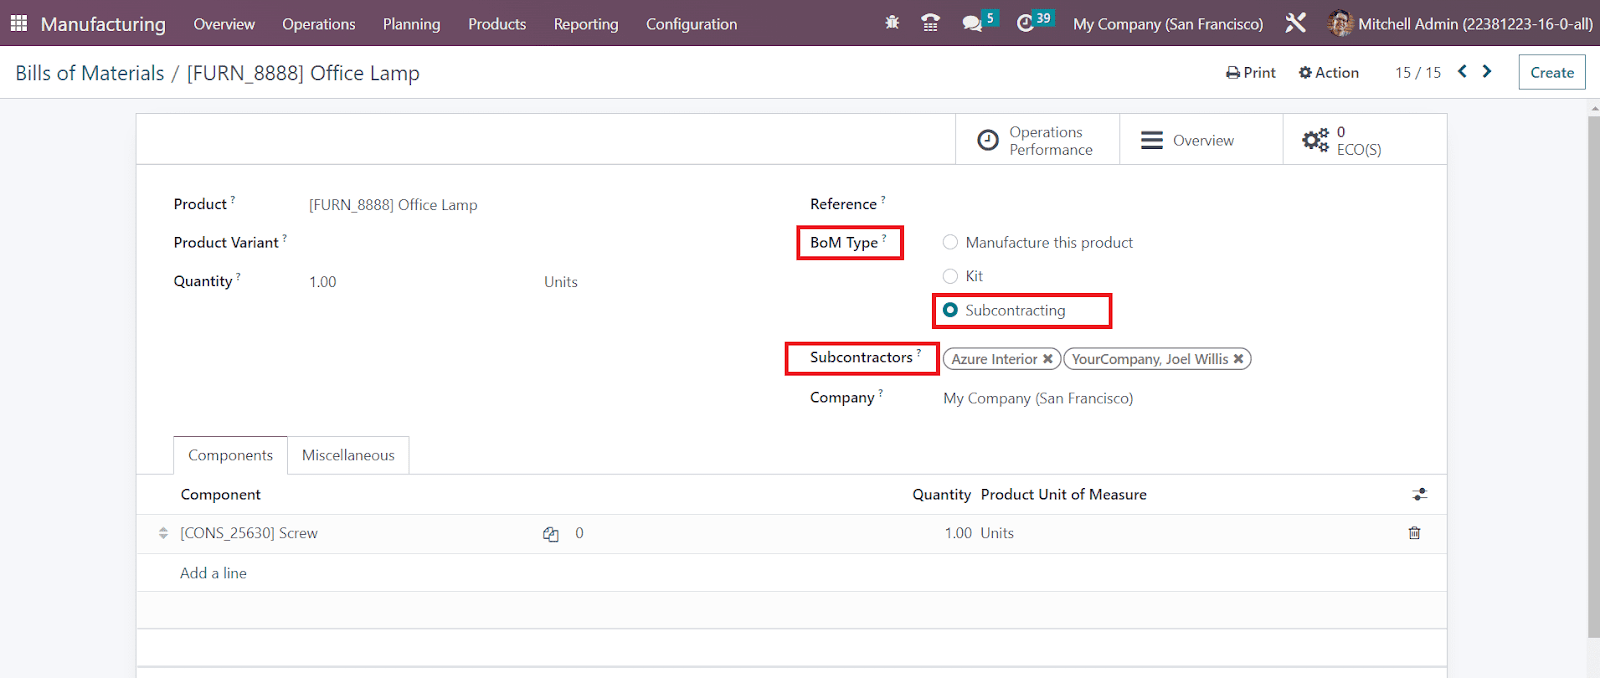
You will get an additional field to specify the name of the Subcontractor. Under the Components tab, mention the raw materials and its quantity so that the subcontractor can identify your requirements. After configuring the subcontracting product, you can purchase them from the respective subcontractor by creating a purchase order from the Purchase module.
Operations
A work center comprises various operations to manage in order to complete the work orders within the specified time. It includes assembling of the components, packing, testing, and many more operations. You can assign various operations to a work center while creating a manufacturing order. From the Operations menu available under the Configuration of the module, you can configure such operations for each work center.

This platform will show the list of already configured Operations with the details of the Operation, Bill of Material, Work Center, Duration Computation, Duration, and Instructions. Near the Instructions field, you will get a button which gives you a detailed view of the instructions. Clicking on the Create button, you can create a new Operation for a work center.

Here, you can mention the name of the Operation in the given field. If this operation is being configured for a particular Bill of Material and Work Center, you can specify them in the respective fields. If you want to apply this operation on product variants mentioned in the BoM, mention them in the Apply on Variants field. There are two methods of Duration Computation available. You can compute the total duration of the operation based on the tracked time using the Compute based on the tracked time option. Or else, you can do it manually by selecting the Set Duration Manually option. The Default Duration of the operation will be available here. The required number of employees for successfully completing the operation can be specified in the Employee Capacity field. After mentioning the Company, you can set a worksheet for the operation. You can add a worksheet to an operation in the form of PDF, Google Slide, or Text. After adding the worksheets, the Operation is ready to use.
Reporting
The reporting platform in OTX is an advantage for users to get an accurate analysis of the operations done in a module. This feature available in the Manufacturing module assists you to get an idea related to the manufacturing operations done during a specific period of time. Under the Reporting menu, you will get the reports of Work Orders, Manufacturing Orders, Overall Equipment Effectiveness, and Production Analysis. Let’s check each of these reports in detail.
Work Orders
The work orders created in the module can be analyzed using the Work Orders reporting option. This platform offers Graphical, Pivot, List, and Gantt views. The graphical view of the report is shown below.

You can alter the view of the graph between line, pie, and bar charts. It can also be arranged in ascending and descending patterns. Using the default filters, OTX allows you to generate reports of work orders based on stages such as Ready, Waiting, Pending, In Progress, Done, Late, and Start Date. Use the Group By option to get reports of the work orders based on the Work Center and Product. The customizable option available in the Filters and Group By option allows you to generate customizable reports of the work orders.

You can expand the view of the Pivot Table by enabling Measures such as Carried Quantity, Cost per Hour, Duration, Duration Deviation, Duration per Unit, Expected Duration, Quantity, and Worksheet Page. Use the Insert in Spreadsheet button to add this report to a spreadsheet for further analysis.
Manufacturing Orders
The report of the manufacturing orders managed in your company can be observed here. The reports can be generated based on the Product, Status, Material Availability, Procurement Group, and Scheduled Date of the manufacturing order.
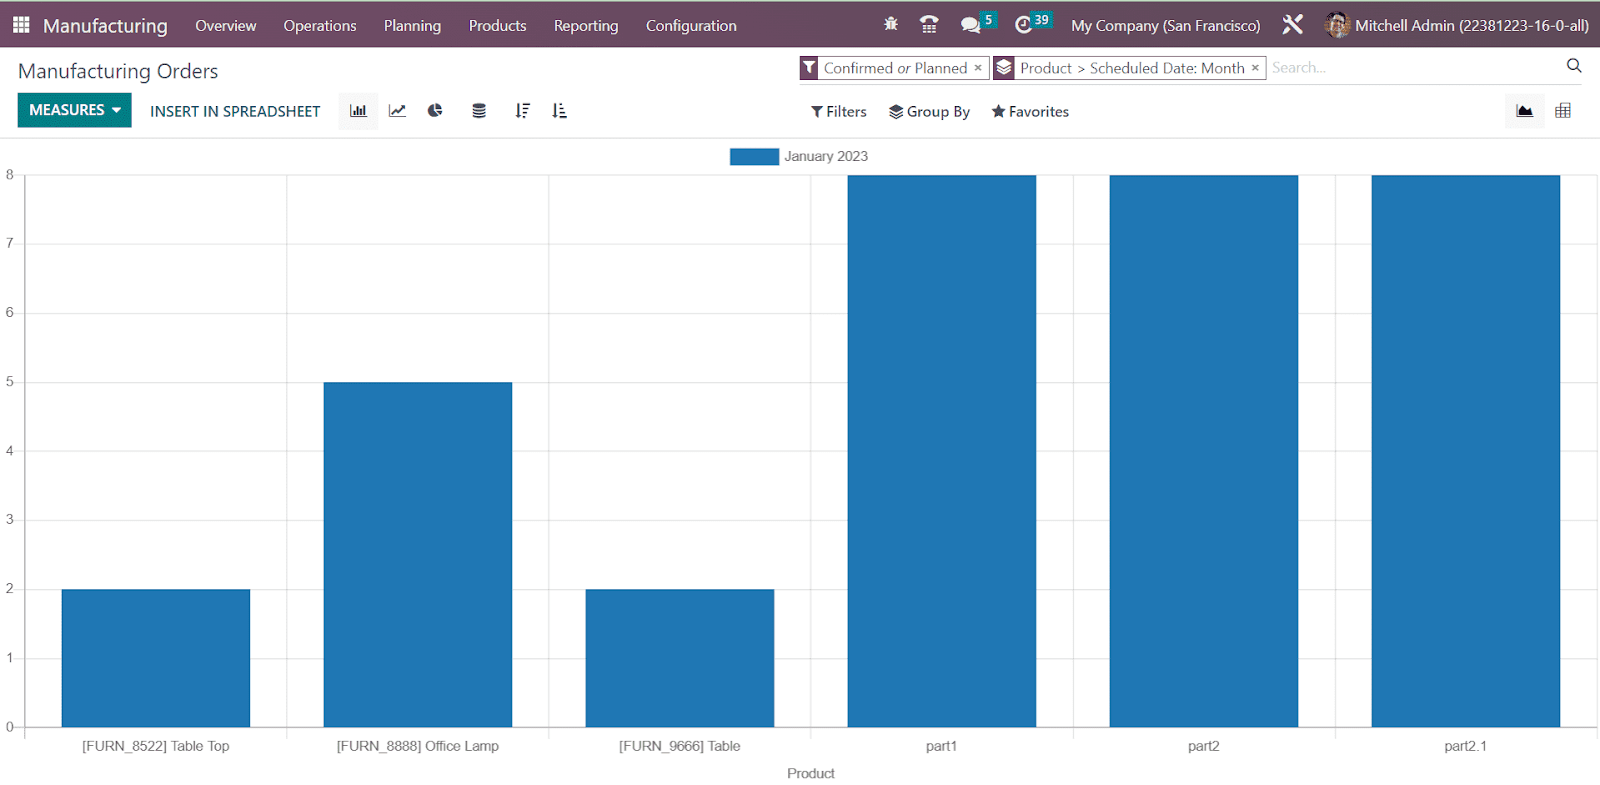
The default filters available in this reporting platform are To Do, Starred, Unbuilt, Draft, Confirmed, Planned, In Progress, To Close, Done, Canceled, Waiting, Ready, Planning Issues, Scheduled Date, and Warnings.

The above shown screenshot is the Pivot view of the manufacturing orders. You can add different measures to enhance the report such as Back Order Sequence, Extra Unit Cost, Quantity Producing, Quantity to Produce, Total Quantity, and Count.
Overall Equipment Effectiveness
The analysis of the overall equipment effectiveness of the work centers of your company can be performed from the Overall Equipment Effectiveness reporting platform. The reports can be generated based on the users, work center, and loss reason.

You can use Availability Losses, Performance Losses, Quality Losses, Fully Productive, and Date as filters to improve the report.

You can set the measures of the report as Duration, Employee Cost, and Count.
Production Analysis
If you want to perform production analysis based on a daily, weekly, monthly, and yearly basis, you can select the Production Analysis option from the Reporting menu. This platform will generate reports of the production analysis based on the product and end date.
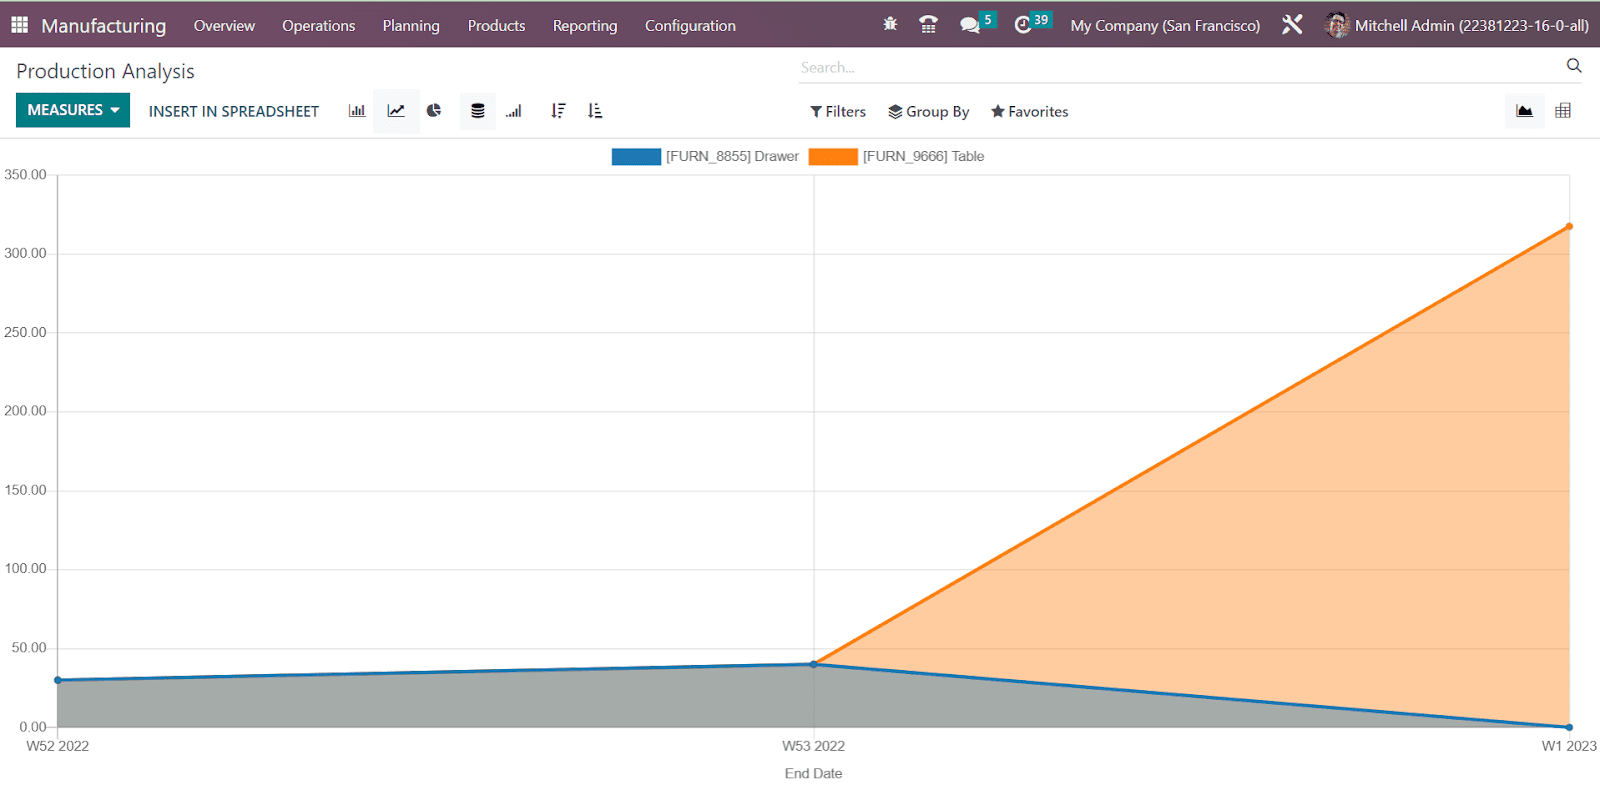
You can set the End Date of the production as a filter to get the reports of the production at the end date of each product.
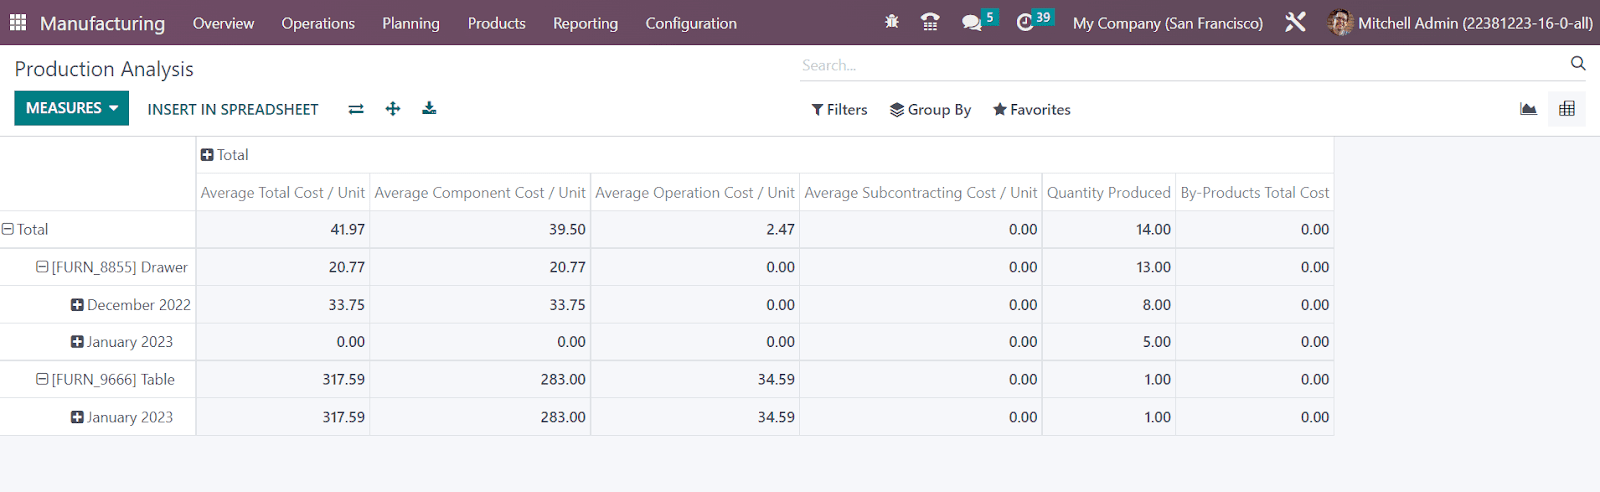
You can add Average Component Cost/Unit, Average Operation Cost/Unit, Average Subcontracting Cost/Unit, Average Total Cost/Unit, By-Products Total Cost, Duration of Operations/Unit, Quantity Produced, Total Component Cost, Total Cost, Total Duration of Operations, Total Operation Cost, Total Subcontracting Cost, and Count as measures of this report.
POS
The OTX Point of Sale module is a perfect solution for registering everyday sales transactions and related operations of shops and restaurants. This dedicated module offers many advanced features and easy-to-use operation tools that help you to run virtual stores efficiently. You can operate this module on your iPads, Tablets, and Desktop without any difficulties. The customization and flexibility offered by this module will aid you in meeting your company’s needs. Today, this module is used by several companies differently based on their various requirements. The customization facility of the Point of Sales module through custom coding enables the companies to use the module differently according to their purpose. The user can integrate the operation of this module with the accounting, inventory, sales, and other departments of your business seamlessly.
This chapter will detail all features of the Point of Sales module.
Dashboard
The dashboard of the PoS module will give a view of all available point of sale sessions in OTX . From the dashboard itself, you can easily manage the sessions with the help of the right tools. The screenshot shows the Kanban view of the PoS dashboard. Using the New Session option, you can start a new session for the respective PoS or use the Continue Selling button to proceed with the current session.

Additional operation tools are available in the menu that appears after clicking the three vertical dots on each session, as highlighted in the image above. Using this menu, you can view the Orders and Sessions of the selected PoS and generate reports on the orders.

This is the list view of the PoS dashboard. You can click any of the available points of sale to edit the configuration. You can use the Create button to create a new PoS in OTX .
OTX will direct you to a new configuration window, as shown below, where you can mention the name of the new Point of Sale in the given space.

Now, you activate additional features for the new PoS according to your organization’s requirements. If you want to allow multiple employees per session, you can activate the Multi Employees per Session field. This will allow us to log and switch between selected employees in the new PoS. An additional field will appear to mention the names of the allowed employees. These employees can scan their badges or enter their PIN to log into a PoS session.
Activating the IoT Box option will allow you to connect devices using an IoT Box. You can specify the Receipt Printer, Customer Display, Barcode Scanner/Card Readers, Electronic Scale, and Sweden Fiscal Date Module in the respective fields. Using the external link, you can manage the connected IoT Devices. It is possible to connect devices to your PoS without an IoT Box by activating the ePoS Printer field. In the given space, you can mention the IP address of the receipt printer. For more settings, you can click on the Configuration menu and select the Settings option.

You can change the settings of any of the PoS from this window. For this, you can select the required PoS in the Point of Sale field. If you want to create a new shop, use the +New Shop button.
Activate the Is a Bar/Restaurant field, if the new shop falls under any of these categories. In order to improve the navigation for imprecise industrial touchscreens, you can activate the Large Scrollbars option. You can start selling from a default product category by mentioning it in the given field after activating the Start Category option. You can also restrict particular product categories using the Restrict Categories feature.

For example, set the product category Chairs as the Start Category. After opening the respective session, the product category Chairs will appear on the point of sale dashboard as default to start the sale as shown below.

Enabling the Margins & Costs feature will show margins & costs on product information in POS.
From the Restaurant & Bar tab, you will be able to get access to design floors and assign orders to tables using the Floors & Tables Map feature. An external link will be available here to manage the Floors of the shop.

If you want to allow printing receipts before payment, activate the Early Receipt Printing option. This option will allow you to print receipts before payment.

Using the Bill option, you can generate a receipt for the order before payment.

You can print orders at the kitchen, bar, etc, by enabling the Kitchen Printers field. In the Printers field, you can specify the corresponding printer. Activating the Kitchen Notes will allow you to add internal notes on order lines from the kitchen. It is possible to split the total amount or order lines by enabling the Allow Bill Splitting feature.
The Default Sales Tax for the products in the PoS can be defined in the Accounting tab. This sales tax is applied to any new products created in the catalog. In order to manage the available sales taxes, you can use the external link given in this tab.

Activating the Flexible Taxes allows you to choose a specific fiscal position at the order depending on the kind of customer. In the Default Temporary Account field, you can specify the intermediary account used for unidentified customers. The default journal used for orders and invoices can be defined in the Default Journals field.

Under the Sales tab, you can assign a sales team for this new PoS and the sales will be reported to the mentioned sales team. In the Down Payment Product field, you can mention a product and this product will be applied when a down payment is made.
By activating the Flexible Pricelists, OTX allows you to decide the pricelists used for products in this PoS. It can be either based on Multiple prices per product or Advanced price rules. The available and default pricelist can be specified in the given spaces. The Product Prices on the receipts can be set as Tax-Excluded Price or Tax-Included Price.

You can add a button to set a global discount on products by activating the Global Discounts feature. You can mention the Discount Product and Discount Percentage in the given fields. You can restrict the price modification to the manager only by activating the Price Control option. By doing so, only users with Manager access rights for the PoS app can modify the product prices on orders. OTX will allow cashiers to set a discount per line after activating the Line Discount option. You can boost your sales by providing multiple offers to your customers. For this, you can activate the Promotion, Coupons, Gift Cards & Loyalty Program button.
In order to add a custom message to the header and footer of the receipts and bills, activate the Custom Header & Footer feature. You will get additional fields to specify the notes that you want on the header and footer of the receipts and bills.

The Automatic Receipt Printing feature helps you to print receipts automatically once the payment is registered. Activating the Use QR Code on Ticket will print a QR code on the receipt to allow the user to easily request the invoice for an order.
The payment methods available on this PoS can be specified in the Payment Method field. By enabling the Set Maximum Difference field, you can set a maximum difference allowed between the expected and counted money during the closing of the session. The allowed difference can be defined in the Authorized Difference field.

You can define the smallest coinage of the currency used to pay by cash by enabling the Cash Rounding feature. In order to accept customer tips or convert their change to a tip, you can use the Tips option. Specify the Tip Product in the respective field, which is used as a reference on customer receipts.
The payment terminals available in the OTX Point of Sale module can be observed under the Payment Terminals tab. You can activate suitable payment terminals from here for your new PoS.

OTX allows you to accept payment through Adyen, Vantiv (US & Canada), Ingenico (BENELUX), Stripe, Six, and Worldline payment terminals based on the option you activate here.
Under the Inventory tab, you can specify the Operation Type used to record the product pickings. You can use barcodes in PoS for scanning products, customer cards, etc, by mentioning the Barcode Nomenclature in the given space.

You can make the processes in the PoS faster using the Barcodes. Once you activate the developer mode, you will get a debug window on the PoS interface as shown below. You can use this window to manually enter the barcode of the product.

It is possible to sell products first and deliver them later in your PoS session by activating the Allow Ship Later feature.
By enabling this feature, you are requested to mention the Warehouse, Specific route, and Shipping Policy of such products in the respective fields.
The Technical tab can be used to mention the Inventory Management details of this PoS. Here, you can decide when to update the quantities in the stock. You can set it as At the Session Closing or In Real Time as per your need.

Activating the Limited Partners Loading option will only load a limited number of customers at the opening of the PoS. You will get an additional field to specify the particular number of customers. In order to load all remaining customers in the background, you can enable the corresponding option. Similarly, activating the Limited Products Loading feature will only load a limited number of products at the opening of the PoS. Here, you can set the number of products that you want to load when you open your PoS session. Finally, use the Save button to save all new changes.
When you check the Dashboard of your PoS module, you can see the newly created PoS there as shown in the screenshot below.

Clicking on the New Session button, you can start a new session for your newly created PoS.
Orders
By starting a new session, you will be able to take orders and record them with the assistance of the OTX 16. The products, product variants, and product attributes for the PoS can be configured in the Point of Sales module just as we did in the Sales module. We already discussed product configuration in OTX in detail in the Sales chapter. If you have any doubts related to the configuration of a product in OTX 16, you can check this chapter. Sales – OTX 16 Enterprise Book
Now, click the New Session button to start taking orders.

This will lead you to a new window where you will be asked to scan your badges or select a cashier to log in to the new shop.

You can use your employee badge or employee PIN Code to log in to a new session. While creating the record of an employee in the Employees module, the assigned officer or HR will provide a unique pin for each employee which can be used to log in to various platforms like attendance and point of sale. It will be available under the HR Settings tab of the Employee form view as shown below.

The PIN Code mentioned here can be used to log in to the PoS session or you can click on the Print Badge button to take print of the Badge ID.

The Badge ID can be used in the Scan your Badge field. If you want to log in with the pin, select your name from the Select Cashier field and enter the PIN.

As soon as you enter into the new session, a pop-up will appear to set an opening balance at the PoS cash box.

The amount mentioned here will be the opening balance of this session before the sales begin. You can directly mention the Opening Cash or use the small calculator icon. A new window will open when you click this icon.

The coins and bill values that have been configured in the backend will appear here. Here, you can select the quantities of each coin and the total value will be displayed in the window. Click the Confirm button, and the Opening Cash will appear in the corresponding field.

Now, you can click on the Open Session button to start the session with this amount.

This is the order interface of the PoS session. The PoS categories of the products can be seen on the top of the screen, and you can use them to get the list of products from a particular category. Or else, the search bar will be available for you to search for the required product. On the top right corner of the screen, you will get the connection status of the customer screen and synchronization. The customer display will show check out to customers through a second display.

In order to lock the session, you can use the small lock icon, as highlighted in the image. The Close button will close the session.
You can observe all orders created for this session from the Orders menu. The window will display the Date, Receipt Number, Customer, Cashier, Total, and Status of the orders.

The search bar can be used for searching orders and the filters will help you to filter the orders based on All Active Orders, Ongoing, Paid, Payment, and Receipt. By clicking on the New Order button, you can create a new order from this window itself.
In the main menu bar, you will get a dedicated menu for recording the Cash In and Cash Out details. There may be situations where the employee has no other option but to take money from the counter in emergency situations. Once they return the money to the counter, it is important to record the Cash In and Cash Out details in the accounting to ensure transparency. Let’s detail this through an example. Imagine that an employee took money from the counter for transportation. You can click the Cash In/Out button to record the details.

Here, select the Cash Out option and mention the amount taken by the employee. You can specify the reason in the given box and click the Confirm button. OTX will record the Cash Out details. When the employee returns the money, you can record the amount on your counter by clicking the Cash In button.
Now, let’s check how to make orders in PoS. the list of products will be available on the right side of the screen with their respective name, image, and price. When a customer places an order, you can select the product from the given list and it will be added to the billing session.

Based on the configuration of this PoS session in the backend, you will get corresponding features in the billing session as shown in the image above. The Customer Note button can be used to add a note in the bill. After making the payment, if the customer wants a refund for specific reasons, you can use the Refund button. The small Info icon will provide additional information related to the ordered product.

It includes the Financial, Inventory, Replenishment, and Order details as shown in the image above.

Use the Tax field to set the tax for the order. If any Discount is applicable to this order, you can click on the corresponding button and mention the Discount percentage.

Click the Ok button and the discount amount will be applied to the order.

If you want to add any internal notes to this order, use the Internal Note button. Clicking on the Bill button will help you to take print of the bill.

The printing details can be specified in the pop-up and take print out of the bill as per your requirements.

Use the Split button to split the bill. If the order contains more than one product, you can use this button to split the bill and pay for the products separately. The Guests button is usually used for bars and restaurants. Using this button, you can add guests to a specific table. If the customer owns any gift card or discount coupon, you can use the Enter Code button to specify the gift card or discount and the offer will be applied to the order. Similarly, if there is any reward that is claimable for this customer, it will be available in the Reward button. When you click on this button, the reward available for the customer will appear on the screen as shown below.

The Customer field will be available for you to select the customer of this order.

The available list of customers can be seen as shown in the screenshot above. You can select your customer from the given list. If the record of the customer is not available, you can create a new customer using the Create button. The Details button will provide a detailed description of the selected customer.

It includes the Name, image, Street, City, Postcode, State, Country, Language, Email, Phone, Mobile, Barcode, and Tax ID of the customer. Use the More Info button to get additional details.

The Quotation or Sales Order related to this order can be observed using the corresponding button. There will be additional buttons available to set the Quantity, %Discount, and Price of the products added to the order. In order to make the payment, click the Payment button. OTX directs you to the payment window as shown below.

The available Payment Methods for this POS session can be seen on the left side of the screen. Select a suitable payment method according to the request of the customer. After selecting the payment method, the corresponding Summary will be available in the given box. On the right side of the screen, you can observe the Name of the customer. The Invoice button can be used to generate an invoice for this order. If the customer wants to give any tips to the employee, you can record the tip using the Tip button. The Ship Later button can be used if the customer wants to order the product now and ship it later.

The payment screen will show the Remaining, Change, and Total Due. Using the Validate button, you can confirm the payment and validate it. Once you validate the payment, OTX will ask you if you would like to receive the receipt and invoice.

You can take a print of the receipt using the Print Receipt button. Additionally, it is possible to send the receipt and invoice to the customer via Email. After sending the receipt and invoice, the order is completed.
You can use the Close button given on the top right corner of the screen to close the current PoS session. While clicking this button, you will get a pop-up window with the details of the closing session.

It includes the Payment Methods used for registering payments from customers and the history of the payment details of that particular day. The Expected amount shows the Opening Cash of the session. In the Counted field, you can specify the total amount collected from today’s sale. It is the closing balance of the session. The calculator icon will assist you in calculating the amount using configured coins. The Difference field shows the difference between the opening cash and closing balance of the session. If you want to add a note before closing the session, you can use the Add a Closing Note box. Now, click the Close Session button.
If there is any Difference recorded, OTX will ask you to accept the payment difference in order to post a profit/loss journal entry in your accounting.

Let’s click the Ok button and see what happens. Now, the session is closed. You can go to the Accounting module and select the Profit and Loss reporting option.

In the Profit and Loss report, the Difference from the session will be considered as Income and recorded in the Cash Difference Gain account. When you check the General Ledger of this account, you can see the entry for the cash difference observed during the counting.

This is how OTX operates different PoS sessions in OTX .
In the backend, the record of all orders will be displayed in the Orders menu of the PoS module.

The list view shows the Order Reference, Session, Date, Receipt Number, Customer, Employee, Total, and Payment Status. This window can also be viewed in Kanban and Pivot at your convenience. Based on Session, Cashier, Customer, Status, and Order Date, you can group the Orders. You will get Invoiced, Posted, and Order Date as default Filters in this window. Use the Custom filters and group by options to create new sorting options.
If you want to get the Sessions history, select the Sessions option from the Orders menu. The Session ID, Point of Sale, Opened By, Opening Date, Closing Date, and Status will be shown in this window.

As default filters, you will get My Sessions, In Progress, and Opening Date. The sessions can be grouped by Point of Sale, Opened By, Status, Opening Date, and Closing State. In order to get additional information, you can click on a session and a form view will be displayed as shown below.

In the smart buttons, you will get details of the total orders, pickings, payments, journal items, and cash register. The status of the session is shown in the top right corner of the window.
Bill Splitting
If the order contains more than one product, you can split the bill and make payments for the bills separately. In order to get this feature in your Point of Sale session, you need to activate the Allow Bill Splitting feature from the configuration settings of the respective Point of Sale.
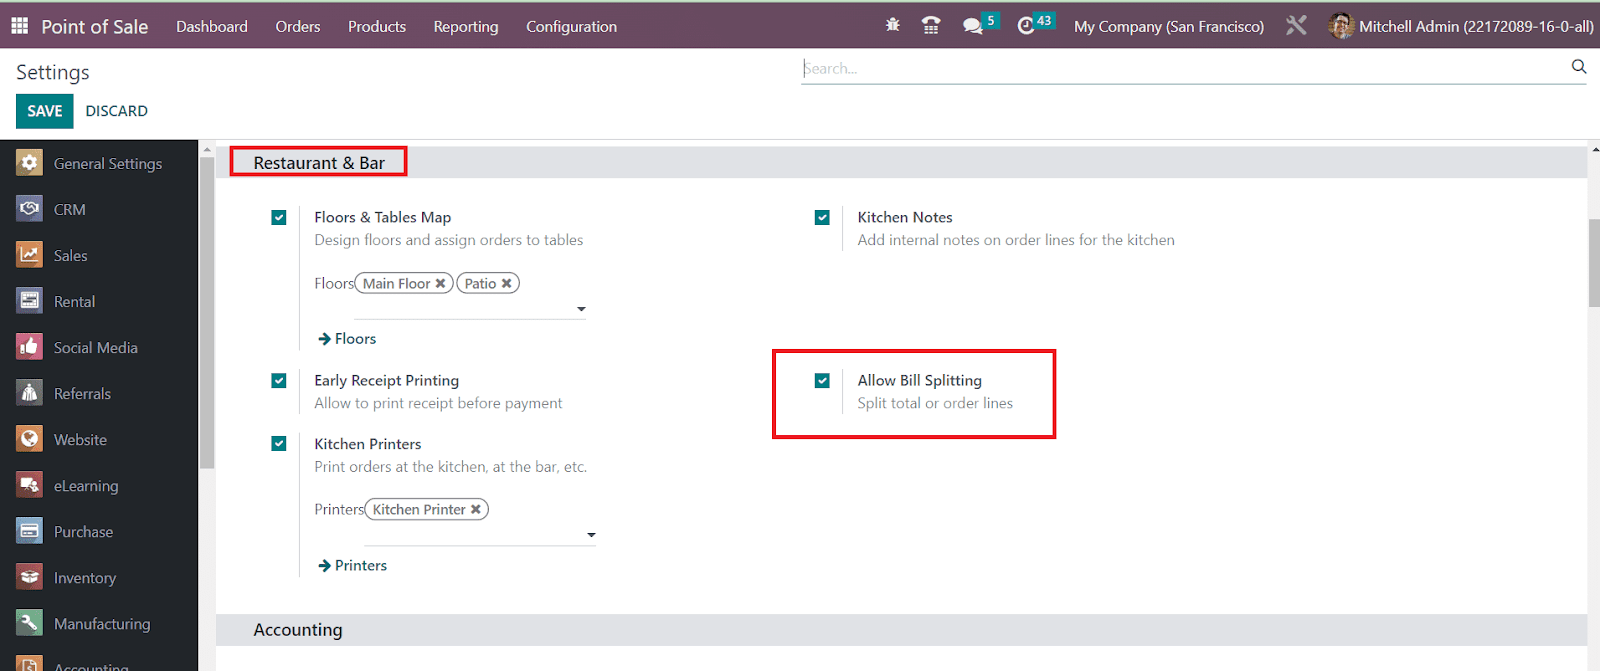
After saving the changes, let’s go to the respective Point of Sale session and check how this feature works. For this, you can create an order with more than one product. An example is shown below.
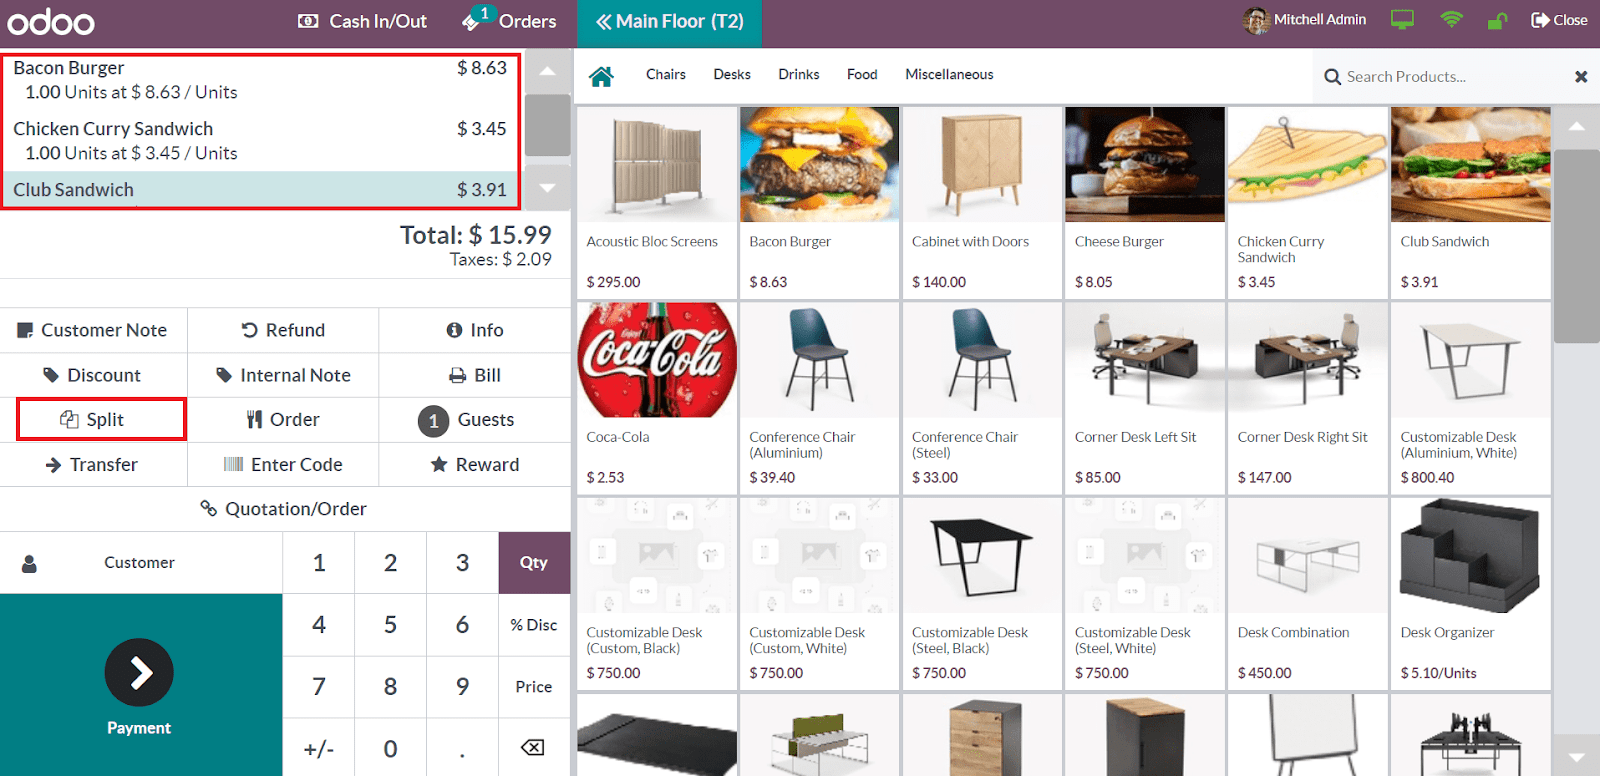
You will get the Split button to split the bill for this order. Clicking on this button will lead you to a new window of Bill Splitting.
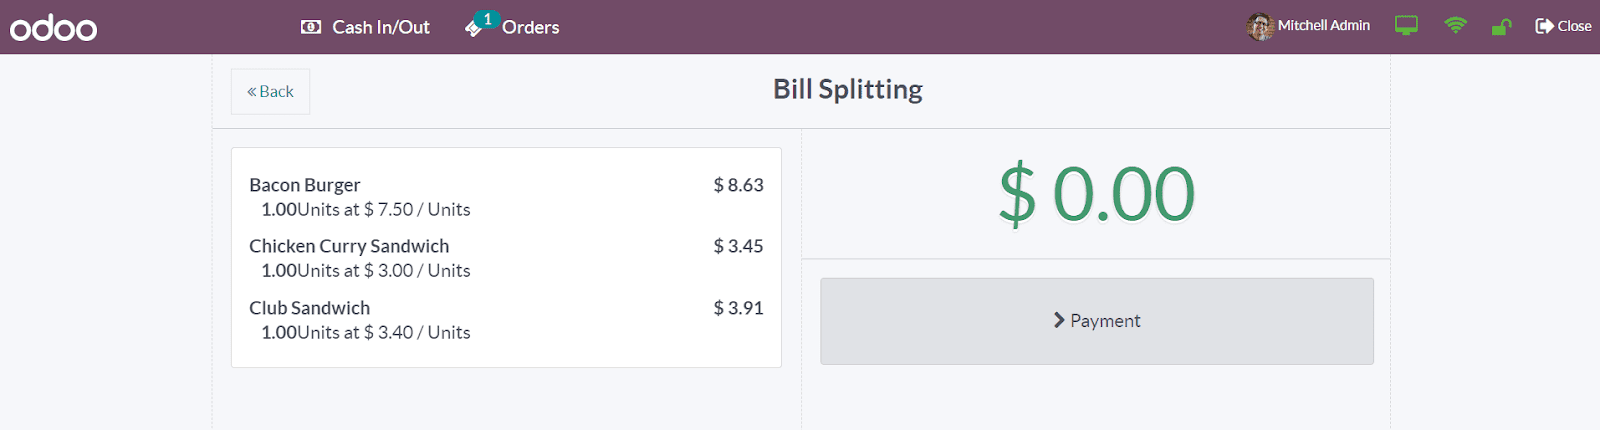
Here, you can split the bill by selecting the products for the first payment.
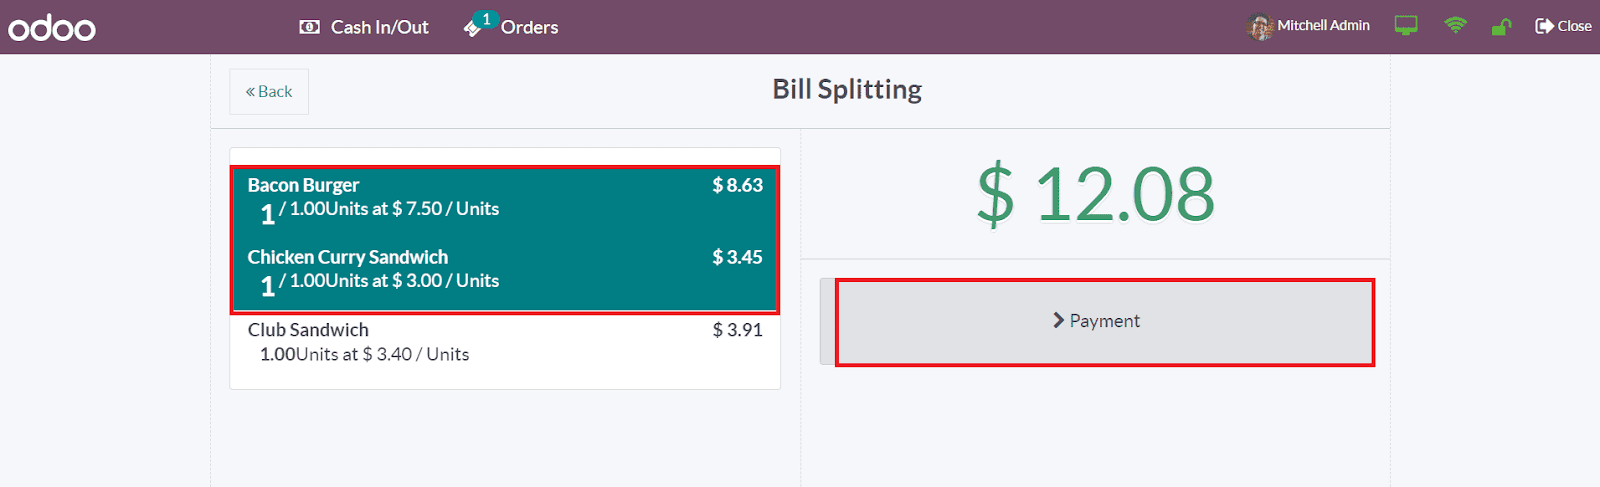
You can proceed with the payment after selecting the products for the first bill. After completing the payment procedure, you can select the remaining product from the Orders menu and complete the payment separately.
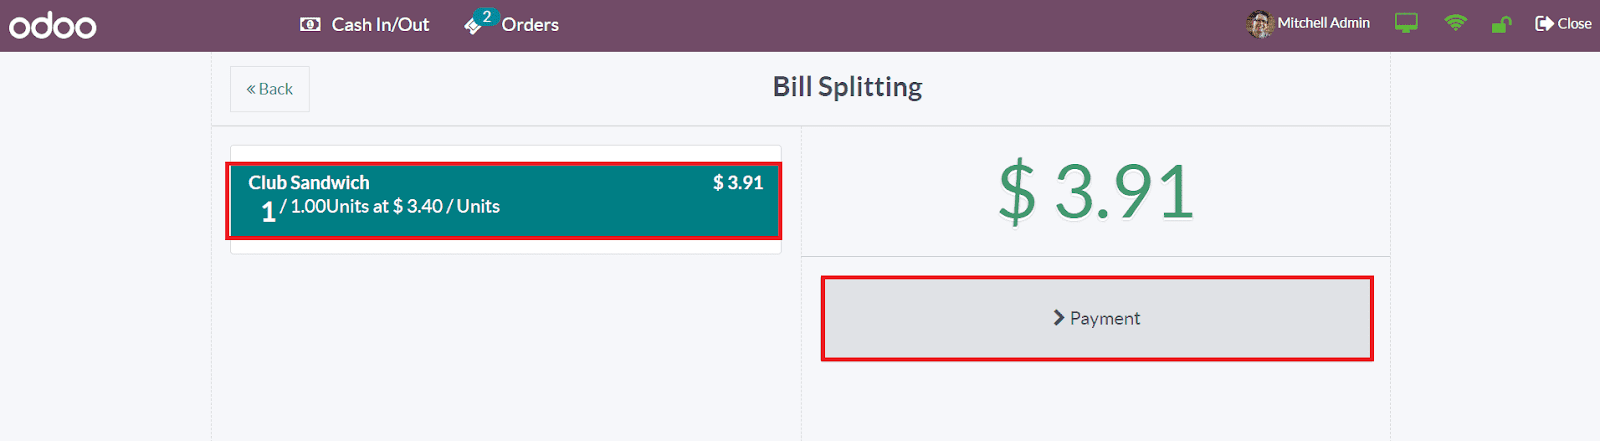
This is how we split bills in a Point of Sale Session.
Ship Later
The Ship Later feature in the OTX Point of Sale is an advanced feature that allows you to ship products later even after completing payment. It permits you to sell products now and deliver them later. This feature can be used to pay for your desired products in advance. In order to get this feature, you need to activate the Allow Ship Later option from the configuration settings of the respective POS.

After activating this option, you will get the Ship Later button on the PoS session during the payment process. For this, create an order in the PoS session and go to the payment window.

As shown in the screenshot above, click the Ship Later button after mentioning the customer.

Once the customer completes the payment, you can check the respective order in the backend from the Orders menu.

By clicking on the Picking smart button, you will get details of the picking of the product.

Here, you can see that the product is ready for picking.

By clicking on the Validate button, you can confirm the picking and ship the product for delivery to the respective customer.
Payments
In the Orders menu of the PoS module, you can find the Payments option, where OTX records the history of all payments from different orders. The payments can be grouped based on payment methods and sessions. Here, the list view shows the Date, Payment Method, Order, and Amount.

In a PoS session, you can offer different payment methods for the customers to make payments according to their convenience. For configuring such payment methods, you can go to the Configuration menu of the Point of Sale module and select the Payment Methods option.
Here, you will get a list view of the already configured Payment Methods with the details of the Method, Journal, and Company. To make any changes in the available payment methods, you can click on them and make the necessary changes.

In order to create a new one, use the Create button.

In the Method field, you can add the name of the payment method that will be shown in the Point of Sale when the payments are selected. Activating the Identify Customer field forces to set a customer when using this payment method and splits the journal entries for each customer. In the Journal field, define the journal where to record the collected payments after closing the session. For a cash journal, OTX directly writes to the default account in the journal via statement lines. For a bank journal, OTX writes to the outstanding account specified in this payment method. Here, only bank and cash journals are allowed. You can leave the field empty to use the receivable account of the customer. You can mention the Intermediary Account in the given space which overrides the company’s receivable account used in the journal entries. You are allowed to leave this field blank to use the default account from the company setting.
Once you complete the configuration process, the new payment method will be added to the available list of payment methods in PoS.
Down Payment
After purchasing products from a company, the customer can pay the complete amount at once or in installments. In order to manage such installment payments, OTX offers the down payment mechanism. Using this feature, you can manage large orders and the customer will get the option to pay the entire bill in regular installments. Let’s check how OTX manages down payments.
For this, you need to create a sales order for the customer from the Sales module.

The details of the customer and products are mentioned in the sales order. Now, confirm the sales order. Once you confirm the order, the products will be reserved for sale.
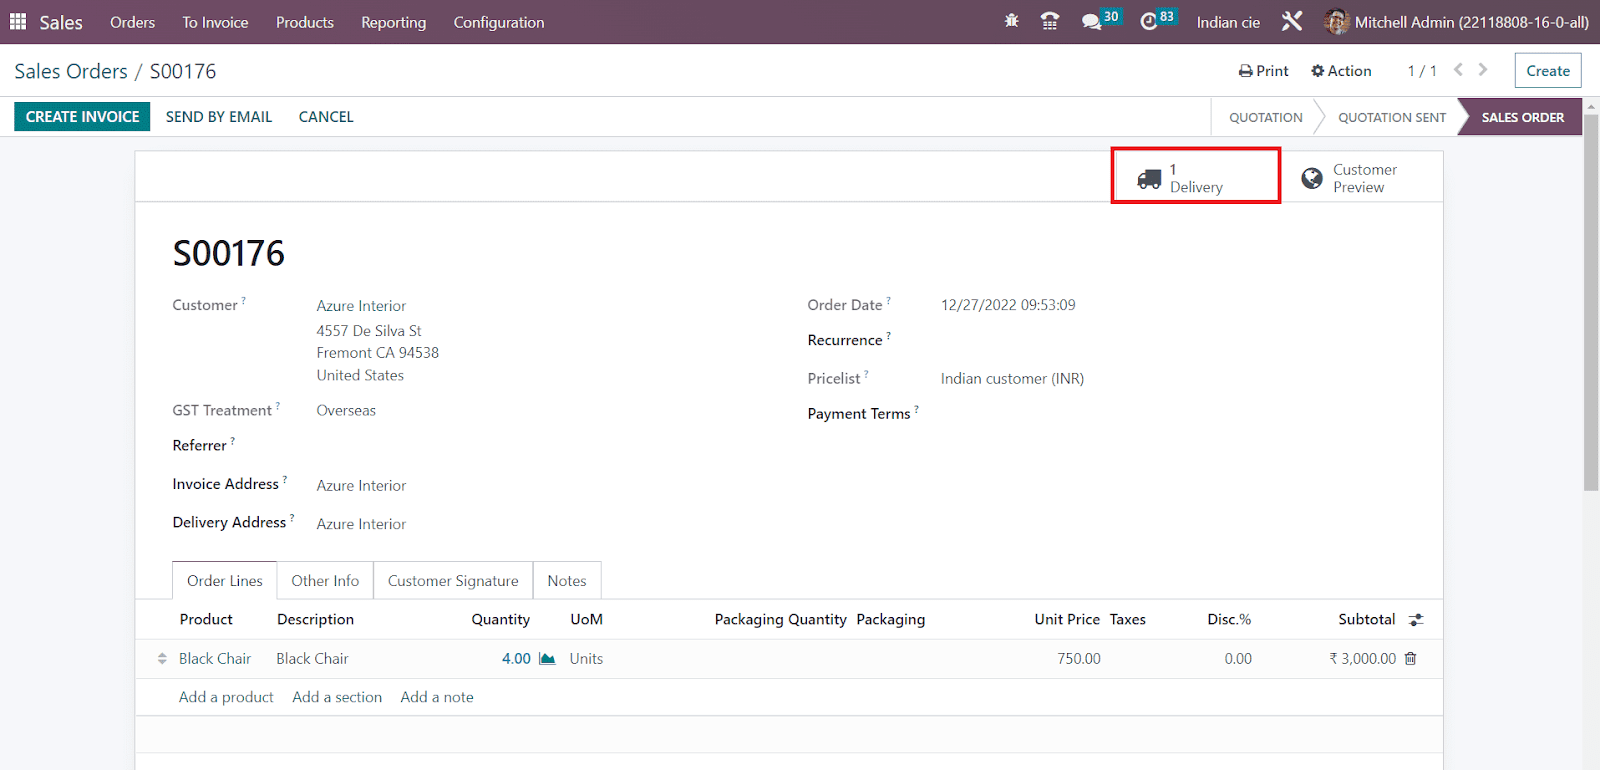
The Delivery button shows that the product is ready for delivery. The customer can collect this product from the Point of Sale session. Now, you can go to the Point of Sale and start a new session. Before starting the session, make sure to mention the Down Payment Method from the configuration settings of the respective Point of Sale.
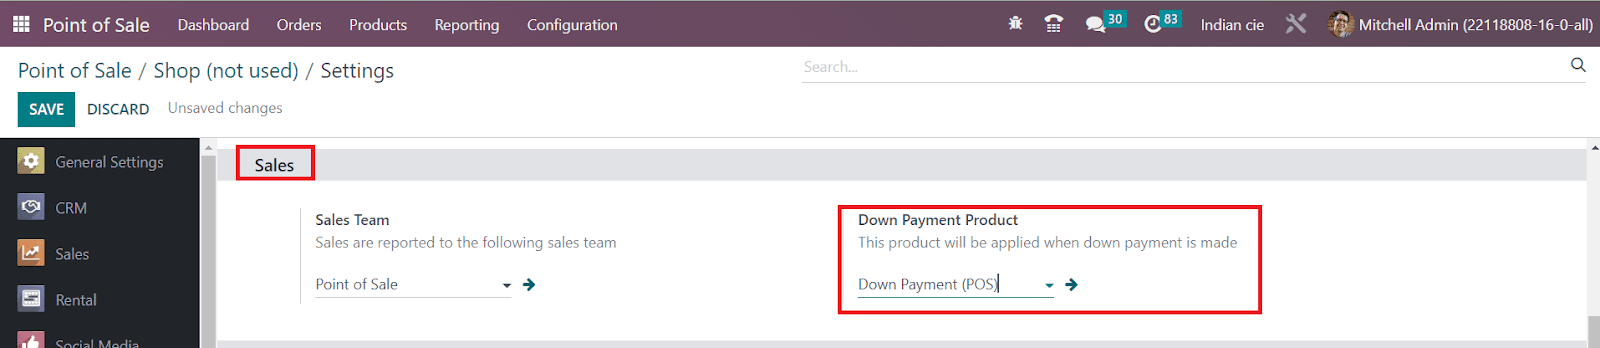
Now, you can start the new session of the Point of Sale.

Here, you will get the Quotation/Order button to select the already configured quotation or order.

From this list, you can select the sales order that we confirmed earlier. As soon as you select the order, a pop-up will appear to select suitable action. The Settle the Order button will allow you to pay the entire amount in one transaction. To make a down payment, click the Apply for a Down Payment button.
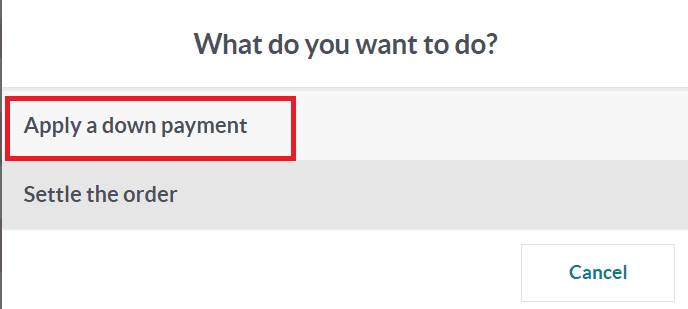
When you click this option, a new window will appear to mention the down payment percentage. The total amount of the bill will be displayed as shown in the image below.
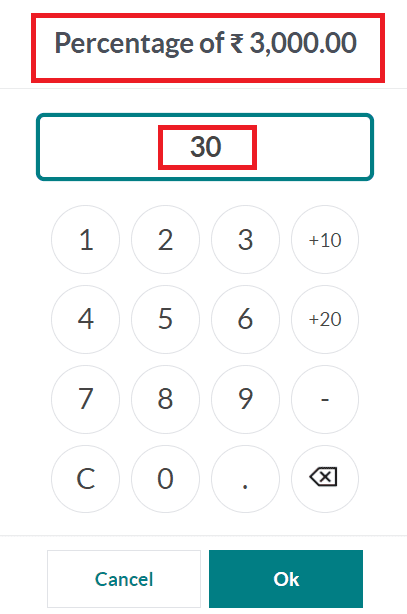
Here, for the amount of ₹3000, the customer has paid 30% of the total amount as first installment. Click the Ok button and the down payment will be applied to the order line.

The amount shown in the order line is 30% of the total amount. Click the Payment button and complete the first installment.
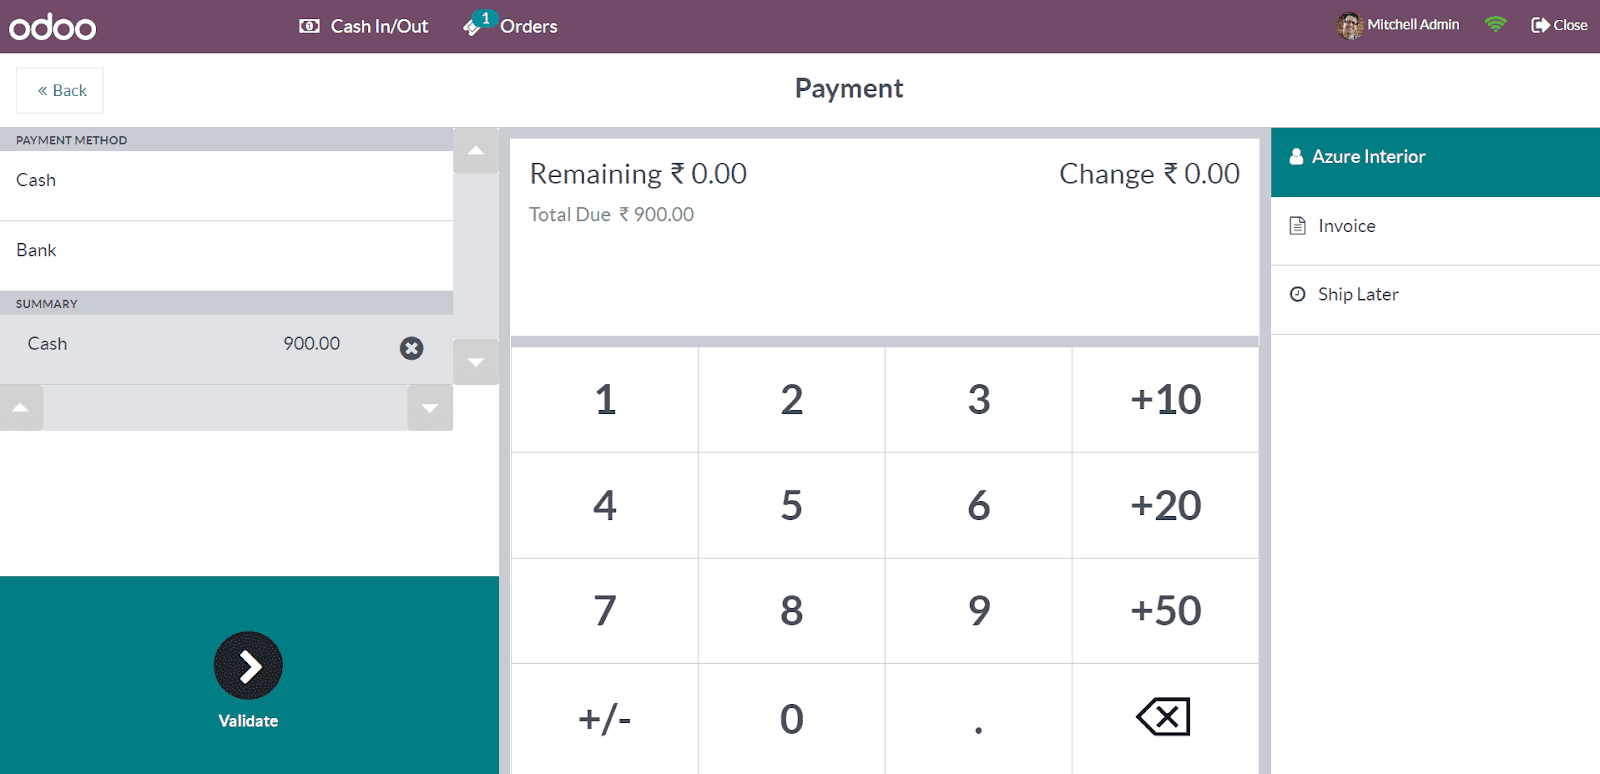
Once you validate the payment, the first installment will be completed. Before the next payment, you need to end this session then only the session will record the changes. The customer can pay the second down payment in the same method.
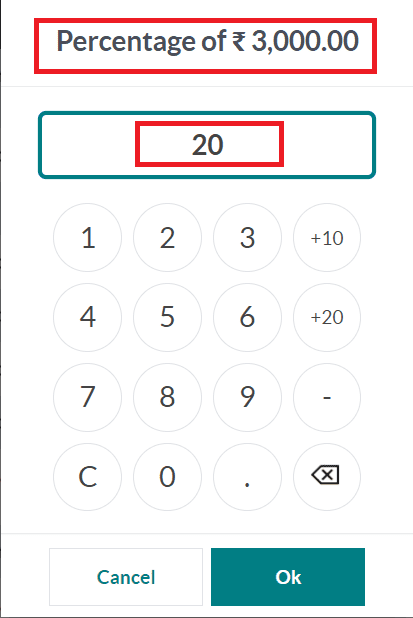
Here, the customer paid 20% of the total amount.
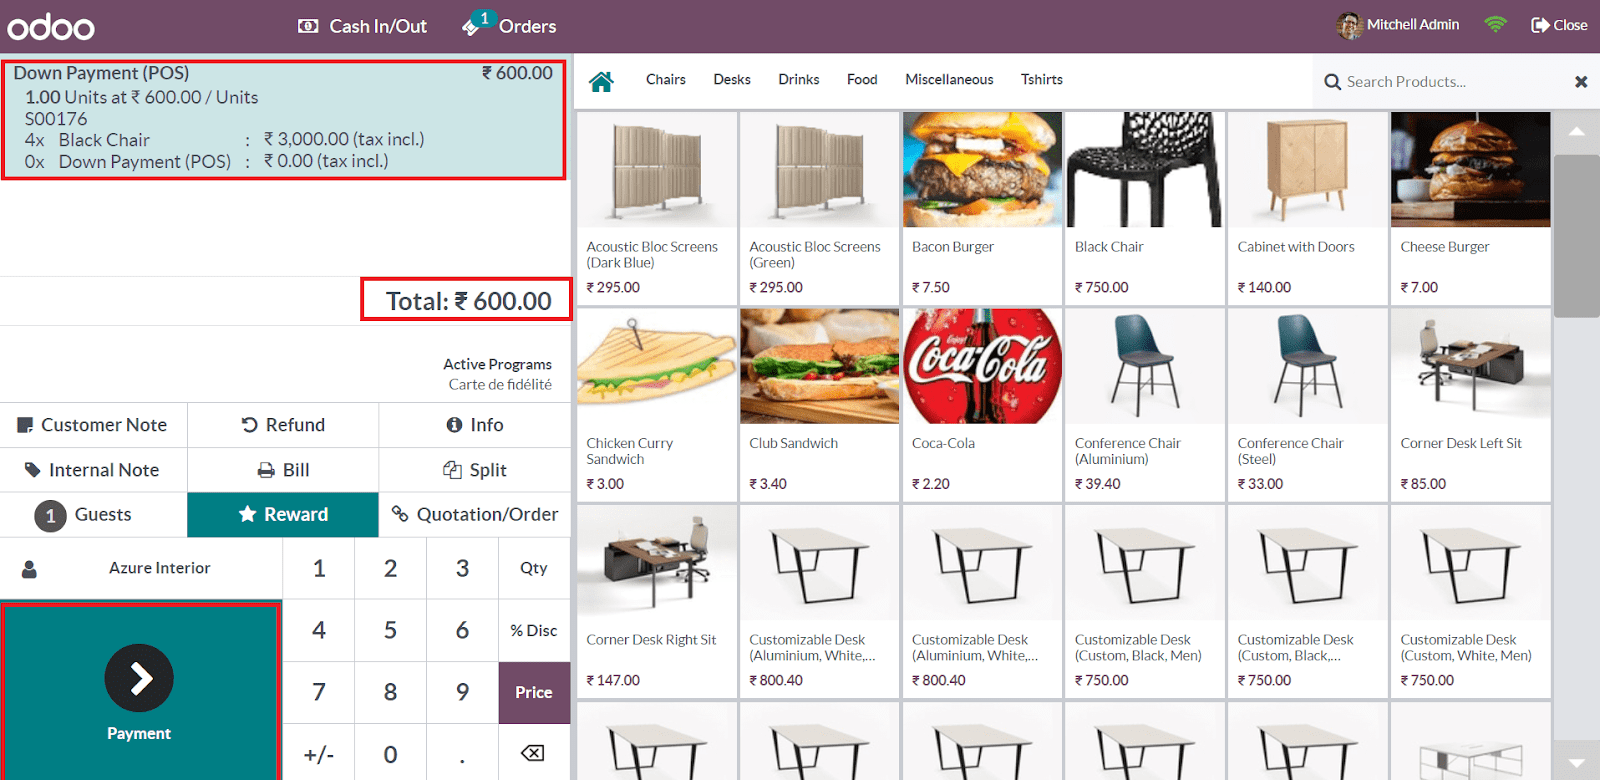
The down payment will be added to the order line as shown above. Complete the payment procedure just like we did earlier. In total, the customer has paid ₹1500 as a down payment. When you check the sales order of the customer in the backend, you can see that the down payments made by the customer are added to the order line.
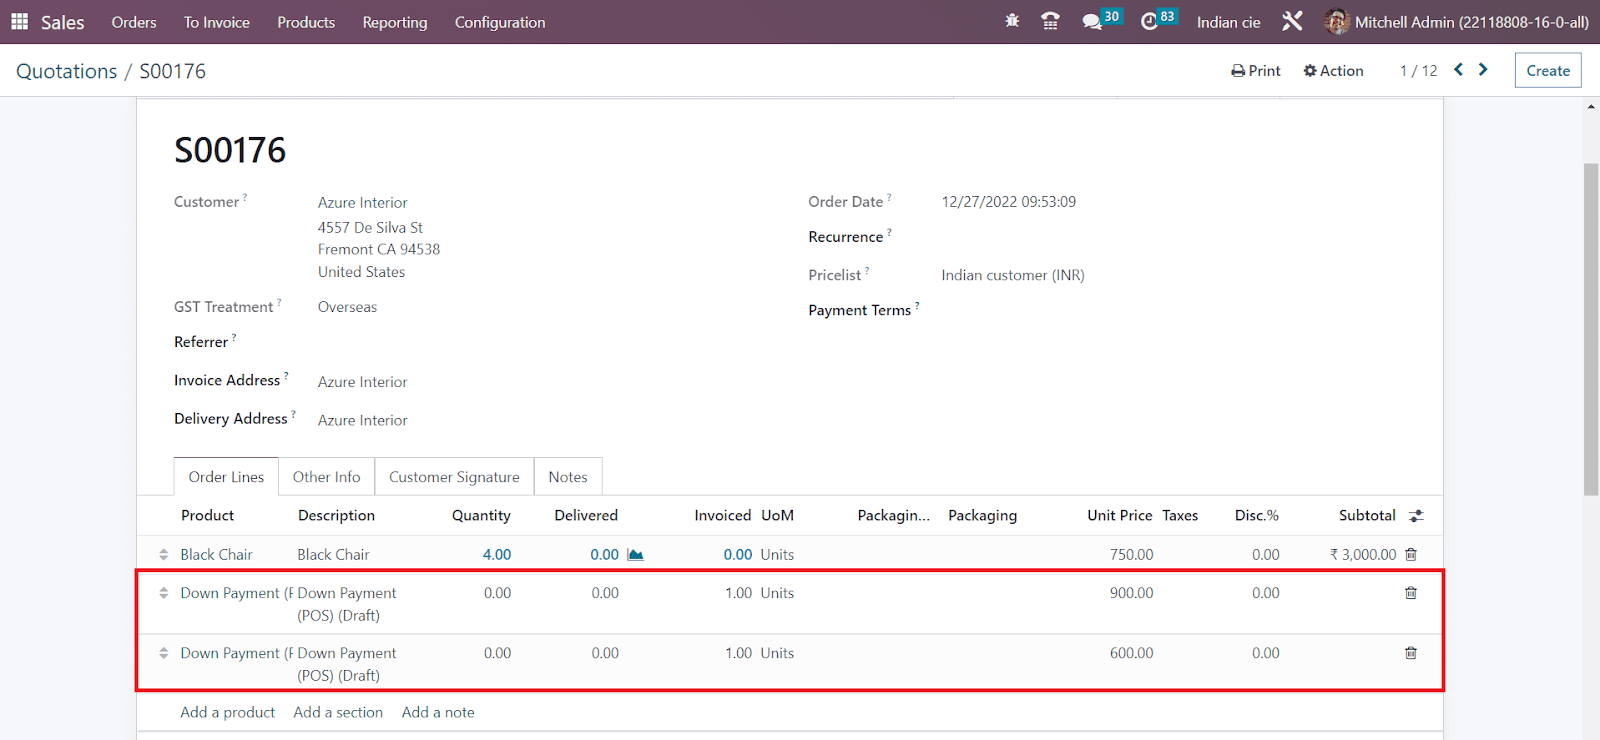
Now, the customer can pay the remaining balance in one transaction. For this, go back to the Point of Sale and start the session. Here, you can select the respective sales order and click on the Settle the Order button to settle the remaining amount.
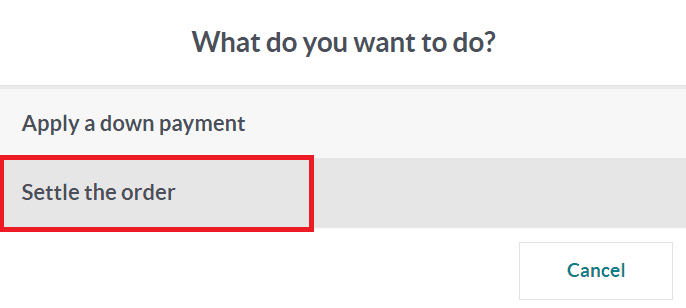
In the order line, you can see the previously made down payments in a negative sign. This indicates that the down payments have been deducted from the total amount of the order.
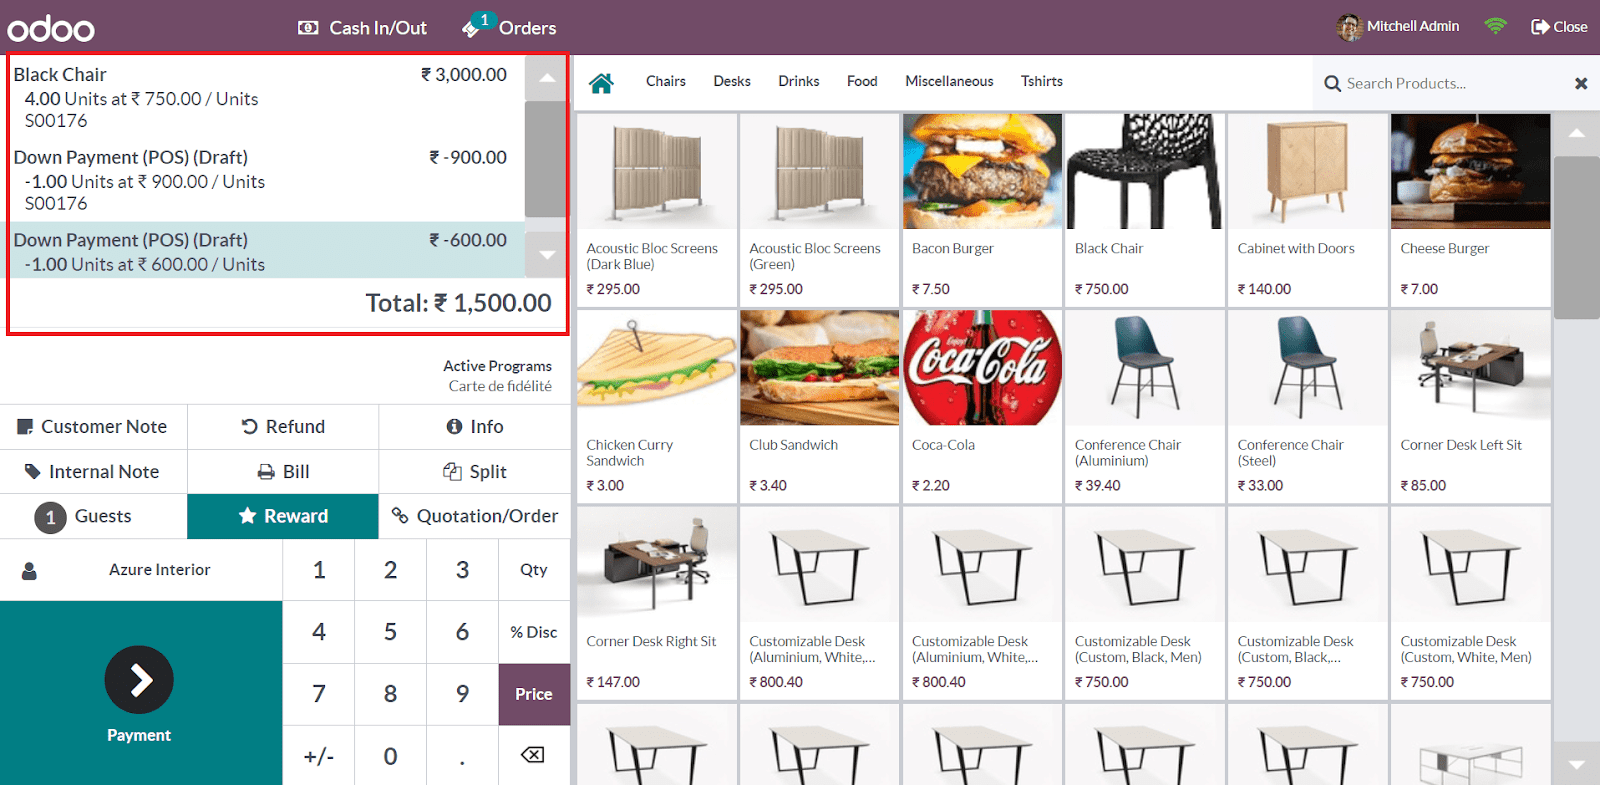
The remaining amount can be seen in the window. Here, the payable amount is ₹1500. You can click the Payment button and complete the payment. Once you complete the payment, the three installments will be completed and the order can be closed.
When you check the sales order, you can view a smart button which shows the three transfers to POS.
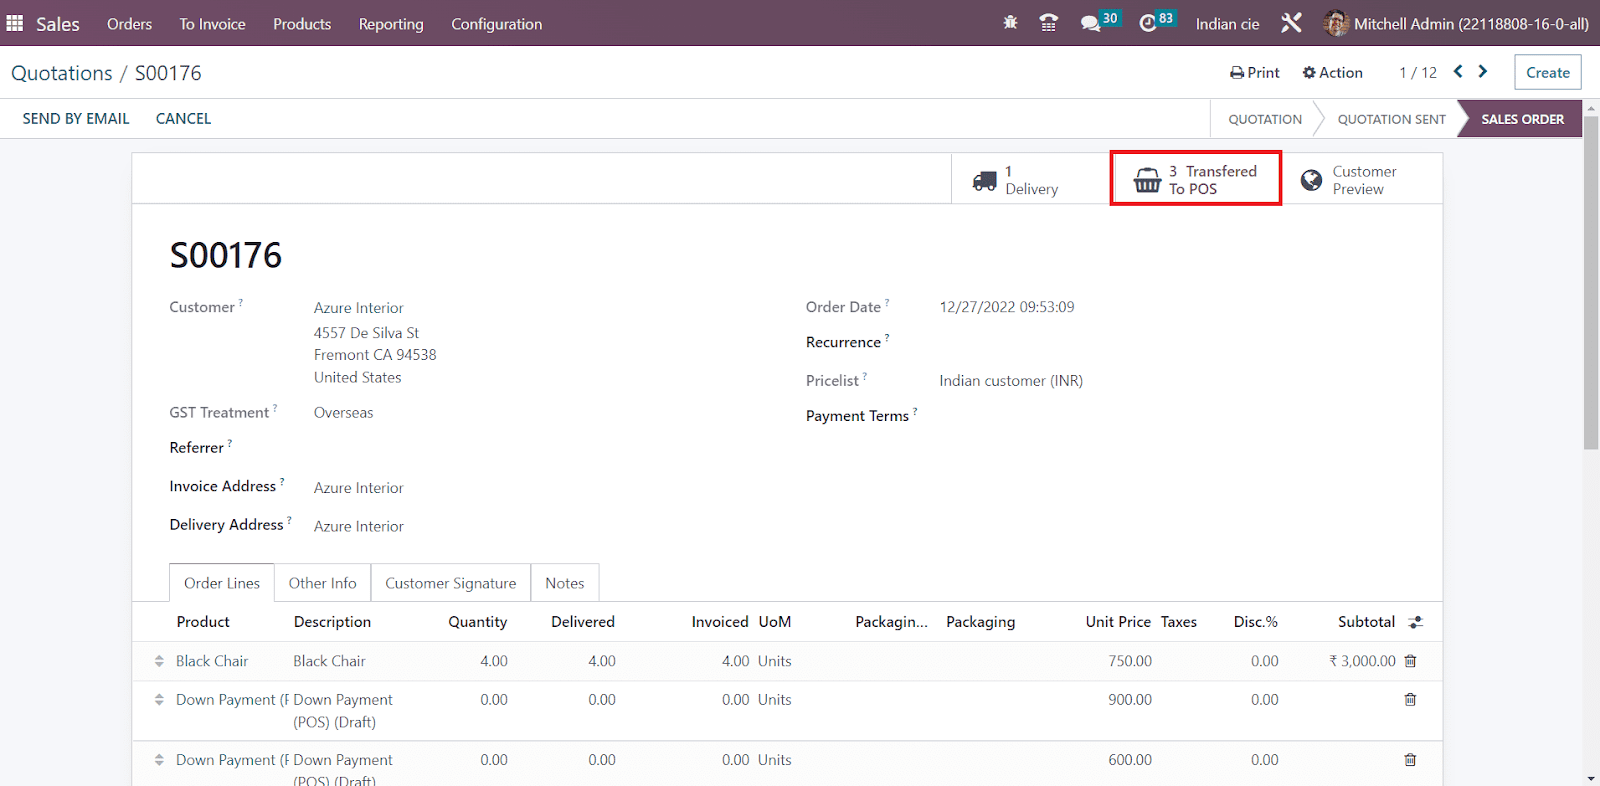
By selecting this smart button, you can observe the three transfers made in the respective PoS sessions.

It shows the Order reference, Session, Date, Receipt Number, Customer, Employee, Total, and Status. From the screenshot, you can figure out that the down payments are posted in the respective journals.
Coins/Bills
Configuring Coins/Bills in OTX will assist you in easily calculating the amounts accurately in PoS sessions. In order to manage and create Coins/Bills, you can go to the Configuration menu and select the corresponding option. A new window will appear with the list of already configured Coins/Bills in OTX . It shows the Name, Coin/Bill Value, and Point of Sales details.
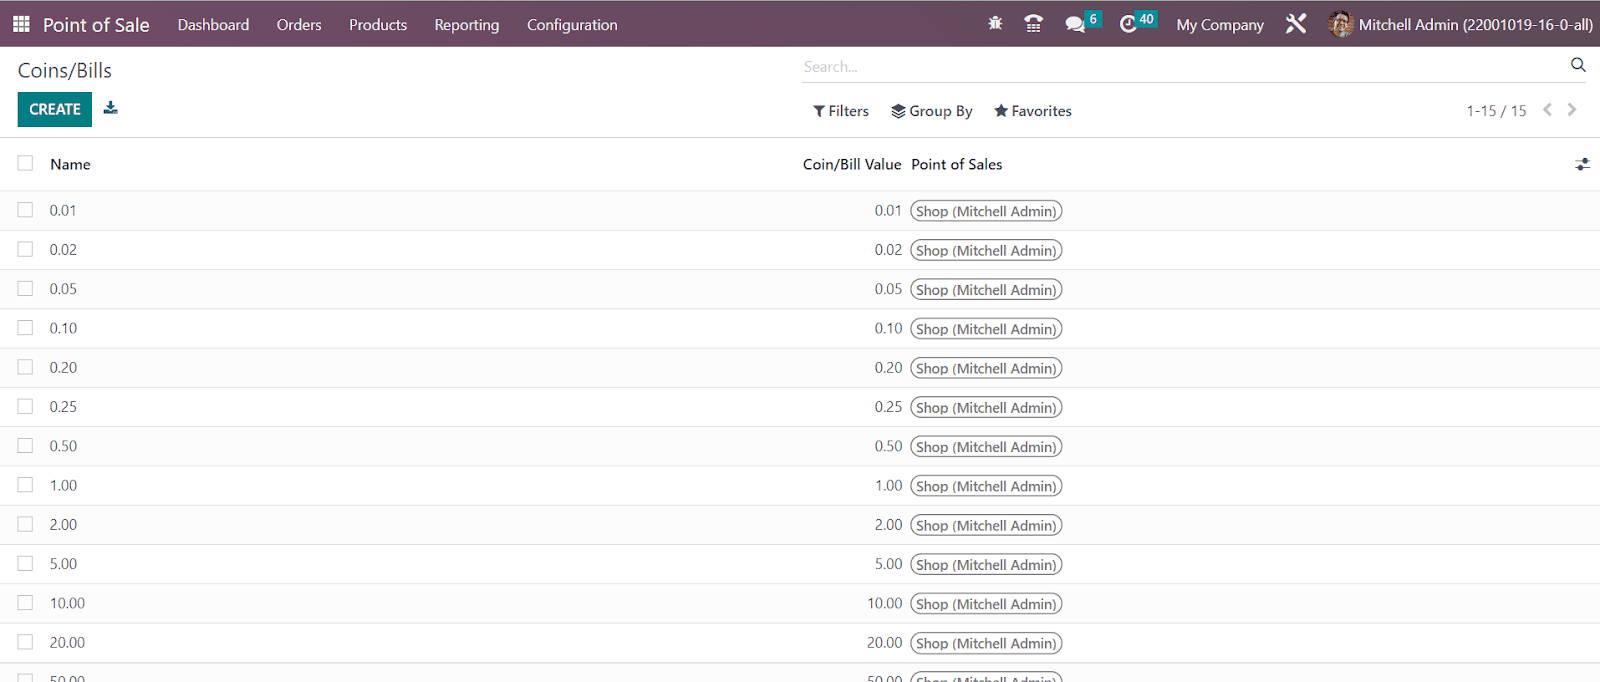
Click the Create button to configure a new one.

In the form view, you can configure a new Coin/Bill by simply mentioning its Name, Coin/Bill Value, and Point of Sales in the respective fields.
Floor Plans
Now, it is easier to create floor plans for your bars and restaurants with the assistance of the OTX ERP System. In the Point of Sale module, you can set your floor plans according to your demands. Using this feature in OTX , it is possible to design floors and assign orders to the table effortlessly. For this, select the Floors Plans option from the Configuration menu. Already created floor plans can be seen in this window as shown below.

Click the Create button to create a new floor plan.

The name of the floor can be mentioned in the Floor Name field. This floor plan will be available for all those Points of Sale that you mentioned in the respective field. In the Background Color field, specify the background color of the floor in an HTML compatible format. Now, using the Add a Line button, you can arrange tables for this floor. As soon as you click on this button, a popup will appear as shown below.

Mention the Table Name for internal identification. The default number of customers served at this table can be specified in the Seat field. Use the Appearance tab to mention the physical features of the table, such as the Shape, Horizontal Position, Width, Color, Vertical Position, and Height. Once you complete the fields, click the Save button. In the same method, you can add details of the tables for this floor one by one.
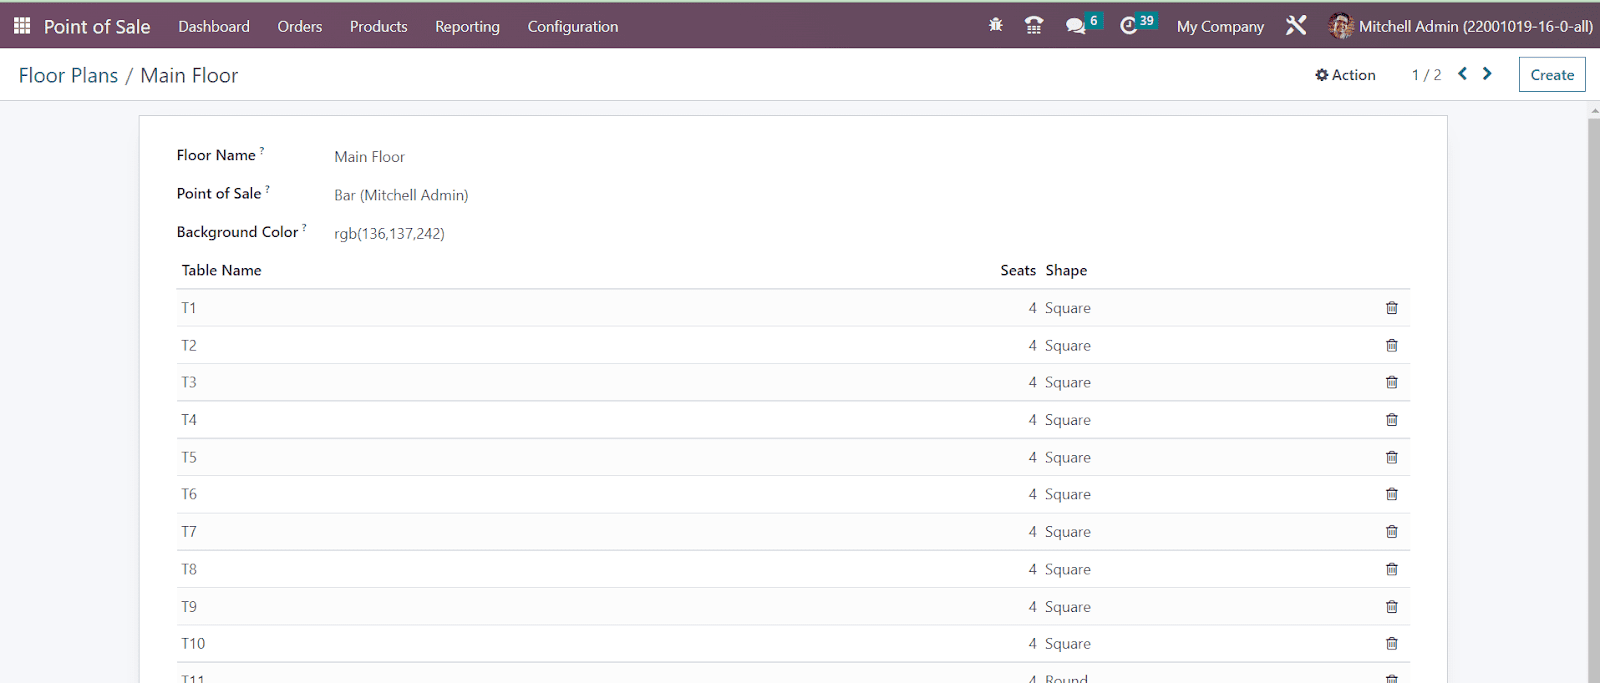
After completing the configuration, let’s see how this floor plan shows in the respective Point of Sale.

If you want to make any changes in the table arrangements, you can use the Edit icon. Using the Edit icon, you can add a new table, create a duplicate of the existing one, change the table name, set number of seats for each table, change the shape of the table, change the color of tables, and delete unwanted tables from the floor plan.
Pricelist
It is possible to create a separate pricelist for the products in a Point of Sale according to the pricing strategy of the company. Using this, you can set separate charges and offer discounts to the products for specific customers of your company. You can create and manage multiple pricelists from the Pricelists option available under the Products menu of the Point of Sale module.

The list view of this platform displays the Pricelist Name, Discount Policy, Currency, Selectable, Website, and Company. The configuration of the Pricelist is similar to that we explained in the Sales module. Under the Products menu, you can manage the Discount & Loyalty and Gift Cards & eWallets. This feature is also detailed in the Sales module. If you want to get more details regarding the configuration of Pricelists, Discounts, Loyalty, Gift Cards, and eWallets, you can check the Sales chapter from our OTX 16
Order Printers
In order to handle kitchen and bar order printing, OTX offers a configuration option to configure suitable printers to take printouts of the orders. This feature will be available in the PoS module only after activating the developer mode. Apart from this, make sure to install suitable printer modules so that the configured printers will support the operations. Now, go to the Configuration menu, where you can find the Order Printers option. Click the button and OTX will lead you to a new window, as shown below.
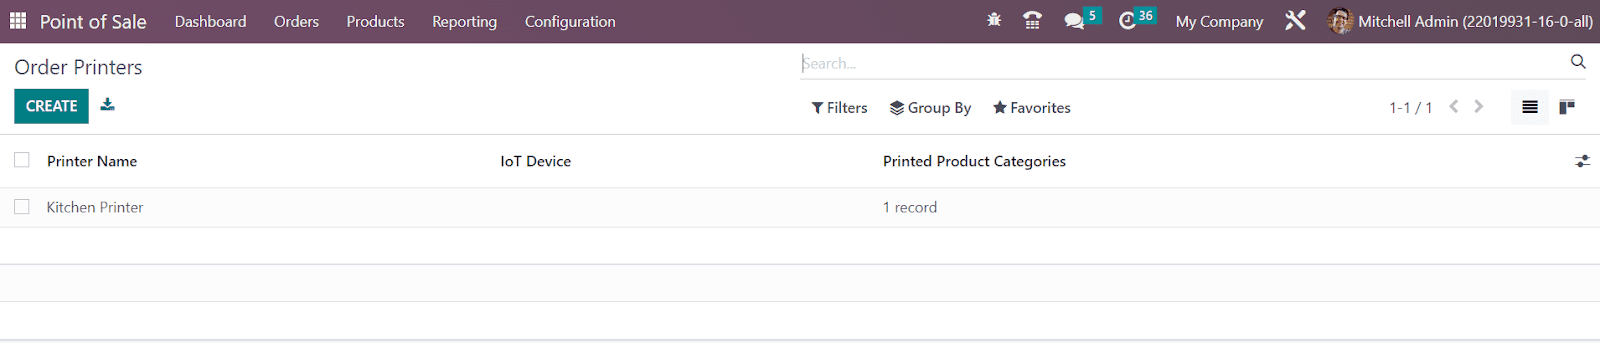
The list of pre-configured Orders Printers will be shown here with the details regarding the Printer Name, IoT Device, and Printed Product Categories. You can click on the Create button to add a new printer.
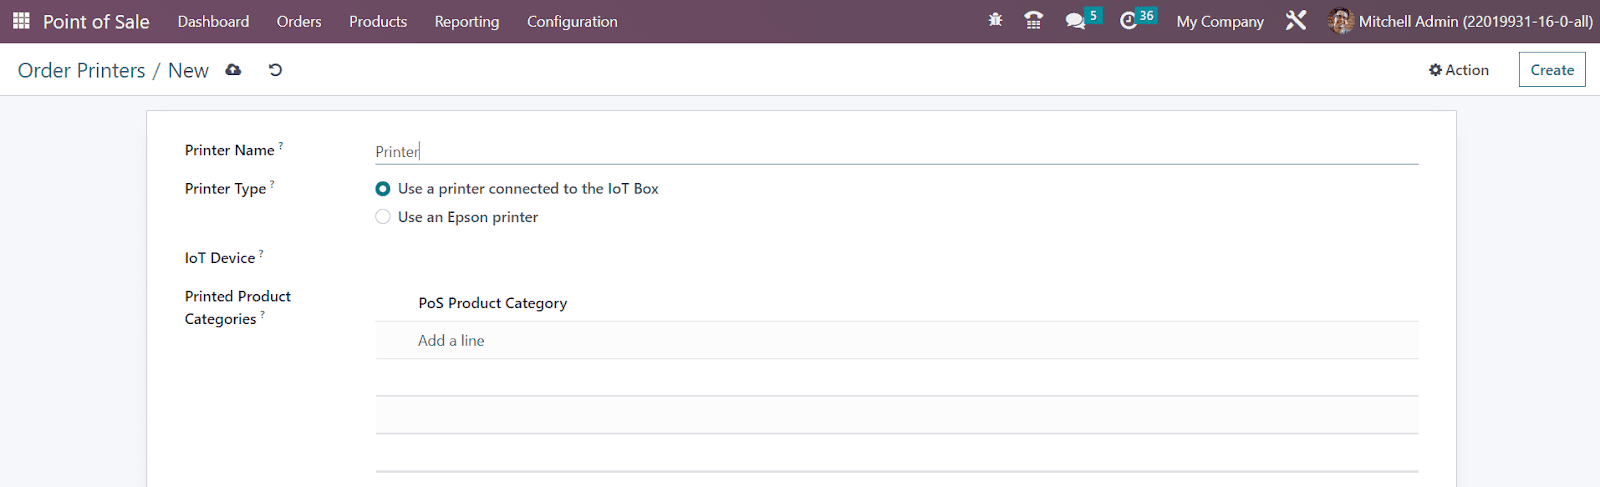
You can add an internal identification for the printer in the Printer Name field. Then, you can select the Printer Type. It can be either Use a printer connected to the IoT Box or Use an Epson printer. After selecting the suitable printer type, you will get an additional field to specify the corresponding device id. Set the PoS Product Categories using the Add a Line button under the Printed Product Categories. You will get a pop-up window to select the product categories that you want to print to this printer when validating a PoS order. This is how we configure Order Printers in the OTX 16 PoS module.
Vantiv Configurations
Vantiv Configurations define what Vantiv account will be used when processing credit card transactions in the Point Of Sale. Setting up a Vantiv configuration will enable you to allow payments with various credit cards (eg. Visa, MasterCard, Discovery, American Express, …). After setting up this configuration, you should associate it with a Point Of Sale payment method.

By activating the Vantiv option from the PoS Settings, OTX will allow you to accept payments with a Vantiv payment terminal.

In order to create new Vantiv credentials, you can go to the Configuration menu of the module. Select the Vantiv Configuration option. As shown in the image above, using the Create button, you can set credentials.

Here, you can mention the Name of the Vantiv configuration, Merchant ID (ID of the merchant to authenticate him on the payment provider server), and Merchant Password in the corresponding fields. After creating credentials, you can associate this with a payment method in the Point of Sale module. For this, go to the Payment Methods option available under the Configuration menu and create a new payment method.

In the Use a Payment Terminal field, you can select the Vantiv option as the payment terminal. As soon as you select this option, you will get a new field to specify the Vantiv Credentials. The credential that we created earlier can be specified here. After configuring this, you will get the option Vantiv on your PoS interface while proceeding with the payment process.
Rescue Session
You can manage OTX PoS both online and offline. Have you ever thought about what will happen to the ongoing orders when you lose the internet connection? In order to ensure an uninterrupted Point of Sale session, OTX will synchronize the data once the connection is reconnected. Even if the session is closed accidentally while working online, OTX will come to the rescue. With the assistance of the rescue session, the OTX Point of Sale creates a rescue session alternative to the accidentally closed session in order to save the session from data erosion. Here, we will detail how the rescue session works in OTX .
When you check the session history from the Orders menu, you can see the In Progress and Closed sessions.
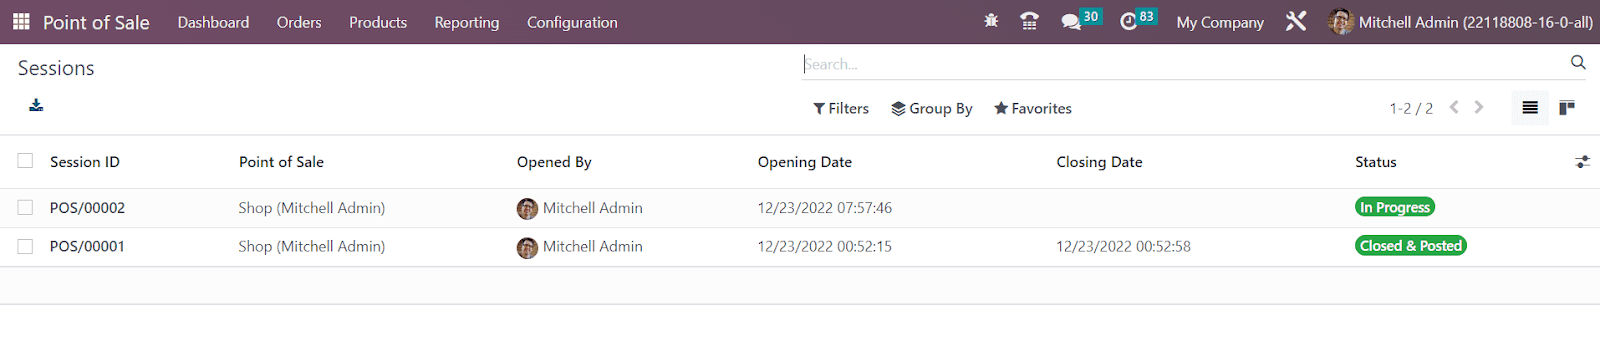
Here, one session is in progress. When the internet connection is lost, the data of the session will be recorded in the cache memory of the browser.

The image shown above highlights the number of orders taken while the system was offline. The status of the session will be displayed as Closed & Posted in the backend if the session is closed. Once the system restores the internet connection, you can click on the synchronization symbol. By doing so, OTX will create a PoS rescue session for the previously closed session.
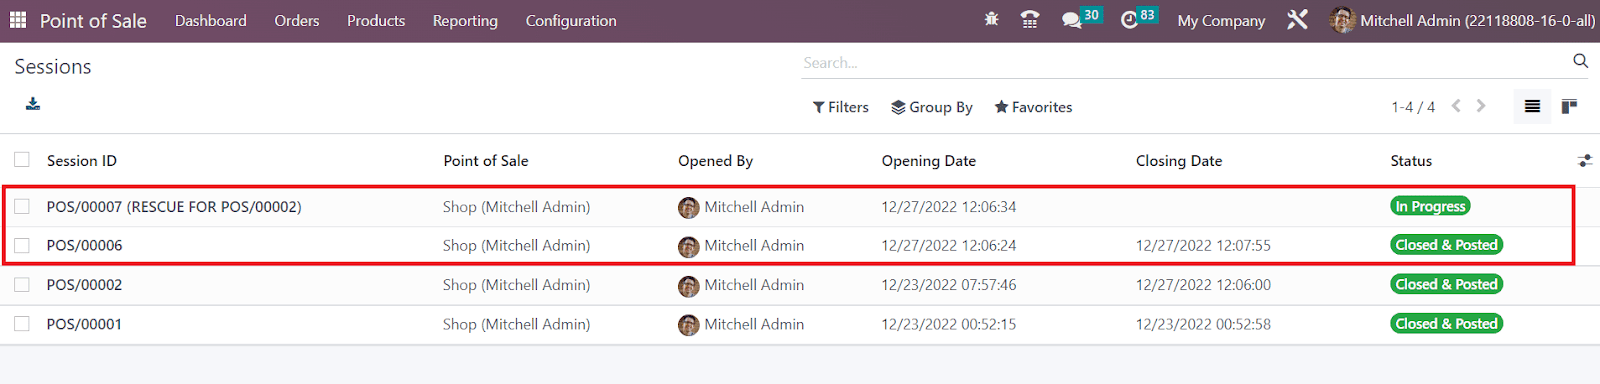
You can check the session history from the backend. The screenshot shows the rescue session as the new session with a new session ID.
Reporting
For the success of a company, it is essential to analyze the operations of the company regularly. Then only you can understand the loss and gains in your business. Proper monitoring will help you to easily trace the areas that require improvement. By considering the importance of sales analysis in a business, OTX offers the Reporting feature in the PoS module that can help you to effectively summarize the sales operations on a daily, monthly, and yearly basis. These reports are beneficial for analyzing the overall performance of each point of sale in your organization. Let’s detail the Reporting features available in Point of Sale one by one.
Orders
The Orders reporting option will give an excellent overview of all orders recorded in your system. You can analyze the reports in a graphical view and a pivot view. In the graphical view, you can shift the view between Line, Bar, and Pie charts.

Select suitable Filters, Group By, and Measures to get the desirable result in reporting.

As default filters, you can use Invoiced, Not Invoiced, and Order Date to generate Order reports. The reports can be grouped based on User, Employee, Point of Sale, Product, Product Category, and Order Date using the default Group By option. The Custom feature can be used to create required Filters and Group By options to enhance the reports.

As Measures, you can use Average Price, Delay Validation, Margin, Product Quantity, Sale Line Count, Subtotal w/o Discount, Total Discount, Total Price, and Count.

The screenshot shown above is the Pivot table of the Order report. Using the Insert in Spreadsheet button, it is possible to insert the data into a spreadsheet for further operations.
If you want to get the Sales details of a particular period, you can use the Sales Details option from the Reporting menu. Clicking on this option will open a pop-up window as shown below, where you can specify the Start Date and End Date of the period.

After mentioning the Point of Sale using the Add a Line button, you can click on the Print button to get the sales details of the mentioned Point of Sale.
OTX offers another feature in the Reporting menu called Daily Reports that helps you to generate daily reports related to the point of sale operations. Select the Daily Reports option from the reporting menu. This will open a pop-up window to specify the id of the Point of Sale Session.

After mentioning the Session id, you can click the Print button to get the daily report of that particular session.

The image shown above is an example of the daily report of a Point of Sale session in OTX . Using this reporting feature, you can effortlessly perform daily sales analysis.
Inventory
Inventory management is one of the crucial aspects of business operations that needs to be monitored with utmost attention and accuracy. Even a simple error in the movement of inventory has the potential to harm your business and that’s why entrepreneurs always prioritize effective inventory management. As the company expands, the need for a dedicated inventory management system also grows. Here comes the OTX Inventory management system for your help with advanced strategic plans that optimizes the operations of organizing, monitoring, and managing inventory in real-time. OTX ensures accurate inventory tracking that helps your business to handle orders as early as possible.
OTX ensures the availability of all necessary features with advanced performance in the Inventory module that are significantly required to streamline inventory management. With this completely packed inventory management system offered by OTX , a company can accomplish the benefits of inventory management such as
- Accurately and easily track the stock in the company warehouses.
- Precision in order fulfillment.
- Advanced inventory planning and ordering strategies.
- Recognizes inventory requirements quickly.
- Immediate replenishment features to restock products based on demand.
- Gives a comprehensive view of the products in hand.
- Provides a history of every operation done on a product during inventory movements.
- Automates transfer orders between warehouses and locations.
- Effective quantitative and analytical reports for inventory analysis.
- Traces products using lots and serial numbers.
These are some of the essential features offered by OTX for its users to simplify the operations of inventory management. We will discuss more features in the coming sessions of this chapter. First, let’s discuss the product management features in the OTX 16 Inventory module.
Product Management
Recording every aspect related to a product is very crucial for the effective maintenance of inventory. OTX Inventory module enables you to configure new products in your database that will effectively track and monitor all operations to enhance the inventory management of the respective products. The process of product configuration in the Inventory module is almost similar to that of the Sales and Purchase modules. You will get a separate menu in the main menu bar of the Inventory called Products that includes all submenus for the effective product management in OTX .

You will get the Products, Product Variants, Lots/Serial Number, and Packaging options under the Products menu as shown in the image above.
All configured products can be easily observed by clicking on the Products option. First, we are going to discuss the configuration of new products using the Products menu.

The image shown above is the Kanban view of the products platform. You will get the name of the products along with important information such as price, image, quantity on hand etc on each product tab. The star icon is used to add the products to your favorite list. This will help you to retrieve all your favorite products at a single click. As you know, OTX provides advanced sorting options on almost all platforms. In this window also you will get the Filters and Group By options to save your time by easily locating required data related to the product described in the Inventory module.

The Filter option provides the default and custom features to locate the required data. You can filter Services, Products, Published, Available in PoS, Can be Sold, Can be Purchased, Can be Rented, Can be Subcontracted, Can be Expensed, Available Products, Negative Forecasted Quantity, Favorites, Warnings, and Archived products using the default options. Using the Add Custom Filter option, you can create new custom filters for the products.
Similarly, you will get default and custom sorting options in the Group By feature also.

The default options allow you to group products based on the Product Type, Product Category, and POS Product Category. Use the Add Custom Group feature to create new grouping options according to your requirements.
The list view will give you a preview of the products as shown below.

The preview includes the Product Name, Internal Reference, Responsible, Product Tags, Sales Price, Cost, Quantity On Hand, Forecasted Quantity, and Unit of Measure. You can expand the list view by adding additional fields to the list view from the default options such as the Website ID, Barcode, Company, POS Product Category, Product Category, Product Type, and eBay Status. The Add Custom Field option allows you to add customized fields to the list view.
You can manage and edit the product details of any product by simply clicking on the required product from the list. The product details window can be observed as depicted below.

The user will get advanced smart buttons in the products window based on the data configured on the respective product. The Extra Prices button can be used to manage extra pricelists of the product. The product can be published and managed on eCommerce easily with the help of the Go To Website . The quantities available in the inventory will be shown in the On Hand button. Similarly, the details of the quantities forecasted will be available in the Forecasted button. The In & Out button will provide the movement history of the products in inventory. The Reordering Rules and Lots/Serial Numbers configured on this product can be obtained from the corresponding smart buttons. The More button will show additional options to obtain the details related to the Bill of Materials, Engineering Change Orders, Putaway Rules, Quality Control Points, Storage Capacities, Purchase Analysis, Sales Analysis, and Digital Attachments regarding the product.
Now, let’s create a new product using the Create button and discuss the options available in the product configuration window. As soon as you click on the Create button from the product’s dashboard, OTX will lead you to the product configuration window as depicted below.

First, you can mention the name of the product in the Product Name field. If you want to add this new product to your favorite list, you are allowed to use the Star icon. You can add an attractive picture of the product in the given space.
While configuring a new product, you will be asked to select the operation types related to the product. The options are,
Can be Sold: Select this option for sales products.
Can be Purchased: Select this option for purchasable products.
Can be Expensed: Select this option if you want to select this product while creating expenses.
Recurring: Select this option to create a subscription while confirming sales orders with this product.
Can be Rented: Select this option to allow renting of this product.
In order to add additional details concerning the product, we have the General Information, Attributes & Variants, Sales, Purchase, Inventory, Accounting, and eBay tabs. The General Information tab is given below.

Under this tab, you can define the Product Type from the given options. From the dropdown menu, you will get a list of the available product types.
Consumable Products: You don’t have to maintain inventory for this type of product because they are directly delivered from suppliers to the respective customers.
Service: OTX considers all kinds of services offered by a company as Service products. The user can’t keep the inventory of this type of product. It is a non-material product offered by a company.
Storable Product: These are the types of products for which you have to manage stocks. The delivery of this product type is possible only after having sufficient stock in inventory. You can replenish the inventory using the reordering rules on the products. Otherwise, OTX will generate warning messages while creating orders to inform the insufficient stock.
Event Ticket: The tickets of an event can be configured as a product in OTX using this product type.
Event Booth: The booths offered by a company at the time of an event can be configured as products in OTX by using the Event Booth product type.
Course: It is a non-material product offered by a company as a part of eLearning programs.
After mentioning the product type, you can set the Invoicing Policy . OTX offers two types of Invoicing Policies for its users.
Ordered Quantities: Using this invoicing policy, you can generate invoices for the quantities ordered by a customer. This will allow you to invoice all the quantities mentioned in the order even before the delivery.
Delivered Quantities: This invoicing policy will consider the delivered quantities only to generate invoices. If a customer ordered 12 quantities of a product and only 5 are delivered, OTX will generate the invoice for the delivered 5 quantities using this invoicing policy. The invoice for the remaining 7 quantities will be generated only after the delivery.
The default unit of measure used for all stock operations of this product can be mentioned in the Unit of Measure field. The Purchase UoM indicates the default unit of measure used for the purchase orders of this product. You can mention the price at which this product is sold to your customers in the Sales Price field. The default taxes applied on the products while setting them can be defined in the Customer Taxes field. The TaxCloud Category refers to taxability information codes that are used to compute specific tax rates for each product type. You can mention the Avatax Category, Cost, Product Category, current Version of the product, Barcode, Product Tags, and Company in the respective fields. The Internal Notes field can be used to specify the notes related to the product which are only for internal purposes.
For Service type products which include Event Tickets, Event Booths, and Courses also, there will be some changes in the available fields.

Here, you will get four types of invoicing policies detailed below.
Prepaid/Fixed: Invoices can be created at any time based on the ordered quantities.
Based on Timesheets: Invoice tasks or projects based on timesheets of the delivered quantities.
Based on Milestone: Invoice tasks or projects based on completed milestones.
Based on Delivered Quantity: Invoice services based on delivered quantities.
You can select a suitable option in the Create on Order field. On sales confirmation, this product can generate a project, task, or project & task together based on the option you select. Using this project/task, you can track the service that you are selling. If the Plan Services option is selected, a shift will be automatically generated for the selected role when confirming the sales order. You can mention the role in the space that appears after activating the Plan Services .
In OTX , you can keep records of different variants and attributes of a product so that the customer will get multiple options to select from.

Using the Add a Line buttons under the Attributes & Variants tab, you can specify the varieties of a product that are already configured in OTX . If you want to add a new variant or attribute, you can use the Configure option.
Under the Sales tab, you can define the Upsell & Cross-sell, Ecommerce Shop, Helpdesk, Point of Sale, Extra Product Media, and Sales Description.

OTX offers different eCommerce strategies to improve sales online. As a part of this, you will get the option to define the upselling and cross-selling strategies in the Sales tab. The Optional Products are the products that are suggested to the customers whenever they click on the Add to Cart button. This is a part of the cross-selling strategy. OTX will recommend related products that can be bought together with the main product using this feature. The Accessory Products are also a part of cross-selling strategy that suggest accessories to the customers whenever they review their cart before payment. Alternative Products will suggest alternatives to the product that you selected. This will be displayed at the bottom of the product page on the eCommerce website and it is considered as one of the best up-selling strategies to enhance online sales.
You can set warnings while selling this product in the Warning field under the Sales tab as shown in the image below.

You can make this product available in PoS by activating the corresponding option from the Point of Sale field. After activating this option, you will get the To Weight with Scale feature to enable. You can enable this feature if the product should be weighted using the hardware scale integration. Specify the category of the product used in the PoS in the Category field.
In the Ecommerce Shop field, you can specify the Website, Website Sequence, Categories, and Ribbons for the eCommerce display of the product. The SLA Policy used for the helpdesk tickets created for this product can be specified under the Helpdesk field. The Sales Description added in the Sales tab will be added to the sales orders and invoices of this product.
Details regarding the purchase of the product can be added under the Purchase tab. The list of vendors of this product can be mentioned using the Add a Line button. If you are intending to subcontract this product with the selected vendor, you can activate the Subcontractor field.

Specify the Currency suitable for the purchase operations with the vendor in the given space. Along with this, you can define the Unit of Measure used for the purchase orders with this vendor, the Price to purchase this product from the specified vendor, and Delivery Lead Time in the corresponding fields. The delivery lead time indicates the number of days between the confirmation of the purchase order with this vendor and the delivery of the product to its destination. OTX allows you to configure multiple vendors to a single product which will help you to compare the prices and select the appropriate one for purchase.
Under the Vendor Bills section, you can set default Vendor Taxes used in the purchase operations of this product. The Control Policy will define how to generate vendor bills for the products. The bills can be generated based on the quantities ordered by the customer by setting the bill control policy on Ordered Quantities. If the customer wants to pay the bill only after receiving the products, you can set the control policy on Received Quantities. Use the Purchase Description tab to add internal notes related to the purchase operations of this product.
Now, let’s move on to the Inventory tab of the product configuration window. You can define the Operations, Logistics, Traceability, and Counterpart Locations in this tab.

According to the modules installed in your OTX database, the Operations field will help you to define the Routes of the product. You can set the route of this product as Buy, Dropship Subcontractor on Order, Manufacture, Resupply Subcontractor on Order, and Dropship based on your company policies. OTX offers tracking features for the storable products in your warehouses that will help you to locate the product in your inventory within seconds. You can track products using the unique serial number or lots configured on each product. In the Traceability field, you can set the Tracking based on Unique Serial Number or Lots. If you don’t want to allow tracking for this product, you can select the No Tracking option.
In the Logistics section, assign a Responsible employee who will be responsible for the upcoming activities related to the logistics operations of this product. The Weight and Volume of this product can be defined in the respective fields. The Manufacture Lead Time will define the average number of days required to manufacture this product. If this product is manufactured based on the multi-level Bill of Material, you can mention the manufacturing lead times of the components here. In the case of the subcontract, you can specify the date at which the components of the product will be sent to the subcontractor as the Manufacture Lead Time. In the Days to Prepare Manufacturing Order field, you can specify a particular number of days required to create and confirm manufacturing orders to ensure enough products in inventory. This will give you sufficient time to replenish components or manufacture semi-finished products. The Customer Lead Time is the number of days promised to the customer for delivery after confirming the sales order. Mention the HS Code in the given field which is used for international shipping and goods declaration. Additionally, you can specify the Origin of Goods from where they have been produced or manufactured.
Under the Counterpart Locations, you can specify the Product Location which is used as the source location for stock moves generated by manufacturing orders. The specified Inventory Location will be considered as the source location for the stock moves generated when you do an inventory.
Under the Inventory tab, you will get an additional field to specify the packaging of the products in inventory. In order to get this option, you need to activate the Product Packaging feature from the Settings menu of the module as shown below.

Once you activate this feature, the product packaging feature will be available under the Inventory tab of the product configuration window as depicted in the image below.

Using the Add a Line button, you can specify the Packaging, Package Type, quantity of the product contained in the packaging, and Unit of Measures. If you want to use this package method in the Sales and Purchase orders, you can select the respective fields. The Description for Receipts and Description for Delivery Orders can be used to add additional notes for receipts and delivery orders respectively.
In the Product Configuration window, you will get the Accounting tab to specify the necessary details required for the accounting operations of the product.

Here, you can specify the Income Account in the Receivables field and Expense Account in the Payables field. In the Intrastat field, specify the Commodity Code and Country of Origin . By mentioning an Email Template in the Automatic Email At Invoice field, OTX will automatically send a product-specific email once the invoice is validated. The UNSPSC Category used in the countries such as Columbia, Peru, and Mexico can be noted in the UNSPSC field.
Under the eBay tab, you will get the Sell on eBay option to activate inorder to sell this product on eBay.

As soon as you activate the eBay option, you will get additional fields to define as shown in the image above. The eBay Status of the product can be observed here. You can add a suitable Title, Subtitle, Item Condition, Category, and Store Category for the product on eBay in the respective fields. The Listing Type can be set as Auction or Fixed Price. Based on the option you select, you will get an additional field to define the price. The eBay listing duration can be specified in the Duration field. Activating the Allow Best Offer will allow you to provide the best offers on eBay. The Private Listing option can be enabled to allow private listing for this product on eBay.
We detailed all available tabs in the product configuration window.

After adding a new product to your Inventory module, you will be able to get some operations tools on the screen such as Print Labels, Update Quantity, and Replenish. If you want to print labels for this product that can be used on the packages at the time of delivery, use the Print Label button. This will lead you to a new wizard as shown below.

Here, you can specify the Quantity of the product, Extra Content, and Format of the label in the given fields. Clicking on the Confirm button will print labels for the selected product. An example is shown below.

So far we were discussing the product configuration feature, now let’s move to the configuration of product variants in the Inventory module.
Product Variants & Attributes
Offering multiple variants of a product to customers is an effective strategy to improve sales. OTX allows you to configure different variants of a product in the Inventory module just like we did in the Sales and Purchase module. Firstly, make sure to activate the Variants feature from the Settings menu of the Inventory module as shown below.
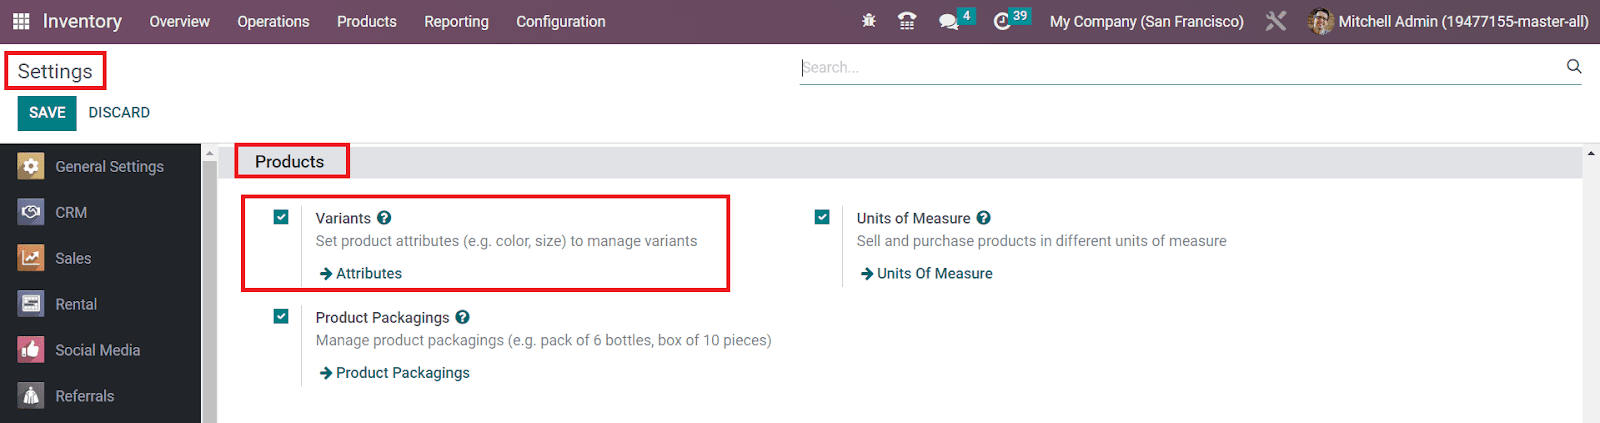
The Product Variants option can be assessed from the Products menu of the Inventory module. The configuration of the product variant is the same as we discussed in the previous section.
The screenshot shown below shows the list of variants configured in the Inventory module. This window also is similar to the Products window. The only difference is that here, you can observe the Variant Values of the respective products.
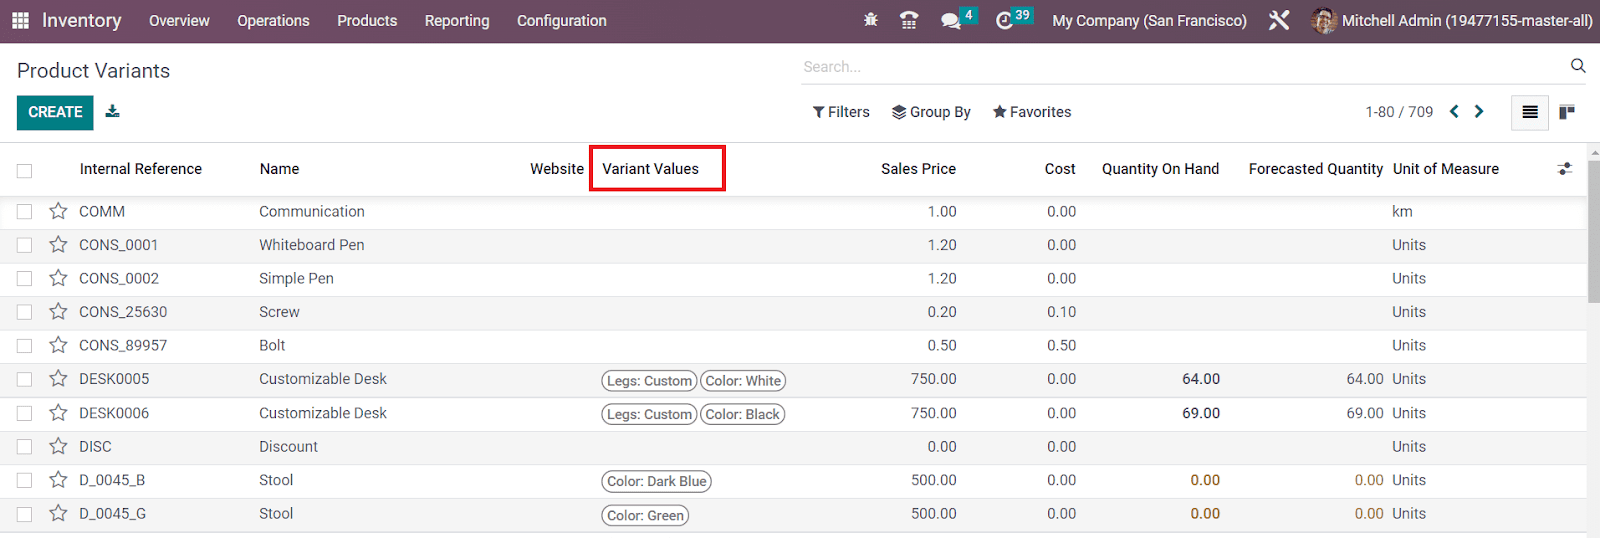
While configuring a new product, you can mention its variants in the Attributes & Variants tab. Here, you need to mention the Attributes and Values of the variant.
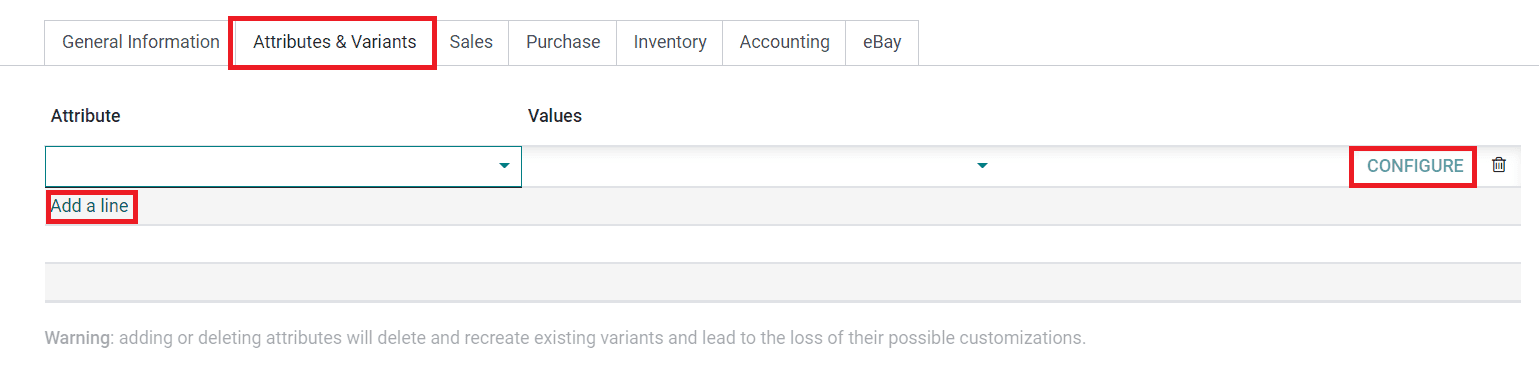
Using the Configure button, you can create a new variant value from this platform itself. Apart from this, OTX offers another platform to configure new attributes of a product and its values. You will get access to this platform from the Configuration menu.
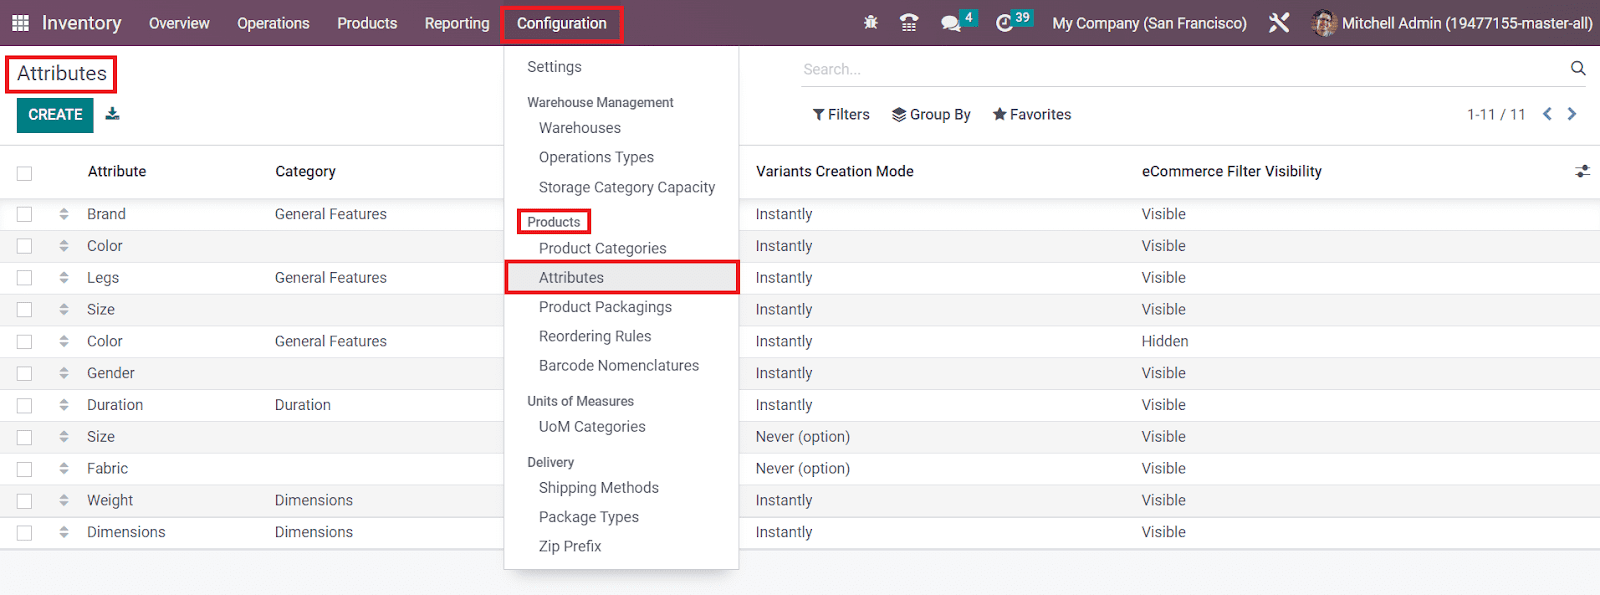
Click the Attributes button from the Configuration button and OTX will lead you to the platform with the list of already configured attributes. It shows the Attribute name, Category, Display Type, Variants Creation Mode, and eCommerce Filter Visibility. In order to search for attributes, you can use the search box. For sorting operations, you will get custom Filter and Group By options on this window. For creating new attributes, use the Create button.

You can mention the suitable title for the attribute in the Attribute Name field. Set a category in the Category field to regroup similar attributes under the same section on the comparison page of eCommerce. The Display Type of the attribute used in the product configurator can be set as Radio, Pills, Select, or Color. In the Variants Creation Mode, you can define the method of variants creation from the given options that are:
Instantly: All possible variants are created as soon as the attribute and its values are added to a product.
Dynamically: Each variant is only created when its corresponding attributes and values are added to a sales order.
Never: Variants are never created for the attributes.
You can not change the variant creation mode once the attribute is used on at least one product. You can provide a filter option for the customer on eCommerce to filter products based on their attributes by activating the Visible option from the eCommerce Filter Visibility field. Selecting the Hidden option will hide the attribute filters on the eCommerce page. You can mention the Attribute Values one by one using the Add a Line button. Activating the Is Custom field will allow users to input custom values for the attribute value.
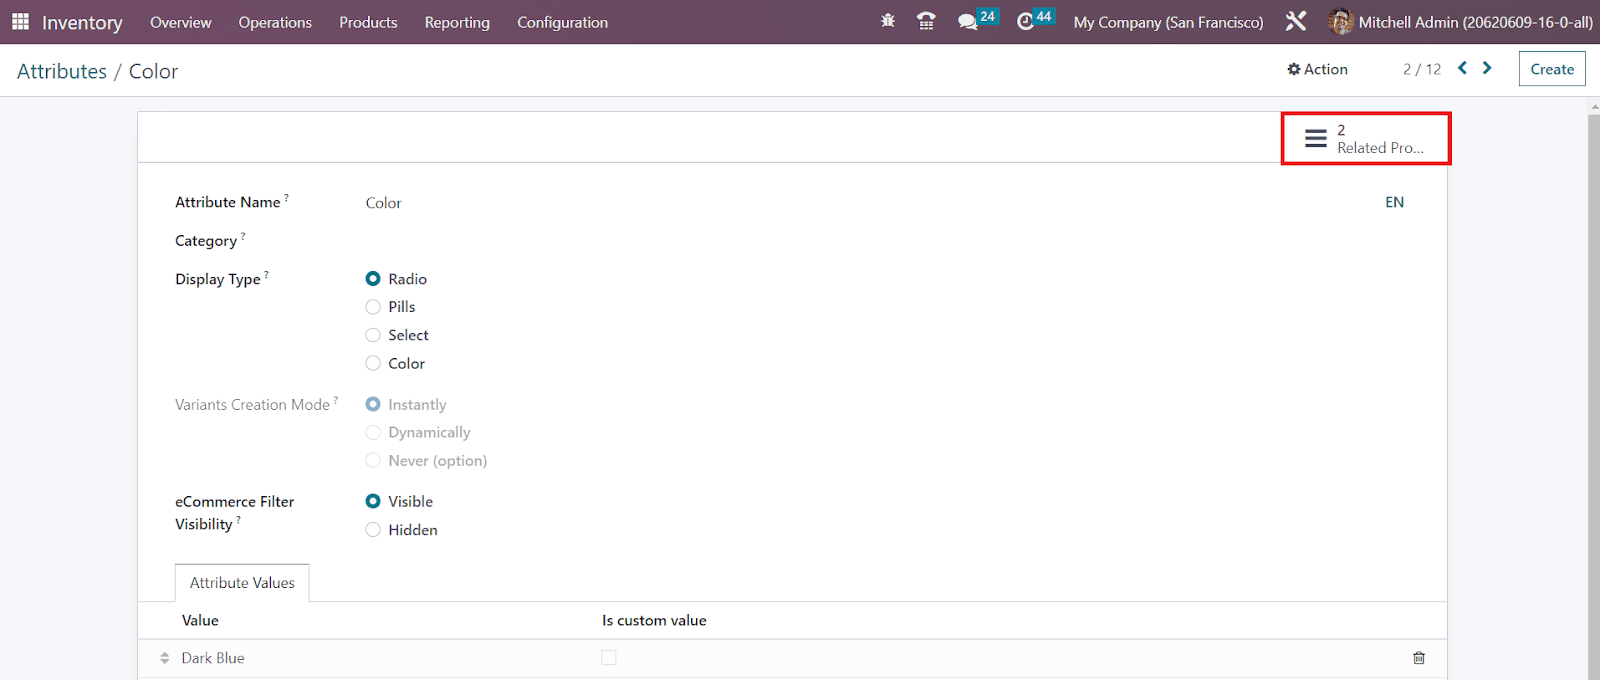
The products with this attribute can be observed using the smart button called Related Products as highlighted in the image above.
Product Categories
You can categorize your products using the Product Categories feature available in the OTX Inventory module. In order to perform various kinds of product operations, it is essential to define product categories in OTX . OTX will make the products easier to find because it allows you to filter by product categories. The user will get access to the Product Categories window from the Configuration menu of the Inventory module as shown below.

The pre-configured categories can be obtained from this window such as All, Consumable, Deliveries, Rental, Saleable, Internal, External, and many more. Let’s create a new product category using the Create button. OTX will direct you to a new window to configure a new product category as shown in the screenshot below.

The name of the new category can be specified in the given field along with the details of its Parent Category and Avatax Category. In the Taxcloud tab, you can mention the TaxCloud Category of this product category. It refers to the taxability information codes which are used by TaxCloud to compute specific tax rates for each category. This value is used when no TIC is set on the product. If no value is set here, the default value set in Invoicing Settings is used. Under the Logistics tab, you can define the Routes of operation of this product category. In the Force Removal Strategy field, you can set a specific removal strategy that will be used regardless of the source location for this product category.
The Reserve Packaging can be set as Reserve Only Full Packaging or Reserve Partial Packaging.
- Reserve Only Full Packagings: It will allow you to reserve full packaging only. If a customer orders 2 pallets of 1000 units each and you only have 1600 in stock, then only 1000 will be reserved.
- Reserve Partial Packagings: It allows reserving partial packaging. If a customer orders 2 pallets of 1000 units each and you only have 1600 in stock, then 1600 will be reserved.
In the Accounting Properties tab, you can specify the Income Account and Expense Account in the respective fields. The income account will be used when validating a customer invoice and the expense is accounted for when the vendor bill is validated.
In the Inventory Valuation tab, you can set the Costing Method for this product category. The costing methods available in OTX are,
- Standard Price: The products are valued at their standard cost defined on each of them.
- Average Cost (AVCO): The products are valued at weighted average cost.
- First in First out (FIFO): The products are valued supposing those that enter the company first will also leave it first.

You can set the Inventory Valuation of the product category as Manually or Automated as per your requirement. In the case of Manual inventory valuation, the accounting entries to value the inventory are not posted automatically. In Automated inventory valuation, an accounting entry is automatically created to value the inventory when a product enters or leaves the company.
When you select the Automated inventory valuation, you will get an additional tab called Account Stock Properties on the screen. This tab includes
- Valuation Account: When automated inventory valuation is enabled on a product, this account will hold the current value of the products.
- Stock Journal: When doing automated inventory valuation, this will be the account journal in which entries will be automatically posted when stock moves are processed.
- Stock Input Account: Counterpart journal items for all incoming stock moves will be posted in this account unless there is a specific valuation account set on the source location. This is the default value for all products in this category. It can also directly be set on each product.
- Stock Output Account: When doing automated inventory valuation, counterpart journal items for all outgoing stock moves will be posted in this account, unless there is a specific valuation account set on the destination location.
The smart buttons available on the product category window will give details of the Products configured under this category and Putaway Rules respectively.
Now, let’s take a look at the Packaging feature offered by the Inventory module.
Product Packaging
Using the OTX Inventory management system, you can put your products in packs and track them effortlessly. It will be beneficial to ensure secure and comfortable transportation and movements of products in inventory. Putting products in packages will protect them from damage to some extent. As we all know, delivering products in good condition without any damage is a crucial responsibility of all companies. OTX 16 helps you to create multiple packages for a single product, a single pack for different products, and delivery packages. Let’s check these packaging features available in the Inventory module.
You will get access to the packaging features in the Inventory module after activating them from the Settings menu. As shown in the screenshots below, you need to activate the Packages option from the Operations tab and the Product Packagings option from the Products tab.


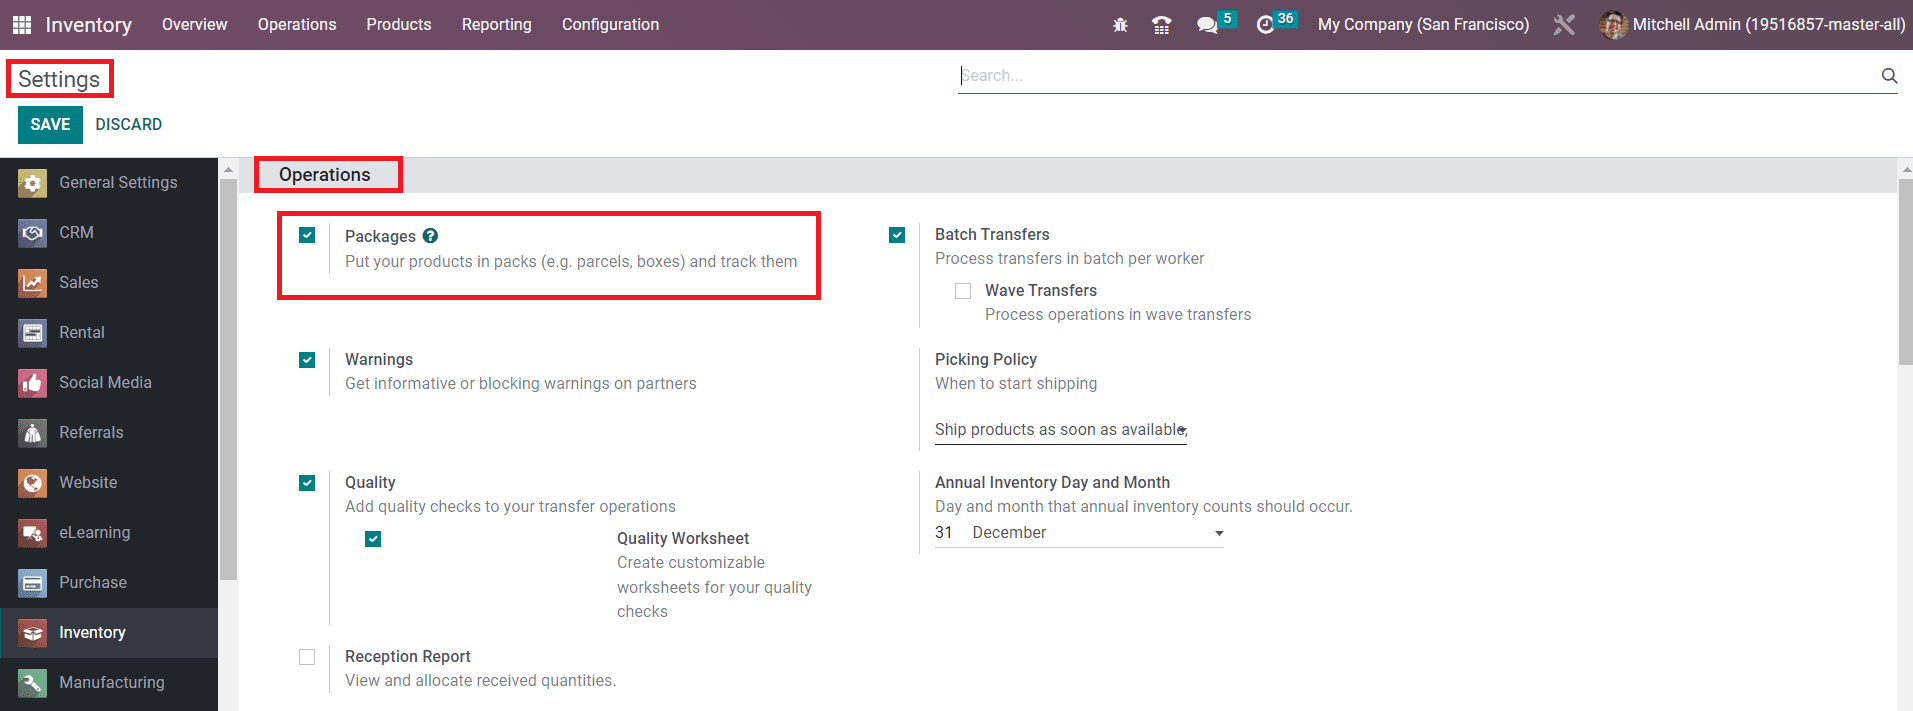
You must be thinking why there are two options for packages. In OTX , Packages and Product Packagings are used for different purposes. Packages are packs of different products. We can put different products in a pack using the Packages features and track them. Whereas Product Packaging is used to pack different quantities of the same product. It is a single pack of multiple units of the same product. Let’s check each of these features in detail.
Packages
After activating the Packages feature from the Settings module, you will be able to find the option under the Products menu of the Inventory module as shown below.

This is the Kanban view of the platform.

From the list view, you will get the Display Name, Package Type, Location, and Company details of the already configured packages. You can create a new package for multiple products using the Create button.

The Package Reference can be observed in this window as shown above. In the Package Type field, you can select a suitable type for your packages. The configuration of the package type will be discussed later. The total weight of the package can be specified in the Shipping Weight field. Mention the name of the Company and the Location of the product in the respective fields. The Pack Date will be displayed in the corresponding field. You can set the Package Use as Disposable Box or Reusable Box. Reusable boxes are used for batch picking and emptied afterward to be reused. In the barcode application, scanning a reusable box will add the products in this box. Disposable boxes are not reused. When scanning a disposable box in the barcode application, the contained products are added to the transfer. The Products included in this package can be seen under the Content tab. The product list will only appear after you use this package for stock movements. It includes the Product Name, Lot/Serial Number, Quantity, and Unit of Measure.
It is possible to put multiple products in a package while confirming delivery orders. After confirming the sales order, you can confirm the delivery order using the smart button available on the respective sales order window. As shown below, you will get the delivery order to validate.

Here, you can find the Put in Pack option under the Operations tab. The products ordered by the customer can be put in a pack using this button. As soon as you click on this option, a new smart button will appear on the screen as shown below.

Clicking on the Packages button will give you the details of the package of this delivery order.

Such created packages can be observed in the Packages menu of the Inventory module as we discussed earlier.
Product Packaging
The user will get access to the Product Packaging window from the Configuration menu of the Inventory module. You can use this feature to pack multiple units of a product. The window will show the Product, Packaging, Package Type, quantity of products in the package, Unit of Measure, Sales, and Purchase details.

Click the Create button. OTX will display a new product packaging creation window as shown below.
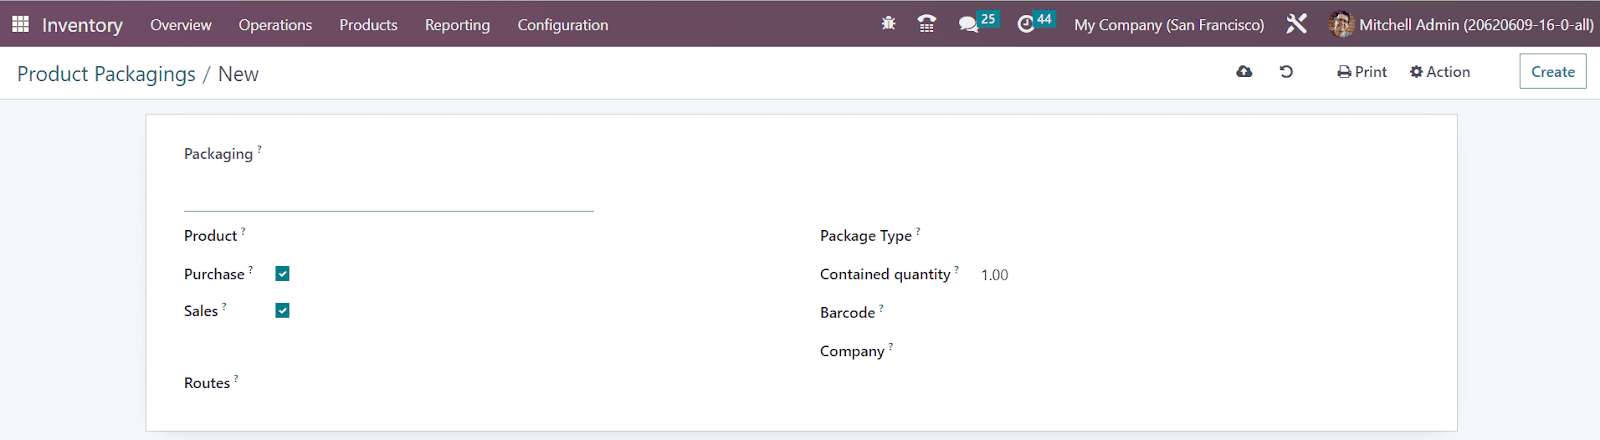
Here, you can mention the name of the Packaging, Product, Package Type, Contained Quantity, Barcode used for packaging identification, and Company in the corresponding fields. You are allowed to activate the Purchase and Sales options if you want to use this product packaging in the purchase and sales orders respectively.

You can define product packaging from the product configuration window also. We already discussed this while detailing the product configuration in the Inventory module.Now, we will look at configuration of package types in the Inventory module
Package Type
The option to define different types of packages can be found in the Configuration menu of the Inventory module as shown in the image below. With the help of this platform, you can configure multiple package types for delivery operations.

You can observe all predefined package types in this window along with the details of the Carrier, Package Type, Height, Width, Length, Max Weight, and Carrier Code. Let’s check how OTX creates new package types for products. For this, you can use the Create button.

In the Package Type field, you can specify a suitable title for the package. After this, define the Size of the package type in the specified field. The total weight of the package can be added in the Weight field. The maximum weight shippable using this package type can be mentioned in the Max Weight field. In the Barcode fields, you can specify the barcode used for the package identification process. After mentioning your Company , you can add the Carrier and Carrier Code used for this package.
As we understand the packaging feature in OTX , let’s move to the product traceability feature.
Product Traceability
The Product traceability feature offered by OTX will assist in tracing and tracking each and every component of a product. Tracking a product at each stage of stock movement is necessary to bring all operations under control. In order to ensure effective monitoring of the stock movement, lots and serial numbers play an important role. From manufacturing processes to delivery operations, product traceability will keep a proper track that improves the efficiency of stock management. Proper monitoring is required to reduce the risk factors during the stock movements of any company. The OTX ERP system will record exact details of the stock movement of each component of a product in inventory in the form of a traceability report. The user can observe the whole production to distribution procedures in the inventory using the lots and serial numbers.
Lots and serial numbers are not exactly the same. Commonly we use a lot as a unique identification number to identify a group of products of the same type. If the products are small or can not count as individual products, you can put them together in a single pack and allot a lot number. They are picked as batches in the inventory. For individual products, you can assign serial numbers. The serial number is considered to identify individual products in the inventory.
We allocate lots and serial numbers for products at the time of their inventory management. You can assign lots and serial numbers to the products while configuring them in the Inventory module so that you can easily keep the traceability report of the respective products thereafter. The inventory management tools offered by OTX 16 support this traceability feature to ensure effective tracking operations. In order to get the complete features of the traceability in the Inventory module, you are requested to activate the Lots & Serial Numbers option from the Settings menu.

As shown in the image above, this feature will be available under the Traceability tab. After activating this feature, you will get the Lots/Serial Numbers option under the Products menu.

Here, already configured lots and serial numbers can be observed. It includes the Lot/Serial number, Internal Reference number in case it differs from the manufacturer’s lots/serial numbers, Product, Creation date, and Company. Assigning a new lost/serial number for a product can be easily done using the Create button.
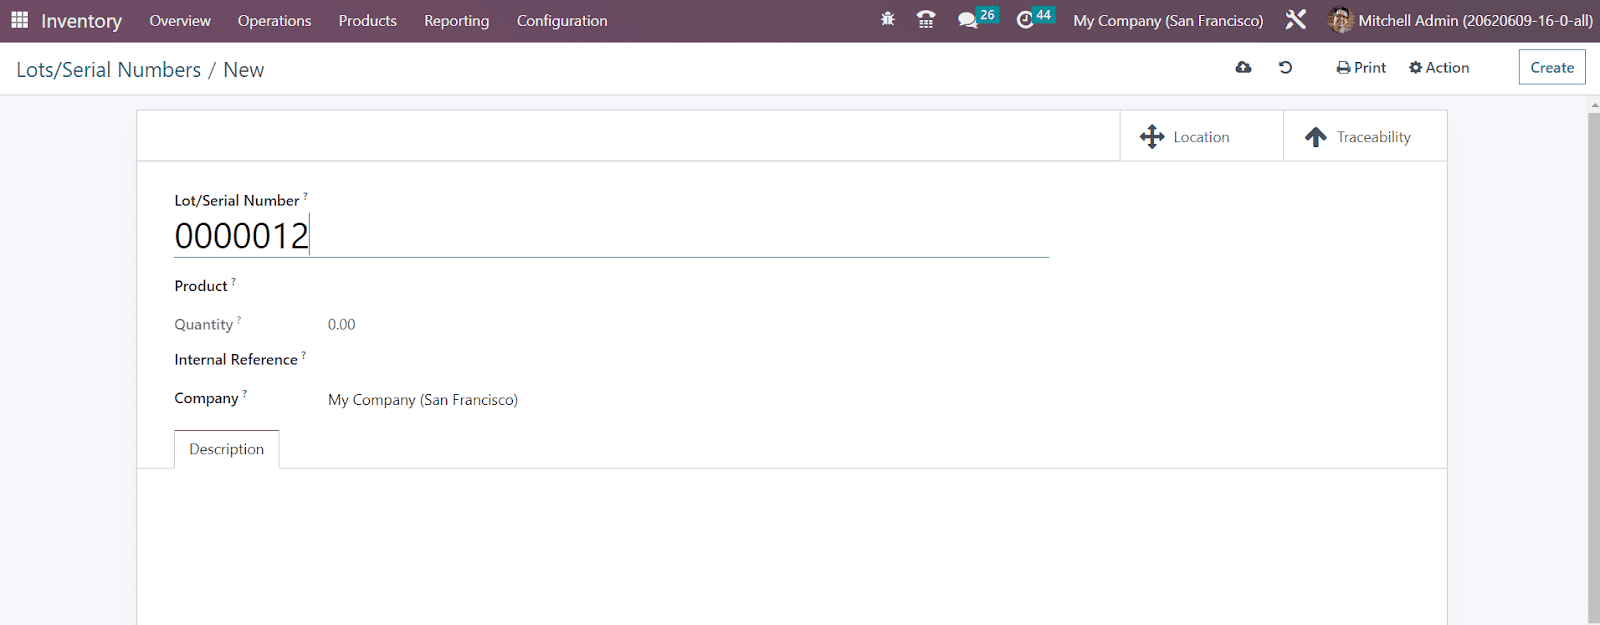
First, you can mention a unique lot/serial number in the given space. In the respective fields, you can specify the Product, Quantity, Internal Reference, and Company. You can not change the serial number anymore if the product has already been moved. Additional notes related to this lot/serial number can be specified in the Description tab.
The user will get some additional smart buttons on the window based on the operations done using this lot/serial number. As soon as you configure a new lot/serial number, you will get two smart buttons called Location and Traceability on the window as shown below.
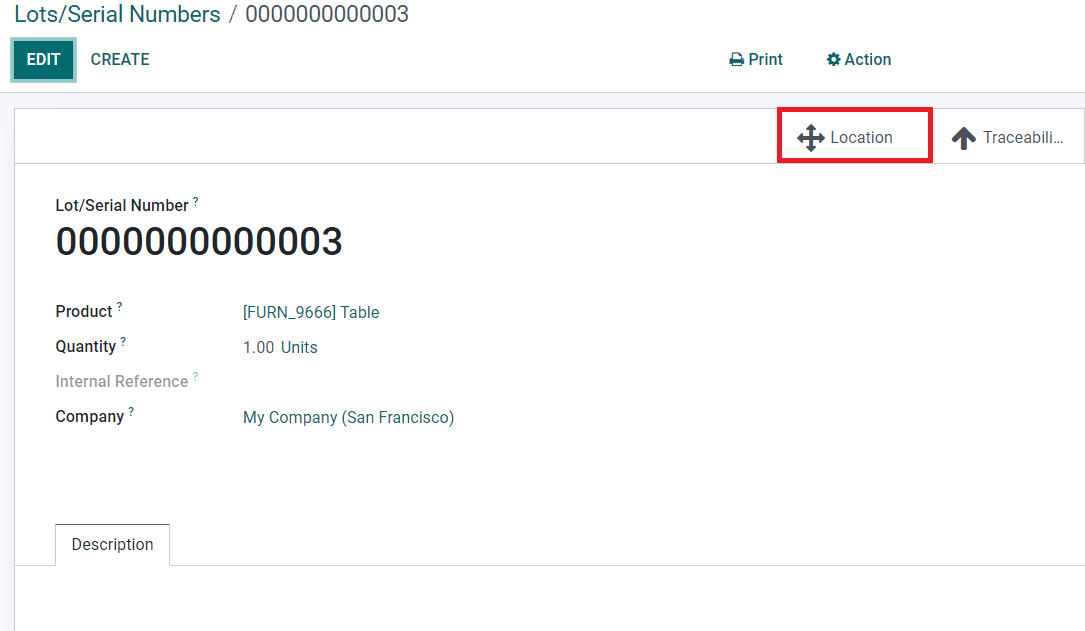
By clicking on the Location button, you will get the exact location details of the product.

In the location history, you can find the Location, Product, Package, Lot/Serial Number, Owner, On Hand Quantity, Reserved Quantity, and Unit details. The History button available here will help you to get the movement history of the product. The product can be replenished from this window itself using the Replenishment button.

The Traceability smart button will give you the tracking information of the product.

Here, you will get the Reference, Product, Date, Lot/Serial, From, To, and Quantity details of each product movement.
While configuring a new product in the OTX Inventory module, you can define the traceability of the product. As shown in the image below, you will get the option to define the Traceability of the product under the Inventory tab.

You can set the tracking of the product by using Unique Serial Number or Lots from this window. If you don’t want to track the product, you can select the No Tracking option.
You can assign lots/serial numbers to products while receiving them in the inventory. After confirming a purchase order, you will be able to manage lots and serial numbers for the products before receiving them. In order to understand this precisely, let’s create a new purchase order and confirm it.
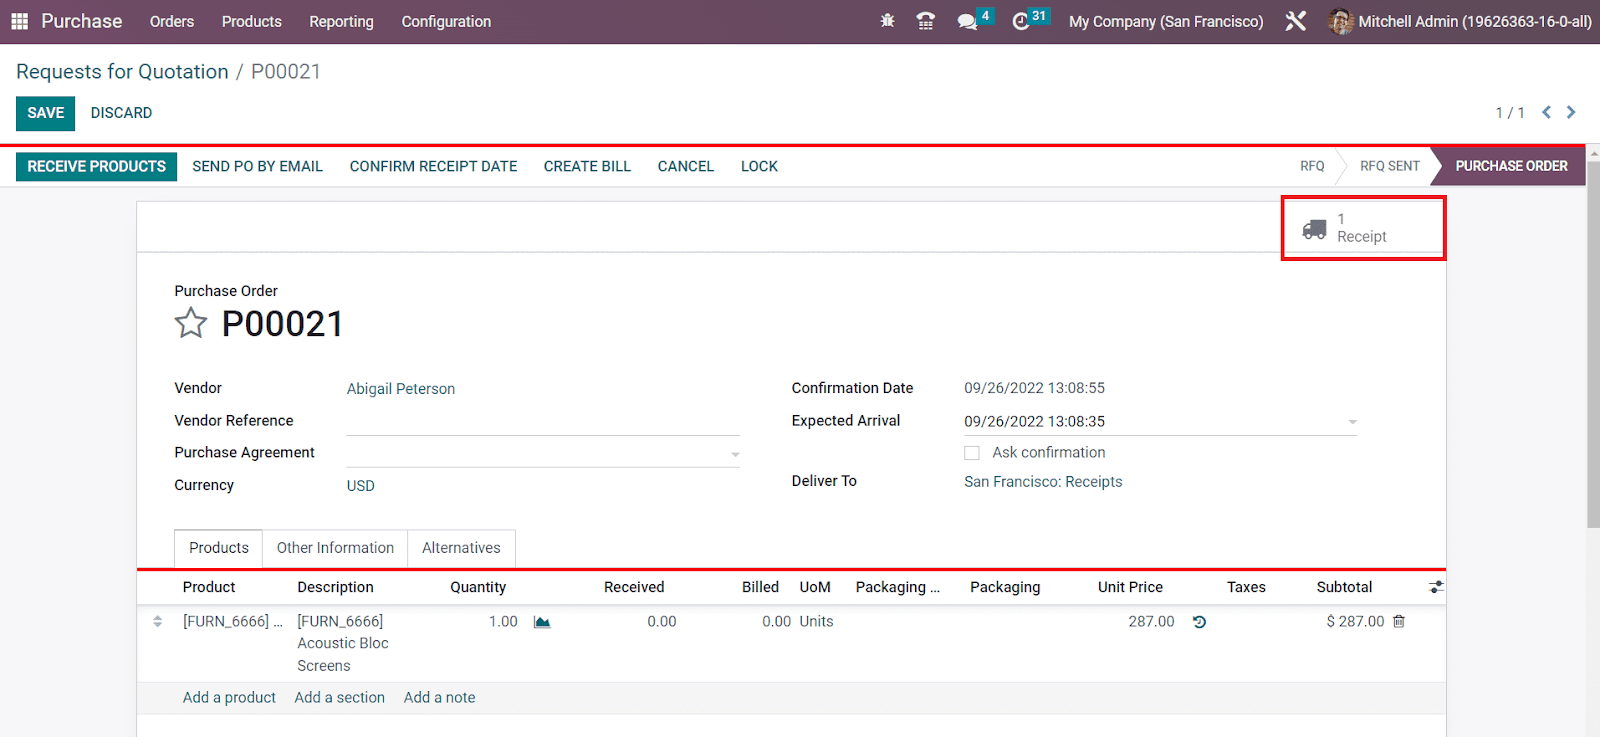
The above-shown screenshot is a confirmed purchase order. Here, you will get a smart button to manage the Receipt of the purchase. Click this button.

Now, you can use the option highlighted in the image above from the Receipt window. As soon as you click on this button, a new wizard will appear to define the lots/serial number of the selected product.

Here, you can specify the Lot/Serial number and Destination Package in the corresponding fields using the Add a Line button. Click the Confirm button. Now, you can validate the receipt and receive the product in your inventory. This lot/serial number will be added to the product details window of this newly purchased product. You can check this using the smart button available on the product details window as highlighted in the image below.
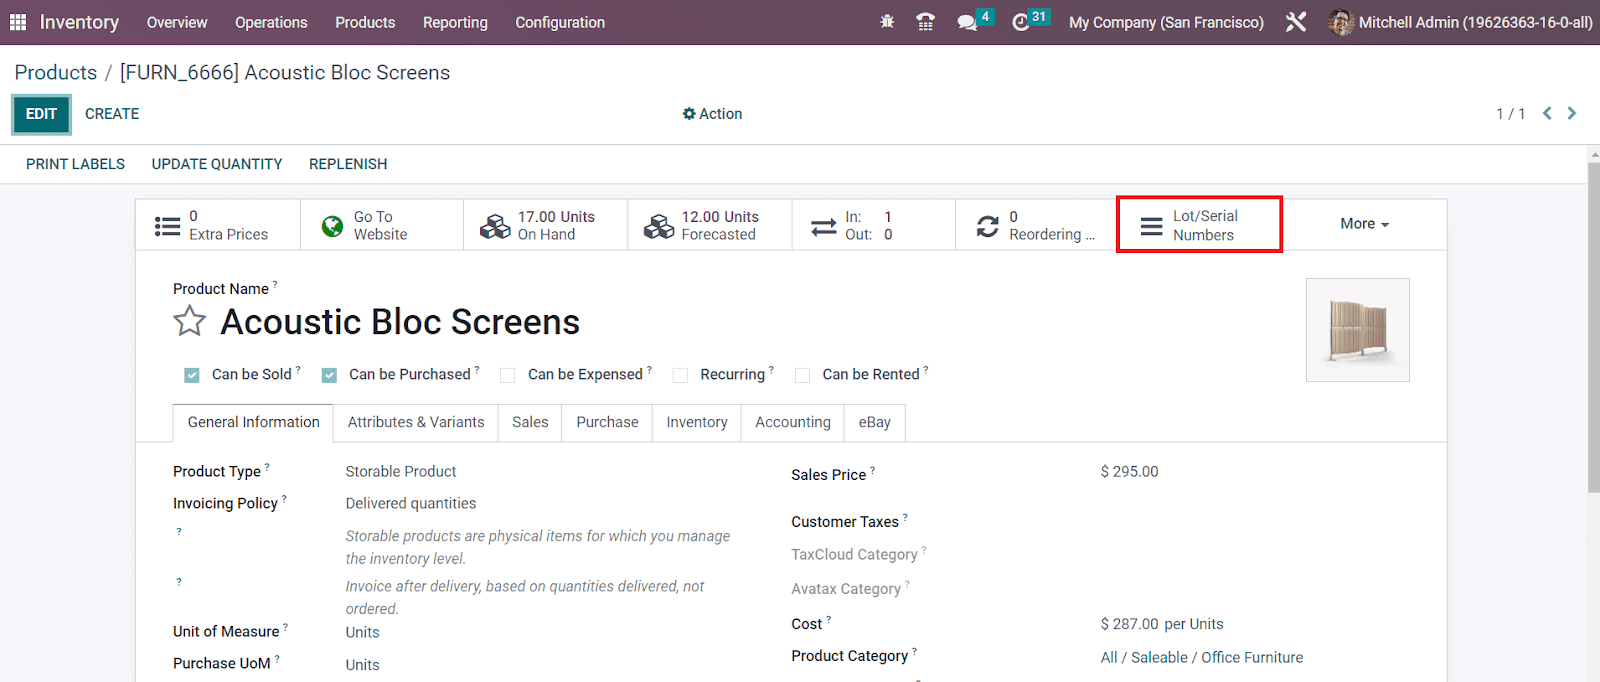
You can observe the newly assigned lot/serial number here.
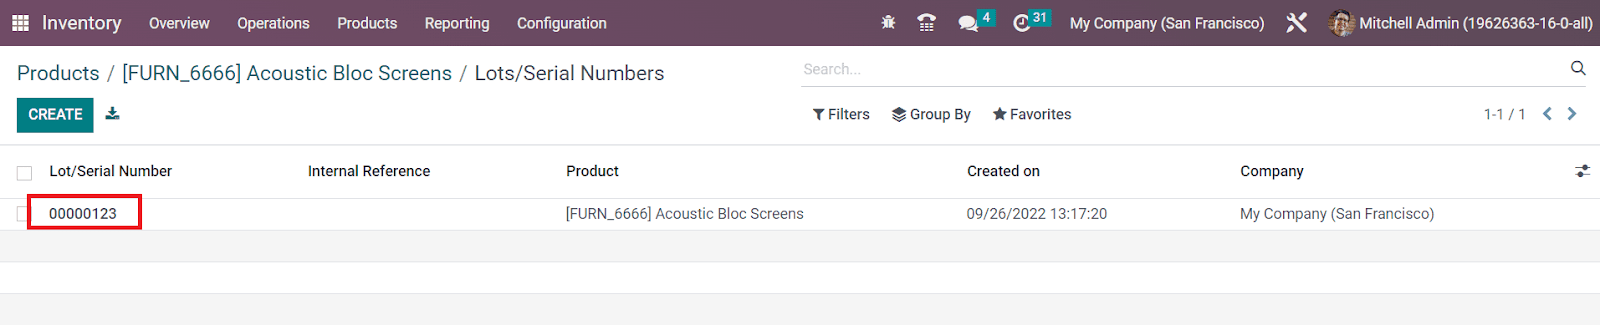
You can display lots and serial numbers on the delivery slips by activating the Display Lots & Serial Numbers on Delivery Slips option from the Traceability tab of the Settings menu. Similarly, activating the Display Lots & Serial Numbers on Invoices button will show lots and serial numbers on invoices.

Now, let’s check how to set expiration dates on lots and serial numbers.
Expiration Date
Defining expiration dates for the storable or consumable products in your inventory is a crucial task. You should definitely mention the expiration date on each product so that the customer will get knowledge about the safety period to consume the product. OTX manages the expiration dates of the products using the lots and serial numbers aspects. You can activate this feature from the Settings menu of the Inventory module.
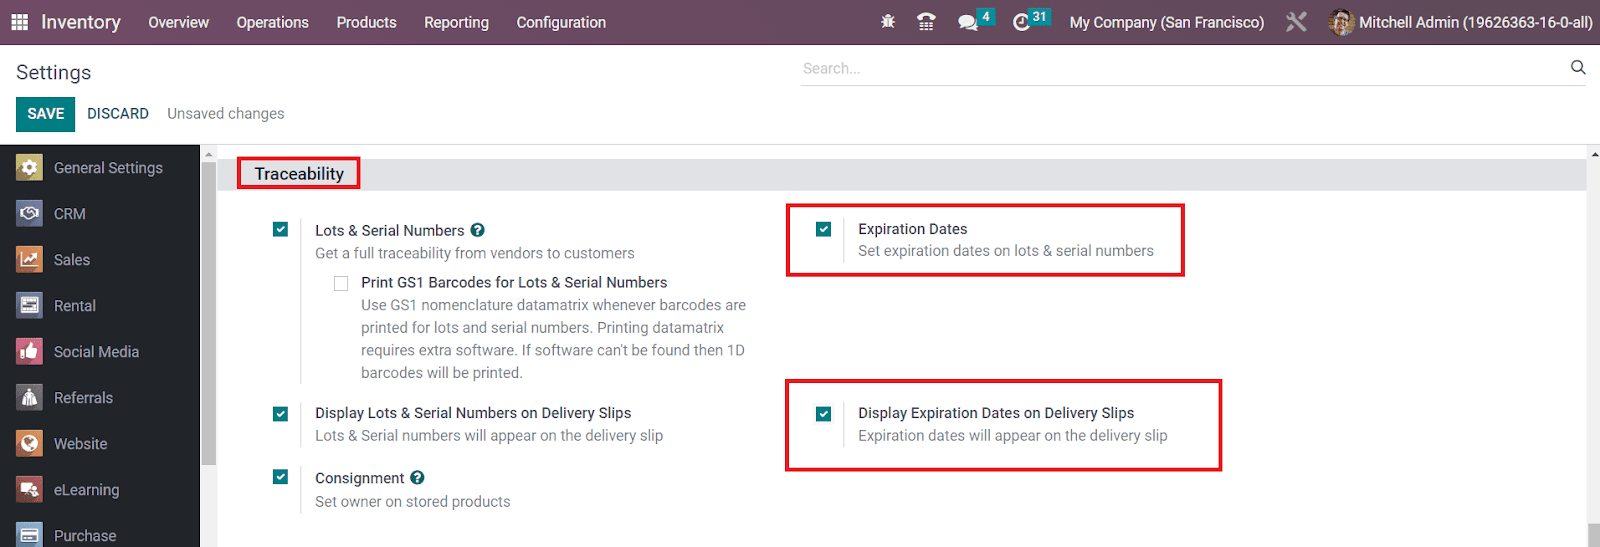
Under the Traceability tab, you can find the Expiration Dates option to activate. Along with this, you can activate the Display Expiration Dates on Delivery Slips option to display the expiration dates on the delivery slips.
After activating the expiration date feature, you can set expiration dates on lots or serial numbers of a product. For this, you can go to the product configuration window. Select the Inventory tab as shown below.

Here, you can define the tracking method from the Traceability field. After selecting the tracking method, you can activate the Expiration Date option.

When this option is activated, you will be able to specify the dates to manage product expiration on the product and on the corresponding lots/serial numbers. As soon as you activate this option, you will get some additional fields to define some important dates which are detailed below.
Expiration Date: The number of days after the receipt of the product after which the goods may become dangerous and must not be consumed. It will be computed on the lot/serial number.
Best Before Date: The number of days before the expiration date after which the goods start to deteriorate, without being dangerous yet.
Removal Date: The number of days before the expiration date after which the goods should be removed from the stock.
Alert Date: The number of days before the expiration date after which an alert should be raised on the lot/serial number.
After specifying the expiration date for a product, you can check the lot and serial number window of the respective product where you will get the expiration details automatically.
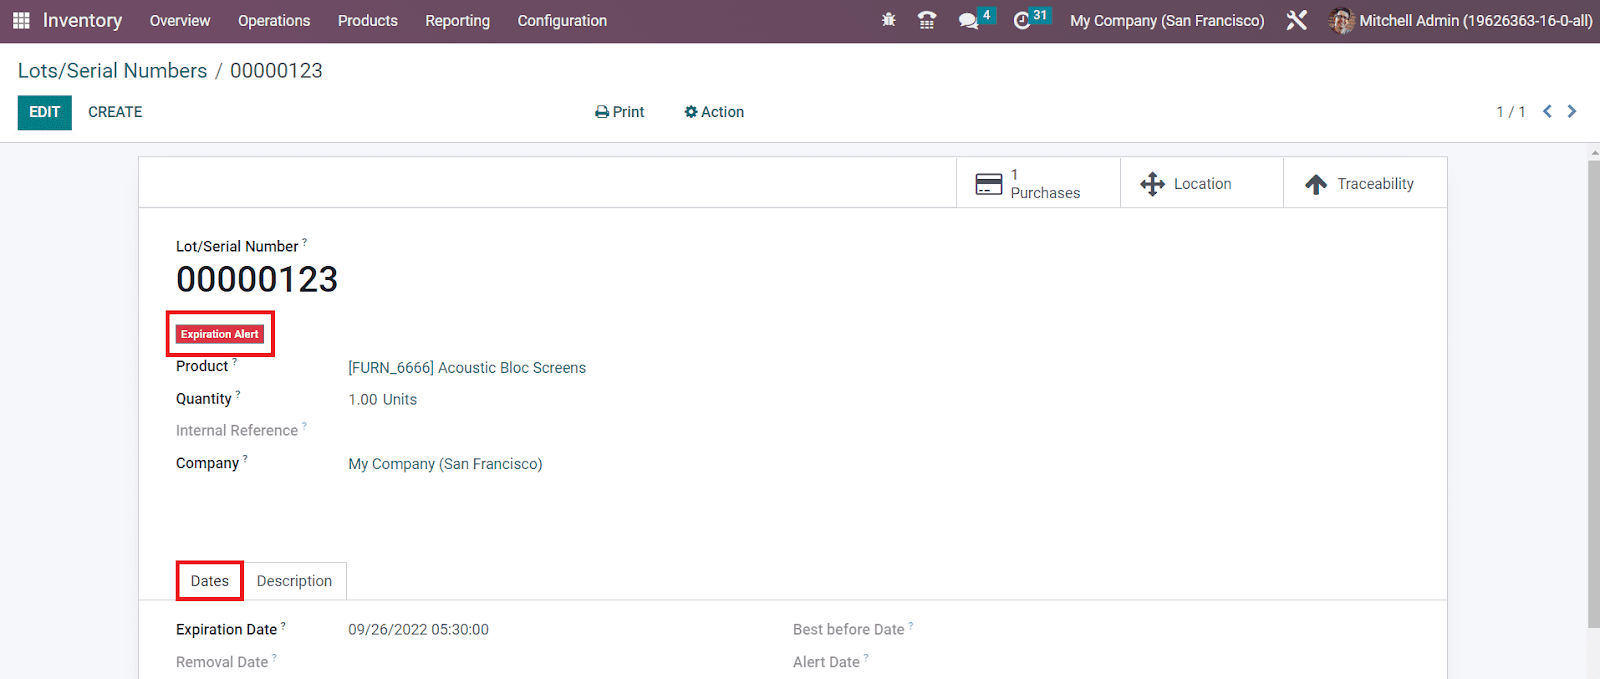
The Dates tab will show the expiry details of the lot/serial number. You can observe an expiration alert on the serial number if it is expired or near to expiration date. The filter Expiration Alert will assist you to get the exact list of the expired lots and serial numbers.

We detailed the feature of the product traceability in this section, now let’s discuss the inventory operations offered by OTX 16.
Inventory Operations
OTX Inventory module is the best option for the effective management of all types of inventory operations. Providing proper support for inventory management in a company is essential to run the business flawlessly. When we talk about OTX as the perfect solution for inventory management, you will be inquisitive about the features it offers. In this section, we will detail the inventory operations managed by OTX with the dedicated Inventory module. The Overview window of the Inventory module itself will give a clear insight into all possible operations managed by the module.
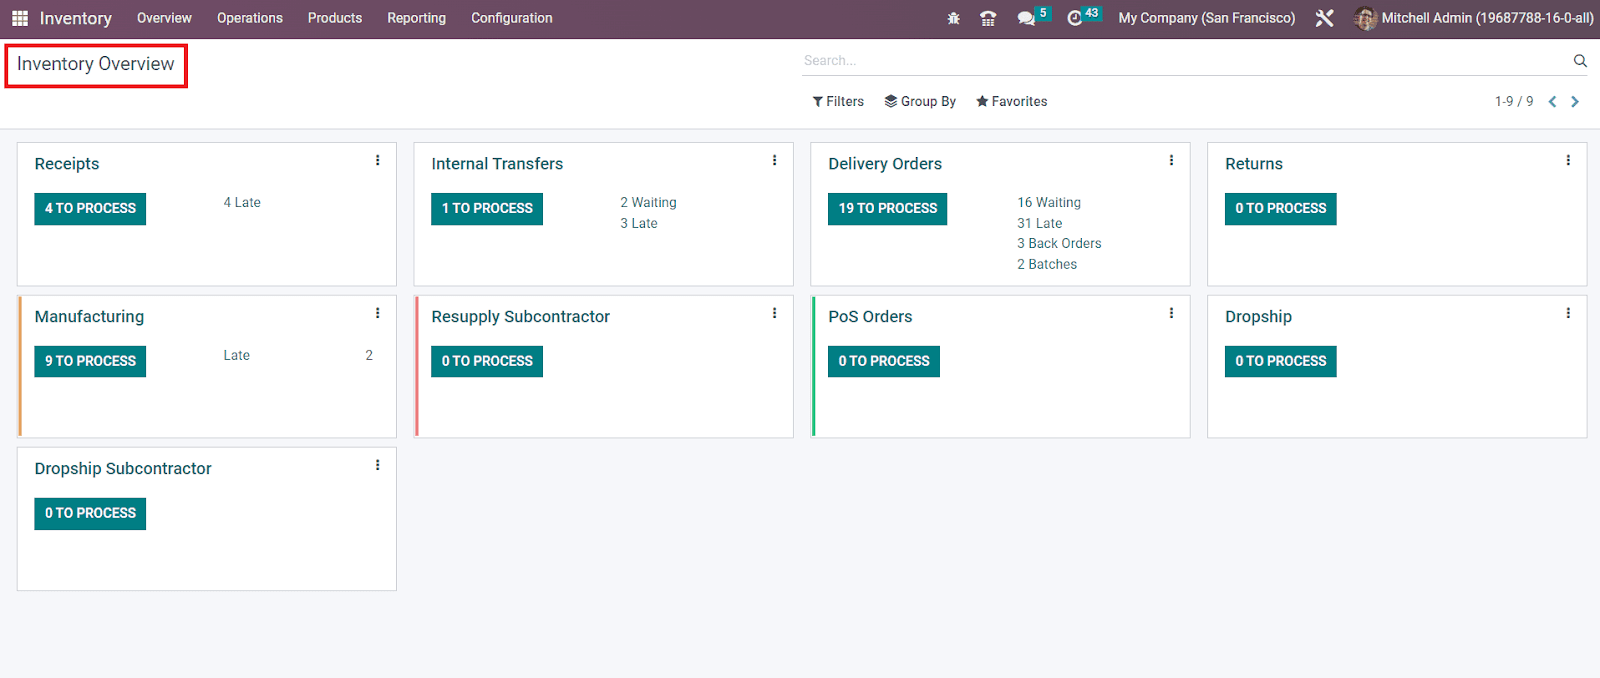
From the Kanban view of the Inventory Overview window, you will be able to manage the Receipt, Internal Transfers, Delivery Orders, Returns, Manufacturing, Resupply Subcontractor, POS Orders, Dropship, Dropship Subcontractor, and many more based on the operations configured in the module. You will get exclusive options in the menu bar of the Inventory module to manage all these operations separately. But, this platform will help you to get an overview of all operations at a glance. The three vertical dots given on the top right corner of each operation tab will give you additional tools to manage each of these operations. If the database is working in a multi-company environment, then the overview will include the inventory operations of all companies configured in your system.
Creating new operation types
In the OTX 16 Inventory module, you can effortlessly create new operation types with the help of the dedicated tools introduced in the module. The Operation Types menu can be accessed from the Configuration menu as shown below.
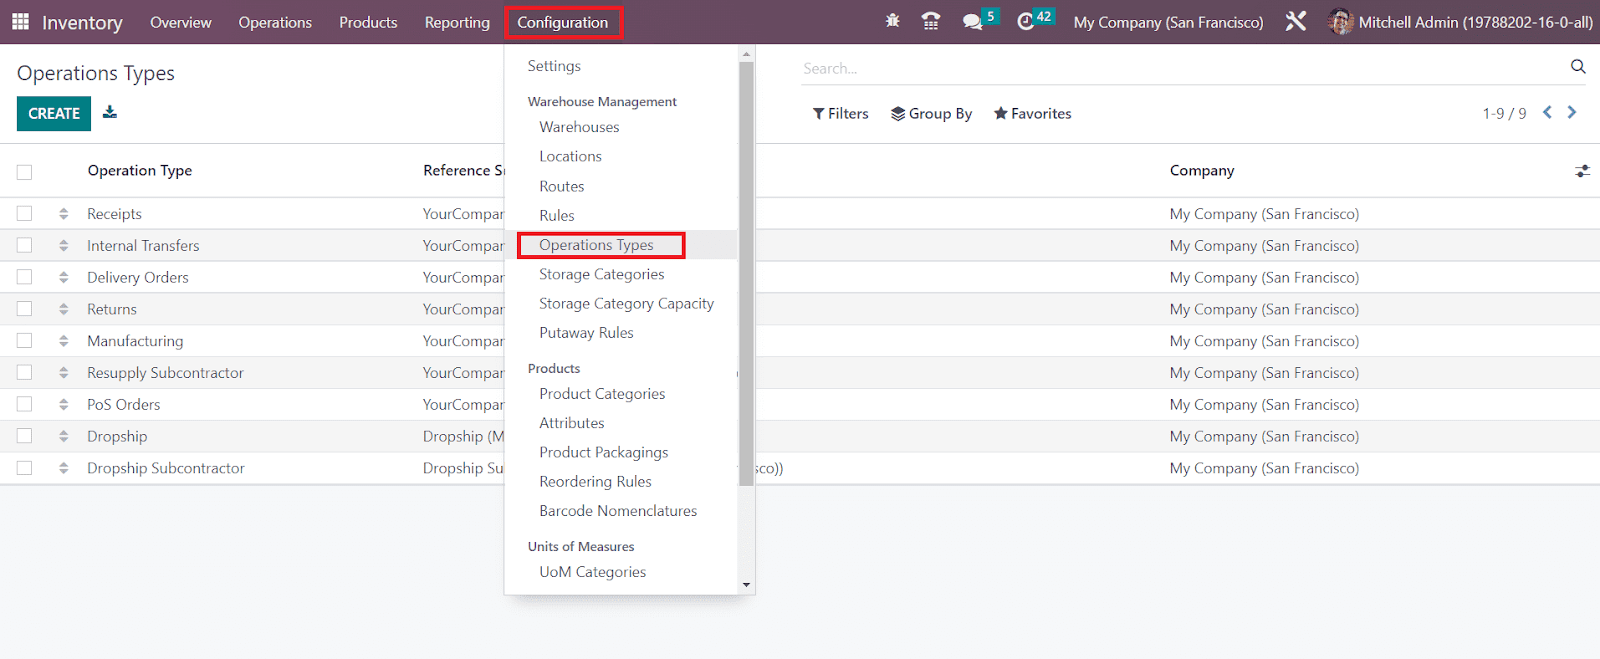
Clicking on this option opens a new window with the details of the already configured operation types. You can make changes to the available operation types by selecting them from the given list. Here, we are going to create a new Operation Type. So, click on the Create button.
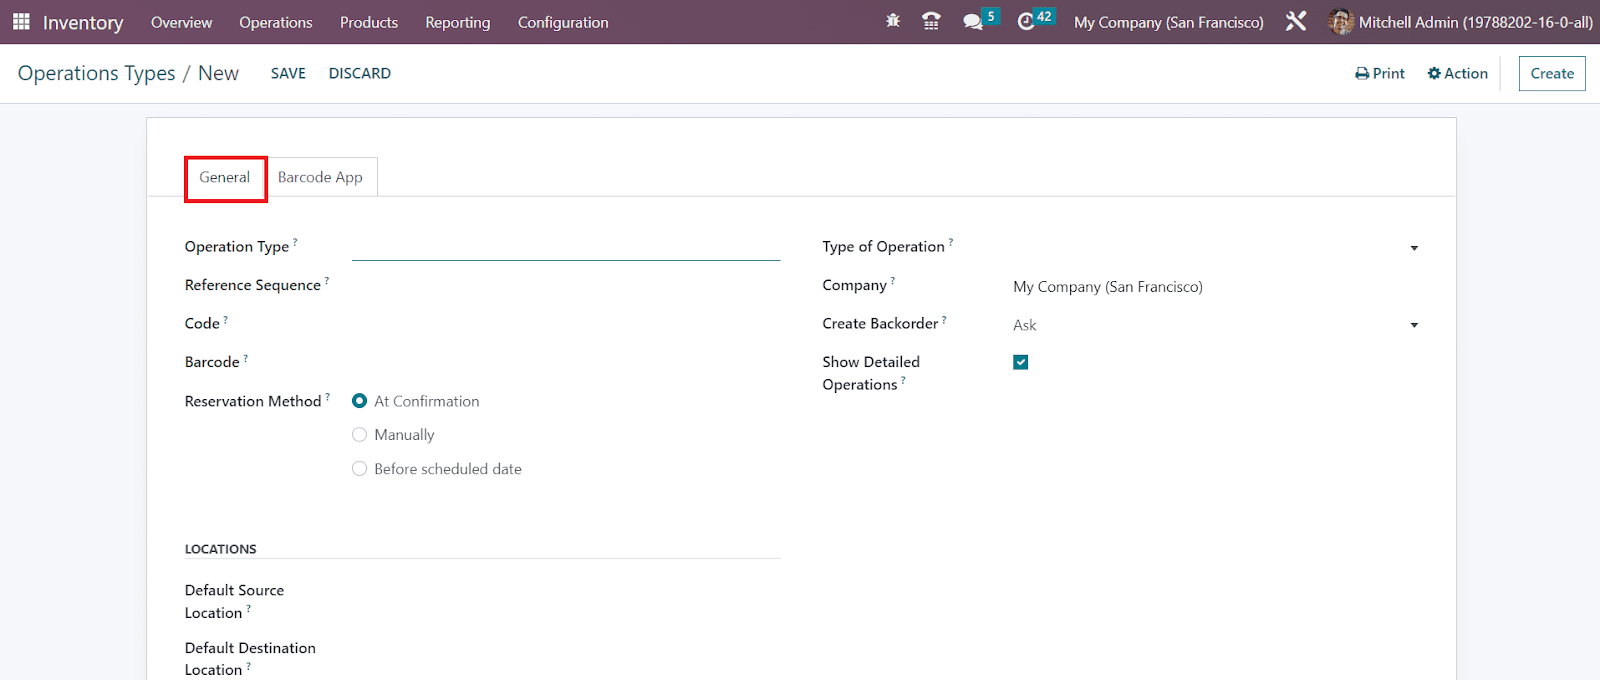
Here, you will get a new window to create a new operation type. You can mention the Operation Type in the corresponding field. Mention the Reference Sequence, Code, Barcode, Reservation Method, and Company in the respective fields. The Reservation Method will decide how the products in transfers of this operation type should be preserved. It can be either at confirmation, manually, or before the scheduled date. When validating a transfer, you can ask your users to choose if they want to create a backorder for the remaining products by selecting the option Ask in the Create Backorder field. By selecting the Always option, OTX will automatically create a backorder for the remaining products. Selecting the Never option will cancel the remaining products. If you want to show a detailed stock operation in the picking lines then you can check the Show Detailed Operation box.
The Default Source Location and Default Destination Location of the transfers of this operation type can be specified in the corresponding fields under the Locations tab.
The Type of Operation can be Receipt, Delivery, Manufacturing, or Internal Transfer. Based on the Type of Operation you select, there will be small changes in the remaining fields. Each Type of Operation has different configuration options. For example, if you select Receipt as the Type of Operation the additional fields that appear on the screen are highlighted below.


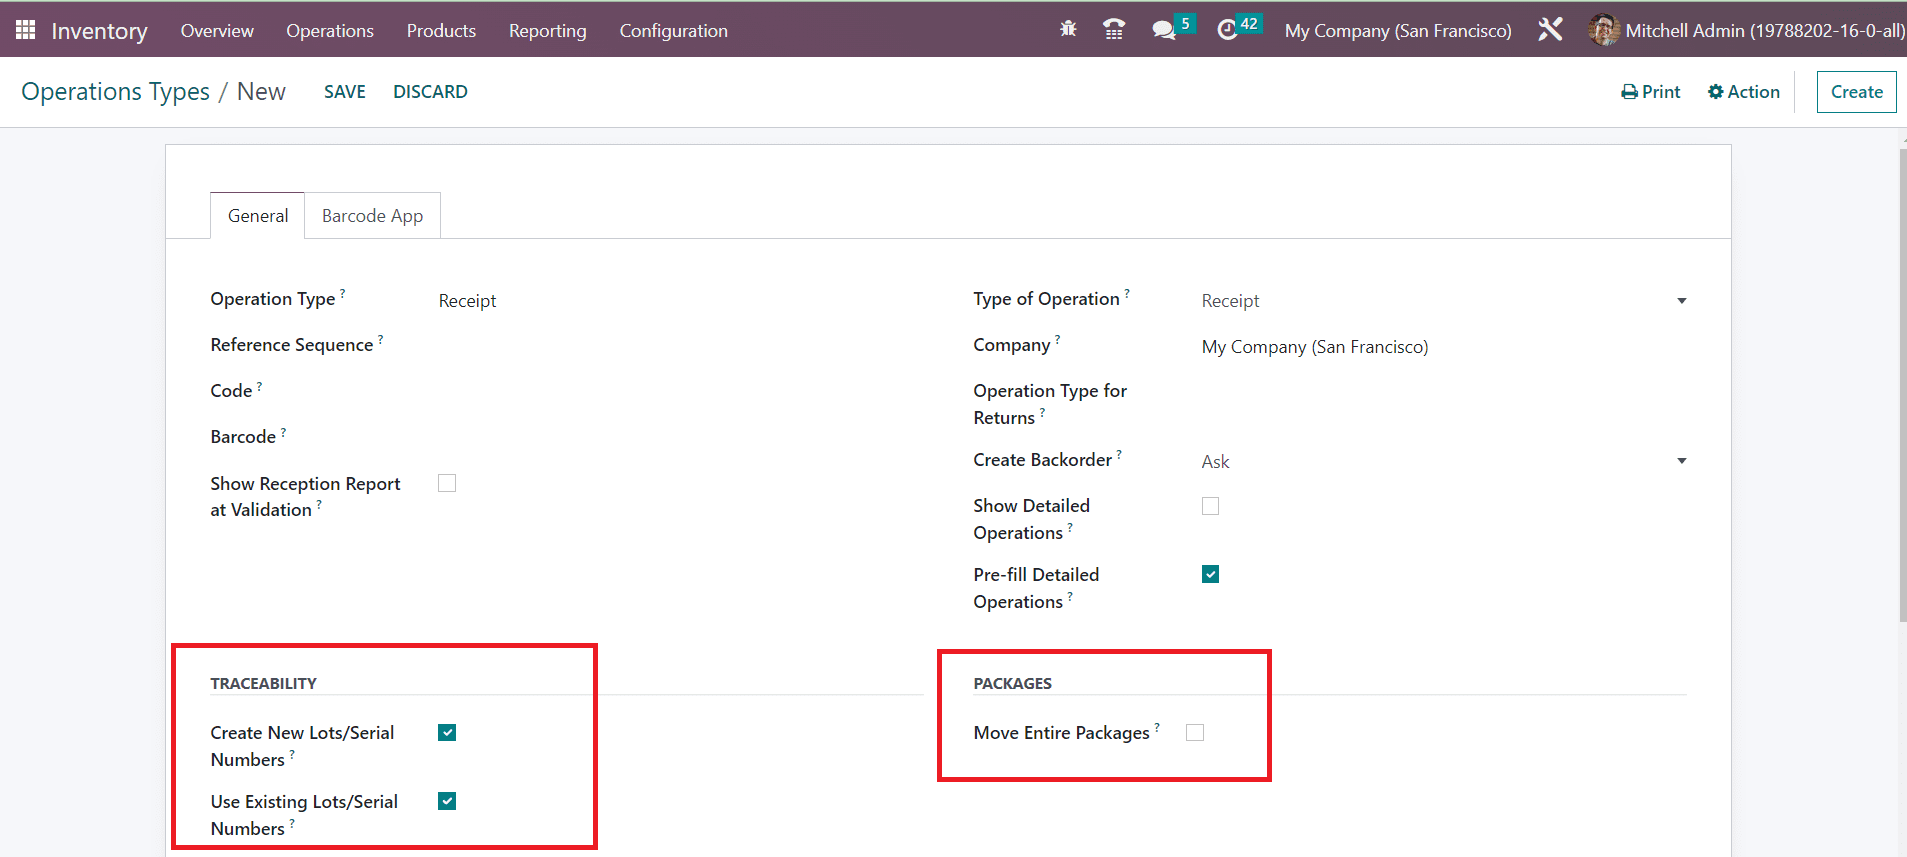
Here, in the case of Receipt, you can activate the Show Reception Report at Validation feature if you want to get an automated reception report at the time of validation. In the Operation Type for Returns field, you can specify the operation type suitable for the return operations of the products. OTX will automatically pre-fill the detailed operations with the corresponding products, location, and lot/serial numbers.
By activating the Create New Lots/Serial Numbers option from the Traceability tab, OTX will allow you to create new lots/serial numbers for the products in the transfers of this operation type. You can also use the existing lots/serial numbers for product transfers by activating the Use Existing Lots/Serial Numbers option. By checking the Move Entire Packages box from the Packages tab, you will be able to select entire packages to move.
The Product traceability feature offered by OTX will assist in tracing and tracking each and every component of a product. Tracking a product at each stage of stock movement is necessary to bring all operations under control. In order to ensure effective monitoring of the stock movement, lots and serial numbers play an important role. From manufacturing processes to delivery operations, product traceability will keep a proper track that improves the efficiency of stock management. Proper monitoring is required to reduce the risk factors during the stock movements of any company. The OTX ERP system will record exact details of the stock movement of each component of a product in inventory in the form of a traceability report. The user can observe the whole production to distribution procedures in the inventory using the lots and serial numbers.
Lots and serial numbers are not exactly the same. Commonly we use a lot as a unique identification number to identify a group of products of the same type. If the products are small or can not count as individual products, you can put them together in a single pack and allot a lot number. They are picked as batches in the inventory. For individual products, you can assign serial numbers. The serial number is considered to identify individual products in the inventory.
We allocate lots and serial numbers for products at the time of their inventory management. You can assign lots and serial numbers to the products while configuring them in the Inventory module so that you can easily keep the traceability report of the respective products thereafter. The inventory management tools offered by OTX 16 support this traceability feature to ensure effective tracking operations. In order to get the complete features of the traceability in the Inventory module, you are requested to activate the Lots & Serial Numbers option from the Settings menu.
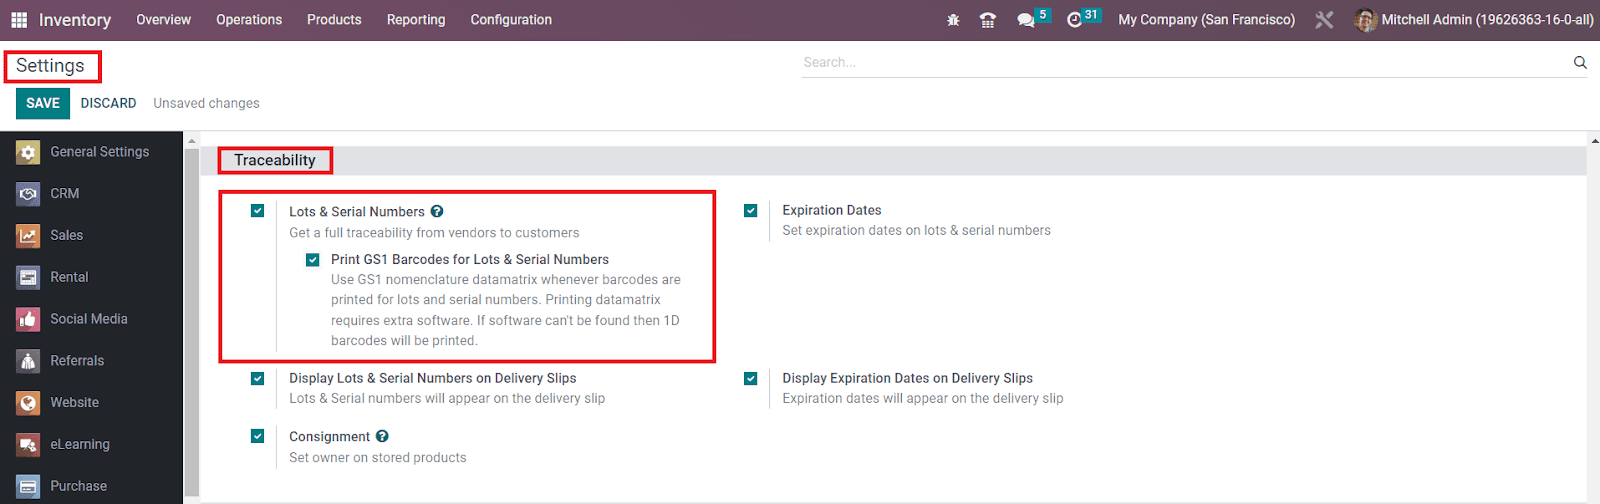
As shown in the image above, this feature will be available under the Traceability tab. After activating this feature, you will get the Lots/Serial Numbers option under the Products menu.
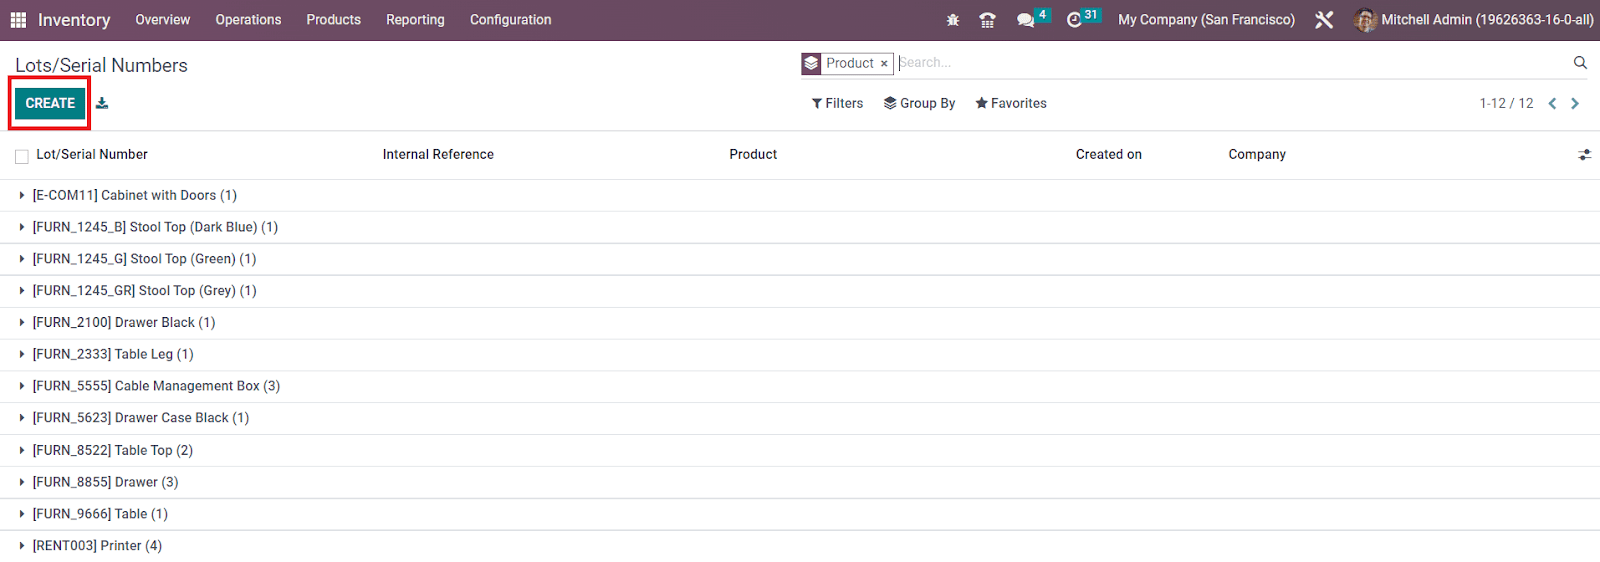
Here, already configured lots and serial numbers can be observed. It includes the Lot/Serial number, Internal Reference number in case it differs from the manufacturer’s lots/serial numbers, Product, Creation date, and Company. Assigning a new lost/serial number for a product can be easily done using the Create button.

First, you can mention a unique lot/serial number in the given space. In the respective fields, you can specify the Product, Quantity, Internal Reference, and Company. You can not change the serial number anymore if the product has already been moved. Additional notes related to this lot/serial number can be specified in the Description tab.
The user will get some additional smart buttons on the window based on the operations done using this lot/serial number. As soon as you configure a new lot/serial number, you will get two smart buttons called Location and Traceability on the window as shown below.

By clicking on the Location button, you will get the exact location details of the product.
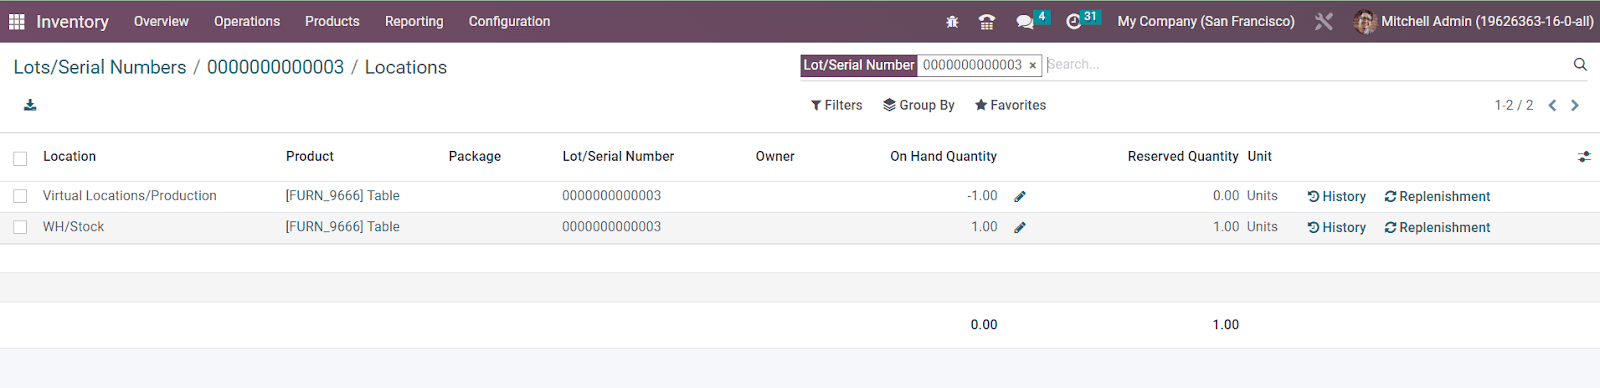
In the location history, you can find the Location, Product, Package, Lot/Serial Number, Owner, On Hand Quantity, Reserved Quantity, and Unit details. The History button available here will help you to get the movement history of the product. The product can be replenished from this window itself using the Replenishment button.
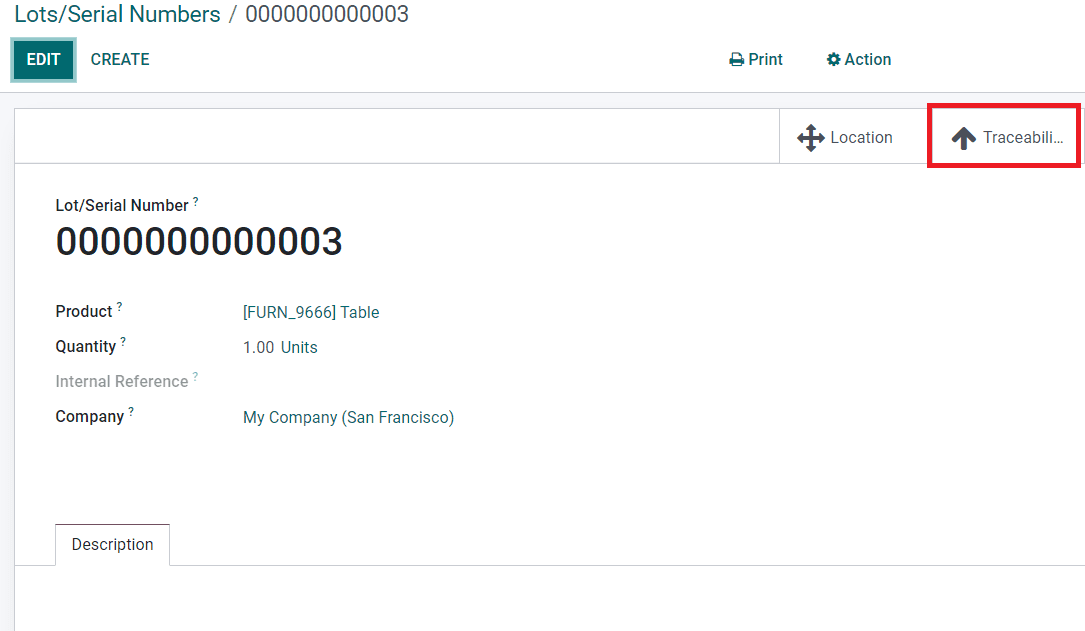
The Traceability smart button will give you the tracking information of the product.
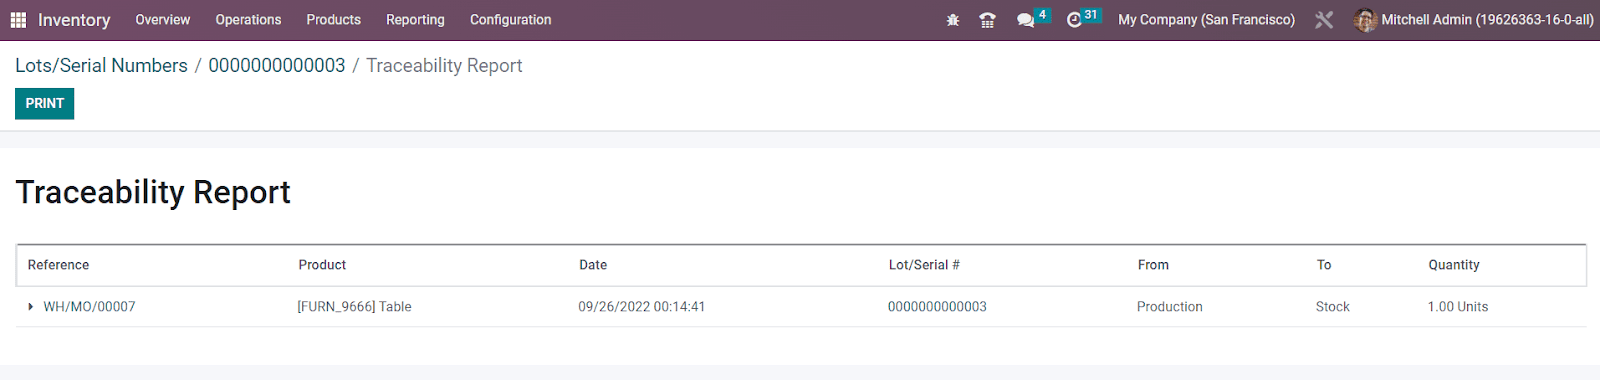
Here, you will get the Reference, Product, Date, Lot/Serial, From, To, and Quantity details of each product movement.
While configuring a new product in the OTX Inventory module, you can define the traceability of the product. As shown in the image below, you will get the option to define the Traceability of the product under the Inventory tab.
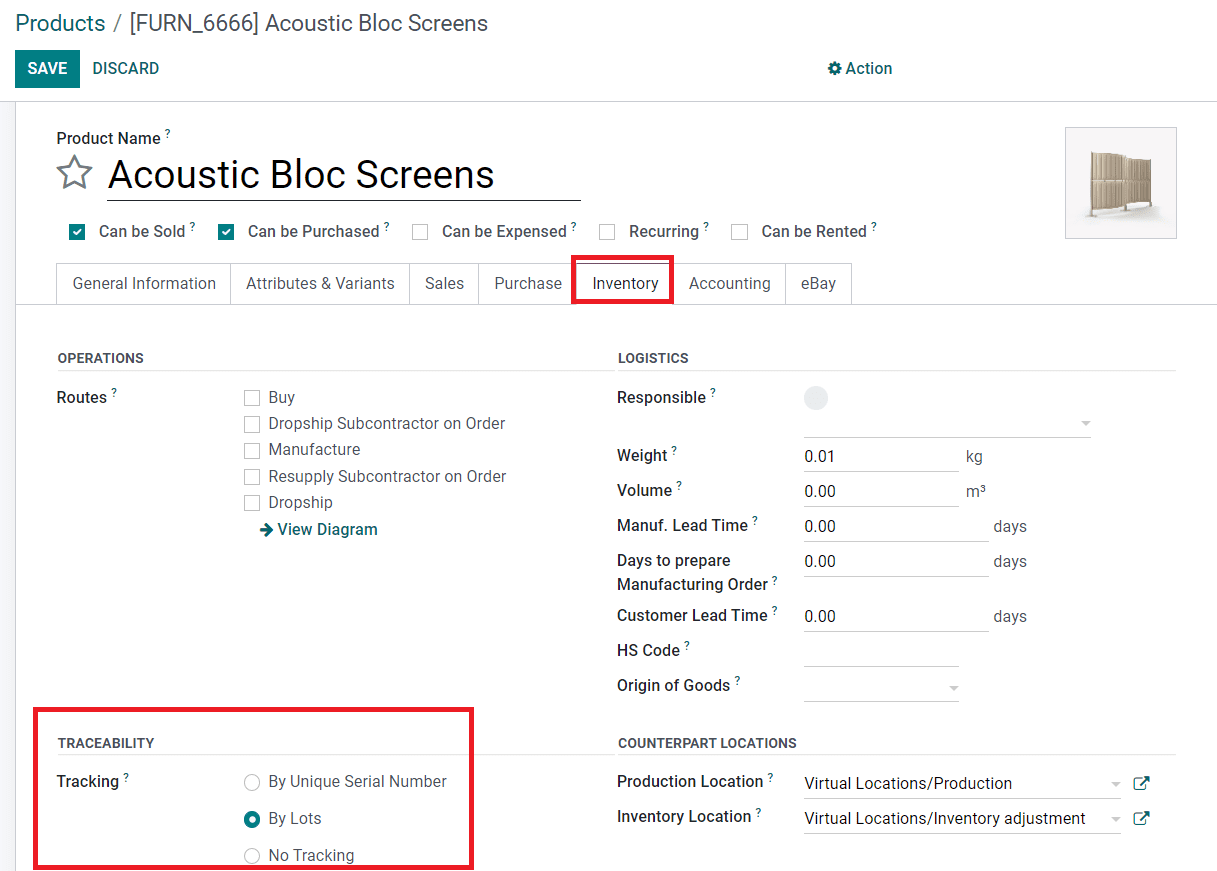
You can set the tracking of the product by using Unique Serial Number or Lots from this window. If you don’t want to track the product, you can select the No Tracking option.
You can assign lots/serial numbers to products while receiving them in the inventory. After confirming a purchase order, you will be able to manage lots and serial numbers for the products before receiving them. In order to understand this precisely, let’s create a new purchase order and confirm it.

The above-shown screenshot is a confirmed purchase order. Here, you will get a smart button to manage the Receipt of the purchase. Click this button.

Now, you can use the option highlighted in the image above from the Receipt window. As soon as you click on this button, a new wizard will appear to define the lots/serial number of the selected product.
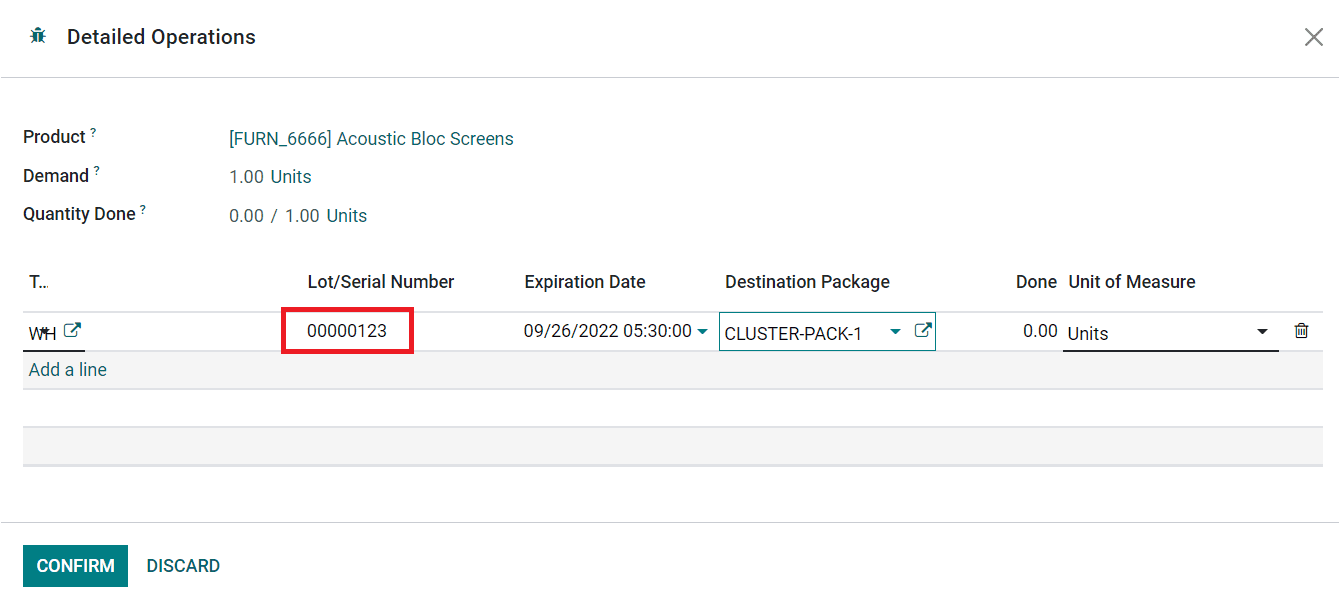
Here, you can specify the Lot/Serial number and Destination Package in the corresponding fields using the Add a Line button. Click the Confirm button. Now, you can validate the receipt and receive the product in your inventory. This lot/serial number will be added to the product details window of this newly purchased product. You can check this using the smart button available on the product details window as highlighted in the image below.

You can observe the newly assigned lot/serial number here.

You can display lots and serial numbers on the delivery slips by activating the Display Lots & Serial Numbers on Delivery Slips option from the Traceability tab of the Settings menu. Similarly, activating the Display Lots & Serial Numbers on Invoices button will show lots and serial numbers on invoices.
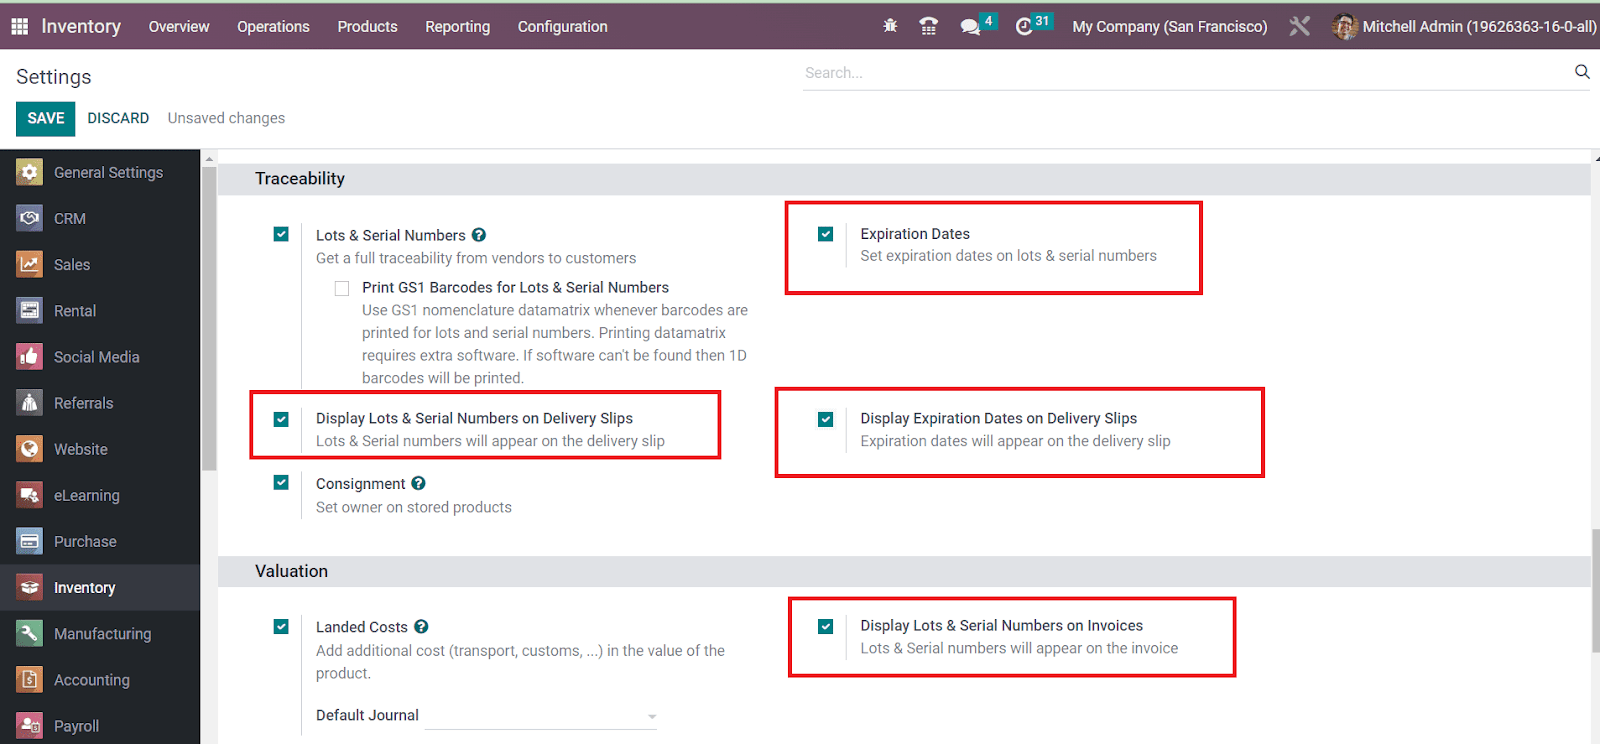
Now, let’s check how to set expiration dates on lots and serial numbers.
Expiration Date
Defining expiration dates for the storable or consumable products in your inventory is a crucial task. You should definitely mention the expiration date on each product so that the customer will get knowledge about the safety period to consume the product. OTX manages the expiration dates of the products using the lots and serial numbers aspects. You can activate this feature from the Settings menu of the Inventory module.

Under the Traceability tab, you can find the Expiration Dates option to activate. Along with this, you can activate the Display Expiration Dates on Delivery Slips option to display the expiration dates on the delivery slips.
After activating the expiration date feature, you can set expiration dates on lots or serial numbers of a product. For this, you can go to the product configuration window. Select the Inventory tab as shown below.

Here, you can define the tracking method from the Traceability field. After selecting the tracking method, you can activate the Expiration Date option.
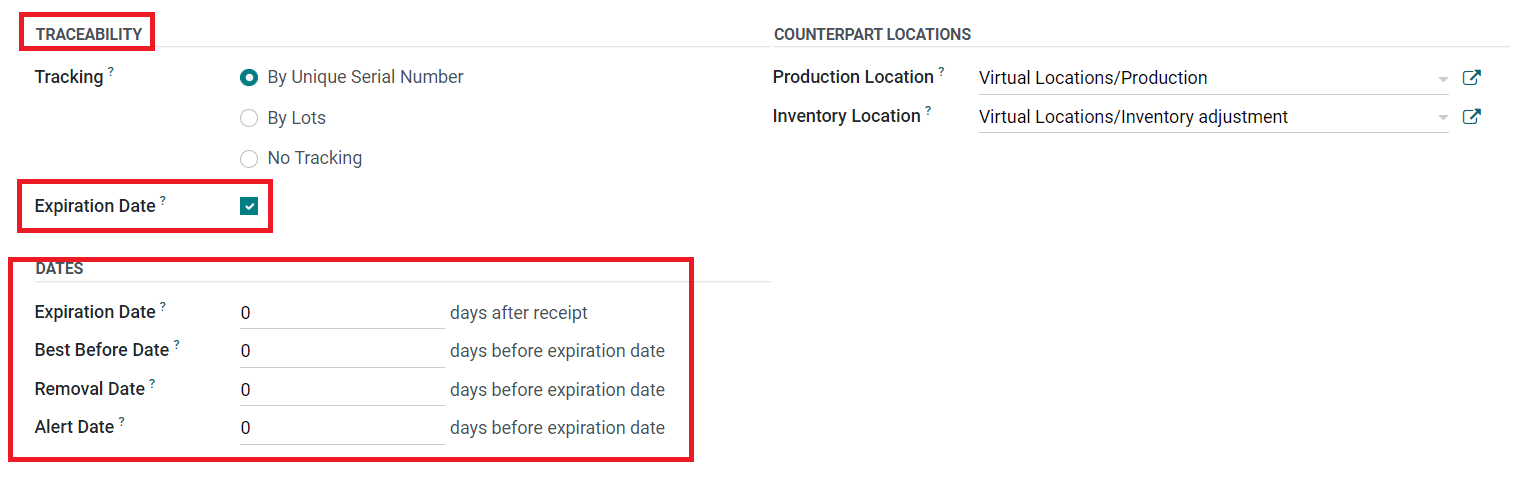
When this option is activated, you will be able to specify the dates to manage product expiration on the product and on the corresponding lots/serial numbers. As soon as you activate this option, you will get some additional fields to define some important dates which are detailed below.
Expiration Date: The number of days after the receipt of the product after which the goods may become dangerous and must not be consumed. It will be computed on the lot/serial number.
Best Before Date: The number of days before the expiration date after which the goods start to deteriorate, without being dangerous yet.
Removal Date: The number of days before the expiration date after which the goods should be removed from the stock.
Alert Date: The number of days before the expiration date after which an alert should be raised on the lot/serial number.
After specifying the expiration date for a product, you can check the lot and serial number window of the respective product where you will get the expiration details automatically.

The Dates tab will show the expiry details of the lot/serial number. You can observe an expiration alert on the serial number if it is expired or near to expiration date. The filter Expiration Alert will assist you to get the exact list of the expired lots and serial numbers.
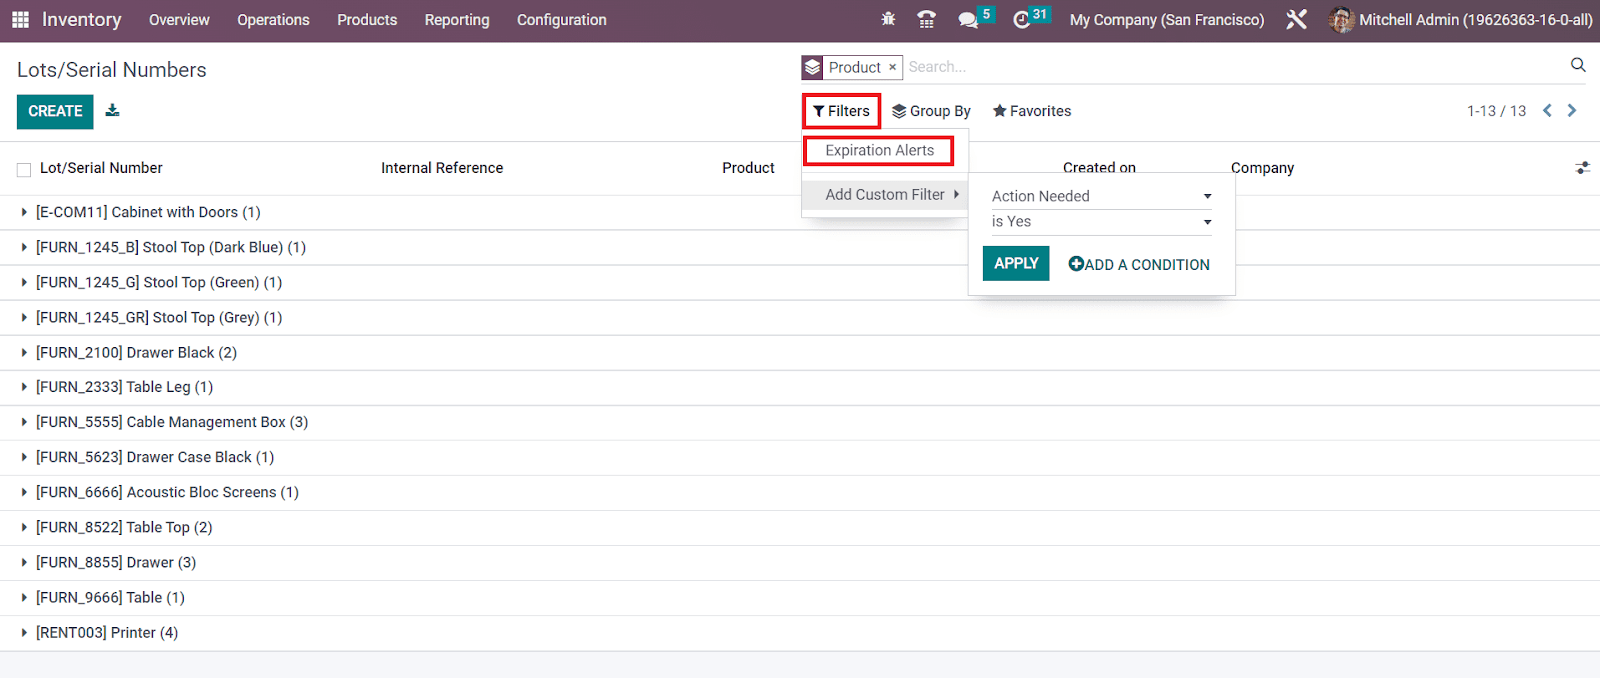
We detailed the feature of the product traceability in this section, now let’s discuss the inventory operations offered by OTX 16.
Transfers
Companies with multiple warehouses need to manage the transfer of products from one location to another. In some cases, the companies may have different branches at different locations, which requires a great effort to manage the product transfers successfully. Companies often manage such situations by allocating main warehouses and sub warehouses for product distributions. The Transfers feature in OTX supports the effortless management of product transfers from one location to another.
Inventory transfers included the movement of products between the warehouses and outside the warehouse. It also includes internal transfers for the movement of products within the warehouses of the company. OTX ERP system supports the configuration and management of warehouses which we will discuss in the next section. After configuring details of the warehouses and locations of the company, you can use the Transfers option available under the Operations menu to manage the product transfer between the configured warehouses and locations.
As shown in the image below, you will get the details of the Reference, From, To, Contact, Scheduled Date, Source Document, Batch Transfer, Company, and Status details of the preconfigured transfers here.

Using the Filters and Group By options, you can effortlessly accomplish the sorting operations. Additionally, you will get Kanban, Calendar, and Location views for this platform. Now, let’s check how OTX helps you to create a new transfer for the movement of products from one location to another. For this, click on the Create button.

In the new transfer creation window, the partner id can be specified in the Contact field. This platform can be used to manage different types of transfer. Some of them are Receipt, Internal Transfer, Delivery Orders, Returns, Manufacturing, Resupply Subcontractor, POS Orders, and Dropship. You can select the transfer type you want for your product movement in the Operation Type field. OTX offers a separate platform to define different operations types in the Configuration menu which we will discuss later. After selecting a suitable Operation Type, you can specify the Source Location and Destination Location of the product. The expected date of stock movement can be mentioned in the Scheduled Date field. The reference of the document related to this product transfer can be added in the Source Document field. Under the Operations tab, you can mention the products included in this transfer one by one using the Add a Line button. Along with the name of the Products, you can mention the Packaging, Demand, and UoM of the products. The Demand is considered as the quantity of the product that is planned to be moved.
The Shipping Information can be added under the Additional Info tab.

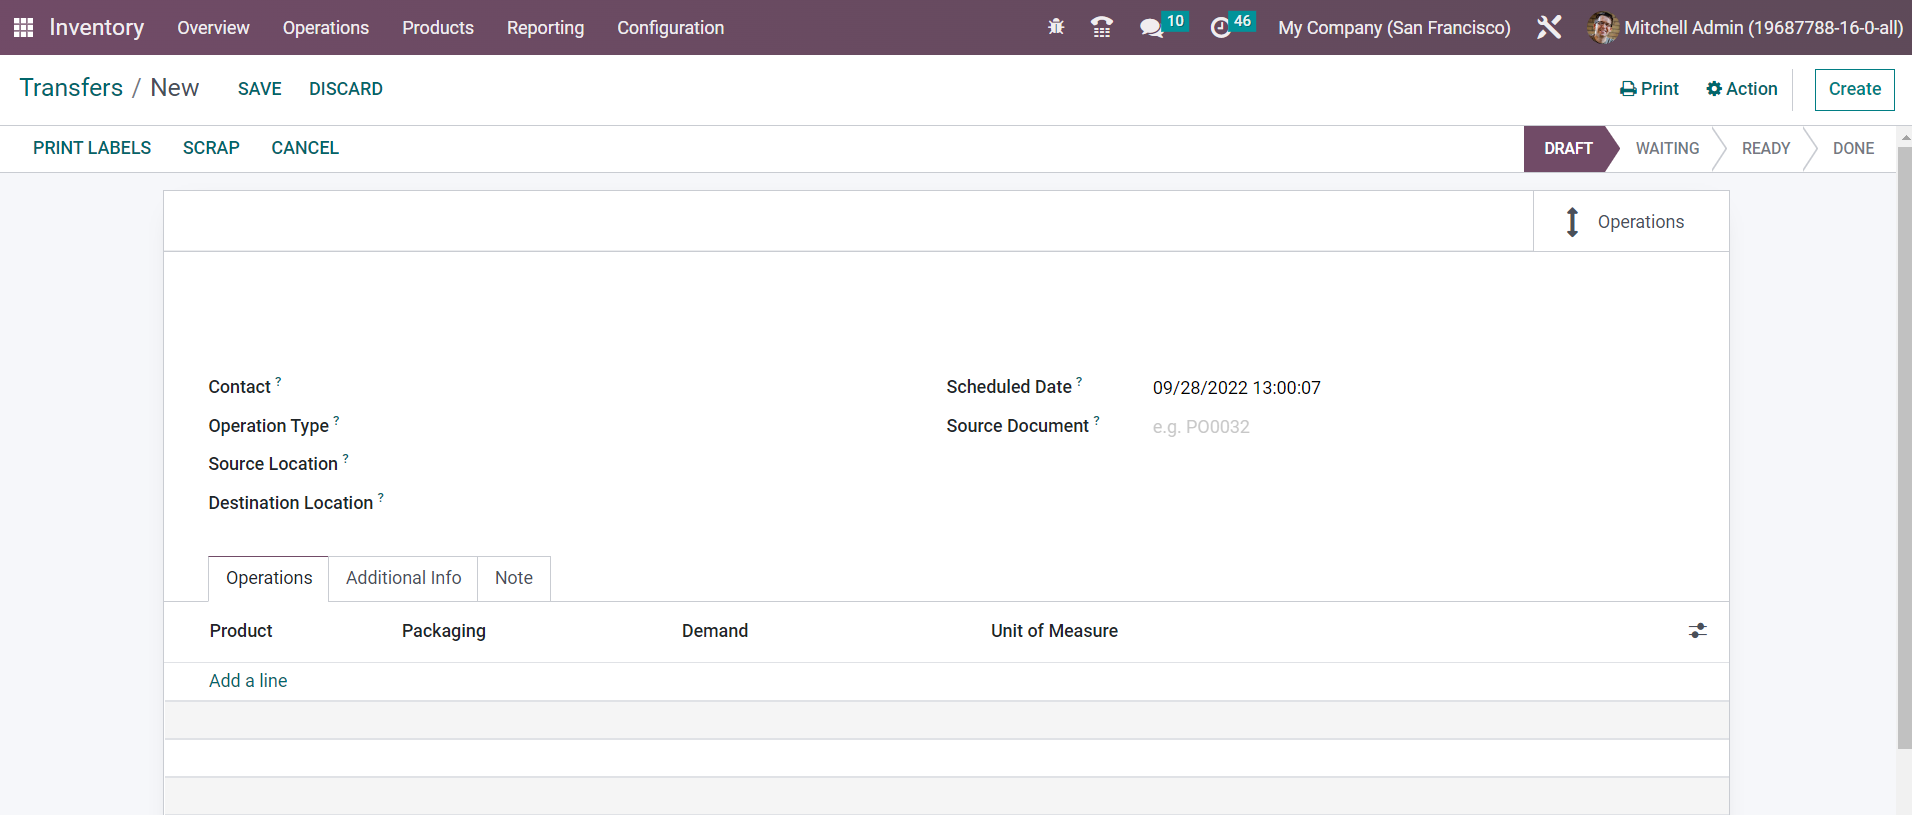
Here, you can add the Carrier information, Tracking Reference, Weight, and Weight for Shipping of the products included in this transfer. In the Other Information section, you can set the Shipping Policy for the transfer. It can be set as ‘As soon as possible’ or ‘When all products are ready’ as per your company policy. Additionally you can assign a Responsible employee who will be responsible for the upcoming operations of this transfer. Finally, specify the Procurement and Company in the corresponding fields. The Note tab can be used to add internal notes related to this transfer. By clicking the Save button, the transfer will be recorded.

Now, the transfer is in the Draft stage. If the transfer is in the Waiting stage, it indicates that it is waiting for the availability of some products. If the transfer is ready to be processed, it can be observed in the Ready state. You can click the Mark as Do to move the transfer to the Ready stage.

Once you complete the transfer process, you can click the Validate button.

The transfer operation is completed now. You can print labels for the newly transferred products using the Print Label button. The Print button will help you to take prints of the delivery slip of the transfer. The products can be returned to the earlier location with the Return button. If you find any defect in the newly transferred products, you can send them to scrap using the Scrap button. You will get the stock valuation report of this transfer by using the smart button called Valuation given in the window as highlighted in the image above.
Batch Transfer
OTX enables you to perform multiple transfers together with the assistance of the Batch Transfer feature. This feature can be used to execute group transfers that will be helpful to you to save your time and effort. In batch transfer, all transfers added to the batch are processed together. By using this method, you can minimize the difficulties faced while managing bulk transfers.
The Batch Transfer feature can be easily activated from the Settings menu of the Inventory module as depicted in the image below.

After selecting the Batch Transfer option click the Save button to save the new changes. Now, you can manage batch transfers from the platform available under the Operations menu as shown below.

The list of already created batches along with the details of the Batch Transfer, Scheduled Date, Responsible, Operation Type, Company, and State can be seen here. You can alter the view of the platform into Kanban also. To create a new batch transfer, you can use the Create button.

You can assign an employee in the Responsible field who will be incharge of the upcoming activities of this batch transfer. Specify the Operation Type and Company in the given spaces. By mentioning the Operation Type, OTX lets you add transfers with this operation type to this batch. The expected date for the transfer can be scheduled manually in the Scheduled Date field. If it is not manually set, OTX will consider the earliest scheduled date of the transfer included in the batch as the scheduled date for this transfer. Now, you can add transfers one by one to this batch using the Add a Line button available in the Transfer tab.
As soon as you click the Add a Line button, a new pop will appear to select the transfers for this batch.

You will get a list of various transfers of the selected operation type in different stages. You can select the transfers from the given list. Make sure to select the transfers from the same stage. In order to add them to the batch, you can use the Select button.

As you can see in the image above, the list of selected transfers will be automatically added to the batch. If you want to remove any of the transfers from the batch, you can use the ❌ icon highlighted in the screenshot above. After checking availability, you can confirm the transfer using the Confirm button.

Finally, clicking on the Validate button you can complete the batch transfer operation.You can create new batch transfers from the Transfers menu also. For this, you can go to the Transfers platform available under the Operations menu.

From the available list of transfers, you can select the transfers that you want to add to a batch. Don’t forget that the selected transfers should be in the same status and operation type. After selecting required transfers, you will get an Action button.

From the Action button, you will get the option to add the selected transfers to a batch. Click on the Add to Batch button. A pop will appear as shown below.

You can add the selected transfers to an existing batch transfer or to a new batch transfer. For new batch transfer, you can mention the Responsible employee in the given field. If you want to create the new batch in draft status, activate the Draft option. Clicking on the Confirm button will create a new batch transfer in the Inventory module. You can observe and manage the new batch transfer from the Batch Transfer platform.
Wave Transfer
The Wave Transfer method is also used for the same purpose of the Batch Transfer option. Using this method, you can move a large number of products from one location to another. But, once you add a transfer into a wave transfer you can not remove it from the wave. The wave transfer method is more advanced than the batch transfer. In order to get this feature in the OTX Inventory module, make sure to activate it from the Settings menu.

Once the Wave Transfer feature is activated, you can go to the Transfers platform. From the Transfers window, you can select the transfers belonging to the same status and operation type to add them to a wave transfer.

As soon as you select required transfers, you will get the Action button on the screen from where you can select the Add to Wave option. Clicking on this button will give a new pop up on the screen as shown below.

The selected transfers can be added to an existing wave transfer or to a new transfer. For a new wave transfer, you need to mention an officer in the Responsible field. Finally, click the Confirm button. Once you confirm the transfer, all orders from the selected transfers will appear on your screen.

You can select required orders from the list and click the Add to Wave button. The new wave transfer is created now and you can observe the transfer from the Wave Transfer platform available under the Operations menu.

The preview of the list will show the details of the Batch Transfer, Scheduled Date, Responsible, Operation Type, Company, and State. Clicking on the wave transfer will open a new window to validate the transfer.

You can click the Validate button to complete the transfer.
As we are clear on the product transfer feature in the Inventory module, now, let’s look at the warehouse management in OTX .
Warehouse Management
Warehouse management is one of the impartial activities in the inventory operations of a company. For the smooth functioning of the stock operations and transfers, the warehouses of a company should be managed and monitored properly. OTX , being an excellent inventory management assistant can offer you dedicated platforms for the effective management of warehouses of the company. The tools offered by OTX can help you to manage multiple warehouses simultaneously. The number of warehouses owned by a company will differ according to the type of business they run. No matter the size and number of warehouses a company owns, OTX will always ensure to streamline the workflow.
In the Configuration menu of the OTX Inventory module, you will get advanced options such Warehouse, Locations, Routes, Rules, Operation Types, Storage Categories, Storage Category Capacity, and Putaway Rules in the Warehouse Management tab.
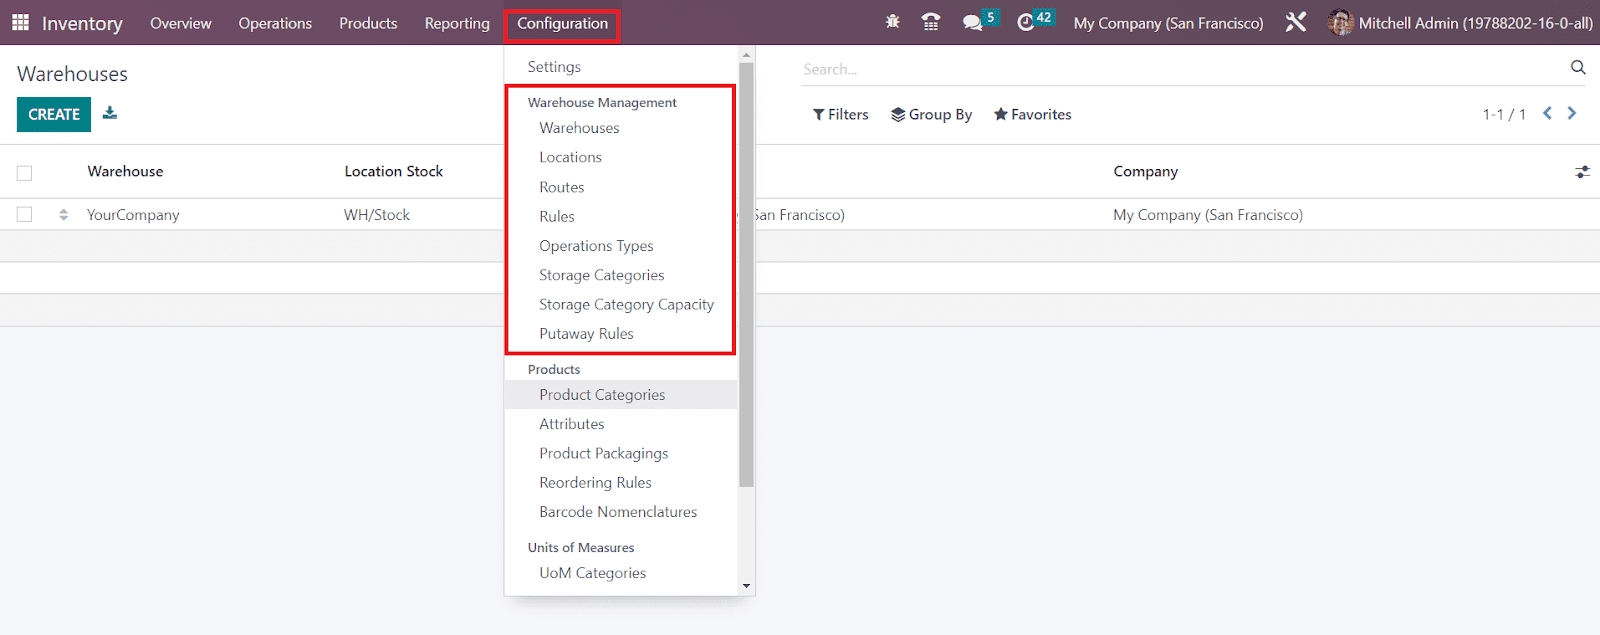
These options will assist you in performing different warehouse management operations. First, let’s take a look at the configuration of warehouses in the OTX 16 Inventory module. For this, you can select the Warehouses option from the Configuration menu.
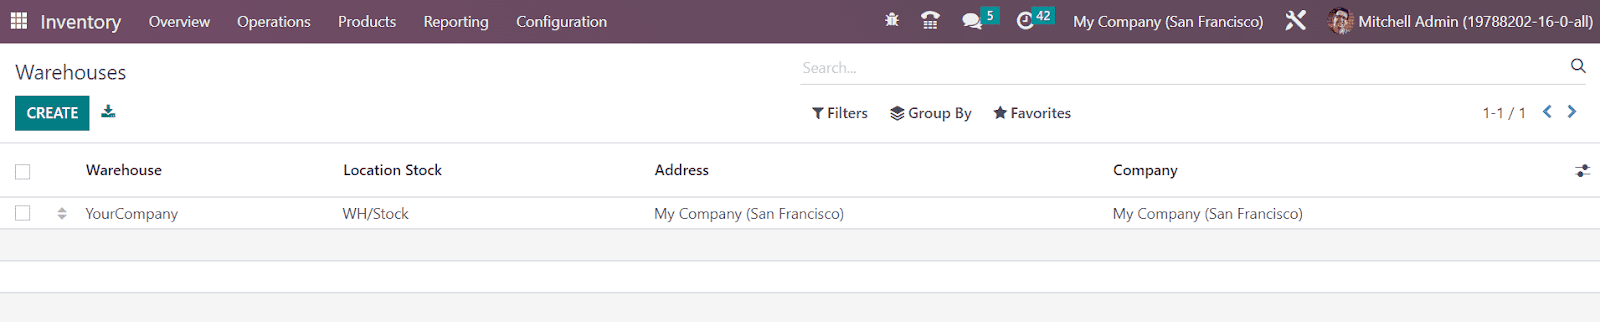
Above shown screenshot is the list view of the warehouse platform. You will get the Warehouse, Location Stock, Address, and Company details from this view. Using the Create button let’s configure the details of a new warehouse to the OTX Inventory module.
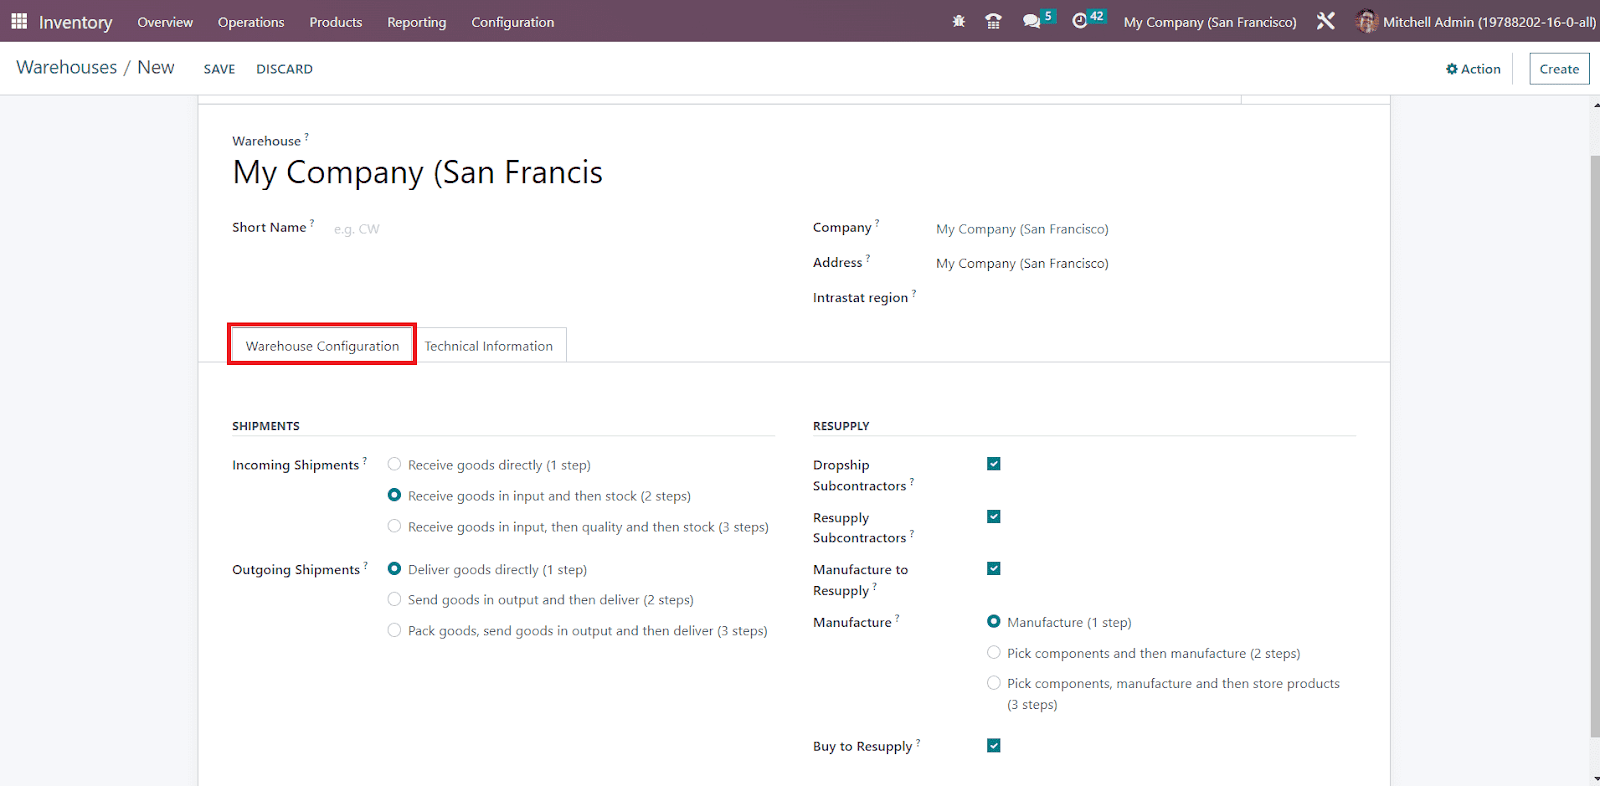
In this window, you can specify the Warehouse, Short Name of the warehouse, Company, Address, and Intrastat Region to which the warehouse belongs in the corresponding fields. Under the Warehouse Configuration tab, you are requested to mention the Shipments and Resupply details.

In the Incoming Shipment, you can decide how to manage the incoming shipment of the products. By selecting the Receive goods directly option, you can receive products directly to the warehouse. In the case of the Receive goods in input and then stock method, the incoming shipment includes two-step. In this two-step process, the products will be received first and then moved to the stock. After receiving the goods, you can apply quality checks on them before stocking using the Receive goods in input, then quality, and then stock method of incoming shipment. Similar options will be available for the Outgoing Shipment also and you can select the suitable one for the shipment operations of this warehouse.
Under the Resupply tab, you will get advanced features to activate.

Activating the Dropship Subcontractors feature will help you to dropship subcontractors with components. The Resupply Subcontractors can be used to resupply subcontractors with the components. This will help the manufacturer to supply materials to the subcontractors when required. If the company has many warehouses, you can resupply components from one to another using these features. When raw materials are in demand, you can easily resupply them in warehouses. When products are out of stock, you can manufacture them in the warehouse for resupply by activating the Manufacture Resupply option. You will get three methods to define manufacturing procedures. By selecting the Manufacture option, you can directly move the components to the production location and start the manufacturing procedures. In the Pick components and then manufacture method, you need to follow two steps. First, you have to unload the components from the stock to the input location and then move to the production location for manufacturing. After picking the components and manufacturing the products, you can store them in the warehouse using the Pick components, manufacture, and then store products option. By activating the Buy to Resupply option, OTX allows you to buy raw materials to resupply and store them in this warehouse. Clicking on the Save button will record the details of the newly configured warehouse.
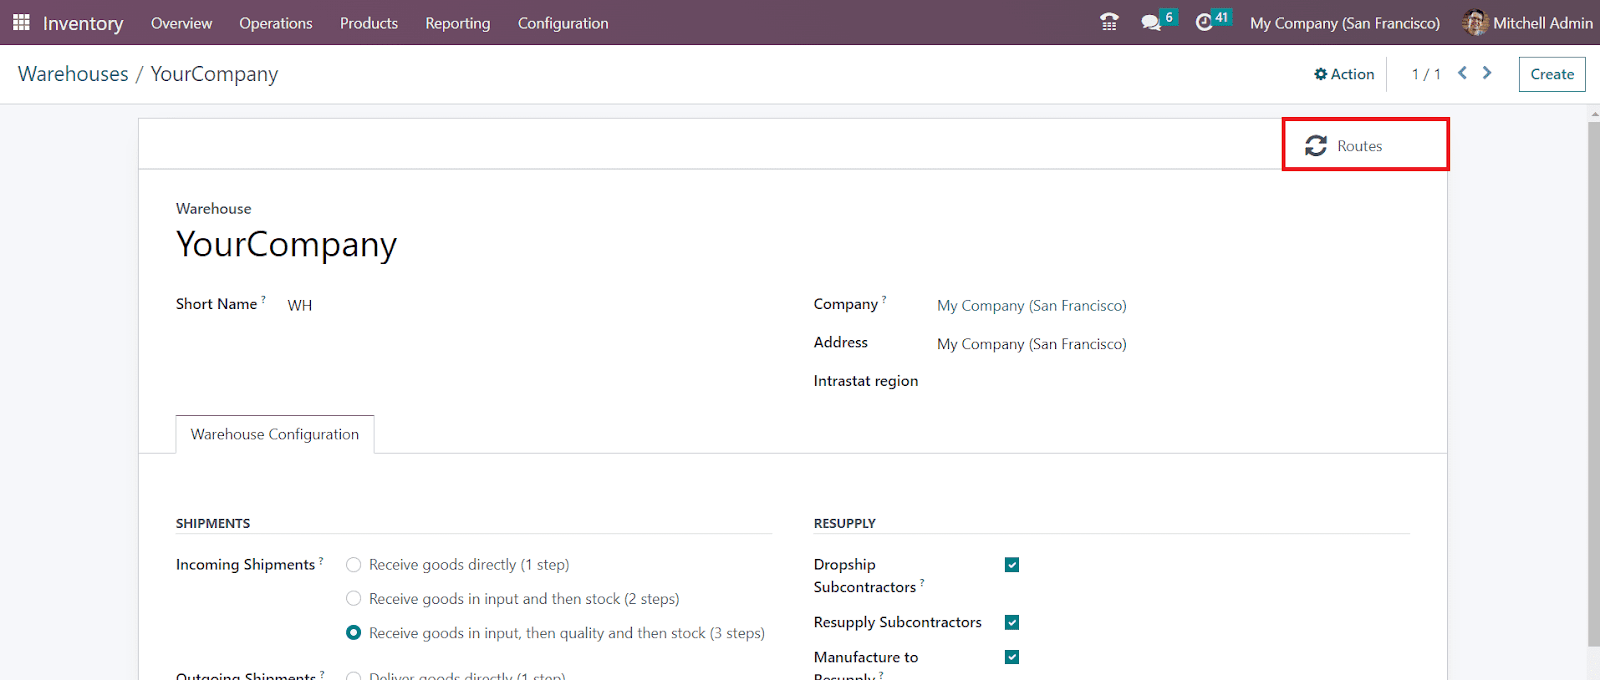
The smart button Routes given on the top right corner of the window will give access to the routes management window of the operations of this warehouse.
In the next section we will detail how to configure different types of locations for stock management.
Locations
The platform to configure and manage different locations available in the OTX Inventory module will help you to define the places in your warehouses in which the products are stocked. Within a single warehouse you can manage multiple locations for your stocks. From the Settings menu of the Inventory module, you can activate the Storage Location feature as shown below that will help you to track product location in your warehouse.

Now, the option to configure Locations can be found under the Configuration menu of the Inventory module as shown below.

The list view of this platform will give details of the Locations, Location Type, Storage Category, and Company. We will detail each of these options while discussing the configuration of a new location in OTX . For this, you can click on the Create button.

The new location creation window is shown above. Here, you can mention the Location Name in the given field. The parent location that includes this location can be specified in the Parent Location field. You can select the parent location from the drop-down. You will get the Additional information, Logistics, and Cyclic Counting tabs to define. From the given options, you can select Location Type for the new one. The available Location Types are,
Vendor Location: Vendor location is considered as a kind of virtual location that represents the source location for the products that come from your vendors.
View: View is another kind of virtual location that is used to create a hierarchical structure for your warehouse. They can’t directly store products.
Internal Location: Internal Locations are the actual or physical locations available in your warehouse.
Customer Location: Customer Location is a kind of virtual location that represents the destination locations for the products sent to your customers.
Inventory Loss: This is also a virtual location that serves as a counterpart for inventory operations used to correct stock levels.
Production: This virtual counterpart location is used for production operations. You can consume components from this location and produce finished products.
Transit Location: The Transit Location is considered a counterpart location that should be used in intercompany or inter-warehouse operations.
The storage category used in this location can be specified in the Storage Category field. If this location is shared between companies, you can let the Company field empty. You can allow using this location to put scrap and damaged goods by activating the Is a Scrap Location?. This location can be used as a return location to store returned products by activating the Is a Return Location?. The Is a Subcontracting Location can be activated to create a new dedicated subcontracting location for this company. The barcode used for this location can be specified in the Barcode field. You can activate the Replenish Location feature to get all quantities to replenish at this location.
Mention the Inventory Frequency in days in the Cyclic Counting tab. When the difference is more than zero, the inventory count date for the products stored at this location will be automatically set at the defined frequency. The Last Effective Inventory field will show the date of the last inventory at this location. The date of the next planned inventory based on cyclic schedule will appear in the Next Expected Inventory field.

It defines the default method used for suggesting the exact location where to take the products from, which lot etc, for this location. This method can be enforced at the product category level, and a fallback is made on the parent locations if none is set here. The available removal strategies are,
FIFO: Products/lots that were stocked first will be moved out first.
LIFO: Products/lots that were stocked last will be moved out first.
Closest Location: Products/lots closest to the target location will be moved out first.
FEFO: Products/lots with the closest removal date will be moved out first.

Additionally, you will get dedicated smart buttons on the location window such as the Putaway Rules and Stocks. The Putaway Rules button will give access to the window that includes the rules for shifting products from one location to another and the Current Stocks button will give details of the current stock updates of this location.
Rules and Routes
The routes defined on a product will help you to understand and track each movement of the product. It is the track or path of operations used for inventory movements. Without a proper strategy, it is difficult to monitor and manage the inventory movements in a company. Based on your company policies, you can set certain rules of operation to define the product movements in inventory. Using these rules, OTX will allow you to configure different routes of operations for the products. This will ensure proper inventory management within your company.
In the OTX 16 Inventory module, the users will get separate platforms to define suitable rules and routes for the stock movements. The routes in OTX work associated with the respective storage locations and warehouse operations so make sure to configure both these options before defining routes for inventory. To set up new routes in OTX , you are requested to enable this feature from the Settings menu of the module. You can find the Warehouse tab as shown below, from where you can activate the Multi-Step Routes.

While activating this option, the Storage Location feature will be automatically activated since they are interlinked. We already discussed how to configure warehouses and locations for inventory management. Now, let’s look at the configuration of rules for the product movement in a company.
Creating Rules
The user can find the option to configure new rules for the inventory movements from the Configuration menu of the Inventory module. Clicking on the Rules option from the Warehouse Management tab opens a new window with the list view of the already configured Rules as shown below.

From this preview, you will get the Action, Source Location, Destination Location, Route, and Company details of each Rule. Just like in any other platform, OTX makes sure of the availability of the default and customizable Filters and GroupBy options to simplify the searching operations. Without any delay, you can click the Create button to know the steps of the configuration of the new rule in OTX .

In the Name field, you can mention a proper title for the new rule. The next step is to define the Action for the new rule. You will get a drop-down menu here to select the suitable action.
● Pull From: You can set this action when products are needed in the destination location. It can be either from a sales order or a manufacturing order. When the demand for a product happens in the destination location, OTX will generate a picking operation type from the source location to complete the requirement.
● Push To: You can use this rule to move a product to another location. When products arrive in the source location, you can move them to another location using this action. In this case, OTX will generate a picking operation type to send them to the destination location.
● Push & Pull: This action can be used in both cases explained above. When products are needed in the destination location a picking is generated from the source location to fulfill the need. This demands product requirements in the source location. Once the source location is fulfilled with the requirement, the products will be pushed to the destination location to fulfill the needs of the destination location.
● Manufacture: Using this action, you can directly generate manufacturing orders to complete the requirements of the source location.
● Buy: When products are needed at the destination location, OTX will generate a request for quotation to buy the product to fulfill the need with the help of this action.
In the next fields, you can mention the Operation Type, Source Location, and Destination Location respectively. In the Applicability tab, you can specify the Route, Warehouse, Company, and Sequence on which this rule is applicable. Under the Propagation tab, you can set the Propagation of Procurement Group as Empty, Fixed, or Propagate. By enabling the Cancel Next Move, the move created by this rule is canceled and the next move will be canceled too. Activating the Propagation of Carrier will propagate the carrier of shipment. In the Warehouse to Propagate field, you can specify the warehouse to propagate on the created move/procurement which can be different from the warehouse this rule is for.
Now, let’s check how to configure routes using these rules in the OTX Inventory.
Creating Routes
The Warehouse Management tools available in the Configuration menu of the Inventory module will give access to the platform to manage and create various routes of operation. The user can observe the preconfigured list of routes here with the details of the name of the routes and the company.

Click the Create button to create a new route for inventory movements.

The name of the route can be defined in the Route field. Additionally, you can specify the Sequence, Supplied Warehouse, and Company in the respective fields. You can leave the Company field empty if this route is shared between all companies configured in your database. In the Applicable On tab, you can select the places where this route can be selected. Here, you will get the Product Categories, Products, Packaging, Warehouse, and Sales Order Lines to select based on your company policies. Under the Rules tab, you can specify the rules used for this route of operation with the help of the Add a Line button. You can configure new rules for this route by following the steps we discussed in the earlier section. Finally, don’t forget to click the Save button to save the changes.
In OTX , you can define a specific route of operation for each product while configuring them in the database. In the products management window, you can find a dedicated field under the Inventory tab as shown below exclusively to select the suitable route for the inventory movement of a product.

Depending on the module you installed in your OTX database, this field will allow you to set the route of a product. It can be bought, manufactured, replenished on order, etc, based on the route you select. This is how we define routes for product movement in OTX Inventory.
Storage Categories
The Storage Categories feature in OTX will allow you to group many storage locations together under a single category. You can create many such categories in the OTX Inventory module that will be beneficial to perform smarter put-away operations. Before configuring the storage categories, you must configure the storage locations available in your inventory. Then you can group them together under a specific category. By activating the Storage Location from the Settings module, you can create and manage all storage locations in your company. As soon as you activate this option, you will get an additional field called Storage Categories as shown below to define various categories for the available storage.

Now, you can go to the Configuration menu of the module where you will get access to the Storage Categories platform.

The list view of this window will show the details regarding the available Storage Categories, Max Weight, Allow New Product, and Company. In order to create a new storage category, we can use the Create button.

The name of the new storage category can be mentioned in the given space. Along with this, you can specify the maximum weight that can be stored under this category. If you want to allow new products to the locations under this category, you can set conditions for this in the Allow New Product field. You can allow new products if the location is empty, if all products are the same, or allow mixed products.
Under the Capacity by Package field, you can mention the Package Type and its Quantity using the Add a line button that can be included in this category. Similarly, the products that can be added to this storage category can be specified in the Capacity by Products tab. Clicking on the Save button will create a new storage category for your inventory. The smart button Location will give the details of the location added under this particular category.
Now, let’s move to the putaway rules in the OTX Inventory module.
Putaway Rules
A proper warehouse management system ensures that products are placed in appropriate locations in the warehouse. If a warehouse contains hazardous and dangerous goods, you should manage them carefully by assigning a separate location to store them in order to avoid contact with other products. To run these operations automatically, the OTX Inventory module introduces the Putaway Rules that will help you to move goods to proper locations. This feature will avoid the wrong storage of products in your inventory. Using the putaway rules, you can shift products from the receiving locations to the most appropriate place within the warehouse itself.
The Putaway Rules window can be accessed from the Configuration menu of the module. The screenshot below shows the list of already configured putaway rules. Here, you will get the details of When the product arrives in, Product, Product Category, Package Type, Store to sublocation, Having Category, and Company.

Creating new putaway rules is an easy process in OTX . Click the Create button and a new line will appear under the available list. Here, you can mention the name of the product, product category, and package type in the corresponding fields. The receiving location of the product can be specified in the When product arrives in field. In the Store to Sublocation field, you can add the location to where you want to move the product that arrives at the receiving location. The category of the sublocation can be specified in the Having Category field. After mentioning the Company, you can click the Save button. When the product from a particular product category in a specified package type arrives at the receiving location mentioned here will be automatically moved to the specified sublocation of the company.
In the Location management window of the Inventory module, you can find a smart button to configure putaway rules for that location.

You can configure new putaway rules for this location to move products to another location.
Now we are going to discuss the Replenishment feature available in the OTX 16 Inventory module.
Replenishment
Replenishment is a crucial inventory operation which helps to maintain a sufficient quantity of stock in your inventory. In order to ensure an uninterrupted supply of goods, you need to replenish the inventory according to demand. OTX ERP System provides quick support to the replenishment operations of a company. You can perform replenishment in two different methods. You can replenish products either from the product management window or by creating a new replenishment operation from the Inventory module.
First, let’s look at the replenishment of products from the product management window.

Here, you can find that the available quantities on hand are 17. You can replenish the product by clicking on the Replenish button.

A pop up will appear as shown above where you can mention the quantity of the product that you want to replenish. Here, we requested 13 quantities of this product to replenish. You can schedule a date at which the replenishment should take place. Along with this, you can set a preferred route for replenishment. Clicking on the Confirm button will trigger a request for quotation for buying this product, a manufacturing order, or a transfer. The replenishment action will take place based on the preferred route. If you have selected Buy as the preferred route, OTX will automatically generate a quotation for purchase based on the product configuration. You can confirm the quotation and complete the purchase procedures.

You can find the purchase order of the 13 units of the products from the Purchase module. By clicking on the Receive Products button, the products will be added to your inventory.
Now, you can check the On hand quantity of the products.

Earlier it was 17 and now it has changed to 30 which means that 13 quantities of the product are replenished.
In the OTX 16 Inventory module, you can access the Replenishment management window from the Operations window. This advanced platform includes the list of preconfigured replenishment orders.

You can search for particular replenishment orders using the search bar. The Filters include default and customizable options which will easily retrieve required data. You can group the orders based on their Location, Product, and Category with the help of the Group By option. On the left side of the window, you will get a dedicated sorting panel that will allow you to sort the data based on the Locations. Using the Trigger option, you can separate the manual replenishment from all replenishment orders.

The preview of the list includes the name of the Products, Location, On Hand, Forcast, Preferred Route, Vendor, Minimum Quantity, Maximum Quantity, To Order, and UoM. You can manually create a new replenishment using the Create button. A new line will appear to mention the details of the replenishment of a specific product.

When you mention the name of the product in the specified field, the Location, On Hand, and Forecast details of the product will automatically appear on the respective fields. You can select the Preferred Route from the given drop-down menu.
Then mention the Minimum Quantity and Maximum Quantity of the product required to be replenished. As soon as you mention the To Order quantity, you will get two options to order the product such as Order Once and Automatic Orders. By clicking on the Order Once button, you can instantly create replenishment by generating a request for quotation. Clicking on the Automatic Orders button will manage the replenishment orders automatically. You can snooze the operation for a particular period of time using the Snooze option.

This option allows you to snooze the operation for 1 Day, 1 Week, 1 Month, or for a Custom period. It is also possible to set a Snooze Date on this pop-up window.
Now, let’s check the Inventory Adjustment features in the Inventory module.
Inventory Adjustment
There may be situations where certain adjustments should be made in the inventory based on the physical stocks available in your company. In order to ensure efficiency in inventory management, the changes made in the inventory should be reflected in the inventory records also. In OTX , you will get the Inventory Adjustment platform that assists you to make adjustments in the inventory records based on the availability of the physical stocks.
In OTX , you easily perform the inventory adjustments from the product description window itself. As shown in the image below, you will get the Update Quantity button on each product in order to create an accurate record of the quantity available in your company warehouses.
Here, you will get the details of the quantities On Hand from the smart button as highlighted in the image. You can update the quantity of this product by clicking on the Update Quantity button. OTX will lead you to a new window where you can find the record of the inventory adjustments recorded earlier. The details of the Location, Product, Lot/Serial Number, Package, Owner, On Hand Quantity, UoM, Counted Quantity, Difference, Scheduled Date, and User can be obtained from this window.

Using the Create button, you can update the quantity based on the available stock. Here, you are requested to mention the Counted Quantities in the selected lot/serial number in the corresponding field. As soon as you mention the counted quantity, OTX will automatically show the difference between the On Hand Quantity and the Counted Quantity.

Now, you can apply this inventory adjustment to the records by using the Apply button.

When you observe the product description window, you can see that the On Hand quantity is updated based on the new inventory adjustments.
Under the Operations menu of the OTX Inventory module, you can find an exclusive platform to manage all these inventory adjustments. The records of all inventory adjustments can be observed on this platform. You can use this window to update the quantities of multiple products at the same time. As shown in the image below, click the Apply All button to apply the new inventory adjustments on respective products.

It is also possible to update the quantities separately. The Create button will help you to create a new inventory adjustment just like we discussed earlier. After creating new adjustments, you can use the Apply button to apply them to the inventory records of the particular product.

If there is no need for inventory adjustments, you can click the Clear button. The history of the inventory adjustment made on a product can be observed using the History button. By selecting the available inventory adjustments from this window, you will get some additional buttons to manage them. You can click the Apply button to apply the selected adjustment together. Using the Clear button, you can clear the selected adjustments together.
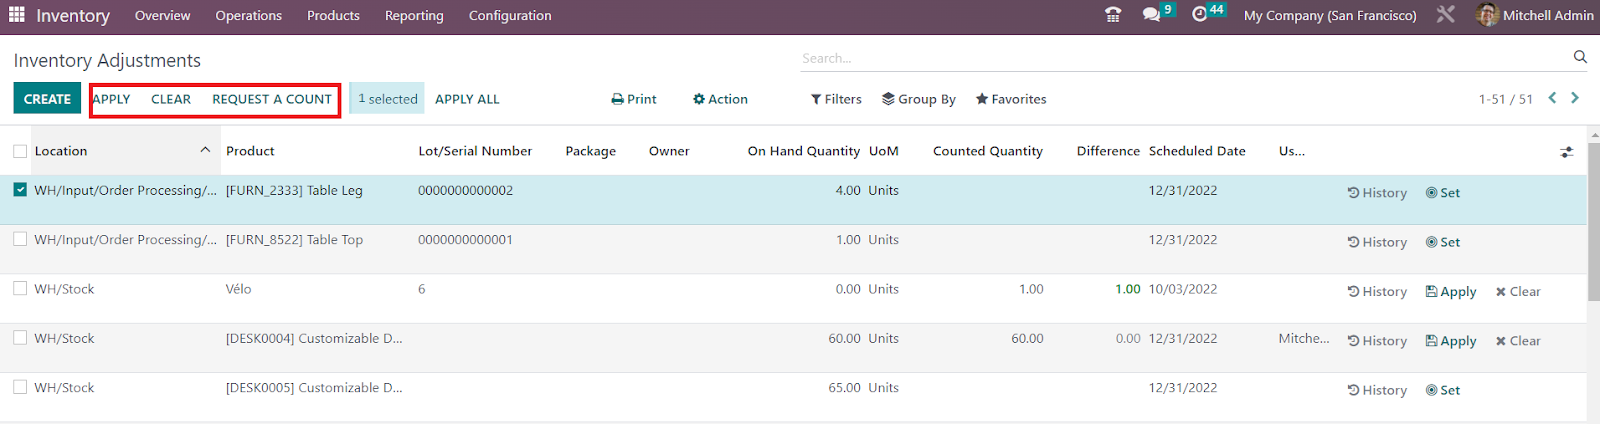
You can request a count for the selected inventory adjustments using the Request a Count button.
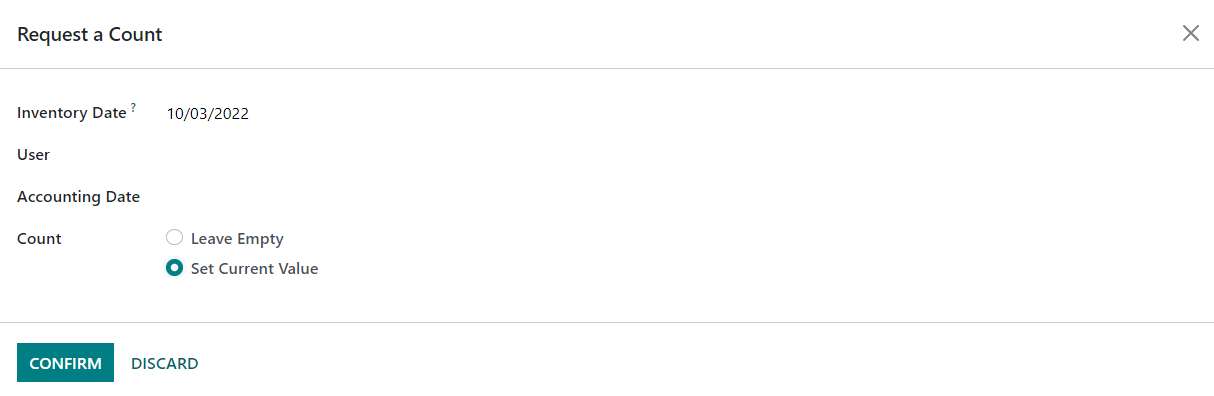
A pop-up will appear where you can select a date to get the inventory on that date. You can leave the Count empty or set the current value based on your need. Click the Confirm button. This is how we manage inventory adjustments in OTX .
In the Settings menu of the module, you can set the Day and Month on which the annual inventory counts should occur.

As shown in the image, you can use the Annual Inventory Day and Month field to specify the day and month that annual inventory should be counted.
Scrap Management
Scrap in inventory is considered useless or damaged products. The date expired products can be also included in scraps. While managing inventory, there may be chances to find expired or damaged products in the inventory. Removing these items from the stock as soon as possible is important because we can not sell damaged or expired products. In most cases, the products with negligible damages are used for repairing processes. The reusable parts of the scraps can be used for the recycling processes. A smarter scrap management solution will help you to save your money and most importantly the environment around us also. The scraper collected from the inventory can be moved to a scrap location.
From the storage locations available in the warehouse, you can allot a location for scrap. Let’s look at how OTX helps you to manage scrap location in your storage. We already discussed the configuration and management of storage locations in the OTX Inventory. Following the same method, you can configure a location for scrap also. For this, you can go to the Locations menu available under the Configuration menu. A new window will open as shown below.

Click the Create button to create a new location for scrap.

In the new location creation window, you can mention the name of the location in the given field. Here, we mentioned the location name as Scrap Location. You can follow the remaining steps just like we detailed in the Location configuration section earlier. The most important step is that you need to activate the Is a Scarp Location field to consider this location as a scrap location. After specifying necessary details in the Additional Information, Cyclic Counting, and Logistics tab, you can click the Save button. We have completed the creation of a location for scrap in the storage. You can create more scrap locations following this method.
Now, let’s check how to add products to the scrap location. In the OTX Inventory management system, you will get the option to add to Scrap in the majority of the operations such as Receipts, Delivery Orders, Internal Transfers, Manufacturing Orders, POS Orders, and many more. Here, we took a delivery order for the demo.

You can find the Scrap button on the delivery orders as shown in the screenshot above. In case, any products in the delivery order are damaged or expired, you can click on this button to add those products to scrap.

Here, you can mention the name of the scrap Product, Quantity, Package, and Owner in the respective fields. The Source Location of the product will be available in this window. In the Scrap Location, you can select the scrap location from the drop-down to where you want to move the damaged or expired product. Clicking on the Done button will move the product to the specified scrap location. The quantity of the scrap product will be deducted from the delivery orders.
Under the Operation menu of the Inventory module, you will get a separate platform to manage all these scrap orders as shown below.

The user will get List, Kanban, Pivot, and Graphical views on this platform. From the List view, you will get the Reference, Date, Product, Quantity, Unit of Measure, Source Location, Scrap Location, Company, and Status details of the Scrap Orders. It is also possible to create a new scrap order from this window itself using the Create button. You can use the default and customizable options in the Filters and Group By features for sorting operations.
Now, let’s move to the landed cost feature available in the Inventory module
Landed Cost
Landed cost can be defined as the total price of a product that a buyer should pay at the time of purchase. This includes transport, customs duties, handling fee, service charge, shipments, and many more. To get the selling price of the product, these additional costs are added to the actual price of the product. Based on the company policies, the method of calculation of the landed cost will be different in different companies. In the OTX Inventory module, you can calculate the landed cost and split them between each quantity of the product to update their selling price.
Go to the Settings menu to activate the Landed Costs option as shown in the image below.
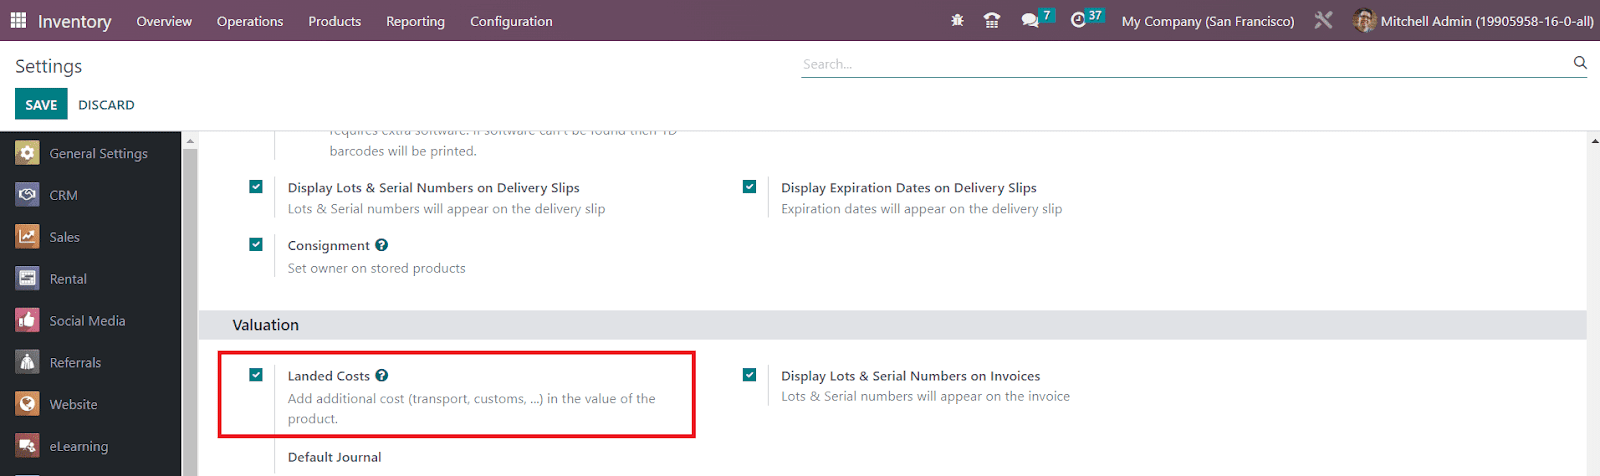
Activating this feature will assist you to implement customized landed costs on products. In order to understand the operations of the landed cost, you can first create a purchase order for some products from the same product categories and confirm the order. You can set landed costs for products whose costing method is configured as AVCO or FIFO. The inventory valuation of such products should be automated. This is the mandatory condition for landed cost that you should take into account before configuring it.

The Unit Prices of the products while purchasing them can be observed under the Products line. Clicking on the Confirm Order button will confirm your purchase. Now, you can receive the products in your inventory.

Clicking on the Receive Products button will add these products to your inventory records.

You can validate the transfer of the products by clicking the Validate button. Now, the purchased products are stocked in the destination location mentioned in the receipt. You can add landed costs to these products while selling them. Imagine, while moving these products to the destination location, you spent some money on the transfers. You can add your lost money on transfers to the products as an additional charge. With the help of the landed cost feature in OTX Inventory, you can create additional charges for the products. For this, go to the Operations menu of the Inventory module. You can find the Landed Costs platform there as shown in the image below.

The details of the already created landed costs can be obtained from this window. Using the Create button, you can create a new landed cost.
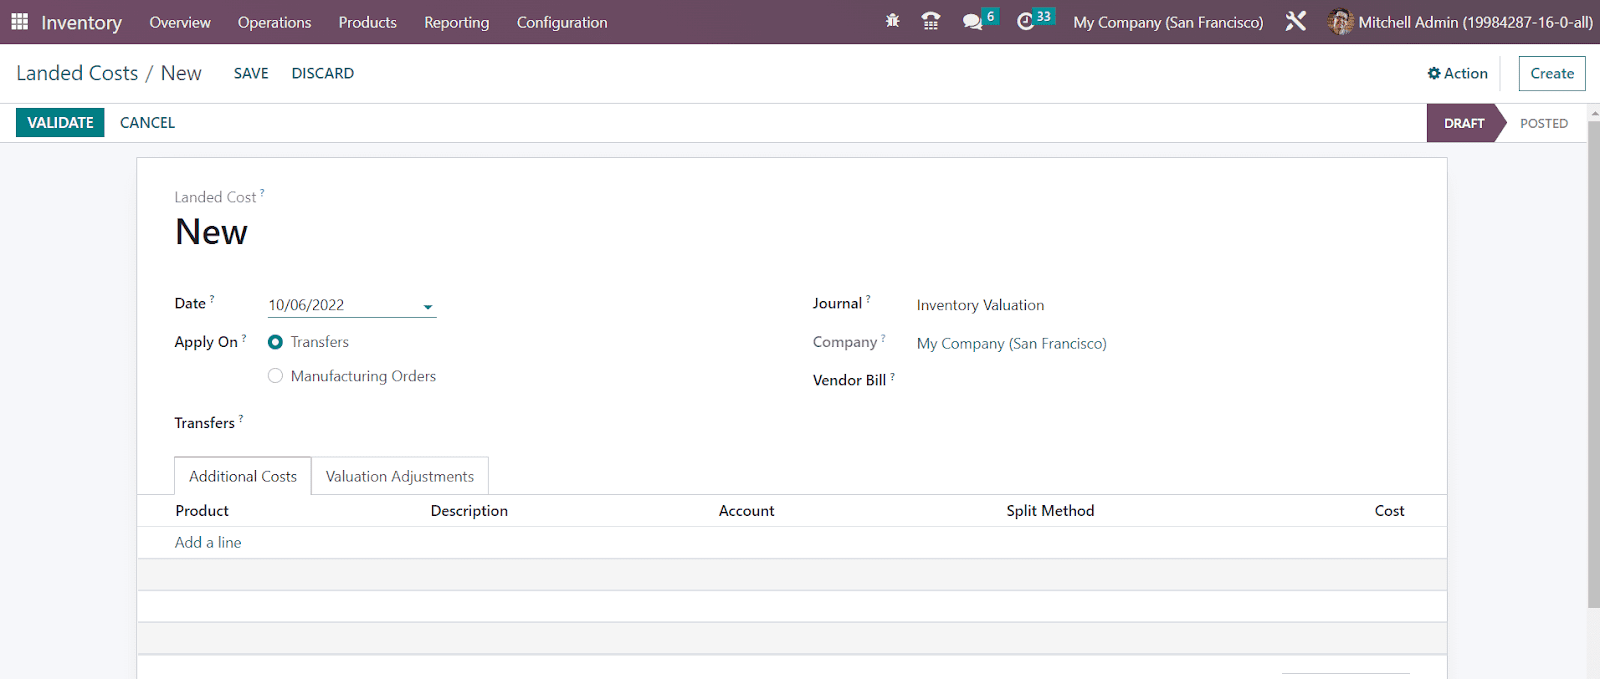
Here, you will get the Date of creation in the respective field. You can set the new landed cost on Transfers or Manufacturing Orders. In the Apply On field, we can select Transfers since we want to add landed costs for transfers. You can mention the id of the receipt that we created earlier in the Transfers field. The Journal, Company, and Vendor Bill of the products can be specified in the corresponding fields. Under the Additional Costs tab, you can mention the additional costs using the Add a Line button.

Here, we mentioned Transportation as an additional cost. While configuring Transportation as the additional cost, don’t forget to save it as a service product as shown in the image below.

After mentioning the Product, Description, and Account details, you can select the suitable Split Method.

The Split Method will decide how to split this landed cost to the products mentioned in the transfer receipt. It can be set as Equal, By Quantity, By Current Cost, By Weight, and By Volume as per your company policy. We can select the split method as Equal in this case. Now, you can validate the landed cost using the Validate button.

The smart button Valuation will give the valuation details of the landed cost. As shown in the screenshot below, you can observe that the landed cost is equally distributed to the products included in the particular receipt.

This cost will be added to the selling price of the products. Using this method, you can create landed costs for your products and increase your sales profit.
Run Scheduler
OTX will allow you to schedule inventory operations manually as well as automatically based on the operation rules applied to them. In the OTX Inventory module, you will get the Run Scheduler feature under the Operations menu that can be used to automate inventory operations on products. The operations will be performed based on the rules defined on the products. You can start the scheduler manually from the Inventory module. To get this feature, you must activate the developer mode in your database.

By clicking on the Run Scheduler button, a pop-up will appear as shown below.

To run the scheduler, you can click on the Run Scheduler button. The Cancel button will assist you to cancel the operation.
Reordering Rules
In the OTX Inventory module, you can configure a set of rules that help you to make sure that the stock would never run out. OTX will try to maintain at least a minimum quantity of product in your inventory using the reordering rules. Let’s check how this feature works in OTX 16. For this, you can select a storable product from your inventory module.

You can see that the unit available in hand is ‘0’. You can configure reordering rules for this product by clicking on the smart Min/Max button highlighted in the screenshot above. This will lead you to a new window. Here, you can define a minimum stock rule so that OTX automatically creates requests for quotations or confirmed manufacturing orders to resupply your stock.

As shown in the screenshot above, you will get the name of Product, Location, On Hand, and Forecast details automatically as soon as you click on the Create button. In the Preferred Route field, you can set the route to reorder the product. It can be Replenish on Order, Buy, Manufacture, or Resupply/Subcontractor on Order. Here, we selected the preferred route as Buy. Mention the name of the Vendor in the respective field.
The minimum quantity of the product that should be maintained in the stock can be defined in the Min Quantity field. When the product quantity goes below the defined Minimum Quantity, OTX will send a Purchase Order automatically to the respective vendor to replenish the stock quantity. Maximum Quantity is the maximum quantity of the product maintained in the stock. To Order can be defined as the lowest quantity that should be purchased from a vendor. This means the quantity we mention in the purchase order will always be the multiple of the To Order quantity.

You can add the Trigger field to the list view by enabling it from the additional fields as shown in the image above. You can trigger the reordering rules automatically and manually. For triggering manually, you can set the trigger as Manual and go to the Run Scheduler feature available under the Operations menu.

The stock will be reserved for operations waiting for availability and the reordering will be triggered by clicking on the Run Schedule button.
When you check the Replenishment menu, you can find the order to replenish the product.

Clicking on the Order Once button will generate an RFQ to the respective vendor. The RFQ of the product can be observed in the Purchase module as shown below.

You can confirm the Purchase Order and Receive the product from the OTX Purchase module.

Click the Receive Product button to receive the product in your inventory.
When you check the product detail form, you can observe that the quantity on hand has changed according to the reordering rule.

You can also see the minimum and maximum quantity of the product that should be maintained in the inventory to avoid running out of stock.

In the Configuration menu of the Inventory module, you will get the Reordering Rules option to manage all reordering rules in a single place.

You can create Reordering Rules for products directly from this window using the Create button.
Barcode Scanner
OTX supports barcode scanning to organize inventory operations of products in a more manageable method. You can use the barcode scanning method to trace and locate products in your inventory. In order to make use of the features of the barcode scanner for your inventory management in OTX , make sure to install the Barcode module from the OTX AppStore. Once you complete the installation process, you can go to the Settings menu of the Inventory module.

As shown in the image above, you can find the Barcode Scanner option under the Barcode tab. You can activate this feature. In the Barcode Nomenclature field, you can select a suitable set of rules for the creation of the barcode. After activating this feature, you can click on the Configure Product Barcode option to assign barcodes for products.

OTX will lead you to a new platform where you will get the list of already configured products in your database. You can easily add Barcode to each product by clicking on the Barcode field of the respective product. After adding a barcode to the product, you can click on the Save button. You can assign barcodes for all products by this method. Using this barcode you can locate products during different inventory operations with the help of a barcode scanner.
It is possible to create a barcode for storage location also. While configuring locations in OTX , you will be able to get the Barcode field to set the location barcode as shown in the image below.

You can set certain rules for the creation of the barcode with the help of the Barcode Nomenclature feature available in the OTX ERP system. In order to set the barcode nomenclature in the OTX Inventory module, you must activate the developer mode. Once you change into developer mode, you can find the Barcode Nomenclature option under the Configuration menu of the Inventory module as shown below.

Using the Create button, let’s create a new Barcode Nomenclature.

In the Barcode Nomenclature field, you can mention a name for the internal identification of this barcode nomenclature. The UPC/EAN Conversion can be set as Always, EAN-13 to UPC-A, UPC-A to EAN-13, or Never as per your requirements. UPC Codes can be converted to EAN by prefixing them with zero. This setting determines if a UPC/EAN barcode should be automatically converted in one way or another when trying to match a rule with the other encoding. By activating the Is GS1 Nomenclature feature, this nomenclature uses the GS1 specification, only GS1-128 encoding rules are accepted in this kind of nomenclature.
Barcodes Nomenclatures define how barcodes are recognized and categorized. When a barcode is scanned it is associated with the first rule with a matching pattern. The pattern syntax is that of a regular expression, and a barcode is matched if the regular expression matches a prefix of the barcode. Patterns can also define how numerical values, such as weight or price, can be encoded into the barcode. They are indicated by {NNN} where the N’s define where the number’s digits are encoded. Floats are also supported with the decimals indicated with D’s, such as {NNNDD}. In these cases, the barcode field on the associated records must show these digits as zeroes.
Using the Add a Line button, you can add rules to this nomenclature. A pop-up will appear as shown below where you can set rules one by one.

Here, you can set a Rule Name, Sequence (used to order rules such that rules with a smaller sequence match first), Type, Encoding, and Barcode Pattern. You can add different rules to the nomenclature by this method.
After configuring the Barcode Nomenclature, you can define which nomenclature should be used while creating barcodes in the Inventory module from the Settings menu.

Here, you will get a drop-down in the Barcode Nomenclature field, from where you can select the suitable one for your operations.
Now, let’s move to the Shipping Method configuration in the Inventory module.
Shipping Method
Configuring and managing shipping methods in the Inventory module can be easily done just as we discussed in the Sales module. You can deliver products directly to the customer or seek assistance from third-party shipping companies. In both cases, OTX ensures secured and effortless shipping management. You can activate the shipping features from the Settings module of the Inventory module.

Activating the Delivery Methods will help you to compute the shipping costs. Along with this, you can activate available shipping connectors to use them as third party shippers in your delivery operations. Here, you can find UPS Connector, FedEx Connector, bpost Connector, Sendcloud Connector, DHL Express Connector, USPS Connector, and Easypost Connector.
Now, you can configure a new shipping method for your delivery operations by clicking on the Shipping Methods option available under the Configuration menu. The list of already configured Shipping Methods will show the details of the Delivery Method, Provider, Is Published, Website, and Company.

Clicking on the Create button, you can configure a new shipping method.

You can specify the name of the Shipping Method in the given field. Mention the Website id to make this shipping available on your eCommerce site. From the Provider field, you can select a suitable shipping provider for your delivery.

Or else you can install more providers using the corresponding option. After selecting Provider, you can specify Company and Delivery Product in the respective fields. The percentage mentioned in the Margin on Rate field will be added to the shipping cost.

Activate the Free if order amount is above field if you want to provide free shipping for orders with an amount equal to or more than the value specified in the Amount field. The tab available in this window will change based on the Provider you select. Here, we select the Fixed Price option. So we will get a tab named Pricing where you can mention the Fixed Price of this shipping method.
In the Destination Availability tab, you can specify the destinations where this shipping method is available.

You can specify the Countries, States, and Zip Prefixes in the corresponding fields. If you want to add additional notes to the shipping method, you can specify them in the Description field. After creating a shipping method, you can use them while confirming a sales order.

After confirming the sales order, you can click on the Add Shipping button from the Order Lines.

You will get a new wizard to select a shipping method for the products in this sales order. The Cost of the shipping will automatically appear as soon as you select the shipping method.
When the delivery orders are done, it is possible to send an automatic confirmation email and SMS to the customer.

You can activate the Email Confirmation and SMS Confirmation features from the Settings menu of the OTX Inventory module. You will get an additional field to set the SMS Template where you can set the default template for SMS.
You can request a signature from the customer to confirm the delivery. The Signature option from the Shipping tab can be enabled to get the sign option on delivery confirmation.

After activating this feature, you can check the Validated Delivery Order where you can find a Sign option.

Using this button, the customer can sign and confirm the delivery.
Picking Policy
You can decide when to start shipping a product from the Picking Policy field available in the Settings menu of the Inventory module. You can ship all products at once or as soon as possible.

The option you select here will be applied to all pickings in inventory. You can change the Picking Policy of a picking operation from the Other Information tab of the Pick detail form as shown below.

Reception Report
You can view and allocate received quantities in OTX using the Reception Reports. This feature can be enabled from the Settings menu of the Inventory module.

After activating this option, you can go to the Purchase module and create a new purchase order. After confirming the Purchase Order, you can click the Receive Product button to receive the products.

A new smart button will appear on the screen called Allocation which will show the Reception Report.

Click the Allocation button.

The reception report will appear on the screen as shown in the image above. It will show product allocations. The expected Delivery of the product can be observed here.
You can allocate products using the Assign button. In order to cancel the allocation, you can click on the Unassign button. For assigned quantities of the product, the Print Label button will be available to print respective labels.
Consignment
Using the Consignment option available under the Settings menu, it is possible to set owner on stored products in your inventory. The product will be sold by the retailer but the actual ownership of the product will be held by the supplier until the product has been sold to a customer. You can return unsold products to the suppliers easily with this method. The retailers don’t need to keep a permanent inventory in the case of consignment.

From the Traceability tab of the Settings module, you can activate the Consignment feature. While receiving products in your inventory, you can assign an owner to them with this feature. Let’s create a receipt for the consignment stock and assign an owner for the stock.
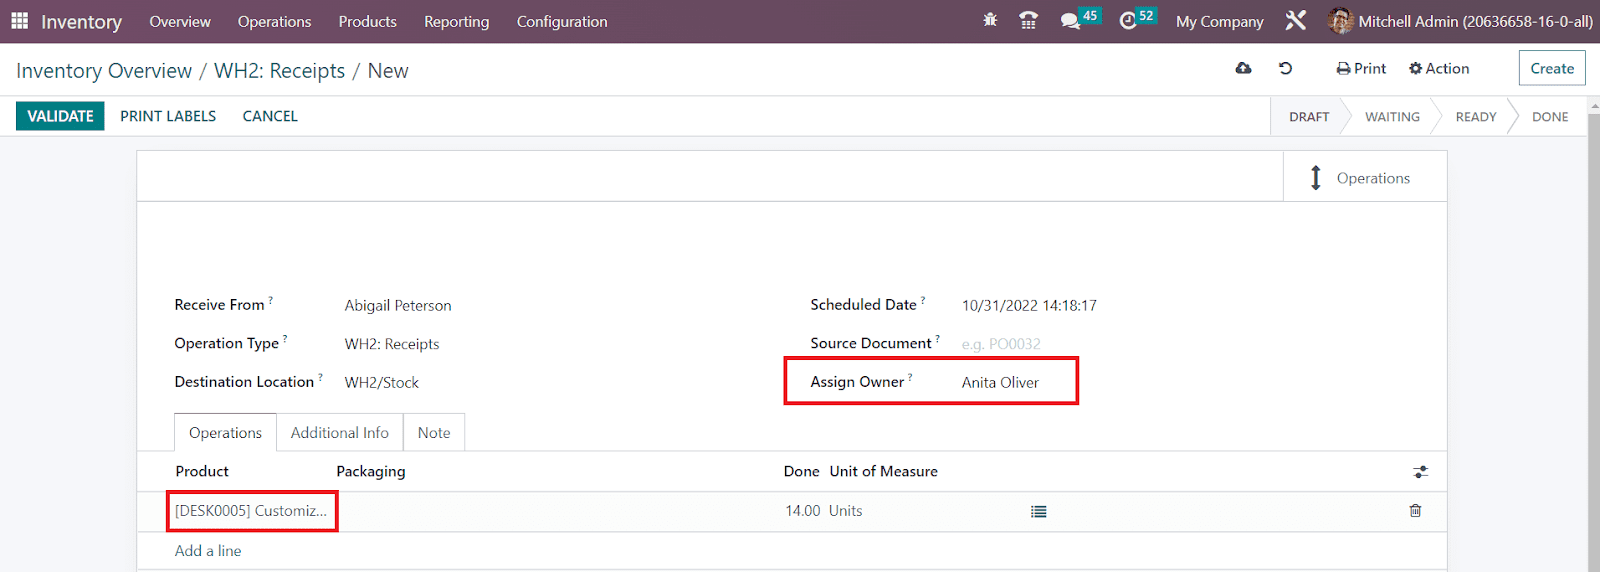
While creating the receipt, you can mention the name of the consignee in the Assign Owner field. The consignment stock and its quantity can be mentioned in the Operations tab using the Add a Line button. Here, we assigned Anita Oliver as the consignee for the product Customizable Desk. We assigned 14 quantities of the product to Anita Oliver. You can click the Validate button. The consignment of 14 quantities of the Customizable Desk to Anita Oliver is completed.
When you check the Stock report from the Reporting menu, you can observe that currently 78 quantities of the product are on hand.
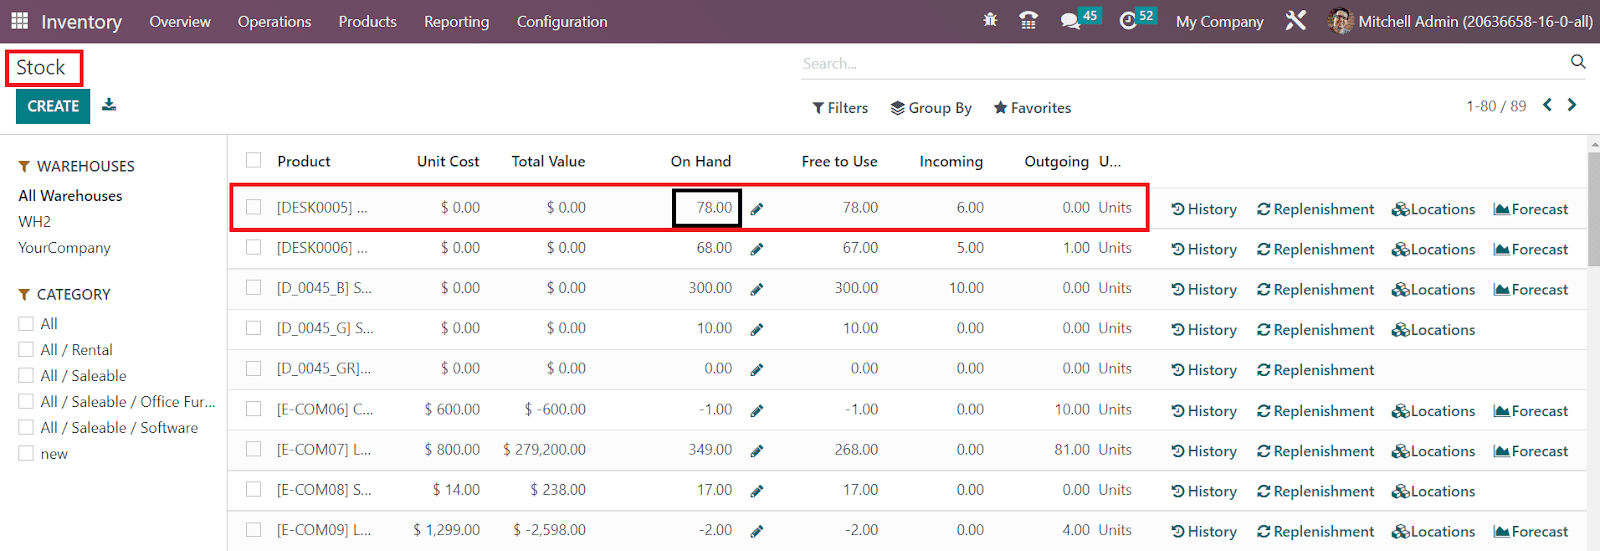
Clicking on the On Hand field will give a detailed view of the stock report along with the consignment details.
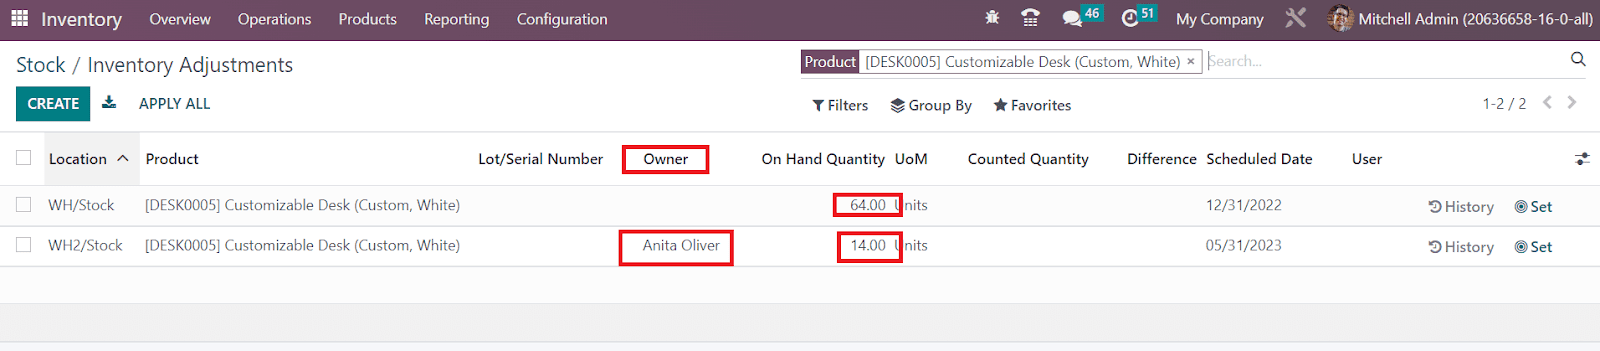
The Owner field will show the name of the consignee. From this report, we can analyze that out of 78 quantities of the Customizable Desk, 14 quantities are managed by Anita Oliver. This is how OTX assigns owners on received products.
Advanced Scheduling
For planning different activities OTX offers an Advanced Scheduling feature in the Inventory module which can be accessed from the Settings menu. This feature will help you to ensure enough time for planning product related activities.
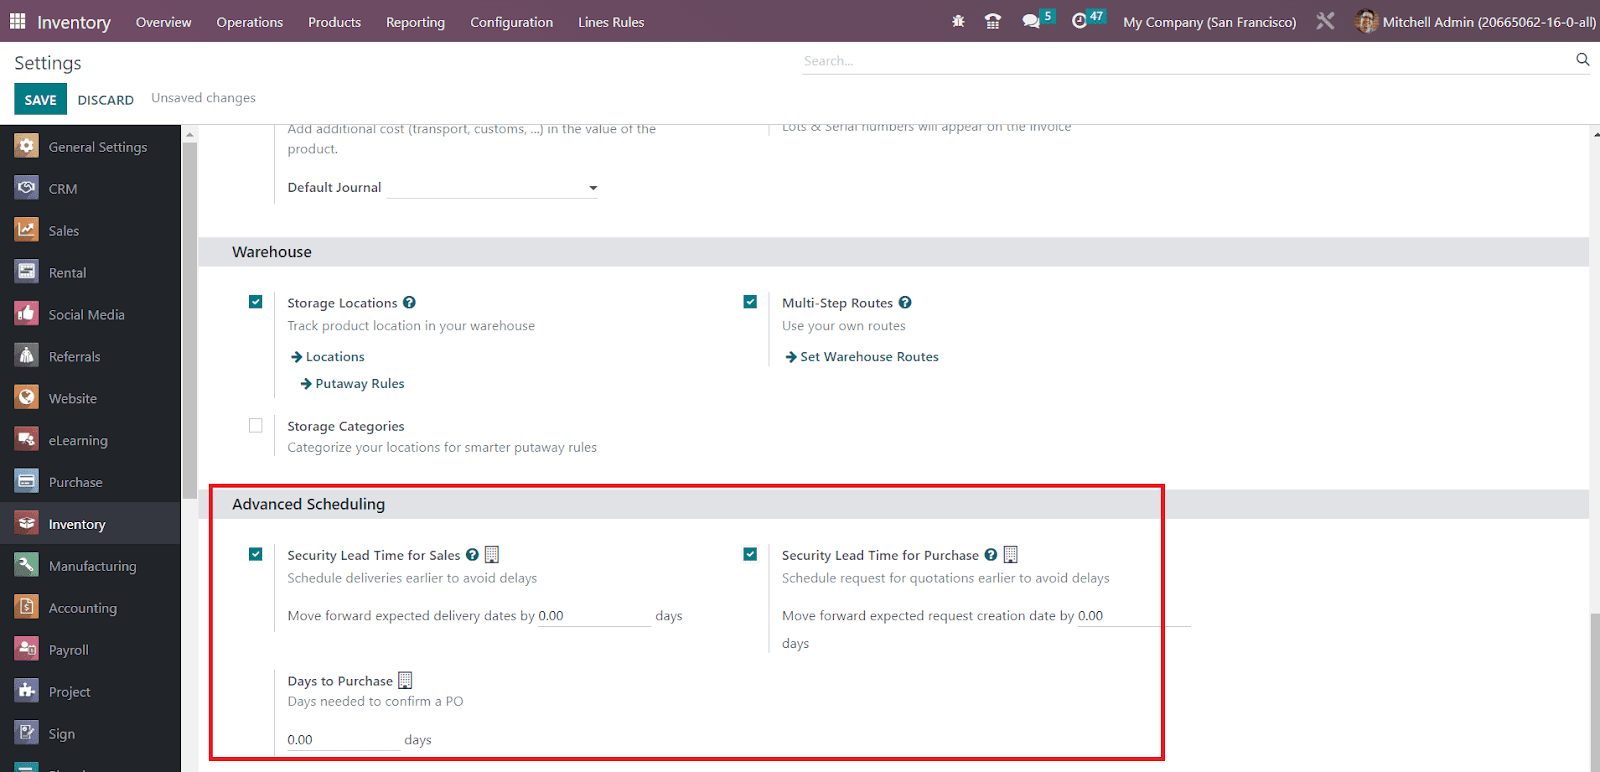
You can schedule deliveries earlier to avoid delays by activating the Security Lead Time for Sales option. You can set a margin here which will be applied on the expected delivery date. The product will be scheduled for procurement and delivery particular days earlier than the actual promised delivery date to cope with unexpected delays in the supply chain. Similarly, you can enable the Security Lead Time for Purchase option to schedule requests for quotations earlier to avoid delays. Set the margin and it will be reflected in the vendor lead time. When the system generates purchase orders for reordering products, they will be scheduled specific days earlier than the days mentioned as the margin to cope with the unexpected vendor delay.
In the Days to Purchase field, you can set a particular number of days required to confirm a purchase order.
Reporting
Proper monitoring of the inventory operations will help you to easily analyze and understand the workflow in managing the inventory. OTX can offer you a dedicated platform especially for generating reports for the inventory operations done in your organization with an accurate representation of data in graphical and tabular views. You can customize your reports in real-time to get meticulous reports as per your requirements. In the Reporting menu of the OTX Inventory module, you will be able to get the reports of Stocks, Locations, Moves History, Stock Moves, Valuation, and Performance. Let’s take a look at each of these reporting platforms in detail.
Stocks
The Stocks platform in the Reporting menu will give a list view of all stocks available in your inventory. You will get the details of the Product, Unit Cost, Total Value, On Hand, Free to Use, Incoming, and Outgoing quantity.

You can categorize the stock list based on the product category using the available categories shown on the left side of the screen as highlighted in the image. In order to simplify the search process, you can use the search bar at any time. The stocks can be filtered as Services, Products, Published, Available in PoS, Can be Sold, Can be Purchased, Can be Recurring, Can be Rented, Can be Subcontracted, Can be Expensed, Favorites, Warnings, Archived, Available products, and Negative Forecasted Quantity using the default Filters. You can create custom filters with assistance of the Add Custom Filter button. You will get Product Type, Product Category, and PoS Product Category as the default Group By option. Make use of the Add Custom Group button in order to create a custom group by option.

By clicking on the icon given near the Total Value field, you will get the Stock Valuation Report of the individual products.

The stock valuation report of a product will show the valuation Date, Reference, Product, Company, Unit Value, Remaining Quantity, Remaining Value, and Total Value. If you want to get the stock valuation report of the product on a particular date, you can click on the Valuation at Date button. A pop-up window will appear asking you to choose a date to get the valuation report at that date.

You can mention the date and click the Confirm button. OTX will show you the stock valuation report of the selected date on your screen.

Clicking on the small icon shown next to the On Hand field will give you the Inventory Adjustment details of the product.

The working of the inventory adjustment platform is already discussed in the Inventory Adjustment section in this chapter.

If you want to get the moves history of any product, you can click on the History button given in the stock window as shown in the image. This will lead you to the moves history window of the respective product.

You can observe the Date, Reference, Product, Lot/Serial Number, From, To, Quantity, and Status of each move on this platform.

The Replenishment button available on the screen can be used to replenish the product based on reordering rules. The Location button will show the locations of a product in your inventory.

You can create a new location history directly from this window using the Create button. This platform shows the Location, Product, Package, Lot/Serial Number, On Hand Quantity, and Reserved Quantity. You will get the History button to observe the products’ moves, the Replenishment button to replenish the product, and the Valuation button to analyze the stock valuation in a particular location.
The Forcast button will help you to get the forecast report of a product.

Location
The list view of the Location report is given below. You can see the Location, Product, package, Lot/Serial Number, On Hand Quantity, and Reserved Quantity here.

As we mentioned earlier, from the Location reporting window, you can observe the history of the moves using the History button and replenish the products using the Replenishment button. The inventory adjustment can be performed using the smart button available on the screen.

This screenshot shows the pivot table view of the Locations. You can use the Measures, Filters, and Group By options to generate suitable reports according to your demands. This window can be altered into a graphical view also where you can shift the graph between line, pie, and bar charts based on your convenience.

Moves History
OTX offers a separate platform to observe the moves history of all products recorded in your inventory. This report will give you a clear idea about the movement of products in your inventory on a particular date.

Along with the date of operation, you will get the Reference, Product, Lot/Serial Number, From, To, Quantity, and Status from the list view of the platform. It also provides options to observe the history of moves in Pivot as well as Kanban views.
The Stock Moves platform in the Reporting menu will show the report of all scheduled stock moves in your inventory.

Stock Valuation
The stock valuation reports can be generated with the help of the Valuation option available in the Reporting menu of the Inventory module. You can effectively analyze stock valuation using this report.

From the list view of this platform, you will get the Date, Reference, Product, Company, Moved Quantity, Unit Value, and Total Value of the inventory valuation. In order to get the valuation report of a particular date, you are allowed to click on the Valuation at Date button where you will get a pop-up to mention the date. After selecting the date, you can click on the Confirm button and OTX will display the valuation report of that particular date.

The pivot view of the stock valuation report is given above. You can use Quantity, Remaining Quantity, Remaining Value, Total Value, Unit Value, and Count as Measures for the pivot table. Use the custom features available in the Filters and Group By options to get the expected report of the stock valuation.
Warehouse Analysis
The performance of warehouse operations can be analyzed using the Performance button from the Reporting menu. OTX will provide useful reports of the warehouse analysis that can be used in the future to enhance performance better than earlier.

You can observe this platform in Pivot and Graphical views. In the graphical view, you can select Pie, Line, or Bar charts according to the demand. You can change the Measures according to your purpose to get accurate details. You can use Cycle Time, Delay, Product Quantity, and Count as Measures. The report can be filtered based on Done Transfers, Done Deliveries, Done Receipts, and Transfer Date.
Using the dedicated Inventory management system in OTX , you can organize and monitor all kinds of inventory operations at a single place. For the complete management of your inventory and warehouse operation, you can rely on the highly integrated Inventory module which can assure maximum efficiency in workflow.
FAQs
Supposed to be commonly asked issues, questions & troubleshoot tricks are in this section.
Repair
The Repair module offered by OTX 16 can be integrated with the Manufacturing and Maintenance modules to ensure seamless performance. You can extend the functionalities of this module with the Inventory module also in order to manage the repairing of the products in your inventory. This module is the best solution for the management of repair services of the products with a warranty. Partially or completely damaged products can be repaired by creating repair orders in the OTX Repair module. It is one of the simplest modules available in OTX with high-performance efficiency.
When you open the Repair module, you will get the list view of all repair orders created in the module, as shown below.

The list view will show the Repair Reference, Scheduled Date, Product to Repair, Customer, Delivery Address, Warranty Expiration, Sale Order, Company, and Status. The Status of the repair orders can be seen in different colors. The star icon given on each repair order can be used to highlight the priority of the order.

The icon available at the right corner of the list view can be used to add new fields to the list view. You can activate the required fields from the given list. If you want to create custom fields for the list view, you are allowed to use the Add Custom Field.

The default Filters available in the platform are Quotations, Confirmed, Ready to Repair, Returned, Invoiced, and Created On. Use the Add Custom Filter option to create custom filters for repair requests.

You can group the repair orders based on Customer, Product, Status, Warranty Expiration, and Company with the help of the Group By feature.
You can manage the already created repair order by clicking on them. If you want to create a new repair order, click the Create button. This will open a new form view as shown below.

Here, you can add a description for the repair order in the Repair Description field. The product that you want to repair can be specified in the Product to Repair field. Additionally, mention the quantity of the product in the Product Quantity field. Add the Customer and the Delivery Address to deliver the repaired product in the respective fields. If you have the Sales Order for the damaged product, you can mention it in the Sale Order field. If the product to be repaired comes from a return order, you can specify it in the Return order field. In the Scheduled Date, schedule a date for the repair of this product. Assign an employee who is in charge of the repairing operation in the Responsible field. The location where the product to be repaired is located can be specified in the Location field. If the product is within the warranty limit, you can mention the Warranty Expiration date. Some companies offer free repair services if the product is still within warranty. In such cases, you select, No Invoice in the Invoice Method field. If it is a paid service, you can generate an invoice before or after the repair by selecting the respective option in the Invoice Method field. Add Tags and mention the Company in the given fields. Using the star icon given next to the Repair Reference, you can prioritize the repair order.
The Parts tab can be used to specify the details of the product that you want to repair. Here, we mention the part of the product that needed to be added or removed in order to repair that product. Use the Add a Line button to mention the details of the part.

The Type can be either Add or Remove. In the corresponding fields, you can add details of the Product, Description, Lot/Serial, Source Location, Destination Location, Quantity, UoM, Unit Price, Taxes, and Subtotal.

Under the Operations tab, you can specify the details of the operation details related to the repair using the Add a Line button. This includes the product, Description, Quantity, Unit of Measure, Unit Price, Taxes, and Subtotal.

The Extra Information section will show the additional information related to the repair order. It will show the Inventory Move of the product mentioned in the repair order. The Repaired field can be seen as activated if the repairing operation is completed. If the order is invoiced, the Invoiced field will be activated.

Here, you will get the Repair Notes field which can be used to add internal notes related to the repair order.

The Quotation Notes tab can be used to specify the quotation notes.
Once you complete all necessary fields, the repair order can be seen as shown below.

Here, we selected the Invoicing Method as After Repair which indicates that you can invoice the order only after completing the repair activities. Now, the order is in the Quotation state. Using the Confirm Repair button, you can confirm the order. The Send Quotation button will help you to send the quotation to the respective customer. You will get a print of the quotation by clicking on the Print Quotation button. If you want to cancel the order, use the Cancel Repair button.
Here, we are confirming the order.

The order is confirmed, and the status can be seen as Confirmed as shown in the screenshot above. Once you start the repair, click the Start Repair button.

During the repairing process, the status of the order can be seen as Under Repair. After completing the operation, click the End Repair button and the order will be moved to the To be Invoiced status. We selected the Invoicing Method as After Repair. So, you can generate the invoice since the repair is completed.

For this, click on the Create Invoice button.

A smart button will appear on the screen which will show the draft invoice for the repair.

You can confirm the draft invoice by clicking on the Confirm button and register the payment details like we usually do in OTX .

The smart button Product Moves will show the inventory moves of the products added to the repair order.

This includes the details of the Date, Reference, Product, Lot/Serial Number, From, To, Quantity, Unit, and Status.
It is possible to generate an invoice before the repair operations. For this, you need to set the Invoicing Method as Before Repair as shown in the screenshot below.

After mentioning the Invoicing Method, you can click the Confirm Repair and confirm the order. This will lead you to a new window where you will get an option to generate an invoice.

Click the Create Invoice button to get the draft of the invoice. After generating the invoice and registering the payment, you can start the repair.
Repair Orders Tags
Under the Configuration menu of the Repair module, you will get the Repair Orders Tags option which can be used to create tags for the repair orders. The platform will show already available tags for the repair orders.

If you want to create a new tag, you can click on the Create button. Clicking on the Create button will open a new line under the available list of tags as shown in the image below.

Here, you can mention the name of the tag. You can easily create new tags as much as you want from this platform.
Subscriptions
Subscription is one of the best and most influential marketing tools that can help your business to maintain a good relationship with customers. If you are wondering about how subscriptions can help to improve customer relationship management, then here is the explanation. With the best strategies, it is possible to retain the customer relationship for a longer period using subscriptions. Customers are more likely to buy products and services from the vendor or company to where they have a subscription. It prompts them to make more purchases with the same organization. With the assistance of an ERP system, you can systematically generate new subscription plans and update renewal programs.
OTX open-source software offers a dedicated module for users to manage subscriptions and OTX -book-16-Subscription-related services. The Subscription module will manage everything related to subscribers of the various programs offered by the company. The advanced dashboard of this module will show the subscription status of each customer. Once you install the Subscription module from the OTX AppStore, you will get the module icon on the main dashboard of OTX . Clicking on the Subscription icon will lead you to the main dashboard of the module as shown below.

From the Kanban view of this platform, you will be able to see the subscription of different customers under different stages. In order to create new stages, you can use the +Stage button available on the screen. If you want to add a new subscription under a particular stage, you can use the + icon given on the title of each stage. In order to schedule various activities for the subscriber, you can use the clock icon given on each subscription. The available Filters are My Orders, Unassigned, Subscriptions, Alive, To Renew, Failed Payment, Closed, Not Started Yet, Good Health, Bad Health, Order Date, and Date of Next Invoice. In the Group By option, you can find Salesperson, Sales Team, Customer, Template, Stage, End Date, Next Invoice Date, Recurrence, Pricelist, and Referrer options for grouping the available subscriptions.
Apart from the Kanban view, you can alter the view into List, Pivot, Graph, Cohort, and Activity. Now, let’s create a new subscription using the New button.

This is the form view of the subscription that appears after clicking on the New button. Before creating a new subscription for customers, you can create a new subscription plan and respective product in the module. After that, you can configure the plan and product into the new subscription. Apart from that, it is possible to create quotations using the subscription product from the sales module. After confirming the sales order, OTX will automatically record the corresponding subscription in the Subscription module.

Here, you can mention the name of the Customer in the given space. The name of the Referrer who suggested this subscription to the customer can be mentioned in the corresponding field. In the respective fields, you can specify the Invoice Address, Delivery Address, New Text, and Subscription Plan. The details related to the invoicing policy and payment terms will be included in the subscription plan. The subscription will end on the date mentioned in the Expiration field. If the customer wants to repeat the subscription in a regular interval, you can mention the Recurrence period. The Pricelist, Payment Terms, and New Multiline Text related to the subscription can be added in the respective spaces.
You can use the Order Lines tab to mention the subscription products one by one. For this, you can use the Add a Line button. This tab will show the details of the Product, Description, Quantity, UoM, Unit Price, Taxes, Discount %, and Subtotal.

You can use the Optional Products tab to add the optional products that come along with the subscription plan.

In the Other Info tab, you can add details related to the Sales, Delivery, Tracing, Invoicing, and Payments. Under the Sales session, you can assign a Salesperson and Sales Team to manage this subscription. The name of the Company will be available in the respective field. If you want to allow the customer to sign and complete payment via online, you can activate the Signature and Payment option from the Online Confirmation field. Suitable tags for this particular subscription can be mentioned in the Tags field. You can set a date in the Start Date field and the subscription period will begin on this particular date. If you are creating this subscription as a part of the renewal plan, you can enable the To Renew field. The Fiscal Position and Analytic Account can be provided in the respective field for the management of invoicing and payments for this subscription.
In the Delivery session, you can set the Shipping Policy for this subscription as As soon as possible or When all products are ready based on the demand of the customer. Along with this, you can set a Delivery Date for the subscription in this session. For Tracking purposes, you can provide Source Document, Campaign, Medium, and Source in the respective fields.

Any internal notes related to the subscription can be specified in the Notes field.
After adding all details, you can click on the Confirm button to confirm the quotation for the subscription.

The Send By button will send this quotation via mail to the respective customer. The Customer Preview smart button can be used to get a customer’s preview of the quotation. If the customer is satisfied with the quotation, they can sign the quotation and complete payment online from the customer preview window.
Clicking on the Confirm button will confirm the Sales Order. Now, you can generate an invoice for the sales order using the Create Invoice button.

The Renew button can be used for the renewal process. If you want to offer more features to the customer after starting the subscription, you can use the Upsell button
Subscriptions to Renew
At the end of the duration of the subscription, the customer can renew their subscription in the OTX Subscription module. Before the end date, you can renew the subscription to get the same benefits. In order to manage the renewal of subscriptions, OTX offers a separate platform in the module. Under the Subscription menu of the module, you can find the Subscriptions to Renew option.

This platform will show all subscriptions that need to be renewed. The list view displays the Number, Order Date, Website, Customer, Salesperson, Activities, Company, Total, Invoice, and Status. In order to manage the renewal of a subscription, you can select that subscription from the window.

A form view of the renewal window will open as shown in the screenshot above. Here, you can see the status of the subscription as To Renew. In order to perform the renewal operation, you can use the Renew button. This will generate a renewal sales order for the subscription as shown below.

This is the Renewal sales order of the subscription. You can click on the Confirm button to confirm the order and then generate an invoice. Once you confirm the order, your subscription will be renewed.
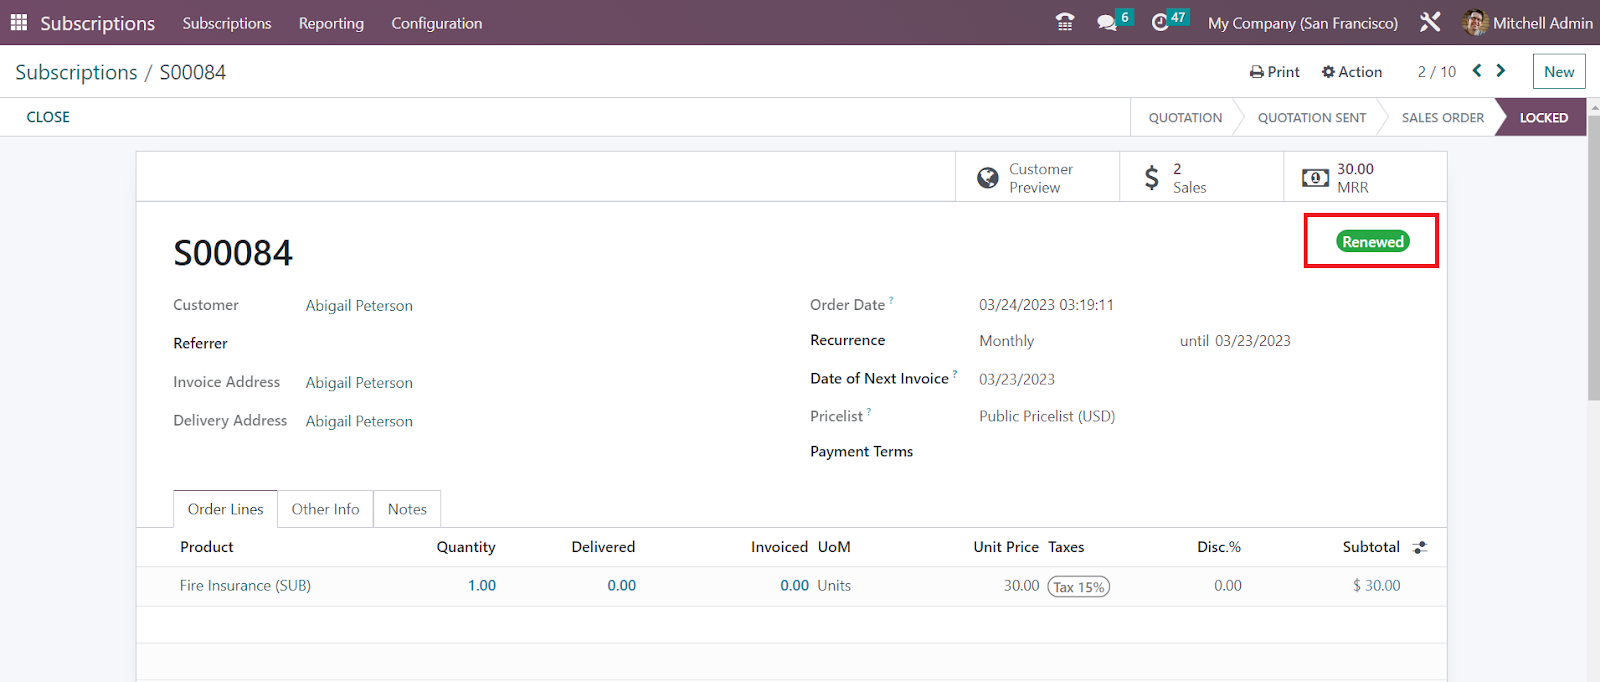
The status of the old subscription can be seen as Renewed, as highlighted in the screenshot above. By following this method, you can renew your subscription.
Upsells
Upsell is an effective marketing strategy used to sell more products of a company. Via upsell, you can upgrade old subscriptions to new subscriptions by including additional offers and subscription products. This can be used to provide more convenient and beneficial offers to your customers. You can find the Upsells option in the Subscription menu of the module. This platform will show the list of sales orders generated for upselling products.

The window displays the Number, Order Date, Website, Customer, Salesperson, Activities, Company, Total, Invoice, and Status.

You can find the Upsell status on the sales orders as shown in the screenshot above.
Now, in order to add upsell products to an existing subscription, you can select one subscription from the main dashboard of the module.

In the form view, you can find the Upsell button as shown in the image above. Clicking on this button will generate a quotation for the upsell products. You can add new products to this quotation. The quotation with new products can be sent to the respective customer for approval.

Once you get approval from the customer, you can use the Confirm button to convert the quotation into a sales order. The new upsell products will be added to the subscription once you confirm the order.
Subscription Products
The configuration of the subscription product is the same as that of the product configuration we detailed in the modules like Sales and Inventory. In the Subscription module, you can configure products under the Products menu. In order to get the list of the subscription products, you can use the Filter Can be Recurring on this platform.

Using this filter will give the details of the recurring products on your screen.

While configuring a subscription product, don’t forget to enable the Recurring option from the form view. By doing so, OTX will automatically generate a subscription for this product whenever you confirm a sales order with this product.
Subscription Plans
Before creating a new subscription, you can create suitable subscription plans for your customers in the Subscription module. The subscription plans in OTX 16 act like a template for new subscriptions. Using these plans, you can easily create new subscriptions for customers. In order to create templates for subscription, you can go to the Configuration menu and select the Subscription Plan option. The platform will show some pre-configured plans, as shown below.

The list view includes the Quotation Template, Recurrence, and Company. Use the New button to create a new subscription plan.

In the given space, you can provide a suitable title for the Quotation Template. The number of days for the validity date computation of the quotation can be specified in the Quotation Expires After field. By doing so, OTX will automatically set the Expiration of the quotations created with this plan. By activating the Signature and Payment options from the Online Confirmation field, OTX allows you to request an online signature and payment to the customer in order to confirm the order automatically. You can add an email template in the Confirmation Mail field. This mail will be sent to the customer at the time of the order confirmation. The name of the Company can be specified in the corresponding field. Set the Recurrence period of the plan from the given options.

You will get some additional fields after selecting the Recurrence. The Duration of the plan can be set as Forever or Fixed. By activating the Self Closable feature, the user will be able to close his account from the front end. In order to close the orders automatically after particular days, you can use the Automatic Closing field. If the chosen payment method fails to renew the subscription after this time, the subscription will be automatically closed. You can add a suitable Invoicing Journal to this template. The subscriptions with this template will invoice in this particular journal.

Under the Lines tab, you can mention the subscription products one by one using the Add a Product button. These products will be added to the Order Line when you select this subscription plan in a quotation.

The Optional Products tab can be used to add additional products that come along with the subscription plan.

The Terms & Conditions for the subscription plan can be specified in the tab shown in the screenshot above.

After creating the subscription plan, you can use the Design Template option to design the template from the OTX Website builder.

Using the editing panel available in the OTX website builder, you can easily drag and drop suitable building snippets to the template and design it according to your requirements.
The Recurrence period of the subscription can be configured from the Configuration menu of the module. Clicking on the Recurrence Periods option will open a window as shown below.

This is the list of available recurrence periods in this database. You can create a new recurrence period by clicking on the New button.

You can mention the Name, Duration, Unit of the period in the given space.
Subscription Stages
Stages will help you to easily identify the status of each subscription at a glance. Configuring various stages will simplify the organizing process of subscriptions in the module. You can use the Subscription Stages option available in the Configuration menu to manage and create stages.

The window will show the already configured list of stages as shown in the image above. You can use the New button to create a new stage.

Clicking on the New button will open a new form view, as shown above. Provide a suitable name for the stage in the Stage Name field. In the Rating Email Template field, you can add an Email Template. By adding a template here, OTX will automatically send an email to the concerned customer when a subscription is moved to this stage. If you want to fold this stage in the Kanban view of the subscription dashboard, you can enable the Folded in Kanban option. You can select a suitable Category for the stage from the given options. The available categories are Quotation, In Progress, Invoicing Pause, and Closed. You will get a Requirements tab here where you can specify the internal requirements for this stage. It will appear as a tooltip over the stage’s name. You can create more stages for the subscription like this.
Alerts
The Alerts option available in OTX will allow you to send reminders to your customers. You can use this feature in the Subscription module to send alerts to customers regarding the expiry of the subscription or payment dues. Go to the Configuration menu and select the Alerts option. OTX will open a new window as shown below where you can observe the pre-configured list of alerts.

The preview of the list includes the Action Name, Company, and Subscription Count. Now, use the New button to create a new alert.

In the form view, you can provide a name for the alert in the Alert Name field. Under the Apply On tab, you can set conditions for the alert. You can set conditions on MRR Between, MRR Change More, and Period over which the KPI is calculated. You can trigger alerts according to the Rating Satisfaction. You can set rules as greater than or less than the mentioned percentage. Similarly, it is possible to trigger alerts on changes of stages. The respective stages can be specified in the Stages goes from field. If you want to set this alert on any particular Quotation Template, Product, Customer, Company, and Sales Team, you can mention details in the corresponding fields.

Now, you can use the Actions tab to define an action for this alert. The action can be set as Create next activity, Set a stage on the subscription, Mark as to renew, Send an email to the customer, or Send an SMS text message to the customer. You can trigger this action on Modification or Timed Condition. The Note field can be used to add internal notes related to this alert.

Finally, you can use the Trigger Now button to trigger the alert in OTX .
Close Reasons
There may be situations where the subscription needs to be closed before the ending date. In such cases, it is important to mention the reason before closing the subscription. In the form view of the subscription, you can find the Close button which can be used at the time of closing a subscription.

As soon as you click on this button, you will get a new pop-up window as shown in the screenshot below.

Here, you can select the most appropriate reason for closing the subscription in the given field. Then, you can click the Submit button and the subscription will be closed.
You can create a list for such reasons in the OTX Subscription module. For this, you can go to the Configuration menu and select the Close Reasons option.

The already created close reasons can be observed here. You can create a new one using the New button. It will open a new line under the existing list where you can mention the Reason. Click the Save button and you can use this reason next time while closing a subscription.
Reporting
In order to understand the workflow of operations in a company, it is necessary to have an adequate platform that offers accurate reports. Such platforms will help the user to get a clear view of the overall activities done during a particular period. In the OTX Subscription module, you will get the Reporting feature that allows you to perform various analysis operations related to the module. Here, the user will get reporting platforms for Subscriptions, Retention, Revenue KPIs, and Salesperson Dashboard.
The Subscriptions Analysis window is shown below. This is the pivot table of the report.

You can use Monthly Recurring Revenue, Quantity, Recurring Amount, Yearly Recurring Revenue, and Count as the Measures for the report. As Filters, you can find the My Subscriptions, Running, To Renew, Expired, Good Health, Bad Health, Order Date, and End Date. In the Group By option, you will get Stage, Salesperson, Customer, Country, Industry, Template, Order Date, and End Date options for grouping the report.
The Retention Analysis window can be accessed by selecting the Retention option from the Reporting menu.

Here, the user will get the same Measures, Filters, and Group By option that we mentioned in the Subscription Analysis window. You can view the report in Cohort, Pivot and Graphical views.
The reporting window of the Revenue KPIs is given below. You can generate Revenue KPI reports of a particular period by adjusting the date and year in the given space. It is possible to customize the report according to the subscription plans, companies, and sales team.

The salesperson will get a dedicated platform to get an advanced view into the subscriptions assigned to them. They can set a particular period in the given space to get the report of that period.
The salesperson can observe Monthly Recurring Revenue, Non-Recurring Revenue, Subscription Modifications, and Non Recurring Invoices on this platform. Using the advanced OTX 16 Subscription module, the user can effortlessly manage all subscription related activities in a professional manner.
Email Marketing
The Email Marketing Module in the OTX platform helps you in making successful campaigns efficiently and effectively. The very easily usable module will assist you in regulating the email layouts and other functions in it. You can even select perfect themes for email marketing campaigns accordingly. The process is very easy under the module. The email templates can be selected according to our wishes, and we make our own using the features available. Those emails can be sent to the required persons very easily.
You have the advanced feature of sending those emails to those persons whom you refer. This feature helps to reduce sending of unnecessary emails to others, and thereby, you can make sure of the acceptance, opening, and thereby the rate of clicks as well. You can choose the groups that are targeted and send them to them. The leads, prospects, and extra groups from our contacts can be selected on the basis of country, date, or other different filters.
The module helps you to enhance the campaigns. As the system has accuracy on all the emails that are sent, we can completely rely on it. The module can track and regulate the bounce rate, orders, click rate, leads that are created, and the revenue formed. You can see that the module got integrated with some other modules like CRM, Marketing Automation, Survey, and Events module for the smooth running of the functions. Here, let us look at the various uses and functions played by the options provided under this module.
On selecting the module, you will get the main dashboard of the module, as shown below.
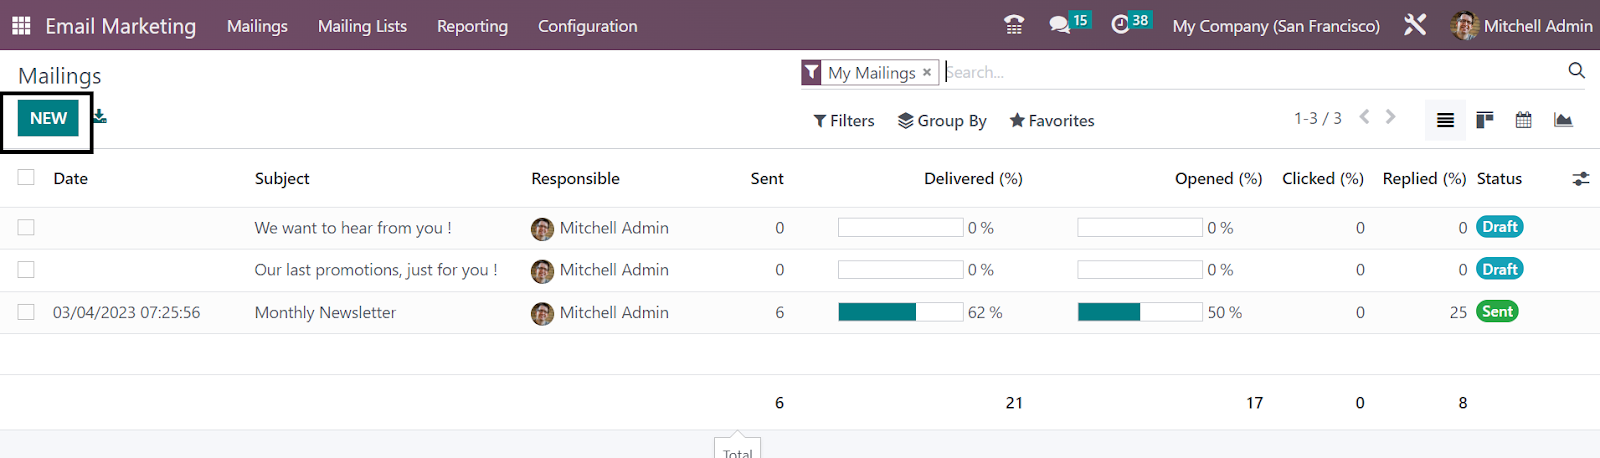
You will get the already created emails with the details, such as date, subject of the mail, responsible user, sent, delivered, opened, clicked, replied, and the status of mail as well. The page can be seen in Kanban, List, Graphical, and Calendar views as well. The options for those views are available on the right side of the page.
You can make use of the Group By and Filters option for sorting according to your needs. On selecting a particular responsible user from the list, you will get the chat box of the person, as shown below.
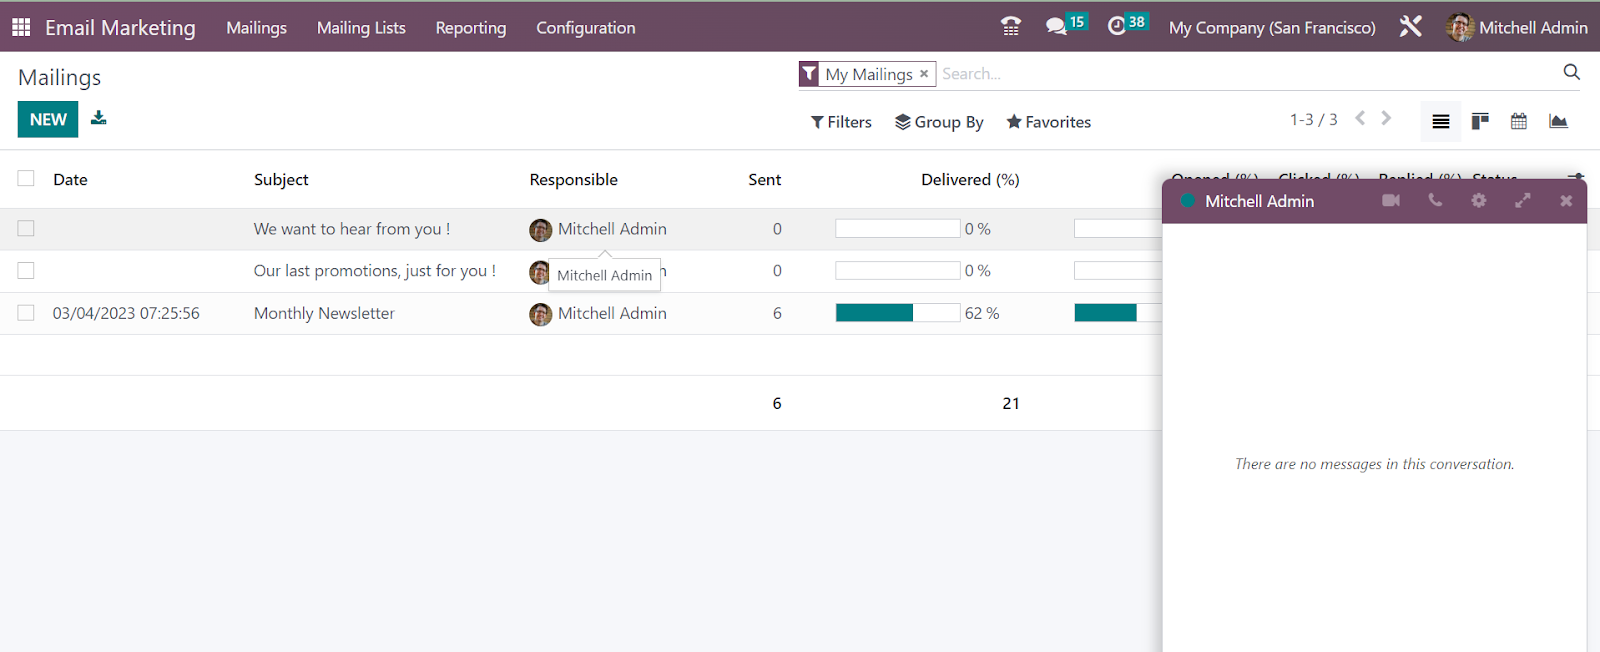
Communication with this responsible user can be done here. All the records of data can be analyzed and studied in detail by selecting the particular one that we want. On screenshot below.
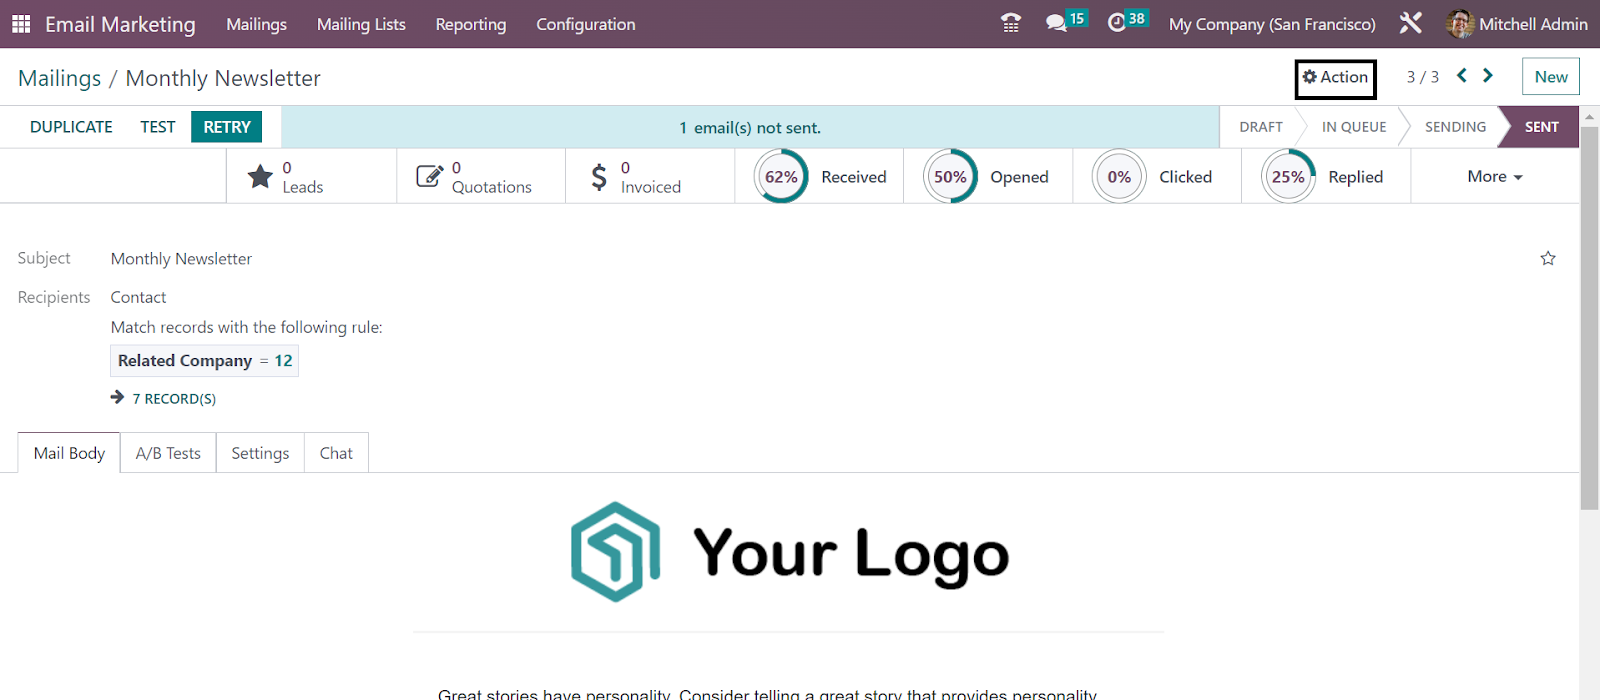
The given image provided above is one of the records on the mailing list. You will get all the information based on the particular mail here very clearly. As marked in the above image, you can make use of the Action icon provided for the purpose of performing extra actions. Under the Archive option, you will get Archive, Duplicate, and Delete options as well, which can be made use of if required.
Now, under the Filters option, you will get some of the filters, such as My Mailings, Send date, A/B test, A/B tests to review, and Archived option, which can be selected accordingly. Moreover, the Group By option includes Status, Send By, Send period, and Add Custom group options. You can also set the particular mail to Favorites, which include Save a current search, Insert view in the article, Insert link in an article, and Add to my dashboard options, respectively.
Now, if you want to make a similar kind of mailing, then go to the New option provided on the left side of the window.

On the creation page, you can see the space for providing the Subject of the mailing. You can also add emojis to the subject if required. Now, below that, you have the Recipients option, which can be selected from the drop-down menu, as per your wish. Now, you can select the mailing list option in the provided space. There are required options under the drop-down menu of the mailing list. You will also get a customizable mailing list from the main menu also.
Under the Mail Body tab, you will get the various mail bodies for the mailing among which, you can go for a particular one. On selecting a particular one from that, you can alter it and customize them as per your need.

Now, under the A/B Tests, you have the option to activate the A/B test, as seen in the image below. Next to that, the Settings tab helps you to provide some details, as shown in the screenshot below.

The options include the Preview text option, which encourages people to select the mail. The preview text can be seen near the subject of the mailing. If the first character of the mail content wants to be seen, the field can be kept as empty. And the responsible person will be provided in the space on its own, and it can be changed if required. Below that, you will get the send from and reply to the option, which can be provided accordingly. Under the attach a file option you can attach files in order to support the subject of the mail.
Under the Chats tab, you will get the option to see the send message, Log not, and Schedule activity, respectively, as shown below.

On completing providing all the necessary details for the creation of the mailing, you can go to the Save icon for getting the mailing added to the already created list. In the Save option, you can Send, Schedule, and Test options, as you can see on the page provided above. On selecting the Send option, you will get a page, as shown below.

The page will ask for confirmation of mail whether to be sent to all recipients or not. If yes, then proceed with the OK icon. On doing so, the status of the email will be shown as SENT, as shown in the screenshot below.
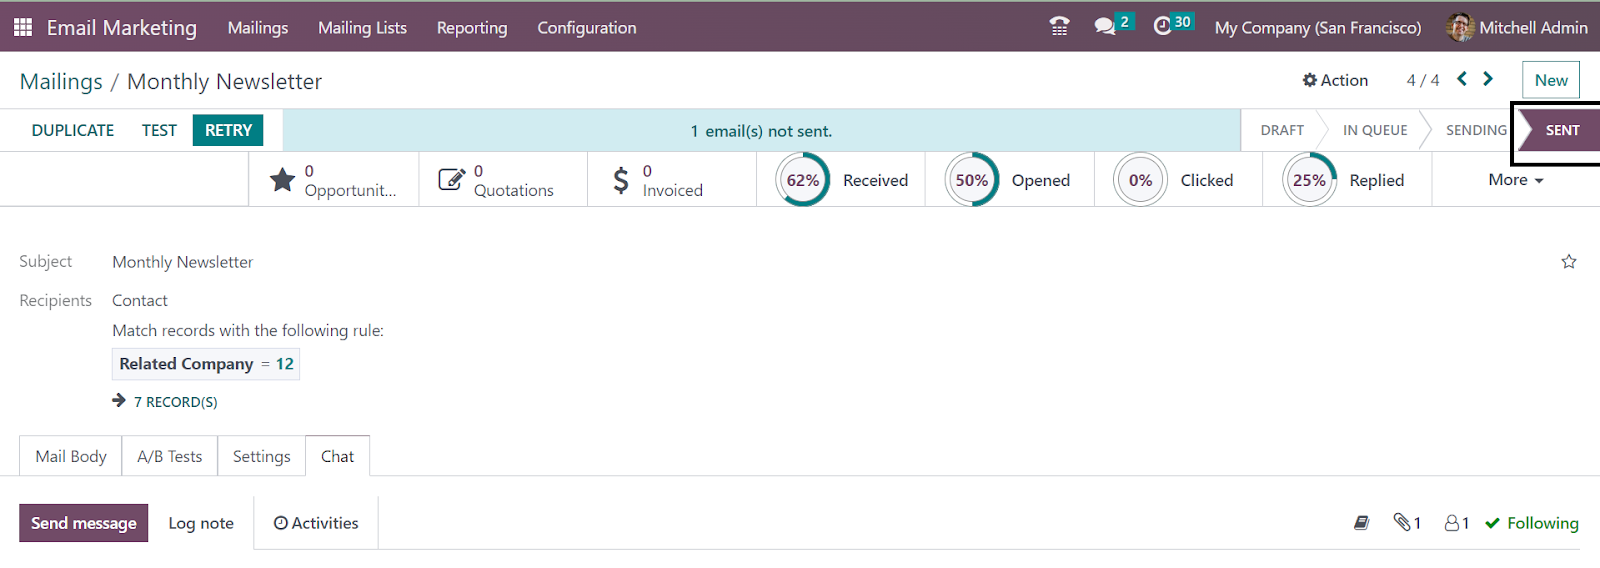
Now, if you are going with the Schedule option, you will get a page where you can provide the date on which the mail should be sent to the particular recipient.
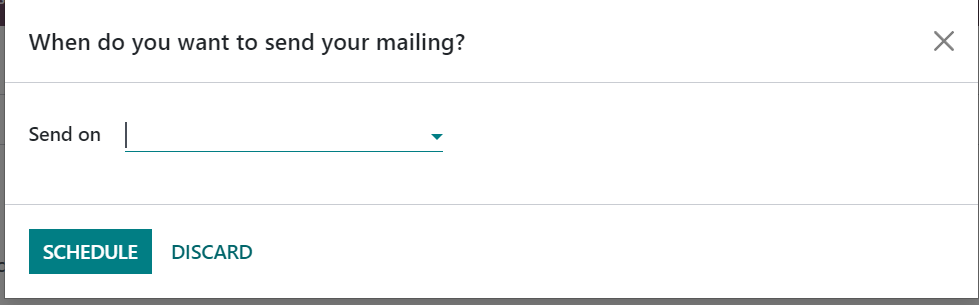
On the Send on option, the date can be provided. Then go to the Schedule option. Now, on the main page, you will get the date that is scheduled, and the status will be set IN QUEUE. And the email will be automatically sent on the scheduled date.

Moreover, the TEST option helps to test the mail to the provided address.

When you are done with all those processes, then you will be provided with some smart buttons, such as Leads, Quotations, Invoiced, Received, Opened, Clicked, Replied, Bounced, Sent, and Ignored, as marked in the below screenshot.

The Lead button helps you by providing the link, which directly leads to the lead page, where you will get all the necessary details regarding the leads made from this mail. Then, Quotations, Invoices, percent of those who received, opened, clicked, replied, bounced, sent, and ignored will be available under these smart buttons. It is on the Kanban view that you will get the view of the status clearly shown, which we had created. It is because the kanban view is made based on those stages. Then the Kanban view is shown in the screenshot below.

Mailing Lists
Under Email Marketing, you will get the option of sending the mail individually or massively. The mass mailing of email helps you to a great extent as it helps you to save most of the time. The mail can be sent to a large group of people within a few procedures. The Mailing List feature helps you in creating email addresses using the feature available under Email Marketing. The mailing list can be made for various purposes, such as events, company promotions, and for advertisements.

The mailing list menu is available in the dashboard. The option gives a new kind of view under the Kanban view. On the page you will get an already-created mailing list on the page, as seen in the image. The page can also be seen in the List view as well. Each of these mailing lists consists of the name of the mailing list, total number of contacts, valid number of recipients, valid number of SMS recipients, and some other details. In order to further details, you can go to a particular one among them.

This is the page that you will get on selecting a particular one. You have an option of showing in preference option to trigger in order to show the mailing on the main list. On selecting the number of contacts provided on each list, you will get the details of the contacts, as shown below.

The page includes details, such as created on date, name of the contact, company name, email of the contact, email blacklisted or not, mobile, phone blacklisted or not, and bounce opt-out or not. Now, back to the mailing list page, you will get the Filters, Group By, and Favorite options in order to sort out and arrange the data accordingly. The List view can be seen by using the list option provided on the right side of the page.
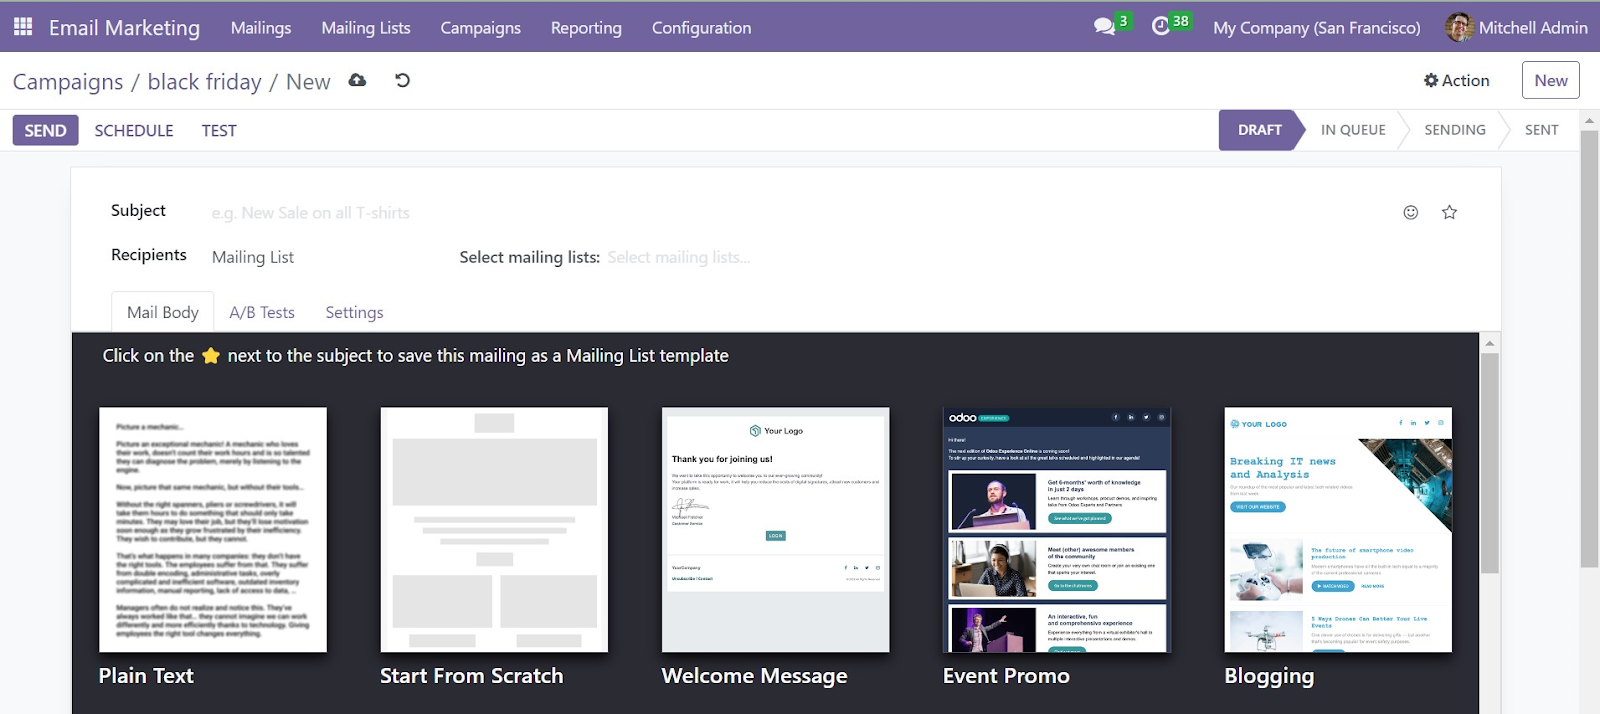
In order to make a similar kind of mailing list, just go to the New icon provided on the left side of the page.
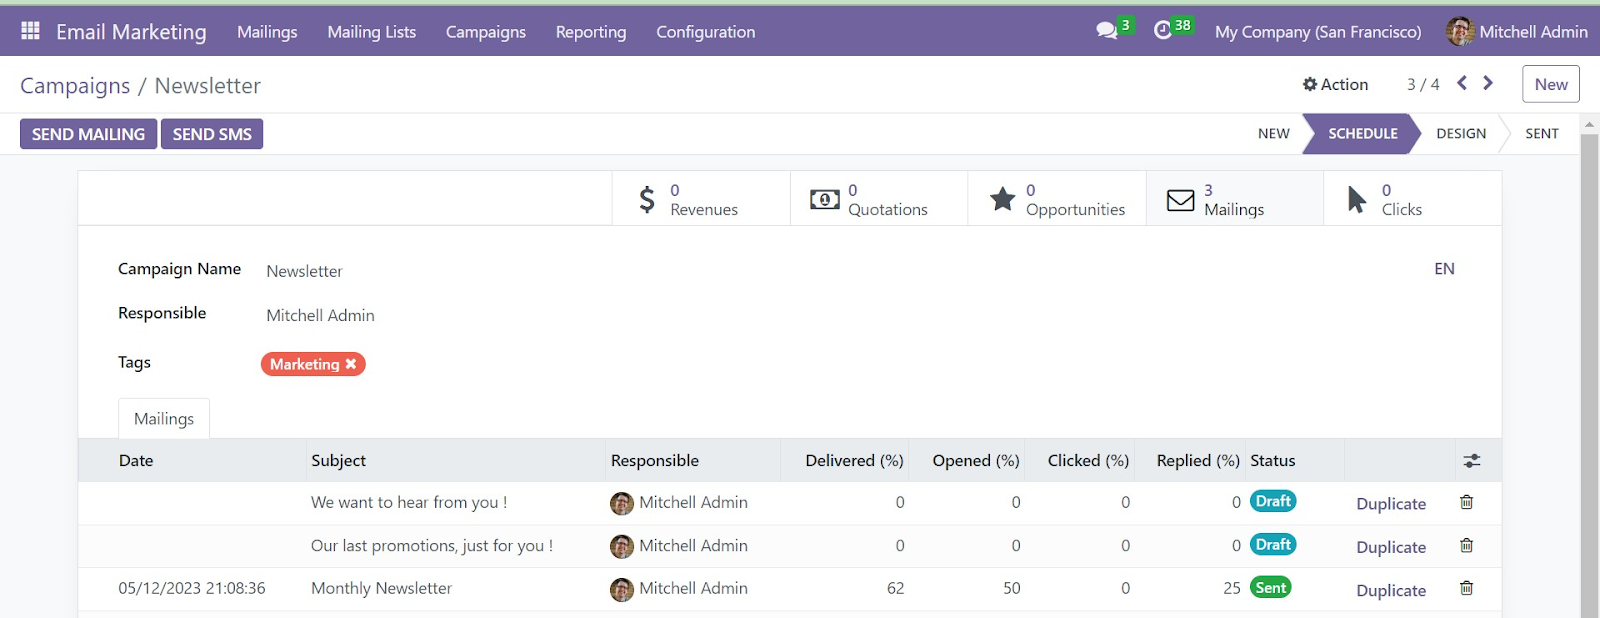
On the creation page, you can provide the name of the mailing list in the allotted space. Shown in the preference option helps you to show the mail in public. You can also see some smart buttons, such as Recipients, Mailings, Bounce, Opt-out, and Blacklist options. These buttons are direct links to the allotted window. To provide all the required details, you can go to the Save icon. The newly formed mailing list will then be seen on the main page.
Mailing List Contacts
Mailing list Contacts will help you to make new contacts for the mailing list. The page of the mailing list contact will be shown, as in the image below.
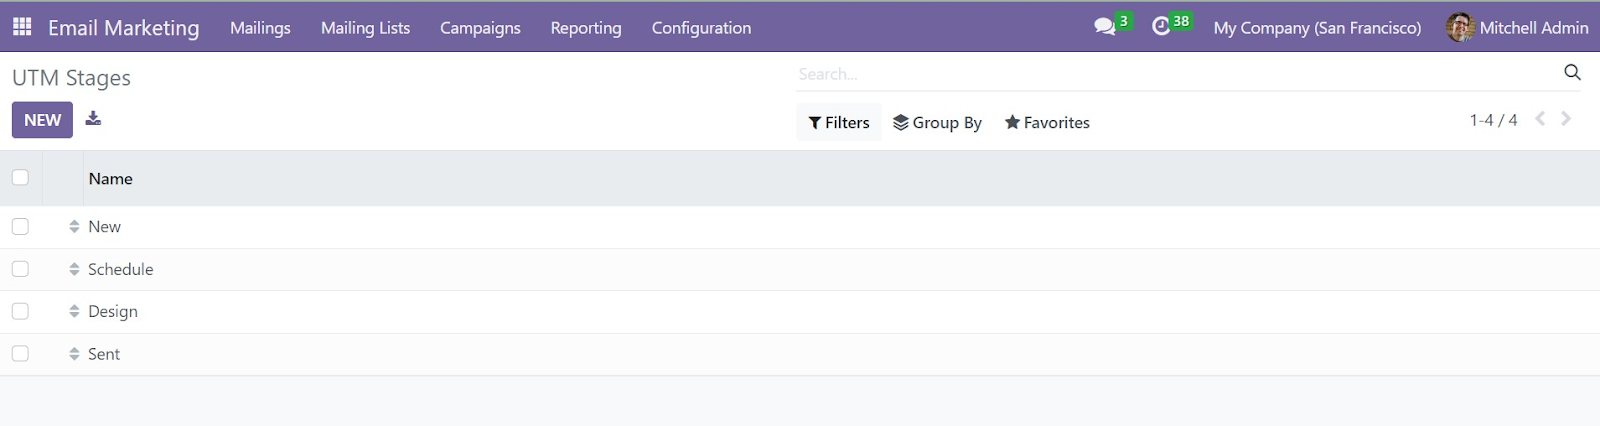
The list of the mailing list contact includes details, such as created on date, name of the contact, name of the company, email, email blacklisted option to activate, mobile number of the contact, phone blacklisted to activate, and bounce, respectively. The page has a list of already created mailing list contacts. The Filters and Group By options help you in categorizing those according to our needs. The Filters option includes Bounced, Excluded Blacklisted Emails, Exclude Blacklisted Phone, and Add custom filters options. To make a similar kind of mailing list contact, you can go to the New icon provided on the page.
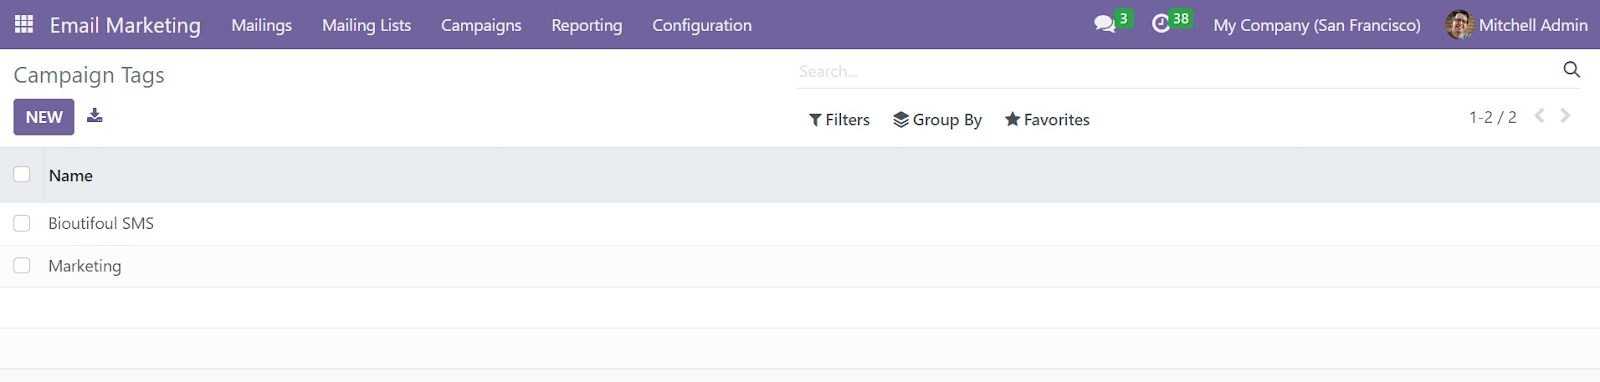
On the creation page, you will get the details to be provided, such as the name of the contact, tags, email, mobile, title, name of the company, and country. The new mailing list can be included using the Add a Line option. You can trigger the unsubscription date option if required. Finally, go to the Save icon in order to get this newly created contact to get added to the existing list.
Reporting
The reporting option under Email Marketing helps you in creating reports on a large group of emails. The mass mailing analysis view will be shown, as in the image below.

This is the image of the mass mailing list in graphical representation. The graphical view can also be seen in Pivot, List, and Bar views. Other than the Graphical view, you can see the page in Kanban, List, and Pivot view as well. You can make use of the different Measures options below, which you will have options, such as bounced, canceled, clicked, delivered, error, opened, replied, scheduled, and sent. The reports can be set in ascending as well as descending order. The Filters and Group By option helps you in grouping the mass mail if required. The Group By option includes Mass Mailing Campaign, State, Sent By, and Scheduled Period. The pivot view of the mass mailing analysis will provide the reports in tabular format, as shown below.
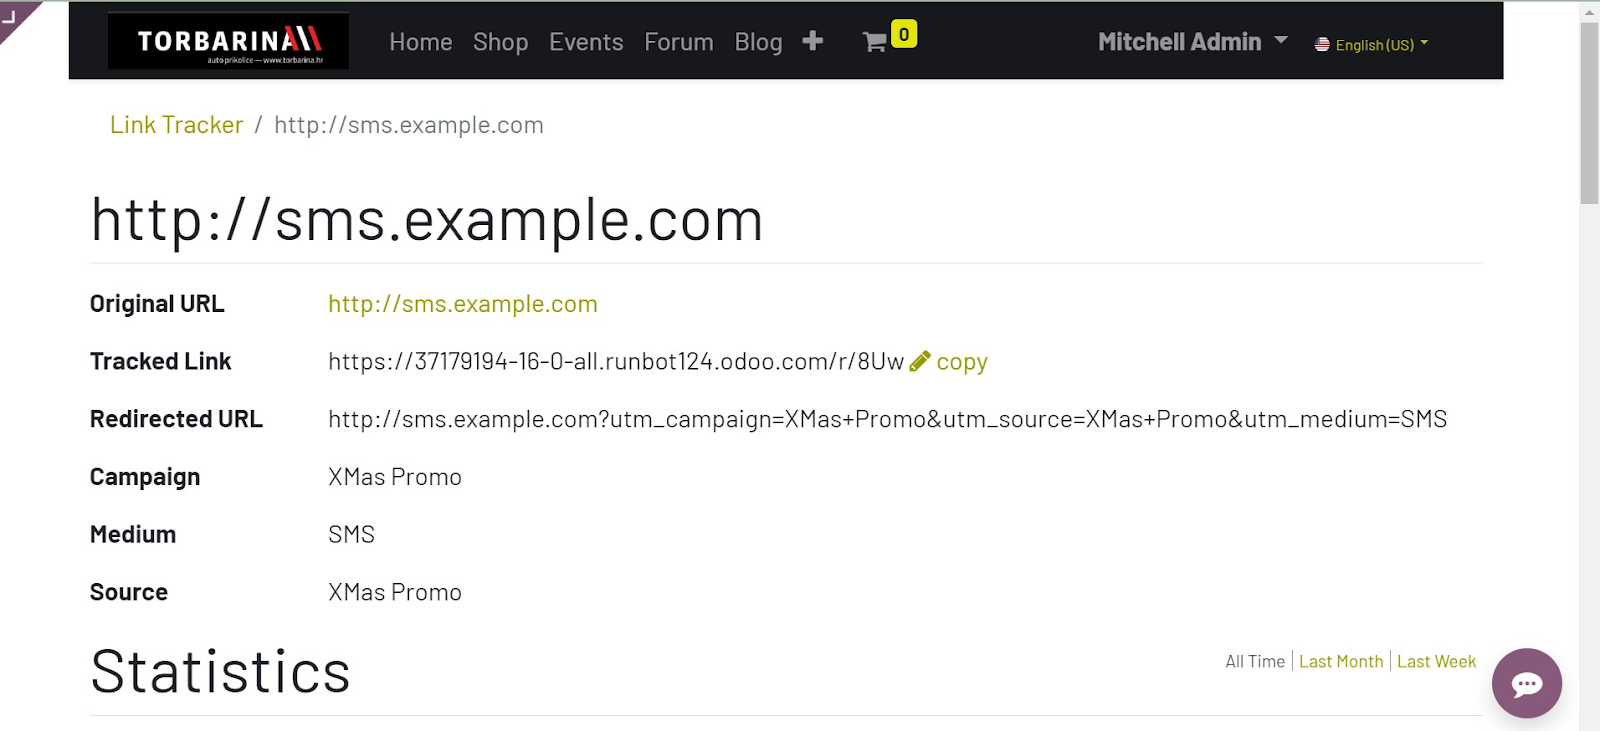
The pivot view of the page includes details, such as Sent, Scheduled, Delivered, Opened, Replied, and Clicked options, which are provided in tabular form. You will also get the list view as well. This reporting feature under the mailing list contact helps you to analyze the mailing list of particular contacts and make corrections if required. The INSERT IN SPREADSHEET option helps you to insert the contact under the spreadsheet. These are the features in the reporting option of Email Marketing. Of the OTX Software.
Configuration
Under the Configuration menu, you will get some options, such as Settings, Link tracker, Blacklisted Email Addresses, and Favorite Filters. Under these options, the Settings option get some features, such as Mailing Campaigns, Blacklist option, dedicated server, and 24 H Stat Mailing Reports options, respectively.

The Mailing Campaign option helps the marketing campaign programs, and thereby it creates a useful mailing campaign tool in the system. In order to begin the system, you have to trigger this option of Mailing Campaign option in the Settings menu. On the Settings menu, you have the space to trigger the option and then go to the Save icon. This option of mailing campaigns will assist you in regulating the campaigns and AB test to the mailings. Using the + icon provided on the main page of the module, you can see the newly triggered option here. The campaign page will be, as shown in the screenshot below.

On the Campaign page, you will get the list of already created campaigns. The page can be seen in both Knaban and List view. The Kanban view of the page can be seen in the above image. The page provides the campaigns on the basis of various stages. You can see different stages, such as New, Schedule, Design, and Sent, respectively. You can also make new stages as per our needs. You can see those stages under Kanban view in a card form. On each box, you will get details, such as Posts, Mailings, SMS, Notifications, Clocks, Opportunities, Revenues, and Quotations, respectively. The three dots, which can be seen on the right side of each card, provide the options, such as Edit, Delete, and Coloring, respectively.
In order to know more about each of the Campaigns, you can just click on the required one. The page will be shown below.

On the Campaign page, you can see a + icon near every stage, which provides the options, such as Settings and Quick Add. The + icon helps you to make new campaigns as well, which can be seen in the screenshot below

Here, you can see the spaces for providing the name of the campaign, the responsible users name, and related tags if required. The Edit option can be used to make further edits on the created stage. On completing providing all the required information, then go to the Add icon. Under the Settings menu, you will get the sub options, such as Fold, EDit state, and Delete options. The fold option among these options helps you to fold the stage that you have to fold.
On selecting the Edit option, you will get another window where you can provide the edits that you want to make.

On selecting the Delete button also, you will be asking for a further confirmation message on a new window, as shown below.

If you are sure about the removal of the column, then you can go with the Ok icon. You will also get an option to add a new stage to the existing list.
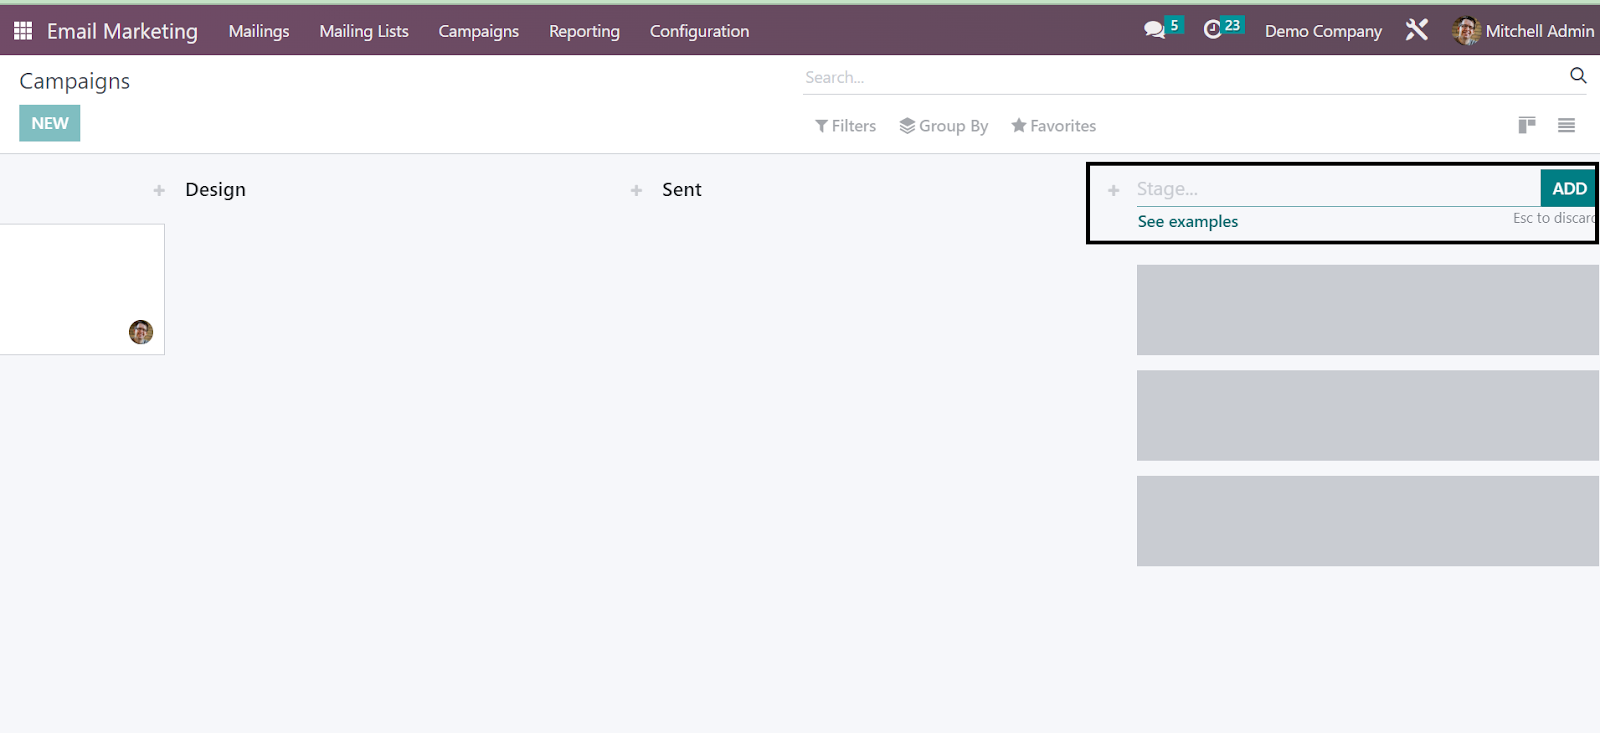
You are also provided with some examples, and those examples can be made use of by selecting the USE THIS FOR MY CAMPAIGNS icon.

You can also go for the list view of the campaign page. On the list view, you will get further details, such as the name of the campaign, responsible user, stage, and related tags. On the page, you will get some filters as well. The Group By option can be used to categorize those campaigns according to our needs. In order to make a similar kind of campaign, you can go to the NEW icon, as shown in the screenshot below.

On selecting the New option, you will get a new page in order to make a new campaign.
On the creation page, you have to provide the name for the campaign, the responsible user for the campaign, and tags if required. Now, on completing adding the required information, you can go to the Save icon. You will also get options, such as ADD POST and SEND PUSH options as well. On the right side of the page, you will get the status, such as NEW, SCHEDULE, SEND, and DESIGN as well. You can also see some smart buttons, such as Engagement, Revenes, Quotations, Opportunities, and Clicks options. Those buttons are direct links to the allotted operations.
The SEND option helps you to send the email under this campaign.
The Send button helps you in sending mail very easily. Under the Mailing tab, you will get those sent items on the main page of the module.
Here, you have options, such as SEND NEW MAILING, SEND SMS, SEND SOCIAL POST, and PUSH Notification, which can be used accordingly. On selecting the send special post option, you will get another window, as shown in the image below.
On the post option, you can see the details automatically provided. You can attach images if there is support from social media. The campaign name also gets filled on its own. Finally, go to the POST icon.
Now, on triggering the Marketing Campaign option on the Email Marketing Settings option, you will get options to provide the stages of the campaign and tags of the campaign. The option will be coming on the Configuration menu.
In order to see the UTM stages, you can go to the Campaign Stage option in the configuration menu, as shown in the screenshot above.
In this window, you will get all the campaign stages that are already configured. In order to make a similar kind of stage, just go to the NEW icon provided on the left side of the window. On selecting the option, you will get a new line, where you can easily add a new stage. Below the Campaign stage option, you will get the option of Camapiagn Tags option, as shown below.
On the page, you will get the already created tags for the campaign. And you can create new tags for the campaign with the help of the CREATE icon. As in the campaign stage, a new line will be displayed where you can easily add a new tag. Finally, go to the Save icon.
Link Tracker
The next option, which is available under the Configuration menu, is Link Tracker. As everyday follow-up and findings are necessary under Email Marketing, there is an option under the Email Marketing module, which is Link Tracker. As we had mentioned earlier, you can find the option under the Configuration menu of the module. The page will be, as shown in the screenshot below.
On the page, you will get some already-created link trackers. The page provides some necessary details, such as created date and time, the title of the page, button labels, target URL, and the total number of clicks, respectively. On the website page, you will get the Visit page and statistics, which are considered direct links, as shown in the image below.
You will get the statistics of the page as well, as marked in the screenshot below.
You will also get this graph by selecting the graphical view of the page. The Filters option helps you to make some flyers with the assistance of the Add Custom Filter option, which can be seen under the Filters option. Using the Group By option, you can categorize the data as campaign, Medium, Source, and Mass Mailing accordingly. Using the New icon, you can create a similar kind of link tracker very easily.
Blacklisted Email Addresses
The blacklisted email addresses option under the Configuration menu of the Email Marketing module helps the users on some special occasions. If there are certain conditions where some of the emails are blocked or reported from the mail list, then this special feature of the blacklisted email addresses option in the module helps you. If you include them in the mailing list, then you will not get any mail. The option can be seen under the link tracker option in the configuration menu.
On the page of the blacklisted email address, you can see the already created blacklisted mailings. The page includes the details, such as the blacklisted date and email address as well. In order to include a new mail address to the blacklist, you can simply go to the New icon provided on the page. The option is available on the left side of the page. On selecting the New option, you will get a new page in order to provide some data required to add the email address to the Blacklist. The page has got a space to provide the email address, which has to be blacklisted, and an Active option, which has got automatically activated.
The above image is the window for creating a Blacklisted email address. You are also provided with an option, Blacklisted Option when Unsubscribing in the settings of the Email Marketing module. The option helps the user to regulate his or her state under the blacklist with the help from the unsubscription page as well. So, for the purpose of getting triggered, you have to activate the option from the settings, as shown below.
You can also see another option of Dedicated Server near that blacklisted Email Address option. You have provided a dedicated server for the purpose of mailing under the settings. In order to get this option, firstly, you have to trigger the option of a dedicated server under the settings option. Then, you can go to the configuration of this outgoing dedicated email server. On selecting the option, you will get a new page, as shown below.
On the page, you have the space to provide the details, such as priority name, SMTP name, username, and connection encryption options, respectively. In order to create a similar kind of dedicated server, you can go to the New icon as well.
You can see a new option of 24H Stat Mailing Reports option in the settings of the module. The option helps you to check how properly your mailing is processed in a day after completing the sending of the mail. In order to get the option, you have to trigger the option from the settings in the Email Marketing module. After making the necessary changes to the settings, you should not forget to click on the Save icon in order to alter the changes.
Favorite Filters
Below the blacklisted mail address, you have an option of Favorite Filters under the configuration menu of the Email Marketing module. The page of the feature will be as shown below.
The option of favorite filters helps you in defining the necessary rules in order to filter the recipients in the process of designing the mailing. For saving the basis, you can just add to the favorites by selecting the star icon, which can be seen just nearer to the recipient option. The page includes details, such as filter name, saved by, and recipients, respectively. To create a similar kind of favorite filter, just click on the New icon provided on the left side of the page.
Altogether the option is really a great help for those who are sending the mails and thereby helps for the promotion as well.
Discuss
Under the OTX platform, it is necessary to have an efficient as well as well regulated space for the communication of the employees within it. For the purpose of proper communication in a team work, they should have a proper communicative environment. There is a Discuss module under the OTX employee for this purpose of communication between the employees. Here, you can have a chat between your colleagues and other workers in the company if required. You have chat rooms as well as group chat options to have individual as well as group chats. The module is integrated with other modules so that you should not need to open the discuss module continuously in order to chat with others. The communication can be done from any of the other modules as well.
The module will be available in the OTX dashboard. On selecting the module, you will get the module with some options, as shown in the screenshot below.

All the messages that are sent will be available on this page. The Mark as Read option in the right-most corner will help you to show the messages that are read as marked as read. The side panel in the left side will show the inbox, starred, and history options. The star icon can be used to mark those messages that have to be included in the list of starred messages.
On selecting the history option, you will get emojis in order to include the situation of the present chatting.

Now, you have options for regulating and controlling those chats in the module. Below the Direct message, you will be able to get the individual as well as group chat options. You can very easily make a new group for the purpose of communication, the group helps others to know about the task that they have to do, the important information as announcements, and important news as well.

With the help of the setting icon marked, you can see or join new channels. On selecting the option, you can see the information regarding the public channel. Then, go to the Create icon.

Here, you can make use of the Join icon in order to get added to this existing group that is already created. You can also leave form the groups if required. The New option helps you with the creation of a new channel.

On this channel creation page, you have to provide some information regarding the channel. It include, name for the group and an icon for the group in the allotted space. The topics that are chatted in the group can be mentioned in the description option. On selecting the options, such as Everyone, Invited People Only, or Selected Group of Users option, you can determine whom to follow up the particular that we are resting. Under the Authorized group, user type or internal user can be mentioned. Auto Subscribe Group. And Auto Subscribe Department option, you can provide the details accordingly.
On including the Auto Subscribe Group and Department options, the members will get included in the groups or departments on its own. Those options are available under the Privacy option. You have the option to include new members to the group using the Members tab.

The Add a Line option can be made use for the inclusion of members to the group. There, you can include the name and the mail ID of the recipient whom you are adding. Finally, go to the Save icon in order to get this member indeed to the existing list.
You can easily make a new channel with the help of the + icon provided in the right side of the page. The channel can be made public or private according to your wish.

Suppose you are making a channel in the name of Support, on providing the name of the channel, you have two options provided. You can go for # Support option for making a public channel and🔓Support option for making the channel private.

In order to begin a conversation in the team, you can go to the + icon. The personal conversation can begin using the + icon provided near the direct message option. Under the Search option, you can look for the person that you wish to talk with.

The call and video call option provided in the right most corner helps you to use them if required. For the invited users, you can include the users to personal chat as well in order to make a chat room.

Using the icons marked in the above screenshot, you can easily invite the people to the chat room. The chat can be controlled and regulated from any place in the OTX software. The notification regarding the messages will be visible from any of the spaces in the OTX . You can go to the Apps option in the filter and see the chats there.

Without going to the Discuss module, you can easily regulate the new messages that have been received to the user. The messages can be easily sent and received by these methods of integrating with other modules. You can easily begin a meeting without opening the Discuss module itself. The New Message option provided in the page helps you to begin the meeting. On selecting the option, you will get the meeting space, as shown below.

Using the Start a Meeting option provided in the main page, you can begin a meeting as well.

On selecting the start a meeting option, you will get another window opened as shown in image above. On the page provided, you will get a meeting link that can be sent to those who have to join in the meeting. If you require any kind pof assistance during your work time, you can simply use this option to begin a meeting and solve the concern.you have an option to invite members to the group chat as well. There is an icon to copy the link as well if required.

During the meeting, you can make use of the chat space along with the emojis to express your emotions regarding the meeting. You can make use of the attachment as well if required.

On starting a video conference during a meeting, you will get some options in the settings, such as Show video participants only and Blur video background as well. The options can be triggered if required. You will get input device and browser default options. Under the Input device, you can activate the push-to-talk option if required. These are all the features available in the Discuss module in OTX ERP Software.
Notes
It is necessary to keep the records of information that has to be remembered for later uses. And it has avital role in a company. If we are looking for the conventional methods, we can find the pen and paper methods used for marking those necessary information. When the digitalized era came to get practiced, all the data used to get saved on the systems accordingly. Under the OTX platform, you can see a space to keep such important notes regarding company operation in a well-structured manner.
There is a Notes module for this purpose of saving all those important data in the system for future needs. All those notes will be defined in various stages under the OTX platform, as shown in the image below. You will get the stages, such a sNotes, Minutes of Meeting, and ToDo list in separate stages, and finally, a stage option to make a similar kind of stage by your own if required. You can make use of the Filters and Group By options if required for easily sorting options. The Page can be seen in Kanban, List, and Activity forms according to our priority.


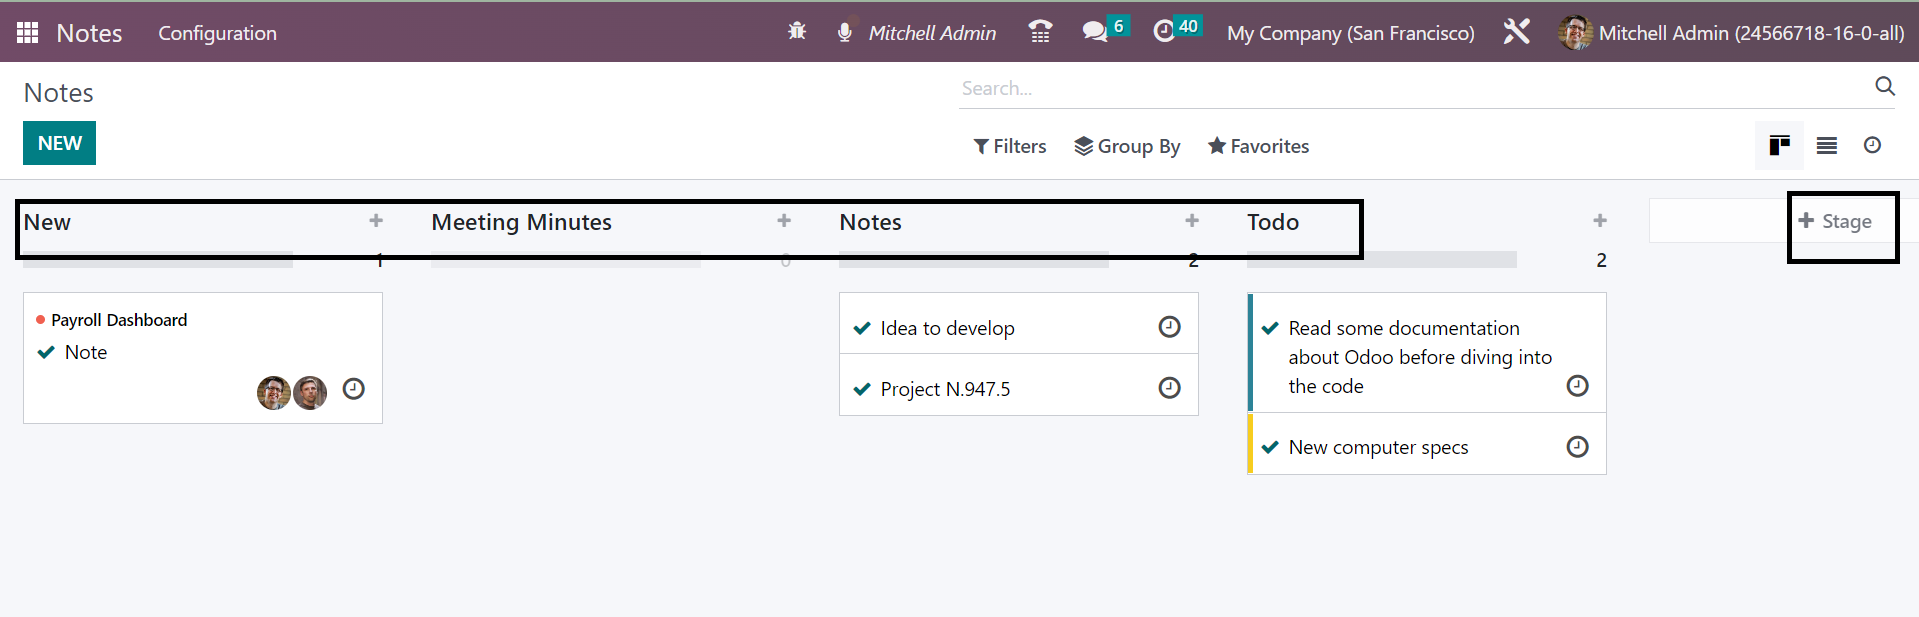
In order to make new similar kinds of notes, then, you can go to the New icon provided in the leftmost corner of the page.

Here, you can easily add the content of the notes on the provided space. You will be included in different editing aspects on completing the providing of the ‘/’ symbol as marked with the editing and configuration menu. You can have the editing and configuration option until the Microsoft Level levels, which helps you to make drafts that are unique in style.

You can mention the specific tags under the Tags option provided. You can also get multiple tags if required. Under the contents space, navigational options, such as Link and Button, can be provided. Images and videos can also be added to the content if required. The notes can be explained to the Minutes of meeting; the notes can be moved to the Meeting Minutes status.
If the notes are set to be as notes, the stage can be kept under the notes stage itself. If the notes made are a list to be done, the stage can be put under the option ToDo.

Here, you will get the media option where images and articles can be added. On clicking on the Button in order to add a button, then, you will get the button creation window, as shown in the screenshot below.

On this page, you can provide the link label and URL or email ID. On the button type, you can assign the link as primary or secondary accordingly. Size and Style can also be determined using the options provided. Finally, go to the Save icon.
You can decide on the activities by scheduling them using the clock icon provided. The option is available in the screenshot.

On selecting the clock icon, you will get an option to schedule the activity. On selecting the schedule and activity option, you will be directed to another page, as follow.

On the schedule activity creation page, you can provide the activity type from the drop-down menu. The summary of the activity can also be provided in the allotted space. Now, under the due date option, the date can be mentioned along with the person to whom the activity is being assigned. If you select the activity type as Meeting, then you will get the calendar view of the page, and their activities can be assigned using the calendar.
You can also set the color for the activity using the three dots provided near each stage on the main page, as shown in the screenshot below.

You can also share those notes with the external users in the OTX ERP to ensure that they have got access to edit and make changes according to the organization. These are major features available under the Notes Module in OTX ERP Software.
Calendar
It is essential to make certain meetings and decisions in order to enhance the relationship between the employees and the staff working in the company. Well-structured planning and scheduling of activity is essential for such kinds of meetings. And such meetings help you in making the meeting well conducted in a company for the success of the company. There is the Calendar module in the OTX Software, which helps you to make well-structured kinds of meetings that are internal as well as external. The process can be done within single steps.
On the main page of the calendar module, you will get already created as well as scheduled meetings of various days of the month. If you want to know the meetings of a particular day, then simply go to a particular date and know the scheduled meeting on that particular date.

On the rightmost side of the page, you will get those who are going to attend the meeting that is scheduled. You can introduce new attendees to the meeting using the + icon provided. The further details regarding the meeting will be understood using the selection of the particular meeting on which you have to know more about.

On selecting a particular meeting, you will get the further details, such as Description of the meeting, Privacy, and related Tags. you can make use of the Edit icon if you have to make further editing on the scheduled meeting on the particular date.
In order to make a similar kind of meeting, then, just go to a particular date on which you have to schedule the meeting. On selecting a date, you will get a window on which you have to provide some details as follows.

In this small window, you can provide the subject for the meeting in the provided space. Then, click on the edit icon provided in the window; then you will get a page as shown in the screenshot below.

On providing the subject of the meeting, you have the Meeting details and Options tab to provide some data. Under the Meeting Details option, you can provide the starting date and Ending date of the meeting in the provided space. The duration of the meeting can be provided in the given space. All Day option can be triggered if the meeting has to be scheduled for everyday. You can mention the organizer and provide a description of the meeting that you are going to schedule in the given spaces. The Email and SMS option helps you to send the notification on the meeting to those attendees who are going to be in this meeting. You can also keep reminders, provide the space for the meeting in the location option, video call URL, and can also add OTX meetings as well. Related tags can be added on the provided space.
Under the Options tab, you can trigger the recurrent option, if the meeting has to be repeated at a particular interval of time.

Here, you have a space to make the meeting as Public or Private under the privacy option. The status of the attendees can also be set as Busy if required. Now, you have an Invitation tab in order to get the details of the attendees in the meeting.

As you can see, under the Invitation option, you will get space to provide the name of the attendees, email and phone number. You will get the status of the invitation as accepted, rejected, or requires action. Finally, go to the Save icon. A meeting can be scheduled using the Add icon in the main page also. You can also sync cyour calendar with google.
For that, you have an option of connecting with google in the main apge of the calendar module.

Here, you can mark it as google or outlook. The option helps you to synchronize the calendar with the google calendar. You can provide the client ID and client secret. Then, go to the connect option. So that, you will get connected with the google calendar.
Online Appointments
On looking at the presence of the employees and clients in the company, you can easily arrange for online appointments under the Calendar module in the OTX ERP. When you are done with the installation of the Appointment module in the OTX , which is available in the app store of the OTX Software, you can easily regulate and manage the appointments. Their feature helps you in reducing the risks in the meetings with the employees and others. You will get the option on the main page of the Calendar module itself. The page provides certain information, as shown below.

As you can see in the above screenshot, you will get the list of already created online appointments. In order to make a similar kind of appointment, just go for the Create icon, as marked in the above image.

On the creation page, you will get some space for providing certain data regarding the creation of online appointments. You have to provide a name for the appointment under the Appointment Title option. The Duration of the meeting can be provided under the Duration option. You can arrange the scheduling of the meeting according to the time taken for the appointment in the allotted space. You can also make use of the allow canceling option in order to cancel the appointment in the provided time period. The users can be given, and the Front end display can be set as no picture or show users pictures.
Under the Availability Tab, you can provide the available days in a week for the appointment with the help of the Add a Line option.

Under the Options Tab, you will get some options, such as Timezone, Location, Limit to work hours option to trigger, create opportunities option to trigger, as well as Reminders to add in the allotted spaces. You can also send the appointment to whom you had set on the CC to option.

As shown in the above image, you will get the Questions Tab, which helps you to add the questions related to the appointment that you are going to have. In order to include the questions, you can go for the Add a Line option, which leads you to a new page, as shown below.

On the questions creation page, you can mention the questions in the provided space. The question type can be set as single line text, multi-line text, dropdown, radio, or checkboxes. You can provide the placeholder and trigger the required answer option if the answer to the question is necessary.

Now, the next Tab in the online appointment creation page is Message. The option helps you to add an introduction and confirmation based on the appointment that you are going to have. On completing the creation process, you can go to the Save icon.
If you want this appointment to get published on the website, just go for the Go To Website option, as shown in the image below.

You can make the unpublished status on the page as published in the marked space in the image below.

On completing the publishing of the online appointments you will be provided with a share option.

The share option helps you to share the link of the online appointment that you have created with the others in the company.

As in the image, the link provided can be copied and sent to others.
Configuration
Under the configuration option of the Calendar module, you will get the option of reminders, which helps you in setting alarms for the appointments, that can be online too.

This option under the Calendar module helps you in reminding of the appointments that are going to get commenced. Reminders can be made more than one that assists the employees in order to avoid forgetting of a particular appointment. As shown in the above screenshot, you will get the calendar alarms from the reminders option in the configuration menu. On the page, you have all the created alarms on particular appointments. The page includes the information, such as type, reminder before, and unit options. In order to make a similar kind of reminder or alarm to the appointment, you can just go to the Create icon provided on the leftmost side of the page.

Here, you can provide the type of the reminder in the first space provided. The type can be Email, SMS, or notification. You have the space for including the email template as well. Now the Remind before option helps you to set the alarm at a specific minute, hours, or days before the commencement of the appointment. You can also trigger the new appointments default option in order to include alarms on new appointments. Now, go for the Save icon in order to get this newly created alarm added to the existing list. You have the appointment invitation and share link options as well under the configuration menu. All the shared links of the appointment will be available under the shared link page.
Reporting
The reporting option in the Calendar module helps you to analyze and understand the appointments that are made under this module. The online appointments and all other appointments will be available in this feature. The reporting of online appointments will be seen in the online appointment option under the reporting option.
As in the image, you will get the reports in graphical, pivot, calendar, and list view. Under the graphical view, you have a line, bar, and pie chart. Under the MEASURES option, you have a count and duration option, which can be selected according to our needs. The reports can be seen on a daily, weekly, or yearly basis as well.
So far we have gone through various uses of the Calendar module in the OTX ERP Software and its distinct features in it. Surely, the module will be of great help in managing and controlling the appointments that can be online as well. You will get the reports of those appointments as well, which helps to analyze the appointments assigned on particular days.
Rental
Under the business programs, you should not waste your time on purchasing those products required for the managing and regulating of the functions; instead, for the purpose of medium and small-scale industries, we have got an option to have rentals. You will be very much at risk of providing much of those products for the operations. You can just take them on rental, which will be cheaper in rate. It’s getting increased the need for rental products these days. For renting furniture, parts of automobiles, clothes for functions, or for some other grant events, you can completely focus on these kinds of rental techniques. The process for the rental is very much easy to do under the rental module in the OTX software.
The rental module helps you in all functions required under the rental operations. The options provided under the rental module are rental quotations, regulating rental orders, creating invoices, and payments, and searching for available rental products as well. The page of the rental module will be like this, as shown in the image below.

You will get the details regarding the already created rental products and the person responsible for them too. On the left side of the page, the kanban view of the page provides the Rental status and Invoice status. Rental status includes the quotation, confirmed, picked up, and many more.
The page can be seen in Kanban, Lsit, Pivot, Calendar, Activity, and Graphical as well. In order to make a similar kind of rental order, you can just go to the New icon. On selecting the New option for making a new rental, you will be provided with a page, as shown below.

On the creation page, you can see a space to provide the name of the customer, referrer, invoice address, delivery address, expiration date, recurrence, price list, and payment terms, respectively. You have got an option to fill certain tabs, such as Order lines, Optional Products, Other Info, and Notes. Under the Order lines option, you will get a list of products, a description of the product, the quantity of the product, unit price, taxes, discount amount, and the subtotal, respectively. Using the Add a line option, you can just add a new product to the given list. Now, on selecting a particular product from the given list, you will get a new window, as shown below.
On completing including the new product on the list, you will get all the total prices for the rent. All other steps are the same as that in the sales order.

Under the optional products option, you have the options such as product, description, quantity, unit price, discount, and many more. As done earlier, you can add a new one using the Add a line option.

The next tab is Other Info, which has the options such as Sales, Invoicing and Payment, Delivery, and Tracking. Under the sales option, you can mention the salesperson, sales team, name of the company, online confirmations as signature and payment, customer reference, related tags, and the start date, respectively. Under the Invoicing and Payment option, you can provide the fiscal position and analytical account. Now, below the Delivery option, you can provide the shipping policy and delivery date. And finally, you have the Tracking option under which you can mention the source document, campaign, medium, and source, respectively.

Under the Notes tab, you can add some internal notes regarding the rental product.

On completing all the necessary details, you can go to the save icon. The made quotation order can then be Send By Email, as shown below.

On getting the confirmation from the particular customer, you can easily go to the Confirm option, as shown in the above image. On confirming the rental product, you will be shown the page, as shown in the screenshot below.

Now, the page shows the status of confirmed on the right side, as marked in the image above. The option of Create Invoice helps the customers to create invoices for the particular product. Then, the payment can be registered using these created invoices very easily. On finishing the payment process, the Pickup option can be activated in order to take this product for delivery. On selecting the option, you will get another window opened, as shown below.

The page is for the confirmation of validating the order. So, go to the Validate option, as seen in the above image. Then, the status will be marked as Picked-up, which suggests that the particular order is delivered to the specific customer. On returning the rental product after completing the time period of rental, the option of Return can be selected. On doing so, the status will be shown as Returned. These are the steps to be kept in mind during the creation and management of rental products under the Rental module.
Now, coming back to the main page of the rental module, you have the orders menu, where you are provided with a ToDo option, shown below.

Here, you have the ToDo Today option under the orders menu, which has got two sub- options, such as Return and Pickup. On the pickup page, you will get the details of the product that has to be picked up, and the return option shows the products that are returned after the rental period of the product.
Rental Products
You can easily create new rental products in the rental module. The process of creating a rental product is similar to the configuration of products. On adding a new product, you should remember to mark it as Can be rented under the Configuration window. The menu of the products is available on the main page itself.

On the page, you can see different kinds of products that are kept for rent. The product includes the name of the product and the cost of the product as well. In order to create a similar kind of product, you can go to the New icon, as seen in the screenshot above.

On the creation page, you have many details to upload. You can provide the name of the product and an image of the specific product in the allotted spaces. Now, you can activate the product, as Can be sold, Can be purchased, Can be expensed, Recurring, and Can be rented, respectively. Among this, you have to trigger the option, as Can be rented.
Now, you have many tabs provided where you can mention various details regarding the product. Under the General Information tab, you can give the product type from the drop-down menu. The Invoice policy can be set as ordered quantity or delivered quantity. The Units of measure, Purchase UoM, Sales price, and Customer Taxes can also be provided in the allotted space. The next option is the Taxcloud category, Avatax category, Cost of the product, Product category, Internal reference, Barcode, Tags related to the product, and the name of the company, respectively. Below that, you have Internal notes where you can add a note about the product. The next tab is Attributes and Variants, which gives space for providing the attribute and the corresponding value. Using the Add a Line option, you can easily add the attributes on the Product.

As in the image below, you can see the next tab, time-based pricing, where you can include a new price using the Add a Price. The price can be added based on the rent period. The calculation of price can be done according to days, weeks, or months. Based on which unit has been selected, we can activate the rental pricing as well. The details include period, pricelist, and price. The next option in the time-based pricing is Reservation, where you can add the extra hours, extra days, and security time as well. The security time helps you to provide the security time in between two rentals. At this security time, the product will be not available and OTX ERP makes sure that the product is returned or not prior to the next rental. So, security time has become highly relevant.

The next tab is Inventory. Under the inventory tab, you have the operations option where you can add the routes as buy, drop-ship subcontractor on order, manufacture, resupply subcontractor on order, or drop ship. You can also view the diagram if required.

Under the Logistics option, you have to add the responsible user, weight, volume, manufacture lead time, days to prepare manufacturing order, HS code, and Origin of goods, respectively. Under the traceability option, you can mention the tracking by unique serial number, by lots, or by no tracking. Now, under the Packaging option, you can add the details using the Add a Line option, where you have to mention the packaging, package type, contain, units of measure, sales, and purchase. Under the Description for receipts option, you can add the notes for the receipt orders. Below that, you have, description for delivery orders, a short note can also be added. And then under the description for internal transfers, similar kinds of notes can be added very easily.

The next tab is Accounting, as shown in the screenshot below.

Here, you have to give the income account under the receivable option, expense account and price difference account under the payable option, commodity code, and country of origin under the Intrastat option, and email template under the automatic email at invoice option.
On completing providing all the necessary details or the creation of a rental product, you can have the details. Then, this product gets added to the already created list of rental products.
Schedule
All the scheduled orders will be available under the schedule menu of the rental module. The rental related functions and activities can be completely done using this option. All the rental activities created in particular days, weeks, months, or years will be available here.

With the help of this page, all the above told daily, weekly, and yearly data can be analyzed very easily. On selecting a particular rental order from the list, the total number of orders, the date and time of the pickup and return, and the current status of the rental order can be viewed without any risk.

Configuration
You have the settings option for the rental module under the configuration menu of the page, as shown below.

There are rental and rent online options under the settings of the rental module. The rental option in the settings has got default padding time, default delay costs, and digital documents options. The least number in between two rentals can be easily added under the Default padding time. The particular time taken will be considered as the preparation time for the product prior to the next rental.
In the default delay costs option, an extra charge for the late return can be provided. The cost will be applied to the new rental seal. The values can be altered from the product form for the created products. The cost per extra hours and day can also be activated on this option. The least delay time before applying this fine can be provided here. The digital document option is to activate a new default document template for the particular locations. And the upload template can be made used to add a new default document as well. The next tab under the settings option is Rent Online option, as shown in the screenshot below.

Here, you can pass the minimum time of rental, minimum rental duration, and the days when the pickup and returns are not possible. You are provided with all the days of the week here. The days when rental is not possible is marked here. The Unavailability Days option under the Rent Online option is here to show those days when pickup and return are not possible.
Under the Configuration menu, you will get another option for Rental periods, which provides the details, such as name, duration, and unit respectively. The page will be as shown in the screenshot below. You can easily create a new rental period using the New icon in order to get the newly created one to the existing group by providing the name, duration, and units as well.

Reporting
The complete analysis of the rental product can be done using the Reporting option, which can be seen on the main page of the module. The option of reporting helps you get the reports on the rental orders, which are made on a daily, weekly, monthly, and yearly basis. The page for reporting will be, as shown below.

On the page, as you can see the reports on the rental order is shown in the graphical view. Other than the graphical view, you have the Pivot view of the page as well. You can apply some measures, such as daily amount, and daily ordered quantity, daily picked-up quantity, daily returned quantity as well. The graph can be viewed based on the count as well. You can apply certain filters and group by option in order to categorize them according to our needs. You can add them to favorites using the star icon provided on the page. You can even compare the present report with the past one as well.
These are the major features available under the rental module of the OTX ERP Software. The module really helps the users with regulating the rental orders and quotations using simple steps.
Contacts
In order to run a business successfully, you need to manage multiple operations simultaneously. One such operation is contact management. Managing the contacts of customers, vendors, sub-contractors, partners, and all others related to your business will be a tiring task. In such situations, you can seek assistance from contact management software. The Contacts module in the OTX ERP solution allows you to sync all your contacts in one place. This module will manage your contacts which is essential in business management. You can select the Contact module from the main dashboard of OTX . OTX will direct you to a new window, as shown below.

This is the Kanban view of the Contact dashboard. As you can see in the screenshot, you will get a preview of the contacts saved in your system. Along with the basic details of the contact, you will get to see the photo of the contact on each profile. On each tab, you can observe small icons which represent the number of opportunities, scheduled activities, sales orders, shopping carts, and purchases. Clicking on the small clock icon will let you schedule an activity with the respective contact.

The list view of the contact dashboard shows the Name, Phone, Email, Salesperson, Activities, City, Country, and Company. In the Filters menu, you will get Individuals, Companies, Customer Invoices, Vendor Bills, Subcontractors, and Archived as filters. You can group the contacts based on Salesperson, Company, and Country using the Group By option. Now, click on the New button to add a new contact to the module.

When you click on the New button, you will get a new form view, as shown in the screenshot above. The configuration of a new contact is similar to that of adding a new customer in OTX . Here, you can mention the Name of the new contact in the given space. Before creating the contact, you can decide how to record the contact in OTX . You can save it as Individual or Company by selecting the appropriate option from the given field. After that, you can provide the Address, Tax ID (Tax Identification Number), Phone, Mobile, Email, Website, Language, and Tags of the contact in the respective fields. Additional Contacts & Addresses related to this contact can be added to the record by using the Add button. This will open a pop-up window as shown below.

This pop-up can be used to add a Contact, Invoice Address, Delivery Address, Private Address, Other Address, or Follow-up Address related to the current contact. In the given spaces, you can mention the Contact Name, Address, Email, Phone, and Mobile. Click on the Save & Close button.

For managing sales operations related to the contact, you can assign a Salesperson in the Sales & Purchases tab. The Payment Terms you mention here will be used for sales orders and invoices of the contact instead of the default one. To process sales to the contact, you can specify a suitable Price List in the given field. The customer code set in Avalara for this partner can be mentioned in the Avalara Partner Code and Avalara Exemption. The code available in the Avalara Code can be used for cross-reference in the Avalara portal. The delivery method used for the sales orders of this contact can be specified in the Delivery Method field. Under the Purchase section, you can add the Payment Terms used for the purchases and vendor bills, 1099 Box (Journal items of this contact will be summed in the selected box of the 1099 report), preferred Payment Method for paying this contact, and Supplier Currency in the respective fields. Activating the Receipt Reminder will automatically send a confirmation email to the contact before the expected receipt date by asking the contact to confirm the exact date.

Under the Point of Sale section, you can set a Barcode to identify this contact. Set Fiscal Position in the Fiscal Information field. In the Miscellaneous section, you can provide the Company ID, Reference, Company, Website, Website Tags, Industry, and SLA Policies in the corresponding fields.

The details required for the accounting operations of the contact can be specified under the Accounting tab. Using the Add a Line button, you can mention the Bank and the Account Number. The payment receivable account and payment payable account can be mentioned in the Account Receivable and Account Payable fields, respectively. If this contact uses OCR numbers on their vendor bills, you can activate the Check Vendor OCR field. Along with this, you can set a Default Vendor Payment Reference for vendor bills.

Any additional notes related to the contact can be added in the Internal Notes section.

The Partner Activation and Partner Review details can be added under the Partner Assignment tab. Here, you can mention the Partner Level, Commission Plan, Activation, Level Weight, Latest Partner Review, Next Partner Review, and Partnership Date in the corresponding fields. Set the Geo Location of the contact in the given space.

If you want to give free membership to the contact, you can activate the Free Member field from the Membership tab. The Associate Member indicates the member with whom you want to associate your membership. The Current Membership Status of the contact will be available here. Additionally, you can observe the Join Date, Membership, Invoice, and Membership Status in this tab. Once you complete all these fields, the details will be automatically recorded and new contact will be created.

From the form view of the contact, you will get some smart buttons as highlighted in the screenshot above. These smart buttons can be used to view scheduled meetings, Opportunities, Sales, PoS Orders, Subscriptions, Purchases, delivery, Invoiced Amount, Vendor Bills, Partner Ledger, Documents, and Direct Debit Mandates. By following the details mentioned in this section, you can easily create a new contact in this module.
Configuration
The Configuration menu of the Contact module encompasses various options that can be used to enhance the performance of the module. Here, we will detail each of these options and their functions in the Contact module.
Contact Tags
It is easy to configure tags for the contacts from the Configuration menu. You will get the Contact Tags option from the Configuration menu which will direct you to the window where you can observe the already configured tags for contacts. It will show the Display Name and Color.

You can use the New button to create a new tag. A new form will appear as shown in the image below where you can specify the name of the new tag in the given space.

Set a color for the tag for easy identification and Parent Category in the respective fields. You can enable the Active field to enable the new tag.
Website Tags
Just like we configured contact tags, you can create Website Tags also to classify contacts for tracking and analysis purposes. This option will be available under the Configuration menu. If you have already created website tags, they will be visible in the website Tags window. Otherwise, you can create new tags using the New button.

A new line will appear in the window where you can mention the Category Name. You can select the Class from the drop-down menu which shows the options Default, Primary, Success, Warning, and Danger. Select the appropriate class and click the Save button.
Contact Title
In order to set pre-configured contact titles, you can go to the Configuration menu and select the Contact Title option.

Clicking on the New button, you can create a new Contact Title. Mention the Abbreviation of the title in the given space and click on the Save button.
Industries
Sometimes you might be requested to mention industries while configuring a new contact in the Contact module. In such cases, you can configure Industries from the Configuration menu so that you can easily select them while creating new contacts. The list of pre-configured industries will be available in the window.

You can use the New button to add new industries. A new line will appear under the existing list where you can specify the Name and Full Name of the industry.
Localization
Under the Localization tab of the Configuration menu, you will get the options to observe the configured Countries, Fed. states, and Country Groups.

The list of Countries will show the Country Name, Country Code, Customs Name, Customs Code, Customs Abbreviations, Use on eBay, and Intrastat Member.

The Fed. States list displays the State Name, State Code, and Country. Using the New button, you can add a new state to this list.

The name of the Country Groups will be available in the respective menu in the Contact module. Use the New button to add another country group to this list.
Bank Accounts
The bank and account details of the contacts can be saved under this platform. Selecting the Bank option from the Configuration menu will display all banks configured in the module.

The list view includes the Cod. SBIF, Name, Bank Identifier Code, and Country. In order to create a new bank, you can click on the New button.

This will open a new form view where you can provide the Cod. SBIF, Name, Bank Identifier Code, Bank Address, Phone, and Email.
The Bank Accounts window will show the accounts of the contacts saved in your system.

This is the list view of the Bank Accounts. You can view the Account Number, Name, Company, Account Holder, and Send Money status from this window. Clicking on the New button will lead you to a new form view to add another bank account for contacts.

You can mention the Account Number, Account Holder, Account Holder Name, Bank, ABA/Routing, and Currency in the corresponding fields. If this account can be used for outgoing payments, you can activate the Send Money option.
Using the OTX Contact module will simplify the process of contact management. This module is the perfect solution for your company for the real-time management of contacts.
Planning
Business organizations all around the world basically function based on pre-planned activities. Creating pre-planned operations will always ensure a seamless working environment in a company. The activities organized in an organization will mainly emerge from the plans drafted by the offices. The success rate of execution of such activities will be high since these are planned by considering the analysis of various regulations of operations, procedures of a company, and major focuses of the company during a financial term. Planning should always maintain a direct connection with the functions of an organization. Otherwise, the actual purpose behind considering planning in an organization becomes meaningless.
OTX offers an automated solution for systematically organizing and running the business activities of a business organization. This dedicated resource planning business management software is capable of managing all your business activities using the most advanced technologies. The users will get the Planning module in the OTX ERP system to plan their activities based on the calendar outline. One can effortlessly schedule activities related to company operations by checking the available date and time. The integration facility offered by the module will permit you to expand the functionalities by integrating with other modules in OTX , such as Employee, Payroll, Attendance, Project, Manufacturing, and many more.
Scheduling
When you select the Planning module from the main dashboard of the module, you will be directed to the scheduling platform of the module. This platform is designed in a calendar pattern so that you can easily schedule your activities according to the available date.

You can schedule activities by Resource, Role, Project, and Sales Order. The screenshot shows the schedule by resource. You can view the plans based on Day, Week, Month, and Year. You can select a suitable view according to your convenience. The schedule of each resource person can be observed here.

In order to get a preview of the schedule, you can place the cursor on a particular schedule. As shown in the screenshot above, the preview will show the details of the schedule. You can find a small red label on the schedule if the employee has more than one shift at the same time.

Next to the field of the resource person, you will get the total occupied hours of the employee based on the selected day, week, month, or year. The Plan Orders button can be used to assign unassigned-sales orders to available employees. If you want to copy the shift from the previous year, you can use the Copy Previous Week option. Clicking on the Publish button will give a pop-up window.

This window can be used to send planning by email to the mentioned resources.

The New button can be used to plan a new activity. You can also use the + icon that appears on the screen while you place the cursor on any particular date. This will open a pop-up window as shown below.

The name of the Resource and Role will be available in the window. If not, you can mention the data in the corresponding fields. Specify the Project and Sales Order Item for which this activity will be planned. In order to repeat the schedule, you can activate the Repeat field. Modifications made to a shift only impact the current shift and not the other ones that are part of the recurrence. The same goes when deleting a recurrent shift. You can disable this option to stop the recurrence. To save the shift as a template, activate the Save as Template option. The Date, Allocated Time, and Company will be available in the respective fields. You can add any additional note in the given space and it will be sent to the employee along with the schedule details. You can use the Save button to save the shift and use the Publish & Send button to perform the respective actions.

Here, you will get Open Shifts, My Shifts, My Team, My Department, My Role, My Project, My Sales Orders, Shifts in Conflicts, Employees on Time Off, No Timesheets, Human, Material, Billable, Non-Billable, Draft, Published, To Send, Future, Next Week, This Week, Tomorrow, Today, Yesterday, Last Week, and Past as default Filters in this platform. Under the Group By option, you will get Department, Manager, Resource, Role, Sales Order, Sales Order Item, Project, Company, Start Date, and End Date options.
As we mentioned earlier, the same schedule pattern will be available based on role, project, and sales order in the By Role, By Project, and By Sales Order menus, respectively.
My Planning
In the Planning module, the user will get a dedicated menu called My Planning, where they can observe their schedules. You can use this platform to view all your schedule at a glance. This will help you to schedule your activities without any overlapping.

You will get the necessary details of your shifts from this window. The schedules will be organized in this window according to the planned date and time. The user will get knowledge about the published shifts here. The systematic organization of the schedule will help the employee easily identify overlapping shifts.
Open Shifts
There may be situations where the employee could not finish the assigned work within the scheduled time due to some technical or personal issues. No matter whatever the situation might be, it is essential to complete the scheduled activity to meet the target of the company. In such cases, OTX offers an option to schedule the pending activities in open shifts.

If the assigned employee couldn’t finish the work on the scheduled date, others can take the shift and complete the scheduled activity. This feature is called the Open Shifts in OTX Planning module.
It is possible to allow employees to unassign themselves from the assigned activities in the OTX Planning module.

For this, you can activate the Allow Unassignment option. Activating this option will let the employees unassign themselves from the shifts. The admin can set a deadline here. By doing so, the unassignment can be performed till the deadline.
Roles
Assigning different roles to employees will help them to get a clear understanding about their duties and responsibilities they should perform according to the assigned role. By doing so, the admin can easily assign activities to the employees according to their roles. It will provide a perspective about the activity they should perform by taking the role. You can configure such roles from the Configuration menu of the module. Under the Configuration menu, the user can find the Roles option as shown in the image below.

The list view shows the Name, Resource, and Services of the roles. You can create a new role using the New button.

When you click on the New button, you will get a new line under the available list. Here, you can provide the Name of the role in the given space. In the Resources field, you can assign employees to this role. The Services that the Resources provide under this role can be specified in the respective field. You can set different colors for different roles for the purpose of quick identification.
Materials
In the OTX 16 Planning module, you will get a new option under the Configuration menu which can be used to configure the materials required or used in a scheduled activity. In order to configure such materials, you can go to the Configuration menu and select the Materials option.

Here, you can observe the already created list of materials with their Name, Roles, Company, Flexible Hours, and Working Time. In order to add new material, click on the New button. This will open a new line under the available list. Provide a name to the material in the given field. In the respective fields, you can mention the Roles, Company, Flexible Hours, and Working Time. Don’t forget to click on the Save button to save the newly created material.
Shift Templates
At the time of the creation of new schedules, it is possible to add shift templates in the OTX Planning module. By doing so, the pre-configured data available in the template will be automatically added to the new schedule. This will save your time from mentioning details manually. In OTX , you will get the option to save a new schedule as a template during the time of configuration. You can also create a new shift template from the Configuration menu of the module. For this, go to the Configuration menu and select the Shift Template option.

You can observe the already configured shift templates here with Hours, Rule, and Project. Click on the New button to create a new shift template.

A new form view will appear as shown in the image. Here, you can mention the Planned Hours, Duration, Role, and Project in the respective fields.
Reporting
The Planning Analysis platform available under the Reporting menu can be used to analyze the activities scheduled using the Planning module.

This is the Pivot view of the report. You can use suitable filters and group by options on this platform to get desired reports. You can change the measures of the reports using the Measures menu.
Planning module offered by OTX 16 will assist you in simplifying the scheduling operations of the company in an efficient manner.
Lunch
In order to maintain a productive atmosphere inside a company, it is essential to consider the health of each employee. It will be difficult to approach each employee to ensure their requirements and preference for their lunch. During such situations, OTX can help you to improve the food supply system of your company. This ERP system will allow each employee to order foods as per their preference using the credits allowed for them. The Lunch module will help them to save time by allowing ordering during their free time so that they don’t have to wait in never-ending queues. Once you install the module from the OTX App Store, you can click on the module to open it.

This is the lunch dashboard you get when you open the module. As you can see in the screenshot, the dashboard shows all major courses for your lunch. The employees can select items from this dashboard and place their orders. On the left side of the screen, you will get the categories and vendors. If you want to order items from a particular category or vendor, you can use this panel. You can use Available Today, Archived, and days of a week as filters. The available Group By options are Vendor and Category.

On the lunch dashboard, you can find your profile as shown in the screenshot above. It will show your name, office address, and your account balance. You can order lunch using this account balance.
Now, let’s take a look at how to make orders in the Lunch module. In order to make orders, you can click on the food item according to your preference. Once you click on the product, you will get a pop-up window as shown in the image below.

The window will display the name of the product along with an image. You will also get a Description related to the food item. Any additional information can be found under the Notes section. Sometimes, the window will show the Extras field, if the vendor offers any extras with the main course. You can use the Add To Cart button to add this product to your cart.

Clicking on this button will add this product to your cast as depicted in the image above. It will be shown on the dashboard with the title Your Order. You can cancel the order using the Delete button.

You can decide the number of the product, using the available icons next to the product name. Once you decide the quantity of the product, you can click on the Order Now button.

Your order will be placed when you click on the Order Now button and the amount will be reduced from your account balance.
Under the My Lunch menu, you will get the My Orders option, which will allow you to view all your orders. This platform will show the Order Date, Vendor, Product, Extras, Notes, User, Lunch Location, Price, Status, and Company.

For ordered lunch, you will get a Cancel button to cancel the order. In the case of the received orders, you can use the Reorder button to order the same lunch again. The Send Notification button will send a notification to the respective vendor.

You can use the My Account History option available under the My Lunch menu to get information about your account history. It will show the Date, Description, and Amount.
The manager can easily monitor all activities using the Manager menu available in the Lunch module. The Today’s Orders option will show the orders placed in that particular day.

The manager can view the Order Date, Vendor, Product, Extras, Notes, User, Lunch Location, Price, Status, and Company from this window. The Cancel and Confirm buttons will be available here to cancel and confirm the orders respectively. Using the Send Orders button, the manager can send orders to the respective vendor.
The Control Vendors option can be used to observe the orders under different vendors. The manager can view the vendors and orders for the vendors separately.

The Control Accounts platform will show the information about account balance of the employees.

The account history will show the Date, User, Description, and Amount. These details will be available separately according to the user.
The manager can control the cash moves using the Cash Moves option.

This platform will show the Date, User, Description, and Amount. It is possible to manually record the cash moves using the Create button.

Here, you can mention the User, Date, Amount, and Description in the respective fields.
Configuration
The Configuration menu of the Lunch module contains Settings, Vendors, Locations, Products, Product Categories, and Alerts options. Let’s check each of these options in this section.
Settings
In the Settings menu of the module, you will get the Lunch Overdraft option, where you can set the maximum overdraft that your employees can reach.

You can set a Reception Notification on this platform. This message will be sent to users when their orders have been delivered.
Vendors
Using the Vendors option, you can configure multiple vendors to the Lunch module. Here, you can find the already configured vendors.

The New button will help you to configure a new vendor to the database. You will get a new form view as shown in the screenshot below.

In the given space, you can provide the Vendor, Vendor Address, Email, Phone, Company, and Responsible. Set the Timezone for the vendor in the corresponding field. According to the working schedule of the vendor, you can mark the Availability of their service in a week in the given space. If the vendor provides the Delivery option, you can specify it in the respective field. In the Send Order By field, you can set how the vendor takes orders from the customers. The expiration date of services can be defined in the Until field. If you want to add any extra label to the vendor form, you can use the specific field.
Lunch Location
A company may have multiple branches and working locations. While making orders, it is necessary to mention the lunch location so that the vendor can make deliveries easily.

Here, you will get the Lunch Location option under the Configuration menu of the Lunch module. The list will show the Location Name, Address, and Company. You can add the details of the new Lunch Location using the New button.

You will get a new line under the available list of locations. Here, you can add the details of the lunch location in the corresponding spaces. Click the Save button to save the location.
Products
You can configure various food items and products to the Lunch module using the Products option available in the Configuration menu. The platform will show pre-configured products in a list view. You can select suitable categories and vendors form the panel given on the left side of the screen.

The preview of the list shows the Product Name, Product Categories, Vendor, Company, Description, and Price. Using the New button, you can easily create a new product.

In the specified fields, you can mention the Product Name, Product Category, Vendor, Prices, Description, New Until, and Company. Add an attractive image of the product in the corresponding field.
In order to define categories for the product, you can select the Product Categories option from the Configuration menu. The list will show the already created categories in the module.

You can use the New button to add a new category. This will open a new form view as shown in the screenshot below.

You can mention the Product Category and Company in the given fields.
Alerts
If you want to send alert notifications for the users, you can set Alerts using this platform.

The pre-configured lunch alerts with Alert Name, Display, and Active status can be viewed as shown in the screenshot above. Use the New button to create a new alert.

Set the Alert Name in the given space. You can Display alerts in the app as well as chat notification. In the corresponding fields, mention Location, Show Until, and Message. Enabling the Active option will activate the alert. You can set the Timezone and select the days from the given field to generate alerts.
The OTX Lunch module is beneficial to streamline the food supply management inside a company. This will save lots of productive time and effort for employees and ensure Lunch for employees without any hazards.